These easy to make homemade pallet compost bins were made by GF fan Greg, a machinist by day, and weekend DIY guy. Pallets work great for compost.
I am a new listener/viewer and love your programs. I’m able to listen to the podcast at work, so have really been on a binge. Found your video “Composting 101” while preparing to build my Composting Center, here it is so far.
Homemade Compost Bins = Good
Note how Greg cut down the front door pallets to allow one to add new compost material to the bins. In other words, much smarter than my first go at building compost bins! See more of our pallet compost bin projects here.
First of all, I love this because Greg took the time to share this with me. Plus he allowed us to post the photos here on the site. A simple design, yet it works great, which works for me. Most of all, I love the barrel composer at the end. You can use this for finishing or doing intensive composting, rolling the barrel every day to aerate the mix.
Probably one of the most popular pallet projects, homemade pallet compost bins are good one for most any DIY-er person. Note how Greg elevated the walls of the compost bin up off the ground. This can extend the life of the bins, and most of all, allow air to get into the bottom of the pile. One could also lay PVC drain pipe with vent holes drilled in them, and therefore, get even more air in the bottom of the pile.Greg adds, “Thanks for including the dogs in so much of your content, Life truly is better with pets.” Here are his two pups.
A big thanks to Greg, I say. Love the sharing that happens here, if you have a project like these homemade pallet compost bins, or most anything, please send me some photos!
A winter beehive inspection can be either a good thing or a bad thing, here’s a video I made about how I check a beehive in winter.
Winter Beehive Inspection Rules
Only do this if its warm enough. If its above 40F, its ok, but warmer is better.
Open and close the hive real fast. You don’t want to chill the hive.
Don’t pull any frames, peer down into the hive as best you can.
In winter, you can’t do much for your bees. What you can do is make sure they have enough food. Of course, you have prepared the hive in the fall, by going through this Winter Beekeeping Prep list. Now about all you can do is open it up quick, and add some sugar if they need it.
I use the dry sugar winter feed method, and it has worked well for me. So in the winter, I can just pop the cover and top off the layer of dry sugar if need be. If the bees are not looking good or if there are very few bees in the hive, there isn’t much you can do in winter. The hive will probably die, as a result, be more prepared going into fall next year.
A winter beehive inspection can tell you if you need to order a package or nuc of bees. If the bees are alive, it can also give you a sense of accomplishment. Getting honeybees to survive winter is no small challenge, especially in norther climates.
You can see in these photos how the bees have chewed through the newspaper and are now eating the dry sugar. Through the winter, the sugar has hardened as it absorbed moisture from the hive, this is a good thing.
So again, work fast, keep the hive open only as long as needed. Its not summer, its cold out, and the hive has to be kept warm.
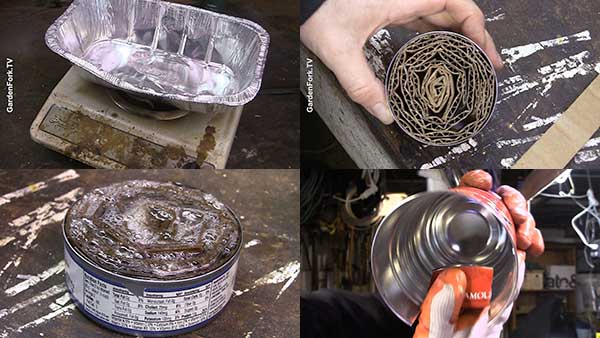
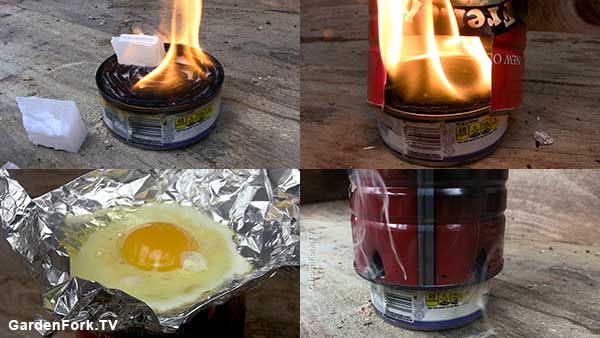
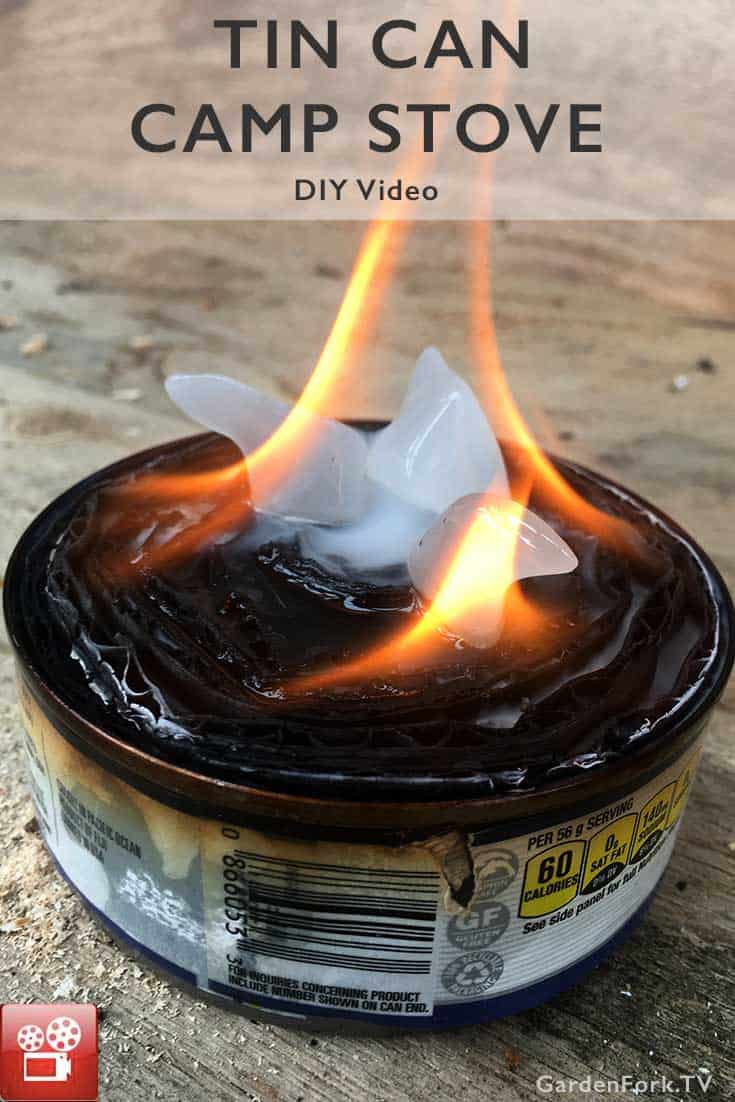
I think the tin can camp stove, aka buddy burner, is ready for a revival. Be it for emergency preparedness or backyard camping, you can make these in about 30 minutes. Here’s the video on how I put one together:
A Few Precautions When Making the Tin Can Camp Stove
Melt the wax in a double boiler or carefully on a hot plate
Hot Wax is flammable! So be careful
Use this stove outside, OK?
First of all, I just need to say BE CAREFUL. Hot wax and open flame require you to pay attention. You can wax you buy at the hardware store, furthermore, you could melt down a bunch of old used candles. Wear gloves while handling the wax melting container. Make sure the cardboard doesn’t have any labels or tape attached to it, because burning plastic isn’t great.
While you may have some tin cans in the house, you might want to seek out the ideal tin can. Cans that are not lined with an interior coating nor have a plastic or painted on label are best. Its actually hard to find such cans. The one in our video had a painted on label, consequently, it smoked and burned. Again, reason to use the buddy burner outside.
I have seen other posts that suggest using the bottom slot as a sort of air damper to control the flame. I have not tried this, as a result, we have a high heat, always on burner to cook our eggs. Maybe if you punched fewer holes up top there would be less air flow. I suggest finding a small fry pan at the dollar store or a yard sale for this. We used aluminum foil to hold our fried eggs, but a fry pan is easier.
Want to sell on ebay to make money or declutter? Selling on eBay is easy, if I can do it, you can do it. One of my friends makes a living on buying antiques and collectibles at yard sales and selling on eBay, and I’ve learned how to use eBay from them. We’ve talked about selling on ebay on this GF Radio episode, and the realities of what your stuff is worth here.
I use eBay to get rid of stuff I don’t need. I’m big into decluttering now, and have instituted the One Year Rule: If I haven’t used the item in the last year, out it goes.
I either sell on eBay, or use our block association email list to give things away, or I just put it on the sidewalk outside our house. Stuff disappears! And the declutter process makes you feel great.
We just moved into a row house, and in the basement we found a metal and porcelain chandelier. Someone at one time really liked this style of lamp, but it wasn’t something we were going to use. But I was thinking it must be a style that some people like.
I went to eBay.com and typed into the search “metal hanging chandelier” and scrolling through the search results, I found several lamps that looked like ours. They all used several key words to describe the lamp style:
Tole, Italian, Shabby Chic, Vintage
How To Sell on eBay
Here’s my steps to selling on ebay.
1. Take good photos. Your cell phone takes good photos, you can use a fancy camera too. I’ve found the best photos are with daylight coming through a window, and the sale item on a white background. We have a white tile table that I photograph items on. Cluttered backgrounds make for bad photos and are a turn-off for buyers – clean white background = good sales.
Take good close-up photos
2. Write a good description and BE HONEST. If the item has scratches on it, you have to state this in the description. Take a photo of the scratches – you can load 8-12 photos per listing for free on eBay. Use the keywords you found in similar listings in your title and description.
3. Don’t use exclamation points and bold type and ALL CAPS. Shouting doesn’t work when trying to sell on ebay. It makes you look like a 9 year old.
4. Be personal. In the description of the lamp we posted for sale, I wrote about how we found it in the basement of our new home, and how it would look nice in a shabby chic decor home.
5. Research what similar items are selling for. Have an idea of its worth, but pay attention to what’s not selling as well.
6. Start the bid at .99 . This might seem counter-intuitive, but it works most of the time. You will get a lot more interested buyers, and the market will prevail on pricing. There will be those buyers that want the item and are ready to pay a market price for it. Your auction price will rise close to what the market is paying right now.
7. Be explicit in payment requirements and shipping. I always use PayPal for payment, unless the person wants to come pick it up in person, and then they can pay in cash.
8. State your return policy. If you are selling a camera or computer, you might offer a refund if the item is DOA ( dead on arrival ) because of a shipping problem. For items like antiques I don’t offer a returns, I sell them as-is.
9. Ship the item promptly. State in your auction how many days it will take to package the item and ship after the end of the ebay auction. Contact the buyer through ebay and send them a tracking number.
10. After the buyer receives the item, ask them to leave positive feedback, and do so as well for the buyer. Remember, Karma is Boomerang.
The auction for the ceiling light ended and we were stunned to see it sell for over $200! I messaged the buyer and they explained a bit about Tole lamps. They lived in California and it fit their house decor well. Good for them.
What are your how to sell on ebay techniques? Let us know below:
After making boiling sap with out steam table pan maple syrup evaporator for 2 seasons now, I have a few thoughts on improvements. The build videos for our homemade maple syrup evaporator are here. Watch the update video below:
How To Improve the Steam Table Pan Maple Syrup Evaporator
I’m not sure why I connected the chimney stack about 6″ below the top of the cabinet. But I think the air flow might improve if the smoke exited higher up, in addition, the hot air would wrap around the back pan more. Also, consider a higher chimney pipe, it will cut down on the smoke the downdrafts on top of you.
For the turbo fan, which really womps up the fire, consider connecting it just below the fire door. I plan on adding a dimmer switch in the power cord, since controlling the fan speed is important. You can find bathroom fans at tag sales or in your neighbor’s garage.
For most 4 drawer letter sized file cabinet, two regular sized trays fit, but there will be space. As a result, that gap needs to be filled in with a scrap piece of metal or a small food tray. Put this small space above the fire door, and move the pans closer to the chimney. Because your fire is moving toward the chimney, the hottest part of the fire is on that end.
I found that putting the fire grate about 10-12″ below the steam table pans worked for me. It depends on the kind of fuel you are burning, consequently, adjust yours to the size of the wood. We burn pallets, which slide uncut into this evaporator.
This homemade maple syrup evaporator gets really hot, so be careful when standing near it. For our next evaporator build, I may line the sides with firebrick.
If you are thinking about buying a real evaporator pan, read our post here.
You can build this DIY Pendant Lamp with parts you buy online. Put them together and you save a bunch of money. Watch our video and read on:
Build A DIY Pendant Lamp, what you need
Shade in the color of your choice
Light Socket and related hardware
Clamp to attach socket to shade
Cord of your choice
There’s all sorts of choices when picking the pendant lamp shade, however, keep in mind the decor of the surroundings.
You can buy the parts from suppliers on Ebay or Amazon. I will list out the main parts you need, add to them what styles you like. If this lamp is in a bathroom or kitchen, use 3 wire cord, because it needs to be grounded. Be sure the power is off when attaching this to an electrical ceiling box.
I found that sharp wire cutters, a utility knife, and multi-tool screwdriver were key here. The antique style lamp cord can be trick to cut cleaning, because it is cloth wrapped. Order more cord than you think you need and take your time cutting it.
Also, something to consider is whether the lamp switch will be on a wall or on the socket above the shade. I ordered a socket with a switch built in, but it ends up we wired this to a switch on the wall. one thing to consider in your project. In addition, a third alternative is to hang the lamp from a screw eye and have it plug into a wall outlet. This method is the simplest way to build a DIY pendant lamp, however, you have a cord coming down the wall.
Erin from The Impatient Gardener joins Eric to talk about garden predictions, the pain part of freecycle and craigslist’s free section, waffles and making your own DIY pendant lamp.
Erin says raised beds are trending. Eric agrees, plus they are very practical, which is what GardenFork is all about. Watch our how to build a raised bed videos here.
Outbuildings are trending, maybe a tangent from the Tiny House movement. Eric saw a prefab grandparents house that one can drop in to a backyard. Whether that kind of house would work with local building codes is a question to be answered locally.
People not showing up after agreeing to pick up a free item you have listed on Freecycle or Craigslist is a constant problem. Eric and Erin recount their experiences and some solutions that work for them. Local seems to work better, especially NextDoor.com for giving away free stuff.
Homemade Yeasted Waffles are discussed, with an overnight rise in the fridge. The flavor blows away quick waffle batters, but does require a bit of planning, as you make the batter the night before. The overnight cold rise works great. Use less batter than you think you should in the waffle maker, FYI.
We talk about Erin’s basement renovation with a home office, and what that entails. Eric noticed a retro lamp Erin wanted to use in the basement project and pointed out one can make these lamps themselves, as GF has a video about it. How unusual…
Erin’s post on how to ditch cable, aka cutting the cord, is here. Eric and Erin have similar systems for getting rid of cable TV, though Eric does not have a DVR. It doesn’t hurt to examine your cable bill occasionally, BTW.
Support GardenFork, become a monthly supporter on Patreon, via PayPal.
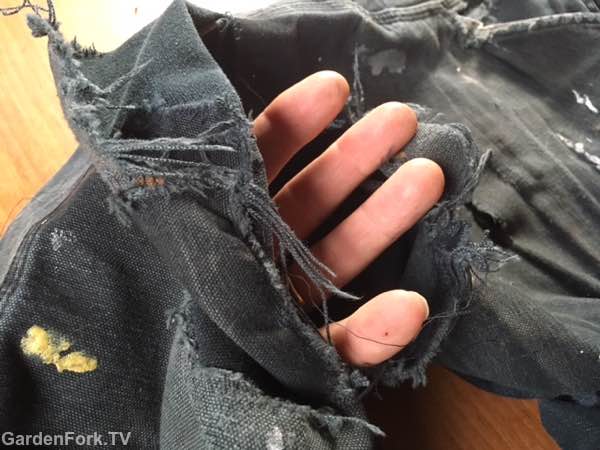
I wear work pants all the time, most of them have sewed on patches – learn how to use a sewing machine here. The pair I had on yesterday had recently developed a new hole, and a tree limb snagged in that hole yesterday. Unfortunately, the tear was quite large, and the dungaree cloth was weak already from previous repairs.
I love using the my sewing machine, I think its the original 3D printer. Its an intricate machine with lots of moving parts hidden behind a plastic case. I don’t know what many of the knobs and adjustments do. But I am able to sew patches on pants with it.
So it was time to retire this pair of Carharrts, though they have served me well. But the silver lining for pants that can’t be repaired, is that you can salvage the cloth. This cloth can be uses to repair other stuff. Typically the back of the pants legs are still in good shape, so sharp scissors make quick work to remove a large section of cloth.
The rest of the pants can be recycled in one of those drop off bins you see in store parking lots. From what I understand, any clothing not intact is sent to be used as insulation or filling. Please don’t just throw them in the trash.
Do you repair your clothes? By hand or machine? Let us know below.
Here’s how I use a sewing machine to repair pants, specifically my work pants. If you have a sewing machine in your basement, go get it out, so you can start learning how to sew.
If you don’t already have a sewing machine, however, all is not lost. Yard sales and craigslist often have sewing machines for sale. People don’t seem to understand these amazing machines, and how versatile they are.
How To Use A Sewing Machine – Some Tips
Be sure to read the manual that comes with the machine.
Buy several basic colors of thread.
Pick up spare needles and bobbins at the store.
Practice.
Thankfully my sewing machine came with a manual. Maybe yours came bare bones, as a result, it has no instruction manual. Thankfully, we have the internet, so a quick search with the name and model of your machine with the phrase “instruction manual” can help.
I mainly use black thread, as a result of me wearing black dungaree work pants most of the time. But pick up white, black, blue, and other colors you may need. Thread is inexpensive.
I have broken a few sewing machine needles when repairing clothing. Consequently, I have bought a package of replacement needles to have at the ready. Again, these are not expensive, so go get some. The needles break when I run over the plastic end of the pins that hold the patch in.
For whatever color spools of thread you have, buy bobbins to fill up with the same color thread. The bobbin supplies the thread from the bottom of the machine, while the needle supplies the top.
Most of all, practice makes perfect. It becomes a zen thing with me, as a result, I lose myself in the sewing process, which is great. And you get to extend the life of your favorite pants.
Let me know your thoughts and suggestions in the comments below.
I’ve been on a decluttering mission for a awhile now, but I’m always stuck by what to do with that has value. Can’t bear to just throw it out, so I have found a solution.
There was this 50 amp generator plug lying around in my shop, and I will never use it, so I looked on ebay, and these plugs sell for about $65 new on the site. I took some photos and posted it, starting the bidding at $1, plus I added a Buy It Now for $35. The plug sold in a few days.
How cool is that? The plug I didn’t need got to someone who needed it and I got some paypal spending money. What fun.
I did the same thing with my older weather station that was partially broken. The unit has several pieces, and some had failed, but I couldn’t stand just throwing it in the trash. Knowing that many people had the same weather station, I thought someone could use the parts to repair their own station.
Up it goes on ebay, with the bidding starting at $1, and I sold it for $40. I was very surprised yet very happy. I get rid of clutter, and the stuff goes to good use, not a landfill.
Erik and Kelly of Root Simple talk about decluttering on their podcast. This got me started, plus just wanting to clear up the place to have room for projects. When your desk and shop table are filled with stuff, you can’t get any work done.
So I am much happier knowing another way to get rid of stuff, yet make sure it goes to good use. How about you? Appreciate your thoughts in the comments.
Tree Pruning is best done on dormant trees, so this being winter, now is the time. I was walking through the park and saw the staff had done some tree pruning. I took these pictures to show how the tree should look after its done. Here’s a video we did on how to prune a tree.
When pruning a tree, after determining which branches to cut, you make 3 cuts to the limb. This is done to keep the tree bark from stripping back down the tree trunk. First is a bottom cut about an inch away from the finish cut, then a top cut an inch farther out on the limb to cut the limb. The bottom cut keeps the bark from stripping down past the cut. The final cut is made flush to the growth ring near the trunk.
Why 3 Cuts When Tree Pruning?
This may seem like a waste of time, so go ahead and prune a few tree limbs, you can see how the bark rips down the trunk, not a good thing.
When doing the final cut it should be close to the trunk, however, you don’t want the cut to be flush with the trunk. Though it can be hard on some trees, you want the cut to be just past the growth ring of that limb. As a result, cutting at the ring will allow the tree to heal faster, like the one below.
On some trees, the ring isn’t obvious, so do the best you can. Trees are amazingly resilient. Do not paint on any kind of coating after making the cut. The tree will create its own chemical barrier inside the wound to prevent bad stuff from enter the tree. If you apply paint or some sort of tree wound product, it will only keep bad stuff in the wound, not out.
Sometimes you can’t get close to the trunk, so do the best you can. Your tree will take care of itself. Be happy that you took out the branches that are dead and dying, making the tree look better and grow better.
I made this video to show you how to plant garlic in the fall, which is the best time to plant garlic, FYI. Watch the vid then read through the how to notes below, there’s lots of info here!
To Plant Garlic, Do These Things:
Order garlic ahead of time
Prepare the garden bed
Separate the cloves
Plant root side down
Wait Until Next July
Probably the biggest mistake people make when they want to plant garlic is to wait too long before ordering some seed garlic. The stuff sells out fast, so order early. The seed garlic supplier will ship just before planting time in your area. I order from Filaree Farm. Most seed garlic is not cheap, but keep in mind you will get many plants from one bulb. You can save your own seed garlic going forward.
You can obsess about prepping the garden bed for the seed garlic, or just do as I do. I make sure the bed has a good mix of compost and soil. Loosen the soil up with a garden fork. Garlic likes some nitrogen, so I sprinkle over the bed some time release fertilizer. I do add some rock powder like azomite, but I can’t say it makes a big difference, its just feels right. I can say that garlic does not like clay soils, or soils that are too sandy, but isn’t that true for most garden vegetables?
The ideal is to plant garlic 2 weeks before the hard frost in your area. For those in warm weather areas, you will usually plant between November and January.
Why Separate The Day Before?
Depending on who is doing the talking, some say you must separate the cloves of the garlic bulbs the day before, I don’t. Usually because I forget, and I have yet to see a difference in doing so. I would suggest getting some help splitting up the bulbs. Many hands make light work.
I plant garlic about 6″ apart in rows about 8-10″ apart. Its not rocket science. Garlic doesn’t like to be crowded, and it doesn’t do well with weeds. Plant about 2″ down, with the root tip facing down. The grow tip should be about an inch below the soil.
I don’t mulch my garlic with straw. I will put down a light layer of leaves I have run through the mulching mower, but its not a thick layer.
If your garlic starts to grow in the fall, don’t worry, the green tip will die back a bit with the frost, and will restart in the spring.
What to do in spring? Watch more of our how to grow garlic vids here.
My best deep fried turkey hacks all in one video. What not to do when deep frying a turkey, OK?
Deep Fried Turkey Hacks, My List
Practice to make sure you know what you are doing. Plan on buying turkeys 2 weeks ahead, defrost them in the fridge for 3-4 days, then do a practice run at making the best turkey you’ve ever tasted.
Test your deep fryer gear ahead of time, make sure it fires up. If something is broken you don’t want to be dealing with that on Thanksgiving Day, the hardware store will be closed. AND have a back up tank of propane. I can never tell exactly how much propane I have left, so I have two tanks.
Wash out the cooker every time. New deep fryer pots may have a coating on them, and pots that have been stored may have something else on them, you never know.
Calibrate the thermometer. Boil a small pot of water, then place the tip of the thermometer in boiling water. It should read about 212F at sea level, at 1,500′ where I am, it will read 210F.
Measure how much oil your fry pot needs to cover the turkey. I put the turkey in the clean pot, pour in enough oil so just the ends of the legs are sticking above the oil. I then remove the turkey and let it drain on a tray, and fire up the oil to heat it to 350F. Coating the bird with oil will not ruin it prior to cooking, OK?
Wear oven mitts and long sleeve shirt. We’ve talked about this one before, but its the easiest safety measure you can take.
Clean out burner with compressor or canned air. The propane burner can get debris stuck in it, and it wont burn nearly as well. As you can see in the video, cleaning the burner made a huge difference.
After making a deep fried turkey, make this easy leftover turkey soup recipe the next day. Watch our video to learn how.
My turkey soup recipe, A few thoughts:
Use what you got, in other words, if you don’t have carrots, use potatoes.
Celery and Onion are key, and you should keep celery in the fridge anyway.
This cooks down in about an hour.
I can’t say I invented this Thanksgiving leftovers recipe, but it seemed like an obvious thing to do the day after the big holiday meal. But you can do this anytime you deep fry a turkey, and I think we all should cook turkey a lot more. Its a huge amount of food for the price of a turkey. BTW, you can also roast a turkey in the oven, if that’s your thing. We did a video about that here.
One GF fan suggested cooking down the soup in one of those pasta pots that have a strainer insert. You could cook the vegetables in the pot, then put in the strainer and add in the turkey parts. That way you could pull out all the bones at once, then separate the meat, and boom you are done.
It helps to use an oversized pasta pot for this turkey soup recipe. The pot I used had turkey and stock up to the rim and it made it easy to spill. I have about 3 pasta pots in the basement, but I blanked on that when cooking this. Note to self.
Keep in mind that if you put in a lot of celery, that flavor will be more pronounced after a night in the fridge. The second time we heated up the soup for dinner, you could really taste the celery above the carrots. But I love celery so that was ok with me.
You usually think about storm preparedness just before the lights flicker out, right? To help you be more prepared, here are 3 things you should have before the power outage.
Storm Preparedness Tools I Have
Whether you have a generator or not, a solar powered radio, that also charges mobile devices, is the first thing I tell everyone to buy. I have this Eton radio that has AM, FM, and 7 pre-programmed weather stations dialed in. This radio has a USB charger plug, and you can power up devices either by turning the crank or using solar power. The solar cell can take all day to charge up a device, however, the hand crank works faster.
I have gone through many cheap LED headlamps, then I finally decided to stop buying whatever was at teh store and upgrade to a better quality one. This Eveready LED Headlamp has 7 LEDs and several functions. I used it last weekend to do some electrical work, so you can also use it for your DIY projects as well.
A quality waterproof flashlight is our 3rd must have tool, because the power goes out when its raining or snowing, not when the sun is shining. We tested this Dorcy LED Flashlight and it works great. I also like that it uses AA batteries, not larger cells. This means we can just use our existing AA batteries.
As you can see in the video, this flashlight floats and can be used a Labrador toy. This may sound like fun, but it also proved to me that your dog can chew on it and it will still be waterproof and function.
We do use a generator for power outages, but its loud and I’d rather not run it day and night. Instead, we power up our headlamps and listen to the radio. I occasionally run generator to heat the house and keep the fridge cold.
People have been asking me how to find used brick for building our DIY pizza oven plan, so as I just found some more brick today, I can share with you how to do this.
The best way is to look around for construction demolition projects going on in your area. Ask you friends if they know of any work being done. I was lucky today to walk down the block to find a crew taking down a brick wall of a building. They were happy to get rid of some brick.
Used Brick sits well in those plastic organizer crates, but make sure they aren’t the cheap flimsy kind.
Perfect reason to ride your bike around, so go look into construction dumpsters and find used brick.
If there aren’t brick buildings near you, check out Craigslist. You’d be surprised how had a pile of brick that they want to get rid of.
You will probably pay more for clean brick, so keep in mind when you want to clean brick and when you to just pay for brick that has already been cleaned.
The issue of using used clay brick has been debated quite a bit. I have used it for several pizza ovens and I am fine with it. You can make your own choice. For pizza, we are not heating up the brick for hour after hour to build heat, we are creating a space to hold fire for a short period to cook some dough and cheese.
A healthy one pot pasta recipe video inspired by Anna Cole. Take your typical one pot recipe, add kale, and turn it from a carb meal into a green meal, at least thats how I look at it. Check out my video, then read through the recipe.
I read about this version of a healthy one pot pasta recipe in the the NY Times Food section, where they reviewed some cookbooks, one of which was Anna Cole’s A Modern Way To Cook.
Cherry Tomatoes Are A Secret Ingredient
Cherry tomatoes are key here, I think. They seem like these pedestrian items, but when you cook them down, they morph in to something more than a store bought tomato. Of course, garden fresh cherry tomatoes are even better, but use what you got.
Don’t forget to add the kale!
The pasta and most of the ingredients go in the pot at once, consequently, its super easy to make this. Even I can do it. Of course, I forgot to add the kale, but it worked out OK. As the spaghetti cooks, it releases starch into the cooking water. This starch mixes with the tomato juices to make a nice sauce.
Be sure to mix the pasta as soon as you add it in, and as it cooks. I didn’t stir it right away so the spaghetti stuck together a bit. Keep the lid off while it simmers, I forgot that one.
Chop the kale into smaller pieces than I did in the video. The smaller pieces mix together better when the dish is finished.
Cleaning cast iron with a battery charger, aka cleaning cast iron with electrolysis, makes it super easy to remove rust and crud from rusted cast iron. Watch this video I made, then we’ll step through the process.
Caution! Use the setup outdoors and away from open flames. Don’t smoke while doing this. Restoring cast iron with electrolysis produces hydrogen and oxygen. Use this info at your own risk, OK?
Cleaning Cast Iron With A Battery Charger, Step By Step
Above is what my setup looks like for cleaning cast iron with a battery charger. Let me walk you through the process.
You will need a battery charger with a MANUAL mode. This is important. The first one I bought said it was manual, but it wasn’t. It should have a switch on it for manual. Here is a link to the battery charger I bought, it works well.
For the metal plates, I used two old baking pans. I used a wire wheel on my drill to remove the coating on the pans to expose the bare metal. DO NOT use stainless steel, bad chemistry will happen. I used a self tapping screw on each pan to attach a 12 gauge copper wire to them, as well as the wire that goes from the pans to the battery charger.
Here is a top view of how my cast iron cleaning tank looks. It is important that the metal cake pans, or whatever metal you are using, does not touch the cast iron to be cleaned. I have been told that you can also use several pieces of rebar wired together for the metal plates. Or visit a scrap yard. Again, do not use stainless steel.
Turn On The Charger And See What Happens
Use a wire brush to clean off the handle of the cast iron where the negative (black) clip of the battery charger connects to the pan. I don’t suggest submerging your battery clamps in the solution, therefore, if you want to submerge the whole piece, wrap copper wire around the handle and attach the clip to the copper wire above the water line.
Important Things To Keep In Mind
Use 1 tablespoon of Washing Soda per gallon of water for the cleaning solution.
Red clamp from battery charger attaches to metal pans in the tank, Black clamp attaches to item to be cleaned.
Wear gloves while doing this, OK?
If you’ve got the rig set up correctly, you will see bubbles start to rise from the solution almost immediately. Let it run for several hours, so all sorts of stuff will have time to bubble off. Most of all, make sure the cast iron pan being cleaned does not touch the metal plates.
Every few hours, pull out the cast iron and clean off the crud with a dish scrubber. Flip the pan 180 degrees in the solution every time you pull it out. Finally, depending on the age and how many layers of seasoning are on the piece, you may need to use steel wool to remove some of the last bits of the material. Learn how to season cast iron here.


 Greg adds, “Thanks for including the dogs in so much of your content, Life truly is better with pets.” Here are his two pups.


 There was this 50 amp generator plug lying around in my shop, and I will never use it, so I looked on ebay, and these plugs sell for about $65 new on the site. I took some photos and posted it, starting the bidding at $1, plus I added a Buy It Now for $35. The plug sold in a few days.


 Above is what my setup looks like for cleaning cast iron with a battery charger. Let me walk you through the process.
 You will need a battery charger with a MANUAL mode. This is important. The first one I bought said it was manual, but it wasn’t. It should have a switch on it for manual. Here is a
  For the metal plates, I used two old baking pans. I used a wire wheel on my drill to remove the coating on the pans to expose the bare metal. DO NOT use stainless steel, bad chemistry will happen. I used a self tapping screw on each pan to attach a 12 gauge copper wire to them, as well as the wire that goes from the pans to the battery charger.
 Here is a top view of how my cast iron cleaning tank looks. It is important that the metal cake pans, or whatever metal you are using, does not touch the cast iron to be cleaned. I have been told that you can also use several pieces of rebar wired together for the metal plates. Or visit a scrap yard. Again, do not use stainless steel.
 Use a wire brush to clean off the handle of the cast iron where the negative (black) clip of the battery charger connects to the pan. I don’t suggest submerging your battery clamps in the solution, therefore, if you want to submerge the whole piece, wrap copper wire around the handle and attach the clip to the copper wire above the water line.
 If you’ve got the rig set up correctly, you will see bubbles start to rise from the solution almost immediately. Let it run for several hours, so all sorts of stuff will have time to bubble off. Most of all, make sure the cast iron pan being cleaned does not touch the metal plates.
 Every few hours, pull out the cast iron and clean off the crud with a dish scrubber. Flip the pan 180 degrees in the solution every time you pull it out. Finally, depending on the age and how many layers of seasoning are on the piece, you may need to use steel wool to remove some of the last bits of the material.
