Author: Eric

  • Best Rice Pudding Recipe : GF Video

    Best Rice Pudding Recipe : GF Video


    How To Make Rice Pudding Recipe Video. I love rice pudding, here I show you how to make rice pudding in the oven. There is also a stove top rice pudding recipe, which we will show you soon. Rice pudding is a comfort food, it reminds me of diners and maple syrup. Plus rice pudding is super easy to make, even I can make it .
    Many people make a bouron sauce for rice pudding, but I prefer honey or maple syrup. I’m not big on the bourbon sauce, I find it too sweet and boozey.

    Plus this is another use what you got recipe, in that you can put in nutmeg or cinnamon or a combo of both. At the local diner, they sprinkle the cinnamon over the dish of rice pudding just before baking it rather than mixing it into the batter.

    Other additions that I’ve seen are chopped apple, lemon or orange zest, dates, currants, and other dried fruit. Try some stuff in your cupboard and let us know what works for you in the comments below.

    In testing for doneness, its eye of the beholder, some people like pudding firm, and others like it more loose pudding like. I think a lot of it depends on what you ate as a kid. I remember a lot of Jello pudding as a kid, so i tend toward the firm side of puddings.


    rice pudding small

    Best Rice Pudding Recipe
    Ingredients
    •    2 cups cooked rice, long, short, or brown
    •    1 1/2 cups milk
    •    4 eggs
    •    1/3 cup sugar
    •    1 tsp vanilla
    •    1 tsp salt
    •    1 tsp cinnamon or nutmeg
    •    1/2 cup walnuts or raisins ( optional)
    Cooking Directions
    1. Preheat Oven to 325F
    2. Mix together everything but the rice.
    3. After the eggs are well mixed, add in the rice.
    4. Pour the batter into a greased 8×8 or 9×9 dish
    5. Bake for 25-30 minutes
    6. Pudding is done when its the consistency that you like pudding, some like it firm, some like it jiggly.
    7. I prefer to serve warm with honey or maple syrup.

  • Calvin Coolidge Notes : GF Radio

    Calvin Coolidge Notes : GF Radio

    My neighbor Charlie joins me to talk about Calvin Coolidge, after  GF Radio viewer asked us to ask our presidential history expert, Charlie, about Calvin Coolidge.

  • How To Cook Mushrooms : GF Video

    How To Cook Mushrooms : GF Video

    Learn how to cook mushrooms in our latest foraging – mushroom identification video. We made a oyster mushroom identification video, and people asked us to show how to cook mushrooms, so here is our mushroom cooking video!

    The oyster mushrooms we use here were cultivated mushrooms, and you can grow your own mushrooms, here’s post about growing mushrooms here, but we bought these at the food coop. In the growing season you can go mushroom hunting, but be sure to learn from an experience mushroom foraging person, and bring your mushroom identification books with you. Below are a few of the mushroom books we like and use.

    To clean mushrooms, I just brush them off with a towel, you can also wash them, but its not always necessary, I feel, but you should do what you want, because you’re going to do that anyway…
    how-to-cook-mushrooms-2

    Butter, Salt, & Pepper are the key ingredients in this simple sauted mushroom recipe, and the cast iron pan is great for cooking mushrooms, holds heat nicely and its evenly distributed too.

    You can store mushrooms in your fridge or a cool basement, I keep them in a paper bag that’s not closed tight. Plastic bags will cause the mushrooms to go bad quickly, I think. Also when you are foraging for mushrooms, bring along a few paper bags, its the best way to store them while you hike around, IMHO.

    Below is my favorite book I use for mushroom identification, let me know any other suggestions you have in the comments below:


    Click To Buy From An Independent Bookstore

  • Tartine Bread, First Loaves

    Tartine Bread, First Loaves

    I got the Tartine Bread Book a while back, and got real excited about it. I was thinking this is the new No Knead Bread, the next new thing to come to bread baking. Buy Tartine Bread on Amazon Buy Tartine Bread on IndieBound

    tartine bread
    First Loaf with 3-4 hour rise

    Tartine’s method is based on starting your own ‘starter’ or leaven batch that sits on your counter, and you feed everyday to keep it viable. I tried to make a starter, and it didn’t start. Then I got distracted for a few months.

    Then I again picked up the Tartine Bread book. Its a beautiful book, clearly the authors and photographer worked hard on this. I decided to try once again to make the starter, which would allow me to make amazing bread.

    This time I followed the instructions [ if all else fails, read directions ] and the starter started! So I read the first part of the book a bunch of times during the week, determined to bake Tartine Bread on the weekend.

    The slow rise local leaven dough takes a while to become bread, there are two rises, the long one being either 3-4 hours in a warm place, or overnight in the fridge. The basic bread recipe makes two loaves, so for one loaf I did the 3 hour rise, and the second loaf i did the overnight fridge rise.

    Constantly re-reading the directions, I actually baked bread, the first loaf was not bad, as shown in the photo, but the second loaf was pretty amazing.

    Tartine bread-2
    Loaf with overnight refrigerator rise

    We’ll be posting more posts on making bread with the Tartine Bread Book, and eventually a video too. I have a bunch of photos of starting the starter for the next in our Tartine Bread posts here.

    Do you use a starter for your breads, how does it work for you? Let us know below:

    Buy on IndieBound

  • fix a stuck food disposer GF Radio

    fix a stuck food disposer GF Radio

    is your food disposer stuck? or is your food disposal stuck? it might be because you put potato skins in it and it became a big ball of glue.

    today on GardenFork Radio, we hear how to fix your stuck food disposer disposal from monica, and how to make simple  roast pork shoulder. Then we move on to closed system green public bathrooms what use plants to filter and clean the waste water. which prompts eric to talk about his plan to use greywater from his clothes washer to supply water in the toilet in his workshop. and from here the discourse devolves into Rick making potty jokes.

    But Rick aslo talks about the Oom writing software he is using for a book project, as we talk about productivity, with an audio clip from the ASAPscience channel on YouTube. 

    We learn the best way to finish a project is to start it. Humans have a built in compulsion to finish things, we are told.

    eric realizes dishwashers have disposers in them
    here is the public urinal on instructables  http://www.instructables.com/id/PPlanter-urinal-sink-planter/

    here is the productivity video  http://www.youtube.com/watch?v=lHfjvYzr-3g&list=UUC552Sd-3nyi_tk2BudLUzA&index=6

    eric uses Remember The Milk for his daily to do list

    finally Rick starts to talk about the meyers briggs test and that he is an INTP, which i think means he’s an introvert, except when he’s on the internet…


    photo by lifeisgood

  • Fix Overheating Steam Radiators Yourself

    Fix Overheating Steam Radiators Yourself

    replace-a-steam-radiator-vent-3

    Is your apartment too hot winter? Learn how to fix overheating steam radiators yourself below.

    If your radiators are hissing or leaking, its time to replace the radiator vent, aka radiator valve, on your radiators. Radiator valves have a finite life, and its probably been too long since they have been replaced.

    Replacing the radiator vent valve with an adjustable valve allows you to control – to a point – how much heat that radiator puts out. This is a great way to balance the radiators in your home, so the radiators heat the house evenly.

    This is an easy DIY Home Improvement project for those of you with older homes.

    In our current apartment, when the heating season started, we got loud hissing on 3 of the radiators, and this told me it was time to replace the radiator vents. Without going into a dissertation on how steam boiler heating systems work, the radiators have to be able to vent out the air that is in a steam system when the system is cold, to allow the steam coming up from the boiler to enter the radiators.

    You may not realize this, but if you have what is generically called a one pipe steam system, you also have steam vents or valves at the end of the steam riser pipes. These valves may be above the ceiling, if the steam riser pipe juts into the ceiling.

    drain tongue sticks out of old style radiator vent
    drain tongue sticks out of old style radiator vent

    My mode of operation is to replace all the steam valves at once, if possible. Steam vents are not cheap, but if you replace them all at once, you solve a lot of problems, i think. Another benefit of replacing all the valves at once is you can balance the vents at the same time. New vents either have specific vent ratings, or are adjustable – in other words, you can adjust how much venting each vent does.

    I use the adjustable vents – link to buy them here – they are much better, I think than the pre-set valves.

    This is important, as large radiators need to be able to vent more air than smaller radiators, and this helps you attain the goal of steam heat getting to all the radiators at one time. I use radiator vents that are adjustable, they have a small tang that juts out that you move to adjust. Other companies make a series of vents that have different vent ratings, each vent lets out a certain amount of steam.

    replace-a-steam-radiator-vent
    Adjustable Steam Radiator Vent

    Your local hardware store will sell radiator vents. I suggest the adjustable ones, and don’t cheap out when buying them, you get what you pay for.

    Most of life is like that, good things cost money, and these radiator vents are worth it. Many times the steam radiators are wedged behind furniture or whatever, and just getting to the radiator is a pain, so do them all at once and get it done with.

    So there you go, a DIY home improvement project that is do-able and will improve your heating system.

  • Simple Paper Seed Pots : GF Video

    Simple Paper Seed Pots : GF Video

    Learn how to make simple paper seed pots, the best paper seed pots, I think. These paper pots are for those of us who can’t make origami paper plant pots, OK? Simple method to make paper pots for your seedlings and seed starting trays. If you want to make a pack of paper pots, just glue or tape them together, use what you got.

    Most newspapers print their paper with soy based inks now, so I’m ok with using regular newspaper for vegetable paper pots. And the newspaper will break down in the garden soil; you just open up the bottom of your paper pots just before planting to allow the roots to easily grow out the bottom of the paper pot.

    You can use different size jars to make different size newspaper pots. I used a peanut butter jar to make paper pots for tomato seedlings, and used a small mason jar for lettuce transplant paper pots.

    simple-paper-seed-pots-pinIts best to bunch the paper pots together under grow lights, as the paper can wick away moisture from the seed staring soil, packing the pots close together cuts down on that evaporation. You can watch our how to build a simple grow light video here, and our other seed starting videos here.


    How do you start your seeds in the spring, what kind of pots or trays do you use? Let us know below:

  • Beekeeping 101, a look back on the first year GF Radio

    Beekeeping 101, a look back on the first year GF Radio

    GF Contributor Matt joins Eric to talk about his first year of beekeeping. Matt reflects on what real world beginning beekeeping is like after watching the Beekeeping 101 – How to keep bees videos on Gardenfork. Losing a hive, getting stung, how to find the queen in a hive, how not to kill the queen are all touched on.

    Matt wrote a series of articles on beginning beekeeping for our site, as he chronicled his first year of beginning beekeeping.

    Matt tells us about how to work a hive and yes, you should wear gloves and beehives are heavy. We agree with Rick’s use of metal handles, as beehives get heavy. bees

    Beehives die, and why do they die? As Rick says, bees are bugs in a box, and bees don’t read books. Eric offers a few reasons why the beehive died: a stressed queen, the queen was crushed when working the bees or putting the hive back together.

    Eric gives reasons for not buying bee packages, and especially not having bee packages sent in the mail. Buying local nucs is much better. Matt’s experience with beginning beekeeping bears this out. His package of bees died, his nuc is going strong.

    Matt talked about a program in Virginia that funds beekeepers,

    Matt also talked about homemade  or DIY honey extractors, like this one on Mudsongs.org .

    We also talk about raised beds, and how to build raised beds using bricks or plastic lumber and the pros and cons of using different materials for building raised beds.


    photo by micky07

  • Simple Vegetable Soup Recipe aka Fridge Soup

    simple-vegetable-soup-recipeI like Jacques Pepin. I don’t know him personally, but I watch his cooking shows, and his cookbooks. His style is GardenFork: a lack of pretention, a desire to share and teach.

    In his book, Fast Food My Way, [ Amazon Link
    , IndieBound Link ] there is a recipe for what he calls Fridge Soup. Jacques looks in the fridge, pulls out whatever leftovers there are, and makes a soup. Hence the name, Fridge Soup.

    What I found neat was his use of grits in this soup. ( we talked about making grits with my neighbor Charlie on this episode of GF Radio here ). Jacques uses instant grits as a thickener for the vegetable soup.

    Lightbulb moment for me, the un-expert in the kitchen.

    We live quite a way from the nearest grocery store, and I avoid making a trip just to buy a few things, so for dinner this weekend, I decided to apply the Fridge Soup Methodology to a real world situation.

    simple-vegetable-soup-recipe-2In our fridge we had carrots – we always have carrots, horse people, you know – cabbage left over from a fermentation experiment, onions, and a sweet potato.

    So all this went into the pot. I started first with the onions and olive oil, added some crushed garlic. Then in went the carrots sliced up. ( Charlie Pup knows when you are slicing carrots, and will arrive to take care of the top of the carrot for you; Henry won’t eat carrots ) I like to try to get some browning on the carrots, not sure if it makes a difference, but I do it. Then the cabbage and sliced up sweet potato ( skin on , BTW ).

    I added water to top it off and let is simmer. You could also do this in slow cooker. I did not add any vegetable stock or boullion; basically the ingredients were the stock, was my thinking.

    I had some thyme from the garden that I hard harvested before the last big snowstorm, and it was slowly drying in a bowl in the kitchen, so in it went, though technically it wasn’t in the fridge.

    Some wayward egg noodles from a half open bag were thrown in when I served the soup, and there you go: Fridge Soup .

    I’ll have to experiment with using grits as a thickener for soup, neat idea. What do you do for simple soups from the fridge? Let us know in the comments below:


    Click Here to Buy Fast Food My Way From IndieBound Here
    Click Here To Buy Fast Food My Way From Amazon

  • Mayan Calendar Dilemma Solved : GF Radio

    Mayan Calendar Dilemma Solved : GF Radio

    Mike joins Rick and Eric to talk about raccoons, snowmobiles, and the mayan calendar. links to follow!

    photo by kconnors

  • Cooking Pizza In A Fireplace – GF Video

    Cooking Pizza In A Fireplace – GF Video

    Cooking pizza in a fireplace is not rocket science! No need to build a pizza ove, let me show you how to cook pizza in the fireplace. This is totally a “Use What You Got” GardenFork moment. I wanted to make pizza in our portable backyard pizza oven, but it was freezing outside, and staring at the fireplace, the light bulb went off in my head. I already had a built-in pizza oven in our living room.

    Cooking Pizza In A Fireplace, How To Start

    For this pizza oven method, you’ll need a cast iron dutch oven combo cooker, You can buy a combo cooker dutch oven here
    And a cooking or camping grate. you can buy the camping grate here

    We make our pizza dough – watch our pizza dough recipe video here – the day before and let it do a slow rise in the fridge overnight.

    Be very careful when working with the fire! Fire burns – don’t wear loose clothing, wear gloves and use fireplace tongs or other metal tools.

    After the fire in the fireplace pizza oven dies down bit, put the camping grate over the fire and preheat both parts of the dutch oven. You may need to adjust the height of the camping grate over the fire, I used bricks under the legs of the camping grate. Have all your ingredients prepared ahead of time, as well as the dough rolled out.

    Hardwoods make the best firewood, my wood shed is primarily stacked with oak and maple. The maple takes longer to catch, so I use a mix of what I have.

    Have you used your fireplace as a pizza oven? Let us know in the comments section below.

    Here are the links again to the combo cooker dutch oven and the camping grate:

  • Simple Pizza Dough Recipe : GF Video

    Simple Pizza Dough Recipe : GF Video

    We’ve been making a bunch of pizza oven videos and how to make pizza videos, so I thought we should show how to make easy pizza dough using your food processor.

    You can make this pizza dough recipe and put it the fridge for two hours, but its much better if you mix it up the night before and refrigerate the pizza dough overnight. I had some extra pizza dough after making a bunch for the video and put it in the dutch oven as a round loaf and it baked up great.

    3 cups Bread or All Purpose Flour

    1 tsp  active yeast  about 1/2 packet of yeast

    1 tbsp sugar

    1 tsp coarse salt

    1/3 cup olive oil

    1 cup warm water

    Put all the dry ingredients in your food processor and turn on the food processor for a few seconds to swirl the ingredients together.
    Turn on the food processor to high and pour in the olive oil
    Start to slowly trickle into the food processor the water. The goal is to get the dough wet, but not real wet
    Once the dough forms into a rough ball, turn off the processor, gather up the dough, and put it on a large piece of plastic food wrap.
    Wrap the dough with the plastic wrap and put in the fridge for at least 2 hours, overnight is better.
    When rolling the dough out, if it shrinks back, allow it to rest a few minutes and then roll it again.

  • Labrador Mij has passed away

    Labrador Mij has passed away

    Mij with Henry in the background
    Mij with Henry in the background

    Mij, our Labrador Henry’s brother, who lived down the road from us and appears in many GardenFork shows passed away this weekend. He had developed an enlarged heart.

    Mij was the tennis ball obsessed alpha male of the Labradors who congregate in our yard. He would let Charlie Pup and Moose act like the goofs they are, while he and Henry sat in the yard or on the couch and watched. He was a great pup.

    Mij in my Ford F150
    Mij in my Ford F150
    Mij and Henry as newborns
    Mij and Henry as newborns


  • Braised Short Ribs Recipe Fail

    Braised Short Ribs Recipe Fail

    Why do my short ribs blow?

    Short Ribs ready to be oven browned
    Short Ribs ready to be oven browned

    So this is one of those where I had some short ribs in the freezer, I defrosted them, and cooked them pretty much how everyone else does, and the short ribs come out tough, not fork tender.

    I’m not a huge cookbook collector, but I have  few general go-to reference cookbooks, and the braised short ribs recipes are all pretty much like this:

    Sear the ribs in dutch oven or in a baking pan in the oven, add liquid, cover and cook for hours on a low flame.

    Short ribs browned in oven
    Short ribs browned in oven

    I did try the browning the meat in the oven method, because I think the short ribs can get cooked to fast when searing them. Or maybe this is all just in my head and not real food science…

    Thinking this was one of those dishes I could safely ignore, I got sucked into the world of tweaking the GardenFork.TV website, and then realized how  long it had been since I started cooking the ribs. I got up and turned them in the dutch oven, and let them cook longer.

    I even cooked these in the afternoon, and then pour off the liquid, threw that in the freezer to separate the fat out – which worked, BTW.

    I gently reheated the ribs which I had cooked with onions, carrots and about 2 cups of liquid, half red wine – half water.

    But the ribs were tough, which bummed me out a bit, as they looked great when i first opened the package. Food guru Chris Kimball has taught me that meats like short ribs will turn tough if cooked too long. The proteins lock up and don’t allow any liquid in, thus being tough to chew.

    Braised Short Ribs look great, taste tough
    Braised Short Ribs look great, taste tough

    So many recipe give a time and oven temp to cook meat, but what I think recipes really need is a temperature to attain, and then the meat is done.

    Have to work on this more. What are your thoughts on overcooking meat, especially things like short ribs? Let us know below:

  • Growing Hot Peppers with Sir Jimmy GF Radio

    Growing Hot Peppers with Sir Jimmy GF Radio

    growing-hot-peppersToday we talk with longtime GF viewer James on how to grow hot peppers, how to dry hot peppers, and bringing your own condiments into a restaurant, and what can happen when you do that.
    James tells us of how he migrated from a regular in ground vegetable garden to using raised beds, and we talk about our how to build raised garden beds videos. James may make a video himself soon, we look forward to it.

    We also touch on freezing vegetables, especially summer squash, which James has a good technique for.

    James is co-host of The Book Guys Podcast, avail on their site and iTunes. We talk about how to start a podcast and what gear we use to record our podcasts, and what we get from podcasting. James has been using Go To Meeting to record his show, we use Skype with a plug in called Call Recorder that records the conversation and saves it as a quicktime file that can be edited.

    Then we get into Mushroom Identification, and the recent GF Video on Oyster Mushroom identification and how to cook mushrooms. James, like myself, is a recent convert to mushrooms, interesting how as one slowly becomes an adult you start to like adult foods.


    photo by mugur


  • Toilet Repair how to replace a broken toilet flange

    Toilet Repair how to replace a broken toilet flange

    Is your toilet wobbly? Learn here how to replace a broken toilet flange. If your toilet wobbles and is not solid on the ground, it could be that the toilet flange is rotted or broken. fun. Let’s see how to repair the toilet.

    You can fix this. I did. And if you follow our how-to toilet repair photos here, you’ll be a DIY home repair expert, or at least you’ll be able to replace a broken toilet flange.

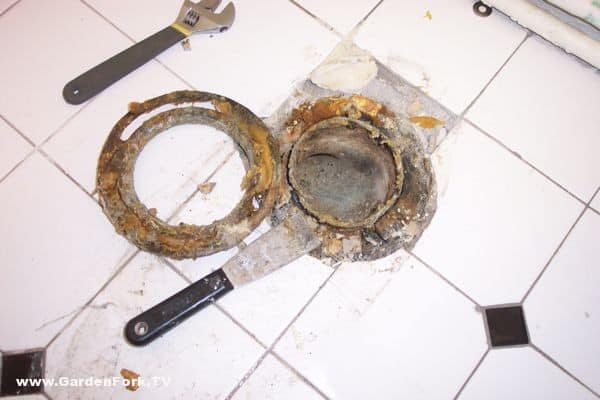
    Toilet-Repair-how-to-replace-a-broken-flange
    Rusted toilet flange, this one separated completely from the waste line.

    watch DIY videos insert

    First remove the toilet. Turn off the water line, flush the toilet, and remove the water line from the bottom of the toilet tank. Have bucket handy, as water will come out of the tank. Sponge out as much water from the tank and bowl as you can. A handyman trick is to use a wet dry shop vac to suck all the water out of the bowl and tank.

    Toilet-Repair-how-to-replace-a-broken-flange-2

    Remove the nuts on each side of the base of the toilet. These nuts-bolts attach the toilet to the flange. You may have to use a saw to cut the nuts off, which is ok, because you are going to put in new toilet bolts and nuts. The flange, when brand new, is attached to the waste pipe. Many times it rusts or snaps off. Tilt the toilet on its side and move out of the way. Have a helper assist you in moving the toilet, they are heavy and bulky.

    Toilet-Repair-how-to-replace-a-broken-flange-4

    Use a putty knife to remove the wax ring residue from the exposed flange and inspect the flange and surrounding area. What is key here is if the wood subfloor is rotted. If this is the case, you will have to cut out the surrounding subfloor and replace it with new plywood, then fix the flange.

    Thankfully on this home improvement project, the subfloor was fine, just the flange fell apart. Go to your hardware store and buy a Super Ring Replacement Toilet Ring. There are several models by different suppliers, don’t buy the cheapest one, its your toilet, remember…
    Also at the hardware store buy new toilet mounting bolts, they usually come in a package with the nuts and washers.

    use wax from the wax ring to get them to stand up straight
    use wax from the wax ring to get them to stand up straight

    Put the toilet mounting bolts in the flange pointing up, and use some wax from the old wax ring to hold them in place. Place the super ring replacement toilet ring over the waste line, making sure the mounting bolts are in the same place as the original bolts were,  one bolt on each side of the flange.

    Screw the new flange into the subfloor. You may have to use a hammer drill to drill through existing tile flooring or cement substrate. Set the new toilet wax ring onto the flange on the base of the toilet, and guide the toilet back onto the super ring, making sure the toilet mounting bolts are lined up with the mount holes in the toilet base. The super ring toilet ring allows for you to adjust the location of the bolts.

    Toilet-Repair-how-to-replace-a-broken-flange-6

    Press down on the toilet to seat the wax ring, wiggle the toilet back and forth to get it to set down and seal. Cut off the the bolts about 1/2″ above the toilet base. Spin on the mounting bolt nuts, and tighten them, but be careful not to over-tighten, as you will crack the porcelain toilet.

    Toilet-Repair-how-to-replace-a-broken-flange-7

    Re-attach the water supply line, turn on the water valve, flush the toilet and check for leaks.

    diy videos play

    Watch More DIY Videos Here.

    So there you go, not as complicated as you thought. The biggest red flag is if the subfloor is rotted, because then your simple home improvement project has become a much bigger deal.

  • About Grits : GF Radio

    About Grits : GF Radio

    We talk with my neighbor Charlie – who Charlie Pup is named after- about growing up eating grits and how to make grits in New York.

  • Electric Clock Repair GF Video

    Electric Clock Repair GF Video

    Electric clock repair video I made with my sister. She bought an Empire style electric clock that needed to be rewired, so we made a how-to video on rewiring an electric clock. Make sure the clock is unplugged while you work on it!

    When repairing an electric clock, pay attention to whether the old plug is polarized. Polarized plugs have one power lug larger than the other. If so, be sure that the wire from the polarized lug on the new plug attaches to the same place in the clock that the old polarized plug wire did. Its important to pay attention to this detail, it can reduce the risk of shock.

    Push Connectors for Electric Clock Repair

    We use push connectors to fix this electric clock. I like push connectors because they make stripping the wire insulation unnecessary. All you do is push the ends of the old wire and the new wire into the push connector and press the metal blade down through the wires to make the connection, then close the plastic tab to seal the deal.

    This same technique could be used for other electric appliances that need rewiring or new wires. However, make sure these old appliances are OK to use, and are not a fire hazard.

    Here is a good book I like if you want to learn basic home wiring:

    Have a question or suggestion or story? Let us know below: