Category: Cooking – Recipes

  • Beer Cooler Sous Vide, The Cheapest Way To Cook Sous Vide!

    Beer Cooler Sous Vide, The Cheapest Way To Cook Sous Vide!

    What is Beer Cooler Sous Vide? It’s a super simple way to cook sous vide without buying an expensive immersion stick gizmo. You probably have all the parts you need in your garage. Let’s watch the video:

    This is a great hack I learned about from Kenji Lopez-Alt of SeriousEats. You can cook meat sous vide with just a beer cooler, some zipper bags, and a thermometer. No need for expensive immersion circulators, just some simple tools and this all tastes amazing.

    Sous Vide is a cooking method that brings the meat up to a set temperature (like medium rare) and holds it there. The beauty of this is you don’t overcook the meat, and you get to precisely pick the done-ness. Nice.

    How to build your beer cooler sous vide rig

    Pretty simple. Get a cooler.

    I’m am all about use what you got, so go in the garage and see what’s there. Or maybe your neighbor has a cooler they want to get rid of.

    Then do this neat hack I learned from Kenji. Insulate the lid.

    beer cooler

    Its something I never thought of, and now I wonder why cooler companies haven’t done it before. Get your cordless drill, and drill two 3/8″ holes in the front edge of the lid. Lift the lid such the edge with the holes is pointing up. Fill with regular spray foam. Let dry.

    beer cooler with spray foam

    Be sure to wear gloves and clothes you don’t care about when you do this spray thing, the foam will get on your clothes and it does not come off. Learn from me.

    That’s is for the build, pretty simple, right. Now that everyone has Yeti coolers, I imagine you can find someone who will give you a cooler for free. Just find the friend who is doing the decluttering thing.

    So why a beer cooler? Coolers keep things cool, but they can also keep things hot for quite a while. To cook a steak, fish, and other thin proteins with the sous vide method, you only need to keep them in hot water for about an hour. The cooler will keep the water right at 135ºF (medium rare) for quite a while.

    A plate of food on a table, with Steak

    IMPORTANT! Season your meat. Its best if you can salt and pepper boths sides of the meat a day before and leave it in the fridge, but even adding it just before sealing in a bag is ok.

    Cooler and Sous vide

    The hardest part of this whole beer cooler sous vide method is getting the air out of the zipper bag. When I first made this video, my air evacuation technique was not great, but now I put the meat in the bag, and lower it in to the cooler (or a bowl of water) and slowly lower the bag until the zipper part is at the water line. Almost all of the air will have been evacuated at this point. Zip up the bag and you are good to go.

    I use water that is a few degrees warmer than the end temperature I am aiming for, this works for me. Test for yourself, and get a digital thermometer, it is a big time saver.

    A plate with a fork and knife and steak

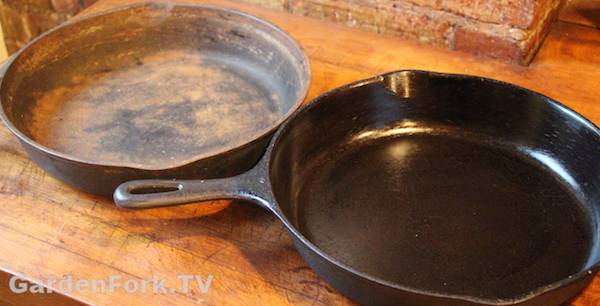
    When your meat has been in the cooler for an hour, it is time to sear it. Heat up a cast iron pan, pat dry the meat, add oil to the pan, and sear for a minute on each side. Drop in some butter if you want a quick sauce. Let the meat sit for a few minutes and you are good to go!

    steak in a fry pan
    Watch another beer cooler sous vide video here.


  • Dandelion Greens & Bacon Salad Recipe : GF Video

    Dandelion Greens & Bacon Salad Recipe : GF Video

    What do you with dandelion greens? You make a salad of course. Watch our video to find out how to identify and forage for dandelion in your yard, and make a great salad. If you are looking for edible plants in your yard, make sure the yard hasn’t been treated with herbicides or other things that are bad for you to ingest. Check out our other foraging videos here.

    How To Find and Prepare Dandelion Greens

    Wild Greens are abundant if you live in an area with grassy weedy places. They grow, we eat them. Things like mustard grow wild, wild onions, dandelion, purslane, burdock, all sorts. What I like about dandelion is it is ubiquitous and abundant, and it grows all summer. It is said that the dandelion greens are more bitter after the dandelion flower have bloomed, but my personal experience has been mixed. It is true the older the leaf, the more bitter it will be.

    I do suggest buying at least one foraging plant identification book, I’m a big fan of Leda Meredith’s Foraging Books, she also has regional foraging books out as well. A second book you might consider is Joy Of Foraging.

    Dandelion Greens

    Follow this simple dandelion greens recipe, and all will be great. It uses items you probably have in your fridge.

    Dandelion Salad Recipe  makes 2 salads

    1 bunch of dandelion, about a large handful, tap root and flower stems removed, washed and dried.

    2 strips of thick cut bacon

    balsamic vinegar

    2 eggs, poached for 3 minutes

    1 avocado

    Cook the bacon to crisp

    While the bacon is cooking arrange the dandelion in two salad bowls or plates.

    Cut the avocado in half, core and add to the bowls

    Add the poached egg on top of the greens,

    Cut the bacon into small pieces, spread over the salad

    Pour about a half teaspoon of the bacon grease from the pan over each bowl.

    Serve as soon as possible.

    Now on to foraging for Lambsquarters!

    Wild and Urban Foraging for Lambsquarters : GF Video


  • Use Soap On Cast Iron? Waffle House Does

    Use Soap On Cast Iron? Waffle House Does

    To use soap on cast iron is a super hot button topic in the cast iron cooking world. I know because of the cast iron videos and posts I have made.

    I happen to be in Waffle House, one of my favorite places to be, sitting at the counter, another favorite place. I noticed that the dishwashing station is under the front counter. And there they were, the cast iron pans they cook eggs in, being washed with soap.

    use soap on cast iron

    People have been told, and repeat, to use soap on cast iron will ruin the pan. It washes off the seasoning. Some comments from our YouTube channel:

    “I season my cast iron the old fashioned way with lard and i tell you from experience that dish soap strips the finish right off it to where everything sticks like glue.”

    The flip side:

    “I have used soap on my cast iron all my life, just like my mother and grandmother did, and I’ve never had a problem. After washing and drying a give the pan a light coating of oil before putting it away, whether it’s going to be put away for a few minutes or a few weeks or months.”

    I grew up being told not to clean a cast iron pan with soap, and to use salt to clean our stuff that stuck to the pan. This never seemed to work very well. So I used some soap and a plastic scrubber pad, and it worked just fine. No one knew the difference, and the world did not come to an end. After washing, I oiled the pan and let it dry. Done.

    And I’m totally OK with that. Are you? Watch this video:

    Use Soap Cast Iron

    I do a deep dive on can you use soap on cast iron in this post here.

  • This Cheap Pull Knife Sharpener Works Just Fine, Thank You

    This Cheap Pull Knife Sharpener Works Just Fine, Thank You

    Best knife sharpener? I have one, its the electric Chef’s Choice, its about $120. How much do I use it? Not much.

    Cheap pull knife sharpener

    What I DO use is my cheap pull knife sharpener. Its right there in the top drawer. The best knife sharpener is in a cabinet somewhere. You have to plug it in, and it makes a bit of noise. The cheap sharpener has a very low carbon footprint…

    The cheap pull knife sharpener I have is from Chef’s Choice, its low tech and handy. They also make the electric model I use every few months. I like the simple knife sharpener because of its ease of use. Just pull it out of the drawer and start pulling the knife through it.

    Works for me, how about you?

    I know there’s all this talk on the knife discussion groups about angle and all, but I just want to be able to cut onions with a sharp knife.

    On a few tangents here, I do think you should store your knives in those plastic sleeves to keep them sharp. Get some here. Throwing a sharp knife into a drawer is a quick way to unsharpen that knife. One thing with the sleeve protector, be sure the knife is dry before storing it.

    I’m not a fan of the knife block, its one more thing on my counter and who knows what’s in the bottom of that knife slot… At least you can clean kitchen drawer partitions.

    And there’s a few good cheap restaurant kitchen type knives that are almost as good as a $100 knife. Check them out here. Mark Bittman pointed out a few years back that most of your food in restaurant kitchens is cut up with cheap knives they buy in bulk:

    I started with an eight-inch, plastic-handle stainless alloy chef’s knife for $10. This is probably the most essential tool in the kitchen. People not only obsess about knives (and write entire articles about them), but you can easily spend over $100 on just one. Yet go into any restaurant kitchen and you will see most of the cooks using this same … tool. NY Times

    How to you keep your knives sharp? Let me know in the comments below.

    Best Cast Iron Seasoning Instructions – GF Video

  • Stovetop Panini Press, What Fun!

    Stovetop Panini Press, What Fun!

    My friend picked up a stovetop panini press, so we had to make some sandwiches with it. Super analog, and a great tool for campfire cooking. The brand name is Toas-tite, you could also call this a stovetop sandwich press. I call it a lot of fun.

    stovetop panini press

    We cooked up a mix of ground beef and chorizo with onion and tomato. Grated cheddar goes over the mix. Sliced buttered bread goes on the press, then the filling, then the second piece of buttered bread.

    stovetop panini press

    We cut off the ends of the bread that stuck out, they were a good appetizer for what was to come. We didn’t preheat the stovetop panini press, we just filled it up and laid it on top of a burner. The press is lighweight, easy to move around. Started on high heat then dialed it down to low after the press heated up.

    stovetop panini press

    We had two of the rigs going, which worked for the two of us. You might want to make these ahead of time if you want to feed more people. One can open the press to see how the toasting is going along, though after a while you get a feel for it. The ingredients do not seep out of the sides, at least ours didn’t. I imagine if you had a mixture with too much liquid or cheese it is possible it would leak.

    stovetop panini press

    But wow how much fun is this! Crunchy bread with savory meat filling. You could certainly go all vegetable as well, a curry would be good. What this works really well with is leftovers. Think brisket or pulled pork.

    You can purchase the Stovetop Panini Press here, its also called a hot pocket sandwich maker or stovetop sandwich press. I also saw on Amazon a cast iron sandwich press that uses the whole slice of bread, which makes sense to me.

    This press uses the whole piece of bread.

    I’ve also seen it called a hobo press, watch Cheryl of Flannel Acres make lasagna in one!


    Save

    Save

    Save

  • Love The Instant Pot! – Instant Pot Pressure Cooker Review – GF Video

    Love The Instant Pot! – Instant Pot Pressure Cooker Review – GF Video

    I have used a stovetop pressure cooker for years. Then a friend of mine showed me his Instant Pot Pressure Cooker. Then I bought one. Buy Yours Here: Instant Pressure Cooker 6 Quart    Watch our review video and read on for more info below the video.

    [Being up front here, the above link is to Amazon and we get a finder’s fee for referring you to Amazon, its part of how we pay the bills to make more videos and posts for you all to watch.]

    OK back to the story:

    pressure cooker review

    Its literally “set it and forget it”. Put in ingredients, turn it on, and go do something else in the yard or house. Don’t leave the property, OK?

    I make beans and chickpeas ever week, we cook pork shoulders and short ribs in it, and I want to try a carrot soup recipe I saw in the Modernist Cooks At Home cookbook next.

    The advantage of electric over stovetop pressure cookers:

    • You don’t have to adjust the stove burner
    • It stops cooking at a pre-set time and goes into keep warm mode
    • Its incredibly quiet
    • It makes cooking super easy

    Read more on the Pressure Cooker review page here.

    America’s Test Kitchen has a great pressure cooker cookbook, Pressure Cooker Perfection and a new book, Multicooker Perfection.

    I’ll go more into this with more posts as I cook more with it. Let me know what you think in the comments. thx!

    Pressure Cooker Short Ribs Recipe – GF Video

    Save

  • No Knead Bread Recipe with Olives – GF Video

    No Knead Bread Recipe with Olives – GF Video

    Easy to make no knead bread recipe, this time we add black olives for extra flavor. Oil cured black olives are what a friend of mine calls ‘little salt bombs’ they are that and more. Watch the video and check out the recipe.

    Lately I’ve been doing a whole wheat – white flour mix for my no knead bread recipe. I’m adding more whole grains into my diet, and the whole wheat adds that nice nuttiness to the bread. Making 100% whole wheat breads can be tough, especially no kneads.

    No Knead Bread Recipe

    But the main ingredient here are black olives! Don’t buy the watery black olives in a can, get oil cured olives. These are usually available in a deli or gourmet shop. I have seen oil cured in a jar, but not often. Buy pitted olives, but when chopping them, keep an eye out for pits, you may run across one or two.

    For some time  now I have been using parchment paper to move the dough from the the bowl it rises in into the dutch oven. This eliminates the risks of flopping the formed dough into the dutch oven. Its ok if the parchment paper sticks out of the lid of the dutch oven, it will help with removing the baked loaf when its done.

    No Knead Bread Recipe
    This is what shaggy can look like.

    For my basic no knead bread recipe, the bread is done with the internal temperature reaches 200F. I usually bake the bread for 35 minutes covered and then 15 minutes uncovered. With your oven these baking times may change. Its better to over-bake bread than to under-bake it. Wet dough bread is no fun.

    watch more bread videosEven if you are a big fan of black olives, using less is more here. Olives pack a lot of flavor in a little portion, OK?

    No Knead Bread Recipe with Olives
    Recipe Type: Bread
    Cuisine: American
    Author: Eric Rochow
    Prep time:
    Cook time:
    Total time:
    Serves: 1 loaf
    An easy bread recipe that adds more flavor with black olives. Serve this at dinner, your friends will like it.
    Ingredients
    • 2 cups all purpose flour
    • 1 cup whole wheat flour
    • 1/4 teaspoon active dry yeast
    • 1 1/2 teaspoons salt
    • 1 cup chopped & pitted oil cured black olives
    • 1 1/2 cups warm water
    Instructions
    1. Mix together the two flours, the salt, and the yeast. I like to use a whisk for this.
    2. Add in the pitted and chopped olives, be sure they don’t have any pits in them. Bad things can happen.
    3. Add in the warm water and mix together.
    4. The dough will be stiff and will not come together. Don’t worry, it won’t. You want the dough to be ‘shaggy’ like shag carpet, not wet.
    5. Add water by the teaspoon if needed, but a bit too much water will make the dough wet.
    6. Cover the bowl with plastic wrap and place is a warm place to rise. I use my oven with the light on.
    7. Let the dough rise 12-18 hours. The dough should have strands pulling away from the bowl when its ready.
    8. Flour a board lightly. Scrape the dough out of the bowl onto the board. Dust the dough with a bit of flour and turn the dough into itself to form a ball.
    9. Place the ball of dough onto a sheet of parchment about 18” long. The parchment should be wide enough to sit in the dutch oven and stick out the top a bit, as shown in the video.
    10. Gather the corners of the parchment/dough and put into a bowl with high sides. One similar to the one I use in the video is good.
    11. Cover with a towel and let the dough rise for two hours in a warm place. I use the oven with the light on again.
    12. After 1 1/2 hours of rise, put the dutch oven and lid in the oven and set the oven to 450F.
    13. After 30 minutes, remove the dutch oven from the preheating oven, lower the parchment with the dough into the dutch oven, cover and bake for about 30-40 minutes. It all depends on your oven.
    14. After 30 minutes, remove the lid of the dutch oven, the bread should be starting to brown. Bake another 15 minutes with the cover off.
    15. Check the temperature of the bread, its done with the bread reaches 200F


  • Sweet Cornbread Recipe with Maple Syrup – GF Video

    Sweet Cornbread Recipe with Maple Syrup – GF Video

    Maple syrup makes this sweet cornbread recipe extra special. And not too sweet either, which is the way I like it. Watch the video and check out the recipe below.

    The vegetarian chili recipe video we mention in the video goes great with this.

    How to make this sweet cornbread recipe

    The maple syrup adds a smokey caramel flavor, I think. If you don’t have any, you can use sugar or honey, but it will have a different taste. You can also dial back the sweetness if you like. Be sure to mix the syrup into the wet ingredients, or else it will sit in the bottom of the mix.

    sweet cornbread recipe

    I really like the stone ground cornmeal. It happens to be from upstate New York, but I’ve seen different brands of stone ground. This might all be in my head, but I like the feel it gives the cornbread. But use what you got, and if you have regular cornbread, then go ahead and use it. K?

    I use butter in this recipe, but you can use bacon fat, vegetable oil, or lard. This fat melts in the pan in the oven, so keep an eye on it to make sure it doesn’t burn. The fat will melt faster than you think!

    I prefer a glass baking dish, but I also use a metal pan with fine results. I think the bottom crust is crunchier with the glass pan. This could all be in my head, anything is possible, you know…

    sweet cornbread recipe

    Sweet Cornbread Recipe with Maple Syrup
    Recipe Type: Dinner
    Cuisine: American
    Author: Eric Rochow
    Prep time:
    Cook time:
    Total time:
    Serves: 9 pieces
    This cornbread recipe is based on one by Mark Bittman in the NY Times. I use whole wheat flour and maple syrup to change it up. I’ve found the whole wheat works very well with cornmeal in baking.
    Ingredients
    • 4 tablespoons butter
    • 1 1/2 cups cornmeal, stone ground if possible
    • 1/2 cup whole wheat flour
    • 1 1/2 teaspoons baking powder – make sure its fresh!
    • 1 teaspoon salt
    • 1/2 cup maple syrup – you can substitute sugar or honey
    • 2 eggs
    • 1 cup milk
    Instructions
    1. Turn on the oven to 375F.
    2. Put the butter in a 8″ baking pan in the oven.
    3. Mix the dry ingredients together in a medium sized bowl.
    4. Put the milk into a small bowl and beat in the two eggs.
    5. Add the maple syrup to the egg-milk mixture.
    6. Pour the liquid ingredients into the dry ingredients and mix together.
    7. Its ok if there are some lumps in the batter.
    8. Pull the pan out of the oven – carefully!
    9. Pour the batter into the pan – it may spatter – and put back in oven
    10. Bake for 30-40 minutes, depending on your oven.


  • Best Vegetarian Chili Recipe with Butternut Squash – GF Video

    Best Vegetarian Chili Recipe with Butternut Squash – GF Video

    Here it is, the best vegetarian chili recipe I’ve made yet. Omnivores, do not skip this chili, its great. Butternut squash adds a sweetness and a fun color to your mix. Watch our recipe video and start cooking. Let me know your thoughts in the comments below.

    Tips on the Best Vegetarian Chili Recipe

    You can use canned beans or cook some dried beans – see our pressure cooker vids here. I used pinto beans, but use what you got. Northern beans, kidney beans, whatever works for you. They will all have a slightly different flavor.

    Start with a small amount of cocoa! In the video I added too much, and have since adjusted the recipe. Add in the cocoa before the squash to preserve the orange color of the squash.

    Cut the squash smaller and it will cook faster. I cut the squash in to pretty large chunks, if they are smaller, it less time to be done.

    Chili powders can be very different. They vary in the amount of heat and smokiness, I’ve found. Start with less powder when you first start. You can add more later to boost the chili flavor if need be.

    This recipe is perfect for a slow cooker. Cook down the onions, then throw everything in a slow cooker for the day on low.

    Best Vegetarian Chili Recipe

    What are your thoughts and experience with making chili? Let me know below.


    Best Vegetarian Chili Recipe with Butternut Squash – GF Video
    Recipe Type: Dinner
    Cuisine: Vegetarian
    Author: Eric Rochow
    Prep time:
    Cook time:
    Total time:
    Serves: 3 quarts
    Easy chili recipe that features butternut squash. This one will appeal to everyone, and fill them up. Start with a small amount of cocoa, you can always add more. The first batch I made for the video had too much cocoa.
    Ingredients
    • 1 sweet onion, coarse chopped
    • 2 cloves garlic, minced
    • 4 carrots sliced into rounds
    • 3 tablespoons chili powder
    • 1 tablespoon cumin
    • 1 28 ounce can chopped or diced tomatoes
    • 2 tablespoons oregano
    • 2 tablespoons tomato paste
    • 2 teaspoons salt
    • 3 tablespoons cocoa
    • 1 24oz to 28 oz can kidney, pinto, or northern beans (do not rinse the beans)
    • 1 medium butternut squashed, peeled and cubed
    Instructions
    1. Use a dutch oven or heavy bottomed pot for this chili. Turn the burner to high.
    2. Pour a few glugs of vegetable oil into the pan, about 1/8″ deep or so. In other words, enough to saute the onions.
    3. When the oil is getting hot, turn down the flame to medium and add in the onions. I like to cook the onions down to where the edges are getting brown.
    4. Add in the minced garlic, be sure it doesn’t stick and burn in the bottom of the pan. Cook for about a minute
    5. Add in the carrots and mix it all up. If you have time, I like to get some cooked edges to the carrots, but its not a deal breaker if this doesn’t happen.
    6. Push the vegetables towards the sides of the pot and allow the oil to flow back into the center of the pot. Add in the chili powder and cumin and let the spices toast in the hot oil for about 30 seconds.
    7. Mix the spices into the vegetables and pour in the can of tomatoes.
    8. Drop in the oregano and tomato paste and salt. I usually do two squirts of the tomato paste from the tube.
    9. Measure in the cocoa powder and mix it all together.
    10. Add the squash and beans.
    11. Bring this to a low simmer, cover the pot, and let cook on low. Depending on your stove, pot, and how thin the squash is cubed, this should cook down in about 30 minutes.
    12. If the chili is too watery for your taste, you can leave the top off while cooking for part of the time.
    13. The chili is done when you can easily pierce through the squash with a fork.


  • Cheater Apple Pie Recipe, aka The Apple Galette – GF Video

    Cheater Apple Pie Recipe, aka The Apple Galette – GF Video

    Simple apple pie recipe hack, this apple galette is much easier to make than a proper apple pie, and tastes and looks just as good. Call it Rustic Apple Pie. Watch the video and check out the recipe below.

    We’ve done a few galette recipes already, and we’ll be doing more, as the form is versatile. Its kinda like a pie tart shell, you can put all sorts of stuff in it, be it sweet or savory. Sign up for our email newsletter to be in the know when we post them.

    Cheater apple pie recipe, aka The Apple Galette

    I call this a cheater apple pie, because its similar to an apple pie recipe, but is less fussy. Roll out dough, drop in fruit, bake, done. Apple pie seems more involved, but we’ll make those too. Now I have ideas for pie in my head. Do you? Let me know below.

    Cheater apple pie recipeThis galette is a low sugar version, a sprinkle of sugar is all I added, and it was fine. I used dried cranberries and learned that its best to have the cranberries tucked under the apples on top of the galette, else they get too crunchy from the oven heat. You could use other dried fruits, but I think we need to eat more cranberries.

    Don’t sweat the pie crust! It’s not rocket science to make a decent crust. Be sure to put the pie dough in the fridge for a while to let it set up. A key ingredient in my pie crust is sugar. It adds a bit of sweetness and crunch to the crust, this same crust would make good rugelach, you know. Have to work on that one. My grandmother made those every Christmas.

    Cheater apple pie recipe

    The apples in this galette get soft, but don’t break down and go mushy, its baked apple slices and cranberries, and goes well with a bit of vanilla ice cream. Some liquid may leak out the side, but that’s ok. Best to bake this on a lined cookie sheet or a greased cast iron flat skillet just in case.

    I used Fuji apples for this, and use my fav apple corer, it makes the prep go fast, I think.

    Cheater Apple Pie Recipe, aka The Apple Galette
    Recipe Type: Dessert
    Cuisine: American
    Author: Eric Rochow
    Prep time:
    Cook time:
    Total time:
    Serves: 1 pie
    A simpler version of apple pie, the apple galette is a open faced rustic crust pastry that you can add all sorts of fruits to. Today we use apples and cranberries
    Ingredients
    • 3-5 apples cored and sliced – if the apples are small use more apples.
    • 1 cup of dried cranberries
    • 1-2 tablespoons sugar
    • 1 tablespoon lemon juice
    • lemon zest
    • 1 1/2 tablespoons cornstarch
    • 1 stick of unsalted butter – cold
    • 1 1/4 cups all purpose flour
    • 1 tablespoon sugar
    • 1/2 tsp salt
    • ice water
    Instructions
    1. If possible, make the pie crust a few hours beforehand, or the day before:
    2. Cut the stick of cold butter into 1/2″ cubes, and place in food processor.
    3. Add the flour and sugar and salt.
    4. Pulse the processor until the flour and butter have cut together. it looks kinda like lumpy cornmeal. if you’re not sure, make sure all the butter cubes have been mixed into the flour.
    5. Put this dough in to a bowl, and add ice cold water a few tablespoons at a time. mix the water into the dough until the dough can form a ball. Don’t add too much water and make the dough sticky. If you do, add some more flour to the dough.
    6. Place this dough onto some plastic wrap, shape it into a large hockey puck, and put in the freezer for 10 minutes, or the fridge for 30 minutes. The longer it is in the fridge , the better the dough gets, I think.
    7. Combine in a bowl the apple slices, lemon, sugar, zest, cornstarch, and cranberries. Mix together.
    8. Roll out the dough on a floured board, you want it about 14″ in diameter, about 1/4-1/8″ thick.
    9. Place the pie dough onto a greased cast iron pan or cookie sheet.
    10. Pour the apples into the center of the crust and pull up the sides onto the pile, pinching the dough together to hold it up. Slip any exposed cranberries underneath some apples.
    11. Bake at 400 for about 35-40 minutes. The apples will not break down, but will be soft.
    Cheater Apple Pie, aka Apple Galette Recipe
  • Homemade Metal  Pizza Oven

    Homemade Metal Pizza Oven

    Here is a home made pizza oven I ran across in a restaurant in Williamsburg, Brooklyn. Can’t remember the name of the place, sorry.

    Metal Home Made Pizza Oven
    This one is interesting in that its a metal pizza oven, rather than the usual brick. I did not see it in operation, but I’m sure it works.
    I do see some improvements that can be made to this home made pizza oven, and I wonder why they did some thing.
    The two side openings are where one would put the firewood to fire the oven. They don’t seem large enough to build a fire that would sustain itself and heat up the oven enough. I didn’t see this rig in action, so it may work just fine, but I’m thinking not.

    Metal Home Made Pizza Oven
    There is a curved metal arch over the pizza platter. I guess this is to channel the  heat up over the pizza, and transfer heat to the metal arch. I’d remove the arch. The heat from the two side fires will naturally move across the roof the oven and out the center flue.
    The pizza platter is too big, I’m thinking. I don’t often see fire baked pizzas that large. With a smaller platter, the whole pizza can fit in the oven, and you don’t have to turn it.
    But its an interesting idea, not sure who built it and how well it works in practice. I love that someone took the time to make it. Clearly some welding and metal skills here.

  • Bacon Wrapped Grilled Cheese Recipe – GF Video

    Bacon Wrapped Grilled Cheese Recipe – GF Video

    The best grilled cheese recipe I’ve ever made. Inspired by a BuzzFeed video, I had to make our version of this grilled cheese. It tastes wow.

    Childhood memory of slices of process american cheese, unwrapped from the plastic, laid on top of white bread, and put in the toaster oven. I’m thinking processed slices of cheese like that were made for grilled cheese. I did not move on to grilled cheese recipes that used two pieces of bread for awhile. Then in college I discovered you could add ingredients into the grilled cheese. First came tomatoes.

    Bacon Wrapped Grilled Cheese Recipe

    That sandwich was in the dorm cafeteria at college. Friday was chili and grilled cheese. Its still a great Friday sandwich now.

    Some thoughts on this Grilled Cheese Recipe

    I made this and it was instantly my favorite sandwich recipe. You can’t eat this everyday, but you can make it in about 10 minutes. Plus it smells great in the kitchen while making it. And the dogs become very attentive during the whole process, not leaving the kitchen.

    Bacon Wrapped Grilled Cheese Recipe

    I found that square bread did better, as did thicker bread. Probably the best bread would be a thick potato bread, but I couldn’t find any, so we went with a sturdy white bread and cut it into a square.

    Bacon Wrapped Grilled Cheese Recipe

    For cheese I used a grocery store sharp cheddar. You can argue all day about the best cheese to use in a grilled cheese sandwich, but to keep it simple, we used cheddar. I have seen recipes where they grate the cheese over the bread, I used slices. Works for me.

    The bread was not buttered or oiled. The bacon takes care of that plenty well. What was surprising was the bacon grilled cheese was not very greasy. You do not have to completely cover the bread with the bacon wrapping. You do have to hold the sandwich on its side to cook the side bacon. Important.

    Bacon Wrapped Grilled Cheese

    Thanks to BuzzFeed for the inspiration.

    Bacon Wrapped Grilled Cheese Recipe – GF Video
    Author: Eric Rochow
    Prep time:
    Cook time:
    Total time:
    Serves: 1 sandwich
    A grilled cheese recipe better than any other I have found.
    Ingredients
    • 2 slices thick white bread
    • 4 slices cheddar cheese
    • 6 slices bacon
    Instructions
    1. Square off the bread slices
    2. Insert the cheese between the bread
    3. Wrap bacon slices around the bread. Wrap one direction, then turn sandwich 90 degrees and wrap again.
    4. Cook in a fry pan on medium heat, use tongs to hold the sandwich on its sides to cook bacon wrapped there.
    5. Crisper bacon yields a better sandwich.


  • Roasted Cherry Tomatoes and Polenta Recipe Video

    Roasted Cherry Tomatoes and Polenta Recipe Video

    When you buy too many of those cherry tomatoes at the big store, make this roasted cherry tomatoes and polenta recipe. This recipe takes tired, older cherry tomatoes and concentrates their flavor, drop them on top of a quick pot of polenta, and you have dinner, or part of a big dinner.

    I had bought a large package of cherry tomatoes at the warehouse style food store, the place where you eyes get big and you want to buy lots of stuff because you think its all a good deal, except that you have to cook it all. I have found that buying dried fruits and nuts at the warehouse store is a good deal. I keep them in zipper storage bags and put the nuts in the fridge, they last longer that way.

    The tomatoes sat on the counter for a week – don’t keep them in the fridge – and started to get soft and a bit wrinkled. I cut them in half, put them in an oiled pan, and sprinkled the magic ingredients over them, olive oil and salt. In the oven for 20-30 min, and out come something completely different that what went in there.

    roasted cherry tomato recipe

    The polenta is based on our quick stovetop polenta recipe, using the secret ingredient to cook the polenta faster. Add in some butter, and its a brilliant dish.

    You can top the cherry tomatoes with dried oregano or a mix of italian seasonings, it makes them that much better with little effort. I like to buy the larger container of italian seasoning, it goes on top of lots of foods in our house. Don’t use the best olive oil you have for this, as it is heated, so any subtle flavors are out the window. Use fine salt, not the course kind, as some salt might remain, and not everyone likes to bite down on chunks of salt, ok?

    Roasted Cherry Tomatoes and Polenta Recipe Video
    Author: Eric Rochow
    Prep time:
    Cook time:
    Total time:
    Smart use of cherry tomatoes that are getting a bit old on the countertop. This transforms them into a new delicious thing.
    Ingredients
    • 1 package of cherry tomatoes
    • Olive Oil
    • Fine Salt
    • Dried Italian Seasoning Herb mix or Oregano
    • 1 batch of stovetop or microwave polenta, link is above
    • Hard cheese like Romano or Parmesan
    Instructions
    1. Slice all the cherry tomatoes in half.
    2. Place them in a lined and/or oiled sheet pan, ideally they will fill up tray.
    3. Drizzle with olive oil and sprinkle salt and seasonings on tomatoes.
    4. Roast for 20-40 minutes at 425F. Keep an eye on them.
    5. Cook a batch of the stove top or microwave polenta.
    6. When the tomatoes are oozing liquid and starting to collapse, they are done.
    7. Spoon polenta into serving bowls and top with tomatoes.
    8. You can drizzle more olive oil over the dish.
    9. Grate cheese over top.


  • Batter Bread Sandwich Loaf Recipe – GF Video

    Batter Bread Sandwich Loaf Recipe – GF Video

    This batter bread sandwich loaf recipe is similar to the no knead bread recipe we have done, but its even easier. Plus it makes a sandwich loaf bread, which is a lot easier to use for making sandwiches than artisan bread.

    batter-bread-sandwich-loaf-recipe-2


    batter bread sandwich loaf recipe

    Batter Breads have been around for a long time, but recent recipes by Fleischmann’s and Cooks Illustrated have offered some improvements, our recipe is adapted from them.

    1 1/2 cups bread flour   9 ozs  260 grams

    3/4 cup whole wheat flour   3.4 ozs  96 grams

    1 packet or 2 1/4 teaspoons active dry yeast

    1 1/4 cups hot water 10 ozs  283 grams

    1 tablespoon honey

    2 tablespoons melted butter

    1 teaspoon salt

    2 tablespoons hot water

    1 egg optional egg wash before baking

    2 tablespoons wheat germ or bran optional

    Add the bread flour, whole wheat flour and yeast into a standing mixer with a dough mixer blade attached. Put in the wheat germ/bran if you want to use it.

    Mix in standing mixer for one minute on low speed.

    Add in the melted butter,  honey, and 1 1/4 cups hot water, not boiling, just 100 – 120F hot, OK?

    Then mix the batter for 4 minutes on medium speed. If the dough sticks to the sides too much, stop halfway through and scrape down the sides.

    Be careful about putting the spatula in the mixer bowl while it is running. Learn from me.

    Detach the dough blade from the mixer and remove it and the bowl from the mixer. Scrape the dough off the dough blade, but let the blade sit in the dough in the bowl.

    Cover the bowl and blade with a towel. Let rise for 20 minutes in a warm place. I use the oven that I have preheated for a few minutes. A warm furnace room, or a hot sunny window works also.

    Put the mixer bowl back on the mixer. Dissolve the salt into the 2 tablespoons of warm water then add to bowl of dough, mix on low speed to incorporate.

    Use vegetable oil spray to coat a 8 1/2  x 4  1/2  loaf pan. This is the more narrow kind of loaf pan, it will give a higher rise.

    Pour the bread dough into the loaf pan.

    Cover the pan with plastic wrap that has been sprayed with oil. When the dough has risen to just below the lip of the loaf pan, remove the plastic wrap and let the dough rise to just above the rim of the loaf pan.

    Optional: you can glaze the dough with an egg wash at this point. Scramble the one egg and apply lightly.

    Bake in a 375F oven  for about 45 minutes, when the internal temp of the loaf is about 208 – 210 degrees, its done.

    After putting on a cooling rack, unwrap the end of a stick of butter and rub it over the top of the loaf to give it a sheen and more flavor.

  • Rooftop Pizza Oven in Cambodia

    Rooftop Pizza Oven in Cambodia

    Tony wanted to make a brick pizza oven, and he found our pizza oven videos, and then made his own version. On a rooftop in Cambodia, of all places. How cool is that?

    Pizza Oven 2.0 from ConceptuallySpeaking.
    Tony writes:

    “I’ve been meaning to re-visit your site since it provided the perfect solution I was looking for in 2013 when I wanted to build a pizza oven on my roof here in Cambodia.

    I stacked and built mine on a custom made angle iron table with the angle iron bars ($40). Then I found these perfect 2 inch think angled cement pieces to put under the oven ($10). Once I found the place to buy the old bricks from the French Colonial buildings being dismantled at a price of $1 for 4, things got a lot easier – but finding the bricks was not an easy task given the language barrier and neither did the fact that it’s a 5 story building with no elevator. Although I did get a great workout bring it up and continue to do so with each or cord of wood. One original modification on made on your design was not to stack the bricks vertically but instead all of them flat.

    I have now re-built the oven three times, replacing cracked bricks and modifying the design slightly. I originally had a chimney in the back but found it was really non-essential. One nice feature I added was an elevated level in the front for cooking the pizza on. I also built it up two brick levels higher over all as the brick price is pretty inconsequential here. I use terra cotta tiles to cook on in the oven and on top of the oven to keep the pizzas warm, help the dough rise and get the crust a bit crispier.

    Thanks for the inspiring solution. If you are ever in Phnom Penh, Cambodia come over for a pizza with one of the best views in town.”

    Not only are they good for making pizza, but our DIY Pizza Oven Plans make for a good workout when you are hauling brick up four flights of stairs!

    Interesting that T0ny also found that one does not need a chimney for this pizza oven. I have had many people ask about that.

    DIY pizza oven video

    Watch all our DIY pizza oven plans videos here.


  • Cabbage & Apples with Salmon Recipe – From The Fridge

    Cabbage & Apples with Salmon Recipe – From The Fridge

    I’m trying to cook more from the refrigerator, as I always have something in there I can cook with. If I was more organized I could plan dinners, but that happens rarely. Instead I keep a stock of stuff I like to cook with, and go from there. But the fridge was looking kinda empty and there was this half a cabbage in there with some apples that were going soft.

    cabbage-apples-with-salmon-2

    So I put some chopped onion into the pan and then added in the apple and cabbage. The apples will disappear in the mix, adding that applesauce kind of taste to the dish. I remembered from a Facebook conversation we had awhile ago, some people suggested caraway seed, and I had that from a bread baking experiment.

    cabbage apples recipe

    I first covered the pan of cabbage to let it steam and break down the leaves a bit. This also softened the  apples. And I could walk around doing other stuff, as the water that sweats out keeps the pan from burning. After the cabbage has broken down nicely you can remove the lid and let it start to brown.

    I read recently where you shouldn’t let cabbage cook too long or it will have a mustardy smell, I have not experienced that.

    cabbage-apples-with-salmon

    I always keep frozen salmon in the freezer. It defrosts quickly using our How To Defrost Meat Quickly video technique. I put it under the broiler for a few minutes. I am good at over-cooking salmon, so I have to focus, which can be a challenge.


    Cabbage With Apples Recipe

    1/2 head cabbage, chopped up

    2 apples, sliced with skin on, its OK if they are soft

    1 medium onion, roughly chopped up

    2 teaspoons caraway seeds.


    Put a few glugs of oil into your pan. You want the whole pan to be covered with about 1/8″ of oil.

    Drop in the onions and cook down a bit until you can they become kinda transparent.

    Add in the cabbage and the apples, scatter some salt on it,  mix it all up, and cover.

    Set on medium or low heat, depending on how your stove works. You want the dish to steam-cook, not burn.

    Give the dish a stir every 5 minutes or so, chopping up any hunks of cabbage.

    When the cabbage has broken down to your liking, take off the lid and brown the cabbage.

    Taste for salt, it may need more, and then you’re done.


  • Oatmeal No Knead Bread Recipe – GF Video

    Oatmeal No Knead Bread Recipe – GF Video

    I love the simplicity and versatility of the no knead bread recipe, this no knead bread variation being a great example of taking the basic recipe, adding a few tweaks, and baking an artisan bread that rivals those in the bakery.

    I don’t often use steel cut oats for anything, but I saw this recipe and I thought, wow that’s a great reason to buy some steel cut oats. After we made this recipe, I cooked the steel cut oats in the pressure cooker, making a nutty oatmeal that was a lot of fun.

    This recipe is based on one on the Breadtopia website, a great source for all sorts of bread baking info and tools. Go check them out, the site is run by a web food guy named Eric, so you know its good.

    But back to the no knead bread recipe. I’ve become a big convert to using a digital scale for measuring out the flour for recipes. I’ve learned that it makes a big difference and I talk about it in this video: Five No Knead Bread Tips
    Pay attention when you’re toasting the steel cut oats on your stovetop. Use a nonstick pan or cast-iron pan. You want to heat this up, but stay right there while it’s toasting. I burnt the first batch of these because I walked away, the oats go from toasted to burnt in very short order. So watch out for that; once again, learn for me.
    oatmeal no knead bread recipe

    But once you get those toasted oats into the bread dough, it’s a great thing. It adds a neat texture and flavor. It’s subtle, it’s not like super oatmeal bread ,but I think it’s just enough. I also added whole wheat flour – I’m trying to eat more whole grains rather than refined flour. I think it works really well here. you can watch our other no knead bread videos here

    Let me know your thoughts, have you made the artisan bread recipes or the no knead bread?

    Oatmeal  No Knead Bread Recipe

    10 ozs  (2 1/4 cups) bread flour

    3 oz (3/4 cups) whole wheat flour

    3 oz (1/2 cup) steel cut oats

    1 tablespoon coarse salt

    heaping 1/4 teaspoon active dry yeast

    1 5/8 cups water filtered preferably


    Toast the oats in a pan on the stove, you want them toasted, not burnt.

    Add the flour, salt, yeast, and oats in a large bowl and stir together

    Pour in the water, (warm water is best, I think) and mix.

    Cover the bowl with plastic wrap and place in a warm area overnight. 12-18 hours.

    Flour a board or counter and shape the risen dough into a ball. Turn the ball into itself several times as shown in the video.

    Place the dough on a piece of parchment paper larger than your dutch oven.

    Place this in a bowl and cover with a towel, let rise for about an hour.

    Preheat the oven and dutch oven at 500F for 30 minutes.

    Dust the dough with flour if you like, and cut a design into the top, as shown in the video.

    Use the parchment paper to lift the dough out of the bowl, and place in the hot dutch oven.

    Cover and bake for 30 minutes at 450F. Take off the lid and bake an additional 15-2o minutes.

    You want the crust browned and the internal temperature to be about 190F.

    Remove from the dutch oven and cool on a wire rack. Do not cut it right away, let it cool.


  • Best Cast Iron Seasoning Instructions – GF Video

    Best Cast Iron Seasoning Instructions – GF Video

    The best cast iron seasoning instructions, hands down. First watch the video, then read more about our easy step by step process to restore cast iron.

    At the end of this article are links to how to remove rust from cast iron and how to remove the seasoning from cast iron, where to buy cast iron, and cast iron videos.

    So you have a brand-new cast iron pan you just bought or you have an older pan that you just strip the seasoning off of. I ruined the seasoning of one of my pans awhile back, and is one of the reasons I created this cast iron seasoning and care video series. While we show a skillet, this process works for how to season a cast iron dutch oven or griddle as well.

    Our cast iron seasoning instructions are based on a blog post by Sheryl Canter, who did a lot of research into this and saved us all from having to do that same research. The secret to cast iron seasoning is you want use an oil that is called a drying oil. When drying oils are applied to a surface like cast iron and heated, the oil goes through what’s called polymerization. The best edible drying oil is Flax oil. You have to buy this in the health food section of a food store and it has to be kept refrigerated, as it can go rancid fairly quickly. Flax oil is the food grade version of linseed oil,  I would not suggest you use linseed oil to season your cast iron pan.

    But a more affordable and easier to find oil that works well is Sunflower Oil. I have found its great. And if you can’t find any of these oils, regular old vegetable oil or Crisco does just fine.

    Best cast iron seasoning instructions

    For this cast iron seasoning method, the more oil application and heating cycles you do, the better the seasoning. Our cast iron seasoning instructions are based on Sheryl’s, I modified it a bit. This process is for new pans, or pans that have had all the previous seasoning removed, watch our video here for how to remove cast iron seasoning.

    Cast Iron Seasoning Instructions

    1. On the stove top, heat up the cast iron pan. This makes sure the pan is dry and opens up the pores of the metal a bit.
    2. Add in a tablespoon or two of oil into the pan. Use a paper towel to coat the whole pan, inside and out, with the flax oil.
    3. Grab a new paper towel, and wipe out excess oil. You only want a thin film of flax oil in the pan. No drips or globs of oil.
    4. Turn the oven to 500F and place the pan – you can do more than one, stack them if you want- into the oven.
    5. Heat for one hour, turn off the oven, allow the pan to cool.

    Repeat the oil coating and heating 2-3-4-6 times. Whatever works for you.
    The more you do this initial seasoning, the better the pan will be.

    cast-iron-seasoning-instructions-6
    The outdoor gas grill is great for cast iron seasoning.

    The cast iron seasoning process puts out a bit of smoke, so I’d suggest using your outdoor gas grill. Turn the grill burners on high, close the lid to heat it up, put in the pans. My gas grill will not get to 500F, but it got close, and that worked well for me.

    I oiled and heated one of my pans 4 times and it looked great, more and it is even better.

    I think new cast iron is just as good as old cast iron, but there are many arguments about that. You can get good cast iron on amazon here. This post may contain affiliate links which won’t change your price but I earn a commission from. Thx!

    cast-iron-seasoning-instructions-7

    Soap On Cast Iron? Video               Remove Old Seasoning From Cast Iron Video

    cast-iron-seasoning-instructions-9

    Remove Rust From Cast Iron Video       Cast Iron Skillet Cornbread Recipe Video