Category: Gardening

  • How To Restore A Weed Infested Garden

    How To Restore A Weed Infested Garden

    My blueberry bushes are the epitome of a weed infested garden. But I want to show you how I restore the weed infested garden bed, with some help from Troy-Bilt. They sponsored this post and provided some fine outdoor power equipment for me to use to restore this blueberry patch.

    I neglected my blueberries this year, not sure why, but there’s always a ton to do, and the weeds took over. It was time for drastic action to remedy the weed infested garden. Look at the ‘before’ photo and see for yourself.

    weed infested garden

    In this overhead drone photo, you can’t see the blueberry bushes, but they are there.

    So my plan was to clean up the area, make a raised wood bed border, and smother the weeds in the raised bed with cardboard, and lay down wood chips on top of the cardboard for a permanent mulch. The cardboard will break down in to the soil, and the wood chips will keep new weeds at bay.

    First I cut down the all the plants that were overwhelming the berries. The brush cutter attachment on the string trimmer worked well for this.

    weed infested garden

    I then outlined what was to be the new raised bed with string and cut a slot for the pressure treated 2×6 lumber to sit in. This area has a slight slope so for the end nearest the woods, the lumber will sit right on the soil.

    For the long end of the bed, I used a mending plate to connect two pieces of lumber to span the length. And in the corners, used corner brackets. You can find these in the roofing hardware area of a home improvement store.

    It was nice that the box that our chipper shredder came in was large. Perfect for the layer of weed suppressing cardboard. Be sure to leave room around the plants, keep the cardboard about 4-5″ away from the stems.

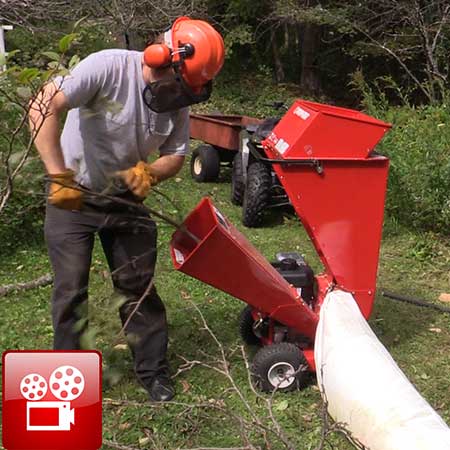
    Then came the fun part. I had already dropped a dead apple tree, so I had plenty of material to run through the Troy-Bilt CS 4325 Chipper Shredder.

    What fun! Nothing like running power equipment and turning brush into useful wood chips. The chipper shredder had no problem with most of the wood we put through it. You have to go slow with bigger branches – it handles up to 3″ limbs – especially because this was fresh hardwood, very different than a soft pine.

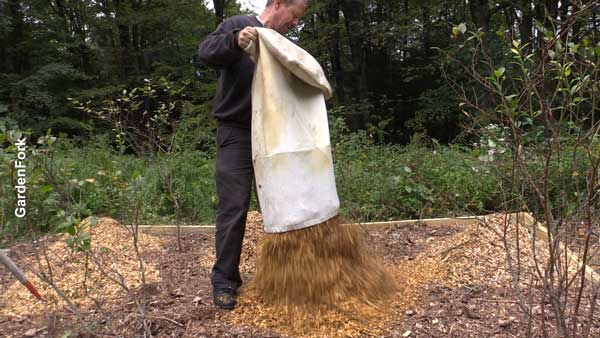
    We made A LOT of wood chips. Nice. The bag filled up right quick and we got rid of all the branches from the tree we dropped.


  • A 4WD Self Propelled Mower Review, The Troy-Bilt 4×4 XP – GF Video

    A 4WD Self Propelled Mower Review, The Troy-Bilt 4×4 XP – GF Video

    Go up hills easy! My self propelled mower review of the Troy-Bilt 4×4 XP. Watch the video and then read through my comments below.

    Why I Like This Self Propelled Mower:

    • Great Power
    • Ease of Steering
    • Troy-Bilt Quality

    Full disclosure here, Troy-Bilt has been a sponsor of GardenFork for a while now. I wouldn’t work with them if I didn’t believe in their products or their company. I’ve met about 20 people who work at Troy-Bilt and have been using their products for years. They are good people and they make good stuff. Here’s a vid about a volunteer project we did recently with Troy-Bilt

    OK, back to the 4 WD self propelled mower. It will pull you up hills.

    self propelled mower

    Yes, its that simple. I took this lawn mower over to my neighbor’s hilly cow pasture and went through 12″ high grass mix up a hill with no problems. And that’s with the mower set the mulching mode.

    On the mower handle you can choose front wheel drive, rear wheel drive, or four wheel drive, pretty easy. I used it in all modes but found 4WD worked best for me.

    self propelled mower

    Talking about Troy-Bilt quality, it the small things that matter, like how they attach the gas cap to the fuel tank. Ever lost your gas cap? I have.

    self propelled mower

    I suggest buying this mower with the large rear wheels and the Honda engine. If you change the oil in your lawn mower, it can last forever.

    self propelled mower

    Its easy to adjust the height of the wheels for grass cutting height. Note the larger real wheels, makes it much easier to drive around and steer. Its all about ease of use, why make it hard to cut the grass?

    Like most, this self propelled mower comes with a bagger and a side discharge and a mulching mode. I like to mulch the grass, so I did not use the bag feature, but its in the box with the mower if you want to make compost from your grass clippings.

    I give this mower a thumbs up, its a quality machine, and the 4WD is brilliant. You will like this rig.

    Learn more about this mower on Troy-Bilt site here.

    Lawn Mower Oil Change, How To Do It Easy – GF Video

    How To Sharpen Lawn Mower Blades – GF Video


  • Purslane Is Not A Weed In Sunset Park

    Purslane Is Not A Weed In Sunset Park

    Many US vegetable gardeners consider Purslane a weed. It pops up and keeps growing. But in my Sunset Park neighborhood in Brooklyn, it is sold at the grocery stores and vegetable markets along Fifth Avenue.

    My neighborhood has a huge Latino population, and they call purslane Burdolaga. I see it every week and thought to share with you. My neighbors upstate tear this out of the garden, my neighbors in the city buy it.

    Vegetable Garden Weed

    Burdolaga has a ton of Vitamin E and provides 25% of daily amount of Vitamin C your body needs.

    Vegetable Market Food

    Of course, I’ve made a video about this super healthy soup and salad green:

    Vegetable Garden Fails & Successes – GF Video


  • Vegetable Garden Fails & Successes – GF Video

    Vegetable Garden Fails & Successes – GF Video

    My vegetable garden fails were pretty obvious this year, and in the video below we give you a garden tour. Watch the vid then read through our thoughts below.

    At least the sunflowers and the kale are growing!

    Garden Fail

    The garden heated up quickly this year and I found that any of the greens or mustards that I got as transplants bolted very quickly. I was surprised how quickly they did. Maybe those plants were already stressed in the plant pack trays and I couldn’t do anything about it.

    Garden Fail

    My bed of salad greens, which is the shadiest bed in the yard, turned into weeds. I think the compost I got was full of weed seeds. Boom, a bed of weeds. I think I will use the string trimmer on this bed and then replant.

    Garden Fail

    The sunflowers are doing well. I even transplanted several from the other garden beds. They key to transplanting sunflowers is to dig out a large root ball and water them often after replanting. They also like fertilizer. I did sow the sunflower seed too early, so a lot of them did not germinate. But I re-seeded and that batch has taken off. I made sure to have the taller varieties in the back of the bed. It should be a good cutting garden soon.

    The sugar snap peas (watch our how to grow sugar snap peas video here) are doing well. They are just now browning out after a good season of producing lots of Labrador snacks. I tried the Sugar Anne variety with not great success. I really like the Super Sugar Snap peas. You learn how to build the trellises we use in a video here.

    Garden Fail

    Our string beans are just starting to flower. I really like the Rattlesnake Pole Beans I get from Fedco Seeds, or you can save your own string bean seeds. they don’t get stringy or woody and can stay on the vine a few days after ripening. They are on the same kind of simple string trellis we use for the peas.

    What are your garden fails? Let me know below. Meantime some more cool posts are below.

    Can You Transplant Snap Peas?

    Simple Techniques To Garden Almost Year Round In This Book

    How To Grow Mushrooms From Plug Spawn – GF Video

  • The Deer Fly Repellent That Catches Deer Flies

    The Deer Fly Repellent That Catches Deer Flies

    You want a deer fly repellent to keep deer flies from dive bombing you while hiking, camping, working the the yard. This repellent works by catching the deer flies on a piece of sticky tape. I know it sounds weird, but it works.

    deer fly repellent

    These 19 deer flies are from one 45 minute walk in the woods with the Labradors. I check my hat a few times during the walk and thwack the flies with my finger to make sure they aren’t going to fly off and bother someone else.

    I wrote about this in a earlier post, How I Get Rid Of Deer Flies, but I wanted to show you just how well this tape works.

    Like me, you are thinking, “Oh, I can just go buy some double stick tape.” No, it doesn’t work. I tried that.

    Besides, if you buy these Deer Fly Patches in bulk, its about the same as the cost of a roll of tape, and easier to carry with you. I don’t know of any other deer fly repellent that works as well.

    Its peace of mind to work in the yard or go on a walk and not worry about getting a deer fly bite, which aren’t fun. Yes, the flies still fly around you, but they end up landing on the patch, not your neck or arms.

    Deer flies tend to stay along the tree line, and park themselves on plants waiting for someone or an animal to walk by. Our yard is surrounded by woods, so its a perfect habitat for them. I’ve found they flies are more active on hotter days. If its cool out, they flies are not out.

    I’ll have to research it more, but its very interesting how the deer flies know to land right between the eyes of my Labradors, and bite them. And the Labs usually don’t know what’s going on. If I approach one of the dogs from behind I can sometimes nail the fly.

    Save

  • Lawn Mower Oil Change, How To Do It Easy – GF Video

    Lawn Mower Oil Change, How To Do It Easy – GF Video

    Here’s my how to video on doing a lawn mower oil change. Its not rocket science, its actually pretty easy, AND it will extend the life of your mower. Ready? Watch the video and scroll through the instructions below:

    Lawn Mower Oil Change, Step By Step

    Check the manual to see what kind of oil your engine uses. Most use 30W, but just check, OK? By changing the oil, you are already helping the engine last much longer. Do a lawn mower oil change a few times a year and your mower could last forever, mbe!

    Run the mower to warm up the engine. This gets the oil hot and the debris that settles up and moving. Turn off the mower.

    Place plastic food wrap over the gas tank fill and screw the cap down. Not so tight that you can’t get it off again, but snug. Now we are going to gently turn the mower on its side. Position a plastic tub such that when you tilt the mower on its side, the oil fill tube will pour into the tub.

    If your mower has an oil drain plug instead of a fill tube, you will have to tilt the mower on its side, remove that plug, then place the mower over the bucket. This may take some finesse and a friend to help.

    lawn mower tune up
    See how the gas cap is on the high side of the tilt?

    Be sure to tilt the mower so that the gas cap is on the higher side of the mower, so no gas could leak out if the cap leaked. Tilt the mower into the bucket and let it sit while the oil drains out. You can prop up the mower and let it sit for a while.

    Get your fresh oil ready and a funnel. You can make funnel out of a piece of paper if need be. Tilt the mower back onto its wheels, and slowly add the new oil into the oil fill tube. Use the dipstick to make sure there is just enough oil.

    Do Not Over Fill The Oil. Bad things can happen.

    AND recycle the used oil. Take it to a quick lube shop or a car repair shop, they will recycle the oil. Don’t dump it in the woods or a stream, OK?

    See More Lawnmower Tune Up and Oil Change Tips Here

    This same process can be used for your generator oil change or your riding mower.

    lawn mower

  • How I Get Rid Of Deer Flies

    How I Get Rid Of Deer Flies

    Tired of being dive bombed? Here’s how I get rid of deer flies when I’m working in the yard or woods. Yes, it looks weird, but it works.

    Get rid of deer flies

    Deer flies like to attack from behind and land on your head or neck. Put on this double stick tape, and they tend to aim for the strip of kinda sorta flesh colored tape instead of your neck. Then their feet get stuck in the tape. No more deer flies buzzing you.

    Being the DIY guy, I first bought this online, and I thought, I can get rid of deer flies myself. So I went out and got a roll of double sided carpet tape. But it doesn’t work nearly as well. I’m not sure what’s up with this special tape, but its cheap enough that its totally worth it for peace of mind.

    Get the Deer Fly Tape Here.

    I can’t stand the dive bombing of the flies. And while I do get stung while beekeeping, the deer flies drive me crazy. Not sure why. Their bite seems to last longer.

    According to Wikipedia, only the female deer fly will bite. The male eats pollen. And the deer fly can be a vector for anthrax, nice! But the deer fly also has predators: nest building wasps and hornets, birds such as the killdeer, and dragonflies. This is why I don’t remove wasps nests unless they are in an area where we are walking around. Leave them be to get the deer flies!

  • Simple Techniques To Garden Almost Year Round In This Book

    Simple Techniques To Garden Almost Year Round In This Book

    Every year I try to extend my vegetable garden season into winter, and get a head start on the spring season while there is still snow on the ground, with mediocre success. This is going to change now that I am re-reading Niki Jabbour’s Year-Round Vegetable Gardener, an excellent read on garden season extenders, as well as a good basic how to grow vegetables kind of book.

    After the first time I read this book, I interviewed Niki on the GardenFork Radio podcast, listen here.

    I talk about it in this video, but my mini greenhouse hoop house had a huge fail this winter. The kale, salad greens, and rosemary I was trying to overwinter crashed and burned. Some lessons learned there.

    Snow Season Gardening

    But I was re-inspired to just plant more vegetables this summer season AND get better at growing vegetables in winter. Or at least growing them later into fall. Niki has a bunch of  methods here that are simple and easy to do. You don’t need lots of equipment. You might need lots of mulch and straw, but that’s easy to get.

    Like a lot of how to grow vegetables books, this one goes through different vegetables, but also has a chart of how to start them early and grow them late. Niki made me realize I could sow successions of beets, not just one crop. Lightbulb goes on.

    As we all know, I am not one for planning, but the ‘plan your garden’ part of this book got me thinking I should plug some dates into my calendar with reminders to get stuff started. A goal is a second crop of sugar snap peas in the fall. Watch our growing sugar snap peas vid here. And a bunch of salad greens.

    Carrots have not been great in the garden, Niki has inspired me to try again. Buy Niki’s book locally or order her book here.

    Other vegetable gardening posts & vids you might like:

    DIY Cold Frame From A Recycled Window – GF Video

    Cardboard Seed Starting Pots – DIY Video

    Pallet Compost Bin Video

  • Can You Transplant Snap Peas?

    Can You Transplant Snap Peas?

    Some garden books say you can’t transplant snap peas, instead just direct sow them early. I disagree. When we say snap peas, I think most of us mean sugar snap peas, the kind that barely make it from the garden into the kitchen. Someone has taught the Labradors to eat peas, so most of our sugar snap peas never get to the kitchen.

    Transplant snap peas
    Sugar Snaps started from seed.

    Lots of ‘how to plant peas’ texts say to plant the seeds as early as you can work the ground. Saying you can even plant them when there’s still snow on the ground. I’ve tried this, digging out some dirt as sowing a line of peas.

    That didn’t work too well.

    Transplant snap peas
    Sugar snap transplants planted at the same time.

    Transplant Snap Peas, my step by step process:

    • Wait too long to start sugar snap peas in seed starting pots
    • Buy transplants at the local nursery.
    • Plant them.
    • And, BTW, sow some snap pea seeds as well.

    I am great to waiting too long to get my pea seed in the ground, but if remember, I pick up some legume inoculant, as stated in my friend Kenny’s excellent how to plant snap peas post. If you don’t have the inoculant, don’t worry, you should still get the seeds or plants in the ground.

    sugar snap peas
    Sugar Snap Pea Transplants I grew myself. Nice!

    The transplants go in right quick, not much rocket science here. I sow the seeds pretty thick in a row 1″ deep and then tamp down the soil over them. The seeds wills split underground, so give them some ground, and the leaves emerge up through the soil. You may see the seed itself pushing through the soil, I sprinkle some light soil on top of these.

    All my peas go at the end of my raised garden beds, learn how to build them here, on a simple trellis. Learn here how to build trellis. The trellises are at the end of all my beds, its the perfect place to put them. They don’t take up any room in the veg bed and the Labs can get to them easily.

    Another improvement I’ve made is I extended my soaker hose drip irrigation system to run parallel to the trellis, right up against the end of the bed. This waters the plants nicely, one less thing for me to blank on.

    The over-seeding pays off for me, I get lots of plants, and masses of peas. I sometimes have to train the plants up onto the string trellis, but they go from there. What has your experience been when you transplant snap peas? Let me know below.

    Some Videos and Posts you might want to check out:

    Cardboard Seed Starting Pots – DIY Video

    Podcast: Drip Irrigation FAQ – GFR 442

    5 Great Seed Starting How To Videos

    How To Build A Trellis Garden Video

    Save

    Save

  • Foraging Guide Books For Your Area – My Suggestions

    Foraging Guide Books For Your Area – My Suggestions

    There are some good foraging guide books for the whole of North America, as well as other continents, but even better are edible plant guides that are local to your area. Here are a some that I like.

    In the U.S., the northeast and the southwest are very different with regard to native plants, so why not a edible plant book that focuses on that area? Lucky for us, Timber Press had put together a foraging guide books series with regional experts in foraging. Yeah!

    books on foragingEven better, their book for the Northeast is authored by Leda Meredith, who has been on our podcast. Neat.

    I have the Northeast Foraging book, and have browsed the rest of these in bookstores and online, and I give them all a thumbs up. I have met some of the people at Timber Press and what’s not to like about a group of people who publish cool helpful books. I picked up my copy of Northeast Foraging at Oblong Books in Millerton, NY. If you are in the Berkshires, go there, buy books, then get coffee around the corner.

    This isn’t some half baked set of edible plant books, its a curated cast of authors with local knowledge of what grows near them and what you can eat. Plus, how you can use them in the kitchen. Its not all just some leaves you toss into salad, though that’s all good with me.

    I was thumbing through Leda’s book on Northeast Foraging and its interesting that I landed on the Garlic Mustard section, which I just wrote about. And I learned from her that you can also harvest the seeds later in the summer to store for a winter snack. Always learning something.

    Please consider buying these books from an independent bookstore, you can order from them online, find yours here.

    Here are the links to each book on Amazon, (we get a referral fee on Amazon purchases)

    Making Sauerkraut Made Easy - GF Video

  • Garlic Mustard Weed, Is It Edible? Yes!

    Garlic Mustard Weed, Is It Edible? Yes!

    To me, Garlic Mustard Weed isn’t a weed, its a salad green, right alongside Mesclun. Maybe because it is so ubiquitous in my area people call it a weed. I call it free food.

    Garlic Mustard Weed

    Garlic mustard weed identification is pretty easy, not many plants look like this. These photos are of a the mustard in its second year of growth. The first year it is a low growing green, with what I call a rosette of small green leaves. In its second year, it shoots up with larger leaves and flowers.

    garlic mustard weed
    Photo by Srtg CC 3.0 Wikimedia

    Is Garlic Mustard Weed Edible?

    According to Wikipedia, Garlic Mustard was “one of the oldest discovered spices to be used in cooking in Europe”. You can use the leaves and flowers in salads. I make a really nice pesto with the leaves, watch my video here. In France the seeds are used to season food. So yes, garlic mustard is edible.

    Garlic Mustard Weed

    This weekend I saw some growing along a stone wall near the house so I pulled over and took these photos, then pulled up the plants by their roots. Free food! In a few minutes you have a sharp tasting mustard green for your salads, soups, and pesto. How cool is that?

    I pull the leaves off the stems and save the flowers whole to drop on top of the salad. This green works well with a balsamic vinegar salad dressing, as it has a pretty strong flavor. Add in avocado to balance it out. That ying-yang thing applied to foraged and farmed foods. The irony of that being you pulled the greens from the side of the road and the avocado had to be trucked a long way to your kitchen.

    Garlic Mustard Weed

    To harvest this wild mustard, bring along a trowel or small shovel, and grab the plant by its base and pull out the whole plant, root and all. Don’t feel guilty pulling this out of the ground. In the U.S. this is an invasive plant that is bad for our local trees and fields. It emits chemicals that make the soil hospitable to its growing and everything else dying, basically.

    Garlic mustard produces allelochemicals, mainly in the form of the compounds allyl isothiocyanate and benzyl isothiocyanate, which suppress mycorrhizal fungi that most plants, including native forest trees, require for optimum growth. However, allelochemicals produced by garlic mustard do not affect mycorrhizal fungi from garlic mustard’s native range, indicating that this “novel weapon” in the invaded range explains garlic mustard’s success in North America. Additionally, because white-tailed deer rarely feed on garlic mustard, large deer populations may help to increase its population densities by consuming competing native plants. Trampling by browsing deer encourages additional seed growth by disturbing the soil. Seeds contained in the soil can germinate up to five years after being produced (and possibly more). The persistence of the seed bank and suppression of mycorrhizal fungi both complicate restoration of invaded areas because long-term removal is required to deplete the seed bank and allow recovery of mycorrhizae. Wikipedia

    In other words, this plant is not good for your local area, so pull it out by the taproot and enjoy it in your salads.


  • The Mini Greenhouse Repair Fail

    The Mini Greenhouse Repair Fail

    You’ve probably seen one or three of my mini greenhouse plans videos. The most recent one talks about the complete fail of the plastic cover in the middle of winter. Here are the photos that show my attempt at repair before the complete breakdown of the covering.

    Mini Greenhouse Repair

    My big mistake 4 months prior to the fail was to put screws through the top of the PVC pipes, and then lay plastic sheeting over the screw heads. Who knew that the metal screw head would eventually puncture through the plastic, starting as all holes do, small.

    Prior to the small hole caused by the screw, all was good in the mini greenhouse. These rosemary plants had over-wintered well. Not so well after the plastic ripped though.

    Mini Greenhouse Repair

    My attempt at repair was to use packing tape over the screw head and the splitting plastic. I knew it was not a 100% guaranteed repair, as it was cold out when I applied the tape. I don’t think other tape would have worked either. The glue on tape is not cold friendly.


    Mini Greenhouse Repair

    That small hole grew through the winter, with the weight of heavy wet snow, and lots of wind. Then we had even more wind and that caused the complete tearing of the mini greenhouse cover. Darn. It sat for a while before I was ready to walk over and deal with it. Besides, there was still 18″ of snow on the ground. I knew all the plants inside the hoop house were toast.

    hoop house cold frame plans

    Going forward I will use UV rated greenhouse plastic, I’ve seen some that is reinforced with netting in the plastic. AND I will screw the screws into the PVC starting underneath it, through the wood crossbeam, then into the pipe. If you have some old storm windows on hand, you can make a neat cold frame with them.

    In the meantime, check the video where we walk through the fail:

  • Easy Flower Box You Can Make

    Easy Flower Box You Can Make

    Here’s an easy flower box you can put together in an afternoon. All you need is some stock lumber and spray paint. I built the planter box for my friend Bill, and he cut out a stencil and decorated it.

    Easy Flower Box

    I made this out of pressure treated pine 1″x6″ lumber. Worried about pressure treated lumber, watch this. And screwed it together with painted deck screws, they will last longer than drywall screws. I set the ends in slightly for a decorative look, a little less boxy, I think.

    Easy Flower Box

    I made this box a little narrow by cutting down the 6″lumber to 4″ wide. You can do this on a table saw, or maybe your neighbor’s table saw. Or don’t cut the lumber down, its all good. Use what you got. Wear eye, ear, and dust protection when cutting wood.

    I did screw into the end grain of the side walls, which isn’t the best carpentry, but i also glued it with a waterproof wood glue.

    I drilled a few drain holes in the bottom board. Depending on where you place this planter, you might want to drill them on the bottom of the side walls. This planter will last much longer if it is not sitting where water can collect underneath it. The photo above is an example of a less than great placement. To fix this, slide some thin wood shims underneath this, or flat rocks, or whatever you have. If you keep the wood of the planter dry, it will go a long way toward a long life for the box.

    Easy Flower Box

    Bill painted the easy flower box with white outdoor spray paint. He then downloaded a stencil design of a fern leaf, printed it out on regular paper, and cut out the leaves with a sharp utility knife. Two different cans of green spray paint work well for the green leaves, I think.

    Here’s a video I did about a fun window box: watch build a window box video

    Easy Flower Box

  • Homemade Leaf Mulcher Bagger

    Homemade Leaf Mulcher Bagger

    Check out this homemade leaf mulcher bagger that Greg built! Using a free wood crate and an electric leaf mulcher, Greg made a rig for almost free that would cost big bucks at the store. How cool is that?

    Homemade leaf bagger mulcher


    Here’s the how to make the Homemade Leaf Mulcher Bagger

    From Greg’s email:

    I love the show.

    You show the world that it’s (usually) pretty easy to do a lot of useful things. You let everyone know that it’s okay if you don’t get everything perfect on your first try. The fact that the dogs continually pester you to play make your projects that much more realistic to me. Because that’s how it works at my house.

    I currently work in a machine shop. We get a lot of pallets and shipping crates. They end up throwing them in the dumpster. So, of course, I have to find a use for as much as I can. It is nice that we get a lot of them all the same size and in new condition.

    Attached you can see that I got tired of emptying the bagger. I adapted one of the crates by adding a base with wheels. I had some hinges around, so I hinged the old top back on but to what is now “the front”. I cut a hole and strapped a spare electric leaf blower/vac to the back side. I mounted it as high as I could in order get maximum fill.

    I connected my gas blower/vac to the electric blower/vac via a 4″ hose, This is the the hard plastic kind that you would redirect a downspout with. Well this is the longest one I could find. When I “accordion” out the entire length of it, its about 25 feet long. I’m sure there is something better suited for this task, but this was only for proof of concept.
    A word of warning. When the hose is in it’s expanded state, it is subject to damage from our four-legged playmates.

    Well, I tell ya. The thing works pretty darn well. Well enough to give my Dad a try at it.

    I maintain a few properties and this whole rig fits into the hatch of my car. With a 100 foot extension cordon the base, I don’t need to stop until I run out of gas, I can make a nice batch of leaf mold. I hinged the door in a manner that allows me to dump the contents right into the waiting compost pile.

    Though you might get a kick out of this.

    Greg has sent a few other projects our way, here is his pallet compost bin setup. Again a big thanks to him for taking the time to show us his homemade leaf mulcher bagger. What have you made? Let me know in the comments.

    Save

    Save

    Save

  • Homemade Pallet Compost Bins By Greg

    Homemade Pallet Compost Bins By Greg

    These easy to make homemade pallet compost bins were made by GF fan Greg, a machinist by day, and weekend DIY guy. Pallets work great for compost.

    I am a new listener/viewer and love your programs. I’m able to listen to the podcast at work, so have really been on a binge. Found your video “Composting 101” while preparing to build my Composting Center, here it is so far.

    Homemade Compost Bins = Good

    Homemade Pallet Compost Bins

    Note how Greg cut down the front door pallets to allow one to add new compost material to the bins. In other words, much smarter than my first go at building compost bins! See more of our pallet compost bin projects here.

    First of all, I love this because Greg took the time to share this with me. Plus he allowed us to post the photos here on the site. A simple design, yet it works great, which works for me. Most of all, I love the barrel composer at the end. You can use this for finishing or doing intensive composting, rolling the barrel every day to aerate the mix.

    Homemade Pallet Compost Bins

    Probably one of the most popular pallet projects, homemade pallet compost bins are good one for most any DIY-er person. Note how Greg elevated the walls of the compost bin up off the ground. This can extend the life of the bins, and most of all, allow air to get into the bottom of the pile. One could also lay PVC drain pipe with vent holes drilled in them, and therefore, get even more air in the bottom of the pile.Watch More Compost Bin VideosGreg adds, “Thanks for including the dogs in so much of your content, Life truly is better with pets.” Here are his two pups.

    A big thanks to Greg, I say. Love the sharing that happens here, if you have a project like these homemade pallet compost bins, or most anything, please send me some photos!

    Save

    Save

    Save

    Save

    Save

  • Tree Pruning Examples Of Good Cuts

    Tree Pruning Examples Of Good Cuts

    Tree Pruning is best done on dormant trees, so this being winter, now is the time. I was walking through the park and saw the staff had done some tree pruning. I took these pictures to show how the tree should look after its done. Here’s a video we did on how to prune a tree.

    Tree Pruning How To

    When pruning a tree, after determining which branches to cut, you make 3 cuts to the limb. This is done to keep the tree bark from stripping back down the tree trunk. First is a bottom cut about an inch away from the finish cut, then a top cut an inch farther out on the limb to cut the limb. The bottom cut keeps the bark from stripping down past the cut. The final cut is made flush to the growth ring near the trunk.

    Tree Pruning How To

    Why 3 Cuts When Tree Pruning?

    This may seem like a waste of time, so go ahead and prune a few tree limbs, you can see how the bark rips down the trunk, not a good thing.

    Tree Pruning How To

    When doing the final cut it should be close to the trunk, however, you don’t want the cut to be flush with the trunk. Though it can be hard on some trees, you want the cut to be just past the growth ring of that limb. As a result, cutting at the ring will allow the tree to heal faster, like the one below.

    Tree Pruning How To


    On some trees, the ring isn’t obvious, so do the best you can. Trees are amazingly resilient. Do not paint on any kind of coating after making the cut. The tree will create its own chemical barrier inside the wound to prevent bad stuff from enter the tree. If you apply paint or some sort of tree wound product, it will only keep bad stuff in the wound, not out.

    Tree Pruning How To

    Sometimes you can’t get close to the trunk, so do the best you can. Your tree will take care of itself. Be happy that you took out the branches that are dead and dying, making the tree look better and grow better.

    Save

    Save

    Save

    Save

    Save

    Save

  • How To Start Seeds Indoors – GF Video

    How To Start Seeds Indoors – GF Video

    I made a new video on how to start seeds indoors to reflect all I’ve learned lately. This included making cool paper pots and cardboard tubes.

    To start seeds indoors

    You need warmth and light and water. Lots of light and warmth, and not much water. Soaking wet seeds or seedlings will die off, imagine having your feet in water all the time, not fun.

    I start my seedlings near the furnace in our basement. You can also buy a waterproof grow mat that is like a heating pad but built for seeds starting. Don’t go and use your heating pad for this, OK?

    Start Seeds Indoors

    When the seeds start to sprout, its time to move them under the grow lights. The seedlings do not  have to be as warm once they are started. But is is very important to keep the seedlings directly under the lights, basically touching the bulbs. With our DIY grow light rig, you can slowly raise the grow light as the plants grow.

    I have found putting seed trays in the window doesn’t work. The plants get very leggy and top heavy. When you transplant them, they fall over in the wind. Your experience may be different, as I live in New England, where the winter light is poor at best.

    Start Seeds Indoors
    It’s OK that the leaves touch the bulbs of the grow light

    For the grow light, we use regular fluorescent bulbs, not the expensive lights. For seed starting, this works fine.

    You don’t want to over-water your seedlings. This can cause mold and fungus to grow and will kill the young plants. Best is slightly moist to slightly dry. Many of the seed starting trays have a wicking mat under the seed pots, and this works pretty good. Watering from underneath instead of over the plants is best. I do not mist the plants.

    I use a prepared seed starting mix, I don’t make my own, too much work, I think. Do not use regular potting soil or soil from your garden. You can get Clyde’s Planner here.

    grow light video insert


  • Troy Bilt Garden Tools Built To Last

    Troy Bilt Garden Tools Built To Last

    I have bought way too many cheap trowels and diggers only to have them break in the garden. Being part of their Saturday 6 group this summer, Troy-Bilt sent me a box of their hand garden tools. I haven’t broken them yet, and I don’t think I will.

    Troy Bilt Garden Tools

    First thing that impressed me was the Made In Germany label. ( I am of German descent, FYI ) A sure sign of quality workmanship. And the tools just feel good in your hand. None of that flimsy metal that you bend when you are digging out some roots.

    The trowels are made from one piece of metal, so there isn’t a point of stress where the handle attaches to the blade. There are holes in the handle to help grip the trowel, plus the design looks nice too. Simple is good in the land of GardenFork. Stainless steel construction means no rust.

    Troy Bilt Garden Tools

    I also received some anvil hand pruners, the Comfort Classic Anvil Pruners. Again made in Germany and easy in your hand. I used these to prune the blueberries, which have a lot of dead wood on them. The grips don’t open real wide so its easy to grip the pruners to close them, a plus for smaller hands. The lock to close the pruners for storage works well, many times this breaks on pruners I’ve used.

    Troy Bilt Garden Tools

    And what’s not to like about a pair of big anvil lopers? Cut limbs up to 1.75″ in diameter with these. The lopers are levered so the cutting power is doubled, makes it easier to cut tough wood. Again, a well made German tool, it feels good in your hands, not like its about to break when wrestling with a tough piece of tree.

    My Saturday6 friend Teresa wrote a review of the Troy-Bilt hand tools here if you’d like more info from someone who really knows gardening.

    So there you go, some nice tools that will last a long time for you. You can learn more about them here.