Category: Articles

blogs

  • Inside the Hive: Views from a First Year Beekeeper (Scene 15)

    Inside the Hive: Views from a First Year Beekeeper (Scene 15)

    The bees in hive #2 (the hive formerly known as “the nuc hive”) have been very productive. Three weeks ago we put a medium super with new foundation atop this hive and when we checked it on Father’s Day, we found not only drawn comb but drawn comb filled with nectar in the process of being turned into honey. All ten frames were drawn and most of them were full of nectar or were in the process of being capped so we put another super on this hive to provide them more room.

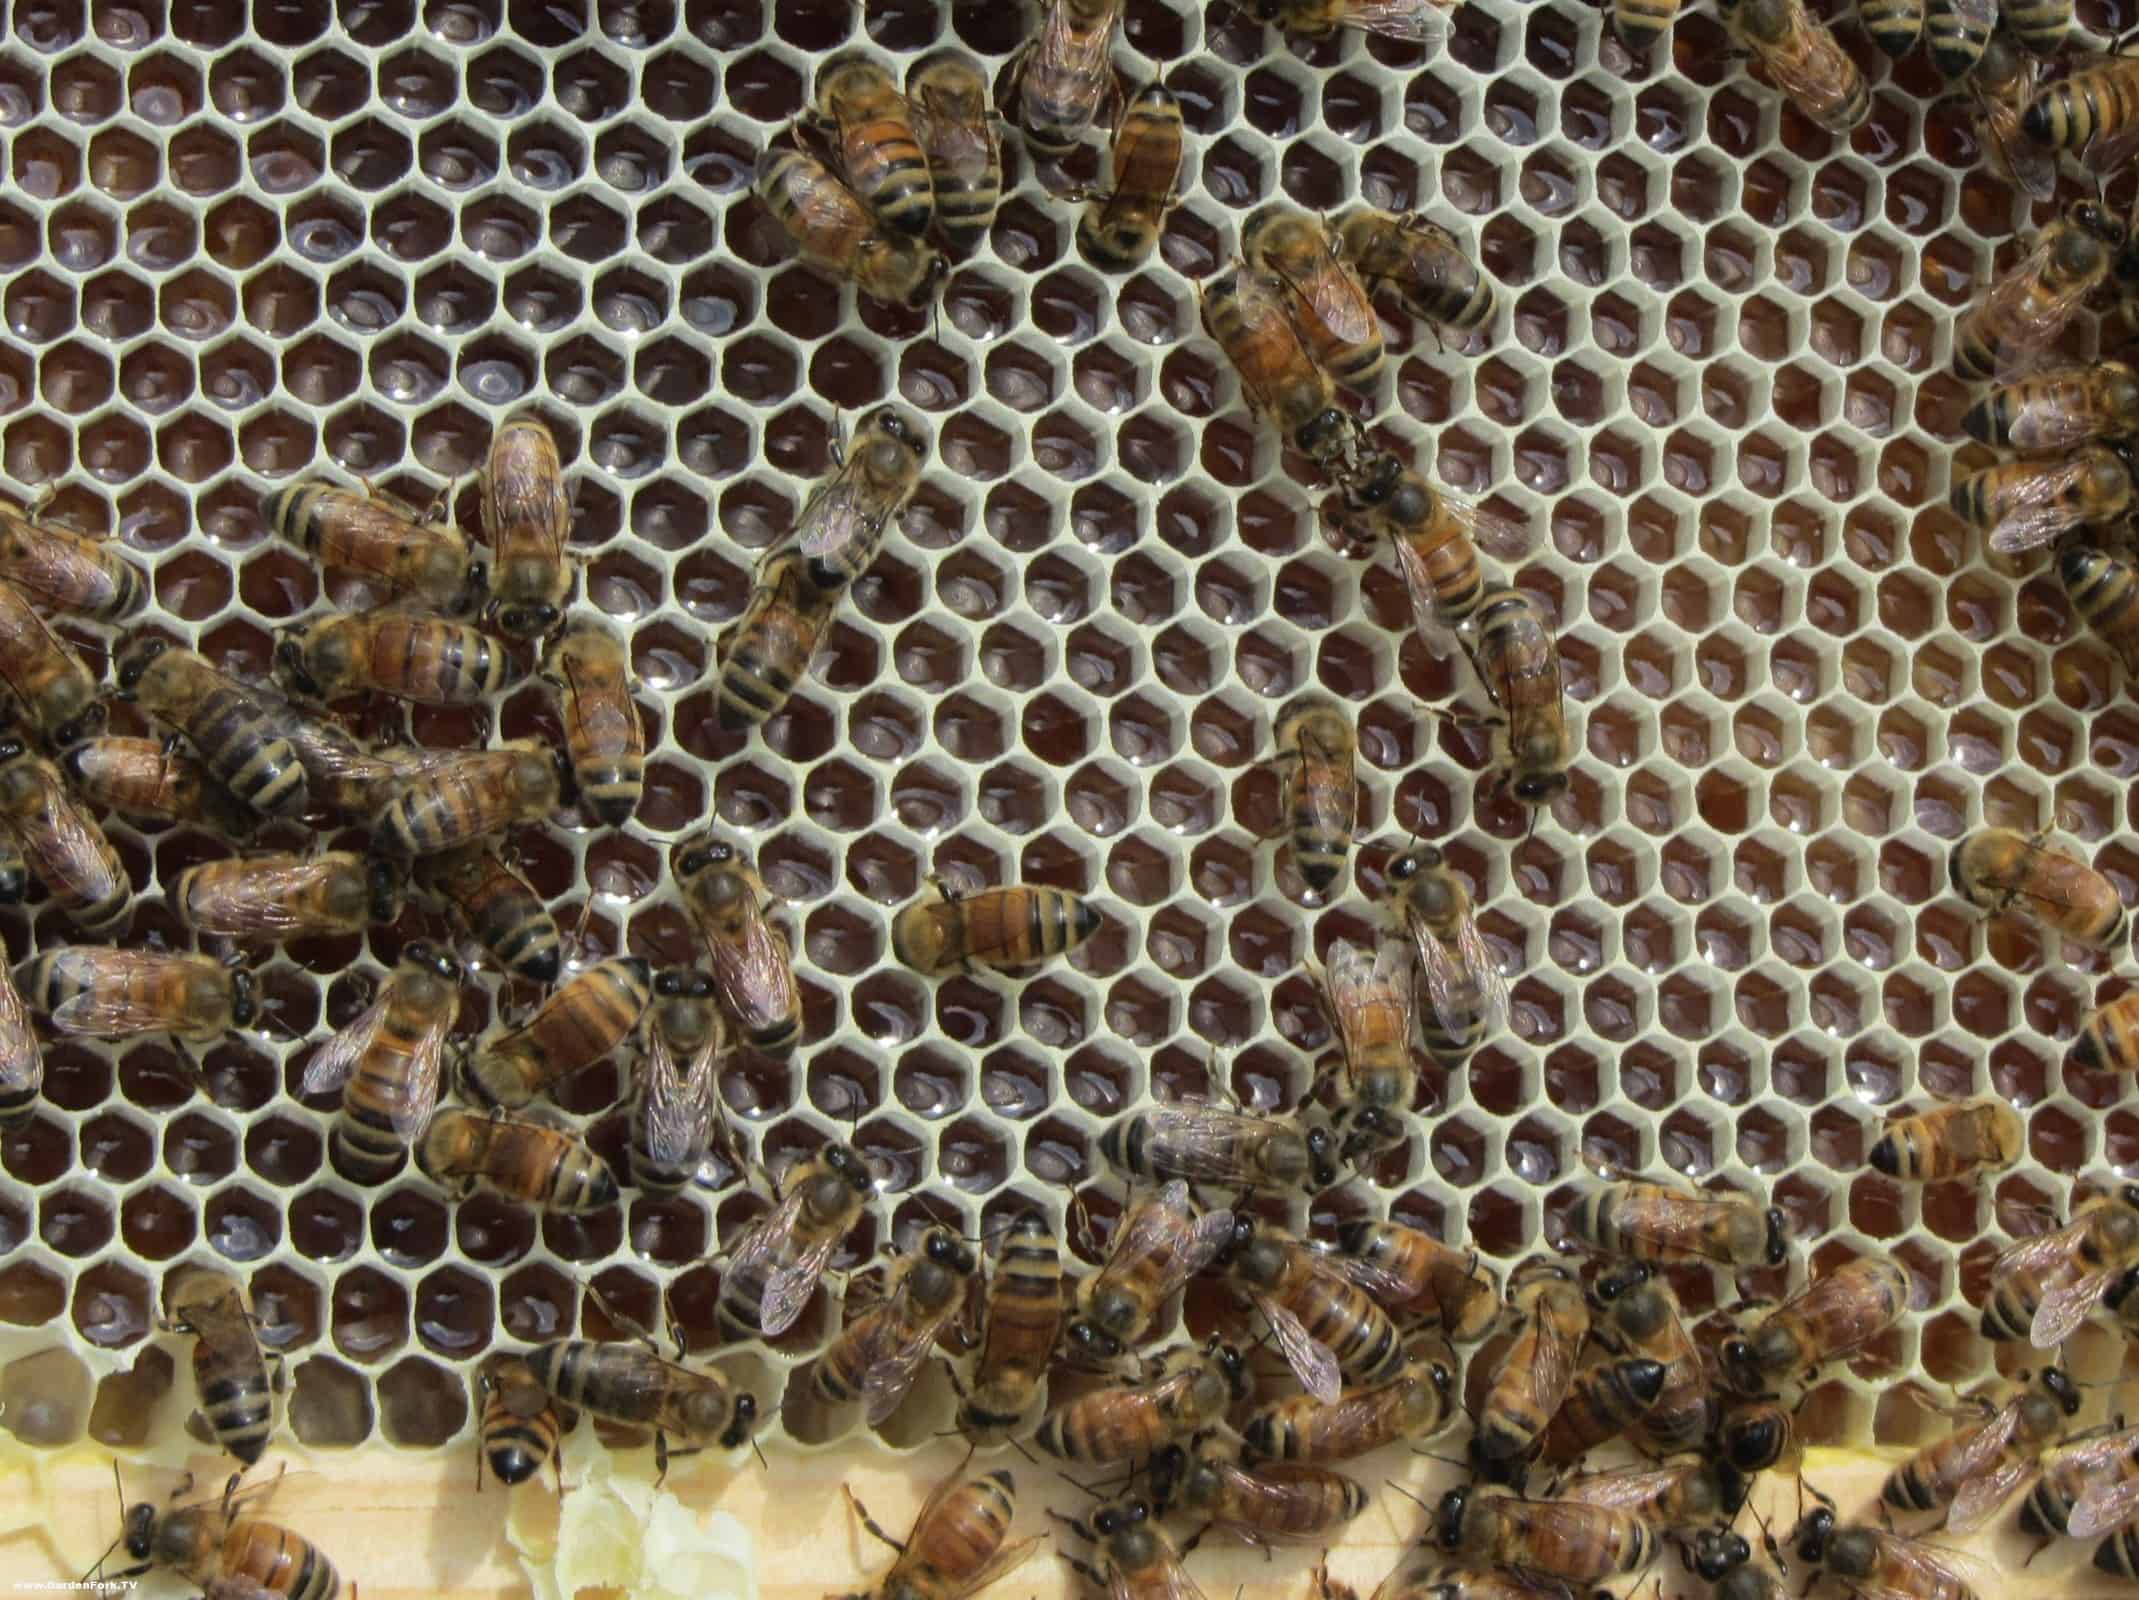
    In this image you can see a sample of what I mean. The bees are very busy working to create honey. This is accomplished via enzymes within the bees which break down the complex sugars into simpler sugars. This is called inversion. Then the water content is reduced by the bees via fanning. Once it has reached the proper moisture content, it is capped by the bees.

    I personally find bees amazing. There are so many aspects of their lives which make me wonder, not the least of which is how do these bees know when to cap the honey. I suspect it is passed down through their genes but still… it is fascinating that they create a substance which has an insanely long shelf life. Cool huh?

    One other thing.

    A medium super of honey is pretty heavy. I can completely understand why some folks opt for the 8-frame mediums vice the 10-frame ones.

    And don’t get me started about the weight of a deep hive body full of brood and bees. But that’s a topic for another time.

    Enjoy,

    Matt

    Read all of Matt’s Inside the Hive Posts here

    Matt (twitter @MattInTheGarden) is not a fan of Bermuda grass. He likes Art Deco but not Zydeco. He prefers to make greeting cards rather than buy them. Twenty-eight years later he still can play (albeit poorly) a tenor sax solo he had to memorize for jazz band concert in high school.

  • Inside the Hive: Views from a First Year Beekeeper (Scene 14)

    Inside the Hive: Views from a First Year Beekeeper (Scene 14)

    It was a Father’s Day hive inspection. Dad (that’s me) and son checking out our two hives. Beautiful day. 78 degrees Fahrenheit and just a light breeze. Quite a few things to say and show about this inspection so expect more posts from me in the coming days.

    There are a LOT of bees in these hives. I think non-beekeepers (as well as this first year beekeeper) just don’t get how many bees can live in a hive. It’s incredible quite honestly when you pop open the hive and there is just frame after frame of bees – often so many of them that you can hardly see the comb underneath. The frames with brood on them are just teeming with bees.

    I’ve written before about pheromones and how the hive uses these to communicate. One pheromone they use quite effectively is the alarm pheromone. I understand folks say it smells like bananas. I’ve got a particularly poor sense of smell and am not sure I personally could smell it. At least I haven’t noticed it yet.

    Here is a closeup of my glove. Yes, there’s some goo on it – white shows every stain – but right in the center of the shot is the topic of this post.

    The stinger.

    Today we were on the business end of the stinger. Not the place you want to be, quite frankly.

    My son was taking the lead on the inspection and the bees weren’t all that happy that we were bothering them today. We used the smoker a couple of times and it helped a bit but they were head  butting us from the beginning. They were crawling all over my son’s gloves and that, pardon the pun, bugged him out a  bit. I think he was worried about squashing them as he lifted up frames.

    He got stung on the index finger through his glove while trying to take out the sixth frame and let the frame drop, maybe only an inch, back into the hive body. That didn’t, as you might guess, improve the hive’s disposition. The stinger stuck in the glove and a bit of the venom went into his finger. He wasn’t happy. They weren’t happy. We stepped away, I took the hive tool in my hand and scraped the stinger off the glove. That step is important. The sooner the stinger is removed, the less venom ends up in the body and the less it will hurt. Scrape it, don’t grab and squeeze.

    I sent him in to put some ice on it.

    I decided then that it was time to button things up and try again another day. Their mood wasn’t going to improve.

    That’s the issue though with beekeeping. Unlike woodcarving or painting or playing the french horn, if  you need or want to stop, you can’t just walk away from the hive. If you’ve opened it up, you’ve got to close it back up. Even if the conditions stink. Even if they aren’t happy. Even if you’ve been stung. Some beekeeping friends of mine (Eric and Rick, to name two) have been stung way more than this and surely wanted to just walk away for the day. But you have to finish what you started because that hive won’t put itself back together.

    There were a dozen or so bees banging into me and buzzing that distinctive “I’m pissed at you” buzz. It took me about five minutes to get everything back together because A) the smoker had gone out and B) I needed to step away a few times because they were getting a bit overwhelming, quite honestly. Crawling over my hands, walking all over my veil, flying about, bouncing into me.

    Then they stung me in the hand. Just two or three times. I only felt one of them, looked down and instinctively wiped my one glove with the other. I scraped one more off that I saw before the camera guy in me said “you dummy, take a picture” and then I looked over the glove and found another. That’s the one you see here. This one, however, didn’t penetrate the skin.

    Fortunately my gloves are thick and it just felt like a pin prick as no venom reached my skin. I took a walk away from the hive for a minute or two to see if things calmed down. It did – at least enough to finish closing up the hive. And I got that picture, which was cool. We took one of my son’s finger post-sting but it didn’t turn out well and he wasn’t all that keen to have dad keep messing with it so I gave up on that shot.

    For the keeper, the poke of the stinger and the pain of the venom is a temporary thing. My son’s already over the sting and off to camp to enjoy a week of fun. For the bee, well… it means death… at least for the workers. The barbed stinger of the worker ends up sticking into the skin (or the glove in our case) and causes the back end of the bee to open up. The bee soon dies. Unlike the worker, the queen has no barb on her stinger so she could, in theory, sting you multiple times. In practice the queen isn’t likely to sting you. The male drones have no stinger, so one can pick those up barehanded without incident. The workers… yeah, they sting. A little smoke applied to the sting area helps to mask that alarm pheromone.

    Box checked. First stings have happened. There will be more. No worries.

    I plan to get back into the hive again later this week to finish what I started. I talked with my son and he was OK and said he’d definitely be back in his beesuit again. I’m glad for that.

    Enjoy,

    Matt

    Read all of Matt’s Inside the Hive Posts here

    Matt (twitter @MattInTheGarden) once went to timber framing school with his brother. He prefers homemade jam to store-bought. He loves the puzzles of Martin Gardner. He wonders why all milk products aren’t packaged in the same plastic as milk jugs.

  • Easy Container Garden You Can Create

    Easy Container Garden You Can Create

    Here’s a easy container patio garden in front of one of my favorite food places in Brooklyn, Brancaccio’s Food Shop. Its square foot gardening on steroids, and it works really well. Take a few oak wine barrels and a few plastic plant containers, and stuff them full of plants, and your done.

    Container Garden using wooden barrels

    The container garden looks great, basil, tomatoes, mustards, parsley, eggplant, chives, chard all mixed together.

    Joe’s container garden does not have a drip irrigation system, so it needs to be watered almost every day, but its in a perfect spot in front of his store, with plenty of sun, and its right on the sidewalk, an added bonus to everyone who walks by. ( here is a GF Drip Irrigation Video )

    You can use all sorts of containers for a patio garden, the mix of wood barrels and plastic plant pots here shows that mantra: ‘use what you got or can get’

    Regular potting soil, the kind you buy in bags works fine for container gardens, just make sure whatever pot you are using has drain holes in the bottom.

    As we ate our amazing meatball sandwiches, ( read about this great meatball sandwich here ) I realize Joe had fig tree growing out of one of the containers in his patio garden. Neat.

    Joe appears in this easy pasta recipe GardenFork video, pasta with poppy seeds.


  • Swarm Box Bait Hive from political signs

    Swarm Box Bait Hive from political signs

    Need Swarm Box or Bait Hive plans? Check out this honeybee bait hive made from those corrugated plastic lawn signs you see for politicians and yard sales. I’ve been making swarm boxes from old honeybee supers and old frames, but GardenFork viewer Howard upcycled some of those plastic signs you see in people’s front yards.

    Swarm boxes, aka bait hives are placed a few hundred feet from a beeyard in an attempt to attract any swarm that comes out of your beeyard. You’d rather not have a swarm go off and start a new colony in a hollow tree, its best to ‘recapture’ the bees and put them in a hive.

    Here’s Howard’s note to me:

    I did not think it would work to attract a swarm, since it is made of plastic and not wood. Well, yesterday a swarm went into one on my deck, even with old deep boxes also being around. So I guess they might work after all. They are nice and light. Better to fill with frames if you have them, otherwise if you don’t know there is a swarm in there soon after they move in, they will fill the empty space with comb from the top. Oh, for the top, I screwed another piece on top, then wrapped string around the whole thing so it can be hung from a tree limb. The frame is 1X3 lath I cut in two lengthwise.

    Great way to recycle or upcycle some of those signs, which have a short life as a sign for an event or election. I have seen people use the wire stakes that hold those signs as plant supports in the garden.

    How do you upcycle stuff? Let us know below:


  • Tomato Planting Tips & Selection with Priscilla : GF Radio

    Tomato Planting Tips & Selection with Priscilla : GF Radio

    How to plant tomatoes? What kind of heirloom tomatoes to grow? What about hybrid tomatoes? Which are the best ones? we talk with tomato growing expert & Eric’s neighbor, Priscilla the Egg Lady about how to grow tomatoes, tomato planting, and all things tomato.

    Every year Priscilla selects way too many varieties to grow in her green house, and she sells the seedlings in her roadside farmstand. We get our tomato plants from her every year. This year she used Solo brand cups to grow her tomato transplants, and it looks like it worked out well, the plants we got are well rooted and slipped easily out of the cups. Remember to plant the seedling deeper than it was growing in the pot. By planting the seedling this way, new roots will grow out from the part of the steam that is below the soil line, which makes the plant stronger. this is helpful in areas where there is a lot of wind, and also helps to keep the plant from drying out quickly, as the roots are deeper.

    Juliette is my favorite tomato plant of the moment, last year it was the best tomato we planted. its a grape style tomato that was resistant to disease and kept on producing well.

    Priscilla was on GF Radio last year talking about how to grow tomatoes, listen here.

    You can watch our how to grow tomato videos here

    What are you tomato growing tips & ideas? let us know below:


    photo by hotblack

  • How To Cook With Cast iIron Dutch Ovens with Gary House

    How To Cook With Cast iIron Dutch Ovens with Gary House

    This is the second of a series of articles about how to cook in a dutch oven, dutch oven recipes, and how to season cast iron and dutch ovens by Gary House, of Cooking-Outdoors.com. A big thank-you to Gary for contributing this.

    Last time we talked about the different types and sizes of Dutch ovens available to cook meals outdoors in. By now, you should have a solid idea of where to start in purchasing a Dutch oven for you and your family or perhaps you have resurrected that dusty black pot that’s been sitting in the corner since you brought it home.
    Dutch oven cooking can become somewhat addictive, so I must warn you early, you can’ just own one! They seem to grow magically as time goes by, first a 12” then a 10”, maybe I need a 12” deep and really, a 14” is not as big as Gary says, etc. I have a collection of 10 active Dutch ovens, those that I keep handy to use on a weekly basis, but hidden away in the garage are another dozen “collectables” that need to be seasoned or I have to remove the rust, etc. This collection just seems to grow and grow and grow, consider yourselves warned.

    For those of you with the will power to minimize and control those urges (un-like myself), there are a few accessories that you will want to add to your Dutch oven cooking arsenal.
    Undoubtedly, the most important item you can start to add to your collection is a cooking platform; you need something to place your hot coals on when you cook with your Dutch oven. The bare ground is not a good option, as it will suck the life out of your coals in record time (a campground fire pit would be an exception as the ground there has baked into a hard heat-reflecting surface and will give you a solid cooking base). Those 45 minutes to an hour cooking time that you planned will reduce to 30 minutes or less if you just place your coals and Dutch oven directly on the dirt.

    I started out with a simple 32-gallon garbage can lid. Just pop the handle off, stomp it flat and it will last for years (I still have my 5 year old model). If you are looking for a Dutch oven dedicated cooking table to use at home and when you go camping you have a few options:
    Table
    Lodge, Camp Chef and several other manufactures offer nice models that will run you $100 or more. Think about these things before you buy yours:
    How many Dutch ovens do you plan to cook with at one time?
    •    2 to 4 pots at one time then stick with a Lodge http://lodgemfg.com or Camp Chef www.CampChef.com Dutch oven cooking table.
    •    Six plus Dutch ovens get yourself a custom table from a reputable source.

    My big Dutch oven cooking table comes from www.chuckwagonsupply.com, it holds 9 Dutch ovens at a time plus room to hang my tools.
    Folding legs or stationary?
    •    Folding legs means you can travel with it.
    Windscreen?
    •    This should come with the table but sometimes it’s extra and it is quite necessary. The wind can cause all kinds of havoc with your cooking times, so a screen is very important.
    Carrying case?
    •    This is usually extra and worth every penny in my opinion
    Height?
    •    Important! The higher the table the higher you have to lift those pots and if you decide to stack your Dutch ovens (cooking one on top of the other), you will want a low platform that reaches to just above your knees.
    Weight?
    •    Bigger = heavier, longer lasting and more difficult to transport but I think the positives far outweigh the weight issue.

    Utensils

    Just the basics to get started, if you’re like me, you will add so much more stuff as time goes by that you shake your head in wonder – why didn’t I buy a bigger truck!

    Gloves – leather welder’s gloves that cover the lower half of your arm
    Lid lifter – indispensable tool that has multiple uses in addition to acting as a solid place to set your lid when you have to stir the pot or add additional food to your recipe
    Charcoal tongs – Goes without saying that charcoal burns, so you will need a tool to move those hot coals around the Dutch oven as you cook
    Charcoal chimney – used to light your charcoal briquettes with a single sheet of newspaper
    Wisk broom – helps to dust the ashes of the Dutch oven lid and table
    Lighter – or matches, your choice. Some people use flame throwers!
    Safety gear
    Never leave home without them!
    Fire extinguisher
    Shovel – a small shovel to move the spent briquettes from the cooking table to the bucket
    Ash bucket – use a galvanized pail with a lid for safe transportation and storage
    First aid/burn kit
    Dutch oven cooking can be as simple as you want or need it to be, do not obsess over all of the accessories available, what you should or should not have, etc. Remember, it only takes one pot and a recipe to produce a fantastic meal. Cooking outdoors in a Dutch oven is a rewarding adventure that can keep your taste buds delighted for many years to come.
    Next time we will discuss how to take care of all that cast iron I have talked you into buying!

    Part Two of our Dutch Oven Cooking Series by Gary House, creator of  www.Cooking-Outdoors.com; an excellent source for all things about outdoor cooking, including Grill & Smoker reviews, recipes, and videos.

    Gary is also the host of a new DVD, Taking Your Dutch Oven To The Max, using the dutch oven to smoke, grill, and even make ice cream.

    Listen to Gary on this episode of GardenFork Radio talk about how to season cast iron, how to use a dutch oven, and dutch oven recipes.

  • Amaranth Urban Foraging Edible Green

    Amaranth Urban Foraging Edible Green

    Urban Foraging while walking the Labs, I ran across a familiar sight in urban areas, an edible green, a type of amaranth that farmers refer to as pigweed.

    Amaranth comes in several versions, the one pictured here is not one of the more floral ones, but it is an urban edible green that you’ll see in tree pits , parks, and weedy lots and roadsides.

    20120607-133407.jpg
    The more visually striking amaranth varieties have names like Golden or Elephant. Golden Amaranth has a huge head of small flowers that lean over from the top of a tall stalk. Elephant Amaranth is purple pink and looks like an elephant trunk.

    You can eat the leaves of all these amaranth varieties, and harvest the seed/grain of those that have substantial flower heads. The weedy version I found in the city doesn’t have much of a flower.

    You can eat the leaves raw, but most cultures cook the leaves. In New York I’ve heard amaranth also called calaloo, which in Jamiaca is the name of the plant and the name of a dish made with amaranth.

    Depending on who you ask, amaranth is a weed or a healthy source of vitamins. Pigweed amaranth fills up farmer’s fields yet cooks use amaranth.

    Do you grow or cook with amaranth? Let us know below:

  • Inside the Hive: Views from a First Year Beekeeper (Scene 13)

    Inside the Hive: Views from a First Year Beekeeper (Scene 13)

    Bees, particularly those in new hives, require a lot of energy to draw out comb. To help jump-start the hive, a 1:1 sugar syrup can be used to help feed them during this time. I’m pretty certain they could make it without this feeding in the spring assuming there were sources of nectar around. But, since my hives are new and I’m not expecting or planning to take any honey this year, I’m OK about feeding them sugar syrup to provide them with the food they need to draw out comb on the frames this year.

    I started with baggy feeders but they are a bit messy and quite honestly I don’t like them because they are really a one-use feeder. I’ve got a bunch of canning jars and those can be reused so I’m trying some 1-quart jars in my hives as feeders. All one has to do is punch some small holes in the lid (I tapped a nail into the lid just a bit so that the smallest of holes was made.)  and fill the jar with sugar syrup. With the lid screwed on tight and inverted over the hole in the inner cover a vacuum is formed and the syrup will not run out. The bees can then slowly eat the syrup. When it’s emptied, I can just swap it out for a new one without disturbing the hive much at all.

    Enjoy,

    Matt

    Read all of Matt’s Inside the Hive Posts here

    Matt (twitter @MattInTheGarden) is a big fan of Punch Brothers and the music of Chris Thile in general. If putt putt doesn’t count, he has never played golf. This time next year he’ll be one year older.

  • Inside the Hive: Views from a First Year Beekeeper (Scene 12)

    Inside the Hive: Views from a First Year Beekeeper (Scene 12)

    The queen is dead. Long live the queen.

    Well, not yet. And perhaps not for a while. But since I’ve got an interesting picture here, I want to write a bit about the topic.

    So, there is a bit of wiggle room in the hive – there’s space between the frames and if not spaced evenly by the beekeeper or if the frames don’t have drawn comb on them, the bees have space to make some non-uniform comb. In the center of this image you can see some comb that is sticking out from the rest of the generally uniform cells around it. These larger ball-shaped cells are called “queen cups” and are cells specifically set aside for raising queens. If an egg is deposited there by the existing queen and then the workers feed it a special diet of royal jelly, a queen will develop. The queen cup will eventually be extended out and look like a peanut, so they are easy to spot in a hive.

    Now, the location of these queen cups on the frame indicates that they would be used to create new queens to replace or “supersede” the current queen. The existing queen, if it begins to fail, will likely alert the other bees in the hive that they need to find a replacement for her. She does this through changes in the pheromones she produces. If the workers believe she is failing, they’ll go into “make a new queen” mode.

    Supersedure is a normal part of hive life. The hive needs to thrive and can’t do so with a weak, failing queen. The strongest new queen will typically kill off the other new queens, often before they’ve emerged, and take over the hive. This may sound harsh, but the hive’s survival depends upon a strong queen as only she has the ability to create workers – and new queens.

    If the queen cups were along the bottom of the frame, then that is an indication that there is the potential for a swarm to occur. Swarming is also a normal part of hive life, providing a mechanism to split the hive into two hives. When a swarm occurs, the old queen leaves the hive with a portion of the hive leaving a new queen behind with the remainder of the hive.

    I’ll certainly be on the lookout for changes to these queen cups and relay anything I learn about them.

    Enjoy,

    Matt

    Read all of Matt’s Inside the Hive Posts here

    Matt (twitter @MattInTheGarden) hated raw tomatoes for the first 40 years of his life but now enjoys them. One day he would like to hike the Appalachian Trail. He regularly torments his kids by making up advertising jingles for hole-in-the-wall businesses they see when driving down the road. His lovely bride puts up with his shenanigans.

  • Inside the Hive: Views from a First Year Beekeeper (Scene 11)

    Inside the Hive: Views from a First Year Beekeeper (Scene 11)

    If someone were to ask me to make a list of adjectives describing the time in which we live, most certainly near or at the top of that list would be the word “connected”. Texting, email, Twitter, Facebook, online forums, Instagram, Skype, IRC, email, VoIP, cell phones, land lines and even snail mail. There are literally dozens of ways to stay in touch with what’s happening in your circle of friends, neighborhood, town, state, country and the world at large. Now we could argue whether all this is good or bad, but I won’t. That’s a discussion for another place and time.

    Honeybees are connected as well. They do some “dances” to communicate to one another about where things are – a good source of pollen, a good place to make the hive, etc. Before humans began scientifically studying honeybees, I’m not sure we recognized just how connected honeybees are. The scientific method, introduced in primary schools here in the States, includes the steps of Observation, Collection of data and Analysis. That skill of observation requires one have the ability to stop and focus, capture mentally what is happening and then record that information in some form so it can be reviewed. I don’t think early humans worried too much about whether bees communicated rather they were looking at the end products – honey and wax. The “waggle dance” wasn’t on their radar. Mostly the idea was “don’t get stung and get the honey” – simple and practical. It is easy to miss the subtleties of life when they don’t, seemingly, affect the day-to-day grind. Heck, we do this today, right? Lots goes on that we miss in our preoccupied, White Rabbit from Wonderland rush through the day.

    But, while they likely didn’t spend too much time observing bee behavior (beehavior?), early humans did recognize that the smoke from a torch was helpful to avoid getting stung when robbing hives found in caves and trees. These people didn’t understand the “why” but they did understand the “what” of the situation. Things haven’t changed much in the modern world – we often recognize correlation and infer causation without understanding things deeply. For our ancestors, getting the honey was all that mattered. Why the torch smoke made it easier wasn’t nearly so important. No doubt all sorts of conjectures were made by those who did ask why, but they lacked the faculties to discover the real answer back then.

    Enough rambling.

    What our ancestors didn’t know was that honeybees use pheromones for communication. Glands in the bee produce a variety of pheromones which tell one another that things are good, there’s trouble in the hive, the queen is failing and all sorts of other information. The presence or lack of a particular pheromone in the hive can signal that the hive needs to mobilize.

    Truly fascinating stuff. At least to me. Perhaps because I’m in “observation” mode these days.

    So, this image is of the modern equivalent of that ancient torch, the hive smoker. Made of metal,  it contains – ideally – a smoldering fire which produces a lot of smoke and not a lot of heat. Unlike most every other fire that humans make, the goal with the fire in a smoker is to maximize the smoke production.

    The smoker has bellows to draw air in from the outside and push it into the smoker’s firebox to stoke the fire a bit and to produce smoke which exits from the top. If you look closely, you can see some smoke escaping from it.

    Smoke, used judiciously and sparingly, severs that communications line within the hive temporarily. Without the ability to distribute the “alarm” pheromone through the hive, guard bees have a difficult time getting the message across to everyone else that there’s trouble in the hive. The smoke also signals to the bees to gorge themselves on honey because there might be a fire and they might need to flee that fire.

    Used excessively smoke will send bees into panic mode. Most of my beekeeper friends use it minimally if at all. Like much in life, less is more.

    Oh yeah – smokers can get hot. Metal transfers heat quickly and so you should take care when handling one.

    Enjoy,

    Matt

    Read all of Matt’s Inside the Hive Posts here

    Matt (twitter @MattInTheGarden) believes it is, as Tears for Fears sang, high time we made a stand and shook up the views of the common man. He’s thinks the hokey pokey is what it’s all about. His favorite pizza topping is black olives. He loved the Furniture Guys and misses their show.

  • Inside the Hive: Views from a First Year Beekeeper (Scene 10)

    Inside the Hive: Views from a First Year Beekeeper (Scene 10)

    Field Marshal of Obvious here. There are a lot of honeybees in a hive. I would say “more than you can shake a stick at” but then two things would happen:

    1. My sister, The Teacher, would lecture me on my poor English skills.
    2. Some idiot fine person would go shaking his (because it would be a guy) stick around a hive, annoying the bees an end up with hundreds of stings and probably anaphylaxis.
    I’m mostly concerned here, of course, with number one. The Teacher can be brutal with her critiques.

    Seriously, I think that it can be a bit overwhelming the first time one pulls a frame out of a hive body and sees all those bees crawling around on the comb. Personally I felt mixed emotions when I first put my J-hook hive tool under the end of a frame, raised it up with my thumb and index finger and then repeated the process on the other end of the frame so I could get a good grip on it. The bees are everywhere and are seemingly putting themselves right where my fingers need to be. I was a bit cautious, frankly a bit intimidated, and certainly exhilarated. And for the most part, the bees didn’t seem to mind all that much that I was getting up close and personal with their world. I had some buzzing about, whining their high-pitched “annoyed” whine and some were bouncing into me – “head butting” as some folks call it. But most were busy as… well, bees.

    This image is a closeup of a brood frame in my hive #2, the one from my mentor’s nucleus, or “nuc” hive. Over in hive #1, the bees originated from a package I purchased from Georgia and had a “marked” queen. Marking the queen, I believe, serves two purposes. First, the color often is used to identify how old the queen is, or at least I’ve been told that. Mine has a blue dot upon her back. That makes it relatively easy to spot her – likely the primary purpose for marking the queen. The blue is bright and stands out against the blacks, yellows, siennas and umbers of the hive. There just don’t tend to be blue things in a hive, so the dot stands out like a sore thumb. But that is over in hive #1.

    In hive #2 there isn’t a marked queen and so it is a bit of a “Where’s Waldo?” game to find the queen. Honestly, I didn’t spot her while doing my inspection, though there was ample evidence of her existence – plenty of capped brood, larva, I assume eggs (my eyes aren’t what they used to be and I didn’t have my reading glasses handy, so I couldn’t be sure) and activity. The hive was humming along and everything seemed, well, orderly so my assumption was that she was alive and well.

    But it is nice to find the queen.

    Take a look closely and there in center is the queen. You can see everything other than her head, which is hidden by the wing of one of the workers. A few points of interest are:

    1. The queen has an elongated abdomen where she stores her eggs and the sperm that she collected while mating with drones.
    2. The abdomen isn’t striped like that of her workers.
    3. Her wings are similar in size to that of the workers and so they look small compared to her length. That is what made her stand out in the picture. In the original picture, she isn’t in the center of the frame and blends in pretty well with the hundreds of workers on that side of the frame.

    One other interesting factoid is that the queen has a stinger but generally doesn’t sting. She can, however, repeatedly sting because unlike the workers, whose stingers are barbed, her stinger isn’t barbed.

    Enjoy,

    Matt

    Read all of Matt’s Inside the Hive Posts here

    Matt (twitter @MattInTheGarden) can do a pretty mediocre Bobby McFerrin chest thumping “Don’t Worry, Be  Happy” impression which he occasionally uses to aggravate his daughter at bedtime. He once saw Mike+The Mechanics and The Outfield in concert at Kings Dominion. One of his favorite musical chords is the Neapolitan Sixth. His favorite in-person drum corps performance is Rocky Point Holliday by the 1983 Garfield Cadets. Amazing stuff. 

  • Inside the Hive: Views from a First Year Beekeeper (Scene 9)

    Inside the Hive: Views from a First Year Beekeeper (Scene 9)

    One of these things is not like the other….

    Take a look at this close up of a frame and you’ll see around 40 adult bees, busily attending to their duties – cleaning out cells, feeding brood and capping cells. Most bees in a healthy hive are female workers. But in this image one of the adult bees is different than the others – the big one near the center of the picture. It  is a drone. A male honeybee whose sole purpose in life is to mate with a queen. The drones in a hive don’t do much of anything else other than mooch food from the working females.

    Ladies, go ahead and insert your quip here about how this isn’t much different than it is in the human population. I’ll wait.

    Ahem.

    So, beyond the obvious size difference, you’ll also notice that this drone has large eyes too. I suspect that this aids drones in searching for queens. Something that isn’t obvious in this picture is that drones cannot sting you. They have no stinger.

    In addition to the drone in this picture, you can see some larva in some cells, particularly on the right side of the image. These are fed by the workers until they are capped for the transition from larva to pupa. I think it is interesting that bees (and other insects) are essentially shut off from the world during this transition and I wonder about that sometimes. What exactly is the purpose in doing so? I think this is a question for my online insect friend, Debbie Hadley. I’ll talk to her about it and report back in the future on this.

    Finally, you’ll notice the glob of comb at the bottom of the frame. This is called “burr comb” and can show up just about anywhere in the hive. I guess any comb that isn’t where you want it to be can be called burr comb. The bees, however, treat it like any other comb and might put nectar, pollen or brood in it. In general  this burr comb is the result of excess space in the hive. Bees fill in the excess space with comb. You’ll also notice that much of the comb on this frame is darker in color and this is because the comb is probably at least a couple of years old. This frame came from my mentor’s nucleus hive so it has some age on it compared to the brand new frames and freshly drawn comb elsewhere in my hives.

    Enjoy,

    Matt

    Read all of Matt’s Inside the Hive Posts here

    Matt (twitter @MattInTheGarden) likes raised bed gardens and collecting rain water for watering his plants. If he’s going to eat fast food, he prefers Chipotle and Subway over burgers. He modified the computer bowling game in high school so that he could always bowl a 300 game. The teacher was not amused. He is allergic to rabbits and politicians.


  • Inside the Hive: Views from a First Year Beekeeper (Scene 8)

    Inside the Hive: Views from a First Year Beekeeper (Scene 8)

    Everything about honeybees is interesting to me. I have seen this brood layout in several hives and I think it is interesting that bees make this sunrise-shaped brood pattern. So, what you are seeing here is capped brood in the center of the frame with some open cells – some were cleaned out, some had larva in them. Outside that center brood pattern is capped and uncapped honey.

    I’ve been wondering why the bees tend to lay out their brood like this – certainly it is convenient to have stores near the brood. It is also interesting that they don’t mix brood and stores together, right? But I guess that just makes sense because otherwise the queen would need to work around the stores to find the cells where she can lay her eggs. Hives seem to be very orderly places where bees have their tasks to do, cells are neatly arranged and activities appear to be carried out automatically. Certainly there are a bucket of mysteries that still remain about honeybees despite the fact that they are the second most studied creature after humans.

    Enjoy,

    Matt

    Read all of Matt’s Inside the Hive Posts here

    Matt (twitter @MattInTheGarden) loves berries of all sorts though he’s not a fan of cherries. Weird, huh? He is neither tone deaf nor color blind but can’t carry a tune and is particularly unskilled at matching clothes. Matt loves to listen to Radio Lab and is quite jealous of Jad and Robert. They’ve got an awesome job.

  • Inside the Hive: Views from a First Year Beekeeper (Scene 7)

    Inside the Hive: Views from a First Year Beekeeper (Scene 7)

    Hey there folks. In this scene from the hive, I’d like to show off something that my son and I saw today during our inspection of hive #2 (the hive from my mentor’s nuc). I almost missed this because it was quite hot out today with no breeze whatsoever. It was the first time we’d used the smoker and, quite honestly, it seemed to agitate the bees more. We’ll work on that.

    In the center of the picture you can see a bee emerging from its cell. When we pulled this frame, we could see her antennae poking out of the cell and within just a minute or two, she’d popped her head out.

    About 5 cells above this there is a bee which appears to be in the pupa stage (which is a capped stage) but it was open. Unfortunately the close-up of this didn’t turn out. I think it might have been dead. If you have thoughts on this, I’d like to hear them.

    Enjoy,

    Matt

    Read all of Matt’s Inside the Hive Posts here

    Matt (twitter @MattInTheGarden) enjoys the heck out of cooking and eating ribs and is particularly enamored with his brown sugar dry rub. Insanely delicious. Matt thinks This Old House’s Tom Silva is really cool. He likes iced tea with lemon and sharp cheddar cheese – not together, of course.

  • Dutch Oven Cooking Adventures

    Dutch Oven Cooking Adventures

    This is the first of a series of articles about how to cook in a dutch oven, dutch oven recipes, and how to season cast iron and dutch ovens by Gary House, of Cooking-Outdoors.com. A big thank-you to Gary for contributing this.

    Adventures in Dutch oven cooking

    The first time I ever saw a Dutch oven in use was on TV. I remember it quite well as I was sick in bed flipping channels on TV and up pops this show about cooking outdoors and they were using a Dutch oven! Even as sick as I was at the time, I knew this was something I had to try, something new and exciting for the family and I. After lots of research, I finally decided to buy my first Dutch oven, a 12” camp Dutch oven seemed just about what I needed to start with.

    The day my Dutch oven arrived, I was so excited and eager to get cooking but I had to “season” my Dutch oven first. Therefore, a day later, I was able to start cooking and it could only be a Mixed Berry Crisp for me. Of course, the day had to be a miserable one to initiate my new Dutch oven; cold, misty, windy as it was, I started cooking!

    I had just recently built a new fire pit in the backyard and the plan was to cook in the fire pit just as on the show I had watched. Plans change, weather was bad, so I fired up some charcoal to start my dessert. Turns out I was going to do this little adventure alone. The family event turned out to be a “me” only event, well it was a bit cold and misty out after all.

    Guys are notorious for just standing around watching this cook, that’s way we love to barbecue, looks difficult and you have to stand around and watch. Well, now you can get a visual of me “watching” my Dutch oven cook in the misty weather outside. Overlooking our backyard is this big bay window; gives you a great view of the yard from inside the house. As I am cooking, I happened to look up from my strenuous task and there was the whole family watching me and laughing at me as I stood in the misty weather “cooking”.

    Undaunted, I continued with cooking my Mixed Berry Crisp until the first “whiffs” of cinnamon started to float out of the Dutch oven and I can say without hesitation, I was hooked on Dutch oven cooking from that second forward.

    I have learned a ton of stuff over the years about cooking outdoors, met many new friends and have found a wealth of information in many locations. The most important lesson I have learned during all of this, is to share what you love, often and willingly. Dutch oven cooking is easier that you think and I would like to get you started with your new adventure!

    Types of Dutch ovens

    There are, basically, three types of Dutch oven available. A basic “kitchen” Dutch oven, a “Camp” Dutch oven and “Pack” Dutch oven in their general terms.

    A “Kitchen” Dutch oven is the most common Dutch oven found. Characteristics are a rounded dome lid, porcelain coated (some) and are also available in oval shapes. All are cast iron and designed for in house cooking but do not hesitate to place one on your grill outside. They work perfectly!

    A “Camp” Dutch oven is the most familiar one, recognized by its three legs and rim around the lid. Made of Cast iron and is the one I will be discussing in these articles.

    A “Pack” Dutch oven, used for rafting and horse packing trips is made of aluminum, they are very lightweight and easy to transport.
    Dutch oven sizes can vary from a 5” model to a 25” behemoth that can weigh in over a hundred pounds when filled with food. Here are the sizes available: 5”, 8”, 10”, 12” – Standard, 12” – Deep, 14” – Standard, 14” – Deep, 16” – Standard, 16” – Deep, 25” and more for custom Dutch ovens. Note that “Camp” Dutch oven, are measured by diameter as opposed to “Kitchen” Dutch ovens that measure in quarts. “Camp” Dutch ovens also have quart equivalents but commonly referred to by diameter size only.
    The difference between “Standard” and “Deep” Dutch ovens is the quart capacity. The “Deep” Dutch ovens hold about 1 to 2 quarts more than the “Standard” size. They are great for holding stews and larger portions of meats that need more height clearance.
    Choosing the correct size Dutch oven for you.
    The following chart should give you some idea of the size oven that you should buy. (http://www.nwdos.org)

    My recommendation is to choose a 10” or a 12” Dutch oven; no need to get a deep version yet. You will be seriously surprised how much food these produce. Stick with brand names such as Camp Chef and Lodge, their quality is the standard and your Dutch oven will last in your family for hundreds of years if your grandchildren do not sell it on Ebay first.
    Next time we will discuss the types of accessories and tools you will need to get started. I laugh when I think of my expensive tools and accessories I used for my first cook on that first Dutch oven adventure; a pair of pliers and a garbage can lid …


    See ya around the campfire!

    Part One of a Dutch Oven Cooking Series by Gary House, creator of  www.Cooking-Outdoors.com; an excellent source for all things about outdoor cooking, including Grill & Smoker reviews, recipes, and videos.


    Gary is also the host of a new DVD, Taking Your Dutch Oven To The Max, using the dutch oven to smoke, grill, and even make ice cream.

    Listen to Gary on this episode of GardenFork Radio talk about how to season cast iron, how to use a dutch oven, and dutch oven recipes.
  • Inside the Hive:  Views from a First Year Beekeeper (Scene 6)

    Inside the Hive: Views from a First Year Beekeeper (Scene 6)

    I wanted to talk about a couple of topics related to this photo – mite control and wax production. There are two mites which are parasitic in the honeybee hive – the Varoa Mite, which literally sucks the life out of the bee externally and the Tracheal Mite which feeds of the bee from within its respiratory system. Varoa is large enough that one can see it with the naked eye while Tracheal mites are too small to see without a microscope. In the upper part of this picture are two “grease patties” which are made of equal parts of vegetable shortening and sugar. Mixed and formed into a patty, these are most easily handled by putting waxed paper between them. Sometimes folks will put some essential oils in the mixture, such as wintergreen. The idea here is that the bees are attracted to the sugar in the patty and get the vegetable shortening on them, greasing them up a bit. Tracheal mites are spread bee-to-bee and have considerable difficulty with the grease. There are a number of ways to deal with tracheal mites, some of which are more harsh than others. What I like about the grease patty approach is that it is something that is both inexpensive and harmless to the bees. These patties go a long way so you dont’ need a bunch of them – maybe one or two per hive per year. How effective is the grease patty treatment? I don’t know, quite honestly, but it is mentioned quite often.

    The zip-top bag (When J&J starts sponsoring GardenFork, I’ll consider using its brand name) in the picture is called a “baggy feeder” and is filled with a 1:1 sugar syrup (1:1 by weight, so 5 pints of water to a 5 pound bag of sugar) that is super simple to make – you could just put the water in the sun and stir the sugar in after a few hours of letting it heat up. Alternatively you can heat the water a bit on the stove (no need to boil it whatsoever), take it off the heat and stir in the sugar. Fill the bag and seal the top. Then lay the bag down on its side (making sure the top is zipped) and cut a small slit in the side of the bag so that the air escapes and the sugar syrup oozes out a bit. As the bees walk on it, they’ll be able to feed on the syrup that comes out.

    Now, the idea with the baggy feeder (or any feeder for that matter) is that the bees in this new hive require a considerable amount of energy to produce wax to create comb on the frames and to fly about and forage. They’ll certainly go out and find nectar but providing a ready source of sugar water gives them all the food they can eat right in the hive and helps the bees “draw out” the comb quickly. In a new hive there’s a lot of wax to produce and shape into comb and the bees will readily take this syrup up and produce remarkable amounts of wax in a short time. As I’m not getting honey from the hives this year (at least this is my expectation), I don’t mind the bees feeding off of sugar water. When they are producing honey for human consumption, you’ll want them to be creating it from nectar rather than just storing up sugar water. I wouldn’t want to purchase (or sell!) honey that was just converted sugar water.

    The nice thing about the baggy feeder is that it is cheap and convenient. The undesirable thing about the baggy feeder is that it is really a one-use feeder and can be a bit messy. I’m changing my hives over to inverted mason jars with punctured lids for feeders. Those are easily swapped out and will last for decades. There are many other feeders out there – frame feeders, hive top plastic feeders, entrance feeders. They all work but have their plusses and minuses. I’ll report later about how my mason jar feeders work.

    Enjoy,

    Matt

    Read all of Matt’s Inside the Hive Posts here

    Matt (twitter @MattInTheGarden) likes sudoku, minesweeper and the “Ticket to Ride” board game. He’s a huge fan of Ze Frank and enjoys the listening to Dan Carlin’s Common Sense. He’s got a “live and let live” attitude toward life and enjoys a good cheeseburger and baked potato wedges with roasted garlic spread on them. In his spare time he writes software.


  • Inside the Hive:  Views from a First Year Beekeeper (Scene 5)

    Inside the Hive: Views from a First Year Beekeeper (Scene 5)

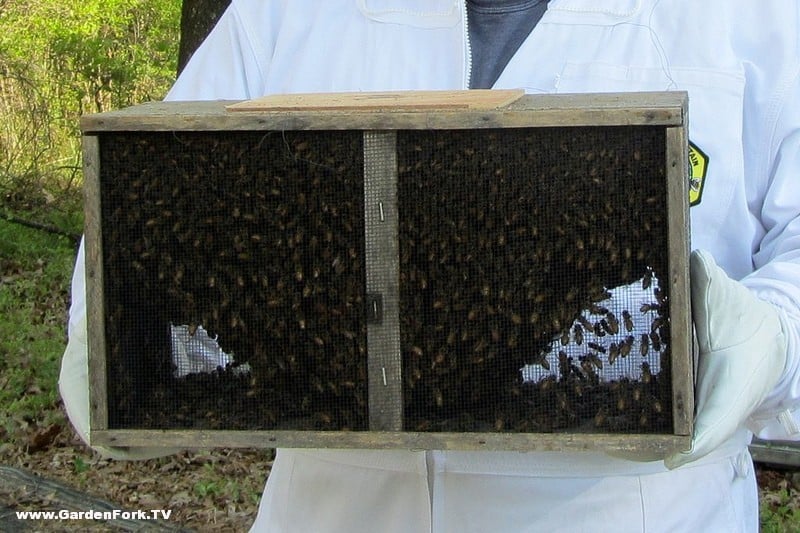
    How do I start a hive? Good question. I asked this myself and of Eric when we talked on GardenFork Radio and via email. Well, you’re going to need some bees and that is the topic of this particular photo. What I am holding here is called a “bee package” and weighs a bit more than 3 pounds. It is a simple wooden box that has screen tacked onto two sides to provide ventilation to the bees within. On the east coast folks down in Georgia literally shake a few pounds of bees down into a cone that is jammed into the top of this box. If you’ve seen videos of this process, you’ll notice that there are bees everywhere. I can imagine the bees don’t like it all that much, but that’s how it goes in the bee package business. There are thousands of bees in this box and one thing that you’ll notice when picking up the box is that it is warm. Bees generate a fair amount of heat and I could feel their warmth through the thin wood of the package.

    They tend to cluster around a queen cage that is hanging down from the top of the box and around a can of sugar syrup that is inverted and rests upon a ledge in the center of the can. You can’t see either of those things in this particular image, but you can see the thin square of wood that is tacked to the top of the package and covers the hole where the syrup can and queen cage are. The majority of the bees stay toward the top of the box though some will move around along the bottom. One point I want to make is that there will be dead bees in the package. I had approximately 1/2″-3/4″ of dead bees in the box after the live ones had vacated it and move into their hive. This is an expected situation, though if you’ve got an inch or more of dead bees you might want to raise some questions about how they were handled, etc. As a recycling guy, I knocked all the dead bees out of the box and into my compost bin, figuring that it was as good a place as any for them, but that’s a story for another day.

    At package pickup I wore my beekeeper suit, veil and gloves but it wasn’t really required (though we did have one package break open and there were bees flying about) and my son and I did it mostly because we wanted to break in our suits. The bees can’t sting you through the wood (obviously) and so handling the package with bare hands and no bee suit is fine for transport.

    I left my package in the garage for a couple of days until conditions were better for installing them into the hive. As long as the bees are not subjected to the hot sun and have food and water (which they do from the syrup can), they’ll be fine if you must delay a day or so. I had my son spray a little 1:1 sugar water on them – just a spritz – twice a day while they were in the garage. I don’t know that they would have done any worse if he hadn’t sprayed them, but I’m sure they were happy with the sugar water and it made us feel like we were tending to their needs while we waited for the adverse weather to pass.

    Enjoy,

    Matt

    Read all of Matt’s Inside the Hive Posts here

    Matt (twitter @MattInTheGarden) makes his living worrying about software efficiency, asynchronous program execution and end-user needs. When he’s not driving the desk, he can be found listening to podcasts like GardenFork Radio while he tends to his hobby farm in Virginia. Matt quite dislikes pickled beets and liver. His miniature Sicilian donkey is unimpressed by Matt’s musical tastes and mostly just wants him to feed her carrots and apples.