Category: Articles

blogs

  • DIY Hive Top Vent Board Keeps the Hive Cooler In Summer

    DIY Hive Top Vent Board Keeps the Hive Cooler In Summer

    Bees on a hot roof in NYC can be a problem in the middle of summer. I built a DIY hive top vent board to keep the hives a bit cooler. This also helps cure the honey in the supers, by the way. On the flip side, if you want to learn how to insulate your beehives for winter, here are a few posts.

    Hive Top Vent Board

    The inner cover on top of the hive has one small opening out the front of the hive. In summer, in full sun, this doesn’t do very well keeping the hive cool. You don’t want the hive to be cold, but you should do what you can to keep it from overheating. If you have a hive in the sun, and see tons of bees crawling around the outside of the hive, its probably not a swarm, but bees that are too hot.

    To keep a beehive cool in summer:

    • Used a screened bottom board, and make sure the screen cover is pulled out.
    • Use a slatted rack below the brood supers.
    • Move it to a shadier area.
    • Use a hive top vent board or screen.

    DIY Hive Top Vent Board How To

    I built this out of scrap 1×4 pine. What we are doing is creating a chimney effect for the hive. The opening in the center of the inner cover isn’t huge, but if we add some vents along the side, we can get more hot air leaving the hive.

    I got this idea from my fav beekeeping websites, HoneyBeeSuite, and MudSongs.org.

    Hive Top Vent Board

    The diameter of the holes is not super important. These are 1 1/4″ but they could be 3/4″, I think. Do not put any vent holes in the front of the vent board, you don’t want to confuse the bees that use the upper entrance. They might try to use the screen covered hole as an entrance.

    Hive Top Vent Board

    I covered the holes with some scrap window screen and stapled around the holes.

    Hive Top Vent Board

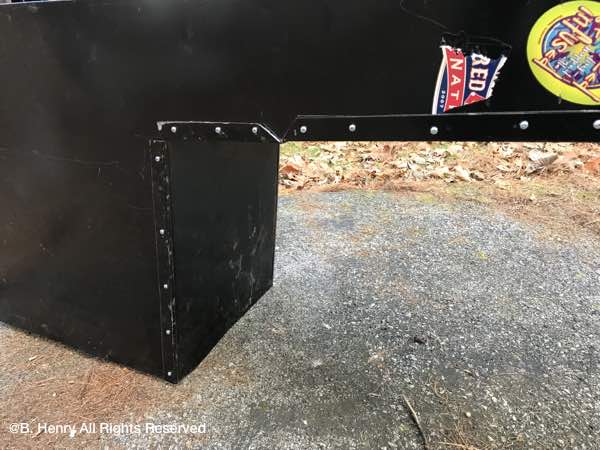
    The corners of the board were made strong by gluing in some scrap wood. These are 2×3″ pieces. I use regular wood glue.

    What is important is that the beehive ventilation board is at least 3″ high. If you use a narrow piece of wood, the outer cover, which has a big overhang, covers the vent holes. Learn from me, the first vent boards I made were from 1×2″ pine. They didn’t work.

    Hive Top Vent Board Hive Top Vent Board

    You can see here how the outer cover would cover up the vents if we used a narrow piece of wood to build the DIY hive top vent board.

    Hive Top Vent Board


  • The Best Way To Unsubscribe From Catalogs

    The Best Way To Unsubscribe From Catalogs

    Finally a mail order company creates the best way to unsubscribe from catalogs.

    How To Unsubscribe From Catalogs

    We get way too many catalogs for people who don’t really buy that much stuff. It all goes into the recycle. To me its a waste of paper and resources to print the thing, and get it to my door, only to be recycled into pizza boxes.

    I have tried to unsubscribe from catalogs by tearing off the mailing label, and postal mailing it back to the company, asking to be removed from their mailing list.

    This works only some of the time. Depsite several requests by postal mail, I keep getting a door mat catalog, even though I only bought one rug years ago.

    Drives me a bit crazy.

    With my efforts to declutter from years of collecting and keeping stuff I might use one day, I’ve managed to slim down the stuff. Selling off stuff on Ebay has been a great way to declutter.

    Catalogs should be an easy one to keep from entering the house, right?

    Not always.

    But FarmTek, who has great agricultural equipment, makes it super easy to unsubscribe from catalogs. There’s a page on their site to just type in your info, and you are done.

    How To Unsubscribe From Catalogs
    FarmTek makes it super easy to unsubscribe.

    I bet there are other catalogs out there too that have the same page on its site. Just type into search ‘unsubscribe from catalog’ and the name of the catalog.

    Less stuff coming in the house, the better.

  • Hops are this giant plant that is fun to grow.

    Hops are this giant plant that is fun to grow.

    I bought some hop plants from Fedco Seeds a while back. They are called rhizomes. Below is what a hop plant looks like 3 years old. hop plant

    When you get the hop rhizomes from the supplier, they look like 6″ long brown sticks with some roots sticking out. Get them in the ground asap. Also buy them from a decent plant supplier, like Fedco. If you get them and they look like dried out sticks, they aren’t good.

    hop plant

    You want to plant the rhizomes in some soft soil, like seed starting mix or something. So when planting, dig a hole 4″ deep, drop in your seed mix, and push the hop rhizome into it about 1″. This is so the plant can easily throw up some green stems and get going.

    Water the thing every day. You will see see that looks like purple asparagus sticking up out of the ground. Be happy, you have successfully gotten them to grow. Now make sure your dogs don’t trample all over the young plants.

    Think about where you are planting. This is a long term commitment, as this thing gets real big, and is not easy to move, IMHO. Mature hop plants grow really tall, and they will grab onto anything nearby.

    hop plant

    You hop plants will grow slowly the first year and be underwhelming to look at. Pay attention that other nearby plants don’t over take them. You might get 2-3′ long vines, and they will be thin in diameter. A simple trellis with some string is enough for the first year.

    hop plant

    The 2nd year, you need to build a real robust trellis. I use a 12′ long 2×4 and then put a 1×4 six feet wide across the top, like a cross, but its a trellis. I staple sisal twine from the cross bar down to the base of the 2×4. The hop plant will grab onto this and go. Fast.

    hop plant

    Hops can grow 6″ in a day. That fast. You can order them in early spring from Fedco Seeds.

    If you’d like to learn more about home brewing, which uses hops, listen us on this GardenFork Radio episode.

  • Heirloom Yogurt Starter and How To Make Yogurt With It

    Heirloom Yogurt Starter and How To Make Yogurt With It

    Heirloom yogurt starter is exactly what it sounds like. Its a yogurt starter passed down through generations. Here I’ll show you how to make yogurt with it. I’m using an instant pot to make yogurt, but this process works for any method. Watch my how to make yogurt in an instant pot video here.

    Heirloomm yogurt starter

    My buddy Rick told me about using heirloom yogurt starter. I had been using a commercial starter, or just some yogurt from the store, to make yogurt. His goal in using the heirloom yogurt was to increase the diversity of probiotics in his system. Makes sense to me.

    Making yogurt is not rocket science. You can make yogurt in a cardboard box if you want. You heat up some milk, let it cool, add starter, and heat it again for X number of hours.

    How To Make Yogurt With Heirloom Yogurt Starter

    I bought an heirloom yogurt starter pack that come with packets of 4 heirloom starters here: http://amzn.to/2prpSaO

    The package has some good instructions, but the first time I followed them, the yogurt didn’t ferment as I expected. The starter supplier suggest making a pint of yogurt overnight in warm place. My attempts this didn’t take. So I made my own method.

    Heirloomm yogurt starter

    The packets that come in the package are quite small. What you are doing with these little packs is making one jar of yogurt, and that one jar is now your starter jar. You will make your heirloom yogurt going forward from this starter jar.

    So here is how I make heirloom yogurt. Its super easy. I love using the Instant Pot to make yogurt, but you can do this on a stove top, wood stove, or on top of your furnace in the basement. Any kind of yogurt maker works as well.

    • Heat up one pint of milk in a clean glass mason jar to about 180F.
    • Let it cool to 110F
    • Add the starter packet to the one jar, mix well.
    • Heat the yogurt for 14 hours.
    • Use this jar as starter for future yogurt batches.

    The instant pot makes this super easy, it maintains a warm temp over the 14 hours, and beeps when its done. I found that shorter ferment times didn’t work for me. Either the yogurt didn’t set up at all, or it was quite runny.

    The key thing I realized is that one little packet is not intended to make several jars of heirloom yogurt, its to make one ‘starter jar’. From that one jar you can add a tablespoon of heirloom starter and add it to each pint of milk. Before that jar runs out, set aside a jar of new yogurt you made from it to be the next ‘starter yogurt’ jar.

    You can order the heirloom yogurt starter here: mzn.to/2prpSaO

    If you are interested in the Instant Pot, I have a video review here.

  • Our Labrador Charlie Pup Had A Canine Stroke

    Our Labrador Charlie Pup Had A Canine Stroke

    One of our dogs had a canine stroke, here’s how we found out and the recovery.

    Canine stroke
    Light grey oval in Charlie’s spinal cord indicates a canine stroke.

    A few weeks back we noticed Charlie Pup slipping when she ran around corners on our wood floors. This progressed into a general wobbly back end, losing control of her back legs. We thought it might be hip dysplasia, so we went to see Charlie Pup’s doctor. Canine stroke was not even in my list of possibilities.

    Hear me talk more about Charlie’s stroke on this episode of the GardenFork Radio Podcast.

    Charlie Pup’s doctor watched her and immediately said that this condition was not hip related, but neurological. She suggested and we agreed to take her to the see a neurosurgeon at the Animal Medical Center in Manhattan. Our vet helped us make the arrangements and did an x-ray and blood tests to rule out a few causes.

    We’ve been to AMC in NYC before, with our other Labrador, Henry about 10 years ago. Its kinda like the Mayo Clinic for dogs.

    So we drive from Brooklyn to Manhattan, park the car in the hospital parking lot, and take the elevator to the waiting room. The doors open, and I see a rooster, an iguana, a parrot, and a bunch of NY people and their dogs and cats.

    Kinda like a live version of a New Yorker Magazine cartoon.

    We get to see Dr. Abby Lebowitz, a neurologist and neurosurgeon. Super nice doctor who also has a Labrador. Dr. Lebowitz and her team take Charlie and want to do some motor function tests. So we get to wait in the waiting room with the cast of characters.

    We met Dr. Lebowitz after the testing and learn there can be several causes for Charlie losing control of her back legs. We are given the option of having an MRI right away, or we can have Charlie on confined rest for 3 weeks and see if she improves.

    We opt for confined rest, as an MRI is not cheap. Having been through several back-spine treatments myself, I know the body can heal itself for some back issues.

    I didn’t realize how confined the rest had to be until I read the instructions they sent home with us. Really confined. We didn’t do a very good job the first week, but I re-read the instructions and the confinement was done right.

    We kept Charlie Pup and Henry up near the front bay window in Brooklyn so they would have sunlight and see outside most of the day. Charlie Pup is bonded to our older Lab, Henry, so we have to keep them together. Our neighbors lent us two sets of folding dog fences that worked great to keep them in their small area.

    canine stroke

    Here is the bolster orthopedic dog bed we use for Charlie Pup, the dog fence, and Henry’s flat orthopedic bed.

    I was surprised the Labradors did not just push the fence down. But it worked very well.

    We are lucky to have a small backyard in Brooklyn, so the pups went outside 4-6 times a day. We would walk Charlie Pup in the yard on a leash. She likes to bolt out the door to chase squirrels. She was not allowed on stairs either.

    After 3 weeks of confinement, we realized her wobbly legs were not improving. We talked with Dr. Lebowitz and scheduled the MRI.

    Charlie Pup spent the whole day in the offices of the neurology department. We are told she was very popular. They did an MRI, X-rays, and a sonogram.

    At the end of the day we met with Dr. Lebowitz and we learned that Charlie Pup had had a canine stroke, and it is causing her to lose control of her back legs.

    This is a relief in a few ways, its not a ruptured disc that would require surgery, or spinal stenosis, which would mean steroids.

    Charlie Pup is to take it easy and slowly progress back to her normal activities. We might try some physical therapy; aqua therapy sounds appealing as she loves to swim.

    She will always be a bit wobbly in her back legs, but its good to know what happened and how to proceed.

    Listen to me talk about what can happen if your dog has wobbly legs on GardenFork Radio.

  • LED vs CFL – 5 ways LEDs are better than CFLs

    LED vs CFL – 5 ways LEDs are better than CFLs

    If you are using compact fluorescent bulbs, hear me out on the LED vs CFL debate. Below I’ll list out 5 ways LEDs are better than CLFs. For a long time I was an advocate for CFL bulbs, but then LEDs became affordable, and the tables turned. I now also use LEDs for dusk to dawn light installations.

    LED vs CFL lights

    LED vs CFL  Here are 5 ways LED are better:

    1.CFL Bulb shape = design fail. CFL lights have always had a bad reputation for being, basically, ugly. I still see some hanging lights in buildings that have those curled CFL bulbs in them. Not a great look. LED bulbs have the same look and feel as incandescent bulbs.

    2. Most of them put out an ugly green tinged light. The light cast is reminiscent of those tube fluorescents of gym class. You can get a warm white compact fluorescent, and some are not bad. But there is still that tinge of an ugly cold white light reputation.

    3. LED bulbs are much cheaper to use. I was always loyal to the CFL for the energy savings. You could leave lights on without feeling guilty. Then LED lights showed up in the hardware store and costs pennies to operate.

    4. LEDs are dimmable! There are a few CFLs that are kinda dimmable, but the light level steps up and down instead of being on a continuous dimming spectrum. You need to use quality dimmer switches with LEDs, the cheap ones don’t work. Learn from me. And buy LED bulbs that specifically say dimmable on the package.

    LED vs CFL lights
    LED bulb on left is in classic bulb shape, CFL less than classic

    5. CFL bulbs contain a trace amount of mercury, and you have to bring them to the hardware store to dispose of. This means the CFLs sit in my car until I remember to drop them off on the next store trip. Even then I will forget them in the car for several weeks. LEDs do contain electronic circuitry, and whether we should recycle them is a work in progress.

    Recommended dimmable LED bulbs on Amazon. Get this dimmer switch to use with dimmable LEDs

  • Is Apisoir A Word? Wikipedia Says No

    Is Apisoir A Word? Wikipedia Says No

    Apisoir is a word coined by Michael Alberty to promote the local terrior of honey. Being a wine writer, Michael had words to describe different wines, so why not honey? Erik of the Root Simple podcast interviewed Michael Alberty, and its a good listen on how one can, or as it happens sometimes, cannot create a new word. The word bootylicious is used as an interesting example of how words happen.

    apisoir

    I’m still left wondering who determines if a word is a word.

    But the idea of having a term for the unique tastes of different honey is a good one. Honey from different hives tastes different. Honey from the same hive, but from different frames of comb, can taste different.

    Why does honey taste different hive to hive? Its all about the nectar used to produce the honey, and the plants that produced that nectar, and the environmental conditions that those nectar producing plants grow in.

    I bet most of us have been to a farmers market where different jars of honey are lined up, and you can see the differences in the honeys. You’ve probably seen buckwheat honey sitting next to goldenrod honey, or similar pairings. So yeah, a word for that would be good.

    But not so fast. Wikipedia wouldn’t allow Michael to create a page for the word Apisoir. This could be just the Wikipedia hall monitor on duty the day Michael added the page didn’t get it. But Wikipedia could have good reasons for not approving the page, they have to manage many people creating many pages. I’m sure they have some interesting stories.

    Interesting to read some of the comments on the Root Simple podcast episode, as some are now saying that the word apisoir, while drawing on the French language, doesn’t sound nice in French. It sounds too much like the word pissoir. Oops.

    So from what I can tell, if we all use the non-word apisoir in our posts and podcasts, it may work its way into the mainstream. Maybe if its used in a hip-hop song it will help, this practice seems to get the attention of the Old English Dictionary.


  • Is Your Car Battery Dead? A Quick DIY Fix

    Is Your Car Battery Dead? A Quick DIY Fix

    You turn the key, and you just hear ‘click’. Is your car battery dead? Maybe not. Here’s a quick DIY repair that may save you some $. (If you suspect the alternator may not be charging, learn how to test an alternator here.

    This happened to a friend of mine who had just replaced their battery recently, and I was able to fix it in about 10 minutes. I opened the hood and could see right away that the problem.

    car battery corrosion

    Is the car battery dead? No.

    Car batteries last about 3 years, in my experience. Open the hood of you car and find the battery. If the above photo is what one or both of your battery cables look like, get some wrenches out.

    What we have here is corrosion that isn’t allowing the cable to connect with the battery in an ideal way. And its real easy to fix. Get these items:

    • Wrenches, pliers, screwdriver, and a socket set if available.
    • Baking soda & plastic bowl
    • WD-40 spray
    • Wirebrush or old toothbrush

    We want to remove the battery cable from the battery. You may need to spray the nut & bolt with WD-40, then loosen it with a wrench or socket. Be careful not to strip the bolt or wrench off the battery terminal. Holding the cable with the pliers may help. A screwdriver can help lift the clamp off the battery. DO NOT allow the tools to touch any metal on the car when removing the RED positive cable. It can spark. Not the end of the world, but please avoid doing this.

    Is Your Car Battery Dead?

    Mix a tablespoon of baking soda into a shallow plastic bowl that has water in it. The measurements are not critical. Put the terminal end of the cable into the solution. It will bubble. If you can’t get the cable in, brush the baking soda-water mix onto the terminal end with a toothbrush.

    Is Your Car Battery Dead?

    Scrub the cable to remove the corrosion, the crumbly blue stuff. Then wipe the cable ends with a paper towel to finish up the job and remove the moisture.

    Clean up the battery itself as well, scrubbing with the solution, and wiping down with a paper towel. Its ok if the solution runs down the side of the battery.

    Replace the cables on the battery, tighten down the clamps.

    Is Your Car Battery Dead? Is Your Car Battery Dead?

    Then do this KEY thing: Spray the terminal ends and clamps with WD-40. This will remove the last bits of water and protect the connection.

    Also, consider keeping a battery booster or jumper cables in your car. These compact battery boosters are quite good, or consider getting the large one to have on hand if you have a big SUV or truck. Here are a few suggested models:

    Compact Battery Booster (affiliate link)

    Large Size Jump Starter  (affiliate link)

    Is Your Car Battery Dead?

    So, next time you ask yourself, is my car battery dead? Open the hood and check this before buying a new battery.


    Bought a 110 Volt power adapter for the car, here’s what I learned.

    Simple Way to Test Your Car Alternator

  • Selling On Ebay, Its Not Always Worth What You Think

    Selling On Ebay, Its Not Always Worth What You Think

    Selling on Ebay is a great way to get rid of stuff. We talk about this in a how to sell post here, and on the GardenFork Radio Podcast. But I learned recently that what you are selling it is not always worth what you think it is.

    Take this antique gumball machine for instance. It has been in the basement for years, with me thinking it was worth lots of money.

    Selling On Ebay

    Looking on Ebay, I was sure this would sell for a couple of hundred dollars. There were several similar items listed wiht nice prices. But they weren’t auctions, there were the Buy It Now or Make Offer listings. The sellers had a set price in mind. Which might not be based on the real market value of the item.

    Selling On Ebay

    Selling on Ebay, A Reality Check

    Here’s the thing. You probably think the gizmo you have is worth more than it really is. Ebay is very good at determining a realistic selling price for your stuff. It can be a kick in the head.

    But I wanted to get this thing out of the basement, where it had been for years, so waiting around for someone to match my price wasn’t an option. Decluttering was the priority. So here’s how I get rid of stuff by selling on ebay.

    I set the starting bid at $1.00 .

    This gets the interest of a LOT of people, and some will bid it up a few dollars. They are now invested in the auction. And there will be a bunch more people ‘watching’ the auction, and may bid at the last minute. Ebay will send those who click the “Watch” button an email when the end of the auction is happening soon.

    AND your item will sell for about what that kind of thing is selling for these days. Probably less than you want. BUT its out of your basement. Your mind will be free-er, if that’s a word.

    Selling On Ebay

    The flip side of this is stuff I think will sell for nothing sells for something. I also had a generator transfer panel that was missing some parts (easily bought new). I listed it at $1, thinking it wouldn’t sell for much at all. Then I watched the bid price rise.

    Selling On Ebay

    Not bad for something out of your garage!

    A Few Key Things For Selling On Ebay

    • Be Honest
    • Start bid at $1.00
    • Answer any questions
    • Ship via US Postal Service, not UPS
    • Sell As-Is
    • Add in a packing fee if need be

    An honest description is key to your integrity on Ebay and in real life. Karma is boomerang here and now. If the buyer is not happy, they can make their displeasure known on Ebay, and you lose your credibility to sell other stuff. I check a seller’s rating before I bid on items. You should too.

    The bid at $1.00 gets eyeballs, the price will rise to close to what its really worth, so relax.

    Answer any questions submitted through Ebay and allow those questions/answers to be posted to the auction page, it shows you are open and honest.

    UPS has an awful website for trying to print out a shipping label, its incredibly clunky. USPS is integrated into the sales process of Ebay. Use them.

    You are selling a used item as-is, with no warranty or returns. Reiterate that several times in the description. Describe all the scratches and dents. Disclose everything.

    For the gumball machine, I had to buy bubble wrap to safely ship it, so I added a $15 packing fee. Save your shipping boxes and packing stuff for your own shipping.

    What are your tips for selling on Ebay? Let me know below.

    Buy A Tiny House Kit On Amazon?


  • Will My Bees Survive Winter?

    Will My Bees Survive Winter?

    Helping your bees survive winter is one of the hardest parts of beekeeping. I have several videos about winter bee survival and feeding.  A reader asked:

    It’s been in the 20’s and 30’s for the last two weeks or so with another week of the same temps. If my bees are clustered will they be able to feed and keep clustered enough to survive until the weather breaks?

    Will My Bees Survive Winter
    Beehive insulated, with insulated inner cover, and strapped to survive winter

    Will The Bees Survive Winter?

    Honeybees don’t hibernate, they cluster. Their metabolism does slow down, but the don’t ‘go to sleep’. The bees move around the hive, in a balled mass, with the queen in the middle. They move through the hive eating the honey stores. The bees on the outside of the cluster move their wings to generate heat, to keep the cluster warm. And the bees rotate, kinda like a volleyball team, so the bees on the outside of the cluster slowly move to the center to warm up, and the inner bees move outward to be the cluster-warmers.

    In a perfect world, this works fine, then spring comes, and the queen lays eggs, and off we go on another season. But in the northern states, this is not the case. Whatever issues a hive had over the season has a big impact on whether the bees survive winter.

    Best Beekeeping Books
    Best Beekeeping Books That I Still Use

    I’ve got a bunch of vids and how to posts on the topic of winter beekeeping, but I’ll answer the question above right quick.

    Temps in the 20 and 30s are pretty good for winter, I think. The problems get really bad when its near zero. But you can still lose your bees in a 30 degree winter.

    Mite Load. If there are mites in the hive in the fall, that number will explode in winter. As the mite load rises, the bee population declines due to winter die off. The mites will eventually kill off the rest of the hive. Currently I think the best mite treatment is with oxalic acid, here’s the video.

    BTW, just because you don’t see mites doesn’t meant you don’t have any. You more than likely do.

    Will My Bees Survive Winter

    Condensation. The outside of the hive is cold, the inside is warm. Condensation collects on the top of the hive, and drips back down onto the bees. Cold bees are OK in winter, cold wet bees are dead bees in winter. The combined use of dry sugar feeding and a insulated inner cover eliminates condensation.

    Starvation. Either leave a lot of honey on the hive or feed your bees starting in late summer. Sugar syrup is cheap winter bee survival insurance.

    Will My Bees Survive Winter
    Bees eating dry sugar in late winter.

    Emergency Winter Feeding. I think the dry sugar feed is great, but you can also put fondant, sugar cakes, or candy boards on top of your hive. The dry sugar method, aka moutain top feeding, is literally a piece of newspaper on top of the hive with 4 pounds of dry sugar poured on it.

    Northern Queen. Southern queen that come in bee packages have a lower survival rate than Northern Queens. If you have bought a package, you can replace the queen in summer (requeening video here), and increase your chances of winter survival.

    OK, that is my 500 word thought on the subject, what are your thoughts? I always learn from you all in the comments. Thx!

    Prepare your bees for the cold with this winter beekeeping checklist

  • Dandelion Greens & Bacon Salad Recipe : GF Video

    Dandelion Greens & Bacon Salad Recipe : GF Video

    What do you with dandelion greens? You make a salad of course. Watch our video to find out how to identify and forage for dandelion in your yard, and make a great salad. If you are looking for edible plants in your yard, make sure the yard hasn’t been treated with herbicides or other things that are bad for you to ingest. Check out our other foraging videos here.

    How To Find and Prepare Dandelion Greens

    Wild Greens are abundant if you live in an area with grassy weedy places. They grow, we eat them. Things like mustard grow wild, wild onions, dandelion, purslane, burdock, all sorts. What I like about dandelion is it is ubiquitous and abundant, and it grows all summer. It is said that the dandelion greens are more bitter after the dandelion flower have bloomed, but my personal experience has been mixed. It is true the older the leaf, the more bitter it will be.

    I do suggest buying at least one foraging plant identification book, I’m a big fan of Leda Meredith’s Foraging Books, she also has regional foraging books out as well. A second book you might consider is Joy Of Foraging.

    Dandelion Greens

    Follow this simple dandelion greens recipe, and all will be great. It uses items you probably have in your fridge.

    Dandelion Salad Recipe  makes 2 salads

    1 bunch of dandelion, about a large handful, tap root and flower stems removed, washed and dried.

    2 strips of thick cut bacon

    balsamic vinegar

    2 eggs, poached for 3 minutes

    1 avocado

    Cook the bacon to crisp

    While the bacon is cooking arrange the dandelion in two salad bowls or plates.

    Cut the avocado in half, core and add to the bowls

    Add the poached egg on top of the greens,

    Cut the bacon into small pieces, spread over the salad

    Pour about a half teaspoon of the bacon grease from the pan over each bowl.

    Serve as soon as possible.

    Now on to foraging for Lambsquarters!

    Wild and Urban Foraging for Lambsquarters : GF Video


  • A Simple Way To Insulate Your Hoop House With This Curtis Stone Video

    A Simple Way To Insulate Your Hoop House With This Curtis Stone Video

    Rick and I were talking on the GF Radio podcast about the success of his mini greenhouse, and how using 2 layers of  plastic, separated by some wood supports, had added an insulation layer. I immediately thought of a video I saw on Curtis Stone’s YouTube channel about how he uses a double layer of plastic in his very successful market garden operation. Here is the video:

    Curtis uses a fan to force air between the two layers of greenhouse plastic, which reduces heat loss through the plastic. Think of it as air as insulation. I think you can do this on a small scale, but the key is to pick a fan that works for your size greenhouse. Here is a good starting point for fans you can connect to your greenhouse plastic.

    I’m wondering if you have a small greenhouse, could you hook up a bathroom fan you’ve pulled out of a dumpster? I’ve got a few from some renovation projects sitting here looking at me. One of them worked really well on the homemade sap evaporator, but we have more to put to use.

    I have built several what I call mini-greenhouses, aka hoop houses, to cover our raised beds. And of course, we have videos about all of them here. Considering the size of my raised beds, 4′ wide x 12′, I’m not sure using a fan to insulate the layers of plastic would be a good use of electricity. Maybe we could go solar with the fan?

    I am a big fan of Curtis Stone, and how he shares so much info on his YouTube channel. He also has in-person classes if you are serious about becoming a market gardener. I’ve learned better methods on how to grow carrots and salad greens from Curtis.

    He has turned his yard, and those of a few of his neighbors, into farmland, basically. Gone is the grass and instead there are rows of vegetables. This doesn’t go over well with everyone, but I’m all about a smaller lawn.

  • Pizza Oven Brick, How To Store It

    Pizza Oven Brick, How To Store It

    I just pulled a bunch of pizza oven brick out of a dumpster in Brooklyn. The contractors were taking down the parapet wall of a crumbling building near my house. I walked down with my hand truck. The crew were happy to help me sort out a ton of excellent brick.

    When I say pizza oven brick, I mean old school clay brick. We talk about this a bit in our pizza oven videos, but we can expand here. We don’t use fire brick in our home made pizza oven, we use used clay bricks. These old kind that we salvage from construction sites or we find online. I wrote about how to find used brick here.

    People have asked about the potential for bad things being in the brick that one doesn’t want touching their pizza dough. From what I understand, that potential is low to non-existent, because the pizza dough is only on the brick for a very short time. Not long enough to absorb anything, in my opinion, as long as the brick is clean.

    How To Store Pizza Oven Brick

    The beauty of our home made pizza oven is you can break it down. But, you have to store the brick somewhere. I learned the hard way that just leaving them out in the yard is bad. Over the winter, the bricks got wet, consequently, they froze and cracked over the winter. Bad Bricks!

    Pizza Oven Brick
    Snow and Rain will damage your bricks, don’t do this.

    Pizza Oven Brick

    So here is how I now store pizza oven brick.

    Grab two pallets, probably an easy thing if you are a GardenFork sort of person. Plan where you are going to store your brick. Ideally, this is not under the overhang of a shed, because we don’t want more water than necessary near the brick. Learn from me…

    Pizza Oven Brick
    Plenty of space between the bricks

    Put one pallet down on the ground, and stack the bricks on the pallet with air space between them. Because if the bricks do get wet, they can dry out. If they are stack tight together, they wont dry out as well.

    Pizza Oven Brick

    Place another pallet of the same size on top of the loosely stacked bricks. Finally, cover the whole stack with a waterproof tarp.

    Pizza Oven Brick

    What I have found is the tarp can pool water, so I make sure the side of the pallet with more cross pieces is facing up. Unlike the photo above… It wouldn’t hurt to slide a piece of scrap plywood over the top pallet, then the tarp.

    Homemade Brick Pizza Oven Video

  • File Cabinet Maple Syrup Evaporator Photos From A Friend

    File Cabinet Maple Syrup Evaporator Photos From A Friend

    Always love getting file cabinet maple syrup evaporator photos, these are from a friend who has greatly improved the GardenFork version 2.0 file cabinet evaporator. The photos tell the story best here. This is designed be used with a stainless steel evaporator pan made by our friend Zach of Silver Creek Maple Equipment. But you could certainly use this file cabinet with steam table trays, similar to our GF version 1.0 file cabinet evaporator.

    File Cabinet Maple Syrup Evaporator
    Super smart way to build your homemade maple syrup evaporator.

    My friend sent me this photo of his version of the homemade maple syrup evaporator and my jaw dropped. I had been trying to find a solution to how to slow down the heat escaping from the fire box, and here is the answer. A smaller firebox and a sloped channel to the chimney. There will be a baffle or bricks at the sharp bend in the floor of the cabinet. This closely mimics the arch of many evaporators I have seen.

    The back of the cabinet is cut along the sides to preserve the right angle corner, and this slips over the cut sidewall of the cabinet. Self tapping screws hold it all together. You could also weld this seam with a flux core or mig welder.

    File Cabinet Maple Syrup Evaporator

    The firebox is about 24″ deep, the fire grate was bought at Tractor Supply. You could do the same, or go to your local welding shop and pick up some scrap extended steel grate.

    File Cabinet Maple Syrup Evaporator

    File Cabinet Maple Syrup Evaporator

    To create some turbulence and keep the heat swirling under the pan, a firebrick, or sand or some steel will go right at the sharp bend in the bottom of the box here.

    File Cabinet Maple Syrup Evaporator

    Big thank you to my friend for sharing the photos and his crafty knowledge here. Read and see more about how to make maple syrup here.


    Steam Table Pan Maple Syrup Evaporator Improvements – GF Video

  • Probably The Best Way To Hook Up A Generator To Your House

    Probably The Best Way To Hook Up A Generator To Your House

    Wandering through YouTube, I found what may be the best way to hook up a generator to your house. Its brilliantly simple and safe. Manual transfer switches require wiring inside the electric panel, generator interlocks a bit less wiring. This rig, technically called a meter mounted transfer switch, no wiring.

    Best way to hook up a generator
    Image from Generlink.com

    Instead of messing with your electric panel, this unit sits between your utility meter and the electric panel on the outside of your house. An electrician or your utility company has to install it, but it should only take about 30 minutes to do. And, in most cases, no electrical or building permits. How cool is that?

    I have a transfer panel in my basement to hook up my generator to the house, and it isn’t the perfect solution. My post about it here. You have to run a wiring harness from the transfer panel into the main panel, choose which circuits to control, splice the wires together, its some work to do it all. This meter mounted transfer switch is much closer to ideal. More info on the unit here.

    The meter mounted switch supplies power to the whole panel, and you choose which circuits to run based on the wattage of your generator and the appliances you want to use. The beauty is you can turn on and off breakers at will. With a hard wired transfer panel, you can’t change which circuits are powered. My transfer panel only has one 220 volt circuit breaker, so it limits what large appliances you can run. With this unit, you can turn off and on different appliances that draw a large amount of power.

    Run your electric dryer, then turn it off and turn on the air conditioner or the well pump. Nice.

    The other plus here is many people have a portable generator and plug multiple extension cords into the generator and run them into the house. You can hook up your central AC or well pump with an extension cord. So yes, at this writing, this is the best way to hook up a generator to your house.

    Watch this video by Steve Maxwell, its a nice visual of how it works:

    Hook Up A Generator To Your House – GF Video


  • Your Water Heater Burner Goes Out, Here’s One Reason

    Your Water Heater Burner Goes Out, Here’s One Reason

    Friend calls me, his water heater burner goes out every time it tries to heat the water in the tank. We re-light the pilot light, and the burner – the big ring of fire that looks like gas kitchen range burner –  keeps going out or wont light at all. So I call my plumber friend. He already knows what’s wrong.

    Here’s the short answer to why the water heater burner goes out. The water heater is starved for air. There’s just enough air getting into the burner area for the pilot light to work, but not enough to sustain the big ring of fire. (Now you have the Johnny Cash Ring of Fire song in your head)

    Walking the Labs in the city this afternoon, I finally had a great visual to explain this all to you. On the curb, waiting for the recycle pickup, was an upside down gas water heater. It was a perfect opportunity to show how air gets into the burn chamber of the rig, and why it can get starved for air.

    Water Heater Burner Goes Out
    Air vents for burner on bottom of water heater

    There are two vents on the bottom of the heater with very small slits, and the whole tank rests on a metal ring that has oval holes cut into it. This metal support ring is wrapped with a filter material. Air for the burner goes through these big holes, and then through the small slits into the burn chamber.

    But keep in mind water heaters are usually in the basement, and many basements aren’t the cleanest places. Lots of dust. The water heater draws in air at a pretty good rate, and along with that air it pulls in dust.

    Eventually enough dust, despite the filter material wrapped around the stand ring, clogs the small vent slits under the burner. Enough air still gets through to keep the pilot light lit. But when the thermostat on the tank calls for the burner to fire up, it fails because it is starved for air.

    The first fix to try when the water heater burner goes out is simple. Clean those tiny vents.

    Why The Water Heater Burner Goes Out
    Pull aside the filter fabric, insert brush, clean.

    For this you can buy a furnace brush (affiliate link). Pull aside the filter material around the ring, and run this brush back and forth across the bottom of the tank, cleaning the vents. If you can get a vacuum hose under there after brushing, all the better.

    Water Heater Burner Goes Out
    This brush saves the day. Go get one.

    After watching my plumber friend fix the problem heater, I bought two of these brushes, one for me and one for my friend. A very cheap solution. And a reminder to keep your basement clean.

    Buy the water heater cleaner brush here (affiliate link)

    Clean A Dirty Tin Ceiling & Prepare For Painting

  • Clean A Dirty Tin Ceiling & Prepare For Painting

    Clean A Dirty Tin Ceiling & Prepare For Painting

    To show you how to clean a dirty tin ceiling, I took some photos to show you how we clean one in preparation for painting. You can also use this method to just clean most tin ceilings that don’t need a fresh coat of paint.

    This paint job was a tin ceiling in a small kitchen, and the tin ceiling was covered in grease from the stove. You can see in the picture below how stained the tin ceiling is. The lighter areas are where we did spot cleaning to see how bad the grease on the ceiling was.

    Clean a dirty tin ceiling
    Kitchen Grease on Tin Ceiling

    To to clean a dirty tin ceiling, we first cover all the counter tops and floors with plastic. We wore paint coveralls and gloves, goggles, and masks to shield ourselves while cleaning the ceiling.

    We then used TSP (Trisodium Phosphate) mixed according to the package directions in a bucket of warm water on the ceiling. We used large sponges to apply the TSP to the ceiling and then removed the cleaning solution and grease with sponges soaked in warm water. It took several applications of the TSP to get the tin ceiling clean.

    TSP is a strong cleaner! Follow all label directions and safety guidelines on the box, OK?

    Clean a dirty tin ceiling
    See the difference cleaning the ceiling makes

    If your ceiling has grease on it or is stained yellow, you have to remove this stuff before painting. The paint wont stick to grease.

    Clean a dirty tin ceiling
    After cleaning one area, you can see the contrast

    It took a whole day to clean the ceiling, applying the soap several times, then allowing the ceiling to dry before painting the ceiling. We used a 3/8″ nap roller and a high quality latex paint.

    Materials List

    TSP Surface Cleaner

    TSP P Free (less harsh cleaner)

    Cleaning Sponges (you will need a bunch of these)

    Chemical Resistant Gloves

    Safety Goggles

    Disposable Coveralls

    Have you cleaned a ceiling? What was your experience? Tell us below:

    Spilled Paint Cleanup!

  • Lithium Batteries Aren’t Always Better

    Lithium Batteries Aren’t Always Better

    I was talking to a tech support person about one of my weather stations that was not working. I told them that I had put lithium batteries in the outdoor sensors for winter. The tech person said, in so many words, that using lithium AA batteries in the weather sensors was not recommended unless it gets very cold in your area.

    Like sub zero cold more than a few times a winter.

    Of course I can’t remember the exact reason, but the voltage levels of AA lithium batteries can affect the electronics in a not good way.

    So the not working weather station is on its way back to the company that makes them. And I’ve taken the lithium batteries out of my outdoor weather sensors.

    BTW, this indoor outdoor temp display works pretty well. I have yet to find the best one ever, but I have three of them and they work.

    From what I can tell from various forums, lithium AA batteries work best in flashlights and other high power drawing devices. Weather station sensors are the opposite, just sending a bit of data ever minute.

    Could you fill in the blanks on how lithium batteries affect electronics?

    Storm Preparedness – 3 Must Have Tools – GF Video