When you replace an outdoor outlet, spend the money on a good cover, or you will be replacing the outlet again soon. I wrote about a GFCI outlet I replaced that was hit with a power washer, and in the project below I use a higher quality outdoor outlet cover. This kind of cover is better, I think, and allows for power cords to be plugged in for the long term without getting water into the outlet.
Old outlet cover gasket had failed.
What breaks first here is the gasket protecting the GFCI outlet from the elements. When the gasket fails, water can get in and fry the outlet. A bad thing. Same thing happens when you hit it with a power washer. Another bad thing.
So when you want to replace an outdoor outlet, go buy one of these high quality outdoor covers. They are worth it. Your outlet will last a lot longer. Plus when you are plugging in your Christmas lights, you will realize how well this cover works.
I like this one because it has knock-outs that allow a cord to be plugged in yet still be protected by the clear plastic cover. Pry out the notched holes to allow the cord to run out the bottom of the outlet.
See the knock outs on the bottom of this cover, remove one or both.
Another plus of putting on a new cover is the new gasket that comes with the outlet kit, and the best thing is included in the kit are new screws! One might not get excited about that, but when you are jammed behind a large shrub, using new screws makes your day.
I see broken outdoor outlets all the time, and they can be a pain to replace. Many times they are tucked below large plantings, and are near the ground, so you have to kneel down to work. Not fun. So do this right the first time, and save your knees and time.
I wanted to walk you through the Skil right angle grinder repair I did this week. A while back, the plastic slide switch on this tool flew right off when I went to turn it on. Right angle grinders are not very expensive, but I hat the idea of tossing out a perfectly good tool just because the switch is bad. Here is the repair I did.
Where the on switch used to be
I thought the switch mechanism was right where the switch tab comes out of the body of the grinder, so I took apart the most of the tool to get to the switch.
4 screws hold in the spindle. Easy enough to remove.
Its always fun to see how tools are built, at least I think its fun. So in addition to completing the Skil right angle grinder repair, I just like taking things apart to see how they work.
Armature removed
But I discovered that the switch wasn’t where I thought it was. But this was after I pulled the armature and the brushes popped off the commutator. I knew then getting those back onto the motor would be a challenge.
Brushes that would have to be slipped back over commutator.
The switch itself was in the back of the grinder, near the power cord, and a long plastic rod connected the switch button and the switch mechanism. Why did I not first just pop the back of the tool open? It was just one screw holding the case together.
When I first looked at it, the back of the grinder looked like it was all one piece, only after unscrewing the one screw did I see the back end came apart easily to reveal the switch.
After trying to jumper the switch internally, meaning bypassing the switch so the grinder was always turned on, I opted to slide in a piece of plastic wedge to push the switch into its ‘on’ position permanently. Plastic glue holds it in place. The plastic I used is from one of those composite wedges one buys for carpentry projects, I think its a combo of sawdust and plastic. It worked perfectly here. Any piece of plastic would do fine.
With the grinder always on, I wired an inline switch into the power cord. This is the hardest part for me, as you have to cut the wire just right for it to fit into the switch case. Be sure to use the black wire in the switch, and the white wire passes through the switch untouched. If you cut too much of the insulation, you can use quality electrical tape to wrap the wire that sticks out of the switch case.
Now I have my grinder back, and saved some landfill space as well.
In hindsight, I would have done this one different. But here’s the story:
One of my best friends needed to replace the roof hatch on his row house in Brooklyn. This also happens to be the roof where we keep our honeybees. Replacing the roof hatch is pretty straightforward, go buy a new steel one, get it up on the roof, screw and glue it on. Done.
Except the roof hatch would not fit up through the existing access hole in the roof. It now occurs to me we could have cut open the hatchway, roll back the rubber roofing, get the hatch up there, then lay back down the roofing and patch it up.
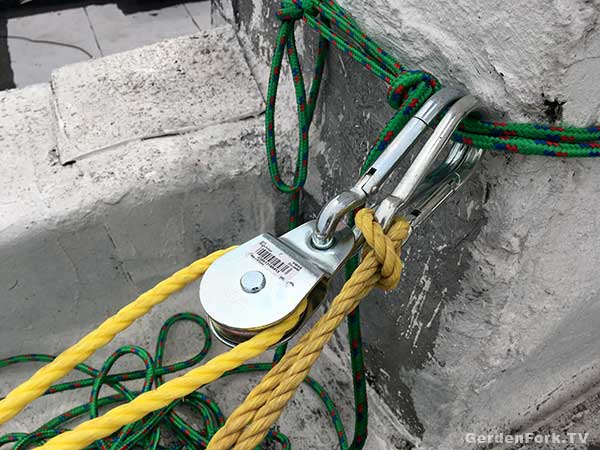
That would have been easier than what we did instead. But ropes, pulley, carabiners, and assorted gear is fun to work with.
We brought the new hatch into the backyard, and figured it would be a straight hoist up. We used a double pulley rig. That way the weight of the load would be much easier to hoist up. To rig this, the rope is secured one of the roof chimneys, the rope then goes down to the roof hatch, where its threaded though another pulley. The rope then goes back up to the roof, through a second pulley, then dropped back down to the ground.
End of the rope, and second pulley secured to chimney.
Pulling on this rope, with the two pulleys connected, makes it much easier to hoist heavy loads.
My friend secured the roof hatch with ratchet straps, and connected the pulley and hoist rope. I then pulled the hatch all the way up the back of the building, and we rested it on the top floor fire escape.
If you’re thinking of doing something like this, be sure to use rope, straps, and pulleys rated for the load you are hoisting, OK?
Once the hatch was resting just below the roof, we had to figure out how to get it up over the roof. Not easy, we found out.
It didn’t help that in the middle of this project, one of the beehives decided to swarm!
Bees swarming in middle of project.Resting on the top floor fire escape.
The last 10′ feet of hoisting involved using a ratcheting come-along (which isn’t recommended for hoisting, FYI) to hold the hatch in place as we lifted up and over the edge of the roof.
Finally up on the roof.
After our “The Eagle Has Landed” moment, we took apart the straps to see two of them had already failed. Wow.
In one of those hindsight moments, we should have ran a few straps around the sides of the roof hatch in addition to strapping it around its top and bottom. The sharp corners of the metal flashing that makes the mating edge of the hatch had cut the strapping. Not good.
Once up on the roof, it was butter to install the hatch. Clean up the existing roof curb, lay down some roof tar, and screw it in. Done.
So yeah, next time you need a large object up on a roof, think about making the hatch hole bigger and then patching that. Easier than what we did.
Every year I try to extend my vegetable garden season into winter, and get a head start on the spring season while there is still snow on the ground, with mediocre success. This is going to change now that I am re-reading Niki Jabbour’s Year-Round Vegetable Gardener, an excellent read on garden season extenders, as well as a good basic how to grow vegetables kind of book.
After the first time I read this book, I interviewed Niki on the GardenFork Radio podcast, listen here.
I talk about it in this video, but my mini greenhouse hoop house had a huge fail this winter. The kale, salad greens, and rosemary I was trying to overwinter crashed and burned. Some lessons learned there.
Snow Season Gardening
But I was re-inspired to just plant more vegetables this summer season AND get better at growing vegetables in winter. Or at least growing them later into fall. Niki has a bunch of methods here that are simple and easy to do. You don’t need lots of equipment. You might need lots of mulch and straw, but that’s easy to get.
Like a lot of how to grow vegetables books, this one goes through different vegetables, but also has a chart of how to start them early and grow them late. Niki made me realize I could sow successions of beets, not just one crop. Lightbulb goes on.
As we all know, I am not one for planning, but the ‘plan your garden’ part of this book got me thinking I should plug some dates into my calendar with reminders to get stuff started. A goal is a second crop of sugar snap peas in the fall. Watch our growing sugar snap peas vid here. And a bunch of salad greens.
Carrots have not been great in the garden, Niki has inspired me to try again. Buy Niki’s book locally or order her book here.
Other vegetable gardening posts & vids you might like:
Some garden books say you can’t transplant snap peas, instead just direct sow them early. I disagree. When we say snap peas, I think most of us mean sugar snap peas, the kind that barely make it from the garden into the kitchen. Someone has taught the Labradors to eat peas, so most of our sugar snap peas never get to the kitchen.
Sugar Snaps started from seed.
Lots of ‘how to plant peas’ texts say to plant the seeds as early as you can work the ground. Saying you can even plant them when there’s still snow on the ground. I’ve tried this, digging out some dirt as sowing a line of peas.
That didn’t work too well.
Sugar snap transplants planted at the same time.
Transplant Snap Peas, my step by step process:
Wait too long to start sugar snap peas in seed starting pots
Buy transplants at the local nursery.
Plant them.
And, BTW, sow some snap pea seeds as well.
I am great to waiting too long to get my pea seed in the ground, but if remember, I pick up some legume inoculant, as stated in my friend Kenny’s excellent how to plant snap peas post. If you don’t have the inoculant, don’t worry, you should still get the seeds or plants in the ground.
Sugar Snap Pea Transplants I grew myself. Nice!
The transplants go in right quick, not much rocket science here. I sow the seeds pretty thick in a row 1″ deep and then tamp down the soil over them. The seeds wills split underground, so give them some ground, and the leaves emerge up through the soil. You may see the seed itself pushing through the soil, I sprinkle some light soil on top of these.
All my peas go at the end of my raised garden beds, learn how to build them here, on a simple trellis. Learn here how to build trellis. The trellises are at the end of all my beds, its the perfect place to put them. They don’t take up any room in the veg bed and the Labs can get to them easily.
Another improvement I’ve made is I extended my soaker hose drip irrigation system to run parallel to the trellis, right up against the end of the bed. This waters the plants nicely, one less thing for me to blank on.
The over-seeding pays off for me, I get lots of plants, and masses of peas. I sometimes have to train the plants up onto the string trellis, but they go from there. What has your experience been when you transplant snap peas? Let me know below.
Some Videos and Posts you might want to check out:
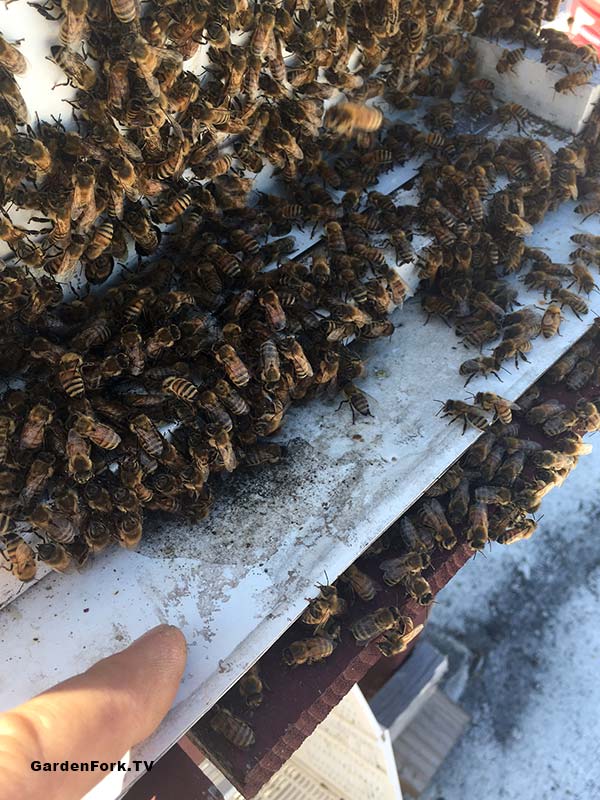
It’s the first really hot day of the year. You climb up on the roof, and the new hive – a bee package we installed this spring – has tons of bees all over it. There’s a liquid sugar feeder on the top of this hive, and 10′ away is a mature hive that might be swarming.
It’s been a frustrating bee season so far, and I see this and just think the worst immediately. The mature hive is robbing the young hive for the sugar syrup sitting up in the top of the hive. Or, a swarm is trying to move in – though I’m not sure that is possible. But being up on a hot roof, your brain already starts to melt when you see this.
I take some pictures and send them to my local beekeeping friends, we have a gmail email group, and wait. The mature hive, which I believe has already swarmed once, it very quiet in comparison.
Bees Don’t Read Books
My beekeeping teacher told us that the first day of class. So while you are trying to figure out what is going on and how to fix it, the bees are doing what they want.
If the young hive was being robbed, you can try to place a wet sheet over the hive to thwart the attack. (there is a entrance reducer on this new hive to thwart just such an event)
Was the young hive going to swarm? This has happened to friends, though I have never had it happen to me, thankfully. Watch this cool video of us catching a swarm.
Was a swarm trying to move in on a young weak hive? I’ve never seen this, but my brain was racing through options.
By now I was starting to get replies from my fellow beeks.
Bearding. In other words, the bees are hot. So they are outside the hive.
Doh!
I use what is called a screened bottom board on my hives. It has a screen window built into the floor, and plastic slider that covers the screen. This allows a few things:
Varrao mite counts with a sticky slider board.
Varroa mite reduction when the mites fall through the screen and out of the hive.
Ventilation in the summer, and air flow to cure honey faster.
Previous to this first hot day of the year, we have still been having cool nights, so I have kept the slider board in, as the bees need to keep the brood boxes (where the eggs are laid) warm. Cool drafts at night aren’t good for that.
But today the temperature was really high, and a closed in box gets hot. So the bees go outside to cool off. You can see in the first photo that the bees are on the shady side of the hive.
My friends emails asked if I still had the bottom board slider in, and then meltdown subsided. Pull out the slider, the bees will cool down.
Pulling the slider out from the bottom board, slowly…
The plastic slider removed.
BTW, a key thing here is if you bees are on a DIY bee table/stand, the tabletop part of the stand has to have the center cut out, so air can flow to the bottom board.
Hive stand top is cut out to allow air flow.
So I was calmer after that, and felt less than smart, even though I’ve been doing this for years. Standing back and looking after the fact, it did look like an overheated hive.
But when you walk into it, that isn’t always apparent. So once again, its good to belong to a group of beekeepers that you can check with, right there on the roof.
I used to be something of a pack rat, now I’m that guy always getting rid of stuff. Before, I always thought something might be useful later on. My thinking was, “I might need that one day.” No more.
I’m not sure exactly when it happened, but now I get excited to look at the model apartment layouts at IKEA, and marvel at how you can live with less in less square footage. And do so with two large Labrador Retrievers.
I’ve built a few projects with IKEA cabinets, check them out here, but this post is about getting rid of stuff.
How did I come to be able to let go of stuff, and not bring more home? I think two things influenced this.
First was me starting to meditate. Not to sound all wooh and crunchy, but its allowed me to mentally let go of a lot of daily mental baggage. Lots of stuff just doesn’t matter, it drags you down. (my favorite app for meditation is Headspace, it is great)
Second was the fact that I do all the cleaning in the house. If there was less stuff on the floor, I wouldn’t have to move it to vacuum. Less Labrador dust balls could collect around that stuff. Fewer horizontal surfaces (piles of stuff) meant less surfaces to dust.
And when I wanted to do a project that involved large stuff, like plywood or cardboard, I always had to move stuff around to do it.
Then there is the visual. Less visual clutter. For some reason now, I like to see less stuff around.
I’ll see stuff in the house, and ask myself, “Have I used that in the last year?” If the answer is no, out it goes. Many cookbooks have left the house lately. I have favorites I reference, and they stay, but I don’t get the amount of cookbooks people have.
Case in point: A few years ago my neighbor was giving away a propane grill. It was in pretty good shape, but it didn’t work. I fixed it, and of course made a video about it here. But I’ve since realized, I just don’t grill. I’ve used the gas grill more for seasoning cast iron than cooking steak.
So it was time to let go of the gas grill. First I took a photo of it and emailed friends. With no response, I wheeled it out in front of our Brooklyn apartment, with a bilingual sign on it. I kept the propane tank for to help make maple syrup up at the house.
Literally in a few hours, someone was out front hauling it away. Nice.
Neighbor taking away my clutter
I still see stuff and think “I should bring that home, I could use it” and then I stop myself, usually. A box of electrical wiring supplies did make it home, but its being used and anything left is put back out on the sidewalk.
Getting Rid Of Stuff, Some Suggestions
If you don’t have an urban sidewalk, maybe your local community has an email list you can send to, or you can use Craigslist and Freecycle. There some drawbacks to using the free section of Craigslist, we talk about it on GardenFork Radio. But if done correctly, its a great way for getting rid of stuff. Freecycle’s attraction is the people in that group understand the process, and are better to deal with. Either way set specific time and dates for pickup, or you will be waiting all day.
I look out the window and love that the grill has gone to a family who can use it, and I have more space in my backyard. It’s a great feeling, just letting go. How do you let go?
When sparks fly out of it, its time to replace a GFCI outlet. My neighbor had his house power washed, and not sure how, but the power wash wand managed to blast up in to the GFCI outlet. Bad, very bad.
I’m sure the power washer operator knew something was wrong when the sparks and smoked started coming out of the outdoor electrical outlet. The one with the weather proof cover on it. Yeah, that one…
My neighbor asked if I knew how to replace a GFCI outlet, so it was time for some DIY electrical repair. Big Note: if you don’t know your way around electricity, enjoy this story but don’t try this yourself, ok?
I guess the power washer guy got the washer wand too close to the outlet, and maybe directed the spray at an upward angle. Water got up under the outlet cover, and into the GFCI outlet. Then the sparks fly.
Black smoke marks means this outlet is toast.
What is a GFCI outlet?
A Ground Fault Circuit Interrupter outlet is used in wet locations. Areas where there is a possibility that despite all your best intentions, you are standing in a puddle of water when plugging something into an outlet, and you managed to grab prongs of the plug when plugging into the outlet.
“These electrical wiring devices are designed to quickly and automatically disconnect a circuit when it detects that the electric current is not balanced between the energized (line) conductor(s) and the return (neutral) conductor. Under normal circumstances, these two wires are expected to carry matching currents, and any difference can indicate a short circuit or other electrical anomaly is present, such as leakage. Leakage can indicate a shock hazard (or shock in progress) which is a potential danger to a person. Current leakage can result in harm or death due to electric shock, especially if the leaking electric current passes through the torso of a human.” Wikipedia
Love the last part, passes through the torso of a human. Yes, that is a bad thing.
My neighbor picked up a new GFCI outlet and we turned off the power to the outlet at the breaker panel. I then removed the screws holding the outlet in its box, pulled out the blown outlet and tested the wires to make sure that they were not energized. IOW, Making sure I wouldn’t get shocked.
Look in the back, there’s still water in this box.
I have a favorite tool for keeping electricity form passing through my torso: it’s called a non-contact circuit tester. You can tell if a wire is energized (it has power in it) by just getting the tip of the tool next to the wire. Neat. It chirps and blinks if there is power present. Whenever I open an electrical box, I first check all the wires with this tool. Saves my torso…
First, when you want to replace a GFCI outlet, buy high quality replacement. The cheap ones will always break. You get what you pay for with most things, and we don’t want to cheap out on anything that involves electricity. Learn from me, OK?
I managed to pull out some wire from inside the wall and cut back the fire damaged wire. I connected the black, white, and green wires to the correct screws. The 2 correct screws for the wires bringing power to the outlet are labeled LINE, and should be across from each other. Most outlets are well marked where the Neutral and Hot wires go. Neutral or Common wires are white. Hot wires are black, but can be red if the outlet is connected to a switch.
If power is flowing from this GFCI outlet to other outlets (which will also be protected by the GFCI) those outlets will be connected to the LOAD screws. The load screws are usually covered with tape like in the photo below.
Insert wires into holes in back of outlet, screw tightly down.Wrap back of outlet tightly with electrical tape
I pushed the new outlet into place. Note: my neighbor bought a 20 amp outlet, one usually installs a 15 amp outlet.
Put your outlet tester into the outlet and turn on the power. You should be good to go.
Weather proof covers are a must for outdoor outlets. Replace the rubber gasket it if it damaged
When you first turn the circuit breaker that feed power to this outlet back on, the outlet will probably be in its “tripped” mode. Press the reset button on the outlet and it will allow power to flow to the receptacle. Press the test button to make sure the GFCI is working, it should trip the GFCI to off, then hit the reset button again. You are now good to go.
I have used a stovetop pressure cooker for years. Then a friend of mine showed me his Instant Pot Pressure Cooker. Then I bought one. Buy Yours Here: Instant Pressure Cooker 6 Quart Watch our review video and read on for more info below the video.
[Being up front here, the above link is to Amazon and we get a finder’s fee for referring you to Amazon, its part of how we pay the bills to make more videos and posts for you all to watch.]
OK back to the story:
Its literally “set it and forget it”. Put in ingredients, turn it on, and go do something else in the yard or house. Don’t leave the property, OK?
I make beans and chickpeas ever week, we cook pork shoulders and short ribs in it, and I want to try a carrot soup recipe I saw in the Modernist Cooks At Home cookbook next.
The advantage of electric over stovetop pressure cookers:
You don’t have to adjust the stove burner
It stops cooking at a pre-set time and goes into keep warm mode
I realized I bit off more than I could chew about one week into this year’s maple syrup season. Ever think about a project for months, only after you start you realize, OK what did I get myself into? That’s me this year making maple syrup.
Have to clean up the rig soon.
First I built a new homemade maple syrup evaporator, I had been building it my head since last season. I found a legal size file cabinet in Brooklyn for $50, hauled it up to the house, and started building the firebox. I bought a Harbor Freight Flux Core Welder to help with the build.
For a while now I have been wanting a MIG welder, but after learning about the flux core, it was the obvious choice, and I now had a project where it would be useful. So a deep dive on YouTube on how to weld led to our first basic flux core welding video.
I had also been thinking about getting a evaporator pan made to fit right on top of the cabinet. For the previous homemade evaporator, we used steam table trays, and that’s ok, but I wanted to boil more sap in less time.
I found a guy named Zach who was selling sap evaporator pans on Ebay, and contacted him about a custom pan. A week later a cheap maple syrup evaporator pan shows up on my doorstep. Cheap isn’t the right word, but mbe that phrase will help Zach get more biz for his site through search. Really well made is a better term to describe it.
Last fall I started collecting way too many pallets to supply the firewood to boil down all the sap I was going to collect.
Way Too Many Pallets!
All during last winter I’m eyeballing more sugar maples I can tap around me. How would I run the lines, how close can I get them to the road – too much thinking. I order more tree taps and sap lines. Sap line and taps are surprisingly cheap, BTW.
And I bought a food grade pallet tote on craigslist, which holds 275 gallons of liquid.
So I fire up the new evaporator and realize quickly I’m burning wood real fast, and not getting a lot of heat in the tray. The sap is boiling OK, but it should be really boiling or I should be throwing less wood into the firebox. The fire is racing through the cabinet and going right up the stack.
Firebox Raceway
Always fun to see flames coming out of the top of a 8′ chimney. No pictures, sorry.
So while I’m slowly boiling sap, I’m collecting A LOT of sap. I had been thinking about extending some of the sap lines I do along the road up into the woods, but I’m glad I didn’t.
The big problem with collecting lots of sap is storage. I then discover the neat pallet tank freezes. And you can’t just break through the ice in the tank like you can with an open barrel. So I had 150 gallons of sap in a pallet tote that I couldn’t get out of it. The valve on the bottom, and the water in the sap, was frozen. The tank is plastic, so you can’t heat it, or it melts. The beauty of the blue plastic barrels I use is that you can break through the ice and haul out the concentrated sap in the center, then turn it on its side to dump out the ice. Not so with an enclosed tank.
A related issue was when I wanted to run a gravity fed line from the storage area up by the garage down to the evaporator, I used the 5/8″ sap line. If it was 32F or lower outside, the sap would freeze in the feed line. I gave up and hauled it with buckets.
My two big problems were the heat racing through the firebox and sap freezing in storage.
The sap freezing was easy, sell the pallet tank buy some more blue barrels for storage.
The firebox inefficiency was not as easy. Reading on the Maple Trader maple syrup forum, many sap makers build a baffle or obstruction in the firebox to get the heat to stick around longer. My friend Bill, who I learned how to make sap from, has two bricks halfway down the firebox, covered with sand. This causes the air – heat to become turbulent (we think) and stick around longer. I read about others who put a metal baffle in the box to slow the burn. One could also put a damper in the chimney.
My experiment with pre-heating the sap by running a copper tubing around the chimney stack didn’t work. The sap just didn’t warm up very much. Copper tubing is expensive! Maybe running the tubing inside the chimney may work better.
And of course, we had the epic FAIL on a glorious winter day:
Not fun…
After this I went out and bought a food grade tank that sits nicely in my trailer. BUT, like the pallet tank, you can’t let sap sit in it, you have to get it into barrels or it will freeze. The fact that the tank sits low in the trailer (good for avoiding more spill fiascos) means I have to bucket it or pump it into the taller blue barrels. I see a pump purchase in my future…
Storage: I’ve been a big proponent of doing with less, minimalism, downsizing your junk. But making maple syrup causes you to need to store quite a bit of stuff. Kinda like beekeeping. The barrels go up in the garage, but I have to find a place for the tank.
More stuff to store
What did work quite well was lining the side of the firebox with firebrick. I found the firebrick at Lowes. It was pretty cheap – previous I always thought firebrick was expensive. This type was sold as bricks to replace cracked ones in a home wood stove. I basically leaned them up against the sides of the file cabinet. This directed heat up to the evaporator pan, and kept the sides of the cabinet cooler. With the previous file cabinet evaporator, you couldn’t stand next to the rig for too long without burning your pants.
The last thing that hampered the sap season was me. I did this all by myself. Friends would be interested, but wouldn’t show up. So if you are thinking about making maple syrup, get your friends involved early.
But I am already thinking about next year!
I will post some photos of my firebox on Maple Trader and ask the experts for suggestions. My friend Bill suggested the bricks and sand method, that is the first one I will test out. Improve the sap pre-heater. And yes, test the firebox before the start of the season. Did not think to build the evaporator in the fall and boil some water to see how it all worked.
It will be easy to sell the pallet tote to a neighbor, and blue barrels are easy enough to get.
So if you are thinking of making maple syrup, start small and involve your friends. Your eyes will be bigger than what you can get done in the 3 weeks of sap season. Learn from me!
There are some good foraging guide books for the whole of North America, as well as other continents, but even better are edible plant guides that are local to your area. Here are a some that I like.
In the U.S., the northeast and the southwest are very different with regard to native plants, so why not a edible plant book that focuses on that area? Lucky for us, Timber Press had put together a foraging guide books series with regional experts in foraging. Yeah!
Even better, their book for the Northeast is authored by Leda Meredith, who has been on our podcast. Neat.
I have the Northeast Foraging book, and have browsed the rest of these in bookstores and online, and I give them all a thumbs up. I have met some of the people at Timber Press and what’s not to like about a group of people who publish cool helpful books. I picked up my copy of Northeast Foraging at Oblong Books in Millerton, NY. If you are in the Berkshires, go there, buy books, then get coffee around the corner.
This isn’t some half baked set of edible plant books, its a curated cast of authors with local knowledge of what grows near them and what you can eat. Plus, how you can use them in the kitchen. Its not all just some leaves you toss into salad, though that’s all good with me.
I was thumbing through Leda’s book on Northeast Foraging and its interesting that I landed on the Garlic Mustard section, which I just wrote about. And I learned from her that you can also harvest the seeds later in the summer to store for a winter snack. Always learning something.
Please consider buying these books from an independent bookstore, you can order from them online, find yours here.
Here are the links to each book on Amazon, (we get a referral fee on Amazon purchases)
To me, Garlic Mustard Weed isn’t a weed, its a salad green, right alongside Mesclun. Maybe because it is so ubiquitous in my area people call it a weed. I call it free food.
Garlic mustard weed identification is pretty easy, not many plants look like this. These photos are of a the mustard in its second year of growth. The first year it is a low growing green, with what I call a rosette of small green leaves. In its second year, it shoots up with larger leaves and flowers.
According to Wikipedia, Garlic Mustard was “one of the oldest discovered spices to be used in cooking in Europe”. You can use the leaves and flowers in salads. I make a really nice pesto with the leaves, watch my video here. In France the seeds are used to season food. So yes, garlic mustard is edible.
This weekend I saw some growing along a stone wall near the house so I pulled over and took these photos, then pulled up the plants by their roots. Free food! In a few minutes you have a sharp tasting mustard green for your salads, soups, and pesto. How cool is that?
I pull the leaves off the stems and save the flowers whole to drop on top of the salad. This green works well with a balsamic vinegar salad dressing, as it has a pretty strong flavor. Add in avocado to balance it out. That ying-yang thing applied to foraged and farmed foods. The irony of that being you pulled the greens from the side of the road and the avocado had to be trucked a long way to your kitchen.
To harvest this wild mustard, bring along a trowel or small shovel, and grab the plant by its base and pull out the whole plant, root and all. Don’t feel guilty pulling this out of the ground. In the U.S. this is an invasive plant that is bad for our local trees and fields. It emits chemicals that make the soil hospitable to its growing and everything else dying, basically.
Garlic mustard produces allelochemicals, mainly in the form of the compounds allyl isothiocyanate and benzyl isothiocyanate, which suppress mycorrhizal fungi that most plants, including native forest trees, require for optimum growth. However, allelochemicals produced by garlic mustard do not affect mycorrhizal fungi from garlic mustard’s native range, indicating that this “novel weapon” in the invaded range explains garlic mustard’s success in North America. Additionally, because white-tailed deer rarely feed on garlic mustard, large deer populations may help to increase its population densities by consuming competing native plants. Trampling by browsing deer encourages additional seed growth by disturbing the soil. Seeds contained in the soil can germinate up to five years after being produced (and possibly more). The persistence of the seed bank and suppression of mycorrhizal fungi both complicate restoration of invaded areas because long-term removal is required to deplete the seed bank and allow recovery of mycorrhizae. Wikipedia
In other words, this plant is not good for your local area, so pull it out by the taproot and enjoy it in your salads.
Make these quick swarm traps when you have some spare beekeeping parts on the shelf. The parts are just sitting there, so we might as well use them, right? Here’s how I build a swarm box using that famous GardenFork mantra: Use What You Got.
I had some frames from a dead hive, plus some frames of honeycomb that had been damaged by wax moths. While not in the best of shape, these are perfect for a quick swarm trap. Not sure if you can see it in the photo above, but most of my frames use plastic foundation. One benefit of this is you can scrape out damaged comb and not ruin the whole frame. The center frame had some wax moth damage, which I removed.
Above is the difference between frames made with wired wax foundation and plastic foundation. Use either one for your hives, its a personal preference, lots of strong opinions about this of course… I like the plastic foundation because its easy to clean up, it lasts longer and the bees take to it easily.
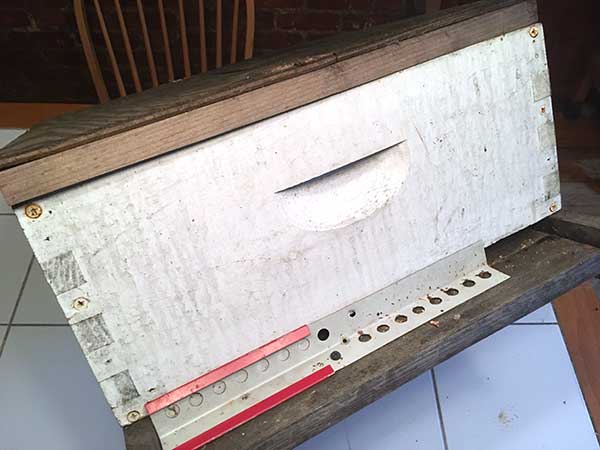
I am using a medium frame super, that is the wooden box that the frames sit in. If you have spare frames, but not a spare super, you can make a box out of scrap wood or cardboard or even plastic sign material. Make sure it has an entrance and ventilation. Again, Use What You Got.
Bees that are swarming and looking for new home LOVE the smell of an old beehive, and are attracted right to it, hopefully. So save those chunks of old burr comb and honeycomb, and stick some in each of your quick swarm traps. I put the comb on the bottom board, under the frames. It doesn’t have to be attached, it can just sit there.
Because I like to buy bee supplies, and this was pretty cheap, I picked up this swarm attractant. Buy online here. The envelope has 2 small plastic vials of mystery fluid. I’m pretty sure its lemongrass extract and perhaps spearmint. It says not to open the envelope, but of course I did anyway, to discover the vials. Basically, the heat of the day warms up the plastic vials, which probably leak a bit of essential oil vapor. Place the vial on top of the hive frames in the box.
I’m using an old bottom board for the base of the swarm trap, but you want to reduce the entrance. The swarm may not have the population to defend a large entrance, so close it down with whatever you have. Duct tape works very well, FYI.
The screen in the bottom board helps to spread the aroma of the old burr comb, the honeycomb in the frames, and the attractant.
I made a cover for this out of scrap plywood and some 1×2 lumber. I screwed the top into the super holding the frames, and screwed the super into the bottom board. This way you can hang the rig in a tree or on a fence and when its full of bees, you can bring it down without it call coming apart. I usually attach a 1×4 piece of wood as a hanger, and wire this into a tree or fence.
Swarm traps seem to do best when located in a partial shade area about 100′ from bee yard. But you can put them anywhere to test them. I put one in my Brooklyn backyard every year, because I see bees on our flowers, but have no idea of any beekeepers nearby. I have yet to catch a swarm in the yard, but I try.
You can make quick swarm traps out of all sorts of stuff, even political signs, learn more here.
I have caught some swarms, and its a lot of fun, watch here:
You’ve probably seen one or three of my mini greenhouse plans videos. The most recent one talks about the complete fail of the plastic cover in the middle of winter. Here are the photos that show my attempt at repair before the complete breakdown of the covering.
My big mistake 4 months prior to the fail was to put screws through the top of the PVC pipes, and then lay plastic sheeting over the screw heads. Who knew that the metal screw head would eventually puncture through the plastic, starting as all holes do, small.
Prior to the small hole caused by the screw, all was good in the mini greenhouse. These rosemary plants had over-wintered well. Not so well after the plastic ripped though.
My attempt at repair was to use packing tape over the screw head and the splitting plastic. I knew it was not a 100% guaranteed repair, as it was cold out when I applied the tape. I don’t think other tape would have worked either. The glue on tape is not cold friendly.
That small hole grew through the winter, with the weight of heavy wet snow, and lots of wind. Then we had even more wind and that caused the complete tearing of the mini greenhouse cover. Darn. It sat for a while before I was ready to walk over and deal with it. Besides, there was still 18″ of snow on the ground. I knew all the plants inside the hoop house were toast.
Going forward I will use UV rated greenhouse plastic, I’ve seen some that is reinforced with netting in the plastic. AND I will screw the screws into the PVC starting underneath it, through the wood crossbeam, then into the pipe. If you have some old storm windows on hand, you can make a neat cold frame with them.
In the meantime, check the video where we walk through the fail:
If you want your appliances to last longer, don’t buy smart appliances. Here’s why:
3 things have stuck in my head recently so I thought if I would write this all down, it would maybe get out of my head.
First, I just fixed my sister’s portable generator. It was a freebie that hadn’t run in several years. I knew immediately what was wrong. Bad gas gummed up the carburetor.
While it took a while to find the engine serial number, I did easily order a new carburetor for about $100, and slapped it on in short order. Except for the trip to find an odd Torx female socket (an E25, FYI) the new carb was on and the generator running in less than an hour. Always nice when an engine starts on the first pull. Very analog. (Always use gas treated with fuel stabilizer, more here.)
2nd was an article by Erik on Root Simple about his #FewerFeatures movement.
When the control panel on our dishwasher failed last month I found myself asking why our appliances and gadgets have so many useless features. Those features bring with them a greater chance that the device will break down and make them harder and more expensive to repair.
The third was a smart thermostat sent to my by an established furnace controls company. I was initially excited, but when it insisted on having my cell phone number and home address to function, I sent it back. Why does a thermostat need my cell phone number and home address? All the better to use that data for what purpose?
My reasoning behind the don’t buy smart appliances mantra that has been swirling in my head for a while is this:
The smart parts of these appliances are going to mothball fairly quickly.
Think about the smartphone. Every time there’s an operating system upgrade, your phone gets older. In a few short years, your phone can’t handle the new software, and you have to buy a new phone.
If you fridge has software in it that is compatible with today’s smart devices, it is already dated. How many software patches and upgrades will appliance companies issue before they say a 6 yr old fridge is beyond their upgrade policy? “This refrigerator is no longer supported” will be a recurring phrase in the future. When will bluetooth be discarded? Same for buying a replacement control panel or circuit board.
There’s also the question of why do we need this? Granted, people asked that about the telephone, dismissing it as a novelty. But do I need to know how much ketchup I have on the door of the fridge? Not at the moment.
When we bought a new washer and dryer, I knew I wanted one of the new high efficiency front loading washers, and tried to get one with less buttons, but it is still full of buttons. I did better with the dryer, instead of buying the companion dryer with all sorts of buttons and choices, I got the super simple tin box with a knob and a start button.
The simpler appliance is a lot cheaper, and it will be a lot easier to fix if it breaks. For the time being, until I have some sort of alternate epiphany, I’m saying don’t buy smart appliances. What do you say?
Want to apply frosted window film? Its easy, and I made a video to show you how. This works for either window privacy or decorative window film patterns. Watch the video and read through the how to below.
We have some french doors that separate two bedrooms. We love the glass doors, but wanted privacy between the rooms. I started researching how to frost glass doors and decided that using frosted glass film was the way to go with these doors. If you’d like to see how to use frosted glass spray paint, watch our video here.
Why Frosted Window Film?
For a french door, which has a bunch of small windows in it, the film was a much easier option than using the spray product. We wouldn’t have to mask off all the wood, we could just cut a piece of frosted glass film to fit each rectangle.
You have a few choices when shopping for window film. (Please consider using our link when buying the film, it helps us pay the bills!) They come in different diffusion densities and sizes. You will need more film than you think, learn from me. I made several mistakes in cutting, and I’m glad I bought more than I thought I needed.
You will need a utility knife with a few brand new blades, and some thick cardboard to cut on. It helps to put down a piece of plywood under the cardboard so you don’t cut your floor. A metal ruler or straight edge is key for cutting the film.
Important, be sure the glass is super clean before applying the film. Any traces of paint or polyurethane need to be scraped off and the glass cleaned, or the window film will peel. Learn from my mistakes, OK?
Let me know your thoughts and questions in the comments below, thx!
I am a map geek. The last two weekends have hauled out the large USGS topo maps I have of our area, spread them out on the table, and gone over them with friends.
But the problem with the USGS topographic maps is: they are huge, big pieces of paper.
National Geographic has solved with problem by offering these free USGS downloadable maps that print out on 8×11 paper. Much better, right?
I have already downloaded 4 maps, as our town is spread across a few of the maps, and now i can piece together a custom map. What fun.
Here’s an easy flower box you can put together in an afternoon. All you need is some stock lumber and spray paint. I built the planter box for my friend Bill, and he cut out a stencil and decorated it.
I made this out of pressure treated pine 1″x6″ lumber. Worried about pressure treated lumber, watch this. And screwed it together with painted deck screws, they will last longer than drywall screws. I set the ends in slightly for a decorative look, a little less boxy, I think.
I made this box a little narrow by cutting down the 6″lumber to 4″ wide. You can do this on a table saw, or maybe your neighbor’s table saw. Or don’t cut the lumber down, its all good. Use what you got. Wear eye, ear, and dust protection when cutting wood.
I did screw into the end grain of the side walls, which isn’t the best carpentry, but i also glued it with a waterproof wood glue.
I drilled a few drain holes in the bottom board. Depending on where you place this planter, you might want to drill them on the bottom of the side walls. This planter will last much longer if it is not sitting where water can collect underneath it. The photo above is an example of a less than great placement. To fix this, slide some thin wood shims underneath this, or flat rocks, or whatever you have. If you keep the wood of the planter dry, it will go a long way toward a long life for the box.
Bill painted the easy flower box with white outdoor spray paint. He then downloaded a stencil design of a fern leaf, printed it out on regular paper, and cut out the leaves with a sharp utility knife. Two different cans of green spray paint work well for the green leaves, I think.


 Even better, their book for the Northeast is authored by Leda Meredith, who has been on our


