When feeding bees sugar syrup, I have tried many methods, and I like the zipper bag method best. Here is another of our beginning beekeeping 101 videos, this one on how to feed bees sugar syrup.
I have tried various sugar feeders with some success, but it seems that most feeders drown bees also. My friend Rick Kennerly introduced me to this zipper bag sugar feeder method.
The advantage of many sugar feeders is that you don’t have to open the hive to add more sugar syrup. With the bag method, you do open the top of the hive, but its not much more work than filling up a sugar feeder. When the first bag of syrup is empty, I leave it on the top frames of the hive, and just lay another one on top if it. This keeps the bees from making too much burr comb in the space where the feeder sits. Its also less intrusive that way, you aren’t peeling off a bag every time you open the hive, you peel off all the bags when its time to stop feed sugar syrup.
You can add essential oils to the sugar syrup, we do. Here is a recipe for essential oil mix for honeybees, or you can buy it pre-mixed. Either works well.
You may have to experiment to find the best zipper style food bags. The store brand ones work fine for us. Transporting them when they are full can be tricky, I put them in a wide tray or bucket when I drive to the beeyard. You don’t want syrup spilling in your car or your yard, it creates bee chaos.
I fill up the bags by putting them in a metal pasta pot, with the opening spread over the top of the pot. Don’t fill it up all the way, or the bag will burst.
Here is our overview of how to overwinter honeybees, with all sorts of good info.
A video and information about sugarcakes, which you give the bees for winter:
Our fav way to cook polenta is with a pressure cooker, but here we show a microwave polenta recipe and a stove top polenta recipe. I call these kitchen hacks, since we are showing you how to get a step ahead in the kitchen and cook polenta faster than you can using traditional methods.
Microwave ovens are not all the same, so pay attention the first time you do this. I overflowed the dish in our first test, not a lot of fun to clean this one up!
Polenta becomes transcendent when you add in some butter and Parmesan or Pecorino cheese.
Our first attempt at a Microwave Polenta Recipe
Microwave Polenta Recipe
3 1/2 cups of water
1/8 teaspoon baking soda
1 cup of polenta or corn grits
Mix the polenta and baking soda into the water in a large microwave proof bowl.
Cover with plastic wrap and put in the microwave on high for 5 minutes.
Remove the plastic and stir the polenta, be careful, the polenta will be real hot.
Cook for another 5-6 minutes at 75% power, keep an eye on it to make sure it doesn’t boil over.
Remove from the microwave and stir, let sit for 5 minutes.
Add salt and real good cheese and eat.
Watch our grilled polenta recipe and pressure cooker polenta recipe video here:
A DIY Portable Generator Cart adds wheels to your portable generator for free. This is from a GardenFork viewer, Edward, who embraces the GF ethic of ‘use what you got’ perfectly.
He writes:
“At first glance, this might not look like much, but seeing how I looked for a wheel kit for a generator and saw
that they cost around $40 to $60, I decided to come up with my own inexpensive solution.
I remove the engine from an old mower. I only leave the lower section of the handle connected to the mower
frame (a great place to leave your extension cord). Using two tie-down ratchet straps the generator is secured to the
mower frame. Doing this, I can remove the generator easily in case I need to put it in the trunk of my car. I am planning
on adding a ply wood deck on the mower or a box style base that I can use for other projects.
This setup is extremely stable and makes moving the generator a breeze. It also keeps the generator higher off
the ground away from water and snow.”
I think this is brilliant. My portable generator has air filled tires, which makes it easy to move around rough frozen ground, but if you have a flat place, or are just rolling the portable generator out of the garage into the driveway, this is the way to go. Save some money on the generator wheel kit.
The quad needed new battery, and I’m preparing for the maple syrup season, so I picked up a new battery at the farm supply store. Its a fairly common battery, and most stores stock this one.
The battery comes dry, that is, there is no battery acid in the battery. It comes in a separate container. This makes it easier to ship and store, I imagine. Car batteries usually come filled and sealed, and they are charged already, not the case with smaller engine batteries like this.
Pretty straightforward process, the important caution here is to wear gloves and eye protection. You don’t want battery acid on your hands or in your eyes. And its easy get a few drops of this in the wrong place. Learn from me…
Follow the instructions that come with the battery, but the general steps are to take off the caps of the battery cells, fill the cells with acid to the level indicated, and charge the battery, usually overnight.
Save the red caps, you will replace those. The instructions that came with this battery were vague about that. I used a low amperage smart charger and this battery was ready the next morning for installation.
I use the smart charger to charge up dead car and small engine batteries. To keep this battery at full charge but not wear it out prematurely, I’m thinking about a solar powered trickle charger. One less thing to plug in and have running all the time.
A re-broadcast of a show from 2 years ago, Mike talks of brakes and Sarah joins in to talk Haybox Cookers. We will post new shows next week, we are taking some time off this week. I cleaned the garage!
There are the vestiges of an outdoor maple syrup evaporator in our yard and every time I look at it, I think about a bunch of people hanging out outside in the winter in the cold boiling sap over an outdoor fire and how much fun that must’ve been. This evaporator was made out of a custom made metal tray that was welded together, and pieces of old wood stoves.
One of my neighbors has a very DIY maple syrup evaporator that is basically a large steel tray that a divided into two parts. He sets this over a fire and boil sap outside on the weekends. Most trays are divided into at least two sections so you can manage the boil. The larger sections are for the initial boil, the smaller sections for when the sap is close to becoming syrup. Most DIY evaporators have a pipe and a valve drilled into one end of the tray to pour off the syrup.
He lives on the main road so when I drive by and I see the steam coming off the saturate I stop by and we’ll just hang out we talk about the same things every time how much sap we collected what the ratio is this year how much sap to how much syrup sometimes it’s high sometimes it slow it’s usually around 35 to 1 or 40 to 1
This year I plan on building a new DIY maple syrup evaporator out of a metal filing cabinet so stay tuned for that in the meantime you can check out sober maple syrup videos here
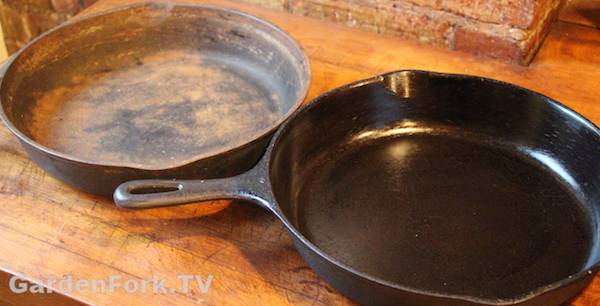
The best cast iron seasoning instructions, hands down. First watch the video, then read more about our easy step by step process to restore cast iron.
At the end of this article are links to how to remove rust from cast iron and how to remove the seasoning from cast iron, where to buy cast iron, and cast iron videos.
So you have a brand-new cast iron pan you just bought or you have an older pan that you just strip the seasoning off of. I ruined the seasoning of one of my pans awhile back, and is one of the reasons I created this cast iron seasoning and care video series. While we show a skillet, this process works for how to season a cast iron dutch oven or griddle as well.
Our cast iron seasoning instructions are based on a blog post by Sheryl Canter, who did a lot of research into this and saved us all from having to do that same research. The secret to cast iron seasoning is you want use an oil that is called a drying oil. When drying oils are applied to a surface like cast iron and heated, the oil goes through what’s called polymerization. The best edible drying oil is Flax oil. You have to buy this in the health food section of a food store and it has to be kept refrigerated, as it can go rancid fairly quickly. Flax oil is the food grade version of linseed oil, I would not suggest you use linseed oil to season your cast iron pan.
But a more affordable and easier to find oil that works well is Sunflower Oil. I have found its great. And if you can’t find any of these oils, regular old vegetable oil or Crisco does just fine.
For this cast iron seasoning method, the more oil application and heating cycles you do, the better the seasoning. Our cast iron seasoning instructions are based on Sheryl’s, I modified it a bit. This process is for new pans, or pans that have had all the previous seasoning removed, watch our video here for how to remove cast iron seasoning.
Cast Iron Seasoning Instructions
On the stove top, heat up the cast iron pan. This makes sure the pan is dry and opens up the pores of the metal a bit.
Add in a tablespoon or two of oil into the pan. Use a paper towel to coat the whole pan, inside and out, with the flax oil.
Grab a new paper towel, and wipe out excess oil. You only want a thin film of flax oil in the pan. No drips or globs of oil.
Turn the oven to 500F and place the pan – you can do more than one, stack them if you want- into the oven.
Heat for one hour, turn off the oven, allow the pan to cool.
Repeat the oil coating and heating 2-3-4-6 times. Whatever works for you.
The more you do this initial seasoning, the better the pan will be.
The outdoor gas grill is great for cast iron seasoning.
The cast iron seasoning process puts out a bit of smoke, so I’d suggest using your outdoor gas grill. Turn the grill burners on high, close the lid to heat it up, put in the pans. My gas grill will not get to 500F, but it got close, and that worked well for me.
I oiled and heated one of my pans 4 times and it looked great, more and it is even better.
I think new cast iron is just as good as old cast iron, but there are many arguments about that. You can get good cast iron on amazon here. This post may contain affiliate links which won’t change your price but I earn a commission from. Thx!
From a GardenFork Fan, an easy way to make yogurt using your oven. You don’t need special equipment, its easy to make, here’s how. Below this yogurt recipe are links to our how to make yogurt videos and more fermentation stuff.
I recommend one special tool; a probe thermometer with an alarm that notifies you when your food has reached the desired temperature. I use this one. There are lots of them on the market ranging from $15 to $60. However any thermometer that will read from 100 to 200 degrees will tell you what you need to know.
Tish’s Easy Way To Make Yogurt Recipe:
Warm your milk in a non-reactive pan over moderate heat to 180 degrees Fahrenheit. go slowly with this step for two reasons. First you don’t want to scorch the milk and second, slow warming allows for some evaporation of water in the milk and that makes a thicker, creamier yogurt. The probe thermometer is a big help here because you don’t have to stand over the milk and stir it. I set this up when I have other kitchen jobs to do and give the pan a quick stir every now and then.
Once the milk has reached 180 degrees, you can hold it there for more evaporation or remove it from the heat right away. You do not want your milk to boil. Allow the milk to cool to 110 degrees (re-set your programmable thermometer to alert you when the milk has cooled). Spoon some of the warm milk into your yogurt culture and stir it in. Keep stirring in milk, a spoonful at a time, until the mix is smooth and thin enough to blend easily with the full pot of milk. Add the culture to the milk in the pot and stir it thoroughly. Pour the cultured milk into your clean containers and cover the containers.
Many ovens can maintain a perfect temperature for yogurt, just by keeping the oven light on. Before you begin, test this by leaving the oven light on for several hours with the probe thermometer sitting on the rack. If the bulb keeps your oven at 100 to 115 degrees, you’ve found your yogurt machine. If this doesn’t work, use a personal sized cooler – the ones designed to hold one or two six-packs of drink cans. Wash the cooler out with hot tap water, even if it’s already clean because you want to warm it. Set the containers of cultured milk in the cooler, add enough hot tap water to come right up to the tops of the containers, cover and move the cooler to a quiet spot in the kitchen.
Leave your yogurt alone for 8 to 12 hours then move it to the refrigerator. Enjoy!
I use pasteurized milk. Many national brands of milk are now ultra-pasteurized and I don’t know how that will do for yogurt. It won’t make cheese so I haven’t tried it with yogurt. You can use any fat content you like from whole milk to skim.
You can buy yogurt culture from New England Cheesemaking. I have done that. However I have had really good results using plain yogurt from the grocery store. In the past I have had problems with the flavor of the yogurt (made with grocery store starter) changing from batch to batch but for the last year that has not happened. Any unflavored yogurt with live cultures will do, but I use the Giant grocery store house brand. Look for live cultures and an ingredient list that includes no more than three items (Milk, live cultures, and maybe milk solids). You need about a tablespoon per quart of new milk.
If you like your yogurt thick, you can add non-fat dry milk to the milk while you warm it. I add a lot – a cup of dry milk per quart of new milk. This gives me yogurt that is almost like Greek yogurt. I get very little whey separation with this much added milk.
I warm my milk while I fix dinner, cool it while I eat, and leave it in the little cooler overnight. I make two quarts every ten to fourteen days.
I just want you to know that you don’t need expensive tools or yogurt-specific equipment. Yogurt is a simple food and it’s easy to make.
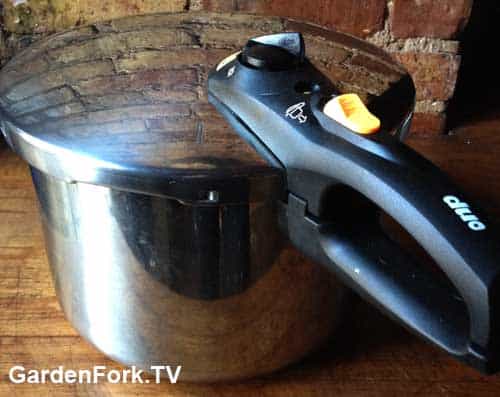
Here are a couple of pressure cooker reviews if you’re thinking of buying a pressure cooker, and a good cookbook to go along with it.
Electric Pressure Cookers
I have become a convert to the electric pressure cooker, notably the Instant Pot. You can buy the Instant Pot model I use here. (affiliate link) Watch the video and then read on about some of the reasons I like it.
Instant Pot Pressure Cooker Review:
Turn it on and walk away, no monitoring cooktop burner flame.
Built in keep warm setting.
Smart technology monitors internal temperature.
Easy to close lid.
It makes yogurt!
Stove Top Pressure Cookers: I own two of these. I recently bought a Fagor pressure cooker which was highly recommended as a Best Buy by the people at America’s Test Kitchen. I found the Fagor to be easy to use and pretty straightforward. Here is a link to buy the Fagor Pressure Cooker. (affiliate link) I suggest buying the 10 quart.
The Fagor has a nice thick bottom and the lid is fairly easy to attach. You’ll find pressure cookers can be a little clunky fitting the lid on because it has a gasket. But this one drops on pretty quickly and it has a couple of guide marks to help you with that.
As far as price it lands about in the middle of what a pressure cooker costs. Don’t buy a cheap pressure cooker, it’s just not worth it, it’s going to not work well and you’re going to be unhappy and then you’re not going to like pressure cookers. You get what you pay for with most things in life and that’s true with pressure cookers as well.
I also own a Magafesa pressure cooker, it is the first one I bought about 10 years ago. It got a good rating from Cook’s Illustrated back then. Now it does not make the recommended list on Cook’s. It works, but I find if the relief valve gets any food debris in it, it can take some time to clean it up.
Do not buy a pressure cooker with what has a jiggle top, this is an old technology, go with the current models. Also don’t buy a used one at a garage sale, you don’t know if it works properly. Take your money and go buy new one.
I use a 6 quart cooker, but I would opt for a larger cooker (8 or 10 quart) if you have the cash and kids. This allows you to make a bigger meal that can be lunch or dinner the next day too. Putting the lid on a cooker can take some practice, none of them are like butter, but the one you buy should go on easily. Make sure the bottom of the cooker has a thick base, much like regular pots, a thin base burns food.
I imagine there are a ton of pressure cooker reviews online, this is my take on it. Please let me know yours in the comments
When I bought my Fagor pressure cooker I also picked up a book, Pressure Cooker Perfection, which is from the people at America’s Test Kitchen.
It has a lot of good information in the front of the book. I mean it’s what you expect when you get something from the Cook’s Illustrated – America’s Test Kitchen people. It’s researched to death – lot of good information and the recipes are good as well. I think the recipes are good for those of us who follow directions and then you can jump off from these pressure cooker recipes and make your own dishes. The Bolognese is kind a good one to start with, I skipped the Mortadella called for in the recipe.
The authors of Pressure Cooker Perfection cookbook haven’t really broken any new ground but they do list out here some nice recipes they have good pictures it shows you step-by-step and that typical America’s Test Kitchen way they do things. I like them for that I applaud them for that.
I also like Lorna Sass’s Cooking Under Pressure cookbooks, they have good recipes and charts for cooking times.
Let me know what you guys think in the notes below what kind of pressure cooker do you own.
Hanging shelves on a concrete wall, or a brick wall? Learn how to drill into brick and cement with our how to video. There are links to the tools you will need, and more DIY videos below the video player here.
Keep in mind when you are hanging shelves on a concrete wall you’re going to have to drill into the cement and that is going to create a lot of dust. Have a vacuum or better yet a shop vac nearby to suck up all that cement or brick dust. What I do when I’m drilling into cement or brick is I have the vacuum hose right next to the drill bit while I’m drilling. This does a really good job of keeping the dust down. You can see on this post on how to hang a TV on a brick wall just how much how much dust gets flying around if you don’t use a vacuum.
Depending on how heavy the items are that you want to put on your shelves, you’re going to have to use fairly cement anchors. Don’t use those cheap plastic anchors, you will regret it. You’re going to need metal anchors – I like to use metal sleeves would you can buy at the home-improvement store.
You’re going to need a hammer drill to drill into the concrete or brick and you’re going to need masonry drill bits to use with your hammer drill. Regular drill bits won’t work for drilling into cement OK?
These are the two best beginning beekeeping books, and I’ve bought more than my fair share of beekeeping books.
Kim Flottum’s The Backyard Beekeeper, I think, is one of the best books. This is actually the book that introduced me to beekeeping. I was in our local bookstore just looking around and I ran across this book called Backyard Beekeeping and a light bulb went off in my head! I immediately thought, I would like to have honeybees. I bought the book and inhaled it. I’ve met Kim Flottum, the author, he’s a super nice guy. He walks you through beekeeping in detail, but in easy to understand writing. Really well done
Lots of really good pictures, Kim is clearly an expert. He is the editor of one of the more popular beekeeping magazines and I’ve heard him speak and he’s just an all-around good guy. In short, I like this book I think it’s a good one to buy for the beginning beekeeper.
The book Beekeeping for Dummies is a really great first year book. Now I know you’re thinking that ‘oh it’s one of those Dummies Books’ but despite its name I think it’s great especially for the first year beekeeper. Its inclusion here as a best beginning beekeeping book is a testament to Mr Blackliston’s easy to understand text in the book.
Your first year beekeeping you have a lot of questions, you might even have some anxiety about it. The author Howland puts that to rest as he walks you through the first year. The book lists out what you should do every month with your bees, he provides recipes and hints and tips. I just think it’s really well done, I like the book and this new edition has more up to date info.
To me these two books are the books you should buy when you’re starting to learn about beekeeping and when you actually get your bees. Buy these books before you get your bees read them over the winter and just inhale. They have a really a lot of great information – it’s how I learned. I constantly refer back to these books when I have a question about something.
Getting honeybees ready for winter, aka winter beekeeping preparation, is one of those things that can fall off the list for beekeepers, probably not a good thing. I believe if you just leave your hives as is, most will perish.
Below we have several videos on getting honeybees ready for winter, but first of all, here’s a few things we do to each hive in late fall to prepare for winter.
Winter Beekeeping Checklist:
Feed 1:2 sugar syrup in the fall
Treat bees for varroa mites
Feed one gallon of syrup with Fumagillin
Add dry sugar to the top of the hive.
Use an insulated inner cover.
Tilt the hives forward.
Close up the screened bottom board.
Insulate the hives with polystyrene.
Install a mouse guard on entrance.
Strap down the hives.
Varroa Mite Treatment: From what I understand, varroa mite populations in your beehive soar in winter, so knocking down that population before winter makes sense. Watch our oxalic acid varroa mite treatment video, its pretty easy to do and is a huge step toward getting your bees through winter. One should rotate mite treatments, Hop Guard is the other mite treatment I’d suggest.
Sugar Syrup: Ask your beekeeping neighbor when they start feeding sugar syrup. I add Fumagillin the first gallon of syrup. Let the bees take down all this treated syrup before adding more sugar syrup to the feeder.
Dry Sugar: This year we used the mountain camp sugar method when providing sugar on the top of the hive. In years past we have made sugar cakes, but this year I wanted something simpler. Reading about this method on the Honey Bee Suite blog, I agree with Rusty’s post, that the mountain camp dry sugar method works pretty good, and because its easy, you will do it. Making fondant or sugar cakes is a pain, and you will likely procrastinate about making the cakes it until its too late. Watch: Mountain Camp Method Video
Mountain Camp Winter Sugar Feeding
Insulated Inner Covers: I am a big convert to using these. Before I put them on the hives in winter, every spring I would find mold in the hives and dead bees. Insulated inner covers reduce or eliminate condensation from collecting on the top of the hive. Imagine its raining inside a hive in winter, that’s condensation. Wet bees are dead bees. Watch and learn how make an them in this video:
Or you can use a piece of polystyrene, a wood spacer you can easily make, and your existing inner cover to do the same thing.
Top View of Insulated Inner Cover – purchase this or make your own
Tilt the beehive forward: Gravity works. Extra insurance to keep condensation from raining down on the hive cluster. Tipping the hive forward allows any drops of water that have begun to form on the top of the hive (which is the bottom of the inner cover) to slide forward, hit the front wall of the hive, and finally, draining out the front of the hive. Its easy to do, just slide a 2×4 under the back of each hive before you strap it down.
A few more winter survival tips:
Close up the screened bottom board: This is one of those opinion based things. I use screened bottom boards that have a plastic board that slides into the bottom. So I close off the screen in winter. Because it is important to have ventilation in the hive, yet reduce condensation, the hive needs at least one top vent hole.
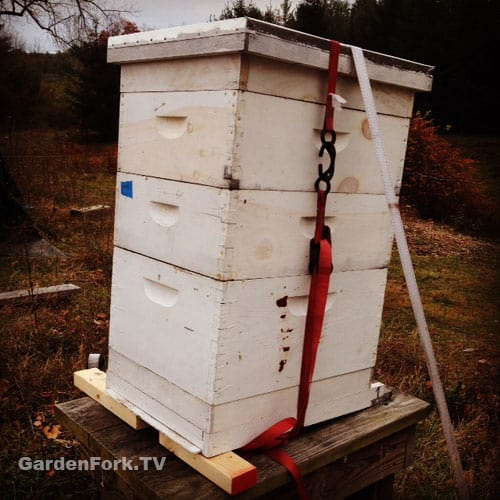
Insulate the Hive: First of all, the best method we’ve found so far is to surround the hive with with polystyrene, secured with a ratchet strap. We have two videos about this, watch here: Beehive Winter Wrap
Mouse Guard: This can be bought from bee suppliers or you can make one out of 1/2″ hardware screening. One year I blanked on mouse guards, as a result, I lost a hive to mice. Its sad and a pain to clean up.
Close the guard down to about 2″ wide with duct tape
Strap Down The Hives: This may seem overkill, yet it has saved us. We secure the hives against high winds and bears. One strap goes around the hive itself. The second hive secures the hive to the ground with two metal stakes. Furthermore, if you live in an earthquake zone, strapping your hives is a must. Watch our video about how using straps saved a hive here.
Winter beekeeping is not the easiest part of keeping bees, therefore some preparation in the fall can help bees survive winter. Follow these tips and increase your chances of getting bees through winter.
How to pick a generator is the first step in hooking up a generator to your house. Here’s my experience in figuring out what kind and size portable generator you need to power your home during a power outage.
Our generator is plenty powerful to power the house.
Figuring out how what size or wattage generator to buy a is the first step in the how to pick a generator process. To determine the size of the generator you need, you have to figure out what you want to power in your house during a power outage. This power number, or watts, also will determine the size transfer panel you will need. In addition to buying a generator you will need generator transfer switch. Here is a link to our post about transfer switch installation.
Based On My Experiences…
This post is about portable generators, the kind on wheels that you pull outside, connect to your manual transfer panel, and power your home. Standby generators, the kinds that sit on a cement slab next to your house, are not covered here. This is based on my experience as a homeowner, I am not a licensed electrician.
First, buy a name brand generator. Cheap generators will cause you problems if you ever need to service it. This came back to burn a friend of mine when he needed to replace a carburetor.
Second, perform regular maintenance on your generator. I run mine for about 15 minutes every month.
Third, use gas stabilizer. Add this to all the gasoline you use for engines around the house. It will save you a lot of headaches and repairs.
Start by going through the house and think about what you and your family want to be able to use in a power outage. Then re-think about what you really need, and what you can live without.
Why? Because the average portable generator/transfer switch setup will not run everything in your house. It will run the essentials, however I think you’ll find that you don’t need to power your whole house.
Your portable generator will probably not run your 240 volt appliances. These include electric clothes dryer, electric stove, electric furnace, electric baseboards. It will run your deep freezer, refrigerator, and microwave oven and most of the lights in your house. It all depends on how the house is wired and the size of your generator transfer panel.
After making a list of of what is essential in your home, find out the amps or watts that each appliance uses. Don’t forget the furnace, well pump, etc. This is usually on a label somewhere. Now convert amps into watts with this equation:
amps x 120 = watts
I imagine you will get a number ranging from 3,000 – 6,000 unless you have lots of large TVs.
How To Pick A Generator, Watts & Amps:
A typical home can use a generator in the 3,000 to 6,000 watt range. Because you will probably not be running all the appliances at once, you don’t need a generator that exactly matches how many watts all the appliances require. The biggest draw on the generator will be the well pump, if you have one, second comes the furnace. Rarely would all of your appliances need power at once.
The question of whether to get a gas or propane powered portable generator depends on your location and preference. The small 20 gallon propane tanks are easier to deal with than carrying around gasoline, but if you run out of propane, how far do you have to drive to get more tanks? You could also get larger propane tanks, as some generators have a gas line hookup. I have a gasoline powered generator, and have been happy with it.
The downside of the gasoline generator is you can splash gas when filling the tank, and you must put gas stabilizer in the fuel. But you should treat all the gas you use for small engines with stabilizer, in my opinion.
You will need to buy and install a manual transfer panel that matches how many circuits you plan on using in the house. That is, how many of the circuit breakers on your panel need to be fed power from the generator. If you need to power 6 circuit breakers of your house panel, you will need a transfer panel with 6 breakers. Most household manual transfer panels have 6 to 10 breakers. If you have to power more than 10 circuits in a power outage, its time for a standby generator. Here is a link to our post about generator transfer panel installation.
You might think, how can I get by using only use 6 circuits in my house? You’d be surprised at how you can. Your family will be happy that they can take hot showers and charge their devices, and the food in the freezer isn’t melting.
I have a 6,500 watt portable generator, and it runs my entire house with power to spare. The generator surges when the well pump kicks in or the furnace turns on, but that’s about it. The power meters on our transfer panel rarely move past 25%.
My point here is you probably don’t need a large generator to survive a power outage, so save some money and buy a less powerful generator. My house would do fine with a 3,000 – 4,000 watt generator.
Below is video about transfer panels and generators, here is the link again to our post about transfer panels. I hope this has answered some of your questions about how to pick generator.
I didn’t really know what to make for dinner last night, and I had a bunch of onions in the refrigerator which I had bought at the Costco. So I thought okay, I’m going to chop up an onion and start cooking it and go from there. I took a large onion and I cut it in half and then cut it into half ring things.
I think you need to cook onions in more oil than people seem to think on the cooking shows, so I dumped a bunch of blogs of oil into a pot and dropped in the onions. I then just kinda looked around and I saw that I had just bought a can of small white beans from the grocery store. The Goya brand, which I like. I guess it’s a 28 ounce can or so of small white beans. I cooked down the onions and I threw in two clothes of chopped up garlic. I first put the lid on and let the onions sweat and steam. Then I take the lid off and let them cook until they are almost burnt – by accident – because I walked away from the stove. I dropped in the white beans and a tablespoon of the Italian seasoning mix that I have. I went into the fridge and pulled out some Parmesan Reggiano cheese rinds that I had been saving and I threw those in. Heated it long enough to cook through, let the cheese rinds get kind of soft and boom done.
That was the most amazing white bean soup I’ve ever made and it was like nothing to it. Of course we have some bean dinner videos here for you to check out. So what do you think, how do you make white bean soup? Let me know below:
Easy White Bean Soup Recipe
1 can medium size 28 oz or so small white beans. I used the Goya brand
1 large onion, cut in half, then sliced into 1/4″ rings
1 tablespoon italian seasoning mix
2 cloves garlic chopped up
Cheese rinds if you have them.
In a medium sized pan, glug in vegetable oil. Don’t just skim the surface, glug enough.
Heat this up till it shimmers, and drop in the onions. Stir around and cover the pan for a few minutes. You want to steam the onions a bit,
Take off the cover, throw in the garlic and cook down the onions until golden, medium heat, but keep an eye on it. Kinda burnt is OK.
When the onions are golden, add in the can of white beans and the cheese rinds.
Top with the italian seasoning, stir in and warm up the mix to bubbling.
Don’t over cook this, but let the cheese rinds soften, so some of their flavor moves into the beans.
OK, what is a locavore garden salad? Its when you walk out to your garden and cut some salad greens. This all started with lunch.
We were about to have lunch, and it was going to be PBJs, since it was simple and all the ingredients were there. But I have been on this kinda sorta gluten free before 6 pm thing – we talk about gluten free on GF Radio here – so I grabbed my scissors and went out to the garden.
There was kale, and young salad greens that had sprouted 2 weeks ago, plus arugula, which grows like a weed anyway. I cut the greens to that they would grow again – this is going to be our hoop house raised bed this winter – and was back in the kitchen in 5 minutes.
Put water on to make some poached eggs – kinda like the neato Salad Lyonaise video we did – and washed the salad quickly. It almost didn’t need washing it was so young, but… I made a quick vinegarette salad dressing in the mixing bowl. You can use just the egg yolk as a dressing, like in the Salad Lyonnaise recipe, but I wanted the balsamic in there.
And its good I did make the dressing, because I overcooked the eggs, they were no longer soft poached, but they were still good. Not bad for a quick switch from PBJ.
Here’s a neat pallet compost bin we made in an hour. My pallet projects obsession continues, lately I’ve been looking way too much at pallets sitting on a sidewalk and thinking what can I make out of those?
Charlie Pup and I went out to dump kitchen compost in our pallet compost bin. She sat for a photo you can see at the end of this post. I wanted to follow up on how our compost bin has been doing.
So far so good is the verdict. While the wood has weathered well, we haven’t filled it up completely, as this bin is mainly for food compost. I do drop stuff from the vegetable garden as well.
I have found that I can build one of these pallet compost bins without the metal brackets. With some care and long wood screws, you can align the pallets at the corners. Then you can sink in some screws between them to join it together. But if you have some spare brackets of some sort, by all means use them. Use what you got!
Keep an eye out for old pieces of pipe or metal fencing, because you can use these to drive down in between the pallet sides to keep anchor the bin. Two of these pipes seems to work well for me. I built one of these up at my friend’s cabin to keep the Labradors from feasting on his food scraps. The bear has not torn through his compost bin yet it has kept the dogs out.
Build The Bin with photos and video
Here is the original pallet compost bin video with some other information if you want to check it out, below are photos of how to build the pallet compost bin.
Here’s a neat little lifehack that I thought of while wanting a snack while in the home office. I don’t keep cookies or sugar type snacks in the house, because I will eat them!
But I do keep fresh fruit, dried fruits, and nuts in the house to snack on, because I eat constantly.
Back from a morning meeting, I had rode my bike to and from the meeting, so that was about a 40 minute workout, but I wanted something to take up to the home office, and I saw the bowl of apples.
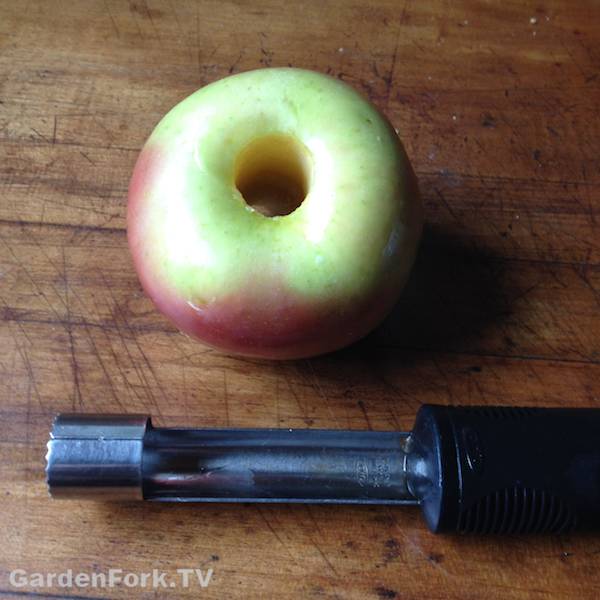
But here’s the issue I have with apples at the desk. The apple core. Yes, you could put it in the trash, but we compost our food waste, so the core will have to lie around the desk while I work. Then I had the eureka lifehack moment: Core the apple.
I had just cored a bunch of apples for an upcoming apple recipe video, and this might have put the idea in my head. So I cored my apple with my neat OXO apple corer gizmo tool, and I was on my way.
Of course, I do have my intrepid bio-composter at the ready here, who loves apple:
We took a Mulberry tree out of our backyard, the neighbors were complaining about the berries, the pups ate the berries, not a good thing. In its place we are planting Leyland Cypress evergreens. These trees grow fast and are good at creating a green fence, which makes good neighbors.
But we had to deal the Mulberry tree stump, plus two other stumps from previous tree removals. I have been delaying this project for a while, but the cool weather means its time to get this in gear. So out comes the reciprocating saw.
A large tree root crossed right where we wanted to plant on of the trees, so I bought a pack of wood cutting blades for the saw and started cutting the large root. It wasn’t as hard as I had imagined, but it took a bit of time. The larger roots have lots of smaller roots coming off of it going downward. Lots of lifting up a root to find it still attached underneath.
I don’t dig a large hole for planting things. The instructions say dig twice as wide and deep, but this doesn’t work for me. I’ve done well planting how I plant so far in life. I have found that as the hole gets deeper, its not easy to use a shovel to get out all the dirt. A scoop of some sort works much better after one had broken up another layer of dirt with the shovel. One more reason to save those yogurt containers!
I wanted to re-use the plastic pots that the trees came in – not sure for what yet – so I pulled the trees out of the pots by laying them down and having help. One person grabs the pot, one pulls the tree trunk. Out it comes.
I think the most important thing in planting in general is plenty of water after planting. I plant things a bit lower than the soil layer, and build a moat of dirt around the plant so I can fill it with water. It will slowly drain into the soil and water the plant. It needs to grow roots, so water it a lot the first few weeks. What are your plant planting methods? Let us know below.