Category: Articles

blogs

  • When Decluttering Your Home Think ebay

    When Decluttering Your Home Think ebay

    I’m on a quest to get rid of stuff I don’t use, so I have this suggestion when you are decluttering your home:

    Sell stuff on ebay.

    I’ve had 4 fishing reels in a box at the bottom of the basement stairs for how knows how long, thinking they are worth something. Today I put them out on the sidewalk. Then I went out and took them back in. Then I went on ebay.

    decluttering-home-think-ebay
    One of the fishing reels I need to let go of.

    A quick search on ebay shows that some fishing reels are worth money, some are not. I don’t think the ones I have are worth much, but if you add it up, sell a few reels, sell some of that other stuff in your basement, and you might have a few bucks in your paypal account. nice. Its surprising how fast a few dollars can add up, and you could buy something you can really use on ebay then. I need some more video lights.

    We sold what I thought was a real ugly lamp for a couple of hundred bucks. Read about it here.

    how-to-sell-on-ebay-1

    The declutter is also a mental thing for me, its like I have this virtual mental list of stuff to do, and a lot of it jams up your brain. So part of letting go of stuff also helps your head, I think. Plus one less box to remind you of at the bottom of the stairs.

    So just another nudge to you all that want to declutter your home, that stuff in that box can go to someone who can use it, and you might make some nice coin.

    Full Disclosure here, we’ve made a video with ebay here, and have their affiliate ads on the site, but I do really sell stuff on their site when I want to get rid of stuff. Some of it sells, some does not.


    Click Here

  • Find Cheap House Renovation Stuff At Metal Recycler

    Find Cheap House Renovation Stuff At Metal Recycler

    Cheap doesn’t always mean good, but in this case finding cheap house renovation stuff paid off.

    With the installation of a new gas fired steam boiler, I decided to replace one of the steam radiators that is way over-sized for the space it is in. This radiator is in the common hallway, and there isn’t a great need to over-heat a hallway.

    find-cheap-house-renovation-stuff-at-metal-recycler-2

    I was driving past a metal recycle shop today and saw them put a nice small steam radiator into their truck. I stopped and asked how much they would sell the radiator for.

    $30

    A $5 dollar tip to the gentleman who put the radiator in the back of the car, and we had crossed one more thing off the to do list. Cheap house renovation parts = good.

    There is a vintage brownstone salvage yard around the corner from the scrap metal recycler where my newly acquired vintage radiator would probably be $100. I’ll replace the steam valve and union when attaching the new radiator, but that valve was leaking already, so now we have two things taken care of at once.

    find-cheap-house-renovation-stuff-at-metal-recycler-1

    How cool is that.

    With the new windows we installed, plus the new boiler, we don’t need nearly as much heat in the house, and the giant radiators are a vestige of then heating oil was cheap and insulation was non-existent. Now is a different story.

    Couple of things to keep in mind when installing radiators.

    • Its a two person job – radiators like to tilt at the wrong moment.
    • Use both teflon tape and paste on the pipe. coat the pipe with paste, wrap it with tape, coat the tape with paste.
    • Make sure the radiator tilts slightly toward the steam valve and riser.

    So there you go, just a nice find when you aren’t expecting it.

  • Easy Spaghetti Meatballs Recipe – GF Cooks Video

    Easy Spaghetti Meatballs Recipe – GF Cooks Video

    What’s not to like about this easy spaghetti meatballs recipe? Bake the meatballs, cook the pan sauce, add pasta and eat. Simple and easy to do, and you could use this recipe to make meatballs sandwiches as well. Nice.

    Our simple recipe uses meatloaf mix and a bunch of italian seasonings. We buy about 1.5 pounds of meatloaf mix, which around us is half pork and half ground beef. The beef I bought for this project was 90% lean, and I’d rather have it around 80% lean. You could toss in a few tablespoons of bacon drippings or butter to amp this up a bit. It all works.

    A key thing here is to not over mix the meat mixture, it will make the meatballs tough. You can use your hands or a spoon to mix it all up, use what you got. Be sure to wash your hands after handling meat.

    This is different than in the video, but I have found out that I like the cheese to be coarse grated with the large holes of a box grater instead of the fine grating of the microplane. It just tastes better, and i think the cheese stands out more, you run across pieces of cheese in the meatballs, which I like.

    easy-spaghetti-meatballs-recipe-gf-cooks-video-2

    Easy Spaghetti Meatballs Recipe

    1.5 pounds of meatloaf mix, preferably 80% lean beef and pork

    4 tablespoons Italian seasoning herb mix

    3 ounces of tomato paste, half a small can

    1- 28 oz can of crushed or pureed tomatoes, buy a good quality brand.

    1 large yellow or sweet onion chopped up

    2-3  cloves of garlic

    2 slices of bread toasted and ground up in a mini chopper or similar gizmo

    1/2 cup milk

    2 eggs

    2 cups coarsely grated pecorino romano cheese

    Preheat the oven to 375F

    Boil up a pound of your favorite pasta.

    Put the onion in a large pan or pot with good slick of oil on the bottom of the pan. Its best to slow cook these onions, but do what you can. Golden color on the onions is best for flavor. Chop up the garlic and add in to toast for a few minutes at the end of the cooking.

    Add half the onion to a bowl with the meatloaf mix, 2 tablespoons Italian seasonings, eggs, ground up toast, milk, cheese, some salt and pepper.

    Add the can of tomatoes and paste and seasoning to the pan with the cooking onions and simmer the sauce while we make the meatballs. Halfway through the simmer, at about 15 min, add a half cup of water and some sugar to taste.

    Mix the meatball ingredients together, don’t overmix the meat!

    Roll the meatballs into about  1.5″ diameter balls and put in a baking pan or sheet. Put in the oven for about 20 minutes, check with a thermometer, 145F is done.

    In a perfect world, this all comes together at about the same time, so you an assemble the dish and sit down, but you can cover the meatballs with foil while prepping the other stuff.


  • Homemade Sauerkraut – Fermentation Progress Report

    Homemade Sauerkraut – Fermentation Progress Report

    We are basing our new homemade sauerkraut how to on Leda Meredith’s new book, Preserving Everything, which shows how one can make sauerkraut in a mason jar. We talked with Leda recently on GF Radio: listen here. Links to buy book at end of post ↓

    homemade-sauerkraut-fermentation-progress-report1

    I like this mason jar sauerkraut method, it makes it less daunting than having to go find or buy a big glass jar or crock. Most of us already have a couple of mason jars somewhere. I might have too many jars, according to some family members…

    But this is pretty simple, chop up cabbage, add salt, put in jar, wait.

    homemade-sauerkraut-fermentation-progress-report2I couldn’t find the shredding blade for my food processor – not surprising – so I cut up the cabbage by hand. Its my experience that shredding with a food processor will yield a much more shredded cabbage, and that will start fermenting much faster than cabbage cut up with a knife.
    The reason for this is that with a food processor, the cabbage is cut finer, exposing more leaf surface area to the salt. The salt draws some moisture out of the cabbage, and the brine starts to form. With the knife sliced cabbage, this process is much slower. Its also important to basically massage or kinda crinkle the cabbage to break down some cell walls and allow the salt to do its work.

    After your cabbage in a jar has let out enough water to create a brine that covers all the fermenting kraut, we will let it sit in a dark place for a few days. We’ll be looking for bubbles, a sign that the lacto fermentation has kicked in.

    In our case, because of the knife cut leaves, I had to add salt brine to the jar. I set out a pint of water overnight – because our water is chlorinated – and then added a teaspoon of kosher salt to it, and topped off the kraut so that all the leaves were covered in liquid.

    You can get Leda’s Preserving Everything book here:


    Buy Preserving Everything On IndieBound

  • Bread Free Lunch from what’s in the fridge.

    Bread Free Lunch from what’s in the fridge.

    As I stick to my basically gluten free diet before 6 pm, which I have found to be very helpful in not having that late afternoon crash, lunch has been a challenge. I would usually make a peanut butter sandwich, or a grilled cheese sandwich, but I can’t do that anymore. ( I talk about the gluten free thing here on GF Radio ) So now I see what’s in the fridge and put together lots of salad kind of things.

    Being gluten free during the day is not as hard as it might sound. I have oatmeal or eggs for breakfast, and usually some sort of salad thing for lunch, here is one of them:

    bread-free-lunch-whats-fridge

    A recent trip to Costco yielded a giant container of cherry tomatoes for about $5. They weren’t the greatest tomatoes, but I can’t complain, they are what they are. And I managed to find the smallest giant block of blue cheese at the Costco. I’m experimenting with freezing cheese, btw.

    I’ve gotten better at buying tofu on a regular basis, so its in the fridge and ready to go when I want to use it. Plus the Labradors love tofu, not sure why, but they inhale it. I imagine its healthy for them.

    Last night we had miso soup with buckwheat noodles, and I had some leftover noodles, so in they went into the bread free lunch salad thing as well. I warmed up the noodles in the microwave, which warms up stuff faster than I think it would on a regular basis. Powerful thing that machine. This started me thinking I could cook extra noodles going forward for the lunch project.

    So this all goes into a bowl and I made the regular GardenFork vinaigrette salad dressing to drop on top. Boom done. There you go, simple gluten free lunch recipe for you all. This was filling for me, the buckwheat noodles did the trick on that front. Let me know what you think.

    bread-free-lunch-whats-fridge2

  • Where to buy that cast iron skillet with sections?

    Where to buy that cast iron skillet with sections?

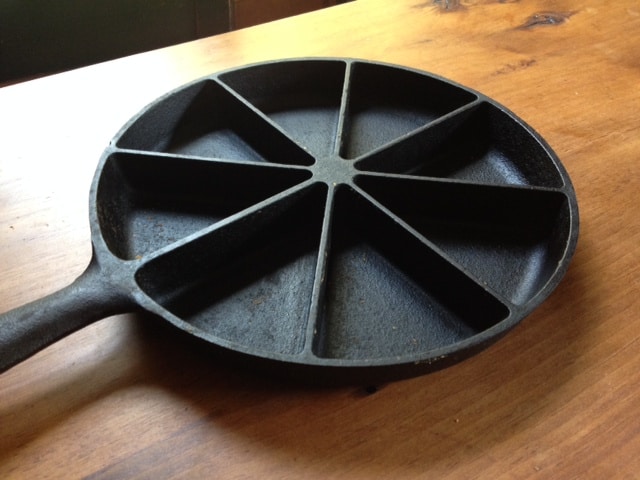
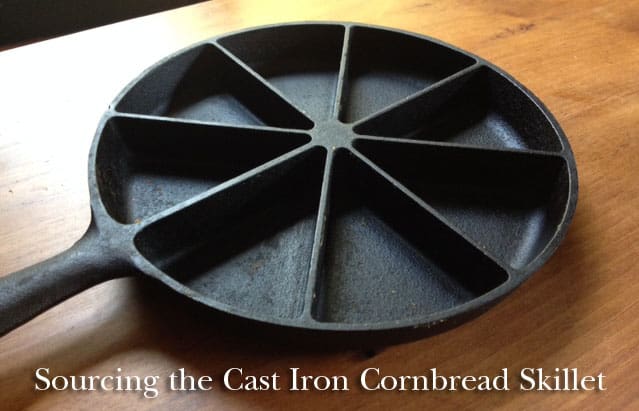
    In our recent pumpkin cornbread recipe video, we use a round cast iron skillet with sections, a pan with the pie sections already divided. I love this pan. I can’t remember where I got it, but I figured out where to buy it.

    buy-cast-iron-pan-pie-sections-2

    Why Love a Cast Iron Pan?

    This skillet has edge wedge already sectioned off, and after you preheat this pan in the oven, you oil the sides of each section, and pour in your batter. The cool thing is each slice of the pan is like getting a corner piece. Each section has that crunchy edge thing going for it.

    I learned early on that this pan needed to be well seasoned, and before putting in the batter, use one of those silicon brushes to slather on butter or oil. You don’t want the batter sticking, its a pain to clean.
 Be sure to put the pan on a wire grate when you pull it out of the oven, else that burned circle on your countertop will haunt you for a while.
 And cast iron is HOT when you pull it out of a pre-heated oven, use a good oven mitt or gloves, OK? Burned hands = bad.

    This pan can be kinda difficult to clean, but for this I pull out an old toothbrush that I keep in the kitchen drawer for this special purpose. You can brush off the baked corn bread batter fairly easily. One could also use one of those small wire brushes, but be gentle. The plastic bristles of the toothbrush work better. Go pull a toothbrush from the bathroom.
Some cast iron pans will come already seasoned. Pre-seasoned is what its called.

    Here’s one of our how to season cast iron videos:

  • Backyard Stump Removal

    Backyard Stump Removal

    The large mulberry tree had to come out. The neighbors complained about the berries that littered their yards each year, and got tracked into their homes by the feet of kids and dogs.

    backyard-stump-removal-1

    So down came the tree, and what was left for me to deal with was about 5 feet of tree. Time for the 20″ bar chainsaw and a lot of sawdust.

    This tree was one tree that had two limbs right at the base, and those limbs kinda fused at the bottom of the tree, and it was my job to cut this as flat as I could. I’m not good at level cuts – it always seems to look good while you are cutting, but by the time you get to the other side of the cut, its not.

    Why is that?

    backyard-stump-removal-2

    To keep the bar of the chainsaw from getting pinched by the cut portion of the tree, I drove a wedge in to keep the cut open. I had forgotten my plastic wedges, so a metal wedge had to do. One usually uses plastic wedges so if the chain touches the wedge, the chain is not damaged. Metal wedges are bad for chainsaws. But I paid close attention to keeping the saw away from the wedge.


    backyard-stump-removal-4

    I did do the smart thing and bought two new chains for the saw before starting this project. It is amazing how quickly a chainsaw will cut through a tree with a new chain. wow.

    Plus look the wood shavings it left behind, a clear sign of a sharp chain. If your saw is putting out dust rather than flakes, its time for a new or sharpened chain.

    backyard-stump-removal-3

    We  have several chainsaw videos here for your to check out:

    chainsaw-tree


  • Apple Tree has lost half of its leaves

    Apple Tree has lost half of its leaves

    Our standard size apple tree has lost half of its leaves for the second year now. Its the middle of summer, and the bottom half of the tree drops its leaves, and we are not sure why. I think this tree may be a Winesap, but I’m not sure. This tree usually fruits bi-annually, every second year, but has not set any fruit recently.

    apple-tree-has-lost-half-of-its-leaves-2

    An initial web search has not turned up any concrete info, but I’m still looking. I’m thinking its some sort of fungus. This tree is in a line of trees, so parts of it do not get a lot of air around it to keep the leaves dry. Spraying the tree is not practical, as the top if it is about 25′ high.

    The tree does have apple maggots, which accounts for the fruit drop that occurs, and i have tried to deal with that with the red spheres coated with pine tar. I have also bought pheromone traps from Fedco Seeds.

    This tree was planted by Mike, who built the house and live in it for bout 50 years. He loved to garden and when we bought the house, it had two large apple trees in the yard. This one, and another in the lawn that is easier to prune. I have not been able to prune this one much, as it is so tall. I’m not big on climbing up a ladder with pruners to lean into a tree.

    We have made cider from the apples from this tree and also applesauce, you can check those out below:

    hard-cider-690-play

    How to make hard cider link

  • Quick Coleslaw Recipe -GF Video

    Quick Coleslaw Recipe -GF Video

    Here’s a quick coleslaw recipe that takes no time to put together. This is a perfect addition to one of our pulled pork recipes. The pairing of BBQ and coleslaw is a given in the GardenFork world, so here we go!

    We use the grater disc on our food processor for this quick coleslaw recipe, you can also use a box grater or a mandolin, but it will take longer, hence, less quick. OK? We used a larger size grater hole for the carrots. I think big chunks of cabbage are unappealing, but I also don’t want the cabbage to look like sawdust. Just my thoughts here.

    You can use red cabbage for part or all of the cabbage in this recipe, but I’d suggest adding some red cabbage but not 100%. Its just too much, and i think red cabbage is a tougher chew when it is raw. We do have some great red cabbage recipe videos here, so check them out after make this coleslaw.

    Quick Coleslaw Recipe

    1 medium head of green cabbage

    4 good sized carrots, washed well but not peeled.

    2 teaspoons of caraway

    1 tablespoon deli or brown mustard

    1/2 cup virgin olive oil

    4 tablespoons apple cider vinegar

    salt and pepper to taste

    Cut the cabbage into quarters and remove the core. Then cut into chunks that will fit into your food processor. Put on the grater blade and shred the cabbage.

    Change the blade to a coarser one and grate the carrots.

    In a large bowl add in the olive oil, vinegar, caraway, mustard, salt and pepper. Whisk this together. The mustard will bind it all together. Taste for salt, you may need to add more afterward.

    Add in the shredded cabbage and carrots, and toss well. This tastes best when put in the fridge overnight, I think, but you can serve it right away as well.


  • Bear or Varmint takes apart an empty hive

    Bear or Varmint takes apart an empty hive

    I had been using this empty hive as a bait hive, hoping to catch a swarm from – no luck there – and I had just left this outside the garage. I had meant to put it inside the garage, but you know how that goes.

    IMG_0650

    Then that night Charlie Pup was barking at the window looking towards the garage, and i figured she was barking at a shadow.

    But then come morning I see some animal has taken the empty hive apart. Luckily it wasn’t too broken up. There was a mix of wax foundation and plastic foundation frames that hadn’t been drawn out yet.

    Can’t say this was a bear, it may have been a raccoon or skunk, but it reminds me not to leave beekeeping gear outside anymore.

  • Bake A Cake : Outdoor Cooking with a dutch oven – GF Video

    Bake A Cake : Outdoor Cooking with a dutch oven – GF Video

    Outdoor cooking recipe to bake a cake in a dutch oven. Great camping recipe or to keep you house cool in summer, outdoor baking is the way to go. We use this basic cake recipe and add in whatever fresh fruit we have in the summer months. Its a fun way to bake a cake that doesn’t heat up the house, or when you are camping, this is a super simple cake recipe. Its easy to change up the recipe to suit whatever ingredients you have.

    How To Bake A Cake Outdoors

    You need to have a fireproof safe place to do this. We use our grill, it works well because it is a good height, and is already built for fire. Or you could use some other fireproof material, but be careful, you will be using hot charcoal to do this. In a camping situation, you can use the coals from a campfire, but you will have to pay more attention to the coals, probably adding a few during the baking process.

    If you do not have some oven-proof bowls of some sort – we like to use ramekins – you can use balled up foil to raise the dutch oven above the coals. You do not want the bottom of the dutch oven to touch the coals, this can burn the bottom of the cake. If your dutch oven does not have a flat lid, you can make a ring of foil that will keep the coals from falling off the top of the dutch oven.

    bake-a-cake-outdoor-cooking

    To Bake a cake this way requires some experimentation, its easy to burn the cake if the coals on the bottom are too hot. There is some trial and error here. And wear oven mitts or heat proof gloves, this stuff is hot!

    Easy Cake Recipe:

    1 cup self rising flour
    OR 1 cup all purpose flour + 1 1/2 tsp baking powder and 1/2 tsp salt

    1 stick of butter

    1 cup milk

    1 cup sugar – you can use less sugar, this cake is pretty sweet

    1 can of peaches, drained, light syrup preferred, 20-24 oz

    Preheat the oven to 375F

    Put the stick of butter in a 9×9 baking dish, preferably a glass dish, and place in the oven to melt the butter.

    Mix together the dry ingredients, then add the milk and mix.

    Pour the batter into the heated baking dish with the melted butter, then add the can of peaches.

    Bake at 375 for 30-40 minutes. The cake is done when a knife comes out clean.

  • Run A General Store 2.5 Hours From Brooklyn

    Run A General Store 2.5 Hours From Brooklyn

    Want to run your a general store 2.5 hours from Brooklyn? here’s your chance.

    The Connecticut town where we live part time, Colebrook, CT, had until recently the longest continually operating general store in Connecticut. It was the central hub of our small town; get a coffee, sandwich, or groceries, and also get an update on what’s going on in town.

    colebrook 015

    It was the place where one could buy home-made donuts and find out about the cardboard boat race happening at the annual town fair.

    After a new owner took over, the store closed, (its not easy running a food business) and a group of town residents formed a non-profit and bought the building. They have fixed up the store, and they are now looking for someone to run a general store – food business.

    In the right hands, the Colebrook Store will flourish, it is a destination for cyclists, bicyclists, tourists, and anyone with a craving for eclairs, which the store is known for.

    The store has three customers, the local residents who need a central social hub to buy a weekday egg sandwich, lunch, milk, butter, coffee, toilet paper, etc., the passerby who is driving through town on the way to the nearby YMCA camp or ski hills, and the destination tourist out for a ride and wants some eclairs or a sandwich.

    To be successful, I think, the store would need to be a hybrid of what the town residents need and what out of town residents would travel for, plus the desires of whoever runs the business. Yes, it could feature seasonal locally sourced foods, but the store also has to sell food staples the town needs: milk, toilet paper, pasta, tuna,  sandwiches.

    The non-profit that now owns the building is accepting proposals from people interested in running the store. One must have food retail experience to be successful, plus a business plan and sufficient funds to open the store.

    I think the startup could be crowdfunded, and with most of the infrastructure in place – range, oven, coolers – it would not take a large amount of funding to get the store up and running again. The crowdfunders would also be a built in base of supporters-customers.

    And the general store has an apartment upstairs, so if you chose to, you could live very inexpensively and have short commute to work.

    Colebrook is 2.5 hours from Brooklyn, NY . There is a bus from Port Authority that runs twice a day to Winsted, CT, which is just down the road from Colebrook.

    The area around here is amazing, lakes for fishing, state forests for hiking, country roads for cycling.

    This store, done right, is a great opportunity. If you’ve been thinking about running your own small town food establishment, here’s your chance.

    Email me:  [email protected] , and I’ll put you in touch with the non-profit that owns the store.

    colebrook 014

    Historical Society
    Historical Society

    colebrook 009

    Town Church
    Town Church
    Historic Home
    Historic Home
    The Sandy Brook
    The Sandy Brook


  • Big Green Egg Table Plans

    Big Green Egg Table Plans

    Big Green Egg Table Plans using 2x4s and a few pieces of marble and a set of caster wheels. Build the table frame, add some legs, build the top, cut a hole, and you’re done. My neighbor built this Egg table and I wanted to share it with you.

    big-green-egg-table-plans-1

    Super simple table plan here. The table is finished with outdoor polyurethane, don’t be tempted to use indoor poly, it will peel very quickly, you want a finish that is UV proof, and water proof.

    big-green-egg-table-plans-2

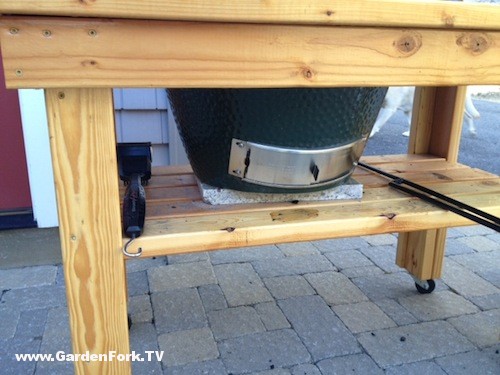
    I like the simple use of some scrap marble to insulate the Big Green Egg from the stand. This allows easy access to the lower vent of the egg.

    big-green-egg-table-plans-4

    Some spare casters allow you to wheel the Egg table out of the way , or into the garage for winter storage. Be sure to use heavy duty casters, as the cooker is heavy.

    big-green-egg-table-plans-3

    Nice huh? I’m all about about simple and these Big Green Egg table plans are just that, easy DIY plans using inexpensive 2×4 lumber. I estimate this table cost about $40-60 to make if you already have some wheels in your shop. Or ask one of your neighbors if they have some spare casters, its a good chance one of them does.

    Cooker tip here, my neighbor tells me to buy the best quality chunk charcoal you can. The cheap chunk charcoal is not great for the Green Egg, it has a lot of small pieces and dust, not good for this cooker.

    How to you use your Big Green Egg? I’ve seen a few DIY table plans, but this one is my favorite for its simplicity and ease of use and easy to build. Let me know your thoughts below:

  • Go buy those mangoes in the store

    Go buy those mangoes in the store

    I’m not sure if mangoes are sold all over, but they are available in the NYC area. I find them at fruit & vegetable stands on the street and in greenmarkets, and at Whole Foods as well.

    mangoMangoes were on sale this week, I found this smaller ones, the brand name is Champagne. Most mangoes are larger than these, but these smaller ones have the benefit of not having as much fiberous material near the seed. On larger mangoes, the flesh closest to the seed can be kinda stringy. With these smaller mangoes, after you slice off the flesh, you can nibble on the seed, you can’t really do that with larger mangoes, the fibers get stuck in your teeth.

    Mangoes are also available sliced and prepared on the street. Prepared mango transcends a single ethnic group. I find these for sale on street corners in several neighborhoods. The mango is usually sliced, and placed in a zipper type sandwich bag. You can then have your choice of seasonings added. Hot sauce, salt, pepper, or lemon juice.

    And mangoes are healthy. They are high in Vitamin C and beta carotene, plus they taste great. So go buy those mangoes in the store.

  • Replacing the Cordless Drill Battery Charger

    Replacing the Cordless Drill Battery Charger

    When we moved, I packed my drill – screwguns and the cordless drill battery chargers. Then when we unpacked, I couldn’t find the battery chargers. Has this happened to you? Battery Charger disappears into vapor. I am convinced they are in the basement in a box, and one day I will find them.

    cordless-drill-battery-charger

    I finally had to acknowledge I would not find them soon after searching everywhere in the house for them. A new replacement cordless drill battery charger would be expensive, so I turned to my favorite source for good deals on stuff, ebay.com . Click Here To Visit ebay.

    My cordless drills use a 14 volt battery, the standard now is 18 volt or more. I’ve found some of 18 volt drills to be too heavy, and my drills still work just fine. I have bought new batteries for them, and they hold charge well.

    I have seen ads claiming methods to rebuild cordless tool battery packs, but I’ve always believed that once batteries are toast, you have to replace the batteries. Plus, if there really were good methods to repair battery packs, there would be blog posts about the methods, and all we see are ads selling the how to information.

    When searching through ebay, use broad search terms, type in the brand name of your tool, and the voltage. If your search is too specific, you may miss some listings. Keep in mind the seller may not know as much as you do about your battery charger and may not title the listing well.

    I managed to find a multi voltage charger for my brand, which will charge the 14 volt batteries, and the newer voltages as well. I opted for the Buy It Now button, because the sale price with shipping was less than $20.

    So now that the replacement cordless drill battery charger is on the way, I am sure to find the original.

    Full Disclosure, GF is now is an affiliate of ebay, so if you click on any ebay links on our site, we get a small finder’s fee. But even if we weren’t I’d still suggest using ebay as a good place to buy replacement parts for cordless tools. Click Here To Visit ebay.

  • Tiny House Plans : A – Frame Vacation Cabin

    Tiny House Plans : A – Frame Vacation Cabin

    Tiny House Plans for a cheap easy to build cabin from Deek Diedrecksen, who is a brilliant designer and carpenter. This cabin is perfect for that piece of land you have in the country  Easy to build with the downloadable tiny house plans Deek and Joe Everson put together. The photos here just say simple and clean to me.

    tiny house plans from Deek
    Tiny House Plans for a simple A frame

    From Deek’s website:

    The idea was to keep it AFFORDABLE to build, EASY and QUICK to build, and to have it so that it could be altered for different uses, or added to, rather effortlessly.

    The total cost for a cabin like this, soup to nuts, is right around $1200- and that’s using city lumber pricing, meaning, elsewhere, it’d cost less to build. Add in some salvaged, free, or recycled materials, and you could EASILY build this under $1000.

    Purchase these tiny house plans here on Deek’s site

    Deek worked with David Stiles, whose site is full of plans for cabins, treehouses, sheds, etc. They also offer design services. Check out their site here.

    This tiny house plan uses locally available materials, and its simple design makes it a do-able project for the average person. If you have a cordless drill – screw gun, and a circular saw, I think you can build this. The sides could be made out of recycled lumber and metal. Is someone tearing down a building nearby? Go get your materials!

    The plans also has explanations of other versions, such as adding a bathroom or a loft, plus 16 photos of the construction. The cabin was built by Joe Everson of www.TennesseeTinyHomes.com and www.TinyHappyHomes.com, and you can check it out at Deek’s Tiny House Workshop April 11-13 2014 in Memphis, Tennesee.

    Deek joined us on GardenFork Radio, you can listen to the show here.

    tiny-house-plans-2


    Full Disclosure: Deek is a friend of mine, he is the inspiration for one of our most popular videos, the One Sheet Plywood Boat.

  • Simple Apple Crisp Recipe : GF Video 12

    Simple Apple Crisp Recipe : GF Video 12

    A simple apple crisp recipe that you can make for a quick dessert with minimal effort. We visited our local pick your own orchard, Riiska Orchard in Sandisfield, Mass, and picked way too many apples! This is our go to recipe for a quick dessert. You can use store bought apples, but we’re all about local when we can, so please consider supporting your local orchards.

    We usually add a lemon juice or orange juice to the sliced apples for flavor. The juice also keeps the slices from browning, but this isn’t a big deal for us, because its going to be baked anyway. We like to use the apple slicer gizmo – link here – but you can also just use a knife to cut them up. Thinner is better, but the apple slices don’t have to be wafer thin, just thin, OK? I have found it handy to use an apple corer when slicing the apples with a knife, this round handle device cuts out the core of the apple, saving time. Yes it is one of those uni-tasker tools, but I have one.

    apple-crisp-recipe-1

    Avoid using the instant oatmeal in this apple crisp recipe, its cut too thin, and I like the big flakes of the rolled oats, aka old fashioned oats. You can use different nuts, again use what you got, I like walnuts, but pistachios would be neat in this, or almonds or whatever you have.

    This is for a 8×8 pan, but works for something slightly larger. Glass or metal pans work fine. Glass might produce a more crunchy apple crisp along the sides and bottom, not sure why. We served this with our homemade ginger ice cream, but it tastes great alone as well. You can dial back the sugar more , but not too much or the topping wont work as well, I think.

    Simple Apple Crisp : GardenFork.TV
    Ingredients
    • 4 sliced apples
    • 1 tablespoon lemon or orange juice
    • 1 tablespoon lemon or orange zest
    • 5 tablespoons butter
    • 1 tablespoon sugar
    • 1 cup rolled oats
    • 1 handful walnuts
    • 1/2 cup sugar
    • 1/2 cup flour
    Cooking Directions
    1. Slice up your apples, not paper thin, but not chunks either. Use the slicer rig or a knife. Either way core the apples.
    2. Put the slices in a bowl and mix with 1 tablespoon sugar and lemon or orange juice and zest. If you like it sweet, you may add more sugar. Keep in mind a little zest goes a long way with flavor.
    3. Put the oats, flour, 1/2 cup sugar, walnuts, and butter in a food process and give it a few whirls. You want to cut in the butter, but not over mix it.
    4. Grease an 8×8 pan, and put the apples in the bottom.
    5. Top with the flour-butter mixture, and bake in a 350 oven for 45 minutes or when the top starts to brown and a bit bubbly

  • Eric’s Foot Surgery!

    Eric’s Foot Surgery!

    I mentioned in a recent GF Viewer Mail Video that I had had surgery on my foot, and while some may not be interested in that, I thought some might, and some have already asked, so here’s what’s up.

    I don’t know the exact medical term, but the joint of the large toe is arthritic and has a large bone spur on top of it. This makes walking, and home improvement work, very painful. I have had this condition for years, but it finally got to the point that I didn’t want to go on walks with my wife and the pups, so it was time to get the surgery done.

    I should have taken a picture of the x-ray of my foot, but here’s one that shows a normal foot with my notes:

    foot-surgery

    The surgeon cut back the bone spur and then cut the bone that connects to the to joint to change the angle of the joint to give the joint more flexibility. He then screwed the bone back together.

    The surgery experience was fine, a very nice outpatient surgical facility with super nice people. I was able to walk out using a cane and a friend drove us home.

    The post operative care you give yourself is key to any recovery, I think. And I followed the directions I was given. Its good they wrote them all down. Ice packs are key here, they reduce the swelling and that promotes faster healing. Keeping the foot elevated is important as well, keeps blood from pooling in your foot.

    I’m good at doing what I’m told, so I’ve been on the couch more than I want to be, foot up on 3 pillows, trying to work on the laptop. The pain has not been much of an issue, except in the middle of the night. I think the pain being worse at night is more a function of your mind than biology. Its dark, quiet, and your mind doesn’t have much else to focus on. I’ve found that when the pain hits, I make myself relax the muscles in my leg and foot that naturally want to tighten, and do my best at what might be best called meditative focused breathing. And then I put on another ice pack.

    foot3
    Post surgery foot looks good.

    What is the ‘AG’ on my foot? That’s the surgeon marking the foot so we both agree this is the foot we’re going to operate on. Blood pools in the toes from the cutting the bone, this will clear up soon.

    Next time I go to the surgeon I’ll try to get a photo of the x-ray showing the screw in my foot. And I’ll post a few more updates on progress here.

    Foot X-ray courtesy of Clintjcl 20090312 – Clint – foot x-ray – left (“good” foot) Creative Commons Attribution Non-Commercial Share-Alike  I added text to image.