In hindsight, I would have done this one different. But here’s the story:
One of my best friends needed to replace the roof hatch on his row house in Brooklyn. This also happens to be the roof where we keep our honeybees. Replacing the roof hatch is pretty straightforward, go buy a new steel one, get it up on the roof, screw and glue it on. Done.
Except the roof hatch would not fit up through the existing access hole in the roof. It now occurs to me we could have cut open the hatchway, roll back the rubber roofing, get the hatch up there, then lay back down the roofing and patch it up.
That would have been easier than what we did instead. But ropes, pulley, carabiners, and assorted gear is fun to work with.
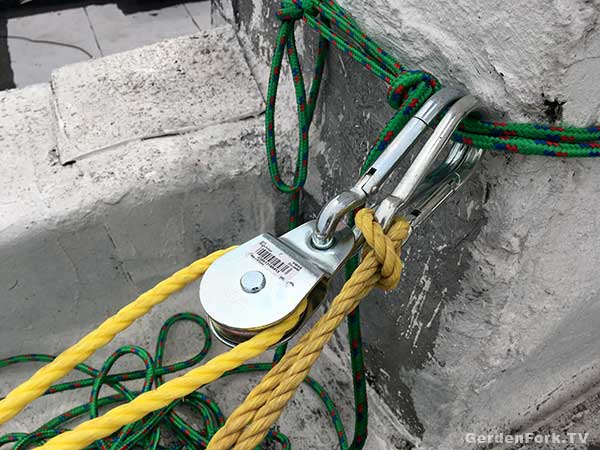
We brought the new hatch into the backyard, and figured it would be a straight hoist up. We used a double pulley rig. That way the weight of the load would be much easier to hoist up. To rig this, the rope is secured one of the roof chimneys, the rope then goes down to the roof hatch, where its threaded though another pulley. The rope then goes back up to the roof, through a second pulley, then dropped back down to the ground.
End of the rope, and second pulley secured to chimney.
Pulling on this rope, with the two pulleys connected, makes it much easier to hoist heavy loads.
My friend secured the roof hatch with ratchet straps, and connected the pulley and hoist rope. I then pulled the hatch all the way up the back of the building, and we rested it on the top floor fire escape.
If you’re thinking of doing something like this, be sure to use rope, straps, and pulleys rated for the load you are hoisting, OK?
Once the hatch was resting just below the roof, we had to figure out how to get it up over the roof. Not easy, we found out.
It didn’t help that in the middle of this project, one of the beehives decided to swarm!
Bees swarming in middle of project.Resting on the top floor fire escape.
The last 10′ feet of hoisting involved using a ratcheting come-along (which isn’t recommended for hoisting, FYI) to hold the hatch in place as we lifted up and over the edge of the roof.
Finally up on the roof.
After our “The Eagle Has Landed” moment, we took apart the straps to see two of them had already failed. Wow.
In one of those hindsight moments, we should have ran a few straps around the sides of the roof hatch in addition to strapping it around its top and bottom. The sharp corners of the metal flashing that makes the mating edge of the hatch had cut the strapping. Not good.
Once up on the roof, it was butter to install the hatch. Clean up the existing roof curb, lay down some roof tar, and screw it in. Done.
So yeah, next time you need a large object up on a roof, think about making the hatch hole bigger and then patching that. Easier than what we did.
When sparks fly out of it, its time to replace a GFCI outlet. My neighbor had his house power washed, and not sure how, but the power wash wand managed to blast up in to the GFCI outlet. Bad, very bad.
I’m sure the power washer operator knew something was wrong when the sparks and smoked started coming out of the outdoor electrical outlet. The one with the weather proof cover on it. Yeah, that one…
My neighbor asked if I knew how to replace a GFCI outlet, so it was time for some DIY electrical repair. Big Note: if you don’t know your way around electricity, enjoy this story but don’t try this yourself, ok?
I guess the power washer guy got the washer wand too close to the outlet, and maybe directed the spray at an upward angle. Water got up under the outlet cover, and into the GFCI outlet. Then the sparks fly.
Black smoke marks means this outlet is toast.
What is a GFCI outlet?
A Ground Fault Circuit Interrupter outlet is used in wet locations. Areas where there is a possibility that despite all your best intentions, you are standing in a puddle of water when plugging something into an outlet, and you managed to grab prongs of the plug when plugging into the outlet.
“These electrical wiring devices are designed to quickly and automatically disconnect a circuit when it detects that the electric current is not balanced between the energized (line) conductor(s) and the return (neutral) conductor. Under normal circumstances, these two wires are expected to carry matching currents, and any difference can indicate a short circuit or other electrical anomaly is present, such as leakage. Leakage can indicate a shock hazard (or shock in progress) which is a potential danger to a person. Current leakage can result in harm or death due to electric shock, especially if the leaking electric current passes through the torso of a human.” Wikipedia
Love the last part, passes through the torso of a human. Yes, that is a bad thing.
My neighbor picked up a new GFCI outlet and we turned off the power to the outlet at the breaker panel. I then removed the screws holding the outlet in its box, pulled out the blown outlet and tested the wires to make sure that they were not energized. IOW, Making sure I wouldn’t get shocked.
Look in the back, there’s still water in this box.
I have a favorite tool for keeping electricity form passing through my torso: it’s called a non-contact circuit tester. You can tell if a wire is energized (it has power in it) by just getting the tip of the tool next to the wire. Neat. It chirps and blinks if there is power present. Whenever I open an electrical box, I first check all the wires with this tool. Saves my torso…
First, when you want to replace a GFCI outlet, buy high quality replacement. The cheap ones will always break. You get what you pay for with most things, and we don’t want to cheap out on anything that involves electricity. Learn from me, OK?
I managed to pull out some wire from inside the wall and cut back the fire damaged wire. I connected the black, white, and green wires to the correct screws. The 2 correct screws for the wires bringing power to the outlet are labeled LINE, and should be across from each other. Most outlets are well marked where the Neutral and Hot wires go. Neutral or Common wires are white. Hot wires are black, but can be red if the outlet is connected to a switch.
If power is flowing from this GFCI outlet to other outlets (which will also be protected by the GFCI) those outlets will be connected to the LOAD screws. The load screws are usually covered with tape like in the photo below.
Insert wires into holes in back of outlet, screw tightly down.Wrap back of outlet tightly with electrical tape
I pushed the new outlet into place. Note: my neighbor bought a 20 amp outlet, one usually installs a 15 amp outlet.
Put your outlet tester into the outlet and turn on the power. You should be good to go.
Weather proof covers are a must for outdoor outlets. Replace the rubber gasket it if it damaged
When you first turn the circuit breaker that feed power to this outlet back on, the outlet will probably be in its “tripped” mode. Press the reset button on the outlet and it will allow power to flow to the receptacle. Press the test button to make sure the GFCI is working, it should trip the GFCI to off, then hit the reset button again. You are now good to go.
I realized I bit off more than I could chew about one week into this year’s maple syrup season. Ever think about a project for months, only after you start you realize, OK what did I get myself into? That’s me this year making maple syrup.
Have to clean up the rig soon.
First I built a new homemade maple syrup evaporator, I had been building it my head since last season. I found a legal size file cabinet in Brooklyn for $50, hauled it up to the house, and started building the firebox. I bought a Harbor Freight Flux Core Welder to help with the build.
For a while now I have been wanting a MIG welder, but after learning about the flux core, it was the obvious choice, and I now had a project where it would be useful. So a deep dive on YouTube on how to weld led to our first basic flux core welding video.
I had also been thinking about getting a evaporator pan made to fit right on top of the cabinet. For the previous homemade evaporator, we used steam table trays, and that’s ok, but I wanted to boil more sap in less time.
I found a guy named Zach who was selling sap evaporator pans on Ebay, and contacted him about a custom pan. A week later a cheap maple syrup evaporator pan shows up on my doorstep. Cheap isn’t the right word, but mbe that phrase will help Zach get more biz for his site through search. Really well made is a better term to describe it.
Last fall I started collecting way too many pallets to supply the firewood to boil down all the sap I was going to collect.
Way Too Many Pallets!
All during last winter I’m eyeballing more sugar maples I can tap around me. How would I run the lines, how close can I get them to the road – too much thinking. I order more tree taps and sap lines. Sap line and taps are surprisingly cheap, BTW.
And I bought a food grade pallet tote on craigslist, which holds 275 gallons of liquid.
So I fire up the new evaporator and realize quickly I’m burning wood real fast, and not getting a lot of heat in the tray. The sap is boiling OK, but it should be really boiling or I should be throwing less wood into the firebox. The fire is racing through the cabinet and going right up the stack.
Firebox Raceway
Always fun to see flames coming out of the top of a 8′ chimney. No pictures, sorry.
So while I’m slowly boiling sap, I’m collecting A LOT of sap. I had been thinking about extending some of the sap lines I do along the road up into the woods, but I’m glad I didn’t.
The big problem with collecting lots of sap is storage. I then discover the neat pallet tank freezes. And you can’t just break through the ice in the tank like you can with an open barrel. So I had 150 gallons of sap in a pallet tote that I couldn’t get out of it. The valve on the bottom, and the water in the sap, was frozen. The tank is plastic, so you can’t heat it, or it melts. The beauty of the blue plastic barrels I use is that you can break through the ice and haul out the concentrated sap in the center, then turn it on its side to dump out the ice. Not so with an enclosed tank.
A related issue was when I wanted to run a gravity fed line from the storage area up by the garage down to the evaporator, I used the 5/8″ sap line. If it was 32F or lower outside, the sap would freeze in the feed line. I gave up and hauled it with buckets.
My two big problems were the heat racing through the firebox and sap freezing in storage.
The sap freezing was easy, sell the pallet tank buy some more blue barrels for storage.
The firebox inefficiency was not as easy. Reading on the Maple Trader maple syrup forum, many sap makers build a baffle or obstruction in the firebox to get the heat to stick around longer. My friend Bill, who I learned how to make sap from, has two bricks halfway down the firebox, covered with sand. This causes the air – heat to become turbulent (we think) and stick around longer. I read about others who put a metal baffle in the box to slow the burn. One could also put a damper in the chimney.
My experiment with pre-heating the sap by running a copper tubing around the chimney stack didn’t work. The sap just didn’t warm up very much. Copper tubing is expensive! Maybe running the tubing inside the chimney may work better.
And of course, we had the epic FAIL on a glorious winter day:
Not fun…
After this I went out and bought a food grade tank that sits nicely in my trailer. BUT, like the pallet tank, you can’t let sap sit in it, you have to get it into barrels or it will freeze. The fact that the tank sits low in the trailer (good for avoiding more spill fiascos) means I have to bucket it or pump it into the taller blue barrels. I see a pump purchase in my future…
Storage: I’ve been a big proponent of doing with less, minimalism, downsizing your junk. But making maple syrup causes you to need to store quite a bit of stuff. Kinda like beekeeping. The barrels go up in the garage, but I have to find a place for the tank.
More stuff to store
What did work quite well was lining the side of the firebox with firebrick. I found the firebrick at Lowes. It was pretty cheap – previous I always thought firebrick was expensive. This type was sold as bricks to replace cracked ones in a home wood stove. I basically leaned them up against the sides of the file cabinet. This directed heat up to the evaporator pan, and kept the sides of the cabinet cooler. With the previous file cabinet evaporator, you couldn’t stand next to the rig for too long without burning your pants.
The last thing that hampered the sap season was me. I did this all by myself. Friends would be interested, but wouldn’t show up. So if you are thinking about making maple syrup, get your friends involved early.
But I am already thinking about next year!
I will post some photos of my firebox on Maple Trader and ask the experts for suggestions. My friend Bill suggested the bricks and sand method, that is the first one I will test out. Improve the sap pre-heater. And yes, test the firebox before the start of the season. Did not think to build the evaporator in the fall and boil some water to see how it all worked.
It will be easy to sell the pallet tote to a neighbor, and blue barrels are easy enough to get.
So if you are thinking of making maple syrup, start small and involve your friends. Your eyes will be bigger than what you can get done in the 3 weeks of sap season. Learn from me!
If you want your appliances to last longer, don’t buy smart appliances. Here’s why:
3 things have stuck in my head recently so I thought if I would write this all down, it would maybe get out of my head.
First, I just fixed my sister’s portable generator. It was a freebie that hadn’t run in several years. I knew immediately what was wrong. Bad gas gummed up the carburetor.
While it took a while to find the engine serial number, I did easily order a new carburetor for about $100, and slapped it on in short order. Except for the trip to find an odd Torx female socket (an E25, FYI) the new carb was on and the generator running in less than an hour. Always nice when an engine starts on the first pull. Very analog. (Always use gas treated with fuel stabilizer, more here.)
2nd was an article by Erik on Root Simple about his #FewerFeatures movement.
When the control panel on our dishwasher failed last month I found myself asking why our appliances and gadgets have so many useless features. Those features bring with them a greater chance that the device will break down and make them harder and more expensive to repair.
The third was a smart thermostat sent to my by an established furnace controls company. I was initially excited, but when it insisted on having my cell phone number and home address to function, I sent it back. Why does a thermostat need my cell phone number and home address? All the better to use that data for what purpose?
My reasoning behind the don’t buy smart appliances mantra that has been swirling in my head for a while is this:
The smart parts of these appliances are going to mothball fairly quickly.
Think about the smartphone. Every time there’s an operating system upgrade, your phone gets older. In a few short years, your phone can’t handle the new software, and you have to buy a new phone.
If you fridge has software in it that is compatible with today’s smart devices, it is already dated. How many software patches and upgrades will appliance companies issue before they say a 6 yr old fridge is beyond their upgrade policy? “This refrigerator is no longer supported” will be a recurring phrase in the future. When will bluetooth be discarded? Same for buying a replacement control panel or circuit board.
There’s also the question of why do we need this? Granted, people asked that about the telephone, dismissing it as a novelty. But do I need to know how much ketchup I have on the door of the fridge? Not at the moment.
When we bought a new washer and dryer, I knew I wanted one of the new high efficiency front loading washers, and tried to get one with less buttons, but it is still full of buttons. I did better with the dryer, instead of buying the companion dryer with all sorts of buttons and choices, I got the super simple tin box with a knob and a start button.
The simpler appliance is a lot cheaper, and it will be a lot easier to fix if it breaks. For the time being, until I have some sort of alternate epiphany, I’m saying don’t buy smart appliances. What do you say?
I am a map geek. The last two weekends have hauled out the large USGS topo maps I have of our area, spread them out on the table, and gone over them with friends.
But the problem with the USGS topographic maps is: they are huge, big pieces of paper.
National Geographic has solved with problem by offering these free USGS downloadable maps that print out on 8×11 paper. Much better, right?
I have already downloaded 4 maps, as our town is spread across a few of the maps, and now i can piece together a custom map. What fun.
Here’s an easy flower box you can put together in an afternoon. All you need is some stock lumber and spray paint. I built the planter box for my friend Bill, and he cut out a stencil and decorated it.
I made this out of pressure treated pine 1″x6″ lumber. Worried about pressure treated lumber, watch this. And screwed it together with painted deck screws, they will last longer than drywall screws. I set the ends in slightly for a decorative look, a little less boxy, I think.
I made this box a little narrow by cutting down the 6″lumber to 4″ wide. You can do this on a table saw, or maybe your neighbor’s table saw. Or don’t cut the lumber down, its all good. Use what you got. Wear eye, ear, and dust protection when cutting wood.
I did screw into the end grain of the side walls, which isn’t the best carpentry, but i also glued it with a waterproof wood glue.
I drilled a few drain holes in the bottom board. Depending on where you place this planter, you might want to drill them on the bottom of the side walls. This planter will last much longer if it is not sitting where water can collect underneath it. The photo above is an example of a less than great placement. To fix this, slide some thin wood shims underneath this, or flat rocks, or whatever you have. If you keep the wood of the planter dry, it will go a long way toward a long life for the box.
Bill painted the easy flower box with white outdoor spray paint. He then downloaded a stencil design of a fern leaf, printed it out on regular paper, and cut out the leaves with a sharp utility knife. Two different cans of green spray paint work well for the green leaves, I think.
This last weekend the temperature was around 5-10 degrees F all night and day. So this played havoc with our maple syrup evaporator operation. The line that feeds raw sap to the evaporator froze as soon as I would defrost it, so I was ladling sap in to the pan by hand.
Bigger problems were elsewhere in the yard. My main sap storage tank was frozen to the point that the drain valve froze shut. Its kinda a bulky object to work with, so it just had to sit until it warms up later this week.
But one thing I had never seen is just how frozen one of my barrels out in the wood was. These barrels sit at the end of a line of maples we have tapped. This one had so much ice in it, the lid had been popped off.
I hacked through the top layer of ice knowing there would be slushy sugary sap inside. I scooped out the sap and carried it in buckets over to the evaporator.
Usually, if I have overnight ice in a bucket, its maybe an inch thick. I remove this ice and toss it. My thinking is the first ice that freezes on cool nights has a low sugar content.
But this barrel was different. It had gotten very cold, and this was a lot of ice. So I dragged a spare barrel over and connected it to the sap line, and let this one just sit. The temperature will go up later this week and I hope most of the ice will melt. Then I can haul it to the evaporator.
Tossing ice from sap buckets is one of those contentious topics in the maple syrup world. I want to borrow my friends brix refractometer and measure the ice in the buckets and the remaining liquid to see the actual sugar percentages.
Check out this homemade leaf mulcher bagger that Greg built! Using a free wood crate and an electric leaf mulcher, Greg made a rig for almost free that would cost big bucks at the store. How cool is that?
Here’s the how to make the Homemade Leaf Mulcher Bagger
From Greg’s email:
I love the show.
You show the world that it’s (usually) pretty easy to do a lot of useful things. You let everyone know that it’s okay if you don’t get everything perfect on your first try. The fact that the dogs continually pester you to play make your projects that much more realistic to me. Because that’s how it works at my house.
I currently work in a machine shop. We get a lot of pallets and shipping crates. They end up throwing them in the dumpster. So, of course, I have to find a use for as much as I can. It is nice that we get a lot of them all the same size and in new condition.
Attached you can see that I got tired of emptying the bagger. I adapted one of the crates by adding a base with wheels. I had some hinges around, so I hinged the old top back on but to what is now “the front”. I cut a hole and strapped a spare electric leaf blower/vac to the back side. I mounted it as high as I could in order get maximum fill.
I connected my gas blower/vac to the electric blower/vac via a 4″ hose, This is the the hard plastic kind that you would redirect a downspout with. Well this is the longest one I could find. When I “accordion” out the entire length of it, its about 25 feet long. I’m sure there is something better suited for this task, but this was only for proof of concept. A word of warning. When the hose is in it’s expanded state, it is subject to damage from our four-legged playmates.
Well, I tell ya. The thing works pretty darn well. Well enough to give my Dad a try at it.
I maintain a few properties and this whole rig fits into the hatch of my car. With a 100 foot extension cordon the base, I don’t need to stop until I run out of gas, I can make a nice batch of leaf mold. I hinged the door in a manner that allows me to dump the contents right into the waiting compost pile.
Though you might get a kick out of this.
Greg has sent a few other projects our way, here is his pallet compost bin setup. Again a big thanks to him for taking the time to show us his homemade leaf mulcher bagger. What have you made? Let me know in the comments.
Want to sell on ebay to make money or declutter? Selling on eBay is easy, if I can do it, you can do it. One of my friends makes a living on buying antiques and collectibles at yard sales and selling on eBay, and I’ve learned how to use eBay from them. We’ve talked about selling on ebay on this GF Radio episode, and the realities of what your stuff is worth here.
I use eBay to get rid of stuff I don’t need. I’m big into decluttering now, and have instituted the One Year Rule: If I haven’t used the item in the last year, out it goes.
I either sell on eBay, or use our block association email list to give things away, or I just put it on the sidewalk outside our house. Stuff disappears! And the declutter process makes you feel great.
We just moved into a row house, and in the basement we found a metal and porcelain chandelier. Someone at one time really liked this style of lamp, but it wasn’t something we were going to use. But I was thinking it must be a style that some people like.
I went to eBay.com and typed into the search “metal hanging chandelier” and scrolling through the search results, I found several lamps that looked like ours. They all used several key words to describe the lamp style:
Tole, Italian, Shabby Chic, Vintage
How To Sell on eBay
Here’s my steps to selling on ebay.
1. Take good photos. Your cell phone takes good photos, you can use a fancy camera too. I’ve found the best photos are with daylight coming through a window, and the sale item on a white background. We have a white tile table that I photograph items on. Cluttered backgrounds make for bad photos and are a turn-off for buyers – clean white background = good sales.
Take good close-up photos
2. Write a good description and BE HONEST. If the item has scratches on it, you have to state this in the description. Take a photo of the scratches – you can load 8-12 photos per listing for free on eBay. Use the keywords you found in similar listings in your title and description.
3. Don’t use exclamation points and bold type and ALL CAPS. Shouting doesn’t work when trying to sell on ebay. It makes you look like a 9 year old.
4. Be personal. In the description of the lamp we posted for sale, I wrote about how we found it in the basement of our new home, and how it would look nice in a shabby chic decor home.
5. Research what similar items are selling for. Have an idea of its worth, but pay attention to what’s not selling as well.
6. Start the bid at .99 . This might seem counter-intuitive, but it works most of the time. You will get a lot more interested buyers, and the market will prevail on pricing. There will be those buyers that want the item and are ready to pay a market price for it. Your auction price will rise close to what the market is paying right now.
7. Be explicit in payment requirements and shipping. I always use PayPal for payment, unless the person wants to come pick it up in person, and then they can pay in cash.
8. State your return policy. If you are selling a camera or computer, you might offer a refund if the item is DOA ( dead on arrival ) because of a shipping problem. For items like antiques I don’t offer a returns, I sell them as-is.
9. Ship the item promptly. State in your auction how many days it will take to package the item and ship after the end of the ebay auction. Contact the buyer through ebay and send them a tracking number.
10. After the buyer receives the item, ask them to leave positive feedback, and do so as well for the buyer. Remember, Karma is Boomerang.
The auction for the ceiling light ended and we were stunned to see it sell for over $200! I messaged the buyer and they explained a bit about Tole lamps. They lived in California and it fit their house decor well. Good for them.
What are your how to sell on ebay techniques? Let us know below:
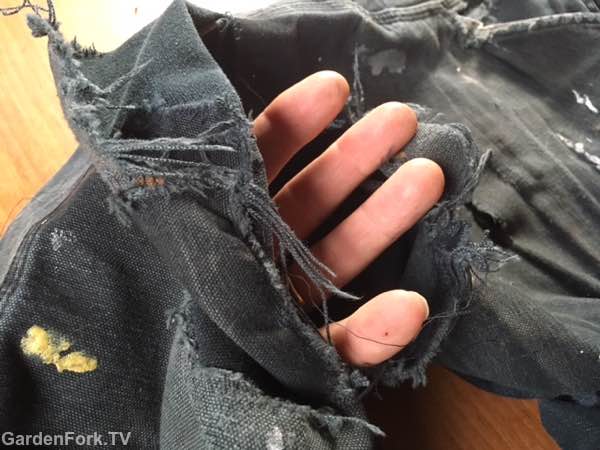
I wear work pants all the time, most of them have sewed on patches – learn how to use a sewing machine here. The pair I had on yesterday had recently developed a new hole, and a tree limb snagged in that hole yesterday. Unfortunately, the tear was quite large, and the dungaree cloth was weak already from previous repairs.
I love using the my sewing machine, I think its the original 3D printer. Its an intricate machine with lots of moving parts hidden behind a plastic case. I don’t know what many of the knobs and adjustments do. But I am able to sew patches on pants with it.
So it was time to retire this pair of Carharrts, though they have served me well. But the silver lining for pants that can’t be repaired, is that you can salvage the cloth. This cloth can be uses to repair other stuff. Typically the back of the pants legs are still in good shape, so sharp scissors make quick work to remove a large section of cloth.
The rest of the pants can be recycled in one of those drop off bins you see in store parking lots. From what I understand, any clothing not intact is sent to be used as insulation or filling. Please don’t just throw them in the trash.
Do you repair your clothes? By hand or machine? Let us know below.
I’ve been on a decluttering mission for a awhile now, but I’m always stuck by what to do with that has value. Can’t bear to just throw it out, so I have found a solution.
There was this 50 amp generator plug lying around in my shop, and I will never use it, so I looked on ebay, and these plugs sell for about $65 new on the site. I took some photos and posted it, starting the bidding at $1, plus I added a Buy It Now for $35. The plug sold in a few days.
How cool is that? The plug I didn’t need got to someone who needed it and I got some paypal spending money. What fun.
I did the same thing with my older weather station that was partially broken. The unit has several pieces, and some had failed, but I couldn’t stand just throwing it in the trash. Knowing that many people had the same weather station, I thought someone could use the parts to repair their own station.
Up it goes on ebay, with the bidding starting at $1, and I sold it for $40. I was very surprised yet very happy. I get rid of clutter, and the stuff goes to good use, not a landfill.
Erik and Kelly of Root Simple talk about decluttering on their podcast. This got me started, plus just wanting to clear up the place to have room for projects. When your desk and shop table are filled with stuff, you can’t get any work done.
So I am much happier knowing another way to get rid of stuff, yet make sure it goes to good use. How about you? Appreciate your thoughts in the comments.
You usually think about storm preparedness just before the lights flicker out, right? To help you be more prepared, here are 3 things you should have before the power outage.
Storm Preparedness Tools I Have
Whether you have a generator or not, a solar powered radio, that also charges mobile devices, is the first thing I tell everyone to buy. I have this Eton radio that has AM, FM, and 7 pre-programmed weather stations dialed in. This radio has a USB charger plug, and you can power up devices either by turning the crank or using solar power. The solar cell can take all day to charge up a device, however, the hand crank works faster.
I have gone through many cheap LED headlamps, then I finally decided to stop buying whatever was at teh store and upgrade to a better quality one. This Eveready LED Headlamp has 7 LEDs and several functions. I used it last weekend to do some electrical work, so you can also use it for your DIY projects as well.
A quality waterproof flashlight is our 3rd must have tool, because the power goes out when its raining or snowing, not when the sun is shining. We tested this Dorcy LED Flashlight and it works great. I also like that it uses AA batteries, not larger cells. This means we can just use our existing AA batteries.
As you can see in the video, this flashlight floats and can be used a Labrador toy. This may sound like fun, but it also proved to me that your dog can chew on it and it will still be waterproof and function.
We do use a generator for power outages, but its loud and I’d rather not run it day and night. Instead, we power up our headlamps and listen to the radio. I occasionally run generator to heat the house and keep the fridge cold.
People have been asking me how to find used brick for building our DIY pizza oven plan, so as I just found some more brick today, I can share with you how to do this.
The best way is to look around for construction demolition projects going on in your area. Ask you friends if they know of any work being done. I was lucky today to walk down the block to find a crew taking down a brick wall of a building. They were happy to get rid of some brick.
Used Brick sits well in those plastic organizer crates, but make sure they aren’t the cheap flimsy kind.
Perfect reason to ride your bike around, so go look into construction dumpsters and find used brick.
If there aren’t brick buildings near you, check out Craigslist. You’d be surprised how had a pile of brick that they want to get rid of.
You will probably pay more for clean brick, so keep in mind when you want to clean brick and when you to just pay for brick that has already been cleaned.
The issue of using used clay brick has been debated quite a bit. I have used it for several pizza ovens and I am fine with it. You can make your own choice. For pizza, we are not heating up the brick for hour after hour to build heat, we are creating a space to hold fire for a short period to cook some dough and cheese.
Chainsaw chaps have saved my leg twice. Lots of people don’t wear them when using a chainsaw, and I think those people are not being smart. I am not the ultimate expert on chainsaw safety and PPE (personal protection equipment) but I do cut down trees and cut firewood on a regular basis.
My chaps saved me from tearing open my leg
Basically, chainsaw chaps keep your chainsaw from cutting into your thigh or leg. The chaps are filled with a threadlike material. If you get a running saw too close to your leg, the chain cuts into the chaps instead of your leg, and the inner material blooms out and stalls the chainsaw. And you are not bleeding all over the ground in the woods.
This has happened to me twice when I was not paying attention. The first time I was kneeling and cutting up a felled tree, and my leg slipped right up against the running saw. The saw stopped almost immediately after hitting the chaps.
Buy chaps a bit shorter than your regular pant leg size, or you will trip over then in the woods. You can get brand name chaps or generic ones. I have both and they both work fine.
I didn’t have a hard hat for a while, then I whacked my head on a limb as it was coming down. Then I bought a hard hat. Its super easy to take on and off. Plus, with the eye screen, you don’t have to keep pulling off safety goggles. If you don’t get an all in one, buy ear and eye protection separately. Its worth it!
Steel toed boots are a must. Logs will roll onto your feet, and anything you damage now will become arthritic later in life, learn from my experience.
Carry several pairs of gloves, you will lose them, and in all that leaf debris, you wont find them. Plastic wedges make tree felling much more controllable, you wont get your saw pinched in a tree anymore once you buy them.And I am a convert to pre-mixed fuel. Yes it costs more, but it saves on repairs. Its cheaper to buy the fuel than to have your chainsaw in the repair shop for a carb rebuild before it needs it.
Tom built this brick pizza oven that is heated by a DIY aluminium foundry, and sent me a note and great photos. He says:
Eric, loved your pizza oven video, so I built one and it worked as described. Mine only got to about 600 degrees, so instead of 90 seconds cook time like Naples style, it took me more like 5 minutes. Not quite as much char and the crust is just not quite there. I spent a lot of time in Italy as a kid, so I really want to try to get the temperature up without having to build a full size permanent wood fired oven in the yard.
I thought you might like to see my first attempt to get higher temps. I took a portable aluminum foundry (YouTube video) and built the oven around it. Above the heat source, I put a 8th inch piece of steel, and laid a pizza stone on it. when fired up (which took about an hour instead of 4), the steel bowed quite a bit (you can see this in the picture), and this caused the stone to crack, so I didn’t force the temp any higher (controlled by amount of air pumped into combustion chamber). I did get up to around 700 degrees, so I’m moving in the right direction. Cook time was more like 3 minutes, and the taste is about 92 percent of what I remember from my childhood. Hopefully by spring, I’ll have a trail number 3, with a thicker slab of steel and a new stone, and a front door to trap more heat. I’ll probably order the Naples flour and tomatoes and pick up some prosciutto and good mozzarella. I’m hopeful I can get up to 850-900 degrees. If I actually do, I’ll send you pics and let you know how it went.
Homemade aluminum foundries are popular on the web, but I never thought of using one to heat up a DIY pizza oven. Brilliant idea, I think, and something I never would have thought of. A big thank you to Tom for sending us the photos!
I’ll be doing more book giveaways on GardenFork, as publishers are sending more books! Here is The Practical Pyromaniac by Bill Gurstelle, who was on GF Radio here.
We made a potato bazooka based on his previous book:
To be entered into the book giveaway, leave a comment below telling us about a DIY project you are doing or are planning this fall. Thx!
I often get asked, “Does it make any difference if the water supply line is hooked up to cold water line rather than hot?” To understand this fully, first watch this video on how to install a dishwasher.
Are you not sure which water pipe you hooked up the dishwasher to? Or are we just figuring out which water valve we need to connect the dishwasher supply hose to before we start the install. For either one, we need to understand dishwasher soap to grasp the whole picture here.
The new formulations of dishwasher detergent have gotten very good at cleaning dishes, and its now common practice to not rinse the dishes before putting them in the dishwasher. Yes, knock off the large stuff, but just put them in. Rinsing dishes before putting them in the dishwasher is a waste of water and your time.
Make sure the dishes face toward the center of the machine. If you have a large pan that needs cleaning, put it face down so the spray jets can do their best cleaning. Plastic items and glasses should go on the top rack. Consumer Reports has found that the detergent pods are the best detergents right now.
Most dishwashers have a water pre-heat function, sometimes it is a feature you can turn on or off, but leave it turned on. Dishwasher detergent, and your dishwasher, work best with very hot water. And when you first turn on your dishwasher, the water in the hot water supply is probably not very hot. The dishwasher pre-heater brings it up to a higher temperature, allowing the detergent to work at its best. The pre-heater supplements the water coming in from the hot water line, don’t think you can hook it up to the cold water line and rely on the pre-heater.
This is why, for dishwashers, its always the hot water supply line.
When doing a dishwasher installation, I have found the existing water supply line hooked up to the wrong pipe. Check under the sink that the dishwasher line is actually hooked up to hot water pipe. If it is not, you will have to switch out the valves under the sink to you can attach the washer line to the hot water pipe. Here’s a good book on basic plumbing that I learned a lot from.
I did this custom DIY dishwasher installation so it fit into existing cabinets at a friend’s apartment. There wasn’t a space for a dishwasher in the kitchen and we made a space in a creative way. Maybe we’ll call it an unusual way, actually. If you’d like to see how to connect the electric, water, and drain lines, see my video on how to hook up a dishwasher.
In small kitchens, I often see those narrow dishwashers that you don’t see in most homes. They are common in apartments, and might be good for a tiny house too. Our plan here was to remove one of the cabinets and slide in a small dishwasher.
Before the DIY installation
I call this a custom DIY dishwasher installation is because it wasn’t as simple as removing a kitchen cabinet and sliding in a dishwasher. I had to install a dishwasher into existing kitchen cabinets. The cabinet under the sink was one unit, so I had to be creative in figuring out how to make space for the dishwasher.
I did this by cutting off about 1/3 of the base cabinet. This isn’t your usual install, it was a challenge, but it was fun. Key here was cutting real straight lines, not the easiest thing to do on site. But we did pretty good
I removed the left cabinet door, pulled off the counter and sink. This involved shutting off the water in the kitchen, disconnecting the drain pipe, and the water lines going to the sink. This is always an adventure when climbing under a sink. The shut off valves don’t always work, and once you turn them, they can break. Then you are toast.
Thankfully the shut off valves were fairly new, so turn them off and then don’t look at them.
I cut the lateral supports where we were to slide in the dishwasher, and moved the side of the sink cabinet unit to the right. Basically shortening the width of the sink unit. Some brackets and screws put the cabinet back together.
The tricky part was then I moved the left side wall of the sink unit, I had to make sure the hinges on that wall were level with the hinges they were across from. Somehow this all came together fairly easily. Sometimes I am lucky. Sometimes I am toast. Today no toast.
I slid in the dishwasher, remembering to slide in the feed and drain hoses beforehand, as well as the power cord. There was an outlet behind the stove, so we were good there.
My friend was very happy, and it was fun to do. What do you think?


 There was this 50 amp generator plug lying around in my shop, and I will never use it, so I looked on ebay, and these plugs sell for about $65 new on the site. I took some photos and posted it, starting the bidding at $1, plus I added a Buy It Now for $35. The plug sold in a few days.


