Garden Problems never end in the vegetable garden. So I made two videos with Erin from The Impatient Gardener about how to deal with Deer in the garden, and much more. Like bears…
These videos are sponsored by Troy-Bilt, a long time supporter of me. Erin and I are working with them for #FenceTalks, solving people’s garden issues.
Deer, Weeds, and Moss In Your Yard and what to do:
Beer, Weeds, Caterpillars in Your Yard
What do to about Deer in your garden?
Oh, if there were only a true fix for this plague of many gardens, including mine. All we can aim to do is discourage deer from hanging out in our yards. Erin from her blog post
As Erin says in the video, plant deer resistant plants and use deer repellant sprays on your fav plants. The sprays only smell for a short while. If you want to go big, you can put in a high fence, or two shorter fences right next to each other.
Moss growing in your grass and yard? I have watched over the years moss take over part of my yard. Its kinda nice and soft, but it tears up easily. The best way to get grass back there is to aerate the soil and cut back shady branches. Moss likes shade, grass does not.
Invasive weeds? We are getting creeped on by Garlic Mustard. I have seen it slowly take over the town. About the only way to deal with it is to remove it. Thankfully, it pull out easily.
There are tougher invasives coming in to our area. Japanese Honeysuckle is a vine that takes over. One of the few ways to deal with it is glycophosphates like RoundUp.
Bears in my compost. Yes, the bears have torn open my pallet compost bin. Not fun. Then my Labradors have gone in and start eating the half composted food scraps. Even more fun.
Erin tells me that I need to avoid putting any meat or fats in the bin. I pretty much to that, but I’m wondering if the eggshells attract the bears? Another tip Erin gave me was to cover the new food waste with leaves.
I’m always learning here.
Holes in you Kale? Every year the precious kale gets its leaves eaten. Erin tell us its the cabbage looper doing the damage. Easy enough to deal with, cover the plants with row fabric to keep the cabbage moth from laying eggs. Done.
What are your garden problems? Let me know, thx! Eric.
Here is the best DIY mini hoop house I have built yet. I’ve crafted bunch mini greenhouses and cold frames, taken that info, and made this mini hoop house for my raised bed vegetable garden.
So, why build a DIY mini hoop house? The big answer is that it extends your growing season. You can start seeds earlier in the spring, and grow vegetable later into fall and even winter if you do it right.
These season extending rigs are also called a mini greenhouse. I’ve built mine to fit on top of a raised vegetable bed. AND I’ve added a major upgrade to make it easier to lift and open the mini hoop house as it sits on the raised bed.
I’ve had hoop houses slip off the raised bed with high winds, or when you open it, so I crafted a simple solution for that, read below for the details.
Building The Raised Bed DIY Mini Hoop House
I used scrap lumber I had around. I’m all about use what you got. So we had these 2x4s. The mini hoop house sits right on top of the wood sides of the bed. Make your hoop house frame the width of your bed, and however long you want it. Mine is 8′ long. Build the frame so that the long ends of the hoop house sits right on top of your bed, not inside the bed sitting on the soil. This will make it easier to open and close, and it will last longer.
For brackets to hold the wood frame together, I think these metal shelf hangers work great. I salvaged mine from some shelves a neighbor was throwing out. These brackets will last longer than the wood they are holding together. And it is completely fine to use coarse drywall screws to connect them. The screws will last longer than the wood as well.
I’ve used 3/4″ pvc for the hoop. Use a tape measure to determine how high you want the top of the DIY mini hoop house to be. You can also experiment with a piece of PVC to see how tight of a bend you can do with it.
I was able to take an 8′ piece of 3/4″ PVC and bend it to fit within the 4′ width of the hoop house frame. The peak of the hoop house is 40″ high. I have found a higher peak with steeper sides really helps winter snow slide off the mini greenhouse.
I slid in one of the bent PVC pipes at the very end of the frame. I then placed a 4’x4′ piece of plywood behind the pipe and drew the arc of the hoop onto the plywood and cut it out. It is best to use outdoor rated plywood for this project. If you can’t find or afford outdoor rated plywood, paint whatever wood you are using with outdoor paint after you cut it but before you assemble it.
These automatic thermatic vents are brilliant for a DIY mini hoop house. The vents open and close around 50ºF, and they are adjustable. Do not buy the cheap ones, they will stop working. For this design, I place one high, to let out hot air, and one low, to let in cooler air. I may add two more of these automatic vents, so each end has two of them. When you get a really warm day in spring or fall, the hoop house can heat up right quick.
Use UV rated plastic to cover your greenhouse. If you use inexpensive plastic, you will be replacing it in a few years. And the plastic breaks and splits apart and gets all over your garden. No fun.
I put in a long 1×2 to support the top of the arch. I drill a pilot hole through each pipe and screw the arch into the cross support. I then cover each screw head and the plywood ends with recycled hose so the plastic is not cut open by the sharp edges of the screw heads or plywood ends.
I attached the mini greenhouse to the raised bed with two recycled hinges. Make sure the hinges you use have a removable hinge pin, so you can just slide out the pin to remove the hoop house from the raised bed edge. If not, you can just remove the screws to disconnect the frame from the bed.
This hinge improvement makes the hoop house green house much more stable on top of the raised bed. It wont blow off in a storm. Learn from me…
A metal handle from my box of salvaged hardware makes it much easier to lift the DIY mini hoop house, and makes it easy to prop open. Note how the rig sits nice on the other side of the bed because of the two hinges.
Here is a recipe for homemade chalkboard paint. Its not rocket science to make, in fact, its real easy. Here we go!
The camera operator loves chalkboard paint, just on the wall, she writes out little quotes and stuff. So I got a bunch of scrap wood and I thought, it’s winter, it’s snowing, and I gotta think of stuff to do in the shop so let’s make some more of these chalkboards. But instead of that using that expensive chalkboard paint, you and I are going to make homemade chalkboard paint.
Get some latex paint and non-sanded grout. I’ve never used non sanded grout before. It’s used for tile. You can buy this in almost any hardware store, but with these two things, latex paint and grout, plus a little bit of water and a brush, and you’ve made chalkboard paint.
The latex paint I have here has been sitting around for a while so the paint needs to be shaken really well. You have the solids settled to the bottom so I actually like to shake the can upside down. Make sure you got that lid on tight. Use what you got for a mixing stick, but bring the bottom of the can to the top. You can see on the mixing stick the solids. Bring them from the bottom to the top, mix for longer than you think one should. It will help.
Here’s the homemade chalkboard paint recipe. One cup of latex paint, one tablespoon of water, two tablespoons of unsanded grout. This is from my friend, Eric, at the RootSimple.com blog. Really brilliant.
How do you measure a cup of paint? You don’t want to ruin your baking measuring cups, right? I have an answer. I’m gonna wanna make two cups of chalkboard paint. So what I did was I got two cups of water and I’m gonna pour it into a yogurt container and then I’m gonna mark that on the side of the container. Then remove the water and pour in your well mixed black paint.
Use a sharpie to mark 2 cups inside the mixing container
I’m wondering if you can get a smaller box of the unsanded grout, but this is what the hardware store had, so this is what we got. The tablespoon measure we’re using, I stole from our coffee machine. Don’t tell anyone, okay? This grout has kind of a clay like, powdered clay… It’s almost like talcum powder or like cornstarch. Two tablespoons of grout per cup and we are making two cups of chalkboard paint, so we want four tablespoons of grout. And then, for each cup of paint, we want a tablespoon of water. Now we mix. I think that addition of the water is a key thing, ’cause adding in that much of the unsanded grout into thick paint, can make this really thick.
So let’s talk about what we want to do with this. I had an idea for kind of a big chalkboard like our Pallet Frame Chalkboard, and then, maybe, some more neat little chalkboards just on some scrap wood and I happen to be a scrap wood hoarder.
It just occurred to me, if you’re using a can of black paint that isn’t brand new, in other words, you’ve used it for something else, there’s probably plenty of space in the can to make the homemade chalkboard paint. You could just mix everything right in here, maybe kind of guesstimate how many cups of paint are left and then add in the unsanded grout and some water. I just thought of that.
BTW: I’ve found the mix needs a little more water than the chalkboard paint recipe states. It’s like milkshake thick.
I found a stair tread in my scrap wood pile. I think it’s pine, I don’t think it’s oak, but a little cleanup and I think this would make kind of a nice, horizontal, simple chalkboard. I’m gonna put a little bit of a border on it and I don’t have any that blue tape, so we’re gonna… GardenFork’s all about Use What You Got. You know we got? Cheap duct tape. That’ll work, maybe…
The chalkboard paint goes on really easily. I’m wondering, I’m using a chip brush but could you use a paint roller? How would that work? This board has lines in it from the brush. What if we used a roller?
I have another stair tread and I found a mini roller. Mini rollers are great for painting. Let’s roll a second piece of wood and see the textural difference. We’ll let ’em dry overnight and then take a look. I think the clay just thickens the paint up over time, so I’ve add a little more water to make it rollable. I’m didn’t mask the edges this one. I’m just kind of make my own little rectangle. I like the rough, not everything has to be pristine and sharp-edged in my life, so here we go.
Protip: so how do you save the paint roller ’cause we may want to do a second coat or work on some more later? I have a whole video about painting tips and tricks. Here’s one. Take your roller, roll it up with plastic food wrap, and then halfway through, fold the edges over and finish rolling. There you go. That’ll last till tomorrow now.
I really like how both of the DIY chalkboards came out. And we just used wood we had lying around the shop. Nice.
These tool cart hacks will take your rolling tool box from good to wow really good in less than an hour. How cool is that?
What are tool cart hacks? They are simple improvements to your rolling tool box that greatly improve its use in your workshop. I’ve also seen them called tool cart mods. Mods is short for modifications, by the way…
I bought a quality tool cart, but the wheels weren’t great. I imagine the brand was trying to lower the price and went with cheap wheels. The wheels were plastic and whenever they hit a piece of grit on the floor, the cart would get caught.
I took one of the plastic wheels to the inexpensive tool store, and bought some decent rolling casters that had the same bolt pattern as the originals. Replacing them took about 10 minutes. Done.
My tool cart hack was to get my socket set in a drawer, yet keep them organized. There are socket organizers you can buy, but I had a simple solution I pulled apart the hinge on my plastic socket case, and slid the bottom half of the socket case into the tool tray. It fit just fine.
I use the top of my tool cart as a portable work surface, but its hard to hold stuff when you need to work on it, or weld something together. I have had a decent vise laying around (a friend gave it to me a while back) so I drilled 3 holes and mounted it on top. I did not drill a hole into the corner of the top, as the bolt would get in the way of the drawer mechanism. The 3 bolts hold the vise on the cart just fine.
How you doing? You guys like rolling tool carts and Labradors, right?
Camera Operator: Yes.
I just got a new rolling tool cart. I been thinking that I could upgrade it, to make it more than the good rolling tool cart it is right. So today I’ve got for you and me three tool cart hacks. With a little help from my friends here. Ready?
Camera Operator: Ready.
I don’t like these wheels. I mean rolling tool carts are competing on price a lot of the time. And you, ya know you want one that’s not too expensive. But the wheels, they get stuck on any little pebble you have in your garage. So I had a simple upgrade for that. Again, not a big fan so let’s take the wheels off. They come off pretty easily. At least on this rig it does.
I’ll link to the tools I use below. Couple of ’em are nice. So what’s really cool about this one. There’s a threaded plate in here already. So the nuts aren’t falling into the bottom drawer. That’s nice. okay next, take this to your local tool store. I went to, let’s just call it the inexpensive tool store. You know which one it is probably. This, I wanted to match this same bolt pattern and I upgraded to these. These are a heavy duty rubber caster. These’ll roll better, and has the same plate pattern, bolt pattern, and the tool cart comes with two swivel and two locked wheels. And I splurged and got four rolling wheels. Which will make it much easier to push this thing around.
That’s my visual for pushing it around. Push this thing around your shop. Learn from me. Don’t sock these in tight till you have all four screws in. Now, you can tighten ’em up. A vast improvement! I mean look at that, it’s like. What do I do with these now? Let me know in the comments. Can we make something? Should we keep these? Do I give ’em away? Let me know, comments below. Meanwhile, let’s spin this some more.
So, like you, I bought a new socket set. Cause, well I got a hole in the roof here, and it rained right onto my socket set and it was bad. So now I have some spare sockets. But anyway, how, you know you got this big case thing and you want to have your sockets in a drawer or something. I figured this out. So you can buy all sorts of socket organizers for your drawers right. Here we go. That kinda occurred to me the other night and I thought, I mean yeah you could tuck it in with some foam or something. But it’s already organized, and you just pulled the hinge off. And now you’re good to go. I thought, well I was pretty happy with that. You let me know what you think.
Camera Operator: Ouch!
By the way I said three tips, there’s four tool cart hacks. The bonus tip will be at the end of the video. So stick around I think you’ll like the bonus tip.
You wanna do some welding. I have some welding videos by the way. Or you wanna do maybe some cutting with this. But your rolling tool cart, and I use this as a work surface. There really isn’t a way. Well you just, it’s hard to hold stuff on top of your cart.
My show is all about “Hey let’s try this, “and see what happens”. So let’s put this on. I mean would it work, I don’t know, let’s try. Let’s mark the center of that hole. I’m gonna use a center punch, so we can drill right where we want to. I really like these step drill bits, they’re kinda fun.
Friend of mine gave this to me prolly five, six years ago. It’s been sitting around in my shop and I was almost ready to like give it away and then I was like. Work bench, I mean not work bench. Rolling tool cart, I can say that word. So anyway this, right there. Lock washer, kind of interesting bolt came with it. This is that part where you’re you’re kinda doing it upside down and backwards. So I didn’t put this in the video, buy maybe you’re like me. I’ve made three trips to my basement workshop. Just to get the bolts and stuff to put this thing on here. Now I’m like “Oh, I forgot that thing”. And I forgot some other stuff so I’ll be going back.
But anyway, this on here. Nice! How cool is that? Oh, let me tighten it up over here. All right, nice! All right question for you guys. How do I put these, well, those are sticky drawers. How does this sit in there? Let me know in the comments. Cause I learn from you all right?
Now, the bonus tip. So when you buy your rolling tool cart. It’s always got these advertising stickers on it. And I can never figure out a great way to get ’em off. But wait, heat gun. Careful when using this. But, heat gun takes this off really nice.
You are wondering, can I eat this mushroom? Is this mushroom edible? Watch this video to find out.
First, be very careful with mushrooms. That said, there are a bunch of mushroom that are safe to eat and easy to identify. Today we will learn how to identify the oyster mushroom.
So, Can I Eat This Mushroom?
There are several ways to learn about identifying mushrooms.
The best way is to learn from someone who already knows. Find a mentor or take a class. Search for your local mycological society or mushroom foraging group.
Pay attention to how they mushrooms attach to the tree
Another good way is to use several mushroom guidebooks. Look up the mushroom you are researching in each of the books, see what they all say about the one in your hand. I have several mushroom books, here is a post I wrote about the ones I use.
When identifying mushrooms pay attention to the following:
What kind of tree or soil it is growing in.
Where on the tree it is growing. Roots, trunk, etc.
Weather conditions
Color and size of mushroom
What kind of gills and stem it has, or no gills at all
Note how these gills look and there is no stem.
The guidebooks I use have great detailed information on each mushroom, and by combining the info from several books, you can start to learn to identify edible mushrooms. If you are not sure, ask a friend who knows, or find a mushroom group online and post a photo with information there.
If you are not absolutely sure, do not eat it.
But I think, after some study and learning you will be able to answer the question: Can I eat this mushroom?
Are you wondering like I’m wondering, what are these, and can we eat ’em? Ready? Let’s go. I’m gonna be back in a minute, okay? Did you see, what I see? I gotta go get a bag, hold on. The girls are in here. Hello my knuckleheads. She has pneumonia. Anyway, you stay here. It is almost Thanksgiving. I know, yuppie bag.
It’s frosted here several times, the ground is frozen about three inches. Actually, I just shot a video about digging up potatoes out of my frozen potato bed and I just drove by that. I think these are Oyster Mushrooms. The question is, can we eat them? First let’s make sure they’re mushroom, but also since it’s frosted last night, the bottom part of this is cold. And, we’ll let’s take some off and see.
See there, well you can’t really see but they are in there. It is, it like crunches when you’re taking it off. And that is cold and hard. But look at that. They feel a little leathery, rubbery. Some of these are past their prime. That’s just, that’s gone. That’s gone, but man, that smells, that’s an amazing smell. I just love that smell of woodsy mushrooms.
Oh wow. These look like they fruited a little later than the ones over there. This is a Maple, probably a Sugar Maple, because I’m in the land of Sugar Maples, but see the snow? Here? So there’s definitely been some frost. Can you eat a frozen mushroom? We’re gonna find out. This is just, I’m very excited as you can tell. That’s definitely frozen. I’m wondering whether this will turn to mush or not. I mean, . I’m all about, hey let’s try this, and see what happens.
So that’s what we’re gonna do. All right, finish some harvesting here. So, I’ve left a bunch here. I don’t know if the spore will travel with this kind of weather conditions, it’s supposed to rain later, it’s like 32 and a half degrees out, just above freezing. So I have some, and I always leave some, I think that karma is boomerang that way, but still, a nice harvest. We’re gonna identify these and then if they’re an edible one we’re going to cook them. Here’s the rub though. I have to go back to New York City today. We love in Brooklyn during the week, so we’re gonna take these and we’re gonna mushroom road trip to Brooklyn, identify ’em and cook ’em. Ready? Here we go.
Look where we are? The Brooklyn Museum, no, the Brooklyn Library. Says right there. So, before you eat mushrooms, you need to identify them, and this is me trying to get you to go to your library and also learn about identifying mushrooms and also seeing if Eric can eat these mushrooms. So, in here is some knowledge. Here we go. Phone booth. We got our books. There’s Grand Army Plaza. I used to live right near here and then I moved. So, it’s kinda fun to be back. But the library, just go to your library. It is amazing. I kinda got lost in the stacks there and I was like gonna check out too many books and I forgot my knapsack and that’s more information than you need to know, so let’s go, let’s go see if we can eat these mushrooms. And then cook them. So stay for that bonus round of cooking.
So some of these are looking a little aged, they’re looking a little old but you can still eat ’em, they’re just not gonna be like wow, but still it’s wow that you got these from the woods and wow that we’re gonna identify ’em. I just said you could eat them, and we don’t know that yet. Strike that, okay? What are you thinking about mushrooms, yeah? Is that exciting? Not too excited huh? Yeah.
So how did I learn about mushroom foraging? It’s, I think the way a lot of people do, I actually went with a conservation group in the next town and they had these two mycology experts in the woods and we walked around and we discovered different kinds of mushrooms that were edible and the other ones to watch out for, which I think is great. So learning from another person, learning from an expert, is really the best way. Like a mentoring.
You want to read the book with me? You can’t eat the book, okay? Another way is through guidebooks. I will link to all the guidebooks that I use, again you don’t have to buy them, you could just get them from the library, like this really good one with a chapter on Oyster Mushroom. So with all the information we’ve garnered from our guidebooks, looking, smelling, observing where it was growing, how we harvested it, what did it look like, stacked kinda like this, my vote is that these are edible. So let’s try this, see what happens.
Is that really a good phrase for mushrooming? I don’t know about that.
I don’t like to slice mushrooms, I just like to tear them into pieces, well, maybe bigger pieces than that but I kinda like, I just like tearing them rather than cutting them. Cutting is too uniform and that’s not Garden Fork. All right, these. Smells pretty good, let’s see if it’s edible. All right, the great moment. Will I live or will I die? Let’s see here. Tastes like a mushroom. Tastes like a winner to me. Let’s you and I continue our mushroom journey here, I have some more mushroom videos should be floating right here, so I will see you in the next video. I’m gonna eat these mushrooms.
In this video, learn how to maintain your snow blower with 5 tips anyone can do. Get your machine prepared for winter before it snows, and your blower will start on the first pull. Watch the video then read through the post for more information:
First! Disconnect the spark plug cable before doing maintenance on your snowblower.
Bad gas is the most neglected part of maintaining a snowblower. Regular gas has ethanol in it, which wreaks havoc with small engine carburetors. Then your machine sits all summer and the ethanol gums up your carburetor. Fuel stabilizer neutralizes the ethanol. Pour it into all your gas storage containers according to the label directions. My machines always start because I used stabilizer. I use Sta-Bil, but the blue stuff works as well.
Make sure your tires are good. If they are deflated, you may have a bad tire valve or the tire bead is not sealing. If the tire sidewall has cracks, its probably time to get new tires. Big Hint:do this in the summer, so when there is 12″ of snow outside, you don’t have any unhappy surprises.
Adjust the shearplate. This doesn’t get talked about with snowblower maintenance, but its important. The shearplate is on the bottom of the snowblower, and it needs to ride just above the driveway pavement or concrete.
Often it is adjusted too high or it scrapes along as you blow snow. For asphalt and concrete driveways, it should be the width of a piece of cardboard above the surface of the driveway. Use the skid shoes on the sides to adjust this height.
If you are snowblowing a gravel driveway, adjust the shearplate so there is more of a gap between it and the road surface. That way you throw out fewer pieces of gravel.
Buy some shear pins, they break. Shear pins are metal pins that break in two when something jams in the snow auger. These pins are designed to shear, preventing damage to the gear box and drive shaft. They are cheap, so keep a few on hand. Of course, these will break when you are clearing snow late at night. Save your machine next time it inhales one of your kid’s toys.
Never know what is under that snow!Shear pins break when the auger gets jammed by an object.
One Tip To Maintain Your Snowblower Year Round
Put mothballs around the engine of your machine, it is one of the best way to maintain a snowblower. If a mouse builds a nest in your engine, it is a huge pain to fix. Mice eat the wires in your engine – not sure why – so do this. Put mothballs in a metal can with holes punched in it with a can opener, or buy the mothballs in a perforated bag.
You want to hang shelves on cement block, a cement wall, or hang shelves on cinder block. I’ll show you how, watch this video and read through the steps. I’ll also list out the best tools and screws for the project below, OK?
Working as a contractor in New York City, I have been asked many times to hang shelves on cement block, also known as CMUs or cinder block. They are basically all the same thing, though they may have slight differences. Some may be solid block, some may have holes in them. The method to drill into them and hang shelf brackets is about the same.
Some Key Tips To Hang Shelves On Cement Block:
Do not drill into the joints between the blocks.
Use A Hammer Drill.
Have a Shop-Vac or vacuum hose right under where you drill.
Size the screws to the weight that will be on the shelf.
I often seen projects where the DIY person has drilled into the masonry joints of a wall instead of drilling it into the cement block. Its much easier to do, but the screw has a good chance of falling out. The masonry joint can easily crumble, and then your bracket falls off the wall. Not Good…
First figure out what it is you want to hang on a wall. Is it a shelf to hold stuff? How heavy is the stuff?
That will answer what kind of shelf brackets and screws to buy. If it is light stuff, you can get simple brackets and use screws with lead anchors. If its a heavier thing, you will need concrete lag bolts (aka Tapcons or Tappers) and stronger shelving brackets.
Lead anchors and concrete lag bolts
Tapcons require a specific size drill bit. Be sure you have the right one, or you can buy one with the screws/bolts. Lead anchors are a little more forgiving in respect to drill bit diameter.
BTW, if you want to hang floating shelves, keep in mind they don’t hold a lot of weight. DO NOT try to put a TV on a floating shelf, OK?
To me, floating shelves are a pain, but I’m not an interior designer.
The key tool for this project is a hammer drill. The one I have linked to here is affordable and will do all sorts of stuff for you. You can not only drill into cement and brick, but also use it to mix 5 gallon buckets of paint. You will be happy you bought one, OK?
A regular corded drill, or cordless drill, will not work when drilling into cement. Many have tried and failed. Make your life easier, get the right drill.
You will need a masonry drill bit set for your drill. Don’t cheap out on the drill bits, you get what you pay for.
Place your shelf brackets on the wall where you want your shelf. Be sure the screw holes on the brackets are not centered on the masonry joints, and mark the holes on the cement wall. Use a level to make sure each bracket is level on the wall and the brackets are level with each other.
When drilling, go straight in and straight out. Do not ’round out’ the hole, the cement lag bolt needs a precise diameter hole or it wont work.
If using lead anchors, tap them into the holes, and then use a cordless drill to screw the brackets into the wall. If using cement lag bolts, use a socket wrench or a cordless impact drill to screw them in. Do this carefully, do not over tighten the bolts, or they can strip out the hole you just drilled.
Finally, do an idiot test. See if the shelf will hold the weight intended. You don’t want your prized object to fall off the wall.
Tool List
Hammer Drill
Masonry Drill Bit Set
Magnetic Level (really cool, IMO)
24″ level
Cordless drill driver set
I am a big fan boy of this Bosch Cordless drill driver set. It has the power of an 18 volt cordless tool, but its only 12 volt and fits in your pocket. I no longer use big cordless tools, I use these. And they recharge quickly.
Here is the video transcription:
You hang shelves on cement block? Today, I’m gonna show you how. Ready, here we go.
I’m gonna try to be a little clairvoyant here. You went to the hardware store, you bought a masonry bit and some kind of hardware to hang your shelves on cement block and you took your regular old drill and it went nowhere. So then you went to the internet and you found Eric. Welcome.
This is a cement block. This one’s a little dirty ’cause it’s been in my basement, this wall’s a little dirty, but what I’m gonna show you, the techniques are the same, the challenge here is you have to drill through this to hang something on the wall. And that can be daunting but I’m gonna show you how to do it.
You need a couple tools though, okay? What you’re missing is this and some knowledge. This is a hammer drill, don’t be daunted by that name. This is an amazing tool, that I think you should consider adding to your toolbox. I’ve had this one forever, I’ve used it a lot and it was inexpensive.
And what it is. But what it does, in addition to turning, it is percussive, it hammers. So it takes this drill bit and goes. All while turning it at the same time into the cement. That is key. If I was organized, I’d actually get things done.
All right, so you want brackets on here. There’s a couple ways you can do it but basically you’re gonna need some sort of screw into there, right? I really like these, these are a masonry lag bolt. A commercial name is Tapcon or I think Tapper is another one. But, it’s a double threaded lag bolt. I think these are just fine for some angle brackets to hold up a wooden shelf. If you’re holding a very heavy TV you might need some thicker ones.
Lead anchors are another choice. I like these when it’s not as heavy of a thing that you’re going to hang. These are lead, you don’t wanna handle ’em too much. ‘Cause they’re lead. See on the side here the diameter of the drill bit you need. But you look on the side here what diameter you need. Drill the hole, put this in. Put the screw in. Butter. Done.
The masonry lag bolts have a specific diameter drill bit that you need. I just, a lot of times I just buy a new one, ’cause I wear these out. The trick here is when we’re drilling this in straight in, straight out, don’t round it out because this won’t be able to bite then. Learn from me. Who’s rounded out this?
So I’m gonna show you how to do both of these. I have to mount, well it’s a water pump. It’s a cast iron water pump from my spring, it’s part of a longer video I’m making. These are what I wanna use, but for you I’m gonna show you how to do these as well. Come along, let’s go.
So when we’re figuring out where we want this to be for drilling the holes, do not drill into the masonry joints. Not here, not here. You wanna drill into the cinder block itself, okay? Use a small level to make sure your bracket is level. That’s important. First the lag bolt, okay? Ear protection, no, eye protection, and ear protection is a must. This drill makes a lot of noise and it’ll throw out cement so, careful.
Bigger drill bit for the lead anchor, okay? There is a lot of dust when drilling cement. Put your shop vac or your vacuum or a dust pan right underneath it, sucks all of it out. If you’re doing this in someone’s living room put a vacuum underneath it then drill, okay? Learn from me, what have I done before? Dust, everywhere.
Lead anchor goes into the wall. Stick around to the end here because once we get the brackets up we still have to test the weight. Did I actually do what I’m, do I know what I’m talking about? You wanna know that, right, so stay to the end. This, in there. Brackets on, weight on. See what happens.
So to put in the concrete lag bolts you have two choices. Impact driver, I really like these, I’ll link below. I’ll link below to all the tools I’m using. Or, a ratchet. First time out, consider using a ratchet ’cause if you spin this out, because you can put this in too tight, and rip out the cement that’s holding this in you have to re-drill the hole. So, I’ll show you both ways, okay?
Don’t over-tighten this, okay? Like that. And stop. Nice. So, look at this, this is the lead anchor screw here. Much thinner. This is much more robust. But it just depends on how much weight you’re going to hang as to which one of these to use, okay? Lighter weight. Heavy weight.
So I’ve got a level across the two brackets here. I’m making sure I’m not going into the cement seam. Looks good, that looks level. Make the marks, and drill. Did you notice something there? I had the drill set on reverse. Yeah, don’t do that. You should always do kind of an idiot weight test before you put the very special thing on the shelf.
BTW if you want to organize the tools you are acquiring for all these DIY projects, see how my friend Erik does it at Root Simple.
What is Beer Cooler Sous Vide? It’s a super simple way to cook sous vide without buying an expensive immersion stick gizmo. You probably have all the parts you need in your garage. Let’s watch the video:
This is a great hack I learned about from Kenji Lopez-Alt of SeriousEats. You can cook meat sous vide with just a beer cooler, some zipper bags, and a thermometer. No need for expensive immersion circulators, just some simple tools and this all tastes amazing.
Sous Vide is a cooking method that brings the meat up to a set temperature (like medium rare) and holds it there. The beauty of this is you don’t overcook the meat, and you get to precisely pick the done-ness. Nice.
How to build your beer cooler sous vide rig
Pretty simple. Get a cooler.
I’m am all about use what you got, so go in the garage and see what’s there. Or maybe your neighbor has a cooler they want to get rid of.
Then do this neat hack I learned from Kenji. Insulate the lid.
Its something I never thought of, and now I wonder why cooler companies haven’t done it before. Get your cordless drill, and drill two 3/8″ holes in the front edge of the lid. Lift the lid such the edge with the holes is pointing up. Fill with regular spray foam. Let dry.
Be sure to wear gloves and clothes you don’t care about when you do this spray thing, the foam will get on your clothes and it does not come off. Learn from me.
That’s is for the build, pretty simple, right. Now that everyone has Yeti coolers, I imagine you can find someone who will give you a cooler for free. Just find the friend who is doing the decluttering thing.
So why a beer cooler? Coolers keep things cool, but they can also keep things hot for quite a while. To cook a steak, fish, and other thin proteins with the sous vide method, you only need to keep them in hot water for about an hour. The cooler will keep the water right at 135ºF (medium rare) for quite a while.
IMPORTANT! Season your meat. Its best if you can salt and pepper boths sides of the meat a day before and leave it in the fridge, but even adding it just before sealing in a bag is ok.
The hardest part of this whole beer cooler sous vide method is getting the air out of the zipper bag. When I first made this video, my air evacuation technique was not great, but now I put the meat in the bag, and lower it in to the cooler (or a bowl of water) and slowly lower the bag until the zipper part is at the water line. Almost all of the air will have been evacuated at this point. Zip up the bag and you are good to go.
I use water that is a few degrees warmer than the end temperature I am aiming for, this works for me. Test for yourself, and get a digital thermometer, it is a big time saver.
When your meat has been in the cooler for an hour, it is time to sear it. Heat up a cast iron pan, pat dry the meat, add oil to the pan, and sear for a minute on each side. Drop in some butter if you want a quick sauce. Let the meat sit for a few minutes and you are good to go!
Here is a cheap sous vide machine that works almost as well as an expensive sous vide machine. My beer cooler sous vide setup works just as well as those immersion sticks. Watch the video and read on!
The beauty of this cheap sous vide machine is, you probably already have all the parts to make it happen. Its not even a ‘machine’, I think, it’s a big insulator sitting on the shelf in the garage. So go get it, clean it out, and let’s go.
One key thing: the lid of most coolers is hollow. Get a can of regular spray foam (not the kind for big gaps) and drill two 3/8″ holes in the lid, along the front edge near the corners. Fill the lid with spray foam. Its ok if it spills out the holes, it will dry and you can snap it off. Its best if you prop the lid up so the front edge of the lid is pointing up, that way the foam will flow down into the lid. Let this dry overnight.
How to use the Cheap Sous Vide Machine, aka Beer Cooler Sous Vide
Go buy good steaks. They don’t have to be expensive, but I’ve found steaks at least 1″ thick work best. I have also used blade steaks and they work quite well. What kind of steak is up to you.
Put the steaks on a tray or plate, and season with salt and pepper on both sides. Put them in the fridge overnight. This allows the salt to permeate the meat and the fridge dries out the steak a bit. Kind of like dry aged steaks only not as dry. It does help.
But if you are like me and don’t plan, just salt and pepper the steaks and put each in a zipper bag. Drop the bags into a bowl of water to push out as much of the air as possible. See the video for how to do this. You can drop in some herbs if you want, and add some butter. Nice.
I like my steaks medium rare, so I aim for an internal temperature of about 132º F. This tells me to fill the beer cooler, aka cheap sous vide machine, with water that is 135º F. There will be a bit of a temp drop in the cooler, so bump the water temp a bit higher than your ideal internal meat temperature. Keep in mind you are going to sear the steak after the beer cooler, so it will raise the temp a bit of the meat.
Once you are happy with the temp of the water in the cooler, drop in your meat in the zipper bag. If the bag wants to float, you need to remove more air. If you’ve gotten as much air as possible out, use a rubber band some silverware to the bag to keep it submerged. Close the lid.
A few times while the water heats the meat, I will pop the lid and stir the water real quick. After an hour, I take out the bags and fire up the grill or the cast iron pan.
IMO, the best way to sear a steak is a cast iron pan, but you can use the grill if you want. OK with me…
Dry the meat after pulling it out of the bag, preheat and oil your pan, and drop in the steaks. Sear each side quick, you can add butter if you want to make a quick sauce – like we do in this steak cooking video – and place on a plate. Let the steak rest at least 5 minutes, OK?
Then pour a nice glass of red wine, sit down with those mashed potatoes you made, and enjoy. You’ve cooked an amazing steak with gear from your garage.
You want to cook a steak, right, and you want to try that sous vide method. I mean, what’s that all about? But the problem is is those sous vide machines are, like, wicked expensive, right, and I’m not gonna go out and buy one of those things and you’re maybe thinking but you want to try something, right? Let me take you on my journey of the cheapest, if not free, DIY sous vide machine. You probably already have one in your basement. Hello? Beer cooler sous vide. Ready? Here we go.
I made a video about this cheap sous vide machine quite a while ago and the other day, the light bulb went off. I had some steaks. I had more than this and I was like, Let’s sous vide these puppies again and I brought out my DIY sous vide beer cooler machine. Total credit, I did not invite this. Invite? Invent this. Kenji Lopez Alt from Serious Eats and also the fantastic book, The Food Lab, he came up with this.
I’m just showing you his, I’m spreading his word, okay? This thing is brilliant. It’s a cooler but it’s also a heater. I mean, it keeps things warm and it keeps things cool. Let me show you.
So coolers are insulated waterproof plastic boxes, right? The trick here is that the top is usually hollow so what Kenji suggests, and I did, was I got some spray foam and I drilled two holes here and then you spray foam the whole lid and that helps insulate. Basically, a giant insulated thing and you usually coop but keep. I can’t talk. You usually use it to keep things cold, right? But it equally keeps things hot and sous vide is all about maintaining a constant temperature to cook something to X degrees, right? Enter the beer cooler and hot water and this.
I salted this steak last night and then I put it in the fridge. I didn’t cover it. I kind of like that it dries out a little bit but I’m gonna add some pepper. Salt and pepper, yellow Labrador, beer cooler. You don’t need to use this big of a cooler. GardenFork is all about, Hey, let’s try this and see what happens and use what you got. And this is what we got. So that’s what we’re using.
And I got a thermometer thing. So I want to see how hot the water comes out of the tap at. Medium rare is what, 130 degrees. This is 128. Maybe it’ll kick up a little bit. 127, 126. I’m gonna heat this water up to get that a little above our ideal temperature.
Salt and pepper, zipper bag. Um, this goes in here at the bottom, whoa, there we go. Yeah, like that. And then the goal is to get all or as much of the air out of here as possible. We’re gonna do this by submerging it in the water, bringing it all the way up to the zipper part and then sealing this. ‘Cause my cooler’s so deep, it’s kind of hard to show that so I’m gonna show you in a pan of water here. So this is submerged and the water pushes all the air out of the bag there. I don’t know if you can see that. So we’re just gonna push the bag all the way down. Just fold it on top of itself. That’s totally fine. A little bit of air is totally fine and then see how I got this, it’s hitting the zipper? The level of the water is hitting the zipper like that? So just push this all down. I run the zipper across while holding this down. It’s not rocket science, doesn’t have to be perfect. Because on GardenFork, done is better than perfect and this is almost done.
Now, into the cooler. More hot water needed. More hot water. I guess it would help to turn this on, right? Okay, so this is at about 132. That’s pretty good. That’s like medium, medium rare. This goes in here and it sits like that. And that’s it. That’s, I mean, you don’t have to use this giant cooler. Just a six-pack cooler makes a fine inexpensive sous vide rig. Kenji, in his video on Serious Eats site, has just a six-pack cooler. This just happens to be what I got so that’s what we use, right? But it’s brilliant and you don’t need to be buying one of those fancy machines, right? That in there, one hour. Let’s watch Labradors. Ready? Go.
All right, steak time. Wow, it’s, wow, you can really feel the warmth in here and that is at, this thermometer runs really slow, so. Shaking it helps, you know. Whoa, it fogs the lens. Sorry. 129. Pretty good. Pull this out. How cool is that? So it looks brown. It doesn’t look super tasty but just hold on, okay? Wait ’til we taste this at the end of the video. So this doesn’t look great. That’s okay. It’s going to be fantastic. Stick around for the tasting at the end of the video. Keep that up really hot. So you want this to be what I call wompin’ hot. That’s hot. We’re gonna throw some vegetable oil in here and then we want to get it to the smoke point of the oil and then lay the steak in.
All right, vegetable oil. I want to get it to its heat smoke point, which it’s pretty much close to right now. Heat, fan on, sorry. This is hot. This . All right, every 30 seconds now, according to Kenji, I’m gonna turn this. I’m being splattered right now. 30 seconds, turn. 30 seconds, turn, and a wadge of butter. Maybe there’s too much vegetable oil in there. Let’s see what happens. Okay, after about two minutes of searing, I want to cook the fat along the edge there. Now comes the hardest part. Let your steak rest a couple minutes. This smells great.
Let’s just go right for the center and see what happens. Wow, look how nicely that cuts. Oh, look at that. That, all the way through and then the sear. Pink all the way through and the sear. That is amazing. That is amazing. It’s tender. It’s got flavor from salt and pepper. It’s not that overcooked edges. I’m talking really well with food in my mouth, aren’t I? Phenomenal.
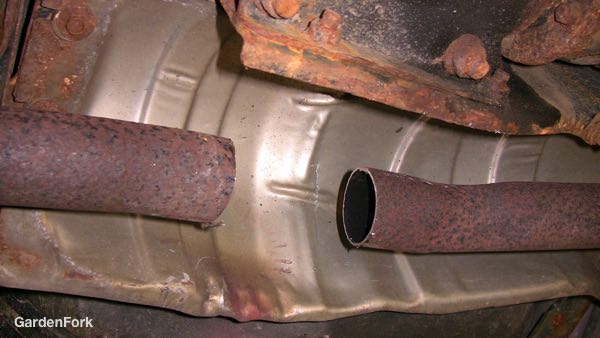
Here’s an exhaust pipe repair hack I learned how to do a while back. It is a simple DIY muffler repair that will last long enough until you have time to take your car to the repair shop. This is not meant to be a permanent repair, this is simply a emergency stop gap measure. Maybe you don’t have the money quite yet to go to the muffler shop, this will knock down the noise. Heads up, this won’t help your car pass an emissions test but it is a neat little DIY hack to fix an exhaust pipe leak temporarily.
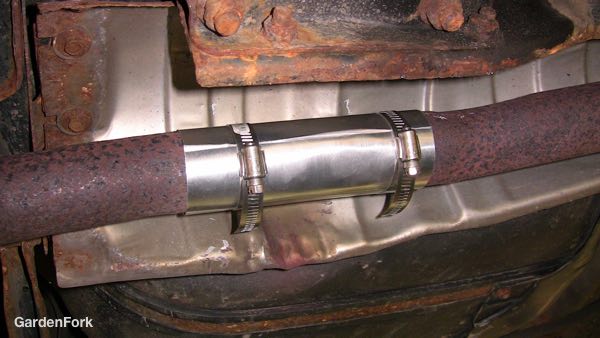
The flexible metal that I used is called roof flashing, but you could also use a metal can, like those that contain tomato paste or chopped up tomatoes for making spaghetti sauce. You can also use a soda can, but soda cans are made out of aluminum, so the hack will not last nearly as long. Aluminum has a lower melting point. Any kind of flexible metal that you may have laying around, something from a gutter repair or maybe your neighbor has some sheet-metal laying around that would work. You basically want to curl the metal around the exhaust pipe and then tighten it with pipe clamps.
You can also use this hack to do a muffler pipe repair. You would have to find a really long pipe clamps or connect together several pipe clamps. You can you can usually get clamps about 4 inches in diameter, if you buy a bunch of those you could connect them end to end and then wrap a big piece of metal around the muffler. This kind of muffler repair is not going to last really long but it would reduce the noise but your car is making – fewer people would stare at you at the red light intersection!
Video Transcript:
One of our cars has a hole in the tailpipe. I’m gonna show you how to do a quick exhaust pipe repair, until you have time to fix it properly, all right? So, you could be stuck somewhere, you can run to the hardware store, buy two clamps, borrow some tin snips, and get some roofing flashing. You could also just use, like, a tin can. Like a soda can, or a tomato can, or something like that. something that has flexible sheet metal stuff. All right?
Get under the car, let’s go. So first I’ve got to cut the old pipe. I’m gonna cut the clamps off and see what’s left there. We’re gonna use what’s called a right angle grinder with a metal-cutting disk on it. And be sure to have eye protection and ear protection. Be careful, all right? A lot of times you can just pull this out. Just put some pliers on here and you work it back and forth and it’ll come out.
Slide two pipe clamps that are slightly bigger, one on each side of the gap, of the hole. And then put your flashing up here and you’re gonna curl the flashing around the break in the pipe. This has sharp edges so careful not to cut yourself. And then slide these clamps over the metal and slide that on like that, there we go. There we go. All right, so you’ve got two clamps on, this is, you wanna center this in the break, and then we’re gonna screw these on. By the way, if you have one of these four in one or six in one screwdrivers, if you take the screwdriver part out, You have a nut driver here. So as the clamp tightens down, it wraps the sheet metal around the gap and it tightens it up. Tighten these up.
All right, there you go. Just a quick muffler exhaust pipe repair. If you’ve got this hole, and you drive down the highway, you could stop at a hardware store and buy those parts and fix it up, until you can get home and order the right parts or take it to the shop. It’s just one of those things that’s helped me out a couple of times so I just wanted to show you about it.
To get rid of deer flies, you have to attract them. Yes, I said attract them. Watch my video here and see what I mean as we make a deer fly trap.
Every summer, I walk out of the house and am bombarded almost immediately with deer flies. They fly around my head dive-bombing me. While my Labradors lie in the yard, the deer flies land between their eyes, on the bridge of their nose, and bite them.
So I had to figure out how to get rid of deer flies. Its been an interesting learning experience.
How to get rid of deer flies
There are two methods I use to get rid of deer flies. The first one is a DIY deer fly trap, the second is a store bought solution. The DIY trap is more fun, but the store bought solution is quick and easy.
BTW, if you are interested in the 12 volt drill – driver I use in the video, you can buy it here: cordless drill combo
A while back I ran across an article on the Univ of Florida website about deer flies with this odd photo:
Deer Fly Trap Univ of Florida photo
Of course I was immediately intrigued. I went out and bought some blue plastic cups and the sticky glue (affiliate links) to apply to the cups. I hacked together a few deer fly traps, using blue cups, dowel rods or sticks, and a few of my less favorite hats.
It worked.
Depending on the day and weather, I filled up the cups with deer flies. From what I understand, there are a finite number of deer flies in any given area, so if I could knock down the population in my yard, I could work in the yard with little interference from deer flies.
I learned that the blue cups with sticky stuff only work if they are moving. You can’t just stick on on a pole and put it in the yard. The cup has to be in motion. You can attach the pole/cup to the front of your tractor, lawnmower, or walk around carrying the pole. Or put a cup on your head.
Deer flies wait for something to fly by them, even though I think they are prowling around the yard. It is the female that bites you. The males eat pollen. You can get some protection by using a DEET based spray, and wearing long sleeve shirt and pants. Deer flies attack on the highest part of one’s body first.
I have read that some people will walk around the yard perimeter several times, pole + blue cup above their head, collect up all the deer flies, and then work in the yard. Sounds good to me.
The second way to get rid of deer flies:
Much simpler. Buy these deer fly patches. Don’t think you can just use that double stick carpet tape in your shop, it won’t work. The tape works by taking advantage of how the deer fly attacks. From up above, usually on a the tallest part of one’s body.
You go out in your yard, you wanna do some work, right? And immediately, you are dive-bombed by deer flies. Me too, we’re in the same boat here, and I keep thinking, “Is there a way to kind of “knock them back, keep them from dive-bombing me, “keep the deer flies at bay?” I have two ideas on how to do this. One is pretty cool, one is store-bought. Well, let’s try these and see what happens, ready? Let’s go.
GardenFork: making things, making food. If I can do it, you can do it. All right, down in the GardenFork research facility, AKA my shop. Don’t look, it’s kind of a mess, but that’s like me, right? Maybe your workshop’s like this too. Deep research, I’ve learned things about deer flies. They’re attracted to the tallest thing around that’s moving. They’re also attracted to different colors, so we want to attract the deer flies, not repel them.
So how do we attract them and keep them to this? This stuff, have you ever used this stuff? It is like the super stickiest thing I have ever dealt with. It’s used for, you put it on tree bark to keep caterpillars from going up into a tree, things like that. We’re gonna use it to stick deer flies to a cup. But our other challenge is, I mean, am I gonna? Well, I could be like that, I guess. Do I have any elastic? But here’s my thought. Hat, cup on hat. All right, how do we get the cup onto here? A little sewing, maybe. Great, elegant, isn’t it?
Oh, there we go. Okay, what’s your secret for threading needles? Ooh, look, I did it, oh my gosh. All right, thread, needle. So my thought here is to sew this onto here. Does that look weird? It does look weird, but they’re deer flies. I mean, do you want to live with deer flies? No, all right. So you want to put this between the two threads you pulled through. I have another idea, do you? It might work. This here, let’s see. Hm, did that work? No. And I got the staple stuck, nice. Oh, that didn’t work. There we go, all right, let’s press on. Right in there. Ooh, did that work?
That did work, except it’s sticking out the side. It’s sticking out the side of the hat. Well, that might work. It’s, uh, kinda centered. A little off, but I’m a little off, too, right? Ooh, I did it, holy cow. All right, step two now. Very important because this will stick to you.
By the way, the second tip is a little simpler. Stick to the end, I’ll share that one with ya, okay?
Application wand, should we call that? Look at that stuff. It doesn’t have to go on super thick because we’re just catching deer flies, right? Uh oh, it broke. One of the staples came loose. My hands are coated, well, the gloves are coated. I just kinda smoked my hat with goopy stuff, so I’m gonna try and maybe I could reattach that with some thread. I don’t know. In and through.
I gotta take off the gloves to do this. I’ve got it through there twice, so I’m gonna loop it around and tie this off for our experiment. Um, yeah, it’s a thing. But there’s already deer fly around me. He’s buzzing around me. Let’s see what happens. They’re buzzing around the camera more, so maybe if I put the camera down lower so they will… How do I know that they’ve stuck on there? Will you tell me? Maybe I should just kinda do some gardening. I could hill the potatoes. What’s it look like? Are there any stuck on there? How do I look?
– Camera Operator: A fly.
– Deer fly, score one for Eric.
– Camera Operator: Just one.
– How do I look?
– Camera Operator: Dashing. You look a little peculiar.
– You could probably keep your neighbors guessing like, maybe thinking that you’re like one of those tin foil hat kind of guys, which I am.
– Camera Operator: Mhm, we don’t have to guess. Yeah, let’s check back in a few minutes.
– Well, I was gonna do some gardening, but I have another idea for a second attractant type cup.
– Camera Operator: On top of that?
– So you don’t have to…
– Camera Operator: Wear it?
– Wear it. They move, they go towards things that are in motion, and supposedly are blue in color. They also attack from behind. They attack from behind to get to your neck.
– Camera Operator: It just flew on there and he is never coming off.
– Oh, there’s one on there?
– Camera Operator: Yeah.
– How cool is that? You just have to have a blue cup on your head.
– Camera Operator: Score two for Eric.
– But, it’s peace of mind. It’s like, I get so tired of being bombarded, you know, when you’re in the garden or wherever. I mean, there’s one flying around you right now and I just get the…
So I’m gonna bring out a second idea and I’m gonna do some gardening and see what works better.
We’re gonna prepare a second cup here. I’ve been thinking about this and I’m like, “Let’s make a video.” I mean, GardenFork’s all about, hey, let’s try this and see what happens, right?
And if we can have a home-made deer fly, not repellent, attractant, actually, to get rid of them, neutralize them, then wouldn’t that be a thing?
I accidentally got some of this on the camera That’s a bad thing. Oh, I still have my blue hat on, don’t I? Yeah, very complimentary there.
Next, dowel rod. This centered in there, hold on. There you go. Yeah, tip number one, don’t wear your blue cap hat inside. We’re being dive-bombed. I have my dowel stick here. Deer flies are attracted to things that move and are tall.
Not yet. You know, this morning, there were tons of them when we walked the dogs in the woods. Should I go in the woods?
We got one! Maybe if you had this on a spring and it could kinda jiggle in the wind and that would attract, because they’re attracted by the motion.
At my friend’s house. I want to show you his blue cap results, and at the end here, the simpler solution. I love the blue cap and the Tangletrap stuff. Tangle stick stuff. Deer flies are already around me here. That is amazing, isn’t it? Look how many are on there, and his application was much better. Uh oh, I’ve been caught. So I have the tub, like the margarine tub, of sticky stuff. This is the rubber cement can version of PVC glue, and I’ll link below to this stuff, but this works.
So a little simpler than the hat and the blue cone, wait for it, is the tape. This is a pre-made piece of double-stick tape. Carpet tape won’t work, by the way. Goes on the back of your hat and this works. Boom, they land on the back of your head, done. You can garden, you can do whatever you want. I’ll link below to the information for that tape. Meanwhile, let’s continue our time together here. Right here should be another video. Eric’s world: cooking, gardening, DIY. You and I, together, right here.
My blueberry bushes are the epitome of a weed infested garden. But I want to show you how I restore the weed infested garden bed, with some help from Troy-Bilt. They sponsored this post and provided some fine outdoor power equipment for me to use to restore this blueberry patch.
I neglected my blueberries this year, not sure why, but there’s always a ton to do, and the weeds took over. It was time for drastic action to remedy the weed infested garden. Look at the ‘before’ photo and see for yourself.
In this overhead drone photo, you can’t see the blueberry bushes, but they are there.
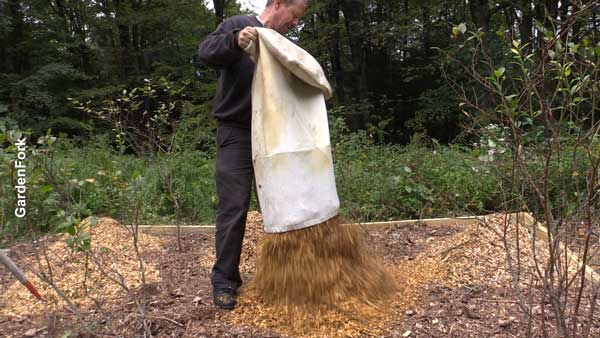
So my plan was to clean up the area, make a raised wood bed border, and smother the weeds in the raised bed with cardboard, and lay down wood chips on top of the cardboard for a permanent mulch. The cardboard will break down in to the soil, and the wood chips will keep new weeds at bay.
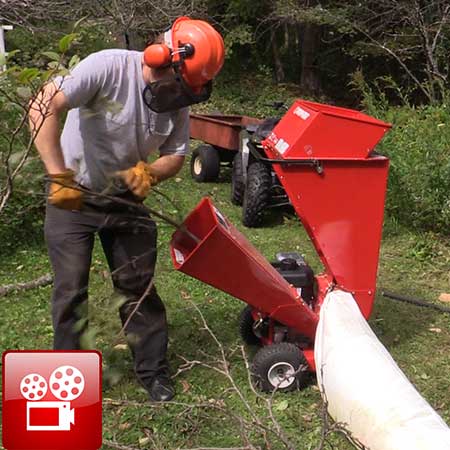
First I cut down the all the plants that were overwhelming the berries. The brush cutter attachment on the string trimmer worked well for this.
I then outlined what was to be the new raised bed with string and cut a slot for the pressure treated 2×6 lumber to sit in. This area has a slight slope so for the end nearest the woods, the lumber will sit right on the soil.
For the long end of the bed, I used a mending plate to connect two pieces of lumber to span the length. And in the corners, used corner brackets. You can find these in the roofing hardware area of a home improvement store.
It was nice that the box that our chipper shredder came in was large. Perfect for the layer of weed suppressing cardboard. Be sure to leave room around the plants, keep the cardboard about 4-5″ away from the stems.
Then came the fun part. I had already dropped a dead apple tree, so I had plenty of material to run through the Troy-Bilt CS 4325 Chipper Shredder.
What fun! Nothing like running power equipment and turning brush into useful wood chips. The chipper shredder had no problem with most of the wood we put through it. You have to go slow with bigger branches – it handles up to 3″ limbs – especially because this was fresh hardwood, very different than a soft pine.
We made A LOT of wood chips. Nice. The bag filled up right quick and we got rid of all the branches from the tree we dropped.
Learning how to mud and tape drywall corners is like most things. The more you do it, the better you get. Here’s a video showing how I do it. You can also see how we mud and tape drywall joints in a video here.
Steps to Mud and Tape Drywall Corners
Get the joint compound smooth like cake frosting.
Lay down a thin layer.
Apply wet tape.
Apply thin layer over tape.
Repeat.
That’s about it. You will get better with the mud and tape drywall thing as you go along. Breathe and go slow. Put down lots of tarps. Play podcasts like GardenFork Radio!
Since making this video, I have started using a new corner tape that has a metal corner built into it. This makes things much easier. But use what you got, you know? The new corner tape has a hard metal corner in the center and paper edges, but it sits nice in the corner and can cover over badly done corners.
For outside corners, if the area will get a lot of traffic, go with the all metal corner bead. It can be beat up more. It takes longer to mud in, but its worth it. Having things bang into the corner can damage a wall, as you probably know.
My other secret to mud and tape drywall corners is to not sand, but wet sponge the compound after it dries. Might seem counter-intuitive, but it works nicely, as you can reshape the compound. And it creates NO dust, which is the thing I hate about mud and tape projects.
Keep in mind you can always hit the re-do button on drywall projects. Joint compound is very forgiving. It is REAL important to keep the bucket of compound pristine. Always put back the thin plastic sheet to keep it moist, and the hard cover to keep debris out. If you get dust in the bucket, its bad. You will not be happy.
Learn how to hook up a generator your house electric panel safely in this video. We run our house with a portable generator and transfer switch when the power goes out, and here we’ll show you how to safely connect a generator to your circuit breaker panel. Watch this video, and read through the text below for more information.
AND, watch this video about installing a generator interlock, which is another option for hooking up a generator to your house. It is a simpler option, if an interlock is available for your particular breaker panel.
IMPORTANT: Do not run a generator in your basement or your garage. Gas engines create carbon monoxide, which will kill you. OK?
Using a portable generator is an affordable way to power the house during a power outage. You can install one of those large generators that sit on cement slab with an automatic transfer switch, but we opted for the less expensive portable generator and a manual transfer switch. I installed the transfer switch myself, but you must follow local electrical codes, and if you are the least bit hesitant, or are not experienced in working on electrical panels, please call a qualified installer.
This 6500 watt generator runs everything we need in our house
Before you go off an buy a portable generator, stop, breathe, and do some math. Generators are rated in watts. You need to know how many watts or amps all your electric powered stuff uses.
To determine how many watts of generator power you need, figure out what appliances in the house you want to power with a generator. Each appliance will list on a label somewhere how many watts or amps the appliance uses.
Use the formula if the appliance is rated in amps:
Watts = Volts x Amps
This will help figure out how many watts you need to power your home. And it will give you a good idea of how large a generator you need to buy. Most portable generators are rated by how many watts they generate.
Go around and total up how many watts your fridge uses, the freezer down in the basement, the large TV, the well pump, the sump pump. Think about all the big things that draw power in your house. (Not the Telsa, ok?)
At its most basic, that total wattage number tells you how powerful a generator you need. Keep in mind most of these appliances will not be running all at the same time. Well pumps turn on for maybe a few minutes, furnaces run longer.
Light bulb usage is not worth calculating, I think, especially if you use LED bulbs. The power drawn is minimal.
After 12 years of regular winter power outages, I have found that I never use the full wattage of the generator I bought. If I had to do it again, I would have bought a smaller portable generator. The meters on my transfer panel barely move when powering most of my house. Something to keep in mind.
The only caveat to under sizing a generator is: with my generator, you can tell when the well pump turns on. The generator engine is definitely under load when the water is pumped. Check with your well pump installer for how many amps the well pump needs to run, that is real important. You don’t want to risk burning out your well pump with an undersized generator.
That being said, my friend has a 5k watt generator, and it runs his well pump just fine. But just check how many amps your well pump draws, OK?
Figure out what circuit breakers control all the things you want to supply power to in a power outage. You will need to buy a manual transfer switch that has that many breakers. Here is one brand I like to use. (affiliate link)
A cheap solar panel system to run most of your small house or cabin. This video walks you through a simple solar installation we did for a friends cabin in the woods.
A Cheap Solar Panel System, How We Did It:
This small weathered panel powers lights and electronics in the cabin.
We talk about a simple solar installation on the GardenFork Radio podcast, in this post I want to show you how I built a cabin solar system. There are many options for what to buy, but if you want to keep it simple, here are the items we have used.
You can get a smaller solar panel than the one we link to, but it will cost about the same amount of money, and its good to have the extra capacity for dark days.
Our solar panel is mounted on a DIY pole consisting of plumbing pipe and some scrap metal parts. It is pointed toward the ideal part of the sky for maximum power generation. If it points in the right direction you can also mount the solar panel on a roof or shed. A heavy duty outdoor extension cord is connected to the panel.
I cut a slit in the grass about 2″ deep for the heavy duty extension cord going from the solar panel to the basement of the cabin. In the basement the extionsion cord cable from the solar panel hooks up to the charge controller. The charge controller is wired to the batteries.
How many batteries you buy will determine how much power you will have on hand. If you don’t run a lot of stuff, you can get just one battery. This is very easy to set up, and its very simple to do.
Regular car batteries will not work here. You need either locally purchased deep discharge batteries, aka golf cart batteries, or sealed solar batteries purchased online. Pictured below are two 6 volt golf cart batteries, you would normally purchase one 12 volt battery.
Here is a still frame from the YouTube channel The Weekend Homestead’s vid on his solar setup showing the inverter and battery. The inverter converts 12 volts to 110 volts. (Full vid at end of this post) Be sure to read the instructions that come with the unit.
Inverter and battery from The Weekend Homestead YouTube video.110 volt powered by generator, 12 volt outlet runs on solar
This cabin can be run simply because we are using 12 volt LED lights and the fridge is propane powered. A solar powered fridge would require a larger panel setup.
You can now buy 12 volt LED bulbs with what’s called an Edison base, this is the regular silver screw in bulb type. This means you can use any regular lamps, and just drop in the 12 volt LED bulbs. Neat!
Laptops, radio, stereo all run on 12 volt. You can buy a 12 volt car adapter to charge many laptops. Or you can pick up a small car inverter and use your regular computer’s cable to charge up the laptop.
A portable generator runs the well pump and any power tools needed.
While making dinner at the camp we sometimes want to use a hand blender or a mixer, so for that we fire up the generator, which is hooked up to a few electrical outlets in the house. Be sure the generator is grounded, OK?
My main point here is that you don’t have to make this complicated, and you can probably do it yourself if you follow directions. Watch Will’s video on how he set up his cheap solar panel system.
I am new to welding, so I call this video Beginning Flux Core Welding. I hope to inspire you to try flux core, and walk you through some tips to get started. After watching this first video, you can see how I have progressed in this welding repair video I did for my neighbor.
Full disclosure, I am an amateur welder, still learning as I go. If you have any suggestions on how I can be a better welder, comments are greatly appreciated.
Beginning Flux Core Welding, How To Get Started
I consider Flux Core the gateway welding method. The welding machine can be bought cheaply, so you can start welding without a huge investment. If you decide you want to do more welding, you can upgrade your equipment. The gear I list below is perfect for someone who is happy to have a simple welding kit in the garage for doing repairs and small projects.
Safety First! You HAVE to use a full face welding helmet. Flux Core puts off UV light, and your face needs to be protected. Do not use welding goggles that are used for gas welding, you will burn your face. Wear long sleeves(ideally a welding jacket) work boots, and tie back any long hair. Weld outside, flux core puts out a lot of smoke.
The metal you want to weld needs to be clean, no paint, rust, just bare metal. A right angle grinder with a metal grinding disc makes short work of cleaning up the metal. After you weld, clean up the bead with a wire brush.
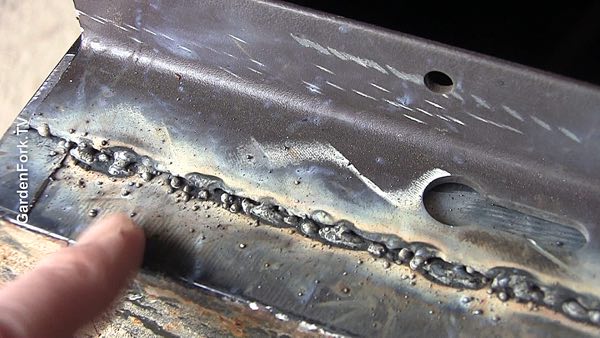
The above photos show how the welding tip goes from off to on very quickly. As soon as the wire touches the metal, the spark starts!
The hardest part of beginning flux core welding is just that. The starting part. It can be hard to figure out just how far to keep the wand from the work, how fast to set the wire feed, and what power setting to set the welder to. And when you start welding, its a lot of light and sparks and arcing sounds.
But like most things, the best way to learn is to just start. I have collected metal bed frames left out for recycling pickup. You can also stop by your local metal shop and ask to buy some scrap pieces. $20 of scrap metal is plenty to start.
The photo above show just how amateur I am with my welding. I am moving the wand too fast. I need to keep the wire feeding into a pool of melted metal. You can see this with your helmet on. But it does take practice.
This photo shows how you can blow a hole in your metal, the part on the right there. But then the weld on the left is am improvement. Keep the tip moving in small ovals, and build up a pool of metal. What is cool is you can actually see the angle iron metal melt and mix into the pool of wire you are feeding in.
The hole in the metal happens when you stay too long in one place, or the power is too high. In this case, I am trying to weld thin metal (the cabinet) to a thicker metal (the angle iron). When welding different thicknesses, keep the wand over the thicker metal most of the time.
Learn how to make maple syrup with this simple maple syrup evaporator. I’ll show you how to tap and collect sap from your sugar maples and then boil down the sap. This setup uses propane and 2 outdoor propane stoves.
What’s great about this simple maple syrup evaporator rig is you can walk away from it. You don’t have to watch it constantly. I have mine outside the kitchen, and every 15 min or so I go out and check it.
I found a used large stainless steel pot that was probably used to boil clams, and I found a large shallow stainless steel bowl at the dollar store. The idea behind this DIY maple syrup evaporator is the cold sugar maple sap is brought up to a boil in the first large pot, and then it is ladled into the shallow finishing pan to be boiled down into maple syrup.
Sugar Maple Sap becomes maple syrup when the sap reaches 7.5 degrees F above the local boiling point. Boil a small pan of water on your stove and when it boils, measure the temperature with your digital thermometer. Add 7.5 degrees to that temp – at our house the boil happens at 210F – and when the sap reaches that temperature, it is now syrup. Quickly turn off the heat on the finishing pan burner, and strain the syrup in to jars. If you are up to it, you can let the sap boil to a slightly higher temperature for a slightly darker syrup – be careful not to burn the finishing pan.
Parts You Need For The Simple Maple Syrup Evaporator
I strongly suggest buying a digital kitchen thermometer, old style candy thermometers are hard to use with this setup.
If you see your finishing pan foaming big time, you probably have syrup, and probably the temperature is above the ideal, turn off the propane and pour off the syrup.
The drawback of this system is that it uses quite a bit of propane, not the best use of what you’ve got. The plan is to build a wood fired evaporator next year. I have a ton of white pine from the trees we dropped that would fire a sugar shack nicely.
Maple sap becomes Maple Syrup at 7.5 degrees F above the local boiling point. Go boil a pan of water on your stove, use your digital thermometer to measure the temp at boiling. I bet it wont be 212F, but probably lower. Add 7.5 to that boiling point for the temperature you want to attain.
Wide Pots work best for boiling sap
When its Syrup, the sap starts to foam up, so you have to keep an eye on the process.
Be very careful. Hot sap burns bad, plus there is open flame. Use common sense, keep kids and dogs out of the way.
The wider the pot you use, the more sap you can boil off faster. Its all about surface area. This is why evaporators are wide and shallow.
Take the pot off the propane burner as soon as you reach temp. Its OK if the temp goes a bit higher, but not much higher. I find it best to finish the boil on the stove in the kitchen. Take it inside when you are within a few degrees of syrup at your elevation.
Strain through cloth, cheesecloth, whatever you like. You will have some cloudiness in the syrup if you use cheesecloth.


 You can also use this hack to do a muffler pipe repair. You would have to find a really long pipe clamps or connect together several pipe clamps. You can you can usually get clamps about 4 inches in diameter, if you buy a bunch of those you could connect them end to end and then wrap a big piece of metal around the muffler. This kind of muffler repair is not going to last really long but it would reduce the noise but your car is making – fewer people would stare at you at the red light intersection!


 This video shows how we improved version of