Here’s a how to on cooking steak on charcoal by our friend Will of the The Weekend Homestead. I’ve been emailing with Will about different DIY and homesteading topics, and he watched our video on how to cook steak directly on charcoal and shot a video about his steak. Nice.
I’m not sure why people get weird about cooking directly on charcoal. Its wood! Like the wood your cutting board is made out of. And your food gets plenty of ash on it when its cooked on a grill or in a wood fired pizza oven.
Dehydrating apples is a great way to preserve food into winter. To us, dehydrated apples are like candy, so they get eaten faster than I’d like. The whole idea being to have some apples in the middle of winter. Watch this video on dehydrating apples and then read on for more information on the dehydrator we use.
Dehydrating apples, what we use:
We use a simple forced air dryer, its not the fanciest dehydrator, but its affordable and works for us.
This is a forced air dehydrator, its a pretty simple design, hot air is circulated around the trays. The model we have is no longer available, but Nesco makes several models that are similar, shop Amazon for food dehydrators here. I have found it helpful to rotate the trays halfway through the drying process, the newer models may not require this step. We don’t spray the trays with any oil, the dehydrated apple slices don’t stick when they are dry.
Slicing the apples is a ton of fun with this apple corer-slicer rig we got as a present one year. What fun. This is a very handy device to have if you want to dehydrate apples, saves a bunch of time. Shop for apple peeler – corer on Amazon here.
You can also make sun dried apple slices with a solar dehydrator. This is pretty simple, use some twine or fishing line and put the apples in a very sunny place. The hard part is keeping bugs from landing on the fruit while it dries. You may be able to fashion some sort of mesh or window screen system to keep the bugs off the apples while they dry.
Do you have any thoughts on what is a good food dehydrator? or any tips on using one? Please let me know in the comments below. thx!
Maple syrup makes this sweet cornbread recipe extra special. And not too sweet either, which is the way I like it. Watch the video and check out the recipe below.
The maple syrup adds a smokey caramel flavor, I think. If you don’t have any, you can use sugar or honey, but it will have a different taste. You can also dial back the sweetness if you like. Be sure to mix the syrup into the wet ingredients, or else it will sit in the bottom of the mix.
I really like the stone ground cornmeal. It happens to be from upstate New York, but I’ve seen different brands of stone ground. This might all be in my head, but I like the feel it gives the cornbread. But use what you got, and if you have regular cornbread, then go ahead and use it. K?
I use butter in this recipe, but you can use bacon fat, vegetable oil, or lard. This fat melts in the pan in the oven, so keep an eye on it to make sure it doesn’t burn. The fat will melt faster than you think!
I prefer a glass baking dish, but I also use a metal pan with fine results. I think the bottom crust is crunchier with the glass pan. This could all be in my head, anything is possible, you know…
Sweet Cornbread Recipe with Maple Syrup
Recipe Type: Dinner
Cuisine: American
Author: Eric Rochow
Prep time:
Cook time:
Total time:
Serves: 9 pieces
This cornbread recipe is based on one by Mark Bittman in the NY Times. I use whole wheat flour and maple syrup to change it up. I’ve found the whole wheat works very well with cornmeal in baking.
Ingredients
4 tablespoons butter
1 1/2 cups cornmeal, stone ground if possible
1/2 cup whole wheat flour
1 1/2 teaspoons baking powder – make sure its fresh!
1 teaspoon salt
1/2 cup maple syrup – you can substitute sugar or honey
2 eggs
1 cup milk
Instructions
Turn on the oven to 375F.
Put the butter in a 8″ baking pan in the oven.
Mix the dry ingredients together in a medium sized bowl.
Put the milk into a small bowl and beat in the two eggs.
Add the maple syrup to the egg-milk mixture.
Pour the liquid ingredients into the dry ingredients and mix together.
Its ok if there are some lumps in the batter.
Pull the pan out of the oven – carefully!
Pour the batter into the pan – it may spatter – and put back in oven
Here it is, the best vegetarian chili recipe I’ve made yet. Omnivores, do not skip this chili, its great. Butternut squash adds a sweetness and a fun color to your mix. Watch our recipe video and start cooking. Let me know your thoughts in the comments below.
Tips on the Best Vegetarian Chili Recipe
You can use canned beans or cook some dried beans – see our pressure cooker vids here. I used pinto beans, but use what you got. Northern beans, kidney beans, whatever works for you. They will all have a slightly different flavor.
Start with a small amount of cocoa! In the video I added too much, and have since adjusted the recipe. Add in the cocoa before the squash to preserve the orange color of the squash.
Cut the squash smaller and it will cook faster. I cut the squash in to pretty large chunks, if they are smaller, it less time to be done.
Chili powders can be very different. They vary in the amount of heat and smokiness, I’ve found. Start with less powder when you first start. You can add more later to boost the chili flavor if need be.
This recipe is perfect for a slow cooker. Cook down the onions, then throw everything in a slow cooker for the day on low.
What are your thoughts and experience with making chili? Let me know below.
Best Vegetarian Chili Recipe with Butternut Squash – GF Video
Recipe Type: Dinner
Cuisine: Vegetarian
Author: Eric Rochow
Prep time:
Cook time:
Total time:
Serves: 3 quarts
Easy chili recipe that features butternut squash. This one will appeal to everyone, and fill them up. Start with a small amount of cocoa, you can always add more. The first batch I made for the video had too much cocoa.
Ingredients
1 sweet onion, coarse chopped
2 cloves garlic, minced
4 carrots sliced into rounds
3 tablespoons chili powder
1 tablespoon cumin
1 28 ounce can chopped or diced tomatoes
2 tablespoons oregano
2 tablespoons tomato paste
2 teaspoons salt
3 tablespoons cocoa
1 24oz to 28 oz can kidney, pinto, or northern beans (do not rinse the beans)
1 medium butternut squashed, peeled and cubed
Instructions
Use a dutch oven or heavy bottomed pot for this chili. Turn the burner to high.
Pour a few glugs of vegetable oil into the pan, about 1/8″ deep or so. In other words, enough to saute the onions.
When the oil is getting hot, turn down the flame to medium and add in the onions. I like to cook the onions down to where the edges are getting brown.
Add in the minced garlic, be sure it doesn’t stick and burn in the bottom of the pan. Cook for about a minute
Add in the carrots and mix it all up. If you have time, I like to get some cooked edges to the carrots, but its not a deal breaker if this doesn’t happen.
Push the vegetables towards the sides of the pot and allow the oil to flow back into the center of the pot. Add in the chili powder and cumin and let the spices toast in the hot oil for about 30 seconds.
Mix the spices into the vegetables and pour in the can of tomatoes.
Drop in the oregano and tomato paste and salt. I usually do two squirts of the tomato paste from the tube.
Measure in the cocoa powder and mix it all together.
Add the squash and beans.
Bring this to a low simmer, cover the pot, and let cook on low. Depending on your stove, pot, and how thin the squash is cubed, this should cook down in about 30 minutes.
If the chili is too watery for your taste, you can leave the top off while cooking for part of the time.
The chili is done when you can easily pierce through the squash with a fork.
Every year I send out the GardenFork Gift Guide to our email list. (sign up here) This year I wanted to break it up into a series of gift guides, the first being the cookbook holiday gift guide.
I am not one for buying stuff one doesn’t need, but I do think a shelf of cookbooks is OK. If I find I am not using a cookbook, I give it away. The cookbooks below are ones that I use. I either cook the recipes as printed, or I use them as a starting point for ideas of my own.
When learning how to deep fry turkey, there’s a lot of info left out, here’s GardenFork video with 10 tips on deep frying.
My 10 Tips On How To Deep Fry Turkey:
Read fryer directions: This is one of those times where I advocate reading the directions that come with a rig.
Do a trail run: Make sure your propane tank is full, and the burner works correctly. If you deep fry turkey the weekend before, you can have it all for yourself. The oil you used can be used again, see below.
Cheap vegetable oil works: Mike Wells at Popular Science is on the same wavelength as I am on this. I don’t think you need expensive peanut oil.
Start with 3 gallons: I have found a 30 quart deep fryer usually takes about 3 1/2 gallons to deep fry a 14 pound turkey . You can test this by putting the bird in the empty fryer, adding water to cover, and measuring the water as you pour it in. Be sure to dry the turkey after doing this, water and hot oil can cause boil overs.
Smaller turkeys are better: An 18 pound turkey is a big deal to deep fry. It can be hard to hold up and get into the pot, and it is more likely to boil over. I deep fried a 12 pound bird for these videos and there was plenty of turkey.
Calibrate your thermometer: Thermometers can be off by quite a bit. Boil some water and see what your temp reads. Water boils at 212F at sea level. As you elevation rises, the water boiling temp will drop. we are at 1500′ and the temp is 210F.
More Deep Fried Turkey Videos:
Wear old clothes: You will get oil on your clothes and shoes, so don’t wear nice clothes. Dress like me, at least for a few hours.
Fresh is better than frozen: I have messed up defrosting turkeys several times. It is much less stressful to just buy a fresh turkey. Plus, unless the turkey is completely thawed, any ice or water in the turkey can cause the oil to boil over the pot. A very bad thing.
ABC fire extinguisher: Have one nearby, OK? It has to say for A B & C type fires on the label.
Turn off burner: When lowering or raising the turkey into the pot, turn off the burner. This way any oil spills down the pot, it wont be ignited by the burner.
I Love These Gloves:
Wear oven gloves: I really like these silicone oven gloves a GardenFork viewer sent me.
Dry rub is ok: If you are a fan of dry rubs or dry brining, you can do that, just use more of it, as some the dry rub or salt will get washed into the oil.
Let rest on metal baking tray: After the turkey is cooked, let is rest on a metal baking sheet for 2o minutes. Keep away from your kids and pets, its still real hot.
Cook on grass: When you deep fry turkey, oil can spill. If you place the burner on the grass, the oil is absorbed by the soil. If you deep fry on your driveway, you have oil on your concrete and its slippery, so don’t say I didn’t warn you.
Reuse oil: You can re-use the vegetable oil 3-4 times, but between frying, keep the oil cool in the basement or fridge. Be sure you strain the oil to remove the turkey bits from the oil after each use. You could also give the oil to someone who uses it to power their car or truck.
Use long lighter: This is one of the easiest when I wanted to write about how to deep fry turkey. When you have a big pot on the burner and you need to relight it, a long lighter is key.
Here is my deep fried turkey recipe, its not rocket science, and you will be amazed at how great turkey can taste. Deep frying is the best way to cook turkey, I think. I’ve had way too many dry Thanksgiving dinners, where the only moist thing is the gravy. With this, you don’t need gravy. Watch our video and get the recipe below.
How to deep fry turkey – gear you need:
There is some equipment needed to deep fry turkey, but once you have it, you will have it for years.
This post covers the basics of how to deep fry turkey. We show you some more tips in our follow up video here.
How much oil to use in a turkey deep fryer?
It depends on the turkey, but with a 14 lb bird, approx 3.5 gallons of vegetable oil usually works for me when using a 30 quart pot. Check the instructions that come with your turkey fryer pot. As you fry the bird, the level of the oil may drop a bit, that is OK. The legs may stick out a bit – I fry with the legs pointing up – that is ok too.
You will heat up the oil to 350F, turn off the burner, and then lower the turkey into the fryer. Fire up the burner again, you’ll notice the temperature will drop quite a bit. The last time I did it, the temp dropped to 200F. The ideal is to keep the oil temp at or near 350F, but that doesn’t always happen. If you are deep frying in cold weather or the wind is blowing, the fryer may not get back to 350F after putting in the turkey. I keep the cover on the pot when initially heating the oil up to 350F, and keep the cover off when the turkey is in the pot. But if its cold outside, you might try keeping the cover on while frying, but you have to keep constant watch on it, to make sure it does not boil over.
How long does it take to deep fry a turkey?
Usually its 4-5 minutes per pound. What is more important to done-ness is temperature of the meat. I use a digital thermoter, and stick it in the thigh. You can pull out the turkey at 145F, I usually pull it at 150F or so. Its an inexact science at best. I've had turkey at 170F that was fine. Let the turkey rest 20 minutes on a baking tray before carving.
Important deep fried turkey recipe safety tips:
Turn off the burner when putting the bird in the pot and when removing it. I don't think you need a ladder - derrick rig.
You do need to use common sense.
Wear silicon oven gloves or welding gloves.
Turkey must be fully defrosted! Any water or ice in the turkey can cause the oil to boil over the pot.
Lower the turkey very slowly into the hot oil, take 30 seconds at least.
Deep Fried Turkey Recipe
Cuisine: American
Author: Eric Rochow
Prep time:
Cook time:
Total time:
Serves: 1 Turkey
Deep Fried Turkey is the best way to cook a turkey, I think. Watch our how to video that accompanies this recipe.
Ingredients
1 fresh or defrosted turkey 12-15 lbs is best
3 gallons vegetable oil - buy what's on sale
1/2 cup Dry Rub spice mix - if you like to spice your turkey
1/4 cup table salt - if you want to dry bring the turkey
Instructions
Defrost your turkey fully. This will take several days, or buy a fresh turkey.
If you want a dry rub or brine, apply the dry rub or salt the day before cooking to the turkey. You can put the dry rub under the skin if you want. Keep the turkey in the fridge overnight.
hours before dinner time, assemble deep fryer burner rig. Put on fry pot and add vegetable oil.
Light burner using long butane lighter.
Heat oil to 350F. This can take 30-45 minutes.
Place turkey legs up on the poultry rack that comes with the fryer pot.
Use the grab hook to slowly lower the turkey into the deep fryer.
Re-light the burner and heat the oil back to 350F.
Cook the turkey until the thigh temperature reaches at least 145F
Turn off burner and remove the turkey using the grab tool.
Rest on a baking sheet for 20 minutes before carving.
Simple apple pie recipe hack, this apple galette is much easier to make than a proper apple pie, and tastes and looks just as good. Call it Rustic Apple Pie. Watch the video and check out the recipe below.
We’ve done a few galette recipes already, and we’ll be doing more, as the form is versatile. Its kinda like a pie tart shell, you can put all sorts of stuff in it, be it sweet or savory. Sign up for our email newsletter to be in the know when we post them.
I call this a cheater apple pie, because its similar to an apple pie recipe, but is less fussy. Roll out dough, drop in fruit, bake, done. Apple pie seems more involved, but we’ll make those too. Now I have ideas for pie in my head. Do you? Let me know below.
This galette is a low sugar version, a sprinkle of sugar is all I added, and it was fine. I used dried cranberries and learned that its best to have the cranberries tucked under the apples on top of the galette, else they get too crunchy from the oven heat. You could use other dried fruits, but I think we need to eat more cranberries.
Don’t sweat the pie crust! It’s not rocket science to make a decent crust. Be sure to put the pie dough in the fridge for a while to let it set up. A key ingredient in my pie crust is sugar. It adds a bit of sweetness and crunch to the crust, this same crust would make good rugelach, you know. Have to work on that one. My grandmother made those every Christmas.
The apples in this galette get soft, but don’t break down and go mushy, its baked apple slices and cranberries, and goes well with a bit of vanilla ice cream. Some liquid may leak out the side, but that’s ok. Best to bake this on a lined cookie sheet or a greased cast iron flat skillet just in case.
I used Fuji apples for this, and use my fav apple corer, it makes the prep go fast, I think.
Cheater Apple Pie Recipe, aka The Apple Galette
Recipe Type: Dessert
Cuisine: American
Author: Eric Rochow
Prep time:
Cook time:
Total time:
Serves: 1 pie
A simpler version of apple pie, the apple galette is a open faced rustic crust pastry that you can add all sorts of fruits to. Today we use apples and cranberries
Ingredients
3-5 apples cored and sliced – if the apples are small use more apples.
1 cup of dried cranberries
1-2 tablespoons sugar
1 tablespoon lemon juice
lemon zest
1 1/2 tablespoons cornstarch
1 stick of unsalted butter – cold
1 1/4 cups all purpose flour
1 tablespoon sugar
1/2 tsp salt
ice water
Instructions
If possible, make the pie crust a few hours beforehand, or the day before:
Cut the stick of cold butter into 1/2″ cubes, and place in food processor.
Add the flour and sugar and salt.
Pulse the processor until the flour and butter have cut together. it looks kinda like lumpy cornmeal. if you’re not sure, make sure all the butter cubes have been mixed into the flour.
Put this dough in to a bowl, and add ice cold water a few tablespoons at a time. mix the water into the dough until the dough can form a ball. Don’t add too much water and make the dough sticky. If you do, add some more flour to the dough.
Place this dough onto some plastic wrap, shape it into a large hockey puck, and put in the freezer for 10 minutes, or the fridge for 30 minutes. The longer it is in the fridge , the better the dough gets, I think.
Combine in a bowl the apple slices, lemon, sugar, zest, cornstarch, and cranberries. Mix together.
Roll out the dough on a floured board, you want it about 14″ in diameter, about 1/4-1/8″ thick.
Place the pie dough onto a greased cast iron pan or cookie sheet.
Pour the apples into the center of the crust and pull up the sides onto the pile, pinching the dough together to hold it up. Slip any exposed cranberries underneath some apples.
Bake at 400 for about 35-40 minutes. The apples will not break down, but will be soft.
A new kale pesto recipe, one that is simply and brilliant and why didn’t I think of this earlier. Kale pesto. Easy to make and a new way to get more green superfoods into your diet. Here we go.
This kale pesto recipe is a classic GardenFork ‘Use What You Got’ kine of meal. The short version is take kale, make pesto, mix into pasta, dollop into soup, or spread on toast. This recipe makes a big batch which you can use for a pasta dinner, and then use the remaining pesto for lunch or enhance dinner the next night or two.
This kale pesto goes nicely mixed into our White Bean Soup recipe. The smooth flavor of the white beans gets spiked with this greens & cheese mix. Nice.
In this recipe video I show how we stem the kale. I don’t use a knife, just stripping the stems off with your hands saves time. I think I learned this technique from watching Sarah Moulton do it on one of her cooking shows.
You can use whatever kale you have on hand or that is in your garden. I grow a classic green curly kale, and a red russian kale, which has a flat leaf. For this video, I added both into the food processor. Lacinato kale, aka dinosaur kale, also works. Wash off the kale before you start!
Key here is to use a good quality extra virgin olive oil. Buy the real thing. Cheap extra virgin probably isn’t the real deal, in my opinion. I like to use Pecorino Romano cheese, which has a nice saltiness to it. You can also use Parmesan, but don’t buy any pre-grated cheese, it tastes like stale cardboard.
Start out with one medium clove of garlic, the garlic flavor will grow if you store the pesto. I like to let the minced or pressed garlic sit out on cutting board for a while before adding it into the processor, I believe it mellows out the bite a bit.
If you are using this new kale recipe with pasta, drizzle some olive oil over the pasta and pesto just before serving. Make it all work that much better.
Thanks to Sarah Moulton for the kale stemming tip, you can check out one her cookbooks here:
Kale Pesto Recipe
Cuisine: Italian
Author: Eric Rochow
Prep time:
Cook time:
Total time:
Serves: 2 cups
A kale recipe that is a no-brainer but one I had not thought of before. Easy to make and one more way to get your family to eat kale and like it.
Ingredients
1 good bunch of kale, Stems removed, Enough to fill your food processor.
1 cup extra virgin olive oil
1 cup walnuts
1 1/2 cups of Pecorino Romano cheese
1 medium clove garlic
Instructions
Mince or press the garlic clove and let it sit while prepping the other ingredients.
If you have time, toast the walnuts in a pan on the stove, toss a few times. Pay attention so you don’t burn them. You can also toast them in the oven
Wash and remove the stems from the kale. Dry the kale as best you can.
Put the kale leaves in the food processor and pour the oil over the leaves.
Process for about 15 seconds and then press the leaves down with a rubber spatula, process again to get the leaves roughly chopped.
Add to the processor the cheese, walnuts, and garlic
Process again, stopping to use the spatula to get everything mixed well.
I prefer a coarse chopped pesto, but process to the consistency you prefer.
Making sauerkraut is the gateway recipe to fermentation success. Here’s how to make sauerkraut: shred cabbage, add salt, put in jar. Done. In this recipe video i wanted to show that making sauerkraut does not have to involve large fermentation crocks and lots of work. This is small batch kraut made easy.
Making Sauerkraut Is Not Rocket Science
I’ve heard from a few people about their fermentation failures, usually with a recipe for making sauerkraut. The first time I tried to make it, it didn’t work out. I think one of the biggest mistakes people make is using tap water that has been chlorinated. I figured this out when I was baking bread, I found that using water from our Brita Water Filter Pitcher allowed the yeast to work much better.
This sauerkraut how to is based on the methods laid out by Leda Meredith in her book, Preserving Everything. I think a lot of people have this impression that you have to have big fermentation crocks and tons of cabbage to make this. Leda’s method uses mason jars. You can use most any glass jar, you just need to be able to cover the jar in some way. Either with a lid or maybe plastic wrap with a rubber band to cover the top – whatever works for you. What does not work is metal containers, use only ceramic, glass, or food grade plastic. If you use a plastic container, it will smell like fermented food forever after, in my experience.
How you chop the cabbage for making sauerkraut is a matter of preference. Basically, do you like chunky or fine kraut? If you cut the cabbage with a knife, you can get chunky cabbage. If you use a knife, mash and crush the cabbage before adding it to the jar, you want to break down the cell walls of the cabbage leaves to allow the fermentation to start quickly.
A box grater works, but I suggest a food processor with a shredding blade.
You want the cabbage to start making a brine fairly quickly, which is why I like to use a food processor to shred the cabbage. This method lets a lot of liquid out of the leaves and mixes with the coarse salt you’ve added to make the brine.
If the brine does not start by itself within an hour, add 1/2 teaspoon of salt to a cup of filtered water, and top up the jar. Some cabbage will always float a bit, but you want most of the cabbage submerged.
Press down the cabbage, if you see some bubbles come up out of the brine, you are making sauerkraut. If you don’t see bubbles, be patient, wait up to 4 days, just be sure the brine is topped off and keep the jar in a dark place. You can start eating the kraut after it has been fermenting for 3 days, but I like to wait at least 1 week. Some people wait a month.
Small bubbles means fermentation has started!
After the initial 3-4 days of fermentation, I keep my sauerkraut in the fridge, I think it mellows the kraut, and it will keep for 6 months. Visit Leda’s website for great foraging info and food preservation recipes.
Small batch fermentation in mason jars allows you to make sauerkraut the easy way. This sauerkraut recipe is based on Leda Meredith’s single jar kraut in her book, Preserving Everything.
Ingredients
One small head green cabbage
1 1/2 teaspoon coarse salt
Filtered water
One pint mason jar
Instructions
Remove any wilted parts of the cabbage
Cut cabbage in half lengthwise, then cut each side into quarters.
Put shredding blade on food process and shred the cabbage.
Layer the cabbage into a pint mason jar, adding about 1″ of cabbage, then some of the salt.
Press down the cabbage a few times while adding the layers.
Add cabbage until the level reaches about 1/4″ below the rim of the jar.
Let sit for 1-2 hours.
If brine does not develop, add 1/2 teaspoon salt into 1 cup water, and add to top of cabbage.
Keep cabbage submerged in brine, add saltwater mix as needed.
Put on jar lid loosely, let sit in a dark place to ferment for 3-4 days.
Simplest recipe I’ve found for how to cook grilled steak is to cook steak directly on charcoal. Watch our how to video and get the recipe below.
How to cook grilled steak directly on charcoal
Key here is the steak you choose. I like the strip steak. Here they call them NY strip steaks, and the work best with the bone-in. I happen to get these on sale, which was a bonus. You will probably have to ask the butcher to cut you thick steaks. I rarely see thick steaks pre-packaged. These are 1 1/2″ thick. I think thin steaks will not work well with this. You can cook thicker steaks too. The NY Times suggests charring on both sides and then cooking them on a grill if you prefer.
Ideally, you will coat the steaks in the dry rub and leave it on overnight or as long as you can. I did these the same day and they were fine, but planning ahead helps. As you know, I am not great at planning…
Chunk Charcoal, aka hardwood charcoal is the only way to cook grilled steak, you don’t want to use charcoal briquettes. Not sure what briquettes have in them, but chunk charcoal is just wood. You will want two chimneys of wood charcoal. Be careful with the chimneys, I almost melted one of them, the charcoal got so hot.
I found a baking pan worked much better than putting the coals in the bottom of a grill. Made it much easier to work the rig and check the temperature of the steak. When laying the steaks on the coals, plan ahead so you can flip the steak over onto fresh coals. This isn’t a must do thing, but I found it helpful. I was able to cook two strip steaks at a time in a 9×13 pan.
How do you cook grilled steak? Let me know in the comments below.
Grilled Steak Dry Rub
Author: Eric Rochow
Prep time:
Cook time:
Total time:
This dry rub recipe to cook grilled steak is based on an article from the NY Times by Matt and Ted Lee and Tim Byres of Smoke Restaurant in Dallas Texas.
Ingredients
2 TBSP of Pimenton Picante, a spanish smoked paprika
2 TBSP Ground Cumin
2 TBSP kosher salt
1/4 cup brown sugar
1/4 cup ground coffee – i used a medium roast set for drip coffee grind, use what you got
Instructions
Mix all the ingredients together in a bowl, break up the brown sugar with a fork or your hands.
Put the steak on a flat dish and dust the both sides of the steak with the dry rub, patting it onto the steak with a spoon or flat metal spatula, use what you got.
Turn the steak onto its sides and roll it to get the dry rub onto the edges of the steak.
Cover with plastic wrap and put in the fridge overnight.
Let the steak warm up before putting on grill.
Its ok if you don’t do the overnight rub, you can put it on shortly before you grill the steaks also.
The best grilled cheese recipe I’ve ever made. Inspired by a BuzzFeed video, I had to make our version of this grilled cheese. It tastes wow.
Childhood memory of slices of process american cheese, unwrapped from the plastic, laid on top of white bread, and put in the toaster oven. I’m thinking processed slices of cheese like that were made for grilled cheese. I did not move on to grilled cheese recipes that used two pieces of bread for awhile. Then in college I discovered you could add ingredients into the grilled cheese. First came tomatoes.
That sandwich was in the dorm cafeteria at college. Friday was chili and grilled cheese. Its still a great Friday sandwich now.
Some thoughts on this Grilled Cheese Recipe
I made this and it was instantly my favorite sandwich recipe. You can’t eat this everyday, but you can make it in about 10 minutes. Plus it smells great in the kitchen while making it. And the dogs become very attentive during the whole process, not leaving the kitchen.
I found that square bread did better, as did thicker bread. Probably the best bread would be a thick potato bread, but I couldn’t find any, so we went with a sturdy white bread and cut it into a square.
For cheese I used a grocery store sharp cheddar. You can argue all day about the best cheese to use in a grilled cheese sandwich, but to keep it simple, we used cheddar. I have seen recipes where they grate the cheese over the bread, I used slices. Works for me.
The bread was not buttered or oiled. The bacon takes care of that plenty well. What was surprising was the bacon grilled cheese was not very greasy. You do not have to completely cover the bread with the bacon wrapping. You do have to hold the sandwich on its side to cook the side bacon. Important.
Here’s a carrot salad recipe that’s better than the usual one. No raisins, this one adds toasted sunflower or pumpkin seeds, which works great for me, and I wanted to share it with you.
Many carrot recipes fail for me, they are too sweet and don’t have the best ingredients in them. This one climbs the ladder, and it should, considering the recipe came from a french bakery cookbook.
A friend of mine works at the Rose Bakery in NYC, and I tried their carrot salad, and then bought their well done cookbook, Breakfast, Lunch, Tea. This a variation on their carrot salad recipe. They suggest olive oil or sunflower oil for the dressing, I opted for canola. I think olive oil would not work with this, but now that I am writing this, I am wondering if I should try it with olive oil.
Time to grate some more carrots.
And on grating carrots – use the food processor, not a box grater. The box grater I have only has large holes for grating, and I don’t like how the carrots look after going through the large holes of the grater. I use the smallest holes of the discs that came with my food processor, and whipped through a bunch of carrots in record time. In the video you can see just how fast and how nice the grated carrot looks.
When adding the dressing to the carrots, you might want to drain off some of the dressing if it collects in the bottom of the bowl. I found I had too much dressing for the amount of carrots I grated. But this is all eye of the beholder stuff, if you like a lot of dressing, leave it in. I used sunflower seeds in this version, but pumpkin seeds will work also. The small pumpkin seeds, pepitas, are good. The large ones won’t work, I think.
Carrot Salad Recipe with Sunflower Seeds
Prep time:
Total time:
A nice summer picnic or BBQ side dish, this is adapted from the Rose Bakery cook book.
Ingredients
8 carrots finely grated in food processor
1 cup pumpkin or sunflower seeds toasted
1/2 cup chopped chives or scallion greens
1/2 cup lemon juice – its ok to use bottled juice
3 tablespoons canola oil
1 tablespoon super fine sugar
salt & pepper for dressing
Instructions
Grate the carrots, and toast the seeds, combine carrots and seeds in a bowl with the chives.
Whisk the lemon juice with the sugar and some salt and pepper. Its best if the lemon juice is warm, so the sugar dissolves well. Mix in the oil to complete the dressing.
Pour the dressing over the salad and toss. If too much dressing collects in the bottom, you might want to pour off some of the dressing, saving it for some other food project.
Taste and add salt and pepper to suite your taste. Be careful with the salt, you can’t undo too much salt.
There are edible wild plants in your backyard that you can forage for and make a great salad from. No need to go to the farmers market, you’ve probably got edible greens in your yard you can eat. Identifying and harvesting edible plants is called foraging, but I call it free food in your yard.
Below are some photos for plant identification, but be sure you know what these plants are. These are fairly unique plants, but be sure, OK? And make sure the area you are foraging has not been sprayed with fertilizers, herbicides, etc. You don’t want that stuff getting into your food. You can buy Leda’s Foraging Book here.
Some Wild Edible Plants:
Dandelion
When harvesting dandelion, you can choose to leave the plant in the ground and growing if you want. Just harvest the outer leaves and the plant will continue to grow. The leaves get stronger tasting when the dandelion flowers, but I think you’ll find the taste pleasing.
Plantain
Plantain grows close to the ground usually. Once it sprouts its flower stem, you probably don’t want to forage for it, as the older leaves are not as great to eat. They can be stringy.
Chickweed
Chickweed grows in nice big bunches, and if you cut off just the top 3-4″ of the plant, it will keep growing. It self seeds if you let some of the plants flower and go to seed. Then you’ll have more free food!
Garlic Mustard
Garlic Mustard is a non-native invasive plant. I see it along roads a lot. Harvest it by pulling up the whole plant with the roots. This plant will crowd out native plants, and most states want to get rid of it. The leaves taste like mustard greens, though not as strong. It has some good vitamins, so eat up.
Violets
Violets grow like weeds. There are some cultivated varieties, but the ones in our yard are wild edible plants, and easy to identify. They are low growing and have white – purple flowers. Harvest the flower and stem for your salads. They look great on a dinner table.
Moms shows us how to make banana bread with a recipe she has used for years. If you want moist banana bread, I suggest using riper bananas and more of them. You will have to bake the banana bread a little longer.
Banana bread is one of those comfort foods from childhood that still work. Having a bad day? Have some banana bread. I really like this loaf toasted with some butter on it, served with tea. Nice.
I don’t recall the name of the cookbook this banana bread recipe comes from, but it was one of those recipe collections put together by a group of people and self published. There are many variations on banana bread, we have one made with coconut here, and a dutch oven banana bread here. But this is mom’s standard and its the one we will learn how to make banana bread with. So here we go.
I have found that dark metal or glass loaf pans work better for this, I like the browning of the crust. And if you want a taller loaf use slightly narrower pans than the standard loaf pan. The baking time will vary depending on your oven, they are all different.
I’m all about saving bananas in the freezer. Have some your family wont eat? Put them in the freezer to save for this. They thaw quickly and fall apart in the batter. Nice that you don’t have to jump through all sorts of hoops to prepare them for freezing. Just throw them in. Done.
Banana Bread – Mom’s Recipe
Recipe Type: Baking
Author: Community Baking Book
Prep time:
Cook time:
Total time:
Serves: 1 loaf
Here is how to make banana bread, this basic recipe will make a nice loaf, if you want a moist banana bread, add more bananas and bake longer.
Ingredients
1 cup sugar
1/2 cup butter
3 ripe bananas
2 eggs
2 cups all purpose flour
1 teaspoon baking soda
1/2 teaspoon salt
Instructions
Mix together the sugar and softened butter with a hand mixer
Add in the bananas and eggs, mix them in.
Mix the dry ingredients together in a bowl with a fork.
Add the dry ingredients into the wet batter and stir to combine, but don’t overmix.
Pour into a greased loaf pan and bake for 1 hour at 350F
When you buy too many of those cherry tomatoes at the big store, make this roasted cherry tomatoes and polenta recipe. This recipe takes tired, older cherry tomatoes and concentrates their flavor, drop them on top of a quick pot of polenta, and you have dinner, or part of a big dinner.
I had bought a large package of cherry tomatoes at the warehouse style food store, the place where you eyes get big and you want to buy lots of stuff because you think its all a good deal, except that you have to cook it all. I have found that buying dried fruits and nuts at the warehouse store is a good deal. I keep them in zipper storage bags and put the nuts in the fridge, they last longer that way.
The tomatoes sat on the counter for a week – don’t keep them in the fridge – and started to get soft and a bit wrinkled. I cut them in half, put them in an oiled pan, and sprinkled the magic ingredients over them, olive oil and salt. In the oven for 20-30 min, and out come something completely different that what went in there.
The polenta is based on our quick stovetop polenta recipe, using the secret ingredient to cook the polenta faster. Add in some butter, and its a brilliant dish.
You can top the cherry tomatoes with dried oregano or a mix of italian seasonings, it makes them that much better with little effort. I like to buy the larger container of italian seasoning, it goes on top of lots of foods in our house. Don’t use the best olive oil you have for this, as it is heated, so any subtle flavors are out the window. Use fine salt, not the course kind, as some salt might remain, and not everyone likes to bite down on chunks of salt, ok?
Roasted Cherry Tomatoes and Polenta Recipe Video
Author: Eric Rochow
Prep time:
Cook time:
Total time:
Smart use of cherry tomatoes that are getting a bit old on the countertop. This transforms them into a new delicious thing.
Ingredients
1 package of cherry tomatoes
Olive Oil
Fine Salt
Dried Italian Seasoning Herb mix or Oregano
1 batch of stovetop or microwave polenta, link is above
Hard cheese like Romano or Parmesan
Instructions
Slice all the cherry tomatoes in half.
Place them in a lined and/or oiled sheet pan, ideally they will fill up tray.
Drizzle with olive oil and sprinkle salt and seasonings on tomatoes.
Roast for 20-40 minutes at 425F. Keep an eye on them.
Cook a batch of the stove top or microwave polenta.
When the tomatoes are oozing liquid and starting to collapse, they are done.
Spoon polenta into serving bowls and top with tomatoes.
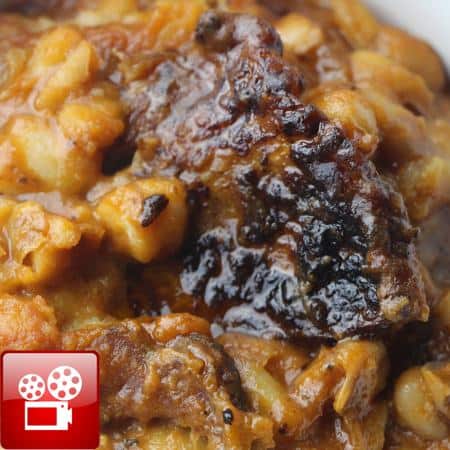
We just finished the maple syrup season, so its time for our easy maple baked beans recipe. You can use canned beans for this or cook some beans in your pressure cooker. There aren’t a ton of ingredients to this, but the few ingredients combine to make this perfect for a BBQ side dish.
A viewer suggested the other day that our homemade maple syrup evaporator could be used as a DIY meat smoker, and that provided the easy connection to make baked beans with maple syrup.
I’ve been to plenty of BBQ places across the U.S.A., and some of the baked beans I’ve been served are not great. I want them to be slightly sweet with some baked tomato flavor, and not too soupy. I’ve seen and eaten a wide range of them, and my easy maple baked beans recipe reflects what I like in a baked bean recipe.
A good potluck dinner recipe, these beans should be served on a paper plate in your friend’s backyard on one of those red stained wood picnic tables. Or at least one made out of pallets… ( more DIY pallet videos coming )
I baked these beans in a seasoned cast iron dutch oven. Learn how to season cast iron here. I think its the perfect vessel for this dish. Its got a nice carrying handle, and the thick walls keep the heat even. And drop that puppy on a potluck table and it looks so much better than those plastic food storage containers, right?
A lot of recipes call for molasses or brown sugar, or both. I am not big on super sweet beans, and the maple syrup works well, I think. 1/2 cup of syrup does well for me. I would not suggest adding any more, but again, its a personal thing. The canned beans are cannelini beans, but any white bean works here – you could even use lima beans – which has now got me thinking about a lima bean baked dish.
The small can of tomato paste stands in for ketchup. I LOVE ketchup, especially on meatloaf, but these beans are better without it.
Here are a variety of cast iron dutch ovens to check out:
Easy Maple Baked Beans Recipe Video
Author: Eric Rochow
Prep time:
Cook time:
Total time:
A perfect segue from the Maple Syrup season to the BBQ season, baked beans work in winter and summer, perfect potluck dinner recipe or just because you love baked beans like I do.
Ingredients
2 29 oz cans of white beans – northern, cannelini, small whites.
1 6 oz can tomato paste
1 medium onion chopped medium
1 tablespoon Worcestershire Sauce
2 tablespoons brown or good deli mustard
1/2 cup real maple syrup
5 strips of bacon, thick cut is preferred
Instructions
Drain the liquid from one of the cans of cooked beans.
Roughly chop the onion.
Cut or Slice 3 of the bacon strips into 1/2″ pieces. Cook in a fry pan while preparing the dutch oven.
Put about 2 tablespoons of the bacon fat or vegetable oil in the dutch oven on the stovetop.
Add in the onion and cook, you want the onion to start to brown and be kinda clear.
Put in the two cans of beans, reserving the drained liquid from one of the cans.
Add the tomato paste, Worchestershire, mustard, maple syrup.
Add in the cooked bacon and mix together the ingredients.
At this point, see how much liquid is in the pot, the liquid should not be above the beans. The top layer of beans should be just above the liquid.
Add more bean liquid if the liquid level is too low.
Lay the remaining uncooked bacon across the top of the bean mix.
Set the oven to 350F and cook covered for 30-40 minutes. Check at 30 minutes, if its not bubbling, cook a bit longer.
Take the lid off the beans, turn on the oven broiler, and put the beans about 6″ below the broiler for 10 minutes, when the top starts to brown, its done.
I figured out how to build a homemade maple syrup evaporator because I was burning through a lot of propane when making maple syrup. I don’t make enough syrup to warrant buying one, but a DIY maple syrup evaporator was just what I needed. Watch the 2 videos below and step through the photos of the evpaorator build.
The Making Of time lapse video:
How to use the Homemade Maple Syrup Evaporator
This is made out of a metal 4 drawer file cabinet and a few steam table pans, plus some stuff you may already have or can get cheaply or for free. If you can find a 5 drawer file cabinet, even better, it will allow you space to have another pan for boiling.
This is not an original idea of mine, I learned about it through Annie Corrigan of Earth Eats, a WFIU radio program and podcast. She produced a story about Mike Bell of the Hinkle Garton Farmstead, who made this great homemade maple syrup evaporator. You can see photos of his rig here.
We have two videos of this evaporator. One is a fun time lapse of me building the rig, the second is a walk through of how to use make maple syrup with it. Below the videos are photos of building the evaporator and more videos on how to make maple syrup
Before I built this evaporator, I was using a lot of propane to boil down sap into syrup, you can watch a video of how we use a propane turkey deep fryer to make maple syrup here. The turkey fryer method works, but you burn through the propane, and make a bunch of trips to the hardware store buying refills.
I did not keep close track of how many gallons of sap I boiled down in a day, but if you keep on top of it, I imagine you can boil down about 50-70 gallons a day, depending on the sugar ratio of your sap and how hot your fire burns. Pallets and scrap lumber burn hotter than firewood, I found.
Click Here to go to the next page for photos and instructions on how to build the homemade maple syrup evaporator.


 How long does it take to deep fry a turkey?


 This galette is a low sugar version, a sprinkle of sugar is all I added, and it was fine. I used dried cranberries and learned that its best to have the cranberries tucked under the apples on top of the galette, else they get too crunchy from the oven heat. You could use other dried fruits, but I think we need to eat more cranberries.