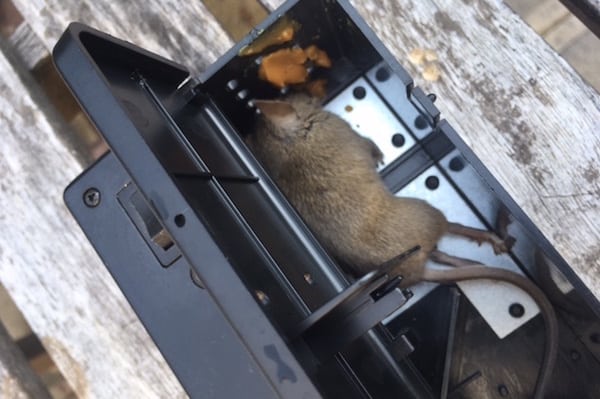
Here is what I think is the best mouse trap. I use these because they kill the mice instantly and are a pet safe mouse trap. Watch this video to see how it works:
Why is this best mouse trap?
It works every time.
Its real easy to set, just add peanut butter and turn it on.
Its easy to remove the dead mouse, just empty into the trash.
Its a pet safe mouse trap, your dog or cat can’t be injured by it.
A pet safe mouse trap is important to me, as we have two Labradors. They leave this trap alone. I put these along the baseboards and kick panels of the kitchen cabinets and the dogs leave them alone. If you have a very curious pet, or one who loves peanut butter, this might be an issue, but its easy enough to put the trap in an out of the way place then.
Once you turn on the trap, it will stay on for usually a week. It holds a static charge to zap the mouse, and you need to reset the trap every 5-7 days by turning it off then on again. Easy enough.
If the trap has a dead mouse in it, the trap light will blink green. Simply open the trap cover over the trash can, turn it over and the mouse drops into the trash. You don’t have to touch the mouse.
The peanut butter bait will last for a long time, as the mouse doesn’t really get to eat much of it before its life is over. Peanut butter mouse bait will dry out after a while, so you can clean it out and add a new dab. I suggest creamy peanut butter. The brand doesn’t seem to matter, but the natural peanut butters usually have too much oil and the oil can get onto the metal plates of the trap. Something to avoid.
If you have a rat infestation, use the Victor Electronic Rat Trap here. The operating premise is the same, just a larger version for getting rid of rats. I have a friend who is a building superintendent, and he swears by these rat traps.
Here’s my how to video on doing a lawn mower oil change. Its not rocket science, its actually pretty easy, AND it will extend the life of your mower. Ready? Watch the video and scroll through the instructions below:
Lawn Mower Oil Change, Step By Step
Check the manual to see what kind of oil your engine uses. Most use 30W, but just check, OK? By changing the oil, you are already helping the engine last much longer. Do a lawn mower oil change a few times a year and your mower could last forever, mbe!
Run the mower to warm up the engine. This gets the oil hot and the debris that settles up and moving. Turn off the mower.
Place plastic food wrap over the gas tank fill and screw the cap down. Not so tight that you can’t get it off again, but snug. Now we are going to gently turn the mower on its side. Position a plastic tub such that when you tilt the mower on its side, the oil fill tube will pour into the tub.
If your mower has an oil drain plug instead of a fill tube, you will have to tilt the mower on its side, remove that plug, then place the mower over the bucket. This may take some finesse and a friend to help.
See how the gas cap is on the high side of the tilt?
Be sure to tilt the mower so that the gas cap is on the higher side of the mower, so no gas could leak out if the cap leaked. Tilt the mower into the bucket and let it sit while the oil drains out. You can prop up the mower and let it sit for a while.
Get your fresh oil ready and a funnel. You can make funnel out of a piece of paper if need be. Tilt the mower back onto its wheels, and slowly add the new oil into the oil fill tube. Use the dipstick to make sure there is just enough oil.
Do Not Over Fill The Oil. Bad things can happen.
AND recycle the used oil. Take it to a quick lube shop or a car repair shop, they will recycle the oil. Don’t dump it in the woods or a stream, OK?
If your generator wont start, I bet the carburetor is toast, here’s how to replace it. First, watch our how-to video.
When Your Generator Wont Start:
I bet the last time you ran your generator was over a year ago. In that case, the carburetor is full of old gas that has broken down into gunk, and clogged the carb. Now, you can take apart the carburetor and clean it, even buy a rebuild kit. But for most of us, this is a higher level of skill than we posses. We can, however, buy a replacement carburetor and install it. You have the skills to do this, as long as you watch GardenFork, I bet.
First step is to order a new carburetor (here is one example, find one that matches your engine). Find the engine model number stamped on the engine somewhere. This may be several lines of numbers, and they are all relevant. If you can, photograph the numbers with your smart device. On Briggs & Stratton engines, the numbers are often on the valve cover. The numbers on the generator chassis are probably not the ones you need, find the engine numbers. Search online for “engine serial number location (name of your generator)”. I have found that there is sometimes one replacement carb that is used on many small engines for a certain brand. I had to search a bit to make sure I was getting the right carb, but the comments made by other purchasers really helped.
Your replacement carburetor may come with several choke handles, as the new carb fits several models of engine. I had to cut a small piece of metal off the back of the air filter mount to allow the new carb choke handle to fit properly. Not a big deal.
Check out the instructions that come with the carb. You may need special torx bits. I did, and only learned this after I started the job. Fun.
To remove the old carburetor, start by draining the old gas out of the fuel tank. Turn off the fuel line that runs to the carburetor, pull the hose off the carb, and put it into a gas can. Turn on the valve, open the fuel tank cap, and drain. Don’t dump this gas in the woods or a creek, OK?
Big thing to remember: take photos throughout this process, so you can refer to how it all came apart, OK? Remove the spark plug wire from the spark plug. This may seem unnecessary, but its a good practice to get into, especially if you have a electric start generator… Now remove the fuel line from the carb and remove the air filter and the frame that holds it to the carburetor.
The carb may have what look bolts or nuts that are star shaped, these are usually called Torx nuts. You may already have a set of tools to remove these, or you can borrow them or you can buy them.
Remove the governor control rod and spring assembly. A new rod and spring may come with your carb, use the new one, but hold onto the old one in case there is an issue. The rod may be concealed under a plastic or metal shroud, it may take some time to remove it.
Remove the carb from the engine carefully. There is at least one gasket that may tear, and you may not have a new one to replace it. Some gas may drip out of the carb, that’s ok.
The new carburetor will go back in about the same way the old one came out. The hardest part is getting the governor control rod and spring reconnected. There should be a diagram that comes with the new carb showing how it connects.
Also the choke handle may be different or require a little cutting to get it fit. The carb I bought came with several choke handles, and you may have to remove and replace the one that is installed on the new carb.
While you are doing the generator repair, you might as well put in new spark plug and change the oil. Spark plugs die out suddenly, and you’re already deep into small engine repair mode, this will take 2 minutes.
If your generator wont start and has been sitting, I bet the oil is the color of mud. This is a bad thing. Muddy oil can mean there is water in the oil, and will ruin the engine. Take the waste oil to a oil change or car repair shop, they will recycle it for you. Don’t dump it in your yard.
Going forward, always use gas stabilizer in your small engines. Then you don’t have to wonder what to do when your generator wont start. Whenever I fill up my gas cans, I immediately add in the gas stabilizer. My engines start on the first pull, even after a winter in the garage.
I used to be something of a pack rat, now I’m that guy always getting rid of stuff. Before, I always thought something might be useful later on. My thinking was, “I might need that one day.” No more.
I’m not sure exactly when it happened, but now I get excited to look at the model apartment layouts at IKEA, and marvel at how you can live with less in less square footage. And do so with two large Labrador Retrievers.
I’ve built a few projects with IKEA cabinets, check them out here, but this post is about getting rid of stuff.
How did I come to be able to let go of stuff, and not bring more home? I think two things influenced this.
First was me starting to meditate. Not to sound all wooh and crunchy, but its allowed me to mentally let go of a lot of daily mental baggage. Lots of stuff just doesn’t matter, it drags you down. (my favorite app for meditation is Headspace, it is great)
Second was the fact that I do all the cleaning in the house. If there was less stuff on the floor, I wouldn’t have to move it to vacuum. Less Labrador dust balls could collect around that stuff. Fewer horizontal surfaces (piles of stuff) meant less surfaces to dust.
And when I wanted to do a project that involved large stuff, like plywood or cardboard, I always had to move stuff around to do it.
Then there is the visual. Less visual clutter. For some reason now, I like to see less stuff around.
I’ll see stuff in the house, and ask myself, “Have I used that in the last year?” If the answer is no, out it goes. Many cookbooks have left the house lately. I have favorites I reference, and they stay, but I don’t get the amount of cookbooks people have.
Case in point: A few years ago my neighbor was giving away a propane grill. It was in pretty good shape, but it didn’t work. I fixed it, and of course made a video about it here. But I’ve since realized, I just don’t grill. I’ve used the gas grill more for seasoning cast iron than cooking steak.
So it was time to let go of the gas grill. First I took a photo of it and emailed friends. With no response, I wheeled it out in front of our Brooklyn apartment, with a bilingual sign on it. I kept the propane tank for to help make maple syrup up at the house.
Literally in a few hours, someone was out front hauling it away. Nice.
Neighbor taking away my clutter
I still see stuff and think “I should bring that home, I could use it” and then I stop myself, usually. A box of electrical wiring supplies did make it home, but its being used and anything left is put back out on the sidewalk.
Getting Rid Of Stuff, Some Suggestions
If you don’t have an urban sidewalk, maybe your local community has an email list you can send to, or you can use Craigslist and Freecycle. There some drawbacks to using the free section of Craigslist, we talk about it on GardenFork Radio. But if done correctly, its a great way for getting rid of stuff. Freecycle’s attraction is the people in that group understand the process, and are better to deal with. Either way set specific time and dates for pickup, or you will be waiting all day.
I look out the window and love that the grill has gone to a family who can use it, and I have more space in my backyard. It’s a great feeling, just letting go. How do you let go?
Want to apply frosted window film? Its easy, and I made a video to show you how. This works for either window privacy or decorative window film patterns. Watch the video and read through the how to below.
We have some french doors that separate two bedrooms. We love the glass doors, but wanted privacy between the rooms. I started researching how to frost glass doors and decided that using frosted glass film was the way to go with these doors. If you’d like to see how to use frosted glass spray paint, watch our video here.
Why Frosted Window Film?
For a french door, which has a bunch of small windows in it, the film was a much easier option than using the spray product. We wouldn’t have to mask off all the wood, we could just cut a piece of frosted glass film to fit each rectangle.
You have a few choices when shopping for window film. (Please consider using our link when buying the film, it helps us pay the bills!) They come in different diffusion densities and sizes. You will need more film than you think, learn from me. I made several mistakes in cutting, and I’m glad I bought more than I thought I needed.
You will need a utility knife with a few brand new blades, and some thick cardboard to cut on. It helps to put down a piece of plywood under the cardboard so you don’t cut your floor. A metal ruler or straight edge is key for cutting the film.
Important, be sure the glass is super clean before applying the film. Any traces of paint or polyurethane need to be scraped off and the glass cleaned, or the window film will peel. Learn from my mistakes, OK?
Let me know your thoughts and questions in the comments below, thx!
If you are wondering how do you frost glass, I’m here to show you. Its easy, even I can do it. Watch this how to video, and step through the photos below.
How To Frost Glass, Step By Step
First, buy some frosted glass spray paint here. The next thing is to either remove the glass from the cabinet door, or remove the cabinet door from the cabinet. If the glass is not easily removed with a few retainer clips, you can detach the hinge. Unscrew the large screw shown in the photo above, and slide out the door. Do not remove the screw, just loosen it, OK?
Next take the glass outside and clean it with window cleaner, the frosted glass spray paint wont stick to dirty glass. Do this on a warm day outside, don’t spray this inside your house. Use long smooth strokes when pressing down on the spray nozzle, don’t hold the can in one place or do circles or zigzags. Long side to side sprays, with overlap are best. The frost will appear in about 10 minutes as the glass dries. If you want a denser more frosted look, apply a second coat.
After the frosted glass has dried, replace the glass back in the cabinet door. If you pulled out the whole door, have someone help you align the hinges and tighten down the set screws.
Here’s what one coat looks like. You can see one fuzzy object close to the glass. Its a ramekin of salt, but the one coat works perfect for me. I like that its less than a solid coat. How about you? Let me know in the comments.
Here’s the whole cabinet after the process, pretty nice I think! I am still getting used to where I moved everything, but the kitchen works more ergonomically now. Support GardenFork and shop here for the spray to frost your glass, thx!
After making boiling sap with out steam table pan maple syrup evaporator for 2 seasons now, I have a few thoughts on improvements. The build videos for our homemade maple syrup evaporator are here. Watch the update video below:
How To Improve the Steam Table Pan Maple Syrup Evaporator
I’m not sure why I connected the chimney stack about 6″ below the top of the cabinet. But I think the air flow might improve if the smoke exited higher up, in addition, the hot air would wrap around the back pan more. Also, consider a higher chimney pipe, it will cut down on the smoke the downdrafts on top of you.
For the turbo fan, which really womps up the fire, consider connecting it just below the fire door. I plan on adding a dimmer switch in the power cord, since controlling the fan speed is important. You can find bathroom fans at tag sales or in your neighbor’s garage.
For most 4 drawer letter sized file cabinet, two regular sized trays fit, but there will be space. As a result, that gap needs to be filled in with a scrap piece of metal or a small food tray. Put this small space above the fire door, and move the pans closer to the chimney. Because your fire is moving toward the chimney, the hottest part of the fire is on that end.
I found that putting the fire grate about 10-12″ below the steam table pans worked for me. It depends on the kind of fuel you are burning, consequently, adjust yours to the size of the wood. We burn pallets, which slide uncut into this evaporator.
This homemade maple syrup evaporator gets really hot, so be careful when standing near it. For our next evaporator build, I may line the sides with firebrick.
If you are thinking about buying a real evaporator pan, read our post here.
You can build this DIY Pendant Lamp with parts you buy online. Put them together and you save a bunch of money. Watch our video and read on:
Build A DIY Pendant Lamp, what you need
Shade in the color of your choice
Light Socket and related hardware
Clamp to attach socket to shade
Cord of your choice
There’s all sorts of choices when picking the pendant lamp shade, however, keep in mind the decor of the surroundings.
You can buy the parts from suppliers on Ebay or Amazon. I will list out the main parts you need, add to them what styles you like. If this lamp is in a bathroom or kitchen, use 3 wire cord, because it needs to be grounded. Be sure the power is off when attaching this to an electrical ceiling box.
I found that sharp wire cutters, a utility knife, and multi-tool screwdriver were key here. The antique style lamp cord can be trick to cut cleaning, because it is cloth wrapped. Order more cord than you think you need and take your time cutting it.
Also, something to consider is whether the lamp switch will be on a wall or on the socket above the shade. I ordered a socket with a switch built in, but it ends up we wired this to a switch on the wall. one thing to consider in your project. In addition, a third alternative is to hang the lamp from a screw eye and have it plug into a wall outlet. This method is the simplest way to build a DIY pendant lamp, however, you have a cord coming down the wall.
Here’s how I use a sewing machine to repair pants, specifically my work pants. If you have a sewing machine in your basement, go get it out, so you can start learning how to sew.
If you don’t already have a sewing machine, however, all is not lost. Yard sales and craigslist often have sewing machines for sale. People don’t seem to understand these amazing machines, and how versatile they are.
How To Use A Sewing Machine – Some Tips
Be sure to read the manual that comes with the machine.
Buy several basic colors of thread.
Pick up spare needles and bobbins at the store.
Practice.
Thankfully my sewing machine came with a manual. Maybe yours came bare bones, as a result, it has no instruction manual. Thankfully, we have the internet, so a quick search with the name and model of your machine with the phrase “instruction manual” can help.
I mainly use black thread, as a result of me wearing black dungaree work pants most of the time. But pick up white, black, blue, and other colors you may need. Thread is inexpensive.
I have broken a few sewing machine needles when repairing clothing. Consequently, I have bought a package of replacement needles to have at the ready. Again, these are not expensive, so go get some. The needles break when I run over the plastic end of the pins that hold the patch in.
For whatever color spools of thread you have, buy bobbins to fill up with the same color thread. The bobbin supplies the thread from the bottom of the machine, while the needle supplies the top.
Most of all, practice makes perfect. It becomes a zen thing with me, as a result, I lose myself in the sewing process, which is great. And you get to extend the life of your favorite pants.
Let me know your thoughts and suggestions in the comments below.
Cleaning cast iron with a battery charger, aka cleaning cast iron with electrolysis, makes it super easy to remove rust and crud from rusted cast iron. Watch this video I made, then we’ll step through the process.
Caution! Use the setup outdoors and away from open flames. Don’t smoke while doing this. Restoring cast iron with electrolysis produces hydrogen and oxygen. Use this info at your own risk, OK?
Cleaning Cast Iron With A Battery Charger, Step By Step
Above is what my setup looks like for cleaning cast iron with a battery charger. Let me walk you through the process.
You will need a battery charger with a MANUAL mode. This is important. The first one I bought said it was manual, but it wasn’t. It should have a switch on it for manual. Here is a link to the battery charger I bought, it works well.
For the metal plates, I used two old baking pans. I used a wire wheel on my drill to remove the coating on the pans to expose the bare metal. DO NOT use stainless steel, bad chemistry will happen. I used a self tapping screw on each pan to attach a 12 gauge copper wire to them, as well as the wire that goes from the pans to the battery charger.
Here is a top view of how my cast iron cleaning tank looks. It is important that the metal cake pans, or whatever metal you are using, does not touch the cast iron to be cleaned. I have been told that you can also use several pieces of rebar wired together for the metal plates. Or visit a scrap yard. Again, do not use stainless steel.
Turn On The Charger And See What Happens
Use a wire brush to clean off the handle of the cast iron where the negative (black) clip of the battery charger connects to the pan. I don’t suggest submerging your battery clamps in the solution, therefore, if you want to submerge the whole piece, wrap copper wire around the handle and attach the clip to the copper wire above the water line.
Important Things To Keep In Mind
Use 1 tablespoon of Washing Soda per gallon of water for the cleaning solution.
Red clamp from battery charger attaches to metal pans in the tank, Black clamp attaches to item to be cleaned.
Wear gloves while doing this, OK?
If you’ve got the rig set up correctly, you will see bubbles start to rise from the solution almost immediately. Let it run for several hours, so all sorts of stuff will have time to bubble off. Most of all, make sure the cast iron pan being cleaned does not touch the metal plates.
Every few hours, pull out the cast iron and clean off the crud with a dish scrubber. Flip the pan 180 degrees in the solution every time you pull it out. Finally, depending on the age and how many layers of seasoning are on the piece, you may need to use steel wool to remove some of the last bits of the material. Learn how to season cast iron here.
I want to show you how to put in a french drain, which will help keep water out of your basement and away from your house.
A french drain is what i call a surface drain, or a drain just below the soil level. For this one, the gravel is exposed, sometimes the french drain is covered with dirt or sand. I prefer to keep the gravel exposed.
I was fortunate to have my neighbor bring his backhoe over and he dug a trench along the wall of the house where I have a water issue. You can also dig this by hand, its not hard unless there are a lot of rocks. I would dig down a minimum of 8″.
You want the trench to pitch toward where ever the water is exiting, aka going to ‘daylight’. The pitch can be very gradual, 1/4″ per foot is fine.
The first thing to go in the trench is the silt fabric. Run it all the way to the drain exit. Be sure there is enough on each side of the trench so it can fold over on itself after adding half the gravel.
Then lay in the perforated pipe. If you are using the PVC pipe, the holes along the pipe face DOWN, OK? Slide the filter sleeve over the perf pipe. Close off the filter sleeve at the top end of the trench and tuck the other end into the pipe itself when it connects to the solid drain pipe.
Shovel more stone over the top of the perf pipe about 2″ and then fold the silt fabric over itself on top of this gravel. Then add more gravel to bring it level with the ground. You can also bury a french drain, and grow grass on top of it. Be sure to put a grate over the daylight end of the pipe to keep animals from nesting in the pipe.
One more thing when you put in a french drain, do not connect any roof gutter downspouts to the drain pipe. The rain water can overwhelm the drain and fill the pipe and gravel with more water, when you are actually trying to drain the water.
When you are learning how to cut down a tree, its best to start with trees smaller than this one, but even after doing this for years, I still make mistakes. Thankfully, nothing bad happened this time. Watch the video to see. And then check out the safety gear that is a must have for chainsaw safety.
There are many posts on how to cut down a tree, here I’ll touch on some of the techniques I use.
If you don’t wear safety gear, you need your head examined.
Plan your exit from the tree 45 degrees from the back of the tree. Make sure you have a clear path, with no obstacles to trip on. Turn off your chainsaw after making your cuts and before you start your exit.
I use a 70 degree wedge cut that cuts the front 20% of the tree. The wedge faces the direction you want the tree to fall. Some will cut the bottom of the wedge flat level, I think the longer the tree stays hinged, the more control it has, so I cut the bottom part of the wedge lower.
Not a perfect hinge, but it worked.
The back cut is ideally about an inch above the center of the wedge cut. In this chainsaw video, that didn’t happen. Going forward I am going to chalk or spray paint the cut lines on the tree before I start. When you are actually cutting the tree, it can be hard to make sure the chainsaw stays level.
I use plastic tree felling wedges to keep the tree from pinching the saw or worse, falling back on itself. You can use wedges for several types of tree felling cuts. Be sure to use plastic wedges that are designed to be used with chainsaws, metal wedges will damage the chainsaw if you happen to touch saw to wedge while working the tree.
A sharp chainsaw chain is so important. Dull saws can hurt you and the saw, and hamper your tree felling. I will buy a new chain for a large tree.
Learn how to sharpen lawn mower blades and cut your grass better with our mower video. Then read through the steps below and you’ll be set to mow the grass.
Key Points To Sharpen Lawn Mower Blades:
Be sure to put some plastic food wrap under the gas cap so it seals before you tilt the mower.
Whatever side of the mower that has the gas cap should be tilted up.
Wear safety gear when sharpening the blade, save your eyes and ears.
The video shows best how to tilt the mower so the gas doesn’t spill out, its easier to show than to put into words, but I trust you get it. Some gas caps have vents in them, hence the need for the plastic wrap to seal it.
Use a block of wood and a clamp set against the rim of the mower deck to keep the blade from moving while you remove the bolt. Do not use an adjustable wrench, use a socket or wrench, or you may round off the bolt.
Clamp the blade into a vise and use a right angle grinder to sharpen the blade, you want to do your best to keep the angle of the blade the same. If you do not have a grinder, you can buy a mower blade sharpening stone that attaches to your corded drill.
The most important part when you sharpen lawn mower blades is to balance the blade after sharpening it. If the blade is off balance, it will wobble when its cutting and damage the engine. Bad things will happen.
When attaching the blade to the mower, do not over tighten the bolt, hand tight and then a little more. Be careful not to bend the blade against the clamp when tightening the bolt.
The engine will take several pulls to start, don’t worry, the gas has to settle in the carburetor again. It will smoke a bit when it first starts. I sharpen my blade several times a year, it makes for a healthier lawn and a cleaner cut.
What are your thoughts on blade sharpening? Let me know below.
Learn here how to replace a broken window pane, its not that hard, and once you do it, its like butter.
Easy Steps To Replace A Broken Window Pane:
Remove the broken glass.
Remove the old putty.
Pull out the old glazing points
Measure the window pane.
Get Glass Cut.
Drop in glass and push in glazing points.
Press in glazing putty.
Safety First! Be sure to wear gloves and safety googles, as you don’t want glass going into your eyes or your hand. If you can remove the window from its frame, it will be easier to do the work. If not, put a tarp below the window to catch the broken glass and old putty.
The putty may come out easily, it may not. Try to pull out the broken glass, it may still be held in by the putty and the glazing points. Alternate between removing putty, glazing points, and the glass, you will eventually get all of it out. Be careful with the wood trim that holds the window, you don’t want to beat it up.
To replace a broken window pane, we need to get a piece of new piece of glass, you can cut the glass yourself or have the hardware store do it. Measure the pane carefully, best to have it slightly smaller rather than too large for the opening in the window.
Place the new glass pane in the window, and press in new glazing points every 6″ to 8″. Again be careful, as you can crack the glass if you press down on it too hard while putting in the points.
If the wood frame is unpainted, you have the option of painting it or brushing on some linseed oil. The thinking here is that unfinished wood will draw out some of the oil in the putty, hampering its ability to form up properly and make it brittle. I have done it both ways, and have not seen a difference, but the theory makes sense to me.
Prepare the glazing putty by kneading it and adding linseed oil if you like. I like the putty more pliable than how it comes from the store.
Lay a bead of the putty all around the window pane, and finish with your putty knife as shown in the video.
Build this DIY Cold Frame with a window your neighbor is throwing out. I see windows out for the trash all the time, I could probably have built a whole greenhouse already! I like this home made cold frame for starting and growing salad greens, as they don’t get too tall, perfect for this rig. Watch the video:
Tips for building the DIY Cold Frame
A wood frame window works best, but use what you’ve got, or what you’ve found.
Be sure to prime and paint all surfaces.
Install a thermatic vent to keep it from over heating.
Our cold frame has a thermatic vent built into the plan, so you don’t have to manually vent the cold frame greenhouse, you can buy one of these vents at a home improvement store. Buy the vent here.
What I also like here is we are recycling materials to build DIY cold frame. You can find old windows somewhere in your town, someone is most likely replacing their windows, and they will put out the old ones for trash pickup. Or check yard sales, or your own garage attic or barn, its very possible there is a window or two sitting there that you can use for this cold frame plan. Also consider using scrap plywood for this, it doesn’t have to look like fine furniture, its for the vegetable garden after all.
Be sure to paint the cold frame with primer and an outdoor latex paint, you may also want to wrap the edges of the plywood that touch the soil with duct tape to keep moisture from wicking up into the plywood. You could also use old garden hose to protect the wood. Slice open the hose along its length and slip the bottom of the cold frame into the slot in the garden hose.
If you want to extend your growing season, check out the books below, they are the ones we use!
Build this homemade pallet pry bar with parts from the hardware store, no welding required. Grab a bunch of right angle brackets and some nuts and bolts, and make a pallet buster. Neat.
Pallet Pry Bar Parts List
Eight 4″ right angle brackets
Two 3 1/2″ Grade 5 3/8″ bolts & nuts
Two 3/4″ 1/4″ bolts & nuts
Handful of lockwashers
Handful of 3/8″ washers
Six 1/2″ nuts to use as spacers
Three foot length of 3/4″ pipe
Right angle elbow 3/4″ pipe
Do a dry run in the hardware store and make sure this all works as best you can, it might save a trip to the store.
I don’t have an exact measurement as to where to drill the holes, you can use this photo as a guide. You can drill this with a corded drill, or ideally, a drill press. Be sure to oil the bit as it cuts to keep it cool. The drill bit will wander when making the holes for the homemade pallet pry bar, so use a pointed metal punch or nail to set a point for the drill to sit in.
Drill out the existing holes in the brackets to accept the bolts.
I used nylon lock nuts on the two bolts that go through the pipe, if you can’t find them, use lock washers to keep the nuts tight. The two smaller bolts that hold the brackets to themselves don’t have to be Grade 5, regular ones will do.
The oversized nuts work great for spacing the brackets off the pallet buster. I made this wide to account for different pallets I have run into.
Be sure to tighten up the bolts! There is a lot of torque happening here, you don’t want this to fall apart. After you have assembled the pallet pry bar, round off the sharp corners of the brackets. This will help minimize damage to the pallet wood, if you want to use it to build stuff.
I found the addition of the pipe elbow really helps this tool work well. It adds a little bit of leverage. I got the idea from the small wonder bar crowbar I have, it has a small loop of metal behind the business end of the bar.
Thanks to Darren and Rybitski of Instructables for the inspiration to build this.
What can we do to improve this pallet breaker? Let me know below.
Learn how to cut glass to repair a broken window or to use cut glass in a crafts project. In our DIY video, we show you few tips to make cutting glass easier.
This same glass cutting method applies to crafts projects too. If you are doing stained glass, the glass cutting process is the same. You will do more curved cuts as you practice.
Tips On How To Cut Glass
Oil the glass cutter
Apply firm pressure
Use a straight edge
Wear safety glasses and gloves
Cut clean glass
Oiling the glass cutter was a wake up moment for me when I was learning how to cut glass. In one of our how to glaze windows videos, Bobby showed me hoe he oils his glass cutter, and it made all the difference. You can use motor oil, automatic transmission fluid, or vegetable oil, use what works and what you have.
When cutting the glass, firm pressure is key. But you don’t want to put all your weight on the cutter. The cutter should make a sound like paper being torn, but a bit louder. You want a clean score line, not a deep gouge in the glass.
I found a square is very helpful when cutting glass. You can run the cutter right along it, and you can put your hand on it to hold down the glass. It helps to tape the square to the glass, duct tape works well.
Clean the glass before you cut it. You don’t want the cutter to hit any debris, and it makes it easier to draw any cut lines.
After you score the glass, you can use the metal tapper on the back of the cutter to tap the back of the glass, the side opposite the score line, to cause the break to expand, and then put the glass on an edge and snap it off.
Craft a pallet Christmas tree in about an hour from start to finish. This wood pallet project all started when my neighbor put a pallet out with the trash, and I grabbed it and brought it into my house. Watch the video to see it all go together:
How To Make A Pallet Christmas Tree
The ideal pallet for this has at least one good side. In other words, the wood slats are in good shape and not splintered. Remember you are only going to use 2/3 of the pallet, so if one side has some issues, that’s ok, just use the other side for the pallet Christmas tree. When cutting through the slats, do not cut into the studs, only cut the slats.
Flip the pallet over and cut off all the slats except the last one, the one at the bottom, is left whole to serve as a support.
Cut of the back slats except the bottom one.
Decide on your color and spray paint the wood. If you want to upgrade this into a super craft project, you can sand the wood slats, prime the wood, and brush on some quality paint. I like the transparent feel to the light coat of green spray paint I applied. Its a matter of taste and patience. And you know how I am with patience. K?
I hand drew some stars on card stock, and then used some paper to make a larger stencil mask to avoid spraying the red paint where I didn’t want it.
I cut two stabilizers from the scrap wood and screwed these into the bottom of the pallet Christmas tree. This could be improved, I think, but for this holiday season I went with this solution.
One thing to pay attention to is make sure the pallet you use has the letters HT branded somewhere on it. This means heat treated for insects, so its safe to use for projects. More info on pallet safety from our friends at Root Simple here.


 Above is what my setup looks like for cleaning cast iron with a battery charger. Let me walk you through the process.
 You will need a battery charger with a MANUAL mode. This is important. The first one I bought said it was manual, but it wasn’t. It should have a switch on it for manual. Here is a
  For the metal plates, I used two old baking pans. I used a wire wheel on my drill to remove the coating on the pans to expose the bare metal. DO NOT use stainless steel, bad chemistry will happen. I used a self tapping screw on each pan to attach a 12 gauge copper wire to them, as well as the wire that goes from the pans to the battery charger.
 Here is a top view of how my cast iron cleaning tank looks. It is important that the metal cake pans, or whatever metal you are using, does not touch the cast iron to be cleaned. I have been told that you can also use several pieces of rebar wired together for the metal plates. Or visit a scrap yard. Again, do not use stainless steel.
 Use a wire brush to clean off the handle of the cast iron where the negative (black) clip of the battery charger connects to the pan. I don’t suggest submerging your battery clamps in the solution, therefore, if you want to submerge the whole piece, wrap copper wire around the handle and attach the clip to the copper wire above the water line.
 If you’ve got the rig set up correctly, you will see bubbles start to rise from the solution almost immediately. Let it run for several hours, so all sorts of stuff will have time to bubble off. Most of all, make sure the cast iron pan being cleaned does not touch the metal plates.
 Every few hours, pull out the cast iron and clean off the crud with a dish scrubber. Flip the pan 180 degrees in the solution every time you pull it out. Finally, depending on the age and how many layers of seasoning are on the piece, you may need to use steel wool to remove some of the last bits of the material.


 Learn about the must-have safety gear when felling trees here


