Category: DIY TV

  • Tap Maple Trees to Make Maple Syrup How To – GF Video

    Tap Maple Trees to Make Maple Syrup How To – GF Video

    Tapping maple trees to make maple syrup in this DIY video. We tap our Sugar Maple trees to collect sap in preparation for making maple syrup. This is a DIY low tech low volume method of tapping some trees in  your yard or perhaps a neighbor’s field. Several of my neighbor’s have sugar shacks complete with large evaporators and huge piles of firewood, some use traditional sap buckets to collect sap, others use plastic lines and taps.

    For my yard, I went with plastic taps and lines, they are not expensive, and I used the food grade plastic buckets from my homebrew beer kit to collect the sap. After we collected the sap, we boiled it down, and we’ll post a video about that soon.

    The general rule of how many taps to put in a tree, according to the Conn. DEP is 1 tap for a 12″ diameter tree ( 38″ in circumference ), 2 taps for 18″ diameter or larger tree ( 56″ in circumference )

    The holes you drill for the taps should be 1.5″ deep with a 5/16″ bit. If you are tapping trees that were tapped previously, pay attention to the previous tap holes. New taps should be 6″ left or right of an old tap hole, and 12″ above or below the old tap hole.

    Sugar Maple sap needs to be stored at 38F degrees or cooler, ideally you will boil the sap the day you collect it. If the sap has turned milky and foamy, it has gone bad.

    Do you tap sugar maple trees? What are some tips you can share with us below? Thanks for watching!

    Here is the tree identification book we like to use:

    Buy From An Indie Bookstore Here

    Buy From Amazon Here

  • Replace the Front Wheel Bearings On Your Car GF.TV video

    Replace the Front Wheel Bearings On Your Car GF.TV video


    Yes, you can learn how to replace the front wheel bearings on your car or truck. Eric shows you how to repair your own truck wheel bearings, using his Ford F150. The front wheel bearings of his truck are making that classic wheel bearing ‘whorl’ sound, so we take an afternoon to make a wheel bearing video.

    Front wheel bearings are usually easy to replace, but can be a bit messy, wear latex or nitrile gloves and save your hands from grease. Buy the new wheel bearings and new wheel bearing grease before you start, and work on one wheel at a time. It helps if you have a car repair manual, we like the Haynes manuals, available here.

    You need only basic car tools to do this, it helps to have  few wood blocks to prop up the hub while working on it. You might also consider changing the disc brake pads while you’re replacing the front wheel bearings, since you have to remove the disc brake calipers to remove the wheel hub anyway. here is a video we did on how to replace your disc brake pads.

    Consider having the disc brake rotors turned, or replacing them also, again, since you have to remove these to work on the bearings.

    Be sure to safely raise the front of the vehicle off the ground using jackstands.

    Have some suggestions or questions? let us know below:

  • Homemade Brick Pizza Oven Video

    Homemade Brick Pizza Oven Video

    Build this homemade brick pizza oven in your backyard with recycled used clay bricks and a recycled metal mattress frame. And the pizza oven is portable! You can assemble this in 20 minutes, make homemade pizzas, then take it apart and store it. Most backyard pizza ovens are big and permanent, this homemade brick oven is great because its easy to break down again until your next pizza baking party.Here are the pizza oven plans shown in photos, our oven uses used clay brick and 24″ angle iron we cut from a old bed frame. You have to heat up the oven for an hour to get it up to temperature. The brick pizza oven has to be on sturdy sawhorses or cement blocks. We used cement tile board to insulate the plywood table from the heat of the brick oven. Stuart, author of the Bread Oven book, emailed us, cautioning that he felt the 2 layers of cement tile board was not enough insulation to keep the plywood from scorching, he suggests a base of cement, as shown on his blog here.

    Clean the bricks that will be used for the floor of the oven, that’s where your pizza dough will be sitting. We didn’t have a thermometer, but I’m told the floor of the brick oven can reach 700F. We also found its good to keep some of the coals in the front part of the oven, so the heat is more even. We had to turn the pizza once during baking to have it cook evenly.

    I have a few ideas for more modifications, which we will post later on. Keep children and animals away from this and all fires, this is for adults.

    base of pizza oven
    building walls of pizza oven
    pizza oven roof using angle iron
    Backyard Brick Pizza Oven

    brick pizza oven videoMore Pizza Oven Plan Photos Here

    diy-pizza-ovenWatch all of our  pizza oven and pizza dough recipes here

    Our backyard pizza oven is based on one in the book Bread , Earth, & Fire by Stuart Silverstein. Stuart’s book has a bunch of plans and info on building backyard ovens, go buy it here. it is available as an ebook or paperback. Read Stuart’s blog here.

  • Washing Machine Repair, Water Pump Replace GF Video

    Washing Machine Repair, Water Pump Replace GF Video

    Washing machine repair video to fix a broken water pump. My washer broke, and I made a video of how to replace the water pump on your wash machine. If the washer is not draining, the water pump is probably broken. Water pumps on washing machines are not hard to fix, watch here and i’ll show you how to fix your Kenmore, Maytag, Whirlpool Sears washing machine.

    Front Loading Washing Machine Broke? It happens more often than you think. With several models, a coin can get stuck in the drain pump, and the coin wrecks the impeller. The impeller is the round thing that looks like a airplane propeller, it pushes the water through the machine.

    Washing Machine Repair isn’t always hard

    This repair is usually easy to do. Make sure of the following:

    • The washing machine is turned off and unplugged from the wall
    • The water lines are turned off and disconnected.
    • There is no wet laundry in the machine.

    The washing machine pump, for most washers, is located in the lower part of the machine, and you access it from the bottom panel of the machine. You will tilt the machine on its back and work from the bottom of it. Take cell phone photos as you take the bottom access panel off, and put all the screws in a bowl or container. Keep a bucket handy, as there may be some water in the hoses and pump as you disconnect them.

    Washing Machine Repair
    Washing Machine Pump from a front loading washer.

    Use a pliers to remove the hose clamps, you may also need a screwdriver, pay attention to how the clamps are situated on the hoses, and where each hose goes! You don’t want to cross the hoses, or the washing machine repair you’ve just done wont work.

    There will be a power cord of some sort, this is usually a plug with a locking tang that plugs into the pump. Carefully bend back the tang with a screwdriver and pull off the plug. Pay attention to how the plug came out so you can put the plug back in the right way.

    Let me know how your repair went in the comments below, always good to hear from you:


  • Plywood boat, How to build one : GF DIY Video

    Plywood boat, How to build one : GF DIY Video

    Learn how to build a Plywood Boat. You can make a great boat out of one sheet of plywood. Watch our video here and see how we build a boat.

    There are links at the end of this post for more of our boat videos and DIY projects ↓. You can make this plywood boat out of one sheet of plywood. If you use one sheet, plus a piece of scrap plywood that is 12″ x 24″ you can build a longer boat. We used 3/8 plywood for this one, next time we will use thinner plywood and fiberglass. I’ve been reading up on making a plywood canoe.

    If you want to find out when we post new DIY videos, get our email newsletter here.

    We used outdoor latex paint to coat the boat, and paintable high quality caulk to seal the joints. We added strength to the boat by attaching the boat pieces with 1×2 wood lath. If you can find some square molding that would be even better. Waterproof wood glue holds it together with the screws. The glue and caulk need to dry overnight before painting. Attaching a keel to the boat – I used a 2×4 – is key to stability. It’s not the most elegant boat, and the keel helps when paddling, otherwise it is hard to control. Several people have asked about mounting a trolling motor on the back of this. I think you can, but I’d suggest building a more robust boat for a trolling motor. This is a simple plywood boat, not a bass boat. plywood-boat-plans plywood boat-5 plywood boat-4 plywood boat-3 plywood boat plywood boat-2 plywood boat plans 6 How To Build A Plywood Boat

    Watch what happens to our first Fiberglass Plywood Boat here. You can listen to Deek of RelaxShacks.com and Eric talk about how to build a plywood boat and tiny houses on this episode of GardenFork Radio I got the idea for this boat plan after watching a video by Deek Dericksen on the Make Magazine site. Here is a boat some students in England made after seeing ours.

    You can find more plywood boat plans here.

  • How To Make A Homemade Dog Toy : GardenFork.TV video

    How To Make A Homemade Dog Toy : GardenFork.TV video

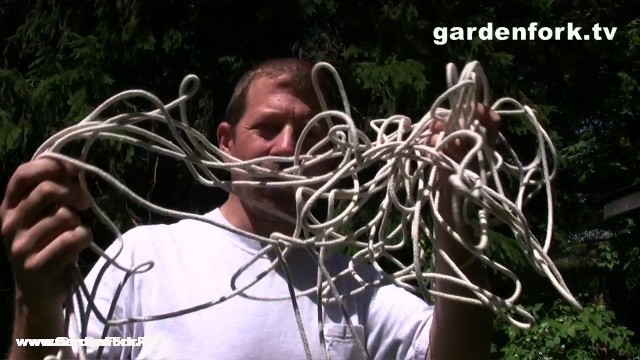
    Dog toys are expensive, here is a video & plan for a simple homemade dog rope toy. Our Labs love this toy, and after they destroy it, we can easily make another one. Moose and Charlie Pup are the tug of war toy dogs in our house, the others are tennis ball fixated. I came up with the idea of this homemade rope toy at the hardware store while looking at the different rope they have for sale. I bought a 100 feet hank of 3/8″ nylon rope and started experimenting with different dog toy designs. The dog toy we show you how to make in this video is the most popular and its simple to make.

    Briefly, to make this rope toy:

    1. cut 3 or 4 lengths of rope about 4 feet long.

    2. bunch together one end of each rope in your hand, so the all the ropes hang down from your hand holding the rope ends.

    3. while holding all 4 ropes together, tie an overhand knot at one end of the ropes.

    4. continue tying overhand knots along the length of the ropes, making sure the space between knots is not large enough for the dogs to get their head stuck.

    5. play tug of war with your dogs.

    Do you make your dogs rope toys, or other homemade toys? let us know below, we’d like to see what GF viewers are doing.

  • How to Chainsaw Tree Logs

    How to Chainsaw Tree Logs

    Here Eric shows you how to use a chainsaw to cut up tree logs into firewood. Keep in mind Eric is not a professional lumberjack, just your average DIY guy who likes to use his chainsaw to cut down trees, and cut the logs to fireplace length. Use this information at your own risk. Always follow all the safety instructions that came with your chainsaw.


    Proper placement of the chainsaw relative to your body, especially your legs and feet is real important here. Think about how the chainsaw may slip down, or up and what part of your body it may hit, which would be a bad thing. What may seem like a comfortable position to hold the saw, especially while you are kneeling to cut up trees, may not be the best way to do something. Steel toed boots are a must have when cutting firewood.

    A sharp chainsaw chain is mandatory, if your chainsaw is spitting out fine sawdust while cutting, its time to switch out the chain with a sharp one. A sharp chain makes large wood shavings when its cutting, not fine wood dust.

    You can watch all our how to cut down a tree chainsaw videos here
    Do you have some chainsaw adventures to share? or some more safety tips on the proper use of a chainsaw? please let us know below

  • How to replace your car or truck fender : GardenFork.TV

    How to replace your car or truck fender : GardenFork.TV

    Need to replace your damaged car fender? Learn here how to replace that car fender that hit guard rail, or got mashed by someone who couldn’t stay in their lane, or whatever accident damaged the fender, learn here how to replace your truck or car fender with a replacement from an auto recycler or a new fender from a auto body supplier.

    Have you done any body work on your car? Let us know some good tips on repairing the bodywork on your car or truck below, thanks.

  • How To Make Maple Syrup at a Sugar Shack: GF Video

    How To Make Maple Syrup at a Sugar Shack: GF Video

    Ever wondered how to make maple syrup? I have a number of friends who have sugar shacks and boil down sugar maple sap to make maple syrup. Last weekend I visited one of my friends and made this video about how to make maple syrup.

    You can also use simpler methods than the one shown here with the 2 stage evaporator, I plan on tapping my sugar maples next year and making maple syrup in with a simple propane burner and stainless steel steam table tray that will be my evaporator.

    Do you make your own maple syrup? How do you make it? and any tips and tricks you can offer us here? Let us know below

  • How to fix & remedy Ice Dams : DIY GF TV

    How to fix & remedy Ice Dams : DIY GF TV

    Water leaks in winter mean one thing, ice dams. Here’s how to fix ice dams. With the hard winter we’ve had, and then a few warm days, the ice dam on our roof caused water to run into our house. In this how to  video, I show you how to deal with ice dams, how to try to remove and prevent them from leaking from your roof in to your home.


    BE VERY CAREFUL when using a ladder, especially in winter. And as always, use of this information is at your own risk. Get a friend or two to help you.

    Ice dams happen when warm air in the attic helps to melt ice and snow, and then the water re-freezes. This ice can work its way up underneath shingles and then this water leaks into your house. A bad thing.

    So, how to fix an ice dam? Carefully. You are up on a ladder and its cold out. You have tools in your hands, you are wearing boots, heavy clothes. Be Careful. K?

  • Snow Avalanche : GardenFork.TV

    Snow Avalanche : GardenFork.TV

    A snow avalanche caught on camera while shooting a GardenFork.TV episode.

    Join our email list to keep up to date on our new videos here

  • To Install an Outdoor Motion Sensor Light: GardenFork.TV

    To Install an Outdoor Motion Sensor Light: GardenFork.TV

    Eric installs an outdoor motion sensor Light, an easy DIY electrical project for the homeowner. Outdoor motion sensor light installation can be done, watch Eric install the light in our latest DIY video using basic electrical wiring techniques. Watch and learn for the next time you want to install an outdoor light.

    Note: The wires on the electrical outlet shown are flopped, the white wire should be on the left side of the outlet, the black wire on the right side of the outlet. You can check this with a inexpensive polarity tester. And, Eric is not a licensed electrician; check your local building codes for your area, if you are not sure what you are doing, hire a professional.

    Comments? Thoughts? tell us below or call our GardenFork Radio listener line: 860-740-6938

  • How to replace your car – truck alternator : GardenFork.TV

    How to replace your car – truck alternator : GardenFork.TV

    You can replace the alternator in your car or truck, even Eric can. Maybe. Watch our How to replace your truck or car alternator video here on GardenFork.TV . We show how you can test your alternator, and how to remove the alternator from your truck or car. AND we have the Labradors in the show as well. Have you removed  your car alternator? Tell us your tips below:

  • How to make a Window Flower Box : GardenFork.TV

    How to make a Window Flower Box : GardenFork.TV

    Here’s plans and video to make a window box for your flowers. Easy to build in a weekend. Many window boxes fall apart because they are made of wood, I solved that. And here is Eric’s solution: the GardenFork Window Box Plans. Watch the show and then check out our video on window box planting. Below is a window box plan and photos to accompany the window flower box video.

    How to make a window flower box

    The wood box is made out of pine. It’s sized to be just slightly larger than the plastic pot that holds the plants. You can use common pine, be sure to prime it first with a stain blocking primer, else the knots in the wood will bleed through the paint. You can buy a can of stain blocking primer in a spray can, hit all the knots with a second coat, it dries pretty fast.watch more plant a window box video

    Give the window box planter several coats of paint, it will last longer that way.

    window flower box

    I had to offset the hanger brackets because the side of the house has board and batten style wood siding. If you are attaching this do a house with vinyl siding or clapboard, you might want to slip behind the brackets some shims so the bracket screws don’t crush the siding.

    window flower box

    When cutting the front and back wood pieces, be sure to cut them 1-1/2″ longer than the width of the inner planter. If you have coated screws, or deck screws, use those, as they are less likely to rust and bleed out of the paint.

    plastic-window-box

    This is how I make a window flower box, please tell us about your window box experience below.

    window flower box

  • How to hang or install a clothesline : GardenFork.TV

    How to hang or install a clothesline : GardenFork.TV

    Watch all our shows on GardenFork.TV : The Solar Powered Clothes Dryer , aka the clothesline is green and saves money. Installing a clothesline is super easy, if Eric can do it, you can do it. So go out and put up your clothesline and be green and save money.

  • Repair the power cord on your power tool : GardenFork.TV : power tool repair video

    Repair the power cord on your power tool : GardenFork.TV : power tool repair video

    Here we make a video on how to repair the power cord of your power tool. Don’t just wrap it in tape; here Eric shows you how he repairs the power cord on his circular saw. You can do this, watch the video and then repair your tools .

    DIY power tool repair is within the grasp of your average person, if i can repair my drill, circular saw, or other electric tools so can you. This DIY video shows you how to fix a circular saw, but this can be applied to other tools as well. Basically anything with  power cord can be fixed , just watch here and learn.

    Its important to match the wires correctly when re-attaching them, you want the polarized plug to work properly and safely. And be careful when soldering wires, the soldering iron is hot, learn from my experiences…

    And pay attention to where the power cord is when you are using a power tool, after we shot this how-to video, I proceeded to cut the cord of this saw yet again, and i repaired it yet again. Not unusual in my world.

    Do you have a good way to repair the power cord on a power tool? let us know below!

  • Practical Green Building and Renovation : GardenFork.tv

    Practical Green Building and Renovation : GardenFork.tv

    Doing a green renovation or building a green building? Watch as I talk with Gennaro Brooks Church of EcoBrooklyn and tour a Brooklyn brownstone he is renovating using practical and pragmatic green building techniques.

    Do you use these techniques? Tell us below in the comments

  • How to make a bread peel or pizza peel : Gardenfork.tv

    How to make a bread peel or pizza peel : Gardenfork.tv

    I needed a pizza and bread peel for our video shows on How to make pizza dough and bake a pizza, and our show on the Artisan Bread in 5 minutes a day method. Instead of buying a pizza peel, I decided to make my own. I went into my basement shop, look around for some scrap plywood, and make a pretty good pizza – bread peel.

    You can make this peel from a piece of 2’x2′ 1/4″ plywood from a home improvement store, and a 1″x2″ stick. You’ll need two 3/4″ wood screws, some 60 grit sandpaper, and white or wood glue.

    What do you think? Watch the show and let me know, have any suggestions? write them below. thx, eric.