Learn how to cook the perfect steak in this steak cooking video we made. Simple steak recipe that uses a frozen steak, so you don’t have to wait to defrost it. Neat. If you are looking for the answer to how to cook the perfect steak, watch this GardenFork video, you will be amazed at this easy steak recipe.
This steak recipe video was inspired by Melissa Clark of the NY Times and Nathan Myhrvold, author of the 5 volume Modernist Cuisine: The Art and Science of Cooking. They made a video on the NY Times site showing this method, and I wanted to share it with you all and put the GardenFork spin on how to cook steak.
For this steak cooking method, I suggest a propane torch from the hardware store, don’t buy one of those little butane torches at the cooking supply store, buy the real thing. Its also great for making Creme Brule, see our how to make Creme Brule video here.
We have also made a video about cooking steak sous vide, which is also a great way to cook steak and is part of the modernist cuisine movement. Our version of sous vide cooking uses a beer cooler, low tech but it works, much like a propane tech is low tech but it works.
I have a copy of the Modernist Cuisine At Home and really like it. If you want the full set, you can get that below as well.
Tell us your steak recipes, hacks and hints below, love to hear from you all, eric.
Build this homemade brick pizza oven in your backyard with recycled used clay bricks and a recycled metal mattress frame. And the pizza oven is portable! You can assemble this in 20 minutes, make homemade pizzas, then take it apart and store it. Most backyard pizza ovens are big and permanent, this homemade brick oven is great because its easy to break down again until your next pizza baking party.Here are the pizza oven plans shown in photos, our oven uses used clay brick and 24″ angle iron we cut from a old bed frame. You have to heat up the oven for an hour to get it up to temperature. The brick pizza oven has to be on sturdy sawhorses or cement blocks. We used cement tile board to insulate the plywood table from the heat of the brick oven. Stuart, author of the Bread Oven book, emailed us, cautioning that he felt the 2 layers of cement tile board was not enough insulation to keep the plywood from scorching, he suggests a base of cement, as shown on his blog here.
Clean the bricks that will be used for the floor of the oven, that’s where your pizza dough will be sitting. We didn’t have a thermometer, but I’m told the floor of the brick oven can reach 700F. We also found its good to keep some of the coals in the front part of the oven, so the heat is more even. We had to turn the pizza once during baking to have it cook evenly.
I have a few ideas for more modifications, which we will post later on. Keep children and animals away from this and all fires, this is for adults.
base of pizza ovenbuilding walls of pizza ovenpizza oven roof using angle ironBackyard Brick Pizza Oven
Our backyard pizza oven is based on one in the book Bread , Earth, & Fire by Stuart Silverstein. Stuart’s book has a bunch of plans and info on building backyard ovens, go buy it here. it is available as an ebook or paperback. Read Stuart’s blog here.
Sugar cookies are an easy christmas cookie recipe, even I can make these holiday cookies, maybe. Watch here and learn how to make sugar cookies for Christmas and the holidays.
Universal Sugar Cookie Recipe
This sugar cookie recipe is based on one Chris Kimball wrote about, saying its the universal recipe used by almost every baker.
1/2 cup white sugar
1 stick butter ( 1/2 cup ) slightly softened, but not mushy.
1 egg
1 1/2 cups flour
1/4 teaspoon baking soda
1/4 teaspoon coarse salt
dash of vanilla
optionals:
chopped walnut, espresso powder, cocoa powder, almonds, etc.
Preheat oven to 375F
Put the stick of butter and the sugar in your food processor. You can also use an electric mixer, but I don’t have one right now, so the food processor works well for me.
Turn the food processor on to medium speed to mix the sugar and butter together, then add the 1 egg and vanilla, mix it in. The mixture should be lumpy, not super smooth.
Mix together all the dry ingredients – flour, baking soda, salt, – and then add these to the food processor butter mixture.
Run the food processor until the mixture starts to form into a ball.
Turn our the dough onto a floured board and divide the dough into two equal pieces.
Roll each piece of dough into a log shape about 1 1/2 inches in diameter.
Wrap these dough logs in plastic wrap and put in the fridge for one hour.
Using knife or pastry blade, slice off 1/4″ thick circles from the dough logs, place on cookies sheets with parchment paper.
Bake at 375F for about 8 minutes. you want the edges to be starting to brown, but not dark.
Cool on a wire rack and eat as soon as possible. They taste great when warm.
What is your sugar cookie recipe, your favorite addition to sugar cookies? Let us know below
This eggnog recipe is for classic eggnog, which is a bit different than the eggnog one buys at the store. Eggnog, is traditionally a milk drink that has egg, spices, and a bit of alcohol in it. Commercial eggnog has thickeners in it.
The recipe for Eggnog is pretty simple, the variations come in what spices one puts in the recipe, and what kind of alcohol is added to the drink. I find most people put too much alcohol in the eggnog, most times I drink eggnog without any alcohol in it, but if there is liquor in the drink, i like just a bit to give it a warmth.
We made a sauerkraut how-to video today. Fermenting green or red cabbage into sauerkraut is an easy recipe to make, and the possibilities are endless. Fermentation and fermented foods are on the rise, with their probiotic organisms and all around healthy food reputation. Making sauerkraut should be on the to do list of all urban homesteaders, and i imagine most homesteaders already make sauerkraut.
Inspired by Daniel Gastieger, author of Yes You Can! And Freeze and Dry It, Too, we make a simple sauerkraut recipe that is the basis for all sorts of combinations. Daniel was on GardenFork Radio, you can hear his interview here.
If your idea of sauerkraut is that greyish stuff you see in the store, try making sauerkraut yourself. Take red or green cabbage, or a mix, add salt and go from there.
Basic Sauerkraut Recipe
this is based on Daniel’s Yes You Can! And Freeze and Dry It, Too book.
1 head of green or red cabbage
pickling or kosher salt
Glass, plastic, or ceramic fermentation container
Remove the outer leaves from your cabbage, just the dinged up ones.
Chop up your cabbage, you can do this by hand or use the food processor to coarsely grate the cabbage.
Put the cabbage into a clean large bowl. Add a teaspoon of salt for each pound of cabbage.
Use your hands to mix the salt into the cabbage, you want to crush and crinkle the cabbage.
Put the cabbage into a fermentation container, mash the cabbage down and put a clean plate or something similar on top of the cabbage to keep the cabbage down in the container.
Cover the top of the container with a plastic grocery bag and put the container in a dark cool area.
Check the sauerkraut after 24 hours, there should be enough brine to cover the top of the cabbage. If there is not, boil a quart of water, add to it 1.5 tablespoons of salt. let the salt water cool, the top off the sauerkraut so the cabbage is covered.
Ferment the sauerkraut for at least 5 days, you can go a month if you want to. any mold that forms should be skimmed off.
Baking a roast turkey or cooking a roast chicken is not hard. Our recipe for baking a turkey is a classic with an Eric spin on it. Mayonnaise.
GardenFork.TV Roast Turkey Recipe How-To
Buy the best turkey you can afford. The uber-organic ones are pretty pricey, I found a mid-range fresh turkey at the local chain store.
Remove the neck and giblets from the turkey, and rinse the turkey inside and out. Place on a platter in the fridge for a day. This dries out the bird, which I think is a good thing .
A few hours before roasting, turn the bird upside down in a roasting rack, and slide an ice pack under each breast. Keep the bird in the fridge until ready.
When ready to roast the turkey, preheat your oven to 425F.
Use a medium sized jar of grocery store mayonaise, 1/2 cup mustard, and a large handful of herbs all mixed together. The herbs can be thyme, parsley, rosemary, oregano, marjoram, etc.
Spread the mayonnaise-mustard-herb mixture over the skin of the bird, also coat the interior of the bird. If you like, you can also lift up the skin of the breast and slid the mix under the skin. A rubber spatula works well for this.
Put a thermometer in the thigh of the bird, and place it on a rack in the oven.
Roast at 425F for 30-45 minutes, until the skin is nicely browned, then turn down the oven temp to 325, roast for another 45-50 minutes. The USDA temp for cooked turkey is 165F. I usually pull the turkey out when it is 160F, as the temp will continue to rise.
When the bird is done, pull it out, cover it with foil and let it rest for 2o minutes, then carve. yum.
Tell us your secret to great baked turkey or chicken below:
You’ve signed a two-year lease on what? Have you taken full-moon-French-leave of your senses…again?
I can tell…She, Who Must Be Obeyed, is intrigued with the idea of my going into business for myself.
“Well…technically I’m extending my Melissa Bee Farms business into new areas, opening new markets, joining the green revolution,” I counter. “Besides, last year we both agreed I needed a bigger beeyard. I’m outgrowing the backyard. I’ve got plans! ambitions! projects! I need ROOM.”
“And MONEY, lots of money. Besides, WHAT bee business? You mean that expensive soup kitchen for bugs-in-a-box, that bee business? Businesses make money; you’ve got another expensive hobby, not a business.”
“Reminds me, I need to pick up another 20 pounds of sugar for syrup,” making a note in my iPad.
“Again? Already…?”
“er….want to see some pictures of the new project, she’s a beaut?”
And so it begins. Secretly, I know She, Who Must Be Obeyed, is right: I’m in over my head…way over my head. The tape in my head is looping: Oh, My God – What Have I Done? I feel a bit sick and a little panicky. It’s put-up or shut-up.
So, what should I do with this green house? (Yeah, I got some space for a beeyard in the bargain.) The owner’s still clearing it out, but it’s mine for two years. That’s two years of lease payments, two years of electricity payments, two years of water payments, two years of buying supplies and materials. I have to make this pay…and I don’t have a clue.
Sure, I’ve been through the Master Gardener classes and I can talk a good game. I grow a pretty good vegetable garden, but what do I know about Growing for Market? Running a green house? Hydroponics? Aquaponics? Marketing?
I need your help. I need reading resources, web sites, advice, suppliers, ideas. If you’ve got experience growing for market, chime in.
First order of business, making it weatherproof. First freeze is predicted for tonight.
Here’s how we use a bee escape to harvest honey. When you harvest honey from your beehive, you need to get the bees out of the honey super ( the box of frames that has honey it it, usually the topmost super ). You can do this several ways; commercial beekeepers remove the bees from the honey super with a blast of air, you can use a fume board, which you put on top of the honey super to drive the bees out of that super, or you can use a bee escape. Watch our video how to harvest honey using a fume board here
A bee escape is basically a one way door that you slide in between the honey super and the top brood super. You leave it there for a day or two, and when you take off the honey super, it will be empty of bees. Watch our video here on how to remove bees from a honey super using a bee escape
I have found that leaving the bee escape on the beehive for 2 days is better than overnight. You will always have some bees still in the honey super, but that is a lot easier than removing a lot of bees from the honey super. Some hives will start to draw comb if you leave it in too long.
It isn’t shown here, but in newer versions of this, I added a 5/8″ upper entrance hole to the escape to take the place of the entrance on the inner cover, which we have covered in tape.
Here is the double three way bee escape I made. I based it on several on the internet. The hardest part is cutting the angle cuts of each piece of wood. the cut are either 30 degrees or 60 degrees, depending on how you set up your saw. The gaps between the sides of the triangle are at least 3/8′ wide. I used regular window screen to cover this. The outer pieces of wood are 12.5″ long, the inner pieces are 7.75″ long.
Questions or comments? Let us know below, we’ll answer to the best of our ability. thx.
Watch our video on how to grow garlic, then go out and plant your garlic! There are a few keys things that we go over below.
Wondering how to grow garlic?
Its not rocket science, as even Eric can grow garlic. Its is easy to do, garlic does not have many diseases or pests, and its pretty low maintenance. Our how to plant garlic video steps you through the process.
Couple of key things to keep in mind:
For most northern climates, you plant garlic in the fall
Order seed garlic as early as you can, most garlic growers sell out.
I don’t mulch my garlic bed, you can if you want.
The garlic may start to grow in the fall, that’s ok.
You can buy seed garlic, which is basically the largest bulbs of a particular strain of garlic from Filaree Farm, you can also find them at your local farmers market. Buy the largest, healthiest bulbs the farmer has.
Garlic is broken down into a few varieties, Rocambole, Purple Strip, Porcelain, Artichoke, Silverskin, and a bunch more. We plant hardneck garlic here in New England, softneck Italian style garlic does not do well here.
Maybe one of your neighbors already grows garlic and you can get a few heads of garlic from them to plant. I’ve heard stories of families who have brought garlic over from Russia or Poland, and keep the variety going in the backyard. Getting garlic from the local farmers market means those particular bulbs will grow well in your area, maybe ask the farmer, I’m willing to bet they’ll talk all you want about growing garlic.
How To Grow Garlic, Start With Soil Prep:
First of all, you can grow garlic in regular garden soil, nothing special needs to be done. Plant in the fall, before frost, when the leaves are starting to drop off the trees, rather than the spring. Break apart the cloves a day early, if possible, and let them dry a bit. The flat end of the clove goes into the bottom of the hole. Space the garlic about 6″ apart in rows 12″ apart.
It is possible to plant garlic in the spring, but the yield will be much lower. I have never done it.
Mulching your garlic is a personal think. I don’t think its necessary, and i’m all about simple.
The garlic may sprout before winter, this is OK. Just leave it alone. The grow tip will wilt in the snow, and then the plant will start to grow again in the spring.
In late winter, this same growth and wilting from cold weather may happen again, its OK. The weather will warm and the garlic will kick in soon enough. Let the plants grow, however harvest the scapes in early summer, and then harvest the garlic plants when the stalks start to go brown at the base.
What have been your experiences with growing and cooking with garlic? Let us know below, be great to hear from people!
A Toad In A Hole recipe cooked outdoors, how cool is that? Watch the video and read on for the recipe and thoughts.
Here’s an Toad In A Hole recipe from the UK that we cook in our cast iron dutch oven outdoors. You can cook this in your kitchen, but its more fun to use this using fireplace cooking, outdoor cooking, or campfire cooking. Perfect for those urban homesteaders who want to take their cast iron outside, build a fire, and cook comfort food. We were introduced to this dish by our friends Barbara and Chris ( who are English ) and visited us at our CT house. Chris made this for us one day. Toad in a Hole is supposed to be for dinner, but I think its great for breakfast, especially after a night out imbiding.
I changed this up a bit from the standard by adding cheddar cheese, which seemed perfectly acceptable seeing that Cheddar Cheese is from England, and cheese tastes good with eggs already, so why not mix them into the recipe?
I make this recipe in a dutch oven, and its super fun to bake the Toad In A Hole outdoors. In the cooking video, we used charcoal to heat the cast iron dutch oven, but you can make this in a fireplace or in a campfire as well.
Buy a Dutch Oven here, and an chimney charcoal starter. This post may contain affiliate links which won’t change your price but I earn a commission from. Thx!
Toad In A Hole Recipe in a Outdoor Cast Iron Dutch Oven – GF Video
Recipe Type: Dinner
Cuisine: English
Author: Eric Rochow
Prep time:
Cook time:
Total time:
Serves: [url:1][img:1]
Making Toad In A Hole in a Dutch Oven outdoors is really fun. Go make this and let me know how it came out.
Ingredients
4 sausages sliced in two and then halved. I used sweet italian sausage from our local butcher, but most any sausage you like will work.
1 cup of flour – all purpose works fine, but use what you’ve got.
1 tablespoon coarse salt
Herbs of your choice, rosemary, chives, oregano, tarragon, whatever you have and like, chopped coarsely
1 cup milk
3 eggs – i’m a big fan of local eggs, so try to get some, help out your local farmers.
2 – 3 tablespoons of good mustard, brown, spicy, deli – whatever you like.
1 cup grated sharp cheddar cheese
Instructions
Fire: This recipe takes about a chimney starter full of charcoal. we used about 10 charcoal briquettes on the bottom of the cast iron to start the cooking. if you are cooking this in a fireplace or campfire, be careful not to get the dutch oven too hot.
Take the sausages that have been cut in half and then sliced open lengthways and put them in the dutch oven to brown.
While the sausaged are browning, take the other charcoal or wood coals and pile some on the lid of the dutch oven to preheat it.
Beat the 3 eggs together, then to it the flour and salt and milk and herbs.
When the sausages are browned on both sides, pour the egg batter mixture into the dutch oven and cover.
Place more coals on top of the dutch oven and bake for 30 minutes. If it smells like it is burning, open the cover and check. you may have to move the dutch oven to a cooler part of the fire, or remove some briquettes.
The dish is done when the batter is yellow with brown patches, you will know when its done. It will smell great.
Notes
Use a chimney starter to start the charcoal briquettes. You can also use chunk charcoal, but the square ones are easier.
Washing machine repair video to fix a broken water pump. My washer broke, and I made a video of how to replace the water pump on your wash machine. If the washer is not draining, the water pump is probably broken. Water pumps on washing machines are not hard to fix, watch here and i’ll show you how to fix your Kenmore, Maytag, Whirlpool Sears washing machine.
Front Loading Washing Machine Broke? It happens more often than you think. With several models, a coin can get stuck in the drain pump, and the coin wrecks the impeller. The impeller is the round thing that looks like a airplane propeller, it pushes the water through the machine.
Washing Machine Repair isn’t always hard
This repair is usually easy to do. Make sure of the following:
The washing machine is turned off and unplugged from the wall
The water lines are turned off and disconnected.
There is no wet laundry in the machine.
The washing machine pump, for most washers, is located in the lower part of the machine, and you access it from the bottom panel of the machine. You will tilt the machine on its back and work from the bottom of it. Take cell phone photos as you take the bottom access panel off, and put all the screws in a bowl or container. Keep a bucket handy, as there may be some water in the hoses and pump as you disconnect them.
Washing Machine Pump from a front loading washer.
Use a pliers to remove the hose clamps, you may also need a screwdriver, pay attention to how the clamps are situated on the hoses, and where each hose goes! You don’t want to cross the hoses, or the washing machine repair you’ve just done wont work.
There will be a power cord of some sort, this is usually a plug with a locking tang that plugs into the pump. Carefully bend back the tang with a screwdriver and pull off the plug. Pay attention to how the plug came out so you can put the plug back in the right way.
Let me know how your repair went in the comments below, always good to hear from you:
A new video in our Beekeeping 101 aka Beginning Beekeeping video series. We had a real hot summer, like everyone else, and honeybees can overheat just like we can. So when I went out to the beehives in the heat of the summer, I made a video about how a beekeeper can ventilate or keep a beehive cool in the summer heat. If you see lots of bees climbing around you hive, it may be that the hive is too warm. Watch this beginning beekeeping video to learn more
The Squash Vine Borer eating the squash, pumpkin, zucchini plants? Get rid of the squash borer with this method. If you have squash borer damage on your squash, pumpkins, zucchini plants, here’s how we treat our squash plants.
The moth of the squash vine borer lays it eggs next to the young squash plants, and the larvae then enter the plant by chewing a hole. If you see what looks like orange sawdust and a hole in your plant, you have borers. Not good, but if you are careful and use our borer removal method, you can still grow some great squash!
The moth that lays the vine borer eggs is a weird looking one, it looks like a cross between a moth and a ninja warrior. It has red and gray markings, here are some photos of the moth.
There are other squash vine borer treatments, methods, ways of prevention, we cover a few of them here:
Despite these squash vines looking dead, you can still get some good squash out of them, so go ahead and try. It also helps to reduce the population of squash moths. From what I’ve read, Butternut Squash are less susceptible to the borer, and summer squash like zucchini are more susceptible. I remember as a kid seeing our zucchini die every year and the presence of that orange sawdust stuff.
Learn how to build a Plywood Boat. You can make a great boat out of one sheet of plywood. Watch our video here and see how we build a boat.
There are links at the end of this post for more of our boat videos and DIY projects ↓. You can make this plywood boat out of one sheet of plywood. If you use one sheet, plus a piece of scrap plywood that is 12″ x 24″ you can build a longer boat. We used 3/8 plywood for this one, next time we will use thinner plywood and fiberglass. I’ve been reading up on making a plywood canoe.
We used outdoor latex paint to coat the boat, and paintable high quality caulk to seal the joints. We added strength to the boat by attaching the boat pieces with 1×2 wood lath. If you can find some square molding that would be even better. Waterproof wood glue holds it together with the screws. The glue and caulk need to dry overnight before painting. Attaching a keel to the boat – I used a 2×4 – is key to stability. It’s not the most elegant boat, and the keel helps when paddling, otherwise it is hard to control. Several people have asked about mounting a trolling motor on the back of this. I think you can, but I’d suggest building a more robust boat for a trolling motor. This is a simple plywood boat, not a bass boat.
Watch what happens to our first Fiberglass Plywood Boat here. You can listen to Deek of RelaxShacks.com and Eric talk about how to build a plywood boat and tiny houses on this episode of GardenFork Radio I got the idea for this boat plan after watching a video by Deek Dericksen on the Make Magazine site. Here is a boat some students in England made after seeing ours.
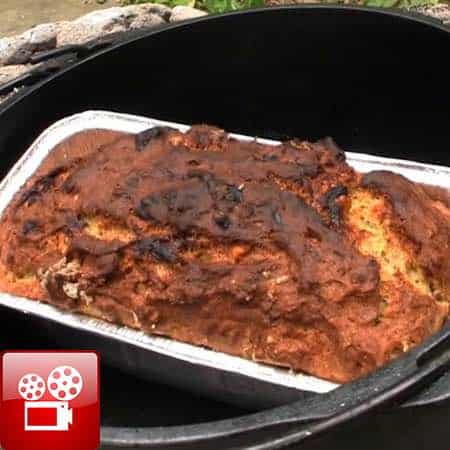
Dutch oven banana bread recipe baked in a campfire or using charcoal, nice right?. Either way it tastes like the instant comfort food that it is. Watch the video and then read the recipe below.
Head up: I now have 4 dutch ovens, and all are well seasoned at this point. You can see our how to season cast iron video here. But I’ve never used a dutch oven for what they were probably originally designed for, cooking over a campfire. So today we use the cast iron dutch oven for what it is for, cooking outdoors. Watch and learn how to bake with fire.
How to make the dutch oven banana bread recipe
Whether for campfire cooking or backyard cooking, the dutch oven comes thru as a great pot for baking. Today we are going to learn how to use the dutch oven you have to bake or cook food outdoors, using charcoal or firewood. There are a couple of tricks here we learned from Gary of Cooking-Outdoors.com, like how to stack coals on the lid of a dutch oven, and how to use a dutch oven to bake breads and cakes.
Update: Reading some of the great comments, I’ve learned that when fully fired up, each charcoal briquette puts out about 40-50F of heat. I will use this info as I experiment more with dutch oven cooking with charcoal and campfires. What fun.
If you don’t already have them here are links to buy a cast iron dutch oven, a charcoal chimney, and heat resistant oven mitts.
Some takeaways from this video and recipe, which was really fun to do.
Its not perfect. Is baking outdoors ever perfect
Use good pot holders and silicon oven gloves.
Charcoal is hot!
You will love baking outdoors.
[tasty-recipe id=”13323″]
Check out our Toad In The Hole Recipe, also made outdoors in a dutch oven.
I built some honey bee swarm traps, or bait hives, to try to capture any bee swarms that came out of the beehives in our beeyard. Swarm Traps, or Bait Hives are basically boxes you place around near your bees, offering them as convenient homes for new bee swarms. The bait hives – swarm traps I show you how to build here are made from old bee frames and boxes. When my neighbor called me to say there were bees flying around one of our Swarm Traps, I left work and drove over, excited to video our first swarm! And happy too that we had not lost swarm to the woods, instead we could start a new hive with it, or recombine it with the hive from where it left later in the fall. Here is the video we made for our Beekeeping 101 Beginning Beekeeping
I’ve been making the No Knead Bread recipe, by Jim Lahey, made famous by The New York Times and Mark Bittman for a while now. I have also been making the Artisan Bread in 5 Minutes a Day recipe, watch our original artisan bread recipe video here. In this video I show you an improved way to make the No Knead Bread and the Artisan Bread Recipes. Flipping the dough has always been a problem for me, and now I’m using parchment paper. You can watch our original video ‘How to bake bread with the No Knead Bread Recipe” here. Watch the video and let me know your suggestions and thoughts below, thanks!
Want to build a trellis for our vegetable garden that uses recycled wood and twine? I made this video to show you how. We grow peas, beans, & cucumbers on this simple trellis. (Want to learn how to grow peas? It’s easy: Watch how to here.)
Enjoy the video I made for you below, and then read through the steps to build your trellis.
If you have raised beds, you can build a trellis by attaching the vertical posts to the sides of the bed. I put the posts just inside the bed and drill into them from the outside wall. Two screws in each post will hold it. Make sure the screws do not jut out past the wood, the point could hurt someone digging in the raised bed.
If you are not using raised beds, I’ve found it helpful to cut a point at the bottom of your vertical posts, then hammer them into the ground where you want the trellis.
If you are building a trellis for a in-ground use, attach a cross bar about 18″ above the bottom of the vertical posts and drive the trellis into the ground. You may want to attach some wood triangles where the posts meet the top crossbar to make it sturdier and keep it from swaying side to side.
For a trellis on a raised bed vegetable garden, I don’t use a bottom cross piece. I staple the bottom loops of the twine right to the wooden sides of the bed. I do screw the top cross piece into the two upright supports. I then cable staple the twine up and down. Pretty easy.
If you want, you can just loop the twine across the top cross support. I’m all about making it simple.
I don’t think you need to use pressure treated wood for to build a trellis. I use regular pine or recycled wood from other projects, and they have weathered just fine. If you have some fallen trees nearby, the limbs work great for this, just cut them to size.
I like vertical gardening like this, it saves tons of garden space. I make sure that my trellises do not shade too much of the rest of the vegetable garden, because sun is already limited in my yard.
Why do I use twine for the trellis? In the fall, I can easily cut down the string with the plants, chop it up a bit, and toss it into the compost pile. The string will break down. For peas I run the string up and down, for a cucumber trellis, I will also run the twine across the posts, as they need more support. My favorite tool for attaching the twine to the wood supports is a cable staple gun.
I am all about keeping it simple and use what you got, but if you want to go fancy, see what my friend Erin has done with a super fancy trellis.
This is only the beginning of how you can DIY make a trellis. Let me know how you build a trellis in the comments below. Thx!


 More Pizza Oven Plan Photos Here


 Tell us your secret to great baked turkey or chicken below:


 I built some honey bee swarm traps, or bait hives, to try to capture any bee swarms that came out of the beehives in our beeyard. Swarm Traps, or Bait Hives are basically boxes you place around near your bees, offering them as convenient homes for new bee swarms. The bait hives – swarm traps I show you how to build here are made from old bee frames and boxes. When my neighbor called me to say there were bees flying around one of our Swarm Traps, I left work and drove over, excited to video our first swarm! And happy too that we had not lost swarm to the woods, instead we could start a new hive with it, or recombine it with the hive from where it left later in the fall. Here is the video we made for our Beekeeping 101 Beginning Beekeeping


