Do you drill into the brick or mortar when you are going to hang a picture, TV, or shelves on a brick wall? I get this question all the time when people watch our first how to hang shelves on a brick wall video.
There are all sorts of experts on the web, with varying degrees of expertise, who will weigh in on this topic. I work 80% of the time in 120 year old brownstone row houses, where there are many brick walls. I have hung many TVs, heavy mirrors, large pictures, etc. on brick walls. So I have an opinion about what is best that is based on experience.
Do You Drill Into Brick or the Mortar?
I’ve seen lots of crumbling mortar in the old buildings I work in, and some bad brick, but I always drill into the brick. If you are drilling into cinder block or cement block, I drill into that and not the cement pointing around the block.
In my mind, bricks are stronger than the mortar around them. They can hold an anchor and a screw or bolt well. I suggest using plastic anchors for lightweight objects, and lead anchors for medium weight items. For heavy things like TVs, you should use sleeved anchors. Be aware that once you put a sleeved anchor into brick or block, it probably won’t come back out, its permanent. Something to consider if the house is a rental.
When drilling into cinder block, aka cement block, most blocks have hollow spaces in them, so you may be pressing on the drill and then you will hit the hollow space, and the drill will slam into the cement face. If the cinder block is an outside wall, the hollow spaces may be filled with cement and rebar (reinforcing rod) if you hit rebar with the drill bit, its not good. The drill bit will be damaged and you can’t drill through rebar with a masonry bit.
Here’s a video on how we harvest honey using an uncapping roller. This extracting tool has saved us a lot of time, say goodbye to capping knives.
Using an uncapping knife gouges the honeycomb
Previous to my friend Rick telling me about this cool too, we would use a capping knife to cut open all the honeycomb to harvest honey. This results in a lot of wax and damaged honeycomb frames. I never liked this part of the honey extraction process, always gouging out chunks of honeycomb.
But the uncapping roller is great –buy it here . You have to take care not to press it too hard into the comb, or you will damage it, but you get the hang of it pretty quickly. Roll it several times back and forth and up and down. You may have to pull a few frames out of the extractor and re-roll them.
I have found that not all the honey comes out of the comb, but its not an issue for me. I put the honey supers back on the hive, above the inner cover, and let the bees clean up the frames. Its all good. I have found it helpful to have a hair dryer, aka blow dryer blowing hot air into the extractor. It seems to help the honey sling out of the comb.
Combining this new roller with the DIY bee escape board we made – video here – , honey extraction has become a much easier process. I have found its best to put the escape board on the hive a 2 days before you plan on removing the honey super.
The capping roller doesn’t ruin much of the comb.
The uncapping roller cleans up easily. I use a spatula to remove as much of the wax cappings as possible from the tool and then I run it under water for a minute.
Simplest recipe I’ve found for how to cook grilled steak is to cook steak directly on charcoal. Watch our how to video and get the recipe below.
How to cook grilled steak directly on charcoal
Key here is the steak you choose. I like the strip steak. Here they call them NY strip steaks, and the work best with the bone-in. I happen to get these on sale, which was a bonus. You will probably have to ask the butcher to cut you thick steaks. I rarely see thick steaks pre-packaged. These are 1 1/2″ thick. I think thin steaks will not work well with this. You can cook thicker steaks too. The NY Times suggests charring on both sides and then cooking them on a grill if you prefer.
Ideally, you will coat the steaks in the dry rub and leave it on overnight or as long as you can. I did these the same day and they were fine, but planning ahead helps. As you know, I am not great at planning…
Chunk Charcoal, aka hardwood charcoal is the only way to cook grilled steak, you don’t want to use charcoal briquettes. Not sure what briquettes have in them, but chunk charcoal is just wood. You will want two chimneys of wood charcoal. Be careful with the chimneys, I almost melted one of them, the charcoal got so hot.
I found a baking pan worked much better than putting the coals in the bottom of a grill. Made it much easier to work the rig and check the temperature of the steak. When laying the steaks on the coals, plan ahead so you can flip the steak over onto fresh coals. This isn’t a must do thing, but I found it helpful. I was able to cook two strip steaks at a time in a 9×13 pan.
How do you cook grilled steak? Let me know in the comments below.
Grilled Steak Dry Rub
Author: Eric Rochow
Prep time:
Cook time:
Total time:
This dry rub recipe to cook grilled steak is based on an article from the NY Times by Matt and Ted Lee and Tim Byres of Smoke Restaurant in Dallas Texas.
Ingredients
2 TBSP of Pimenton Picante, a spanish smoked paprika
2 TBSP Ground Cumin
2 TBSP kosher salt
1/4 cup brown sugar
1/4 cup ground coffee – i used a medium roast set for drip coffee grind, use what you got
Instructions
Mix all the ingredients together in a bowl, break up the brown sugar with a fork or your hands.
Put the steak on a flat dish and dust the both sides of the steak with the dry rub, patting it onto the steak with a spoon or flat metal spatula, use what you got.
Turn the steak onto its sides and roll it to get the dry rub onto the edges of the steak.
Cover with plastic wrap and put in the fridge overnight.
Let the steak warm up before putting on grill.
Its ok if you don’t do the overnight rub, you can put it on shortly before you grill the steaks also.
After using the Flex system all summer, here is our Troy Bilt Flex review video. We used the lawnmower and pressure washer attachments with the Flex power base around the house, here’s our take on it.
Note: This is a Sponsored Post sponsored. Troy Bilt sent me the Flex and compensated me for my time, but all opinions are my own
The GardenFork Troy Bilt Flex Review
I like the Troy Bilt Flex concept of one engine that connects to multiple pieces of outdoor power equipment. Its much easier to maintain one engine than 4 or 5 of them every year.
The power base has a 208cc engine with ample power to run everything that attaches to it. I like that the engine has an oil dipstick and an easy oil drain plug, plus a solid gas cap. The wheels are air filled knobby tires and the power base is self propelled. The handles fold back onto the unit for space saving storage, a nice feature.
The lawn mower has a 28″ wide deck, which is 8″ wider than most walk behind mowers. The front wheels are solid and can be set to free wheel or lock straight for when you are mowing on inclines. Two blades under the deck work nicely. I used the deck in mulching mode, but you can set it for side discharge or you can order a grass collection bag for it.
The pressure washer is quite nice, it will do everything I will ever need a pressure washer to do. It has 5 quick connect nozzles and can generate 3,000 psi of power. You can attach a hose to the pump for cleaning solution injection. I really like that it has a 40′ hose on it. I need to wash the clapboard on our 2 story house, and I don’t have to buy an additional length of hose to reach the 2nd story. This will come in handy if you are washing down large equipment.
The Troy Bilt Flex also has a snowblower and leaf blower attachments that we did not test. I don’t blow our leaves, and it being summer, well, no snow.
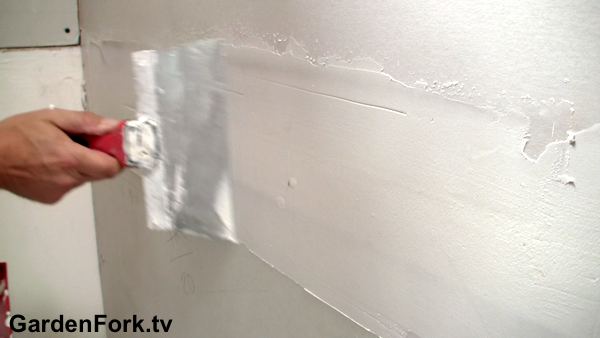
To mud and tape drywall aka sheetrock, you have to practice, but if I can do it, you can do it. I don’t do it perfectly, but I made a video here of how I mud and tape drywall while working on our renovation projects. I also have a video about how to mud and tape drywall corners.
It’s one of those things where having the right tools and the right materials pays off. Your first attempts at mudding and taping will not go perfectly, but keep doing it. You will attain that ‘Ah Ha’ moment.
Tip: Listen to our podcast, GardenFork Radio, while taping drywall.
I like to use lightweight compound, and use a 5 gallon paint mixer paddle to whip it up into a whipped cream – cupcake frosting consistency. Some add water or plaster, I do not. BTW, adding plaster is called a ‘hot mix’ and can cause the compound to crack. The hot mix is used when you want the compound to dry quickly. I let the stuff dry overnight. Position the tray just below the area you are applying the compound to.
When you mud and tape drywall, slow and steady wins the race, OK? Its a lot easier to do it better the first time than to make a mess that will take a long time to fix later. And several thin layers is better than one thick layer. When mudding bevel joints, its ok to use more than a thin layer for the first pass, as you want to fill in the bevel and get the mud into the mesh tape.
Tools I use to mud and tape drywall
Ideally, all these tools are stainless steel, I have a carbon steel blade ( you can see it in the video ) and it rusts despite everything I do to protect it.
You can also experiment with what is called ‘setting mix’ compound. This is a dry powder you mix with water, it comes in several drying times. Its more work, but it dries faster, and can fill in deep cracks better. The tub type compound will shrink and crack in large voids.
Its important that the drywall screws are screwed below the surface of the wall, as you see in the video, some of the screws are not, and the blade hits them. Also key is clean compound. You can see in the photo above the streaks you get if you get some junk in your mix.
Learn here how to plant a window flower box, like the one we built in a previous DIY video. Watch as we show a few tips for window box plantings. The first tip: simple is good. Here we go!
A few things to keep in mind in planning how to plant a window flower box
Choose heat tolerant plants, especially if these window boxes are on the sunny side of the house.
Use a good quality potting soil with a time release fertilizer.
Water window boxes regularly, they will dry out faster than you think.
For this window box, we used some shade plants as this side of our house is shady most of the day. The few hours of sunlight are ok on these guys. Plus its on ground level, so its easy to water – a big plus not having to haul water upstairs.
The more window boxes you have, the simpler the design should be. Window boxes are great but they are, as Tim Gunn would say, “a lot of look.” If there are too many colors or textures going on, your house is going to look like the little shop of horrors. Keep your plant choices to one, maybe two or three at an absolute maximum (and then only if they relate closely to each other, such as a light pink and a dark pink petunia) and then plant every box the same. I know it’s hard to pick just a few plants when there are so many great ones around, but pick one or two this year then do something totally different next year. Just don’t do it all at the same time.
Erin also suggests moving away from sweet potato vines, which do appear in our flower box video.
Better than most anything I’ve said yet. But then Erin is more of the designer kind of person than I am. I make stuff. Like flower boxes:
A beehive knocked over by wind or a bear or storms is not fun. Here’s how to prevent your beehives from being knocked over.
I recently got a call from my friend Bill, saying that one of our beehives was knocked over. Normally, a beekeeper would stress about this, I didn’t, watch the video to see why.
When a beehive falls over, its usually a very bad thing. The supers are open, and the bees are very agitated, and if its cold or raining, the bees may die. Check out what happened to my friend Erik of Root Simple when his hive fell over.
Strapping your hives with ratchet straps, the good kind used by truckers, will reduce the chaos when a beehive is knocked over.
We first started strapping our beehives as part of our bear proof the bee yard project. If the hives are strapped, the hives stand a better chance of surviving a bear in the beeyard. One can say that a ratchet strap won’t keep a bear from tearing open a beehive, but I’ve read where the strapping has helped save hives. Watch our bear proof a bee yard video here.
But an additional benefit of having to strap the hives because of the bears is the ability of the hive to withstand a fall.
Stake for Straps
Yes, removing a ratchet strap every time you want to do a hive inspection is a pain, but it may save your hive one day. Its important to buy good quality ratchet straps, and spray them with WD40 or similar lubricant every few months.
In winter, we double strap our hives – see this winterizing beehives post – one strap is around the hive, another straps the hive to the ground. We have found these spiral spikes that are sold for dog runs work well. Wooden stakes can get loose with frost heave.
High winds knocked over this hive, but the strap kept it pretty much intact.
Even our hives on city rooftops are strapped, one less thing to have to worry about.
A Hive Inspection is just that, you are checking out the beehive to see how its doing. Part of our Beekeeping 101 Video series, today we are doing a hive inspection of a nuc we installed this spring. This bee nuc had a late start, as did all our bees, because spring came late.
Note in the beekeeping video we did not smoke the honeybees. I don’t smoke bees unless I know I am giong to take apart the hive or pull honey off. When you smoke the hive, it can cause stress in the hive, and the bees start to eat their food stores, so it sets them back a few days whenever you do it.
If you are going to just do a quick eyeball check, I see no need for the smoker. For this hive inspection, I wanted to confirm the presence of the queen and make sure the hive looked robust and smelled good. You can tell a lot from just how the bees are behaving.
Some of this is gut feeling, but listen to your bees while doing the hive inspection. If there is a low incessant buzz, the beehive may be queenless, which is a bad thing.
How do you know if the hive is queenless? The big red flag is no uncapped brood. In other words, no open cells with very small eggs or larvae in the bottom of the cell. You might also see a lot of drone egg cells, which means you have a drone laying worker. Which is bad. This means one or more of the female workers has started to lay eggs. The eggs will be sterile, so they become drones, hence the presence of large drone cells.
Pull out a frame from the center of the top brood super. If you see open brood, that’s a great thing. The queen has been present in the past few days, and she is probably still around. You want your frame pattern to look roughly like the photo above. It wont be perfect, but something like this. Not every cell in the brood area will be capped, there will be some empty ones.
I think its best to learn how to raise bees by having two hives. You can compare the two, and get an idea of what is ‘normal’. There are several good books on beekeeping we recommend here.
Here’s how we harvest potatoes. It isn’t rocket science, its just dirt. Watch our how to video first.
Like I said, its not rocket science to harvest potatoes. The most important thing is to not pierce the potatoes when harvesting them. If you use a shovel or gardenfork, you may pierce them. No big deal, just cook those pierced potatoes for dinner tonight.
I think the best tool to harvest potatoes is your hands. Gloves help. Most of us don’t have massive rows of potatoes, so hands work pretty good. Besides, we have them nearby. Just add gloves.
Storing potatoes is harder than harvesting potatoes. For best storage, the potatoes need to be mature. Dig up a potato and see if the skin rubs off easily. If it does, the potato is not mature. You could still harvest potatoes at this point, but they would be for cooking in the near term.
To store them long term, you need to ‘cure’ them. Two weeks of dark storage at high humidity, about 80-90%, and then 40-45F at high humidity. A cool basement may be a good place for storage, check the humidity level first. Cook up any damaged potatoes, they can ruin a crop if left in storage. Learn more about potato curing here.
What are your thoughts? Suggestions? Let us know below:
The best grilled cheese recipe I’ve ever made. Inspired by a BuzzFeed video, I had to make our version of this grilled cheese. It tastes wow.
Childhood memory of slices of process american cheese, unwrapped from the plastic, laid on top of white bread, and put in the toaster oven. I’m thinking processed slices of cheese like that were made for grilled cheese. I did not move on to grilled cheese recipes that used two pieces of bread for awhile. Then in college I discovered you could add ingredients into the grilled cheese. First came tomatoes.
That sandwich was in the dorm cafeteria at college. Friday was chili and grilled cheese. Its still a great Friday sandwich now.
Some thoughts on this Grilled Cheese Recipe
I made this and it was instantly my favorite sandwich recipe. You can’t eat this everyday, but you can make it in about 10 minutes. Plus it smells great in the kitchen while making it. And the dogs become very attentive during the whole process, not leaving the kitchen.
I found that square bread did better, as did thicker bread. Probably the best bread would be a thick potato bread, but I couldn’t find any, so we went with a sturdy white bread and cut it into a square.
For cheese I used a grocery store sharp cheddar. You can argue all day about the best cheese to use in a grilled cheese sandwich, but to keep it simple, we used cheddar. I have seen recipes where they grate the cheese over the bread, I used slices. Works for me.
The bread was not buttered or oiled. The bacon takes care of that plenty well. What was surprising was the bacon grilled cheese was not very greasy. You do not have to completely cover the bread with the bacon wrapping. You do have to hold the sandwich on its side to cook the side bacon. Important.
Hilling Potatoes is the middle step when you grow and harvest potatoes. Not sure what hilling potatoes is? Watch our how to video and read on.
Hilling Potatoes, what is it?
Potatoes, the crop, grow along the stem of the potato plant. When you plant your potatoes – video here – you plant them 6″ deep in the soil. To get a better crop, once the plants grow above the soil line, and are about 12″ high, you add about 6″ of soil along the potato plant stem. ( you can add more soil, if you want, its subjective) This adding of soil along the plant stem is called hilling.
We use raised beds, so hilling potatoes is easy, we remove some of the soil in the potato bed, then dig down 6″ to plant the seed potatoes. When its time for potato hilling, we add some sort of fence alongside the raised bed, and add soil, burying the stems of the potato plants.
You can use different materials to hill. Straw, compost, leaves, soil, or a mix of all this. With straw you may get mice burrowing into it, so keep an eye on that.
If you have a long planting season, you may be able to hill the potatoes twice, and get a larger crop. We aren’t able to do this, being in New England. We’ve also found that hilling potatoes much past 6-8″ doesn’t yield many more potatoes. Your results may be different, that just the way gardening is.
Learn to grow potatoes in this video, and in the following videos we show how to hill potatoes and how to harvest them. Growing potatoes is not hard, but there are a few terms you need to be familiar with. We’ll go through them below.
How to grow potatoes – step by step
Potatoes are best grown from what are called seed potatoes. At first, I didn’t know what that was, then I realized seed potatoes are just like regular potatoes, but they have gone to seed, in a way. They usually have little sprouts coming out of them, kinda like flowers or vegetables that have gone to seed. Hence the term seed potato. One big difference that you may want to look for is what’s called certified seed potatoes. This means they have gone through some sort of inspection process to be certified free of disease.
Seed potatoes can also be some potatoes you find in the back of your vegetable drawer that have started to sprout. Yes, you can grow these. They may not grow out to be amazing, but they will probably work. Many people find potatoes growing in their compost pile, because they tossed some old potatoes in there. And then you know what’s going to happen.
Some people will cut a seed potato into two or more pieces. I do. You want at least two ‘eyes’ or sprouts on each piece you carve. You can either plant these directly or allow the cuts to dry overnight.
Potatoes are usually grown in a trench, or if you are using a raised bed like we do, you would remove some of the soil in the bed. This is to prepare for hilling the potatoes. Plant the potatoes 6″ below the soil level in the trench, with most of the potato eyes pointed up.
Cover the seed potatoes and water them in. They will take a week or so to pop up out of the soil.
This is the first of our how to grow and harvest potatoes video series. Watch the next video here:
Here’s my Troy Bilt Flex review after using the Flex Power Base and the Wide Area Mower and Pressure Washer around the GardenFork Testing Grounds. The testing grounds, otherwise known as my yard, are typical of what your average homeowner has: grass, trees, some weeds, dogs.
Full Disclosure: Troy Bilt has compensated me for my time and provided me with their products. Opinions are mine own, and I don’t work with companies that aren’t a good fit for me or the GardenFork audience. More info here.
I’ve known the Troy-Bilt brand for many years. Their rear tine rototillers are the best, I think, and make life easy, especially if you’ve ever wrestled with a front tine tiller.
So when I was asked if I’d like to try out Troy Bilt’s new Flex system, I signed on. The delivery truck brought 3 boxes of Flex components, and I got 4 free wood pallets from the truck driver. Neat.
Attachments snap on to Flex Power Base
The Troy-Bilt Flex Review
Here’s the way I describe the Flex system: Its all based on a power unit that a bunch of different tools snap onto. The Flex base is like the rear half of a walk behind self propelled snowblower with a PTO out the front that snaps into several different attachments. I like the idea of having one power source and a bunch of outdoor equipment attachments. So I only have to maintain one engine, not an engine for every outdoor power tool in the garage. Plus, you save on garage storage space – the attachments have a smaller footprint – making it all easier to store.
Power Base on left, Mower deck on right
If you’ve ever been on a working farm, all the tractors have a PTO (power take off) shaft on the back and sometimes front to run different machines, this is the same concept for the Flex line.
Right now Troy-Bilt has mower, snow thrower, pressure washer, and leaf blower attachments for the power base, I’m told a log splitter and a few other attachments are in the works. I’d really like that log splitter, it would make fast work of the pines I’ve been dropping for next winter’s sap season.
I chose the Wide Area Mower and the Pressure Washer attachments to test out. The back of my clapboard house has mold growing on it, so this was perfect. We’ll be making a video showing the power washing and mowing this summer.
First I snapped on the mower deck.
What I like about the Troy-Bilt Flex Wide Area Mower:
It feels solid. This is kinda intangible, I know, but you know how some mowers just feel cheap? This doesn’t, it has good feel and nice power.
The power wheels are better, they are pnuematic, meaning they have air in them instead of solid plastic wheels of many self-propelled walk behinds. The rig powers nicely through the lawn. The drive system is robust, unlike many self-propelled mowers that have a small belt that powers the wheels.
The mower deck is 28″ wide, so I’m already saving time from my 20″ wide walk behind mower. Rough math tells me that every 3 passes with the Flex is 4 passes with my smaller mower.
The front wheels spin free, so you can make surprisingly tight turns for such a large mower deck. You can also lock the wheels for when you are mowing on hills for better control.
Front wheels free spin or lock straight
The Flex powers through the yard at a nice clip with enough power to go up a moderate hill. The lever that controls the speed of the wheels takes a few minutes to master, the low end of the range is short, so when you grab the lever, it starts moving faster than you expect at first. You should wear ear protection, the Flex mower isn’t super loud, but it all adds up.
I then worked with the Pressure Washer attachment. Here’s where the advantages of the Flex system become clear. I don’t have to own a pressure washer that has its own engine, this pressure washer just snaps onto the Flex base. One less engine to maintain.
The pressure washer comes with 5 spray nozzles and 40′ of hose, plenty to get up to the 2nd floor of your house and wash the siding. It pumps 3,000 psi, which is more than enough for what you all are doing around the house. I used a friend’s power washer a while back and it was made mostly of plastic, this isn’t. Plus I like the hose rack, its large enough to store all of the hose, unlike some other washers I’ve used where the hose storage never works.
I know GardenFork is all about ‘done is better than perfect’, but sometimes the details matter, and the photo below makes that clear to me. When I put gas in the Flex tank, I saw the cap was chained, and the chain was metal, not plastic. It’s not something many would notice, but that tells me the people who designed this designed it to last.
I’ll be doing a Troy Bilt Flex Review video this summer, where we power wash one of the plywood boats, wash the back of the house, and power through my lawn in 2/3 the time it takes with the smaller mower I own.
UPDATE: here’s the video review of the FLEX:
To read more about the Troy Bilt Flex and other outdoor power equipment, here is their website, plus:
Kim of Sand and Sisal reviewed the Troy Bilt 4 cycle trimmer that has a ton of attachments. I got to use this gear when we went to meet Troy Bilt, and its a nice set of tools.
Build these DIY Storage Racks to store long stuff in your basement or garage using recycled lumber. These storage racks are good for long things, like lumber, kayaks, poles, canoes, etc.
I had some 2″x3″ lumber left over from a project, and I didn’t want to throw it away, so this recycled lumber became these cool DIY storage racks to hold lumber. What’s nice about this is you don’t need long pieces of lumber to make this happen, each piece of the brackets aren’t that long. You can adjust this design to the lengths of lumber you have.
I used 2 1/1″ coarse drywall screws to put this together and to secure it to the wall. I have a few favorite tools, and one of them is the Flip Bit, which is a screw bit and a drill bit in one piece that makes drilling pilot holes and screwing stuff together go real fast. I used 3 screws in each bracket to attach it to the wall. This DIY storage rack will hold quite a bit of weight, if you plan on something very heavy, switch out the drywall screws for wood screws, which have more lateral strength.
I use a laser stud finder to locate the studs in the drywall. If you are going to set these brackets into brick or cement, use a hammer drill and masonry bits. The cheaper stud finders don’t work, I think. You get what you pay for when buying these. The good ones last and will save you time in future DIY projects.
As a bonus, I had some metal shelf brackets laying around, and I screwed them to the bottom of the rig and hung my ladders. So I was pleased at what a space saver these DIY brackets are, one step further in my declutter project! Its great to get stuff up off the floor. Makes it much easier to clean and move around.
Here’s a carrot salad recipe that’s better than the usual one. No raisins, this one adds toasted sunflower or pumpkin seeds, which works great for me, and I wanted to share it with you.
Many carrot recipes fail for me, they are too sweet and don’t have the best ingredients in them. This one climbs the ladder, and it should, considering the recipe came from a french bakery cookbook.
A friend of mine works at the Rose Bakery in NYC, and I tried their carrot salad, and then bought their well done cookbook, Breakfast, Lunch, Tea. This a variation on their carrot salad recipe. They suggest olive oil or sunflower oil for the dressing, I opted for canola. I think olive oil would not work with this, but now that I am writing this, I am wondering if I should try it with olive oil.
Time to grate some more carrots.
And on grating carrots – use the food processor, not a box grater. The box grater I have only has large holes for grating, and I don’t like how the carrots look after going through the large holes of the grater. I use the smallest holes of the discs that came with my food processor, and whipped through a bunch of carrots in record time. In the video you can see just how fast and how nice the grated carrot looks.
When adding the dressing to the carrots, you might want to drain off some of the dressing if it collects in the bottom of the bowl. I found I had too much dressing for the amount of carrots I grated. But this is all eye of the beholder stuff, if you like a lot of dressing, leave it in. I used sunflower seeds in this version, but pumpkin seeds will work also. The small pumpkin seeds, pepitas, are good. The large ones won’t work, I think.
Carrot Salad Recipe with Sunflower Seeds
Prep time:
Total time:
A nice summer picnic or BBQ side dish, this is adapted from the Rose Bakery cook book.
Ingredients
8 carrots finely grated in food processor
1 cup pumpkin or sunflower seeds toasted
1/2 cup chopped chives or scallion greens
1/2 cup lemon juice – its ok to use bottled juice
3 tablespoons canola oil
1 tablespoon super fine sugar
salt & pepper for dressing
Instructions
Grate the carrots, and toast the seeds, combine carrots and seeds in a bowl with the chives.
Whisk the lemon juice with the sugar and some salt and pepper. Its best if the lemon juice is warm, so the sugar dissolves well. Mix in the oil to complete the dressing.
Pour the dressing over the salad and toss. If too much dressing collects in the bottom, you might want to pour off some of the dressing, saving it for some other food project.
Taste and add salt and pepper to suite your taste. Be careful with the salt, you can’t undo too much salt.
There are edible wild plants in your backyard that you can forage for and make a great salad from. No need to go to the farmers market, you’ve probably got edible greens in your yard you can eat. Identifying and harvesting edible plants is called foraging, but I call it free food in your yard.
Below are some photos for plant identification, but be sure you know what these plants are. These are fairly unique plants, but be sure, OK? And make sure the area you are foraging has not been sprayed with fertilizers, herbicides, etc. You don’t want that stuff getting into your food. You can buy Leda’s Foraging Book here.
Some Wild Edible Plants:
Dandelion
When harvesting dandelion, you can choose to leave the plant in the ground and growing if you want. Just harvest the outer leaves and the plant will continue to grow. The leaves get stronger tasting when the dandelion flowers, but I think you’ll find the taste pleasing.
Plantain
Plantain grows close to the ground usually. Once it sprouts its flower stem, you probably don’t want to forage for it, as the older leaves are not as great to eat. They can be stringy.
Chickweed
Chickweed grows in nice big bunches, and if you cut off just the top 3-4″ of the plant, it will keep growing. It self seeds if you let some of the plants flower and go to seed. Then you’ll have more free food!
Garlic Mustard
Garlic Mustard is a non-native invasive plant. I see it along roads a lot. Harvest it by pulling up the whole plant with the roots. This plant will crowd out native plants, and most states want to get rid of it. The leaves taste like mustard greens, though not as strong. It has some good vitamins, so eat up.
Violets
Violets grow like weeds. There are some cultivated varieties, but the ones in our yard are wild edible plants, and easy to identify. They are low growing and have white – purple flowers. Harvest the flower and stem for your salads. They look great on a dinner table.
Moms shows us how to make banana bread with a recipe she has used for years. If you want moist banana bread, I suggest using riper bananas and more of them. You will have to bake the banana bread a little longer.
Banana bread is one of those comfort foods from childhood that still work. Having a bad day? Have some banana bread. I really like this loaf toasted with some butter on it, served with tea. Nice.
I don’t recall the name of the cookbook this banana bread recipe comes from, but it was one of those recipe collections put together by a group of people and self published. There are many variations on banana bread, we have one made with coconut here, and a dutch oven banana bread here. But this is mom’s standard and its the one we will learn how to make banana bread with. So here we go.
I have found that dark metal or glass loaf pans work better for this, I like the browning of the crust. And if you want a taller loaf use slightly narrower pans than the standard loaf pan. The baking time will vary depending on your oven, they are all different.
I’m all about saving bananas in the freezer. Have some your family wont eat? Put them in the freezer to save for this. They thaw quickly and fall apart in the batter. Nice that you don’t have to jump through all sorts of hoops to prepare them for freezing. Just throw them in. Done.
Banana Bread – Mom’s Recipe
Recipe Type: Baking
Author: Community Baking Book
Prep time:
Cook time:
Total time:
Serves: 1 loaf
Here is how to make banana bread, this basic recipe will make a nice loaf, if you want a moist banana bread, add more bananas and bake longer.
Ingredients
1 cup sugar
1/2 cup butter
3 ripe bananas
2 eggs
2 cups all purpose flour
1 teaspoon baking soda
1/2 teaspoon salt
Instructions
Mix together the sugar and softened butter with a hand mixer
Add in the bananas and eggs, mix them in.
Mix the dry ingredients together in a bowl with a fork.
Add the dry ingredients into the wet batter and stir to combine, but don’t overmix.
Pour into a greased loaf pan and bake for 1 hour at 350F
When you buy too many of those cherry tomatoes at the big store, make this roasted cherry tomatoes and polenta recipe. This recipe takes tired, older cherry tomatoes and concentrates their flavor, drop them on top of a quick pot of polenta, and you have dinner, or part of a big dinner.
I had bought a large package of cherry tomatoes at the warehouse style food store, the place where you eyes get big and you want to buy lots of stuff because you think its all a good deal, except that you have to cook it all. I have found that buying dried fruits and nuts at the warehouse store is a good deal. I keep them in zipper storage bags and put the nuts in the fridge, they last longer that way.
The tomatoes sat on the counter for a week – don’t keep them in the fridge – and started to get soft and a bit wrinkled. I cut them in half, put them in an oiled pan, and sprinkled the magic ingredients over them, olive oil and salt. In the oven for 20-30 min, and out come something completely different that what went in there.
The polenta is based on our quick stovetop polenta recipe, using the secret ingredient to cook the polenta faster. Add in some butter, and its a brilliant dish.
You can top the cherry tomatoes with dried oregano or a mix of italian seasonings, it makes them that much better with little effort. I like to buy the larger container of italian seasoning, it goes on top of lots of foods in our house. Don’t use the best olive oil you have for this, as it is heated, so any subtle flavors are out the window. Use fine salt, not the course kind, as some salt might remain, and not everyone likes to bite down on chunks of salt, ok?
Roasted Cherry Tomatoes and Polenta Recipe Video
Author: Eric Rochow
Prep time:
Cook time:
Total time:
Smart use of cherry tomatoes that are getting a bit old on the countertop. This transforms them into a new delicious thing.
Ingredients
1 package of cherry tomatoes
Olive Oil
Fine Salt
Dried Italian Seasoning Herb mix or Oregano
1 batch of stovetop or microwave polenta, link is above
Hard cheese like Romano or Parmesan
Instructions
Slice all the cherry tomatoes in half.
Place them in a lined and/or oiled sheet pan, ideally they will fill up tray.
Drizzle with olive oil and sprinkle salt and seasonings on tomatoes.
Roast for 20-40 minutes at 425F. Keep an eye on them.
Cook a batch of the stove top or microwave polenta.
When the tomatoes are oozing liquid and starting to collapse, they are done.
Spoon polenta into serving bowls and top with tomatoes.


 BTW, here is detailed post on how to hang a TV on a cement wall using sleeved anchors.