Category: Video

  • Easy Maple Baked Beans Recipe Video

    Easy Maple Baked Beans Recipe Video

    We just finished the maple syrup season, so its time for our easy maple baked beans recipe. You can use canned beans for this or cook some beans in your pressure cooker. There aren’t a ton of ingredients to this, but the few ingredients combine to make this perfect for a BBQ side dish.

    A viewer suggested the other day that our homemade maple syrup evaporator could be used as a DIY meat smoker, and that provided the easy connection to make baked beans with maple syrup.

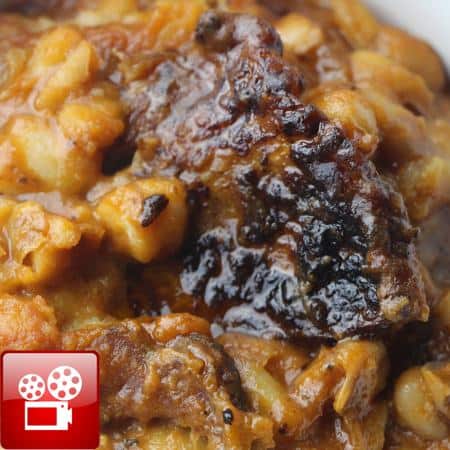
    I’ve been to plenty of BBQ places across the U.S.A., and some of the baked beans I’ve been served are not great. I want them to be slightly sweet with some baked tomato flavor, and not too soupy. I’ve seen and eaten a wide range of them, and my easy maple baked beans recipe reflects what I like in a baked bean recipe.

    A good potluck dinner recipe, these beans should be served on a paper plate in your friend’s backyard on one of those red stained wood picnic tables. Or at least one made out of pallets… ( more DIY pallet videos coming )

    easy maple baked beans recipe

    I baked these beans in a seasoned cast iron dutch oven. Learn how to season cast iron here. I think its the perfect vessel for this dish. Its got a nice carrying handle, and the thick walls keep the heat even. And drop that puppy on a potluck table and it looks so much better than those plastic food storage containers, right?

    A lot of recipes call for molasses or brown sugar, or both. I am not big on super sweet beans, and the maple syrup works well, I think. 1/2 cup of syrup does well for me. I would not suggest adding any more, but again, its a personal thing. The canned beans are cannelini beans, but any white bean works here – you could even use lima beans – which has now got me thinking about a lima bean baked dish.

    The small can of tomato paste stands in for ketchup. I LOVE ketchup, especially on meatloaf, but these beans are better without it.
    Here are a variety of cast iron dutch ovens to check out:


    Easy Maple Baked Beans Recipe Video
    Author: Eric Rochow
    Prep time:
    Cook time:
    Total time:
    A perfect segue from the Maple Syrup season to the BBQ season, baked beans work in winter and summer, perfect potluck dinner recipe or just because you love baked beans like I do.
    Ingredients
    • 2 29 oz cans of white beans – northern, cannelini, small whites.
    • 1 6 oz can tomato paste
    • 1 medium onion chopped medium
    • 1 tablespoon Worcestershire Sauce
    • 2 tablespoons brown or good deli mustard
    • 1/2 cup real maple syrup
    • 5 strips of bacon, thick cut is preferred
    Instructions
    1. Drain the liquid from one of the cans of cooked beans.
    2. Roughly chop the onion.
    3. Cut or Slice 3 of the bacon strips into 1/2″ pieces. Cook in a fry pan while preparing the dutch oven.
    4. Put about 2 tablespoons of the bacon fat or vegetable oil in the dutch oven on the stovetop.
    5. Add in the onion and cook, you want the onion to start to brown and be kinda clear.
    6. Put in the two cans of beans, reserving the drained liquid from one of the cans.
    7. Add the tomato paste, Worchestershire, mustard, maple syrup.
    8. Add in the cooked bacon and mix together the ingredients.
    9. At this point, see how much liquid is in the pot, the liquid should not be above the beans. The top layer of beans should be just above the liquid.
    10. Add more bean liquid if the liquid level is too low.
    11. Lay the remaining uncooked bacon across the top of the bean mix.
    12. Set the oven to 350F and cook covered for 30-40 minutes. Check at 30 minutes, if its not bubbling, cook a bit longer.
    13. Take the lid off the beans, turn on the oven broiler, and put the beans about 6″ below the broiler for 10 minutes, when the top starts to brown, its done.
  • How To Build A Maple Syrup Evaporator – GF Video

    How To Build A Maple Syrup Evaporator – GF Video

    I figured out how to build a homemade maple syrup evaporator because I was burning through a lot of propane when making maple syrup. I don’t make enough syrup to warrant buying one, but a DIY maple syrup evaporator was just what I needed. Watch the 2 videos below and step through the photos of the evpaorator build.

    The Making Of time lapse video:

    How to use the Homemade Maple Syrup Evaporator

    This is made out of a metal 4 drawer file cabinet and a few steam table pans, plus some stuff you may already have or can get cheaply or for free. If you can find a 5 drawer file cabinet, even better, it will allow you space to have another pan for boiling.

    This is not an original idea of mine, I learned about it through Annie Corrigan of Earth Eats, a WFIU radio program and podcast. She produced a story about Mike Bell of the Hinkle Garton Farmstead, who made this great homemade maple syrup evaporator. You can see photos of his rig here.

    We have two videos of this evaporator. One is a fun time lapse of me building the rig, the second is a walk through of how to use make maple syrup with it. Below the videos are photos of building the evaporator and more videos on how to make maple syrup

    Before I built this evaporator, I was using a lot of propane to boil down sap into syrup, you can watch a video of how we use a propane turkey deep fryer to make maple syrup here. The turkey fryer method works, but you burn through the propane, and make a bunch of trips to the hardware store buying refills.

    I did not keep close track of how many gallons of sap I boiled down in a day, but if you keep on top of it, I imagine you can boil down about 50-70 gallons a day, depending on the sugar ratio of your sap and how hot your fire burns. Pallets and scrap lumber burn hotter than firewood, I found.

    how to build a maple syrup evaporator
    Click Here
    to go to the next page for photos and instructions on how to build the homemade maple syrup evaporator.

    After reading through photos for the homemade maple syrup evaporator, check out how I improved the original design in this video:


    Watch all our Maple Syrup How To Videos here.

    Steam Table Pan Maple Syrup Evaporator Improvements – GF Video

  • Roasted Sweet Potato Wedges Recipe Video

    Roasted Sweet Potato Wedges Recipe Video

    This Roasted Sweet Potato Wedges recipe is one of those overlooked but super easy dishes that makes me realize how simple it is to cook with what’s already in the kitchen. These sweet potatoes are dusted with a bit of cinnamon to give them even more of a earthy warm flavor that offsets their natural sweetness. Watch our recipe video and then tell us your sweet potato recipes in the comments below.

    When I first made this recipe, I added too much cinnamon, so I dialed it back for the recipe. You can add more if you like, but I suggest starting with a small amount. I was surprised at how such a small amount of a spice can overwhelm something like a sweet potato, but it can, as I learned. And I’m always learning.

    The same thing goes for the  honey, less is a lot in this recipe, and too much and it will burn on the potato wedges. I’m repeating myself here, but please try to get local honey, or at least honey that is from the U.S. . Honey can be adulterated, like olive oil. If you don’t have honey, a bit of maple syrup works or brown sugar, or just leave out the sweetener and it will taste great.

    You may want to double this batch, as this recipe makes one sheet of roasted sweet potato wedges, and it depends on who you are feeding as to how much you should make. I like to line my cookie pan with foil, it makes clean up easier, but please recycle the foil, ok? Then we can use it again.

    Roasted Sweet Potato Recipe

    Roasted Sweet Potato Wedges Recipe

    2 large or 3 medium sweet potatoes, washed and skin on

    1-2 tablespoons of olive oil

    1/2 teaspoon salt

    4-5 grinds of black pepper

    1 tablespoon honey

    1/2 teaspoon cinnamon

    Cut the sweet potatoes in half lengthwise, from end to end, so the potatoes will lay flat on a cutting board.

    Cut the sweet potatoes into half circles about 1/4″ thick.

    Put in a bowl large enough toss them in. This bowl is larger than you think.

    Add in the oil, salt, pepper, honey, and cinnamon.

    Use a rubber spatula or similar tool to toss the ingredients together, scraping the sides of the bowl to get the seasonings onto the potatoes.

    Scatter the wedges on a foil covered baking sheet, its OK if the potatoes overlap a bit.

    Turn on the oven to 375F and roast the potatoes for about 45 min.

    They are done with a knife slides into the wedges easily.

    These are best served warm or hot, they aren’t great colder.

    Turn the oven on to 375F

  • Tap Maple Trees Update Video

    Tap Maple Trees Update Video

    A new how to tap maple trees video for you. We just tapped our sugar maples, getting ready for maple syrup season, and we made another video about how to tap your sugar maple trees. We have more great how to make maple syrup videos below this video.

    We use tubing and tree saver taps to tap our sugar maples. You can buy tree saver taps here. The tubing leads to a barrel made of food grade plastic. You can also line a 30 gallon trash can with a food grade plastic bag.

    You can also have 5 or 6 gallon buckets at the base of each tree and run your tubes into them. But its easier to empty one big barrel instead of a bunch of small buckets in deep snow.

    This year the maple syrup season started late and we have so far only had a few days of sap running. We need warm days and cold nights for the sap to run, and we have had way too many cold days.

    I am tapping trees on my neighbor’s land this year as well. They  have some nice sugar maples right on the road, which makes hauling sap much easier. Imagine walking through the woods carrying buckets of water through deep snow. Now you know why I use lines and tap trees near the road!

    We have a bunch of how to make maple syrup videos here on GardenFork. It is super fun to tap your own trees and boil down sap into syrup. Watch our videos to learn how.

    maple syrup videos
    Watch our How To Make Maple Syrup Videos here


  • Cook With A Pressure Cooker – GF Video

    Cook With A Pressure Cooker – GF Video

    Learn how to cook with a pressure cooker in this GardenFork Cooks video. I cook recipes with a pressure cooker all time in the kitchen. Its perfect for last minute meals where you decide you want beans, but forgot to cook them ahead of time. People claim you can cook foods in 5 minutes, which isn’t exactly true, but its a great kitchen tool.

    One of my favorites is our how to cook with a pressure cooker pork roast recipe video. Its very  popular because its so darn easy. And it makes you look like a genius when you have people over for dinner. Put in the pork, add beans if you like, some seasonings, maybe  you did a dry rub to the pork before hand, and cook.

    Tips when you cook with a pressure cooker:

    • Pay attention to how much liquid you add. Your cooker should have a mark inside the rim showing the maximum liquid level. Don’t go over that. The liquid could expand too much and clog the relief valve.
    • Be sure the gasket and lid are clean after each use, you don’t want any food debris to compromise the seal.
    • Read the directions that come with the cooker. You don’t usually read these, I know, but its important here, OK?
    • If steam coming out of the pressure cooker is louder than a low hiss, turn down the heat.
    • Most pressure cookers have a high pressure and low pressure setting, check the recipe to see which setting you should use.

    Some people  have a fear of cookers, which is understandable, but they are super safe. Modern day cookers have numerous relief systems in place, so cook on.

    I wrote about how to buy a pressure cooker here. I own two cookers, and based this on my experience and what some of the leading food publications recommend.

    Two of my favorite pressure cooker cookbooks are the Cooking Under Pressure series by Lorna Sass, they have great charts in them, plus recipes.

    cook with a pressure cooker

    Watch all our pressure cooker recipe videos here.

  • Cardboard Seed Starting Pots – DIY Video

    Cardboard Seed Starting Pots – DIY Video

    These cardboard seed starting pots are made from paper towel tubes. Biodegradable plant pots made from stuff in your house. Watch this DIY video about how to make the seed starting pots and get more info below, plus links to our other seed starting videos.

    You can buy seed starting pots, but I like to make them with stuff I already have. Our neighbor, Priscilla, who we call ‘The Egg Lady’ because we get our eggs from her, has a huge garden. She grows many heirloom tomatoes, in addition to some stuff I have never heard of. Unique string beans, heirloom flowers, plus she has several apple orchard around the property. Priscilla is like me, always wanting to share cool stuff she has discovered or found or grown.

    Plus she has a menagerie of animals, horses, turkeys, guinea hens, cats, and dogs. You can hear Priscilla on GardenFork Radio here.

    I had been saving cardboard tubes for her and then one day she showed me what she was doing with all the tubes. So I wanted to share this all with you.

    Couple of important things to remember when using starting plants from seed:

    • Cardboard seed starting pots are not for long term use.
    • Take care not to over-water them. Too much water invites mold and fungus, as a result, bad things when you are starting plants.
    • Don’t use potting soil to start seeds. Buy seed starting mix.
    • You can also use coir, which is shredded coconut fiber, mixed with vermiculite and perlite.
    • Do not add fertilizer to seed starting mixes.
    • Use a grow light rig. Learn how to build a DIY Grow Light here.

    The height of the seed starting pot depends on the plants you are growing. Taller plants need more root space, therefore, make those pots larger. Salad greens can be grown in a 2″ high pot.

    Here are some of our hoop house cold frames for when its time to move the seedlings in to the garden:

    hoop house cold frame

    So there you go, let me know any improvements or suggestions and how you start seeds in the comments below.

    cardboard seed starting pots

    Save

    Save

    Save

    Save

    Save

  • External Hard Drive Repair and Replacement DIY Video

    External Hard Drive Repair and Replacement DIY Video

    You can do an external hard drive repair. Learn how to replace the hard drive of your exnternal hard drive or backup drive with our DIY video here. Below the video are links to buy replacement hard drives and a computer toolkit.

    External Hard Drive Repair Tips

    Be sure to discharge any static charge you have by touching a water pipe.

    Take pictures as you take apart the external drive.

    Use the right tools, or you will strip the screws.

    Its best to remove the broken hard drive and then order a replacement drive. Click here to shop for hard drives. That way you know exactly what kind of hard drive it is. You can also probably buy a larger size drive for a few dollars more.

    external hard drive repair

    When is a drive broken and must be replaced?

    Most of the time. Really, its rare to be able to repair a drive if it is damaged. If you hear mechanical noises, scratching, metal on metal kind of sounds, the drive is toast. It is sometimes possible to fix a drive if its a software driver issue, but if you hear unhealthy sounds coming from the drive, its a bad sign.

    When taking apart the external hard drive, keep all the parts in a container, and keep your workspace clean. Its possible there will be some dust in the drive housing, so be prepared for that. Use some canned air to remove dust from the electronics, do not use a brush, bad things can happen.

    external hard drive repair

    Most drives slide right out of the chassis holding it. The drive has a set of pins that line up with the chassis to connect it all together. Here are some computer tool kits: http://amzn.to/1ExWh1u

  • Batter Bread Sandwich Loaf Recipe – GF Video

    Batter Bread Sandwich Loaf Recipe – GF Video

    This batter bread sandwich loaf recipe is similar to the no knead bread recipe we have done, but its even easier. Plus it makes a sandwich loaf bread, which is a lot easier to use for making sandwiches than artisan bread.

    batter-bread-sandwich-loaf-recipe-2


    batter bread sandwich loaf recipe

    Batter Breads have been around for a long time, but recent recipes by Fleischmann’s and Cooks Illustrated have offered some improvements, our recipe is adapted from them.

    1 1/2 cups bread flour   9 ozs  260 grams

    3/4 cup whole wheat flour   3.4 ozs  96 grams

    1 packet or 2 1/4 teaspoons active dry yeast

    1 1/4 cups hot water 10 ozs  283 grams

    1 tablespoon honey

    2 tablespoons melted butter

    1 teaspoon salt

    2 tablespoons hot water

    1 egg optional egg wash before baking

    2 tablespoons wheat germ or bran optional

    Add the bread flour, whole wheat flour and yeast into a standing mixer with a dough mixer blade attached. Put in the wheat germ/bran if you want to use it.

    Mix in standing mixer for one minute on low speed.

    Add in the melted butter,  honey, and 1 1/4 cups hot water, not boiling, just 100 – 120F hot, OK?

    Then mix the batter for 4 minutes on medium speed. If the dough sticks to the sides too much, stop halfway through and scrape down the sides.

    Be careful about putting the spatula in the mixer bowl while it is running. Learn from me.

    Detach the dough blade from the mixer and remove it and the bowl from the mixer. Scrape the dough off the dough blade, but let the blade sit in the dough in the bowl.

    Cover the bowl and blade with a towel. Let rise for 20 minutes in a warm place. I use the oven that I have preheated for a few minutes. A warm furnace room, or a hot sunny window works also.

    Put the mixer bowl back on the mixer. Dissolve the salt into the 2 tablespoons of warm water then add to bowl of dough, mix on low speed to incorporate.

    Use vegetable oil spray to coat a 8 1/2  x 4  1/2  loaf pan. This is the more narrow kind of loaf pan, it will give a higher rise.

    Pour the bread dough into the loaf pan.

    Cover the pan with plastic wrap that has been sprayed with oil. When the dough has risen to just below the lip of the loaf pan, remove the plastic wrap and let the dough rise to just above the rim of the loaf pan.

    Optional: you can glaze the dough with an egg wash at this point. Scramble the one egg and apply lightly.

    Bake in a 375F oven  for about 45 minutes, when the internal temp of the loaf is about 208 – 210 degrees, its done.

    After putting on a cooling rack, unwrap the end of a stick of butter and rub it over the top of the loaf to give it a sheen and more flavor.

  • 5 No Knead Bread Recipe Tips – GF Cooks Video

    5 No Knead Bread Recipe Tips – GF Cooks Video

    Make better bread with these 5 no knead bread recipe tips I’ve learned from baking this great bread. The original recipe is great, but with a few baking tips, its even better. Below are links to our other no knead bread videos. Watch our tips video here and then tell us your bread baking tips in the comments below.


    The basic no knead bread recipe can be changed up several ways, we did a steel cut oatmeal no knead recipe video here, that adds a neat oat flavor to the bread.
    First a big thank you to Jim Lahey, and his book, My Bread, The No Knead Method. He also has a pizza book, My Pizza.

    Using parchment paper has been a lightbulb for me. I’m not sure where I learned it from, but I used to flop the dough in to the dutch oven with some unfortunate results. Now I simply lower the bread dough in to the hot dutch oven. Its OK that the parchment sticks out of the lid, not a problem.

    5 no knead bread recipe tips

    Using a digital scale to measure your ingredients makes a huge difference! Yes, I am a convert to this method, as you can tell. The drag and scoop method makes for inaccurate measuring. Why does the bakery bread taste better? They use a scale to measure their ingredients.

    We love our dutch oven, but you don’t absolutely need one to bake the no knead bread recipe. Any oven proof bowl that has a lid that wont melt will work. Corning Ware kind of stuff is what we are talking about here big casseroles, etc.

    You can make cool designs in your bread, we use scissors, but you can use some serrated knives, and this fancy bread baking tool called a Lame. Dust the top of the dough before you cut into it. What kind of flour do you dust your bread with? I’d like to read about what people are using.

    Yes, you can make a whole wheat no knead bread, but from what I’ve found, the 100% whole wheat breads don’t come out great. We usually add up to 30% whole wheat to bread flour. Works pretty good.

  • Cheap Cold Frame How To – DIY GF Video

    Cheap Cold Frame How To – DIY GF Video

    Here’s a cheap cold frame you can make out of scrap lumber and a window. In this video I’ll show you how to build the cold frame in a few hours. With this rig, you can do some winter gardening, and of course we have some videos on that, the links are at the end of this post.

    Some enhancements I’ve done with we made the video:

    • I painted the cold frame with outdoor latex paint, 2-3 coats is good, as plywood does not like to get wet, you know.
    • I split open some old garden house and slipped it on the bottom of the cold frame to keep the wood out of the dirt.
    • I’ve grown vegetables in winter for several years. Neat.

    I’m betting you can find enough scrap lumber to make this a recycle or freecycle project. The wood doesn’t have to be finish grade, and one of my pieces was warped, but it worked anyway. The hinges I had laying around, and the only thing I had to buy was the thermal vent.

    What grows well in a cold frame? I grow cold hard salad greens and kale. Kale will grow in snow. I’ve dug it out of the garden and its still green in February. You can buy winter salad green mixes from the seed companies. Mache is a neat green that not many people grow, the seeds are kinda tiny.

    cheap cold frame

    If you don’t get the auto vent, you will have to open up the frame on warm days. You will be surprised how hot it can get in a our cheap cold frame, even if it didn’t cost us any money to build.

    The biggest problem with this rig is the glass. It can break. That tree limb could have landed anywhere, but it landed on top of your super cheap cold frame instead. I have replaced the glass once. Luckily I had some spare windows that I salvaged a piece of glass out of. You might try putting some screening over the glass to protect it. Just a thought.

    cheap cold frame

    Below are some suggested books for winter gardening, let me know your thoughts.

    hoop house cold frame
    Watch all of our  hoop house videos here.

  • Cold Frame Gardening at BBG – DIY GF Video

    Cold Frame Gardening at BBG – DIY GF Video

    Cold frame gardening can be done in the Northern climes, as we see at the Brooklyn Botanic Garden. We made this winter gardening video at their demonstration garden in December. They were harvesting greens like arugula and mache. Watch the video and see for yourself. Below are some book recommendations for winter gardening.

    The cold frame plans for this set are easy to build. The dimensions depend on the size of the windows. You may already have some windows, or a neighbor may be replacing their windows and you can grab a few of them. Or pick them up from a garage sale or look on the web for free stuff.

    The cold frames in this video were built with 2×8 or 2×10 lumber, but you could use something less thick and it will be ok, i think. I like how they had the cold frames next to each other, so each frame helped insulate the one next to it. You could use scrap hinges off some old doors, its a ‘use what you got’ kind of project.

    cold frame gardening

    cold frame gardening

    For cold frame gardening, its best to orient the cold frame so it faces south, if you are in the northern hemisphere. This cold frame is manually vented, meaning you vent them by opening them up and closing them yourself. You could install the thermatic vent we have used in our hoop house greenhouse plans if you like.

    What to grow when gardening in winter? Cold tolerant plants, mainly salad greens work well. Several seed suppliers sell winter salad mixes, they will do well until it becomes just too cold. But then those plants will revive in early spring. Many times there is enough moisture in the ground to keep the plants watered, but keep an eye on them. If the cold frame gets too warm, the soil can dry out. And you’d be surprised at just how hot a cold frame can get in winter.

  • How To Remove A Dishwasher – DIY GF Video

    How To Remove A Dishwasher – DIY GF Video

    Learn here how to remove a dishwasher with our DIY video. It’s pretty easy, and only takes a few tools. It helps to have someone helping you, never hurts to have a second set of hands and more important, eyes. We also have a video on how to install a dishwasher here.

    The most important thing is to make sure the electric running to the dishwasher is turned off and the water supply is turned off. Only then can you remove the dishwasher.

    How To Remove A Dishwasher

    • Turn off the power going to the unit. The dishwasher may be hard wired or have a power plug.
    • Turn off the water supply. Hopefully there is a valve under the sink that controls this.
    • Disconnect the drain tube by removing the clamps.
    • Remove the screws holding the dishwasher in its space.
    • Pull it out gently.

    Watch the video for the details, and take your time and you will know how to remove a dishwasher.

    electrical wiring of dishwasher
    Cover power wires with wire nuts when removing dishwasher, be sure power is off!

    Some stuff to think about. Pay attention to the floor, you don’t want to scrape it when you pull out the dishwasher. The appliance has small leveling feet, and they can drag on the floor. Also, there is likely some debris under the unit, be careful with that too, might be some surprises!

    I’ve heard stories where someone has installed a wood or tile floor after the dishwasher was installed, and this makes removing the dishwasher real hard. you may be able to lift the counter above the washer a bit to slide it out, all while having warm thoughts about whoever did this to you.

    Breathe.

    The drain hose of the dishwasher will have water in it. Hold it up in the air and dump the water in to a bowl. Learn from me.

    Dishwasher Installation photo

    bathroom sinkWatch More DIY Videos Here.

    So there you go, a fine video on how to remove a dishwasher for you. Let me know your comments below.

  • Hoop House Cold Frame #2 – DIY GF Video

    Hoop House Cold Frame #2 – DIY GF Video

    This is the second DIY Hoop House Cold Frame we have built in our video series. Easy to build, this mini greenhouse allows you to grow plants in winter. Watch the video here, plans and photos are below as well as links to our other DIY Hoop House Cold Frame Videos.

    This cold frame uses a wire mesh that’s usually used for concrete, but it works really well as a cold frame form to hold the plastic up. I like how it works
    You can buy this concrete reinforcing wire at a local lumber supply yard. It comes in two thicknesses, you want the thinner gauge wire, the thick wire is too much, I think. This wire also comes in rolls, but the it is a pain to work with. The mesh I bought was 10’ x 5’.

    hoop house cold frame plansTo cut the wire mesh we use a right angle grinder with a metal cutting disc. Be sure to wear ear and eye protection and wear gloves while you’re handling this material, it can cut your skin.

    hoop house cold frame

    Be sure the cut end of the wire mesh faces the plywood end, else the plastic can get sliced by the sharp ends of the wire. You can put pieces of old garden hose along the end of the wire mesh where the plastic bends over to form the end wall, as well as on the plywood end to protect the plastic from the hard edges of the wire and wood.

    But you can build this! It’s not hard and I really like it. Another great version of the hoop house cold frames that we’ve built, we have a whole series of them – link here – and every time we make one we get better and better. The super cool part is that you can extend your growing season in the fall and you can use one of these cold frames to warm up the soil in your vegetable beds in late winter and plant seeds even earlier than you could normally. Cold frame hoop houses are especially good for salad greens, radishes, sugar snap peas – plants that are cold tolerant.

    cold frame hoop house
    You can use scrap wood to tie the corners together, or use brackets.

    thermatic-vent-hoop-house-cold-frame

    The automatic vent that we use is kind of a specialty item but that they’re not that expensive. Here is the link to buy it.

    You could put one vent in or you could put in two vents. With two vents you would put plywood at both ends of this cold frame. Having a vent on both sides allows more warm air to exit. Cold frames can get quite hot, you don’t realize how much solar energy the sun has even in the winter. You will need to vent the hoop house, you can go out on sunny days and manually vent it if you want by lifting up the cold frames, but I’m not there all the time. So I like the automatic vents.
    Have you made a cold frame? Do you have anymore questions? Pease leave them in the comments below.

    My cold frame experiences have been greatly influenced by these books by Eliot Coleman and Niki Jabbour.

    Four-Season Farm     Year Round Vegetable Gardener (affiliate links)

    Watch more of our hoop house cold frame plans videos here.

    PVC Cold Frame Hoop House #3 – DIY GF Video

  • Oatmeal No Knead Bread Recipe – GF Video

    Oatmeal No Knead Bread Recipe – GF Video

    I love the simplicity and versatility of the no knead bread recipe, this no knead bread variation being a great example of taking the basic recipe, adding a few tweaks, and baking an artisan bread that rivals those in the bakery.

    I don’t often use steel cut oats for anything, but I saw this recipe and I thought, wow that’s a great reason to buy some steel cut oats. After we made this recipe, I cooked the steel cut oats in the pressure cooker, making a nutty oatmeal that was a lot of fun.

    This recipe is based on one on the Breadtopia website, a great source for all sorts of bread baking info and tools. Go check them out, the site is run by a web food guy named Eric, so you know its good.

    But back to the no knead bread recipe. I’ve become a big convert to using a digital scale for measuring out the flour for recipes. I’ve learned that it makes a big difference and I talk about it in this video: Five No Knead Bread Tips
    Pay attention when you’re toasting the steel cut oats on your stovetop. Use a nonstick pan or cast-iron pan. You want to heat this up, but stay right there while it’s toasting. I burnt the first batch of these because I walked away, the oats go from toasted to burnt in very short order. So watch out for that; once again, learn for me.
    oatmeal no knead bread recipe

    But once you get those toasted oats into the bread dough, it’s a great thing. It adds a neat texture and flavor. It’s subtle, it’s not like super oatmeal bread ,but I think it’s just enough. I also added whole wheat flour – I’m trying to eat more whole grains rather than refined flour. I think it works really well here. you can watch our other no knead bread videos here

    Let me know your thoughts, have you made the artisan bread recipes or the no knead bread?

    Oatmeal  No Knead Bread Recipe

    10 ozs  (2 1/4 cups) bread flour

    3 oz (3/4 cups) whole wheat flour

    3 oz (1/2 cup) steel cut oats

    1 tablespoon coarse salt

    heaping 1/4 teaspoon active dry yeast

    1 5/8 cups water filtered preferably


    Toast the oats in a pan on the stove, you want them toasted, not burnt.

    Add the flour, salt, yeast, and oats in a large bowl and stir together

    Pour in the water, (warm water is best, I think) and mix.

    Cover the bowl with plastic wrap and place in a warm area overnight. 12-18 hours.

    Flour a board or counter and shape the risen dough into a ball. Turn the ball into itself several times as shown in the video.

    Place the dough on a piece of parchment paper larger than your dutch oven.

    Place this in a bowl and cover with a towel, let rise for about an hour.

    Preheat the oven and dutch oven at 500F for 30 minutes.

    Dust the dough with flour if you like, and cut a design into the top, as shown in the video.

    Use the parchment paper to lift the dough out of the bowl, and place in the hot dutch oven.

    Cover and bake for 30 minutes at 450F. Take off the lid and bake an additional 15-2o minutes.

    You want the crust browned and the internal temperature to be about 190F.

    Remove from the dutch oven and cool on a wire rack. Do not cut it right away, let it cool.


  • Microwave Polenta Recipe – GF Video

    Microwave Polenta Recipe – GF Video

    Our fav way to cook polenta is with a pressure cooker, but here we show a microwave polenta recipe and a stove top polenta recipe. I call these kitchen hacks, since we are showing you how to get a step ahead in the kitchen and cook polenta faster than you can using traditional methods.


    Microwave ovens are not all the same, so pay attention the first time you do this. I overflowed the dish in our first test, not a lot of fun to clean this one up!

    microwave polenta recipe

    Polenta becomes transcendent when you add in some butter and Parmesan or Pecorino cheese.

    microwave polenta recipe
    Our first attempt at a Microwave Polenta Recipe

    Microwave Polenta Recipe

    3 1/2 cups of water

    1/8 teaspoon baking soda

    1 cup of polenta or corn grits

    Mix the polenta and baking soda into the water in a large microwave proof bowl.

    Cover with plastic wrap and put in the microwave on high for 5 minutes.

    Remove the plastic and stir the polenta, be careful, the polenta will be real hot.

    Cook for another 5-6  minutes at 75% power, keep an eye on it to make sure it doesn’t boil over.

    Remove from the microwave and stir, let sit for 5 minutes.

    Add salt and real good cheese and eat.

    Watch our grilled polenta recipe and pressure cooker polenta recipe video here:

    microwave polenta recipe

  • Pressure Cooker Polenta Recipe – GF Video

    Pressure Cooker Polenta Recipe – GF Video

    Here’s our pressure cooker polenta recipe, and it couldn’t be easier, but that’s why we love the pressure cooker.


    Polenta doesn’t have to be hard to cook. So many people think to make polenta you have to stand over the stove and constantly stir the polenta in a sauce pan for hours and that’s not true. You can use your pressure cooker to make polenta quickly and easily and you don’t have to stir it.

    Our pressure cooker polenta recipe is based on one from Lorna Sass who has several pressure cooker cookbooks I have her Great Vegetarian Cooking Under Pressure book and I like it

    This is a great example of how a pressure cooker can make things go much faster in the kitchen and they taste great of course polenta always taste really good with butter and cheese I especially like pecorino reminder cheese with the polenta

    pressure cooker polenta recipe

    I usually make a double batch of polenta because I like to take the leftover polenta and pour it into an oiled loaf pan to make grilled polenta slices the next day would you can fry up for breakfast lunch or dinner they taste great anytime do you have a favorite polenta recipe or do you use polenta in a dish that you make I like to hear about that in the comments below.

    Watch our Microwave and Stovetop Polenta Recipe Video here:

    polenta recipe video

    Grilled Polenta goes great with a simple tomato sauce, vegetables, or Braised Short Ribs.

    pressure cooker polenta recipe


    Pressure Cooker Polenta Recipe

    Quick polenta recipe that doesn’t require constant stirring that uses a pressure cooker. I’ve cooked polenta many ways and i think this pressure cooker recipe is the best and easiest way to do it.

    Ingredients

    • 1 cup
      Polenta or Corn Grits
    • 4 1/2 cups
      water
    • 1 teaspoon
      salt

    Cooking Directions

    1. Take your polenta, also called corn grits and put in the pressure cooker
    2. Add the 4 1/2 cups of water and salt.
    3. Close the pressure cooker and lock the lid.
    4. Bring up to high pressure, and then cook for 5 minutes.
    5. Take the pressure cooker off the heat and allow to cool for 10-15 minutes, allowing for a natural release
    6. When you open the pressure cooker, the polenta needs to be mixed together, best tool for that is a whisk.
    7. If you want to make polenta slices, pour the cooked polenta into an oiled loaf pan and cool overnight.

  • Coconut Banana Bread Recipe – GF Cooks Video

    Coconut Banana Bread Recipe – GF Cooks Video

    Not your bland banana bread recipe, this one has a few twists to make banana bread stand on its own. Too often, banana bread is this dense wet slice of cake that is overpriced in the artisanal cafe. Not this one. Watch the video, the recipe is below.

    Banana bread brings up those memories of being raised in the Midwest. You came home from school and your mom had made banana bread. You carved off a big slice and life was good.
    My aim here was to make a banana bread that wasn’t like that kind of dense stuff that they sell in coffee shops now. I put in a couple of twists that I’ve been thinking about for a while: first I added whole wheat flour, which I think adds a different flavor definitely in a little bit better structure I think. And I added coconut which I happen to love – if you’re not a big coconut band that’s okay this banana bread recipe taste great without coconut.

    coconut banana bread recipe www.GardenFork.tv

    Source your bananas from the discount rack at your grocery store. Somewhere in the produce section in the far corner is probably a rack of vegetables and fruits that have been discounted because they might have some dents or they might be a little brown or have some spots on them, but they’re perfectly edible. And they’re super cheap! I got this bunch of bananas for $.69 which is a beautiful thing.

    coconut banana bread recipe www.GardenFork.tv
    If you want a higher loaf you should use a slightly smaller loaf pan. There is a standard loaf pan which is 9″ x 5″, but there’s also one that they sell that just slightly narrower 8.5″ x 4.5″ (buy here) and that’ll make this pop up a bit more. You could also amp up the baking soda, but the careful if you add too much baking soda it starts to have kind of a chemical taste to it.
    What are your banana bread recipe favorites any suggestions you have any thoughts about the recipe or just your memories of banana bread let me know in the comments below thanks.

    Coconut Banana Bread Recipe

    4 super ripe bananas – ok to use less than super ripe

    1/2 cup Whole Wheat Flour

    1 cup all purpose flour

    1 1/2 tsp baking soda

    1/4 teaspoon salt

    1/2 cup sugar

    1 cup sweetened coconut

    1/2 cup (1 stick) melted butter

    1 egg, scrambled

    1/4 cup milk

    Mix the dry ingredients together in a bowl.

    Add in the wet ingredients, be careful with the butter, its better if its cool, don’t want to burn anyone.

    Pour into a buttered or oiled loaf pan, I like butter better for this one.

    Bake in a 350F oven for about an hour, the sides may smell toasted before the center is done.

  • Lentils Recipe with Carrots and Coriander Video

    Lentils Recipe with Carrots and Coriander Video

    Here’s a lentils recipe we make often when its cold. I call it wow winter comfort food. I don’t remember the first time I had lentils but I’m pretty sure it was probably a can of Progresso lentil soup, which is not the worst thing, but again it wasn’t the greatest thing. But now you can make the greatest thing: a lentils recipe with carrots and coriander.

    I’m not a vegetarian, but this is a vegetarian and vegan recipe, and that doesn’t mean it doesn’t tast great. It tastes more than great. Wow winter comfort food. I’m pretty sure I read about the addition of coriander seeds first in the NY Times, Martha Rose Shulman has written about lentils there.

    There are many different kinds of lentils, for this recipe, I like to use the Goya Pardina lentils. You could also use French green lentils or just a regular round brown lentils. The brown lentils tend to break apart, but then, that’s what that kind of lentil is supposed to do. I recently went to an Indian food market, and there were shelves with all kinds of lentils. They are called Dal by the way, so don’t ask for lentils, just look for Dal, OK?

    Lentils Recipe

    Canada, interestingly enough, produces the most lentils in the world. India is the second biggest grower, understandably. Lentils are a great protein source and has good fiber, besides tasking great. Green lentils have more fiber than red lentils, FYI, according to Wikipedia.

    The secret to this dish is coriander seed coriander powder or ground coriander you want coriander seed would you contact might have to search all of it if you have a Indian grocery store or a light room foods grocery store coriander seed little later

    Coriander seeds are like little flavor bombs. This is one of those simple recipes where the sum is greater than the ingredients.

    Lentils Recipe with Carrots and Coriander

    Lentils Recipe with Carrots and Coriander Video
    Recipe Type: Vegetarian
    Prep time:
    Cook time:
    Total time:
    Serves: [url:1][img:1]
    Healthy lentils make a great weekday dinner.
    Ingredients
    • 1 cup pardino or green lentils, if possible
    • One medium onion, chopped as you like, not super fine.
    • 1 heaping tablespoon coriander seeds
    • One lb bag of carrots chopped into 1-2″ pieces
    Instructions
    1. Pour a few glugs of vegetable oil into a medium pot, you want to coat the bottom of the pot, and not a thin coat either.
    2. Drop in the chopped onions when the oil is hot.
    3. After about 5 minutes, add in the coriander
    4. Brown the onions until they are clear and the edges are getting the burn brown look to them.
    5. At the same time, in a medium small saucepan, bring 2 1/4 cups of water to a boil.
    6. Rinse the lentils, and when the water is boiling, add in the lentils.
    7. Set the lentils to simmer covered.
    8. When the onions are cooked down to your liking, add in the lentils and chopped carrots, and cover the pot and simmer for 20 minutes.
    9. Take off the lid of the pot, and allow the liquid to cook down a bit.
    10. Check the lentils, they should not be crunchy.
    11. Add salt, mustard, and vinegar to your taste.

    Lentils Recipe With Carrots