Eric tells how he tries to keep the house cool on the hot days of summer, then reads and reflects on viewer mail on dishwasher installation and baking disasters.
Become a monthly supporter of Gardenfork: http://patreon.com/gardenfork
Make a one time contribution via PayPal: https://gardenfork.tv/paypal
This post may contain affiliate links which won’t change your price but I earn a commission from. Thx! https://gardenfork.tv/amazon
Simplest recipe I’ve found for how to cook grilled steak is to cook steak directly on charcoal. Watch our how to video and get the recipe below.
How to cook grilled steak directly on charcoal
Key here is the steak you choose. I like the strip steak. Here they call them NY strip steaks, and the work best with the bone-in. I happen to get these on sale, which was a bonus. You will probably have to ask the butcher to cut you thick steaks. I rarely see thick steaks pre-packaged. These are 1 1/2″ thick. I think thin steaks will not work well with this. You can cook thicker steaks too. The NY Times suggests charring on both sides and then cooking them on a grill if you prefer.
Ideally, you will coat the steaks in the dry rub and leave it on overnight or as long as you can. I did these the same day and they were fine, but planning ahead helps. As you know, I am not great at planning…
Chunk Charcoal, aka hardwood charcoal is the only way to cook grilled steak, you don’t want to use charcoal briquettes. Not sure what briquettes have in them, but chunk charcoal is just wood. You will want two chimneys of wood charcoal. Be careful with the chimneys, I almost melted one of them, the charcoal got so hot.
I found a baking pan worked much better than putting the coals in the bottom of a grill. Made it much easier to work the rig and check the temperature of the steak. When laying the steaks on the coals, plan ahead so you can flip the steak over onto fresh coals. This isn’t a must do thing, but I found it helpful. I was able to cook two strip steaks at a time in a 9×13 pan.
How do you cook grilled steak? Let me know in the comments below.
Grilled Steak Dry Rub
Author: Eric Rochow
Prep time:
Cook time:
Total time:
This dry rub recipe to cook grilled steak is based on an article from the NY Times by Matt and Ted Lee and Tim Byres of Smoke Restaurant in Dallas Texas.
Ingredients
2 TBSP of Pimenton Picante, a spanish smoked paprika
2 TBSP Ground Cumin
2 TBSP kosher salt
1/4 cup brown sugar
1/4 cup ground coffee – i used a medium roast set for drip coffee grind, use what you got
Instructions
Mix all the ingredients together in a bowl, break up the brown sugar with a fork or your hands.
Put the steak on a flat dish and dust the both sides of the steak with the dry rub, patting it onto the steak with a spoon or flat metal spatula, use what you got.
Turn the steak onto its sides and roll it to get the dry rub onto the edges of the steak.
Cover with plastic wrap and put in the fridge overnight.
Let the steak warm up before putting on grill.
Its ok if you don’t do the overnight rub, you can put it on shortly before you grill the steaks also.
After using the Flex system all summer, here is our Troy Bilt Flex review video. We used the lawnmower and pressure washer attachments with the Flex power base around the house, here’s our take on it.
Note: This is a Sponsored Post sponsored. Troy Bilt sent me the Flex and compensated me for my time, but all opinions are my own
The GardenFork Troy Bilt Flex Review
I like the Troy Bilt Flex concept of one engine that connects to multiple pieces of outdoor power equipment. Its much easier to maintain one engine than 4 or 5 of them every year.
The power base has a 208cc engine with ample power to run everything that attaches to it. I like that the engine has an oil dipstick and an easy oil drain plug, plus a solid gas cap. The wheels are air filled knobby tires and the power base is self propelled. The handles fold back onto the unit for space saving storage, a nice feature.
The lawn mower has a 28″ wide deck, which is 8″ wider than most walk behind mowers. The front wheels are solid and can be set to free wheel or lock straight for when you are mowing on inclines. Two blades under the deck work nicely. I used the deck in mulching mode, but you can set it for side discharge or you can order a grass collection bag for it.
The pressure washer is quite nice, it will do everything I will ever need a pressure washer to do. It has 5 quick connect nozzles and can generate 3,000 psi of power. You can attach a hose to the pump for cleaning solution injection. I really like that it has a 40′ hose on it. I need to wash the clapboard on our 2 story house, and I don’t have to buy an additional length of hose to reach the 2nd story. This will come in handy if you are washing down large equipment.
The Troy Bilt Flex also has a snowblower and leaf blower attachments that we did not test. I don’t blow our leaves, and it being summer, well, no snow.
I have bought way too many cheap trowels and diggers only to have them break in the garden. Being part of their Saturday 6 group this summer, Troy-Bilt sent me a box of their hand garden tools. I haven’t broken them yet, and I don’t think I will.
First thing that impressed me was the Made In Germany label. ( I am of German descent, FYI ) A sure sign of quality workmanship. And the tools just feel good in your hand. None of that flimsy metal that you bend when you are digging out some roots.
The trowels are made from one piece of metal, so there isn’t a point of stress where the handle attaches to the blade. There are holes in the handle to help grip the trowel, plus the design looks nice too. Simple is good in the land of GardenFork. Stainless steel construction means no rust.
I also received some anvil hand pruners, the Comfort Classic Anvil Pruners. Again made in Germany and easy in your hand. I used these to prune the blueberries, which have a lot of dead wood on them. The grips don’t open real wide so its easy to grip the pruners to close them, a plus for smaller hands. The lock to close the pruners for storage works well, many times this breaks on pruners I’ve used.
And what’s not to like about a pair of big anvil lopers? Cut limbs up to 1.75″ in diameter with these. The lopers are levered so the cutting power is doubled, makes it easier to cut tough wood. Again, a well made German tool, it feels good in your hands, not like its about to break when wrestling with a tough piece of tree.
Rick and Eric answer some viewer mail and comments on where we get our ideas from. Rick tells us about a new tomato he wants to try next year, and we touch on the usual suspects of GardenFork Radio.
Support GF on Patreon: http://patreon.com/gardenfork
This post may contain affiliate links which won’t change your price but I earn a commission from. Thx! https://gardenfork.tv/amazon
The Tomato Rick likes: http://www.slate.com/articles/life/food/2015/07/garden_gem_tomato_why_harry_klee_s_perfect_cultivar_isn_t_sold_in_supermarkets.html
What’s wrong here? Oh, I forgot to add the butter.
Are you sometimes on autopilot when baking. I must bake some sort of cobbler or crisp every week, and I do the recipe mostly by eye now. Not sure what was going on in my head here, but I made this whole cobbler, baked it in the oven, and then realized something was wrong. (Of course we have a cobbler recipe video here.)
The crust was just blah.
But it was time to go to dinner at the camp, and I was to bring dessert, and this was it. So I got out the propane torch and dropped some cubes of butter on top of what was supposed to be cobbler, melted the butter and toasted the topping.
It ended up being not bad, especially when ice cream was added. Just crunchy sweet stuff. Definitely a done is better than perfect moment. What have your forgotten ingredient incidents been?
I did this custom DIY dishwasher installation so it fit into existing cabinets at a friend’s apartment. There wasn’t a space for a dishwasher in the kitchen and we made a space in a creative way. Maybe we’ll call it an unusual way, actually. If you’d like to see how to connect the electric, water, and drain lines, see my video on how to hook up a dishwasher.
In small kitchens, I often see those narrow dishwashers that you don’t see in most homes. They are common in apartments, and might be good for a tiny house too. Our plan here was to remove one of the cabinets and slide in a small dishwasher.
Before the DIY installation
I call this a custom DIY dishwasher installation is because it wasn’t as simple as removing a kitchen cabinet and sliding in a dishwasher. I had to install a dishwasher into existing kitchen cabinets. The cabinet under the sink was one unit, so I had to be creative in figuring out how to make space for the dishwasher.
I did this by cutting off about 1/3 of the base cabinet. This isn’t your usual install, it was a challenge, but it was fun. Key here was cutting real straight lines, not the easiest thing to do on site. But we did pretty good
I removed the left cabinet door, pulled off the counter and sink. This involved shutting off the water in the kitchen, disconnecting the drain pipe, and the water lines going to the sink. This is always an adventure when climbing under a sink. The shut off valves don’t always work, and once you turn them, they can break. Then you are toast.
Thankfully the shut off valves were fairly new, so turn them off and then don’t look at them.
I cut the lateral supports where we were to slide in the dishwasher, and moved the side of the sink cabinet unit to the right. Basically shortening the width of the sink unit. Some brackets and screws put the cabinet back together.
The tricky part was then I moved the left side wall of the sink unit, I had to make sure the hinges on that wall were level with the hinges they were across from. Somehow this all came together fairly easily. Sometimes I am lucky. Sometimes I am toast. Today no toast.
I slid in the dishwasher, remembering to slide in the feed and drain hoses beforehand, as well as the power cord. There was an outlet behind the stove, so we were good there.
My friend was very happy, and it was fun to do. What do you think?
This is an easy one. My flash drive recommendation has to have three things that I need to be able to work efficiently.
Large capacity storage – I shoot in HD video
Fast Throughput – the time it takes to copy a file
Protection – not just a cap that falls off
I need a flash drive to be able to shoot video in the yard, copy it to my laptop and edit it, and then bring those video files back to the office and put the editing project and the media files onto one of our media hard drives.
I recently bought a PNY 128 GB Flash Drive, and its a great choice for me, and probably you as well.
This flash drive uses USB 3.0, which is the data transfer protocol I’ve switched to after having problems with Firewire 800 and some of our hard drives. 3.0 is fast! You will like it, its not like watching pain dry as you copy files, it just zooms through it.
This PNY has a sliding plastic cover to protect the USB connector, its slides up and covers it. I’ve lost a bunch of those caps that come with some flash drives. You probably realize this is an issue with me, right?
The thumb drive also has a hole in the side where you can slide it onto a key ring, a nice touch. Be sure not to let a thumb drive with a bunch of keys on it hang off a computer or laptop, OK?
I have bought other memory products from PNY and they were good purchases. No drive failures or memory issues with their products. My own memory is another story, but mbe we’ll have artificial memory capacity for our own brains soon. Insert a thumb drive into a slot behind my ear…
So my flash drive recommendation is this PNY 128 GB Flash Drive. It’s working for me, and it will work for you.
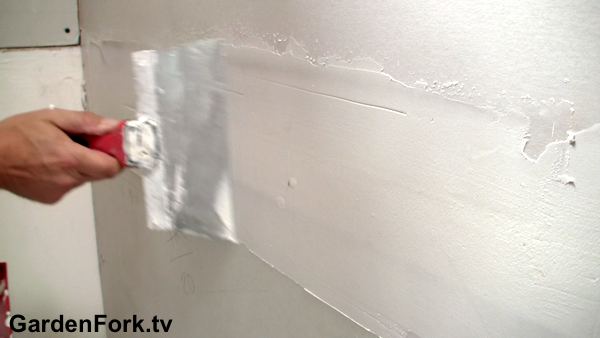
To mud and tape drywall aka sheetrock, you have to practice, but if I can do it, you can do it. I don’t do it perfectly, but I made a video here of how I mud and tape drywall while working on our renovation projects. I also have a video about how to mud and tape drywall corners.
It’s one of those things where having the right tools and the right materials pays off. Your first attempts at mudding and taping will not go perfectly, but keep doing it. You will attain that ‘Ah Ha’ moment.
Tip: Listen to our podcast, GardenFork Radio, while taping drywall.
I like to use lightweight compound, and use a 5 gallon paint mixer paddle to whip it up into a whipped cream – cupcake frosting consistency. Some add water or plaster, I do not. BTW, adding plaster is called a ‘hot mix’ and can cause the compound to crack. The hot mix is used when you want the compound to dry quickly. I let the stuff dry overnight. Position the tray just below the area you are applying the compound to.
When you mud and tape drywall, slow and steady wins the race, OK? Its a lot easier to do it better the first time than to make a mess that will take a long time to fix later. And several thin layers is better than one thick layer. When mudding bevel joints, its ok to use more than a thin layer for the first pass, as you want to fill in the bevel and get the mud into the mesh tape.
Tools I use to mud and tape drywall
Ideally, all these tools are stainless steel, I have a carbon steel blade ( you can see it in the video ) and it rusts despite everything I do to protect it.
You can also experiment with what is called ‘setting mix’ compound. This is a dry powder you mix with water, it comes in several drying times. Its more work, but it dries faster, and can fill in deep cracks better. The tub type compound will shrink and crack in large voids.
Its important that the drywall screws are screwed below the surface of the wall, as you see in the video, some of the screws are not, and the blade hits them. Also key is clean compound. You can see in the photo above the streaks you get if you get some junk in your mix.
Erin of the website The Impatient Gardener joins me, Eric to talk about gardening, ornamentals, & sailing. Check out Erin’s website here. Erin and I are part of the TroyBilt Saturday6, and met this spring.
Erin came to gardening through her mother, and when buying her first home, started her website to chronicle her gardening and home renovation. Hydrangeas are a big plant on her list and in her yard, and all gardens should have Lady’s Mantle. Perfect for bouquets. Lavender is a goal as well, but can be difficult to grow in the northern midwest.
Erin then tell us about her lifelong relationship with sailing. We hear about the Chicago – Mackinac Race that she just did with her family on their boat.
Become a monthly supporter of GardenFork! learn more here: http://patreon.com/gardenfork
This post may contain affiliate links which won’t change your price but I earn a commission from. Thx! https://gardenfork.tv/amazon
Learn here how to plant a window flower box, like the one we built in a previous DIY video. Watch as we show a few tips for window box plantings. The first tip: simple is good. Here we go!
A few things to keep in mind in planning how to plant a window flower box
Choose heat tolerant plants, especially if these window boxes are on the sunny side of the house.
Use a good quality potting soil with a time release fertilizer.
Water window boxes regularly, they will dry out faster than you think.
For this window box, we used some shade plants as this side of our house is shady most of the day. The few hours of sunlight are ok on these guys. Plus its on ground level, so its easy to water – a big plus not having to haul water upstairs.
The more window boxes you have, the simpler the design should be. Window boxes are great but they are, as Tim Gunn would say, “a lot of look.” If there are too many colors or textures going on, your house is going to look like the little shop of horrors. Keep your plant choices to one, maybe two or three at an absolute maximum (and then only if they relate closely to each other, such as a light pink and a dark pink petunia) and then plant every box the same. I know it’s hard to pick just a few plants when there are so many great ones around, but pick one or two this year then do something totally different next year. Just don’t do it all at the same time.
Erin also suggests moving away from sweet potato vines, which do appear in our flower box video.
Better than most anything I’ve said yet. But then Erin is more of the designer kind of person than I am. I make stuff. Like flower boxes:
A beehive knocked over by wind or a bear or storms is not fun. Here’s how to prevent your beehives from being knocked over.
I recently got a call from my friend Bill, saying that one of our beehives was knocked over. Normally, a beekeeper would stress about this, I didn’t, watch the video to see why.
When a beehive falls over, its usually a very bad thing. The supers are open, and the bees are very agitated, and if its cold or raining, the bees may die. Check out what happened to my friend Erik of Root Simple when his hive fell over.
Strapping your hives with ratchet straps, the good kind used by truckers, will reduce the chaos when a beehive is knocked over.
We first started strapping our beehives as part of our bear proof the bee yard project. If the hives are strapped, the hives stand a better chance of surviving a bear in the beeyard. One can say that a ratchet strap won’t keep a bear from tearing open a beehive, but I’ve read where the strapping has helped save hives. Watch our bear proof a bee yard video here.
But an additional benefit of having to strap the hives because of the bears is the ability of the hive to withstand a fall.
Stake for Straps
Yes, removing a ratchet strap every time you want to do a hive inspection is a pain, but it may save your hive one day. Its important to buy good quality ratchet straps, and spray them with WD40 or similar lubricant every few months.
In winter, we double strap our hives – see this winterizing beehives post – one strap is around the hive, another straps the hive to the ground. We have found these spiral spikes that are sold for dog runs work well. Wooden stakes can get loose with frost heave.
High winds knocked over this hive, but the strap kept it pretty much intact.
Even our hives on city rooftops are strapped, one less thing to have to worry about.
Rick and Eric discuss the new GardenFork Patreon Campaign for listeners to support GardenFork, and how it diversifies the GF income stream. More info here: https://www.patreon.com/gardenfork?ty=h
The video of musician Jack Conte explaining how he co-founded Patreon is here: https://www.youtube.com/watch?v=K9NjntTUJ1Q
We talk a bit about our upcoming show about weight loss with Mike, Rick references an article on Runner’s World http://www.runnersworld.com/weight-loss/biggest-weight-loss-myth-revealed
Beekeeping is next, Eric made a video about a hive inspection of a nuc hive installed this spring: https://gardenfork.tv/beekeeping-101-hive-inspection-gf-video
Watch Clean Slate Farm’s videos on YouTube here: https://www.youtube.com/user/1215cleanslate
A Hive Inspection is just that, you are checking out the beehive to see how its doing. Part of our Beekeeping 101 Video series, today we are doing a hive inspection of a nuc we installed this spring. This bee nuc had a late start, as did all our bees, because spring came late.
Note in the beekeeping video we did not smoke the honeybees. I don’t smoke bees unless I know I am giong to take apart the hive or pull honey off. When you smoke the hive, it can cause stress in the hive, and the bees start to eat their food stores, so it sets them back a few days whenever you do it.
If you are going to just do a quick eyeball check, I see no need for the smoker. For this hive inspection, I wanted to confirm the presence of the queen and make sure the hive looked robust and smelled good. You can tell a lot from just how the bees are behaving.
Some of this is gut feeling, but listen to your bees while doing the hive inspection. If there is a low incessant buzz, the beehive may be queenless, which is a bad thing.
How do you know if the hive is queenless? The big red flag is no uncapped brood. In other words, no open cells with very small eggs or larvae in the bottom of the cell. You might also see a lot of drone egg cells, which means you have a drone laying worker. Which is bad. This means one or more of the female workers has started to lay eggs. The eggs will be sterile, so they become drones, hence the presence of large drone cells.
Pull out a frame from the center of the top brood super. If you see open brood, that’s a great thing. The queen has been present in the past few days, and she is probably still around. You want your frame pattern to look roughly like the photo above. It wont be perfect, but something like this. Not every cell in the brood area will be capped, there will be some empty ones.
I think its best to learn how to raise bees by having two hives. You can compare the two, and get an idea of what is ‘normal’. There are several good books on beekeeping we recommend here.
Do These 8 Thing and be more creative insightful is an article Rick tweeted and I read. Then we talked about it here on GardenFork Radio. Or at least we eventually got to it, after the usual back and forth. Happens. First we have to talk about malaria.
How do our microphones sound? We are getting better at this podcast thing, maybe one day we will be on Slate!
This post may contain affiliate links which won’t change your price but I earn a commission from. Thx! https://gardenfork.tv/amazon
Thank you to all who are writing reviews on our iTunes podcast page.
Read the Wash Post article here: http://www.washingtonpost.com/news/inspired-life/wp/2015/07/06/seven-things-to-do-that-neuroscientists-say-will-enhance-insight-and-boost-creativity/
Floor sanding is a thankless DIY project. Avoid it at all costs. I’ve sanded several floors, I’ll never do it again. Here’s why:
Like many who read GardenFork, my mindset is: I can do this, why pay someone? Well, when it comes to floor sanding, pay a professional. There is much that can go wrong and stuff that can break, that you will probably save money by hiring a floor refinishing company.
First you have to rent the equipment. A floor sander is a beast with few, if any, safety features. It is a high horsepower motor with a spinning drum of sandpaper that can tear up the power cord, toes and wood. Have a helper wrangle the power cord as you sand the floor. You will buy many pieces of round sandpaper for the drum, as you will hit invisible nails and tear up the sandpaper regularly. Then you have to stop and attach new sandpaper.
Sanding passes made perpendicular to each other
To remove paint or finishes from a wood floor you will do several passes perpendicular to each other. Start with rough sandpaper and move down to smooth sandpaper. You will be doing this all day.
Then you have to sand along the walls with an edger, which is a smaller version of a floor sander. You are on your knees wrestling with a small beast.
The floor sander has a collection bag, but it doesn’t collect much of the sawdust, it goes into the air. Put a box fan in a nearby window and exhaust it out. Use a wet-dry vacuum frequently to remove the dust.
Don a high quality respirator that fits your face well, not a cheap dust mask. Good ear protection is a must, you will have a large motor running next to you all day. Knee pads because you are always changing the drum paper and using the edger.
Add this all up, and you will be better off, and healthier, if you hire a professional floor sanding company. Yes, it costs money, but you can spend your time doing some other DIY project better suited to your skill set.
Most professionals now use a dustless floor sander, they are nice. GF Radio co-host Rick had his maple floors refinished and the dustless floor sander did great.
So there you go, my take on outsourcing floor refinishing. Your take? Let me know below.
Here is a home made pizza oven I ran across in a restaurant in Williamsburg, Brooklyn. Can’t remember the name of the place, sorry.
This one is interesting in that its a metal pizza oven, rather than the usual brick. I did not see it in operation, but I’m sure it works.
I do see some improvements that can be made to this home made pizza oven, and I wonder why they did some thing.
The two side openings are where one would put the firewood to fire the oven. They don’t seem large enough to build a fire that would sustain itself and heat up the oven enough. I didn’t see this rig in action, so it may work just fine, but I’m thinking not.
There is a curved metal arch over the pizza platter. I guess this is to channel the heat up over the pizza, and transfer heat to the metal arch. I’d remove the arch. The heat from the two side fires will naturally move across the roof the oven and out the center flue.
The pizza platter is too big, I’m thinking. I don’t often see fire baked pizzas that large. With a smaller platter, the whole pizza can fit in the oven, and you don’t have to turn it.
But its an interesting idea, not sure who built it and how well it works in practice. I love that someone took the time to make it. Clearly some welding and metal skills here.
An eclectic mix of DIY on this week’s podcast. We are talking Roma paste tomatoes at Rick’s house, and how they are doing well with measured rainfall. His tomatoes have been doing well and are now starting to ripen. We talk about toilets briefly, and Eric announces he will stop talking about toilets, maybe. Then, of course, more talk on toilets.
Get a toilet snake here: http://amzn.to/1HcQ0Wf
Eric talks about the upcoming GardenFork Patreon fund, allowing GardenFork viewers to become sustaining supporters.
Steak grilled right on the coals is next, Eric did an experiment with this method last weekend, and will shoot a video about it this weekend. Interesting to Eric was the lack of flare ups from the coals, as the meat is right on top of it. Read the NY Times article here: http://www.nytimes.com/2015/07/01/dining/steak-on-charcoal-cooking.html
Both Eric and Rick use the Apple TV box instead of watching Cable TV. Its great. You can watch GardenFork on it, either though iTunes or YouTube on the Apple TV box. Buy one here: http://amzn.to/1Cmir8s