• Using Tubing for Tapping Sugar Maples, Some Thoughts

    I am using plastic tubing for tapping sugar maples, and learned a hard lesson this weekend. When you only tap maple trees once a year, you forget stuff. And when you’re working in 2′ of snow and the wind is howling, your brain takes a hit.

    I tapped our sugar maples a week ago using tubing, I find it works better for me than sap buckets, which you have to empty every day the sap runs. I’m only able to work on this on the weekends, so I run tubing to a large collection barrel that can collect several days of sap. You can buy maple tapping supplies here.

    So last weekend I tapped the sugar maples, and ran the lateral lines to the barrels. But I made a mistake. The lateral lines where close to level with the tapping spouts, so the tubing connecting the spout to the lateral line looped down below the lateral. I didn’t think this was a big deal until the temperature dropped, and the sap in the loop of tubing below the lateral line froze.

    using-tubing-for-tapping-sugar-maples
    The wrong way to tap sugar maple trees

    The problem here is that sugar maple sap will run even when its near freezing, but if the tubing has frozen sap in it, the sap stays in the tree.

    So as a reminder to myself and a lesson for you all, you want your taps and the tubing to be above the lateral line. So the sap drains to the barrel, not collect in the tube and freeze.

    using-tubing-for-tapping-sugar-maples-1
    Tap spouts above the lateral line, the right way to tap maple trees.

    maple syrup videos
    Watch our How To Make Maple Syrup Videos here


  • Cook With A Pressure Cooker – GF Video

    Learn how to cook with a pressure cooker in this GardenFork Cooks video. I cook recipes with a pressure cooker all time in the kitchen. Its perfect for last minute meals where you decide you want beans, but forgot to cook them ahead of time. People claim you can cook foods in 5 minutes, which isn’t exactly true, but its a great kitchen tool.

    One of my favorites is our how to cook with a pressure cooker pork roast recipe video. Its very  popular because its so darn easy. And it makes you look like a genius when you have people over for dinner. Put in the pork, add beans if you like, some seasonings, maybe  you did a dry rub to the pork before hand, and cook.

    Tips when you cook with a pressure cooker:

    • Pay attention to how much liquid you add. Your cooker should have a mark inside the rim showing the maximum liquid level. Don’t go over that. The liquid could expand too much and clog the relief valve.
    • Be sure the gasket and lid are clean after each use, you don’t want any food debris to compromise the seal.
    • Read the directions that come with the cooker. You don’t usually read these, I know, but its important here, OK?
    • If steam coming out of the pressure cooker is louder than a low hiss, turn down the heat.
    • Most pressure cookers have a high pressure and low pressure setting, check the recipe to see which setting you should use.

    Some people  have a fear of cookers, which is understandable, but they are super safe. Modern day cookers have numerous relief systems in place, so cook on.

    I wrote about how to buy a pressure cooker here. I own two cookers, and based this on my experience and what some of the leading food publications recommend.

    Two of my favorite pressure cooker cookbooks are the Cooking Under Pressure series by Lorna Sass, they have great charts in them, plus recipes.

    cook with a pressure cooker

    Watch all our pressure cooker recipe videos here.

  • Pole Pruners, WiFi Phones, & Dirty Dishes – GF Radio 372

    Rick and Eric talk about how using a pole pruner can wipe you out, or look at it as exercise.

    This post may contain affiliate links which won’t change your price but I earn a commission from. Thx! https://gardenfork.tv/amazon

    And a few auspicious dates are coming up:
    Friday the 13th
    Pi Day and Einstein’s Birthday on the 14th
    the Ides of March on the 15th
    St Patrick’s day on the 17th
    The 20th of March:  The Vernal Equinox, a solar eclipse, and a super moon

    The totality of the solar eclipse will be mostly over the north atlantic and north pole, the largest populated land mass is the Faroe Islands  https://en.wikipedia.org/wiki/Faroe_Islands , but the Icelandic slooh observatory will televise the eclipse:  http://main.slooh.com/  on the 20th at 4:30 am EDT

    And the big show: the Vernal Equinox on the 20th of March at 6:45 PM EDT (22:45 UTC)

    And Spring Begins. Now mark your calendars, the next confluence of the vernal equinox and total solar eclipse will not happen again until 2072.

    The supermoon: kind of a non-event but this new moon does mark it the moon’s closest approach to earth in the moon’s somewhat eliptical orbit, about 15% bigger.

    Dr. Don Olsnn, TSU, and Wife an English professor, investigate literature and historical events in relation to astronomy.

    Tarawa WWII, disastrously low tide. Van Gogh, etc. http://www.smithsonianmag.com/ist/?next=/arts-culture/forensic-astronomer-solves-fine-arts-puzzles-116770403/

    great pix
    http://www.accuweather.com/en/weather-news/total-solar-eclipse-vernal-equinox-spring-new-supermoon/44013327

    The hoop house video we talked about: https://gardenfork.tv/pvc-cold-frame-hoop-house-2-0-diy-gardenfork-video

  • Diners, Cool Tools, & Furnace Repair – GF Radio 371

    Rich Gee, our resident executive coach joins Eric to talk about an eclectic mix of things. A wide ranging discussion begins with the Laurel Diner in Southbury, CT and then Eric’s fondness for the Waffle House.

    Rich tell us about his love of the Snow Wolf a neat snow removal shovel, info here: http://amzn.to/1Af1ULS

    He learned about the snow wolf from a website we both like, Cool Tools http://kk.org/cooltools/

    We both like Stabilicers, those strap on ice cleats that keep you from slipping: http://amzn.to/1KSGxeG

    Super important data protection begins with online backups for Rich, Eric uses a hard drive dock to back up media to bare drives, here is the video describing how to change the hard drive in an external hard drive: https://gardenfork.tv/external-hard-drive-repair-replacement-diy-video

    We then move on to troubleshooting your heating system, Rich was able to narrow down his heating problem to a controller on one of the heat zones of his house. It does help to check the obvious things first, like are the batteries in the thermostat working. Check…

    And we close with our love of stovetop pizzas, what a simple yet brilliant idea: https://gardenfork.tv/best-stove-top-pizza-recipe-gardenfork-video

    You can learn more about Rich and his executive coaching work at www.RichGee.com

  • Cardboard Seed Starting Pots – DIY Video

    These cardboard seed starting pots are made from paper towel tubes. Biodegradable plant pots made from stuff in your house. Watch this DIY video about how to make the seed starting pots and get more info below, plus links to our other seed starting videos.

    You can buy seed starting pots, but I like to make them with stuff I already have. Our neighbor, Priscilla, who we call ‘The Egg Lady’ because we get our eggs from her, has a huge garden. She grows many heirloom tomatoes, in addition to some stuff I have never heard of. Unique string beans, heirloom flowers, plus she has several apple orchard around the property. Priscilla is like me, always wanting to share cool stuff she has discovered or found or grown.

    Plus she has a menagerie of animals, horses, turkeys, guinea hens, cats, and dogs. You can hear Priscilla on GardenFork Radio here.

    I had been saving cardboard tubes for her and then one day she showed me what she was doing with all the tubes. So I wanted to share this all with you.

    Couple of important things to remember when using starting plants from seed:

    • Cardboard seed starting pots are not for long term use.
    • Take care not to over-water them. Too much water invites mold and fungus, as a result, bad things when you are starting plants.
    • Don’t use potting soil to start seeds. Buy seed starting mix.
    • You can also use coir, which is shredded coconut fiber, mixed with vermiculite and perlite.
    • Do not add fertilizer to seed starting mixes.
    • Use a grow light rig. Learn how to build a DIY Grow Light here.

    The height of the seed starting pot depends on the plants you are growing. Taller plants need more root space, therefore, make those pots larger. Salad greens can be grown in a 2″ high pot.

    Here are some of our hoop house cold frames for when its time to move the seedlings in to the garden:

    hoop house cold frame

    So there you go, let me know any improvements or suggestions and how you start seeds in the comments below.

    cardboard seed starting pots

    Save

    Save

    Save

    Save

    Save

  • Barrel Style DIY Maple Syrup Evaporator

    Here’s a DIY maple syrup evaporator made out of an old metal barrel with a few enhancement you can easily put together from spare parts or a scrap yard. I ran across the homemade evaporator at my friend Priscilla’s house. She has upgraded to a stainless steel commercial evaporator, but this was sitting next to the barn, so I had to check it out.

    DIY maple syrup evaporator

    The evaporator tray on this DIY maple syrup evaporator is an old turkey roasting pan, perfect for the wide surface area you need when boiling down sugar maple sap. The wider and larger your tray is the better. The whole idea is to boil off the water to make maple syrup.

    I’m not sure where the firedoor came from, you might find one at a welding shop, or  you can buy a kit online that will turn a barrel into a wood stove here. After you attach the fire door and the stovepipe, you cut out an opening for the evaporator tray, and you are good to go.

    Couple things to remember using a DIY Maple Syrup Evaporator:

    Maple sap becomes maple syrup when it reaches 7.5 F degrees above the local water boiling point. Water boils at 212F at sea level, so boil some water on your stove and use your digital thermometer to see what temperature it is boiling at. The temp will probably be lower than 212. Our water boils at 210F, as we are at about 1700′ in elevation.

    Don’t let the syrup get overheated. I do the final boil in the stovetop in my kitchen in a big pasta pot. Its hard to control the temp on a wood fired barrel stove.

    You don’t have to boil all the sap down at once. You can let the fire die down with sap in the tray, and just start up again the next day.

    Store your sap in the cold. I keep it in clean plastic trash can buried in snow.

    You can buy maple tapping supplies here.

    Check out our other how to make maple syrup videos here:

    DIY maple syrup evaporator


  • Mini Greenhouse Seed Starting Pots

    We have all sorts seed starting pots, but how about seed starters that have their own roofs? A neat idea that includes a solution for plastic bottles that function as a mini greenhouse for each seed starting pot. Jeremy sent me this photo and email about making these mini greenhouses with recycled bottles.

    mini-greenhouse-seed-starting-pots

    “I just want to thank you for all you have done for everyone over the years. You have been a huge help to me and an inspiration since last spring when I started gardening again after the loss of my mother.It was the best therapy I could ever hope for and You helped me more than you would ever imagine. Now I want to try and help you out if possible.

    While starting my seeds this last week I had come up with a cheap way to make a little green house by just getting a 2 piece disposable baking pan with large dome lid for a dollar at the dollar store and the smaller peat pots that you could fit 16 of them into each pan. Well I had a little too much moisture in there and had to open it up and kill the fungus on a few of the pots and it got me thinking.

    I drink bottled water a lot and I grabbed an empty bottle cut the top off and it fits perfectly over the peat pot and has a resting ledge on the ribbing of the bottle where it stops making each pot have it’s own personal mini green house.

    You can set them on a window sill if you are low on space and line the whole thing with them. If it works out well I was thinking it would also be a good way to keep infestations contained to one or two seedlings instead of a whole tray. Here are some Pictures in case you wanted to see it and give it a try. It’s a great way to recycle some of the water bottles and keep them out of a landfill. “

    Beautifully simple and something I had never thought of. I am always wanting to over-engineer everything, and make it bigger than it needs to be. A big thank you to Jeremy for taking the time to send that. Do you make seed starting pots? Let me know in the comments below!

    If you live in the northern areas of the world, its time to start seed starting pots with sugar snap peas, and then some tomatoes too. Below are links to check out our how to make seed starting pots and how to start seeds videos.

    seed starting pots

    seed starting pots


  • 12 minutes of rambling, then Walden – GF Radio 370

    Where has Eric been, talk about the use of archive shows, playing previous episodes of GardenFork Radio and how do people like that?

    Next subject is the aging of your parents and getting a financial and medical power of attorney to be better prepared for helping them later in life. An advanced medical directive is just as important.

    Finally Rick talks about Walden and living deliberately. Which basically living life while actually being actively aware of it, not just living life in a blur, letting the world schedule your life and not taking part in living it, just going through the motions.

    Meditation apps  http://well.blogs.nytimes.com/2015/02/23/meditation-for-a-good-nights-sleep/

    Rick talks about the book 10% Happiness book: http://amzn.to/17KIJmd

    Here is his review: http://rhkennerly.com/book-review-10-percent-happier-by-dan-harris

    Rick likes how Consumer Reports works for both Maximizers and Satisfiers, here is a link to a podcast they did http://htl.li/JFXnB

    Here is the link to the tomato weaving video : https://www.youtube.com/watch?v=XSf3aSj46jo

    This post may contain affiliate links which won’t change your price but I earn a commission from. Thx! https://gardenfork.tv/amazon

    Our Home Depot link: https://gardenfork.tv/home-depot-1


  • External Hard Drive Repair and Replacement DIY Video

    You can do an external hard drive repair. Learn how to replace the hard drive of your exnternal hard drive or backup drive with our DIY video here. Below the video are links to buy replacement hard drives and a computer toolkit.

    External Hard Drive Repair Tips

    Be sure to discharge any static charge you have by touching a water pipe.

    Take pictures as you take apart the external drive.

    Use the right tools, or you will strip the screws.

    Its best to remove the broken hard drive and then order a replacement drive. Click here to shop for hard drives. That way you know exactly what kind of hard drive it is. You can also probably buy a larger size drive for a few dollars more.

    external hard drive repair

    When is a drive broken and must be replaced?

    Most of the time. Really, its rare to be able to repair a drive if it is damaged. If you hear mechanical noises, scratching, metal on metal kind of sounds, the drive is toast. It is sometimes possible to fix a drive if its a software driver issue, but if you hear unhealthy sounds coming from the drive, its a bad sign.

    When taking apart the external hard drive, keep all the parts in a container, and keep your workspace clean. Its possible there will be some dust in the drive housing, so be prepared for that. Use some canned air to remove dust from the electronics, do not use a brush, bad things can happen.

    external hard drive repair

    Most drives slide right out of the chassis holding it. The drive has a set of pins that line up with the chassis to connect it all together. Here are some computer tool kits: http://amzn.to/1ExWh1u

  • Batter Bread Sandwich Loaf Recipe – GF Video

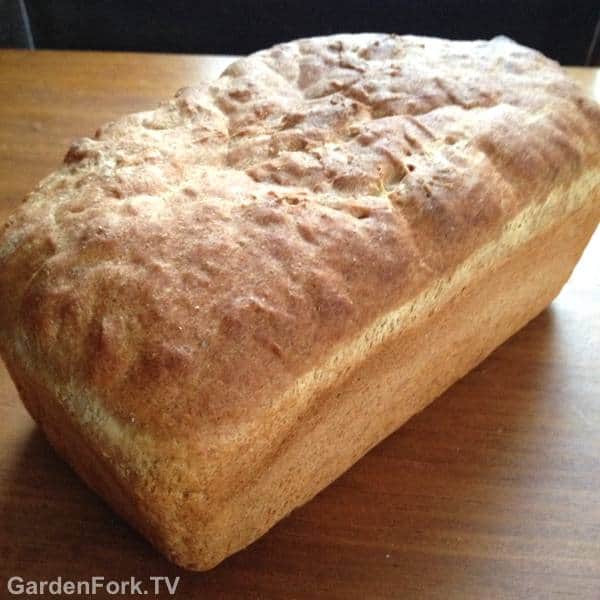
    This batter bread sandwich loaf recipe is similar to the no knead bread recipe we have done, but its even easier. Plus it makes a sandwich loaf bread, which is a lot easier to use for making sandwiches than artisan bread.

    batter-bread-sandwich-loaf-recipe-2


    batter bread sandwich loaf recipe

    Batter Breads have been around for a long time, but recent recipes by Fleischmann’s and Cooks Illustrated have offered some improvements, our recipe is adapted from them.

    1 1/2 cups bread flour   9 ozs  260 grams

    3/4 cup whole wheat flour   3.4 ozs  96 grams

    1 packet or 2 1/4 teaspoons active dry yeast

    1 1/4 cups hot water 10 ozs  283 grams

    1 tablespoon honey

    2 tablespoons melted butter

    1 teaspoon salt

    2 tablespoons hot water

    1 egg optional egg wash before baking

    2 tablespoons wheat germ or bran optional

    Add the bread flour, whole wheat flour and yeast into a standing mixer with a dough mixer blade attached. Put in the wheat germ/bran if you want to use it.

    Mix in standing mixer for one minute on low speed.

    Add in the melted butter,  honey, and 1 1/4 cups hot water, not boiling, just 100 – 120F hot, OK?

    Then mix the batter for 4 minutes on medium speed. If the dough sticks to the sides too much, stop halfway through and scrape down the sides.

    Be careful about putting the spatula in the mixer bowl while it is running. Learn from me.

    Detach the dough blade from the mixer and remove it and the bowl from the mixer. Scrape the dough off the dough blade, but let the blade sit in the dough in the bowl.

    Cover the bowl and blade with a towel. Let rise for 20 minutes in a warm place. I use the oven that I have preheated for a few minutes. A warm furnace room, or a hot sunny window works also.

    Put the mixer bowl back on the mixer. Dissolve the salt into the 2 tablespoons of warm water then add to bowl of dough, mix on low speed to incorporate.

    Use vegetable oil spray to coat a 8 1/2  x 4  1/2  loaf pan. This is the more narrow kind of loaf pan, it will give a higher rise.

    Pour the bread dough into the loaf pan.

    Cover the pan with plastic wrap that has been sprayed with oil. When the dough has risen to just below the lip of the loaf pan, remove the plastic wrap and let the dough rise to just above the rim of the loaf pan.

    Optional: you can glaze the dough with an egg wash at this point. Scramble the one egg and apply lightly.

    Bake in a 375F oven  for about 45 minutes, when the internal temp of the loaf is about 208 – 210 degrees, its done.

    After putting on a cooling rack, unwrap the end of a stick of butter and rub it over the top of the loaf to give it a sheen and more flavor.

  • Floor Sanding Archive Show – GF Radio 369C

    From the archives: How not to sand a wood floor is just part of this week’s GardenFork Radio. We also talk about hydroponics, aquaponics, composting, chainsaw safety, and some new viewer mail!

    This post may contain affiliate links which won’t change your price but I earn a commission from. Thx!  https://gardenfork.tv/amazon

    Our Home Depot link: https://gardenfork.tv/home-depot-1

  • Straw Bale House Construction by Jas. Townsend

    Straw bale house construction has always been on my bucket list, and I recently discovered Jonathan Townsend’s YouTube channel where he makes videos about 18th century lifestyle.
    Jonathan and his wife have built 2 straw bale houses, and he recently posted 2 videos about straw bale construction, and I wanted to share them with you here.

    Now I want to build a straw bale house!

    Some of the key points of straw bale construction makes:

    • Use straw, not hay. Stray is the stem of wheat, and hay is a mix of grasses baled together.
    • Have a large overhang, so the bales have no chance of getting wet from roof runoff
    • Stucco over the straw bales inside and out.

    Wikipedia states the insulation R value of a straw bale can range from R17-R55 depending on construction factors, so lets say R35 could be considered an average R value. Not bad for any house.
    The construction method used in this straw bale house is a pole barn with straw side walls. Columns are set in place, then a standard roof is built on top, then the straw bales are used to fill in the walls. Note in this video the large roof overhang to protect the stucco from rain.
    Wire mesh is placed over the bales and a cement stucco is applied.

    I don’t know what issues one would have with some local zoning ordinances. There are parts of the US where you have few zoning regs, and would be an ideal place for a straw bale house.

    I love it for the renewable resource walls and simple construction with substantial insulation properties. Plus you can build most of it yourself.

    If you are interested in more alternative house building, check out our GardenFork Radio talk with Deek of RelaxShacks, one of the experts on the Tiny House Movement.

    And read this post about Deek’s Tiny House Plans here.

    tiny house plans from Deek
    Tiny House Plans for a simple A frame

    You can learn more about Jonothan on his YouTube channel and on his online store for historical reenactors looking for clothing and goods from 1750-1840.

  • Rooftop Pizza Oven in Cambodia

    Tony wanted to make a brick pizza oven, and he found our pizza oven videos, and then made his own version. On a rooftop in Cambodia, of all places. How cool is that?

    Pizza Oven 2.0 from ConceptuallySpeaking.
    Tony writes:

    “I’ve been meaning to re-visit your site since it provided the perfect solution I was looking for in 2013 when I wanted to build a pizza oven on my roof here in Cambodia.

    I stacked and built mine on a custom made angle iron table with the angle iron bars ($40). Then I found these perfect 2 inch think angled cement pieces to put under the oven ($10). Once I found the place to buy the old bricks from the French Colonial buildings being dismantled at a price of $1 for 4, things got a lot easier – but finding the bricks was not an easy task given the language barrier and neither did the fact that it’s a 5 story building with no elevator. Although I did get a great workout bring it up and continue to do so with each or cord of wood. One original modification on made on your design was not to stack the bricks vertically but instead all of them flat.

    I have now re-built the oven three times, replacing cracked bricks and modifying the design slightly. I originally had a chimney in the back but found it was really non-essential. One nice feature I added was an elevated level in the front for cooking the pizza on. I also built it up two brick levels higher over all as the brick price is pretty inconsequential here. I use terra cotta tiles to cook on in the oven and on top of the oven to keep the pizzas warm, help the dough rise and get the crust a bit crispier.

    Thanks for the inspiring solution. If you are ever in Phnom Penh, Cambodia come over for a pizza with one of the best views in town.”

    Not only are they good for making pizza, but our DIY Pizza Oven Plans make for a good workout when you are hauling brick up four flights of stairs!

    Interesting that T0ny also found that one does not need a chimney for this pizza oven. I have had many people ask about that.

    DIY pizza oven video

    Watch all our DIY pizza oven plans videos here.


  • Burning Sponges Archive Show – GF Radio 369B

    Rebroadcast of an earlier show, as I am traveling and blanked on posting a show before I left town. In this one, Rick and I talk about unique protein diets for dogs that may help them with skin issues and food allergies. Then we touch on sous vide cooking for a minute, and of course beekeeping.

    Dashcams, cameras that are mounted on the dashboard of your car, are a topic today also. Having a dashboard camera may help if you are in an accident.

    Eric brings up his new favorite book, Modernist Cuisine, about food safety and how to disinfect your kitchen sponges. Eric tries to disinfect his kitchen sponges in the microwave and discusses what happens next. Rick touches on the correct way to crack eggs before adding them to the bowl you are mixing them into.

    Finally we read viewer mail about dogs in the kitchen. You know how this ends.

  • Cabbage & Apples with Salmon Recipe – From The Fridge

    I’m trying to cook more from the refrigerator, as I always have something in there I can cook with. If I was more organized I could plan dinners, but that happens rarely. Instead I keep a stock of stuff I like to cook with, and go from there. But the fridge was looking kinda empty and there was this half a cabbage in there with some apples that were going soft.

    cabbage-apples-with-salmon-2

    So I put some chopped onion into the pan and then added in the apple and cabbage. The apples will disappear in the mix, adding that applesauce kind of taste to the dish. I remembered from a Facebook conversation we had awhile ago, some people suggested caraway seed, and I had that from a bread baking experiment.

    cabbage apples recipe

    I first covered the pan of cabbage to let it steam and break down the leaves a bit. This also softened the  apples. And I could walk around doing other stuff, as the water that sweats out keeps the pan from burning. After the cabbage has broken down nicely you can remove the lid and let it start to brown.

    I read recently where you shouldn’t let cabbage cook too long or it will have a mustardy smell, I have not experienced that.

    cabbage-apples-with-salmon

    I always keep frozen salmon in the freezer. It defrosts quickly using our How To Defrost Meat Quickly video technique. I put it under the broiler for a few minutes. I am good at over-cooking salmon, so I have to focus, which can be a challenge.


    Cabbage With Apples Recipe

    1/2 head cabbage, chopped up

    2 apples, sliced with skin on, its OK if they are soft

    1 medium onion, roughly chopped up

    2 teaspoons caraway seeds.


    Put a few glugs of oil into your pan. You want the whole pan to be covered with about 1/8″ of oil.

    Drop in the onions and cook down a bit until you can they become kinda transparent.

    Add in the cabbage and the apples, scatter some salt on it,  mix it all up, and cover.

    Set on medium or low heat, depending on how your stove works. You want the dish to steam-cook, not burn.

    Give the dish a stir every 5 minutes or so, chopping up any hunks of cabbage.

    When the cabbage has broken down to your liking, take off the lid and brown the cabbage.

    Taste for salt, it may need more, and then you’re done.


  • 5 No Knead Bread Recipe Tips – GF Cooks Video

    Make better bread with these 5 no knead bread recipe tips I’ve learned from baking this great bread. The original recipe is great, but with a few baking tips, its even better. Below are links to our other no knead bread videos. Watch our tips video here and then tell us your bread baking tips in the comments below.


    The basic no knead bread recipe can be changed up several ways, we did a steel cut oatmeal no knead recipe video here, that adds a neat oat flavor to the bread.
    First a big thank you to Jim Lahey, and his book, My Bread, The No Knead Method. He also has a pizza book, My Pizza.

    Using parchment paper has been a lightbulb for me. I’m not sure where I learned it from, but I used to flop the dough in to the dutch oven with some unfortunate results. Now I simply lower the bread dough in to the hot dutch oven. Its OK that the parchment sticks out of the lid, not a problem.

    5 no knead bread recipe tips

    Using a digital scale to measure your ingredients makes a huge difference! Yes, I am a convert to this method, as you can tell. The drag and scoop method makes for inaccurate measuring. Why does the bakery bread taste better? They use a scale to measure their ingredients.

    We love our dutch oven, but you don’t absolutely need one to bake the no knead bread recipe. Any oven proof bowl that has a lid that wont melt will work. Corning Ware kind of stuff is what we are talking about here big casseroles, etc.

    You can make cool designs in your bread, we use scissors, but you can use some serrated knives, and this fancy bread baking tool called a Lame. Dust the top of the dough before you cut into it. What kind of flour do you dust your bread with? I’d like to read about what people are using.

    Yes, you can make a whole wheat no knead bread, but from what I’ve found, the 100% whole wheat breads don’t come out great. We usually add up to 30% whole wheat to bread flour. Works pretty good.

  • Cheap Cold Frame How To – DIY GF Video

    Here’s a cheap cold frame you can make out of scrap lumber and a window. In this video I’ll show you how to build the cold frame in a few hours. With this rig, you can do some winter gardening, and of course we have some videos on that, the links are at the end of this post.

    Some enhancements I’ve done with we made the video:

    • I painted the cold frame with outdoor latex paint, 2-3 coats is good, as plywood does not like to get wet, you know.
    • I split open some old garden house and slipped it on the bottom of the cold frame to keep the wood out of the dirt.
    • I’ve grown vegetables in winter for several years. Neat.

    I’m betting you can find enough scrap lumber to make this a recycle or freecycle project. The wood doesn’t have to be finish grade, and one of my pieces was warped, but it worked anyway. The hinges I had laying around, and the only thing I had to buy was the thermal vent.

    What grows well in a cold frame? I grow cold hard salad greens and kale. Kale will grow in snow. I’ve dug it out of the garden and its still green in February. You can buy winter salad green mixes from the seed companies. Mache is a neat green that not many people grow, the seeds are kinda tiny.

    cheap cold frame

    If you don’t get the auto vent, you will have to open up the frame on warm days. You will be surprised how hot it can get in a our cheap cold frame, even if it didn’t cost us any money to build.

    The biggest problem with this rig is the glass. It can break. That tree limb could have landed anywhere, but it landed on top of your super cheap cold frame instead. I have replaced the glass once. Luckily I had some spare windows that I salvaged a piece of glass out of. You might try putting some screening over the glass to protect it. Just a thought.

    cheap cold frame

    Below are some suggested books for winter gardening, let me know your thoughts.

    hoop house cold frame
    Watch all of our  hoop house videos here.

  • Cold Frame Gardening at BBG – DIY GF Video

    Cold frame gardening can be done in the Northern climes, as we see at the Brooklyn Botanic Garden. We made this winter gardening video at their demonstration garden in December. They were harvesting greens like arugula and mache. Watch the video and see for yourself. Below are some book recommendations for winter gardening.

    The cold frame plans for this set are easy to build. The dimensions depend on the size of the windows. You may already have some windows, or a neighbor may be replacing their windows and you can grab a few of them. Or pick them up from a garage sale or look on the web for free stuff.

    The cold frames in this video were built with 2×8 or 2×10 lumber, but you could use something less thick and it will be ok, i think. I like how they had the cold frames next to each other, so each frame helped insulate the one next to it. You could use scrap hinges off some old doors, its a ‘use what you got’ kind of project.

    cold frame gardening

    cold frame gardening

    For cold frame gardening, its best to orient the cold frame so it faces south, if you are in the northern hemisphere. This cold frame is manually vented, meaning you vent them by opening them up and closing them yourself. You could install the thermatic vent we have used in our hoop house greenhouse plans if you like.

    What to grow when gardening in winter? Cold tolerant plants, mainly salad greens work well. Several seed suppliers sell winter salad mixes, they will do well until it becomes just too cold. But then those plants will revive in early spring. Many times there is enough moisture in the ground to keep the plants watered, but keep an eye on them. If the cold frame gets too warm, the soil can dry out. And you’d be surprised at just how hot a cold frame can get in winter.