The best cast iron seasoning instructions, hands down. First watch the video, then read more about our easy step by step process to restore cast iron.
At the end of this article are links to how to remove rust from cast iron and how to remove the seasoning from cast iron, where to buy cast iron, and cast iron videos.
So you have a brand-new cast iron pan you just bought or you have an older pan that you just strip the seasoning off of. I ruined the seasoning of one of my pans awhile back, and is one of the reasons I created this cast iron seasoning and care video series. While we show a skillet, this process works for how to season a cast iron dutch oven or griddle as well.
Our cast iron seasoning instructions are based on a blog post by Sheryl Canter, who did a lot of research into this and saved us all from having to do that same research. The secret to cast iron seasoning is you want use an oil that is called a drying oil. When drying oils are applied to a surface like cast iron and heated, the oil goes through what’s called polymerization. The best edible drying oil is Flax oil. You have to buy this in the health food section of a food store and it has to be kept refrigerated, as it can go rancid fairly quickly. Flax oil is the food grade version of linseed oil, I would not suggest you use linseed oil to season your cast iron pan.
But a more affordable and easier to find oil that works well is Sunflower Oil. I have found its great. And if you can’t find any of these oils, regular old vegetable oil or Crisco does just fine.
For this cast iron seasoning method, the more oil application and heating cycles you do, the better the seasoning. Our cast iron seasoning instructions are based on Sheryl’s, I modified it a bit. This process is for new pans, or pans that have had all the previous seasoning removed, watch our video here for how to remove cast iron seasoning.
Cast Iron Seasoning Instructions
On the stove top, heat up the cast iron pan. This makes sure the pan is dry and opens up the pores of the metal a bit.
Add in a tablespoon or two of oil into the pan. Use a paper towel to coat the whole pan, inside and out, with the flax oil.
Grab a new paper towel, and wipe out excess oil. You only want a thin film of flax oil in the pan. No drips or globs of oil.
Turn the oven to 500F and place the pan – you can do more than one, stack them if you want- into the oven.
Heat for one hour, turn off the oven, allow the pan to cool.
Repeat the oil coating and heating 2-3-4-6 times. Whatever works for you.
The more you do this initial seasoning, the better the pan will be.
The outdoor gas grill is great for cast iron seasoning.
The cast iron seasoning process puts out a bit of smoke, so I’d suggest using your outdoor gas grill. Turn the grill burners on high, close the lid to heat it up, put in the pans. My gas grill will not get to 500F, but it got close, and that worked well for me.
I oiled and heated one of my pans 4 times and it looked great, more and it is even better.
I think new cast iron is just as good as old cast iron, but there are many arguments about that. You can get good cast iron on amazon here. This post may contain affiliate links which won’t change your price but I earn a commission from. Thx!
Our rugelach recipe is based on the on my Grandmother and Mom for the Christmas holiday. We also called Rugelach ‘roll-ups’ not sure why, maybe it was easier to say. But, Rugelachs are easy to make, and with Eric’s recipe for rugelach, you can too. Our family’s version of rugelach used the classic nut – sugar mix, but we also used jam or jelly. Its important not to use too much jam or jelly; when you bake the rugelach, some of the jam may seep out and burn you cookie sheet. Not a good thing.
There are some people that say rugelach and croissants are related but after reading this Wikipedia entry, I don’t think so. Rugelach is a much older treat and croissants only came about in the 19 century. Nonetheless rugelach are found in a lot of different cultures and in a lot of different countries, especially in Eastern Europe. Take some flour, a little sugar, add some nuts and something sweet, roll it up and bake it and you got this excellent dessert.
Here’s my modern take on rugelach I add cream cheese to the pie dough and it works out really well. The dough might be a little wet, so use a little less water. You can always add a little more as you go along. If you find the dough is too wet after comes out of the fridge, you can add a little bit of flour to soak up the moisture.
Eric’s Rugelach Recipe
2 cups all purpose flour
2 sticks butter – cold – cut into 1/2 cubes
3 teaspoons sugar
8 ounces cream cheese – cut into 1 inch blocks
1 teaspoon salt
2 cups chopped walnuts
1/2 cup brown sugar
1 teaspoon cinnamon
lemon zest – optional
Preheat oven to 350F
In a food processor, pulse the flour and butter together until the flour coats the butter and the mix starts to look like large cornmeal.
Add in the cream cheese and pulse to mix it all together, it should start to form small marbles, and also just some fine powder as well. ( it never looks like it does on the food TV shows, don’t worry )
Put the flour mixture into a large bowl, and start to add small amounts of ice water, about 2 tablespoons at a time. Mix the water into the flour until you get a dough that is wet, but dry enough to handle.
Shape the dough into a big disc, wrap in plastic wrap, and put in the freezer for about 10 minutes, or the fridge for 30 minutes. You can also leave the dough in the fridge until the next day if you want.
Mix the walnuts with the brown sugar and cinnamon. You can also add lemon zest to the nut mix.
On a floured counter or plastic wrap, or whatever you like to use for dough, try to shape the dough into a big circle, like a pizza. If it isn’t perfect, don’t worry, use a pastry scraper to cut out a rough circle, save the extra pieces.
Pour the nut mixture onto the circle of dough
Cut pizza slices into the dough. the outside of the slice should be 1.5 – 2″ wide.
Roll up the slices so they look kinda like croissants.
Place on a greased baking sheet, bake at 350F for about 30 min. The crust should be slightly golden, you can bake them more if you like, just don’t burn them.
Make your own DIY Christmas cards, how makers are going into space, and how to make yogurt by GF listener Tish on GardenFork Radio this week.
Rick tell us of a new portable backup device for your digital photos. This is great for when you are on vacation and want to back up the photos on the camera’s memory cards. Thanks to GF listener Kevin, Rick bought a portable wireless backup hard drive that you can easily back up your memory cards to. Here is the Amazon link.
How to make your own Christmas cards is next, Eric made a how to do block printing video and make Christmas cards here.
We talk about DIY Power Tool Repair, in a recent email newsletter
Eric mentioned Patrick of Lucky Duck Press in upstate CT, he has a neat Etsy store with nicely done cards and printed matter. Patrick will be a guest soon on the show.
Building your own rocket ship is next from an article from ArsTechnica, a website we like.
Marcus sent us an email and lets us know about a neat youtube show, the Culinary Fanatic.
From a GardenFork Fan, an easy way to make yogurt using your oven. You don’t need special equipment, its easy to make, here’s how. Below this yogurt recipe are links to our how to make yogurt videos and more fermentation stuff.
I recommend one special tool; a probe thermometer with an alarm that notifies you when your food has reached the desired temperature. I use this one. There are lots of them on the market ranging from $15 to $60. However any thermometer that will read from 100 to 200 degrees will tell you what you need to know.
Tish’s Easy Way To Make Yogurt Recipe:
Warm your milk in a non-reactive pan over moderate heat to 180 degrees Fahrenheit. go slowly with this step for two reasons. First you don’t want to scorch the milk and second, slow warming allows for some evaporation of water in the milk and that makes a thicker, creamier yogurt. The probe thermometer is a big help here because you don’t have to stand over the milk and stir it. I set this up when I have other kitchen jobs to do and give the pan a quick stir every now and then.
Once the milk has reached 180 degrees, you can hold it there for more evaporation or remove it from the heat right away. You do not want your milk to boil. Allow the milk to cool to 110 degrees (re-set your programmable thermometer to alert you when the milk has cooled). Spoon some of the warm milk into your yogurt culture and stir it in. Keep stirring in milk, a spoonful at a time, until the mix is smooth and thin enough to blend easily with the full pot of milk. Add the culture to the milk in the pot and stir it thoroughly. Pour the cultured milk into your clean containers and cover the containers.
Many ovens can maintain a perfect temperature for yogurt, just by keeping the oven light on. Before you begin, test this by leaving the oven light on for several hours with the probe thermometer sitting on the rack. If the bulb keeps your oven at 100 to 115 degrees, you’ve found your yogurt machine. If this doesn’t work, use a personal sized cooler – the ones designed to hold one or two six-packs of drink cans. Wash the cooler out with hot tap water, even if it’s already clean because you want to warm it. Set the containers of cultured milk in the cooler, add enough hot tap water to come right up to the tops of the containers, cover and move the cooler to a quiet spot in the kitchen.
Leave your yogurt alone for 8 to 12 hours then move it to the refrigerator. Enjoy!
I use pasteurized milk. Many national brands of milk are now ultra-pasteurized and I don’t know how that will do for yogurt. It won’t make cheese so I haven’t tried it with yogurt. You can use any fat content you like from whole milk to skim.
You can buy yogurt culture from New England Cheesemaking. I have done that. However I have had really good results using plain yogurt from the grocery store. In the past I have had problems with the flavor of the yogurt (made with grocery store starter) changing from batch to batch but for the last year that has not happened. Any unflavored yogurt with live cultures will do, but I use the Giant grocery store house brand. Look for live cultures and an ingredient list that includes no more than three items (Milk, live cultures, and maybe milk solids). You need about a tablespoon per quart of new milk.
If you like your yogurt thick, you can add non-fat dry milk to the milk while you warm it. I add a lot – a cup of dry milk per quart of new milk. This gives me yogurt that is almost like Greek yogurt. I get very little whey separation with this much added milk.
I warm my milk while I fix dinner, cool it while I eat, and leave it in the little cooler overnight. I make two quarts every ten to fourteen days.
I just want you to know that you don’t need expensive tools or yogurt-specific equipment. Yogurt is a simple food and it’s easy to make.
I’ll be posting a more thorough how to season cast iron series here soon, with more photos and information, but I wanted to get these up on the site for you all. And the last video in this list here is our excellent cast iron cornbread, check it out.
Good podcasts to listen to and lessons learned on grilling and frying turkeys start off the show, and we talk about viewer mail from Rick on the Left Coast about Eggs.
Eric was tasked with cooking two turkeys on Thanksgiving, one deep fried like we do in this video, and one grilled on a Weber Grill, which Eric has never done before. Like life, it doesn’t all go according to plan. Rick wrote a post about how to grill a turkey on a Weber Grill here.
Podcast We Like
From Steve in Canada:
Hey Eric, an insightful podcast I like listening to is Tiny House Chat. I’ll probably never own my own Tiny House but my wife and I love the idea and inspiration behind these funky abodes. This podcast is very descriptive and informative on all aspects of building and living in a tiny house.
Give it a listen! Love your shows, we eagerly await what you’ll teach us next!
Rick reminds us to check out the tiny house documentary that features our friend Deek, Tiny The Movie.
Rick likes the Quick and Dirty Tips podcast, specifically the Nutrition Diva.
We got a great viewer mail on our chat about eating eggs, based on an article on the NY Times Well column.
Hi Rick and Eric,
If you read the egg study carefully, I think the researchers are saying that eggs are “less bad” than other choices, not that “they are good for you.” Comparing eggs to “sugared cereal” is not a terribly high standard to beat. Some of Rick’s worm compost would likely beat sugar-laden cereal.
Love the show! Rick (on the left coast)
We end on what kind of fitness monitors or apps you use, and Rick suggests the Moves app.
How to defrost a turkey? Rick and Eric tell you how to do this. Based on the info from the epic how to defrost meat quickly video, the Thanksgiving experts save the holidays. Or at least we think we do.
And we talk about the new news that its OK to eat eggs again. We’ve been eating eggs anyway. They are healthy. Here the NY Times Well column says so. This moves into how we both have cut down on sugar consumption, and just how much sugar is in processed foods like soda. Rick gives us this article on how sugar may shorten your life.
Thanksgiving emergencies are solved by the experts, or at least solved by the GardenFork crew here.
Here is the beginning of the show in a transcript:
It’s a wet and rainy day here in Margaritaville North.
Today we’re going to talk about eggs, Rick ‘s trip to Florida and some camera camera tips. And We answer some Thanksgiving emergency questions
I read this great article from my the New York Times about Eggs. For those of us of a certain generation, it was most drilled into our heads that eggs were unhealthy, and they would cause heart attacks and now they’re finding that you know it’s okay to eat eggs, that’s great.
And the American Heart Association has looked at clinical studies, they no longer condemn eggs in its guidelines. It recommends people limit themselves to consume a single egg that has two hundred milligrams, as well as a mix of saturated, unsaturated fats, including the monounsaturated kind found in olive oil. Olive oil is good for you, right, and eggs are good for you. I love eggs we keep a dozen eggs boiled a hard-boiled in the refrigerator and I will add them to salads and all kinds of side dishes . From a Doctor who is who is from the Harvard school of Public health, “Eggs are particularly good replacement for less health healthful fare like processed meats and refined carbohydrates. So instead of maybe that processed meat like hams or hot dogs or refined carbohydrates, which is sounds like white bread. The study suggested for most people starting your day with a breakfast of scrambled eggs will have a better impact on your overall cholesterol profile than a bagel or a bowl of sugary cereal.
Do you know that drinking a twenty ounces of Bob regular soda not diet soda, but sugared soda a day will reduce you lifespan by age four to six years. It wouldn’t surprise me. It shortens the telomeres I’ve got a study here. I’ll send it to you and put the link in the show notes, telomeres are the part of the reproductive part of cells that determine how long cells live, and it turns out, looks like all of the sugar in the that soda is actually aging the cells. Not that the fake sugar is any better.
We have just about given up all of the other guy sodas and and regular sodas of all that stuff. It’s its water, tea, coffee and more coffee. I’ve been having oatmeal for breakfast. I love bagels and live in bagel Central, of course.
We have eggs for dinner also we have a salad every night, I will throw a poached egg in the salad or a hard boiled eggs. We have several salad recipes and i will put them in the show notes.
Let us know your thoughts in the comments below, thx!
Here’s my go to cast iron corn bread recipe for most weekends at the house. Cornbread goes with so many of the dishes we make, I have the ingredients in my head.
Melt fat, mix dry, add wet, pour into pan. I love cornbread. I’m not sure when the first time I ever had cornbread was, but I’m pretty sure it was probably at the Friday night fish fry when we lived in Wisconsin.
We would go to Etzel’s Country Inn and sit in what looked like someone’s basement recreation room. There was a bar next-door, and we would have fried perch, french fries, and corn bread. All this and a polka band playing with accordion music.
And it was that his fish fry that the epiphany that I want to learn how to play the accordion. We see how well that turned out.
But what I love about this cast iron cornbread recipe is it’s easy super simple. You literally throw the oil in the pan, put the pan in the oven to heat up. You mix the dry ingredients dump, the wet ingredients and mix it all together. Pour in a hot pan, if it sizzles be careful. I’ve never had it spit at me but you got to becareful these days or else someone’s gonna get mad at you you know.
Drop it in your oven half an hour later, boom: delicious cornbread.
In this recipe I use a bacon drippings. You don’t have to do that if you don’t want to, it does give it a neat taste, but you could also use butter or you could use a vegetable oil. Really what ever makes you happy go do it. Okay?
Full disclosure: I am a northerner and I like cornbread that’s a little sweeter maybe than my southern friends. I know I like it sweeter than my southern friends because when I serve them cornbread there’s always a raised eyebrow that I got from them.
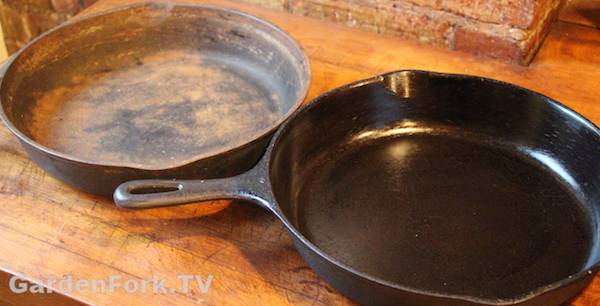
If you want to buy a cast-iron skillet here’s a link.
4 tablespoons of bacon drippings, veg oil, or butter
1 1/2 cup cornmeal, medium or coarse ground
1/2 cup whole wheat flour
1/2 cup sugar, less if you like.
1 1/2 teaspoons baking powder
1 teaspoon salt
1 cup milk
2 eggs
You can also use a glass or metal pan for this. I would opt for the glass pan if i didn’t have any cast iron.
Fire up the oven to 375 with the cast iron pan in it.
After assembling your ingredients, pull out the pan.
Drop the oil into the cast iron pan, and put back into the oven.
Mix together the dry ingredients using a fork or similar tool.
Add the two eggs into the milk and scramble them. Don’t over-scramble, K?
When the cast iron pan has melted the oil, pull it out, and place on a rack, as it will be hot.
Pour the batter into the pan. The oil will puddle up, that’s ok.
Bake for 30 minutes, test with a clean knife for done-ness.
I love cooking with my pressure cooker and this braised pork recipe what white beans is to me the quintessential fall and winter recipe.
Cut up some pork, with some dried beans, add onions, some herbs, in for the pressure cooker 30 minutes later you’re done. Isn’t that amazing?
I could probably eat white beans every day all winter. They just have this kind of magic quality and you really haven’t done anything. Maybe you added some onions and garlic, some olive oil – just a little bit of something and boom amazing. What I really like to do is save with the cheese rinds from Romano and Parmesan cheese, and when I’m cooking white beans, I throw them in. I chopped up the cheese rinds into 1 inch chunks, and throw them in while I’m cooking the beans. The rinds gives off a magic flavor quality which I love.
This pressure cooker recipe works really well for this recipe. If you wanted to go a little faster you could add in frozen carrots at the end of the dish instead of chopping up carrots in the beginning. Just one little cheat that might work and make it a little faster for you. I posted about pressure cooker reviews and a really good pressure cooker cookbook I like here.
Pressure Cooker Braised Pork with White Beans and Peas Recipe
This is for your average 6 quart pressure cooker, if you have a larger pressure cooker you can increase the dried white beans to 1 pound.
2-3 pound boneless pork shoulder or pork butt, or a pork shoulder you have deboned. Cut into 1″ or so cubes. Cut off large pieces of fat.
8 ounces of dried white beans, Northern, Cannenelli, or whatever you have
2 Medium Onions, or one large one chopped into 1/2″ pieces
6-8 cloves of chopped garlic depending on how big the cloves are
2 tablespoons Italian Seasoning herb mix, or Herbs de Provence herb mix
4 bay leaves
1 cup white wine dry wine is better, I think
3 cups chicken broth you can use beef broth if you want a bigger flavor
2 lbs of carrots chopped into 1″ lengths
16 ounce bag of frozen peas.
Rinse the white beans, put in a bowl and cover with hot water, add in 1 tablespoon of salt and let sit for an hour or longer.
Heat a glug of oil in a skillet and add in the chopped onions and chopped garlic, you want them to start to brown.
Heat a glug of oil in the pressure cooker and brown the cubed pork shoulder. You don’t want to cook the meat, just brown it.
When the onions-garlic is browned, put them in with the meat. Pour some white wine into the onion pan, deglaze the bottom, and pour this into the pressure cooker with the meat and onions. Add in white wine to 1 cup or so.
Add in the carrots to the pressure cooker.
Drain the beans in the salt brine – do not rinse them – and add to the pressure cooker.
Pour in the 3 cups of broth.
Drop in the herbs. I go kinda heavy on herbs, follow your nose…
Important: follow your model’s instructions on how full you can fill the pressure cooker, most limit it to 2/3 or 3/4 full. You may have to hold back on some of the beans or carrots.
Close up the pressure cooker and bring to high pressure, lower the heat and cook at high pressure for 30 minutes. Let it sit for 10-15 minutes and then quick release any residual steam.
Drop in the bag of frozen peas, stir into the mix.
If you have any cheese rinds from Romano or Parmesan, you could cut these into big chunks and drop them in. Carve off the hard edge or wax rinds themselves, as they will dissolve.
If you want make this a bit faster, omit the chopped carrots and when the pork is done, drop in a bag of frozen sliced carrots when you put in the frozen peas.
Here are a couple of pressure cooker reviews if you’re thinking of buying a pressure cooker, and a good cookbook to go along with it.
Electric Pressure Cookers
I have become a convert to the electric pressure cooker, notably the Instant Pot. You can buy the Instant Pot model I use here. (affiliate link) Watch the video and then read on about some of the reasons I like it.
Instant Pot Pressure Cooker Review:
Turn it on and walk away, no monitoring cooktop burner flame.
Built in keep warm setting.
Smart technology monitors internal temperature.
Easy to close lid.
It makes yogurt!
Stove Top Pressure Cookers: I own two of these. I recently bought a Fagor pressure cooker which was highly recommended as a Best Buy by the people at America’s Test Kitchen. I found the Fagor to be easy to use and pretty straightforward. Here is a link to buy the Fagor Pressure Cooker. (affiliate link) I suggest buying the 10 quart.
The Fagor has a nice thick bottom and the lid is fairly easy to attach. You’ll find pressure cookers can be a little clunky fitting the lid on because it has a gasket. But this one drops on pretty quickly and it has a couple of guide marks to help you with that.
As far as price it lands about in the middle of what a pressure cooker costs. Don’t buy a cheap pressure cooker, it’s just not worth it, it’s going to not work well and you’re going to be unhappy and then you’re not going to like pressure cookers. You get what you pay for with most things in life and that’s true with pressure cookers as well.
I also own a Magafesa pressure cooker, it is the first one I bought about 10 years ago. It got a good rating from Cook’s Illustrated back then. Now it does not make the recommended list on Cook’s. It works, but I find if the relief valve gets any food debris in it, it can take some time to clean it up.
Do not buy a pressure cooker with what has a jiggle top, this is an old technology, go with the current models. Also don’t buy a used one at a garage sale, you don’t know if it works properly. Take your money and go buy new one.
I use a 6 quart cooker, but I would opt for a larger cooker (8 or 10 quart) if you have the cash and kids. This allows you to make a bigger meal that can be lunch or dinner the next day too. Putting the lid on a cooker can take some practice, none of them are like butter, but the one you buy should go on easily. Make sure the bottom of the cooker has a thick base, much like regular pots, a thin base burns food.
I imagine there are a ton of pressure cooker reviews online, this is my take on it. Please let me know yours in the comments
When I bought my Fagor pressure cooker I also picked up a book, Pressure Cooker Perfection, which is from the people at America’s Test Kitchen.
It has a lot of good information in the front of the book. I mean it’s what you expect when you get something from the Cook’s Illustrated – America’s Test Kitchen people. It’s researched to death – lot of good information and the recipes are good as well. I think the recipes are good for those of us who follow directions and then you can jump off from these pressure cooker recipes and make your own dishes. The Bolognese is kind a good one to start with, I skipped the Mortadella called for in the recipe.
The authors of Pressure Cooker Perfection cookbook haven’t really broken any new ground but they do list out here some nice recipes they have good pictures it shows you step-by-step and that typical America’s Test Kitchen way they do things. I like them for that I applaud them for that.
I also like Lorna Sass’s Cooking Under Pressure cookbooks, they have good recipes and charts for cooking times.
Let me know what you guys think in the notes below what kind of pressure cooker do you own.
Build these DIY rolling garage shelves and make your basement or garage more organized and save some bucks. Shelving units with wheels are expensive, here’s how I added caster wheels to my existing garage shelving units.
You can build the DIY rolling garage shelves either as a light-duty or heavy duty version. Light duty would be for a shelving unit that doesn’t have a lot of heavy material on it. Light stuff might be beach towels, blankets, pillows, things like that. A duty shelf would be one that has tools, screws, nails, that sort of thing on the shelves.
You can build this with scrap lumber that you have laying around. One special tool that you will need is called a hole saw. If you don’t have a hole saw kit you might be able to borrow one from a neighbor or you can buy a hole saw kit here online. Don’t buy the cheapest hole saw kit, it will break.
I used 1 1/4″ and 1 5/8″ drywall screws to pu this together, it depends on if you are using 2x4s or something thinner. Its good to have a box of both on hand anyway. For the lumber, you can use cast off studs from a renovation, spare pieces of plywood, metal studs (for the lightweight version). This is really a use what you got kind of project.
I got the caster wheels for this project from an IKEA desk that I had taken apart, but you can find these wheels at the hardware store or at tool supply stores. I have also taken wheels off of furniture that has been put out for the trash. You can also buy wheels online here.
Adding wheels to your shelving units does increase the height of the shelving unit. So if you have low ceilings in your basement, keep that in mind. Your new DIY Rolling Garage Shelves might hit the ceiling now if you have tall stuff on the top shelf.
Assembly of the DIY rolling garage shelves:
holes line up with legs of shelfShelf sits in holes of the wheel baseHave an assistantAssemble upside downHeavy Duty ShelvesLight Duty Shelves
Here’s a mushroom hunting video about some really amazing oyster mushrooms we found growing along the side of the road right near our house
A few things to keep in mind when you’re going mushroom hunting:
bring along several identification books we like a couple that we listed at the end of the video here
learn from someone who already knows what they’re doing take a class or ask if you can tagalong with someone who is a mushroom expert
Join your local mycological society, in other words your local mushroom group. You can learn a lot from these people and they might even take you long to show you some really cool spots to go mushroom hunting.
When you find some mushrooms you want to harvest, don’t take all of them. Leave one third of the mushrooms there so the mushrooms can propagate they will release their spores and they will grow more mushrooms that you would go in harvest.
After a while you’ll be able to recognize some of the common edible mushrooms in your area but bring along several mushroom identification books anyway. I really like the Audubon guide and there are also several regional guides. We have a few for the Northeast United States or New England listed those below.
Avoid mushrooms that have slugs or bugs in them, yes they are a protein, but many don’t taste that great. You can wash mushrooms, but they usually only need to be brushed off. You can use a towel, I’ve seen mushroom brushes that look like a whisk broom/porcupine thing. So again, if you’re not quite sure don’t eat it or check with your friend who is an expert OK?
Cross check the mushrooms you find with several sources, books are best, I think. I use several books for identifying mushrooms , below are the mushroom identification books I recommend:
Hanging shelves on a concrete wall, or a brick wall? Learn how to drill into brick and cement with our how to video. There are links to the tools you will need, and more DIY videos below the video player here.
Keep in mind when you are hanging shelves on a concrete wall you’re going to have to drill into the cement and that is going to create a lot of dust. Have a vacuum or better yet a shop vac nearby to suck up all that cement or brick dust. What I do when I’m drilling into cement or brick is I have the vacuum hose right next to the drill bit while I’m drilling. This does a really good job of keeping the dust down. You can see on this post on how to hang a TV on a brick wall just how much how much dust gets flying around if you don’t use a vacuum.
Depending on how heavy the items are that you want to put on your shelves, you’re going to have to use fairly cement anchors. Don’t use those cheap plastic anchors, you will regret it. You’re going to need metal anchors – I like to use metal sleeves would you can buy at the home-improvement store.
You’re going to need a hammer drill to drill into the concrete or brick and you’re going to need masonry drill bits to use with your hammer drill. Regular drill bits won’t work for drilling into cement OK?
These are the two best beginning beekeeping books, and I’ve bought more than my fair share of beekeeping books.
Kim Flottum’s The Backyard Beekeeper, I think, is one of the best books. This is actually the book that introduced me to beekeeping. I was in our local bookstore just looking around and I ran across this book called Backyard Beekeeping and a light bulb went off in my head! I immediately thought, I would like to have honeybees. I bought the book and inhaled it. I’ve met Kim Flottum, the author, he’s a super nice guy. He walks you through beekeeping in detail, but in easy to understand writing. Really well done
Lots of really good pictures, Kim is clearly an expert. He is the editor of one of the more popular beekeeping magazines and I’ve heard him speak and he’s just an all-around good guy. In short, I like this book I think it’s a good one to buy for the beginning beekeeper.
The book Beekeeping for Dummies is a really great first year book. Now I know you’re thinking that ‘oh it’s one of those Dummies Books’ but despite its name I think it’s great especially for the first year beekeeper. Its inclusion here as a best beginning beekeeping book is a testament to Mr Blackliston’s easy to understand text in the book.
Your first year beekeeping you have a lot of questions, you might even have some anxiety about it. The author Howland puts that to rest as he walks you through the first year. The book lists out what you should do every month with your bees, he provides recipes and hints and tips. I just think it’s really well done, I like the book and this new edition has more up to date info.
To me these two books are the books you should buy when you’re starting to learn about beekeeping and when you actually get your bees. Buy these books before you get your bees read them over the winter and just inhale. They have a really a lot of great information – it’s how I learned. I constantly refer back to these books when I have a question about something.
Getting honeybees ready for winter, aka winter beekeeping preparation, is one of those things that can fall off the list for beekeepers, probably not a good thing. I believe if you just leave your hives as is, most will perish.
Below we have several videos on getting honeybees ready for winter, but first of all, here’s a few things we do to each hive in late fall to prepare for winter.
Winter Beekeeping Checklist:
Feed 1:2 sugar syrup in the fall
Treat bees for varroa mites
Feed one gallon of syrup with Fumagillin
Add dry sugar to the top of the hive.
Use an insulated inner cover.
Tilt the hives forward.
Close up the screened bottom board.
Insulate the hives with polystyrene.
Install a mouse guard on entrance.
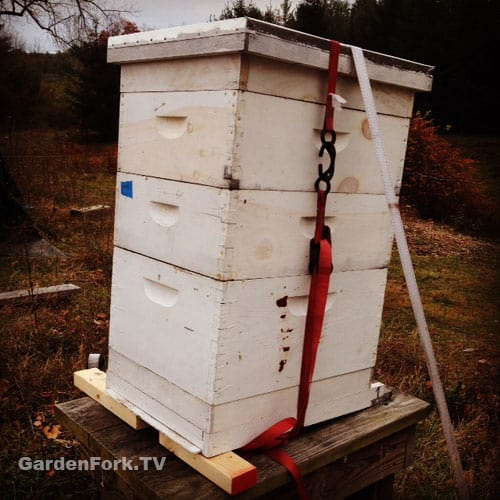
Strap down the hives.
Varroa Mite Treatment: From what I understand, varroa mite populations in your beehive soar in winter, so knocking down that population before winter makes sense. Watch our oxalic acid varroa mite treatment video, its pretty easy to do and is a huge step toward getting your bees through winter. One should rotate mite treatments, Hop Guard is the other mite treatment I’d suggest.
Sugar Syrup: Ask your beekeeping neighbor when they start feeding sugar syrup. I add Fumagillin the first gallon of syrup. Let the bees take down all this treated syrup before adding more sugar syrup to the feeder.
Dry Sugar: This year we used the mountain camp sugar method when providing sugar on the top of the hive. In years past we have made sugar cakes, but this year I wanted something simpler. Reading about this method on the Honey Bee Suite blog, I agree with Rusty’s post, that the mountain camp dry sugar method works pretty good, and because its easy, you will do it. Making fondant or sugar cakes is a pain, and you will likely procrastinate about making the cakes it until its too late. Watch: Mountain Camp Method Video
Mountain Camp Winter Sugar Feeding
Insulated Inner Covers: I am a big convert to using these. Before I put them on the hives in winter, every spring I would find mold in the hives and dead bees. Insulated inner covers reduce or eliminate condensation from collecting on the top of the hive. Imagine its raining inside a hive in winter, that’s condensation. Wet bees are dead bees. Watch and learn how make an them in this video:
Or you can use a piece of polystyrene, a wood spacer you can easily make, and your existing inner cover to do the same thing.
Top View of Insulated Inner Cover – purchase this or make your own
Tilt the beehive forward: Gravity works. Extra insurance to keep condensation from raining down on the hive cluster. Tipping the hive forward allows any drops of water that have begun to form on the top of the hive (which is the bottom of the inner cover) to slide forward, hit the front wall of the hive, and finally, draining out the front of the hive. Its easy to do, just slide a 2×4 under the back of each hive before you strap it down.
A few more winter survival tips:
Close up the screened bottom board: This is one of those opinion based things. I use screened bottom boards that have a plastic board that slides into the bottom. So I close off the screen in winter. Because it is important to have ventilation in the hive, yet reduce condensation, the hive needs at least one top vent hole.
Insulate the Hive: First of all, the best method we’ve found so far is to surround the hive with with polystyrene, secured with a ratchet strap. We have two videos about this, watch here: Beehive Winter Wrap
Mouse Guard: This can be bought from bee suppliers or you can make one out of 1/2″ hardware screening. One year I blanked on mouse guards, as a result, I lost a hive to mice. Its sad and a pain to clean up.
Close the guard down to about 2″ wide with duct tape
Strap Down The Hives: This may seem overkill, yet it has saved us. We secure the hives against high winds and bears. One strap goes around the hive itself. The second hive secures the hive to the ground with two metal stakes. Furthermore, if you live in an earthquake zone, strapping your hives is a must. Watch our video about how using straps saved a hive here.
Winter beekeeping is not the easiest part of keeping bees, therefore some preparation in the fall can help bees survive winter. Follow these tips and increase your chances of getting bees through winter.
How to pick a generator is the first step in hooking up a generator to your house. Here’s my experience in figuring out what kind and size portable generator you need to power your home during a power outage.
Our generator is plenty powerful to power the house.
Figuring out how what size or wattage generator to buy a is the first step in the how to pick a generator process. To determine the size of the generator you need, you have to figure out what you want to power in your house during a power outage. This power number, or watts, also will determine the size transfer panel you will need. In addition to buying a generator you will need generator transfer switch. Here is a link to our post about transfer switch installation.
Based On My Experiences…
This post is about portable generators, the kind on wheels that you pull outside, connect to your manual transfer panel, and power your home. Standby generators, the kinds that sit on a cement slab next to your house, are not covered here. This is based on my experience as a homeowner, I am not a licensed electrician.
First, buy a name brand generator. Cheap generators will cause you problems if you ever need to service it. This came back to burn a friend of mine when he needed to replace a carburetor.
Second, perform regular maintenance on your generator. I run mine for about 15 minutes every month.
Third, use gas stabilizer. Add this to all the gasoline you use for engines around the house. It will save you a lot of headaches and repairs.
Start by going through the house and think about what you and your family want to be able to use in a power outage. Then re-think about what you really need, and what you can live without.
Why? Because the average portable generator/transfer switch setup will not run everything in your house. It will run the essentials, however I think you’ll find that you don’t need to power your whole house.
Your portable generator will probably not run your 240 volt appliances. These include electric clothes dryer, electric stove, electric furnace, electric baseboards. It will run your deep freezer, refrigerator, and microwave oven and most of the lights in your house. It all depends on how the house is wired and the size of your generator transfer panel.
After making a list of of what is essential in your home, find out the amps or watts that each appliance uses. Don’t forget the furnace, well pump, etc. This is usually on a label somewhere. Now convert amps into watts with this equation:
amps x 120 = watts
I imagine you will get a number ranging from 3,000 – 6,000 unless you have lots of large TVs.
How To Pick A Generator, Watts & Amps:
A typical home can use a generator in the 3,000 to 6,000 watt range. Because you will probably not be running all the appliances at once, you don’t need a generator that exactly matches how many watts all the appliances require. The biggest draw on the generator will be the well pump, if you have one, second comes the furnace. Rarely would all of your appliances need power at once.
The question of whether to get a gas or propane powered portable generator depends on your location and preference. The small 20 gallon propane tanks are easier to deal with than carrying around gasoline, but if you run out of propane, how far do you have to drive to get more tanks? You could also get larger propane tanks, as some generators have a gas line hookup. I have a gasoline powered generator, and have been happy with it.
The downside of the gasoline generator is you can splash gas when filling the tank, and you must put gas stabilizer in the fuel. But you should treat all the gas you use for small engines with stabilizer, in my opinion.
You will need to buy and install a manual transfer panel that matches how many circuits you plan on using in the house. That is, how many of the circuit breakers on your panel need to be fed power from the generator. If you need to power 6 circuit breakers of your house panel, you will need a transfer panel with 6 breakers. Most household manual transfer panels have 6 to 10 breakers. If you have to power more than 10 circuits in a power outage, its time for a standby generator. Here is a link to our post about generator transfer panel installation.
You might think, how can I get by using only use 6 circuits in my house? You’d be surprised at how you can. Your family will be happy that they can take hot showers and charge their devices, and the food in the freezer isn’t melting.
I have a 6,500 watt portable generator, and it runs my entire house with power to spare. The generator surges when the well pump kicks in or the furnace turns on, but that’s about it. The power meters on our transfer panel rarely move past 25%.
My point here is you probably don’t need a large generator to survive a power outage, so save some money and buy a less powerful generator. My house would do fine with a 3,000 – 4,000 watt generator.
Below is video about transfer panels and generators, here is the link again to our post about transfer panels. I hope this has answered some of your questions about how to pick generator.
On this episode of GardenFork Radio we talk about standing desks and how you can make one from IKEA parts. We also talk about how to use Evernote to keep your to do list and how Evernote can be very very simple or very complicated.
Our new website is powered by StudioPress Themes for WordPress we’ve used several themes from different WordPress theme companies, and I think StudioPress is the best one. The site loads much faster and I like the clean design we are using.
We talk about using one of our website hosts, BlueHost , if you want to have your own private email or build a wordpress website, BlueHost has a very affordable plan.
I prefer to keep Evernote simple and it works for me. Also we talked about push lawnmowers, specifically push lawnmowers that don’t have an engine, and they have a cutting reel. GF listener Scott likes one that is made by Fiskars. Tanya writes to tell us about how Gordon Ramsay cooks stovetop pizza.
We recently had a how-to video on how to make stove top pizza here is the link and Tonya talks about how she makes pizza herself. Finally Jim ass why we have two different garden fork shows now and I talk a little bit about that


 There are some people that say rugelach and croissants are related but after reading this Wikipedia entry, I don’t think so. Rugelach is a much older treat and croissants only came about in the 19 century. Nonetheless rugelach are found in a lot of different cultures and in a lot of different countries, especially in Eastern Europe. Take some flour, a little sugar, add some nuts and something sweet, roll it up and bake it and you got this excellent dessert.


 Eric recently discovered the
  And we talk about the new news that its OK to eat eggs again. We’ve been eating eggs anyway. They are healthy. Here the
 I love cornbread. I’m not sure when the first time I ever had cornbread was, but I’m pretty sure it was probably at the Friday night fish fry when we lived in Wisconsin.


 You can build this with scrap lumber that you have laying around. One special tool that you will need is called a hole saw. If you don’t have a hole saw kit you might be able to borrow one from a neighbor or you can buy a


 Keep in mind when you are hanging shelves on a concrete wall you’re going to have to drill into the cement and that is going to create a lot of dust. Have a vacuum or better yet a shop vac nearby to suck up all that cement or brick dust. What I do when I’m drilling into cement or brick is I have the vacuum hose right next to the drill bit while I’m drilling. This does a really good job of keeping the dust down. You can see on this post on how to hang a TV on a brick wall just how much how much dust gets flying around if you don’t use a vacuum.