• PVC Cold Frame Hoop House #3 – DIY GF Video

    Easy to build PVC Cold Frame Hoop House is a mini greenhouse that allows you to grow salad greens and cold tolerant vegetables into the winter, and get a head start on early spring planting. This hoop house is more resistant to heavy snow than our previous versions, listed below.

    This is version 3.0 of our cold frame hoop house. What I like about this one is that it’s a taller than our previous cold frames, so you could start to grow tall plants like kale or start sunflowers earlier in the spring.

    hoop house cold frame plans

    PVC cold frame hoop houseA couple things to keep in mind while you’re building this hoop house, especially if you are using this on raised beds. You want this hoop house to fit just inside the walls of your raised bed. I made this mistake when I made my first hoop house, I didn’t measure how wide my raised bed was and the cold frame didn’t fit exactly. Experience has once again taught me something. The frame fits just inside the wooden sides of the raised bed and it doesn’t have to have a super tight seal with the soil, you do want some air exchange in and out. What the hoop house is doing is moderating temperature. When it gets really cold outside, it’s going to be cold in there but it will extend your growing season.

    Consider planting some cold tolerant greens in August, I like a salad green mix that sold by Fedco seeds. They have  a fall and winter lettuce greens mix and that’s worked really well for me.

    One thing I did not mention in the video is that where the plastic meets the plywood ends of your hoop house, the plywood can cause the plastic to tear and so you might want to put something soft around the edge of the plywood. If you have some old garden hose you could split the garden hose open and run that along the edge of the plywood and that would go a long way toward making the plastic such that it wouldn’t rip.

    For  this 8′ x 4′ cold frame I used:

    • Two 2×3 8′ long studs
      Two 2×3 studs cut to 45″ long
      One 1×2 8′ stud, you could also use a 2×2
      4 metal angle iron brackets
      3 pieces of 1/2″ Schedule 40 PVC cut to 6′ long
      1 1/4″ and 1 5/8″ drywall screws
      Two pieces of 4’x4′ thin plywood. You could also cut down a 4’x8′ piece.
      3 or 4 mil plastic, i used a roll of 10′ x 25′, which is enough for two hoop houses.
      Two thermatic vents, available here http://amzn.to/2Cg81fg
      Staple gun

    Using the angle brackets, build a 4′ x 8′ wood frame, make sure the shorter pieces of 2×3 wood (the 45″ pieces) are inside of the larger pieces, so the outside dimensions are 48″ x 96″

    I cut the plywood ends to match the arc of the pvc hoops. Take one of the hoops and curve it into the wood frame at the end of the frame, and use this to sketch the arc on the plywood ends, it does not have to be perfect.

    pvc-cold-frame-hoop-house pvc-cold-frame-hoop-house-3 pvc-cold-frame-hoop-house-2 pvc-cold-frame-hoop-house-5 pvc-cold-frame-hoop-house-6 pvc-cold-frame-hoop-house-7 pvc-cold-frame-hoop-house-8

    My hoop house cold frame gardening has been greatly influenced by Eliot Coleman and Niki Jabour.

    Four-Season Harvest    The Year-Round Vegetable Gardener

    hoop house cold frame
    Watch all of our  hoop house videos here.

  • Best Stove Top Pizza Recipe – GardenFork Video

    Most fry pan pizza ain’t great, but this stove top pizza recipe is truly the best. Why? Its a thin crust pizza with a nice snap, and it can be made in about 5 minutes, and you don’t have to make pizza dough the day before.

    The key ingredient to this pizza is tortillas. Who knew? I’ve seen many recipes that say to use a pita bread as the pizza crust, and its real underwhelming. The torilla is already thin, and it crisps up nicely in some oil in a cast iron pan. You can also use a Calphalon style pan, but it has to be oven proof.


    But where to get tortillas? In your grocery store. From what I can tell, they are now sold all over the country. Yes you can use those tortillas that you have to cook first, just cook the top side bit first, then flip it and add your sauce and toppings.

    The pan does not need a lot of oil, as the excess oil can smoke when you put this in the broiler. Learn from my experience. The ideal tortilla is one that covers the bottom of the fry pan, mine did not, but it wasn’t a big deal, it still tasted great.

    best-stove-top-pizza-recipe

    My tomato sauce is super simple. Quality pureed canned tomatoes are already cooked and only need some salt and I add a few tablespoons of italian seasoning mix. Done.

    For cheese, I used chopped up fresh mozzarella, and quality Pecorino Romano. Do not fill the whole crust with cheese, it will spread out nicely.

    For toppings, its really use what you got. I always keep a can of sundried tomatoes in the fridge, and I had some nice dry sausage that I chopped up.

    Best Stove Top Pizza Recipe

    1 can quality pureed tomatoes

    2 tablespoons italian seasoning mix

    1 bag tortillas that fit your fry pan

    1 chunk of pecorino romano

    1 ball of fresh mozzarella

    Few slices of quality dried sausage

    1 cup sun dried tomatoes

    Preheat the broiler

    Heat the cast iron fry pan on the stove top, add enough vegetable oil to coat the bottom of the pan. When it shimmers, drop on the tortilla.

    Spread the tomato sauce mixture lightly on the tortilla, and drop on chunks of mozzarella.

    Add dried tomatoes and sausage.

    Sprinkle romano cheese.

    By now the fry pan will be hot, so be careful. Take this pan and put it in the broiler, the closer the better to the broil element.

    Keep an eye on it, but in about 2-3 minutes, the top of the pizza will be melted and toasted.

    Pull out, let cool a bit, and cut into slices.

  • Easiest Best White Bean Soup in 30 Minutes

    I didn’t really know what to make for dinner last night, and I had a bunch of onions in the refrigerator which I had bought at the Costco. So I thought okay, I’m going to chop up an onion and start cooking it and go from there. I took a large onion and I cut it in half and then cut it into half ring things.

    easiest-best-white-bean-soup

    I think you need to cook onions in more oil than people seem to think on the cooking shows, so I dumped a bunch of blogs of oil into a pot and dropped in the onions. I then just kinda looked around and I saw that I had just bought a can of small white beans from the grocery store. The Goya brand, which I like. I guess it’s a 28 ounce can or so of small white beans. I cooked down the onions and I threw in  two clothes of chopped up garlic. I first put the lid on and let the onions sweat and steam. Then I take the lid off and let them cook until they are almost burnt – by accident – because I walked away from the stove. I dropped in the white beans and a tablespoon of the Italian seasoning mix that I have. I went into the fridge and pulled out some Parmesan Reggiano cheese rinds that I had been saving and I threw those in. Heated it long enough to cook through, let the cheese rinds get kind of soft and boom done.

    That was the most amazing white bean soup I’ve ever made and it was like nothing to it. Of course we have some bean dinner videos here for you to check out. So what do you think, how do you make white bean soup? Let me know below:


    Easy White Bean Soup Recipe

    1 can medium size 28 oz or so small white beans. I used the Goya brand

    1 large onion, cut in half, then sliced into 1/4″ rings

    1 tablespoon italian seasoning mix

    2 cloves garlic chopped up

    Cheese rinds if you have them.

    In a medium sized pan, glug in vegetable oil. Don’t just skim the surface, glug enough.

    Heat this up till it shimmers, and drop in the onions. Stir around and cover the pan for a few minutes. You want to steam the onions a bit,

    Take off the cover, throw in the garlic and cook down the onions until golden, medium heat, but keep an eye on it. Kinda burnt is OK.

    When the onions are golden, add in the can of white beans and the cheese rinds.

    Top with the italian seasoning, stir in and warm up the mix to bubbling.

    Don’t over cook this, but let the cheese rinds soften, so some of their flavor moves into the beans.

    I had this with grilled cheese. nice.

  • DIY Standing Desk and Lawnmower vs. Tractor – GF Radio 359

    Rich tells us how he built a DIY Standing Desk out of Ikea parts, aka an Ikea Hack for much less than what a standing desks costs to buy.

    We then move on to switching from a garden tractor to a push lawnmower, what are the pros and cons of a lawn tractor and a push mower?

    Rich gives us some tips on time management and tells us how to use the Eisenhower matrix to prioritize your tasks and how the some stuff falls off the matrix and that’s ok.

    Find out more about executive coach Rich Gee here.

    diy-standing-desk-and-lawnmower-vs-tractor-gf-radio-359


  • Chocolate Halloween Treats Recipe – GF Video

    Here’s a Halloween Treats Recipe for those of you who want to go the DIY way and make their own treats for the trick or treaters.

    As you know I love chocolate almost in any form, and I was watching Jacque Pepin’s TV show More Fast Food My Way and he did a quick little recipe for these DIY Halloween treats,  he called them Chocolate Rochers, similar to my last name. Very simply just melted chocolate with a couple different crunchy items dropped onto parchment. They were brilliant, really simple and I thought that’s a GardenFork Halloween treat if I ever saw one. Click Here to buy Jacques Pépin’s Book More Fast Food My Way

    Our Halloween Treats Recipe is based on his, pretty straightforward. Taking crunchy items like Rice Crispies, Cornflakes, toasted almonds, you could also use toasted hazelnuts or toasted walnuts. It’s really what do you like, if it’s crunchy and goes good with chocolate, it probably works. I’m a big fan of peanuts as well, you could have peanuts that you toasted in the fry pan.

    chocolate-halloween-treats-recipe-pin


    As far as what kind of chocolate to use for the chocolate Halloween treats, we were using semi sweet baking chocolate which I preferred or a big bar of Hershey’s dark chocolate, both of which you can buy at almost any grocery store. Experiment and buy a couple different ones and see what you like.

    Be very careful when melting the chocolate! You can melt it in the microwave with short pulses of about 30 seconds and you wait a minute or two and then zap it for another 30 seconds. I found that a simple homemade double boiler works fine for mem. A small saucepan pan with about an inch of water in it,  a metal bowl on top works very well as a double boiler.
    So there you go, our version of a DIY Chocolate Halloween Treat. What is your favorite kind of halloween treat that you can make? I would love to hear in the comments below, it’s great to hear from you all.

    Chocolate Crunchers, a DIY Halloween Treats Recipe

    1 box of semi sweet baking chocolate or whatever chocolate you like.

    2 cups of Rice Crispies, Corn Flakes, roasted nuts such as almonds, walnuts, hazelnuts.

    In a double boiler, break up the chocolate bar into pieces and melt the chocolate. Do not over-melt it, you want it such that it is thick.

    Take the bowl off the boiling water and add in the chosen ingredient(s). Be careful as the bowl is hot.

    If you are working with kids, scrape the melted chocolate into another bowl.

    How much of the crunchy ingredients is up to you. I prefer most of the nuts be covered in chocolate.

    Drop tablespoon sized amounts of the melted chocolate onto parchment paper and let the chocolate cool.

  • Locavore Garden Salad instead of PBJ for lunch

    OK, what is a locavore garden salad? Its when you walk out to your garden and cut some salad greens. This all started with lunch.

    locavore-garden-salad-instead-of-pbj-for-lunch

    We were about to have lunch, and it was going to be PBJs, since it was simple and all the ingredients were there. But I have been on this kinda sorta gluten free before 6 pm thing – we talk about gluten free on GF Radio here – so I grabbed my scissors and went out to the garden.

    There was kale, and young salad greens that had sprouted 2 weeks ago, plus arugula, which grows like a weed anyway. I cut the greens to that they would grow again – this is going to be our hoop house raised bed this winter – and was back in the kitchen in 5 minutes.

    Put water on to make some poached eggs – kinda like the neato Salad Lyonaise video we did – and washed the salad quickly. It almost didn’t need washing it was so young, but… I made a quick vinegarette salad dressing in the mixing bowl. You can use just the egg yolk as a dressing, like in the Salad Lyonnaise recipe, but I wanted the balsamic in there.

    locavore-garden-salad-instead-of-pbj-for-lunch-2

    And its good I did make the dressing, because I overcooked the eggs, they were no longer soft poached, but they were still good. Not bad for a quick switch from PBJ.

  • Pallet Compost Bin Plans & Photos

    Here’s a neat pallet compost bin we made in an hour. My pallet projects obsession continues, lately I’ve been looking way too much at pallets sitting on a sidewalk and thinking what can I make out of those?

    Charlie Pup and I went out to dump kitchen compost in our pallet compost bin. She sat for a photo you can see at the end of this post. I wanted to follow up on how our compost bin has been doing.

    So far so good is the verdict. While the wood has weathered well, we haven’t filled it up completely, as this bin is mainly for food compost. I do drop stuff from the vegetable garden as well.

    I have found that I can build one of these pallet compost bins without the metal brackets. With some care and long wood screws, you can align the pallets at the corners. Then you can sink in some screws between them to join it together. But if you have some spare brackets of some sort, by all means use them. Use what you got!

    more compost videosKeep an eye out for old pieces of pipe or metal fencing, because you can use these to drive down in between the pallet sides to keep anchor the bin. Two of these pipes seems to work well for me. I built one of these up at my friend’s cabin to keep the Labradors from feasting on his food scraps. The bear has not torn through his compost bin yet it has kept the dogs out.

    Build The Bin with photos and video

    Here is the original pallet compost bin video  with some other information if you want to check it out, below are photos of how to build the pallet compost bin.

    pallet-compost-bin-plan-gf-video pallet-compost-bin-plan-gf-video-8 pallet-compost-bin-plan-gf-video-7

    Pips add stability
    Pipes add stability

    pallet-compost-bin-plan-gf-video-3 pallet-compost-bin-plan-gf-video-6

    Save

    Save

    Save

    Save

    Save

  • NUTS Nagging Unfinished Tasks and how to deal with them – GF Radio

    Rick and Eric talk about NUTS Nagging Unfinished Tasks and how to declutter you life.

    First we deal with some GardenFork news

    Some new changes to the GardenFork site, and a suggestion to try our web host, Blue Host, info here: https://gardenfork.tv/bluehost .

    Then we move on to NUTS nagging unfinished tasks. To Eric, these are those unfinished things that clutter up your mind and keep you from getting the importantant stuff done. Rick suggests not to bring home projects that wont get finished, finish what you already have started at home before bringing home any more.

    We talk about getting rid of stuff and how to sell on ebay, or using craigslist to give away free stuff. Rick tells about a new social network called NextDoor.com which allows you to keep in touch with your neighbors on your block or town.

    We move on to home made pizza ovens like the DIY Pizza Oven we built , and the weber grill pizza oven that Eric wants to try out. Rick thinks you can just cook pizza on weber grill without any extra equipment or hacks, but we know Eric is into pizza oven hacks.

  • Core your apple before you eat lifehack

    Here’s a neat little lifehack that I thought of while wanting a snack while in the home office. I don’t keep cookies or sugar type snacks in the house, because I will eat them!

    But I do keep fresh fruit, dried fruits, and nuts in the house to snack on, because I eat constantly.

    Back from a morning meeting, I had rode my bike to and from the meeting, so that was about a 40 minute workout, but I wanted something to take up to the home office, and I saw the bowl of apples.

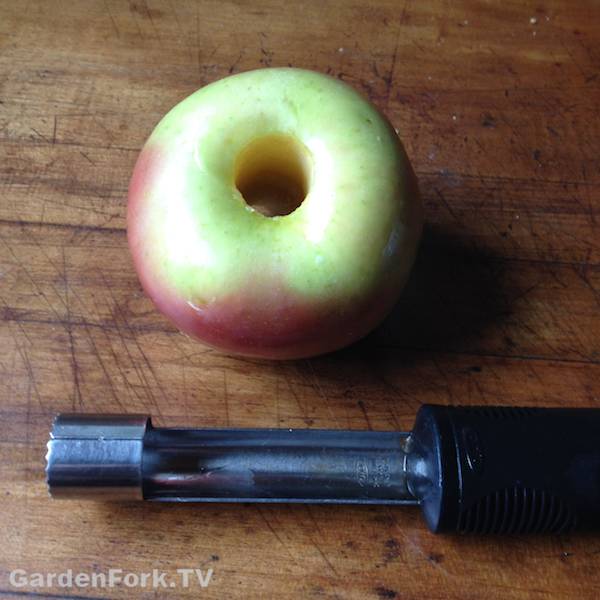
    But here’s the issue I have with apples at the desk. The apple core. Yes, you could put it in the trash, but we compost our food waste, so the core will have to lie around the desk while I work. Then I had the eureka lifehack moment: Core the apple.

    core-your-apple-before-you-eat-lifehack-2

    I had just cored a bunch of apples for an upcoming apple recipe video, and this might have put the idea in my head. So I cored my apple with my neat OXO apple corer gizmo tool, and I was on my way.

    Of course, I do have my intrepid bio-composter at the ready here, who loves apple:

    core-your-apple-before-you-eat-lifehack

    Get your own apple corer here:

  • Planting a tree next to a tree stump is a challenge

    planting-a-tree-next-to-a-tree-stump-is-a-challenge1

    We took a Mulberry tree out of our backyard, the neighbors were complaining about the berries, the pups ate the berries, not a good thing. In its place we are planting Leyland Cypress evergreens. These trees grow fast and are good at creating a green fence, which makes good neighbors.

    But we had to deal the Mulberry tree stump, plus two other stumps from previous tree removals. I have been delaying this project for a while, but the cool weather means its time to get this in gear. So out comes the reciprocating saw.

    planting-a-tree-next-to-a-tree-stump-is-a-challenge2

    A large tree root crossed right where we wanted to plant on of the trees, so I bought a pack of wood cutting blades for the saw and started cutting the large root. It wasn’t as hard as I had imagined, but it took a bit of time. The larger roots have lots of smaller roots coming off of it going downward. Lots of lifting up a root to find it still attached underneath.

    planting-a-tree-next-to-a-tree-stump-is-a-challenge3

    I don’t dig a large hole for planting things. The instructions say dig twice as wide and deep, but this doesn’t work for me. I’ve done well planting how I plant so far in life. I have found that as the hole gets deeper, its not easy to use a shovel to get out all the dirt. A scoop of some sort works much better after one had broken up another layer of dirt with the shovel. One more reason to save those yogurt containers!

    planting-a-tree-next-to-a-tree-stump-is-a-challenge4

    I wanted to re-use the plastic pots that the trees came in – not sure for what yet – so I pulled the trees out of the pots by laying them down and having help. One person grabs the pot, one pulls the tree trunk. Out it comes.

    planting-a-tree-next-to-a-tree-stump-is-a-challenge5

    I think the most important thing in planting in general is plenty of water after planting. I plant things a bit lower than the soil layer, and build a moat of dirt around the plant so I can fill it with water. It will slowly drain into the soil and water the plant. It needs to grow roots, so water it a lot the first few weeks. What are your plant planting methods? Let us know below.

  • When Decluttering Your Home Think ebay

    I’m on a quest to get rid of stuff I don’t use, so I have this suggestion when you are decluttering your home:

    Sell stuff on ebay.

    I’ve had 4 fishing reels in a box at the bottom of the basement stairs for how knows how long, thinking they are worth something. Today I put them out on the sidewalk. Then I went out and took them back in. Then I went on ebay.

    decluttering-home-think-ebay
    One of the fishing reels I need to let go of.

    A quick search on ebay shows that some fishing reels are worth money, some are not. I don’t think the ones I have are worth much, but if you add it up, sell a few reels, sell some of that other stuff in your basement, and you might have a few bucks in your paypal account. nice. Its surprising how fast a few dollars can add up, and you could buy something you can really use on ebay then. I need some more video lights.

    We sold what I thought was a real ugly lamp for a couple of hundred bucks. Read about it here.

    how-to-sell-on-ebay-1

    The declutter is also a mental thing for me, its like I have this virtual mental list of stuff to do, and a lot of it jams up your brain. So part of letting go of stuff also helps your head, I think. Plus one less box to remind you of at the bottom of the stairs.

    So just another nudge to you all that want to declutter your home, that stuff in that box can go to someone who can use it, and you might make some nice coin.

    Full Disclosure here, we’ve made a video with ebay here, and have their affiliate ads on the site, but I do really sell stuff on their site when I want to get rid of stuff. Some of it sells, some does not.


    Click Here

  • Find Cheap House Renovation Stuff At Metal Recycler

    Cheap doesn’t always mean good, but in this case finding cheap house renovation stuff paid off.

    With the installation of a new gas fired steam boiler, I decided to replace one of the steam radiators that is way over-sized for the space it is in. This radiator is in the common hallway, and there isn’t a great need to over-heat a hallway.

    find-cheap-house-renovation-stuff-at-metal-recycler-2

    I was driving past a metal recycle shop today and saw them put a nice small steam radiator into their truck. I stopped and asked how much they would sell the radiator for.

    $30

    A $5 dollar tip to the gentleman who put the radiator in the back of the car, and we had crossed one more thing off the to do list. Cheap house renovation parts = good.

    There is a vintage brownstone salvage yard around the corner from the scrap metal recycler where my newly acquired vintage radiator would probably be $100. I’ll replace the steam valve and union when attaching the new radiator, but that valve was leaking already, so now we have two things taken care of at once.

    find-cheap-house-renovation-stuff-at-metal-recycler-1

    How cool is that.

    With the new windows we installed, plus the new boiler, we don’t need nearly as much heat in the house, and the giant radiators are a vestige of then heating oil was cheap and insulation was non-existent. Now is a different story.

    Couple of things to keep in mind when installing radiators.

    • Its a two person job – radiators like to tilt at the wrong moment.
    • Use both teflon tape and paste on the pipe. coat the pipe with paste, wrap it with tape, coat the tape with paste.
    • Make sure the radiator tilts slightly toward the steam valve and riser.

    So there you go, just a nice find when you aren’t expecting it.

  • Easy Spaghetti Meatballs Recipe – GF Cooks Video

    What’s not to like about this easy spaghetti meatballs recipe? Bake the meatballs, cook the pan sauce, add pasta and eat. Simple and easy to do, and you could use this recipe to make meatballs sandwiches as well. Nice.

    Our simple recipe uses meatloaf mix and a bunch of italian seasonings. We buy about 1.5 pounds of meatloaf mix, which around us is half pork and half ground beef. The beef I bought for this project was 90% lean, and I’d rather have it around 80% lean. You could toss in a few tablespoons of bacon drippings or butter to amp this up a bit. It all works.

    A key thing here is to not over mix the meat mixture, it will make the meatballs tough. You can use your hands or a spoon to mix it all up, use what you got. Be sure to wash your hands after handling meat.

    This is different than in the video, but I have found out that I like the cheese to be coarse grated with the large holes of a box grater instead of the fine grating of the microplane. It just tastes better, and i think the cheese stands out more, you run across pieces of cheese in the meatballs, which I like.

    easy-spaghetti-meatballs-recipe-gf-cooks-video-2

    Easy Spaghetti Meatballs Recipe

    1.5 pounds of meatloaf mix, preferably 80% lean beef and pork

    4 tablespoons Italian seasoning herb mix

    3 ounces of tomato paste, half a small can

    1- 28 oz can of crushed or pureed tomatoes, buy a good quality brand.

    1 large yellow or sweet onion chopped up

    2-3  cloves of garlic

    2 slices of bread toasted and ground up in a mini chopper or similar gizmo

    1/2 cup milk

    2 eggs

    2 cups coarsely grated pecorino romano cheese

    Preheat the oven to 375F

    Boil up a pound of your favorite pasta.

    Put the onion in a large pan or pot with good slick of oil on the bottom of the pan. Its best to slow cook these onions, but do what you can. Golden color on the onions is best for flavor. Chop up the garlic and add in to toast for a few minutes at the end of the cooking.

    Add half the onion to a bowl with the meatloaf mix, 2 tablespoons Italian seasonings, eggs, ground up toast, milk, cheese, some salt and pepper.

    Add the can of tomatoes and paste and seasoning to the pan with the cooking onions and simmer the sauce while we make the meatballs. Halfway through the simmer, at about 15 min, add a half cup of water and some sugar to taste.

    Mix the meatball ingredients together, don’t overmix the meat!

    Roll the meatballs into about  1.5″ diameter balls and put in a baking pan or sheet. Put in the oven for about 20 minutes, check with a thermometer, 145F is done.

    In a perfect world, this all comes together at about the same time, so you an assemble the dish and sit down, but you can cover the meatballs with foil while prepping the other stuff.


  • Homemade Sauerkraut – Fermentation Progress Report

    We are basing our new homemade sauerkraut how to on Leda Meredith’s new book, Preserving Everything, which shows how one can make sauerkraut in a mason jar. We talked with Leda recently on GF Radio: listen here. Links to buy book at end of post ↓

    homemade-sauerkraut-fermentation-progress-report1

    I like this mason jar sauerkraut method, it makes it less daunting than having to go find or buy a big glass jar or crock. Most of us already have a couple of mason jars somewhere. I might have too many jars, according to some family members…

    But this is pretty simple, chop up cabbage, add salt, put in jar, wait.

    homemade-sauerkraut-fermentation-progress-report2I couldn’t find the shredding blade for my food processor – not surprising – so I cut up the cabbage by hand. Its my experience that shredding with a food processor will yield a much more shredded cabbage, and that will start fermenting much faster than cabbage cut up with a knife.
    The reason for this is that with a food processor, the cabbage is cut finer, exposing more leaf surface area to the salt. The salt draws some moisture out of the cabbage, and the brine starts to form. With the knife sliced cabbage, this process is much slower. Its also important to basically massage or kinda crinkle the cabbage to break down some cell walls and allow the salt to do its work.

    After your cabbage in a jar has let out enough water to create a brine that covers all the fermenting kraut, we will let it sit in a dark place for a few days. We’ll be looking for bubbles, a sign that the lacto fermentation has kicked in.

    In our case, because of the knife cut leaves, I had to add salt brine to the jar. I set out a pint of water overnight – because our water is chlorinated – and then added a teaspoon of kosher salt to it, and topped off the kraut so that all the leaves were covered in liquid.

    You can get Leda’s Preserving Everything book here:


    Buy Preserving Everything On IndieBound

  • Bread Free Lunch from what’s in the fridge.

    As I stick to my basically gluten free diet before 6 pm, which I have found to be very helpful in not having that late afternoon crash, lunch has been a challenge. I would usually make a peanut butter sandwich, or a grilled cheese sandwich, but I can’t do that anymore. ( I talk about the gluten free thing here on GF Radio ) So now I see what’s in the fridge and put together lots of salad kind of things.

    Being gluten free during the day is not as hard as it might sound. I have oatmeal or eggs for breakfast, and usually some sort of salad thing for lunch, here is one of them:

    bread-free-lunch-whats-fridge

    A recent trip to Costco yielded a giant container of cherry tomatoes for about $5. They weren’t the greatest tomatoes, but I can’t complain, they are what they are. And I managed to find the smallest giant block of blue cheese at the Costco. I’m experimenting with freezing cheese, btw.

    I’ve gotten better at buying tofu on a regular basis, so its in the fridge and ready to go when I want to use it. Plus the Labradors love tofu, not sure why, but they inhale it. I imagine its healthy for them.

    Last night we had miso soup with buckwheat noodles, and I had some leftover noodles, so in they went into the bread free lunch salad thing as well. I warmed up the noodles in the microwave, which warms up stuff faster than I think it would on a regular basis. Powerful thing that machine. This started me thinking I could cook extra noodles going forward for the lunch project.

    So this all goes into a bowl and I made the regular GardenFork vinaigrette salad dressing to drop on top. Boom done. There you go, simple gluten free lunch recipe for you all. This was filling for me, the buckwheat noodles did the trick on that front. Let me know what you think.

    bread-free-lunch-whats-fridge2

  • Tick Bite, What To Do – GF Radio 357

    Eric tells about the tick bite he got over the weekend and what to do about it. He had the classic red dot around the tick bite and then a larger lighter red rash area around the it. What is key is to be able to save the tick. If you grab the tick from the side, rather grabbing the tick from behind, is the best way to remove the tick. Slowly pull the tick away from your skin. The skin will pull up, and it may smart a bit, but pull slowly. The tick will release and you can then save it.

    tick-bite-gf-radio-357

    According to Wikipedia, and other sources I have read, here are a few precautions to take to avoid getting a tick bite:

    • Wear light colored pants
    • Tuck pants into socks
    • Spray a DEET bug spray on your clothes
    • Put your clothes in a hot dryer after being outside
    • Check your body for ticks after being outside

    My neighbor Priscilla has Guinea Hens, who are great at eating ticks. Priscilla says she does not have many ticks in her yard because of the Guinea Hens.


    We launched our New DIY show on YouTube, Please Subscribe Here. To make it easier for people and clearer for me, all the DIY  and how to videos will be posted on our DIY GardenFork Channel, and the cooking food videos will be posted on GardenFork Cooks.

    Feedback on our how to cook steak in a pan video, a viewer suggests we put the box fan in the window, but we turn the fan to one can access the controls on the side rather than the bottom of the fan. Smart, thank you.

    We talk about how to make hard cider, and Eric bought some liquid cider yeast to make a new batch for this fall.

    And don’t forget one of our fall Thanksgiving recipes, Pumpkin Cornbread, and that very cool cast iron skillet with sections

    GardenFork is now on Instagram, what fun.

  • Where to buy that cast iron skillet with sections?

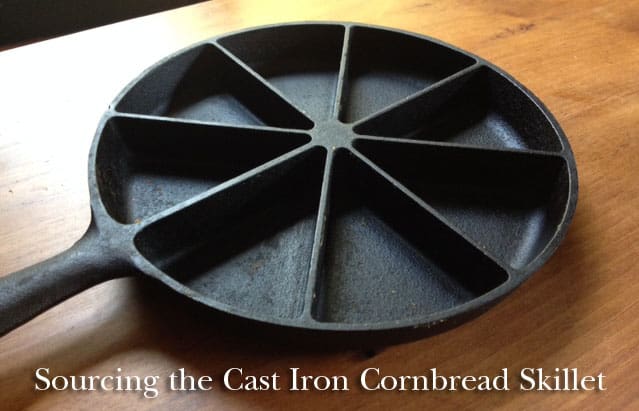
    In our recent pumpkin cornbread recipe video, we use a round cast iron skillet with sections, a pan with the pie sections already divided. I love this pan. I can’t remember where I got it, but I figured out where to buy it.

    buy-cast-iron-pan-pie-sections-2

    Why Love a Cast Iron Pan?

    This skillet has edge wedge already sectioned off, and after you preheat this pan in the oven, you oil the sides of each section, and pour in your batter. The cool thing is each slice of the pan is like getting a corner piece. Each section has that crunchy edge thing going for it.

    I learned early on that this pan needed to be well seasoned, and before putting in the batter, use one of those silicon brushes to slather on butter or oil. You don’t want the batter sticking, its a pain to clean.
 Be sure to put the pan on a wire grate when you pull it out of the oven, else that burned circle on your countertop will haunt you for a while.
 And cast iron is HOT when you pull it out of a pre-heated oven, use a good oven mitt or gloves, OK? Burned hands = bad.

    This pan can be kinda difficult to clean, but for this I pull out an old toothbrush that I keep in the kitchen drawer for this special purpose. You can brush off the baked corn bread batter fairly easily. One could also use one of those small wire brushes, but be gentle. The plastic bristles of the toothbrush work better. Go pull a toothbrush from the bathroom.
Some cast iron pans will come already seasoned. Pre-seasoned is what its called.

    Here’s one of our how to season cast iron videos:

  • Pumpkin Cornbread Recipe – GF Video

    A cornbread recipe that adds in pumpkin to change it up. This will go great with chili, stews, or as a Thanksgiving side dish recipe. I love cornbread already, and when I saw pumpkin puree on sale at the store, I started to think of ways to use it, and there you go: add it to a cornbread recipe!


    A couple of key things here, I use a sectional cast iron pan for this, you can use a cast iron fry pan or an 8×8 or other square baking pan as well. A glass baking dish will make the best crust, I think. If you are using cast iron, put the fry pan in the oven and then preheat the oven and the cast iron. Do not oil the cast iron pan, just let it heat up. We will oil the pan just before we put in the batter, OK? You can buy the cast iron cornbread pan here. This post may contain affiliate links which won’t change your price but I earn a commission from. Thx!

    If you are using a baking pan, put 2 tablespoons of butter in the pan, and put it in the oven to melt just before you are ready to add in the batter. Take care not to burn the butter, this is a bad thing. If the butter burns, get a clean pan out and start over with that process.

    This is basically a quick bread recipe, so take care not to over mix the batter, the milk helps everything come together pretty well, but don’t beat it into a mess. If you want more pumpkin flavor, add in more puree, and dial back on the milk. It will be an experiment, but I think it will come out fine. Let me know how you use pumpkin in the comments below.

    pumpkin-cornbread-recipe-gf-cooks-video2

    Pumpkin Cornbread Recipe
    Recipe Type: Bread
    Cuisine: American
    Author: Eric Rochow
    Prep time:
    Cook time:
    Total time:
    Serves: 8[url:1][img:1]
    Cast Iron Corn Bread Recipe gets a flavor upgrade with Pumpkin for Thanksgiving or any time.
    Ingredients
    • 1 1/2 cups Cornmeal
    • 1/2 cup All Purpose Flour
    • 1 tablespoon Baking Powder
    • 1 teaspoon Salt
    • 1/4 cup Brown Sugar
    • 1/2 teaspoon Nutmeg
    • 2 Eggs
    • 1 cup Pumpkin Puree
    • 1/4 cup Vegetable Oil
    • 1/2 cup Milk
    Instructions
    1. Preheat the oven to 375F and preheat the cast iron pan if you are using one.
    2. Mix all the dry ingredients together in medium sized bowl
    3. Crack the two eggs into a small bowl and scramble them together, then add to the dry batter.
    4. Add in the puree, milk, veg oil.
    5. Mix the ingredients together, but don’t over mix, OK?
    6. If using a baking pan, put 2 tablespoons of butter in it, and place in the oven to melt.
    7. After butter has melted, swirl it around in pan and then add batter.
    8. If using cast iron, take pan out, swab vegetable oil all around and add batter.
    9. Bake for about 30 minutes and test for doneness. Its not the end of the world if cornbread overbakes a bit.
    10. Let cool for 1o minutes then pop out of the pan.
    11. This tastes great with maple syrup.