Rick and Eric talk about clean food in the kitchen, dog allergies, and modernist cuisine.
-
Dog Treat Recipe Sweet Potato Dog Biscuits GF Video
Homemade Dog Treat Recipe! These dog treats are easy to make, and our dogs love these dog biscuits. I’m wondering if there’s a difference between dog treats and dog biscuits, maybe dog treats is a more general term and dog biscuits refer to baked dog treats like these sweet potato dog treats we made for the Labradors.
While working on this recipe, I found the amount of milk you add varies depending on how large and how moist the sweet potato is. You want the dough to be kinda dry, like pie crust dough, not wet. I’ve reduced the amount of milk in the dog treat recipe here, after mixing in the dry ingredients, you can add more milk or water if the dough is too dry to work with a rolling pin.

You also might consider adding in brewer’s yeast or powdered garlic to these dog treats, if you’ve found those ingredients help your dog’s health, or flax seed perhaps? What do you think?
I add flax seed oil to our Labrador’s breakfast to supplement their omega 3,6,9 intake. Keep flax seed oil in the fridge, btw. If you want to buy flax seed oil, its usually kept in the fridge case of the health food store.
If you don’t have a dog biscuit cookie cutter, you can use a glass or tuna can to cut out round dog treats, but its fun for kids to make dog bone style treats.
Here are some dog treat cookbooks
you might want to check out, and let us know your dog treat recipes below:
Sweet Potato Dog Treat Recipe : GardenFork.TV
Ingredients
• 1 Medium sweet potato
• 2 cups whole wheat flour
• 1 cup whole oats
• 2 eggs
• 3/4 cup milk
Cooking Directions
1. preheat oven to 350F
2. poke 4-5 fork holes into sweet potato, microwave for about 8 minutes, or use the \”bake potato\” setting on your microwave. let the potato cool before handling it!
3. mix the two eggs together in a small bowl, set aside
4. remove the sweet potato from the skin and mash with a fork
5. add the dry ingredients together with the mashed sweet potato
6. add in then eggs and milk. you want a thick dough that isn\’t sticky, you may have to adjust the amount of milk.
7. flour a board and roll out the dough, you don\’t want a sticky dough
8. roll out to 1/2\” or 1/4\”
9. cut out dog treats with cookie cutters or a glass or a tuna can or just use a knife to cut out whatever shape you like.
10. grease a sheet pan with cooking spray, butter etc. put the dog treats on the pan
11. pick up the leftover rolled out dough and form it into a ball again, and roll it out into a sheet, and cut more dog biscuits
12. bake for 30 minutes or until slightly browned on top. -
Replace Sink Strainer Gasket DIY Plumbing
Sink leaking? I bet the gasket in the sink strainer is leaking. This is a DIY plumbing repair I did at a friend’s restaurant, but the concept is the same. But if you need to fix your leaking chef kitchen sink, this is how to repair a leaking sink.

Using a screwdriver and hammer to unscrew the ring in a commercial sink For this sink, which is a bit more industrial than your average sink, you remove the top ring from inside the sink. For most household sinks, there is a ring with tabs on it that attaches the sink strainer to the sink itself. For either type, you can buy a fancy tool to remove the ring, or you can use my favorite tools, a hammer and a screwdriver.
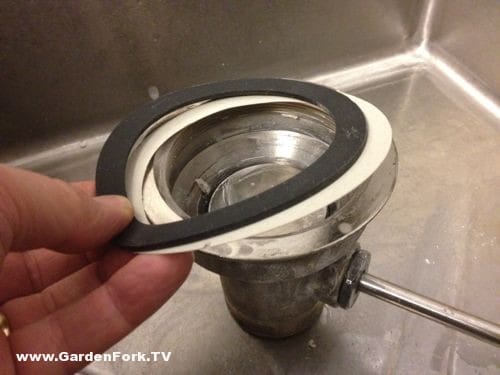
Rubber gasket, cardboard ring and sink basket assembly – restaurant sink First remove the pipe that is connected to the strainer – this is called a tailpipe, btw. Tap on the tabs under the sink to move the ring counterclockwise. You might have to jam a screwdriver into the basket from the top to keep it from spinning. If you break the tabs, its ok, you can go buy a new sink stainer for cheap, and its shiny clean too.

Home kitchen sink Remove the the strainer, and clean it and the sink surfaces. There may be old plumber’s putty around the hole in the sink. Pick up a new gasket at your local hardware store, it will be a rubber gasket that also comes with a cardboard ring. If you are using the old sink strainer and there was plumber’s putty on it or the inside part of the hole in the sink, roll out a long hot dog of plumber’s putty about 1/4′ in diamter, and wrap this around the sink strainer and place the sink strainer back in the hole. Press down on strainer to squish out excess putty.

Gasket replaced, no leaks! ( how unusual for Eric… ) From underneath, place the rubber gasket onto the strainer, then the cardboard ring, then screw on the metal or plastic ring. For this restaurant kitchen sink, its a little backwards, but you get the idea. Screw the ring on tight, but don’t break the ring getting it tight.
Re-attach the tailpipe – the piece of pipe that connects the sink to the drain pipes- and fill the sink with water, and check for leaks. If it leaks, you may be able to just tighten up the ring a bit, if that doesn’t work, it may be that the sink hole is warped or has some crud in it that is not letting the gasket seal tight. You’ll have to take it apart, clean up the hole, and re-assemble.
Have you done some DIY plumbing repair? Let us know below:
-
Meteors, Online Book Clubs, & Home Prepardness : GF Radio
 Rick and Eric talk about the recent meteor landing in Siberia, dashboard cameras, book clubs online, home prepardness, and some beekeeping. Plus whatever else we happen to talk about.
photo from MorgueFile
-
Cheap Grow Light Stand : GF Video
Easy grow light stand made from scrap lumber! Don’t buy one of those $100 grow lights, build this grow light stand to go with our DIY grow light video. Homemade grow lights have always been funky, but with this grow light stand, and our easy grow lights built from cheap shop lights, you won’t have to have this mess of lights and cords and rope to hang grow lights above your plant seedlings.
I built this light stand out of scrap lumber I had in the garage, if you don’t have any, ask your neighbors or walk around the neighborhood on trash day, I bet you’ll find free wood to build this. You’ll need some chain as well, which you can get from the local hardware store.

What I like about this grow light rig is that you don’t have to hang lights from the ceiling or some kludged together mess of ropes and wood. The side braces allow the light to be adjusted up as the seedlings start to grow. I’ve also got an idea for a stacked version of the grow light stand, so you can put one on top of the other and save space. neat.

What kind of bulbs should you use in grow lights? I use regular old warm white or cool white fluorescent bulbs. Other may disagree with this, but here’s my thinking, we’re not growing plants, we’re starting seedlings, and the light output of these inexpensive lights works fine for me. Its been suggested not to mix the kinds of bulbs you use in a grow light made from shop lights, it can make the ballast wear out faster.


Check out our special Seed Starting How To page here.
What are your ideas for grow lights? let us know below:
-
Catching Up With Rick GF Radio
 Rick joins Eric to catch up and talk seed starting! If you are listening on iTunes, please leave us a review, we appreciate it. Eric just weathered the snowstorm named something which Rick doesn’t know about. Rick took a quick trip to Florida. Eric rebuilt his cold frame hoop house to start salad greens, but learned recently that while salad greens are considered cool weather crops, the seed prefers a warmer temp to germinate. Seed germination mats is talked about and one should not use a regular heating pad to try to warm your seed trays to speed germination. regular heating pads are too hot. When is the best time to start seeds and why Eric does not like to use a window sill to start seeds. Eric’s how to build a grow light video is talked about, and how one should not mix up the color temperatures in each fixture of the simple grow light.
Building plastic greenhouses, how to use PVC pipe for greenhouses, and why you might consider UV stable plastic when making a hoop house or cold frame. Rick tells us some of his experiences in the plastic greenhouse he has his hydryponics system in, and how the raccoons have ruined a lot of his project.
Rick is going to try tomato grafting, he has ordered tomato root stock and is on the way , he will update us as he goes along.
photo by blackbird
-
Homemade Jello
Hey everyone! I haven’t posted in a while but wanted to wish you all an early happy Valentine’s Day and share a recipe for a healthy treat. I wanted to make my 11-month-old something special for the holiday that wasn’t loaded with sugar or white flour and decided to try my hand at homemade jello. It’s really simple and fast to make, plus it’s fun to eat.

Homemade jello doesn’t take any longer to make than the boxed mix and comes together without any food colorings, artificial flavors, or preservatives. All I used was 100% fruit juice (in this case, tart cherry sweetened with apple) and gelatin. Any gelatin would do but bear in mind there are some high quality products out there, like Great Lakes gelatin, made from grass-fed cows.
Enjoy and I look forward to catching up with you next week! I have a very cool book review in the works…
Sarah
Homemade Jello
Ingredients
• 2 c cold fruit juice, divided
• 1 tbsp unflavored gelatin
Cooking Directions
1. Place one cup juice in a bowl and sprinkle the gelatin over it. Allow to soften for 10-15 minutes.
2. Add the second cup of juice to a small saucepan over high heat and cook until almost boiling. Pour over the juice and gelatin mixture and stir for a minute, until the gelatin has melted.
3. Pour the mixture into a glass or plastic container or jello mold. Chill for at least 4 hours then turn out. Cut into squares or use cookie cutters to make whatever shape you’d like. -
Paper Seed Pots – great photo!
GardenFork viewer Rich sent us this photo of the paper seed pots he made after watching our how to make paper seed pots video. He’s got a ton of them here. Great to see people making cool stuff for starting seeds! thanks to Rich for sending this.

-
Best Rice Pudding Recipe : GF Video
How To Make Rice Pudding Recipe Video. I love rice pudding, here I show you how to make rice pudding in the oven. There is also a stove top rice pudding recipe, which we will show you soon. Rice pudding is a comfort food, it reminds me of diners and maple syrup. Plus rice pudding is super easy to make, even I can make it .
Many people make a bouron sauce for rice pudding, but I prefer honey or maple syrup. I’m not big on the bourbon sauce, I find it too sweet and boozey.Plus this is another use what you got recipe, in that you can put in nutmeg or cinnamon or a combo of both. At the local diner, they sprinkle the cinnamon over the dish of rice pudding just before baking it rather than mixing it into the batter.
Other additions that I’ve seen are chopped apple, lemon or orange zest, dates, currants, and other dried fruit. Try some stuff in your cupboard and let us know what works for you in the comments below.
In testing for doneness, its eye of the beholder, some people like pudding firm, and others like it more loose pudding like. I think a lot of it depends on what you ate as a kid. I remember a lot of Jello pudding as a kid, so i tend toward the firm side of puddings.

Best Rice Pudding Recipe
Ingredients
• 2 cups cooked rice, long, short, or brown
• 1 1/2 cups milk
• 4 eggs
• 1/3 cup sugar
• 1 tsp vanilla
• 1 tsp salt
• 1 tsp cinnamon or nutmeg
• 1/2 cup walnuts or raisins ( optional)
Cooking Directions
1. Preheat Oven to 325F
2. Mix together everything but the rice.
3. After the eggs are well mixed, add in the rice.
4. Pour the batter into a greased 8×8 or 9×9 dish
5. Bake for 25-30 minutes
6. Pudding is done when its the consistency that you like pudding, some like it firm, some like it jiggly.
7. I prefer to serve warm with honey or maple syrup. -
Calvin Coolidge Notes : GF Radio
My neighbor Charlie joins me to talk about Calvin Coolidge, after GF Radio viewer asked us to ask our presidential history expert, Charlie, about Calvin Coolidge.
-
How To Cook Mushrooms : GF Video
Learn how to cook mushrooms in our latest foraging – mushroom identification video. We made a oyster mushroom identification video, and people asked us to show how to cook mushrooms, so here is our mushroom cooking video!
The oyster mushrooms we use here were cultivated mushrooms, and you can grow your own mushrooms, here’s post about growing mushrooms here, but we bought these at the food coop. In the growing season you can go mushroom hunting, but be sure to learn from an experience mushroom foraging person, and bring your mushroom identification books with you. Below are a few of the mushroom books we like and use.
To clean mushrooms, I just brush them off with a towel, you can also wash them, but its not always necessary, I feel, but you should do what you want, because you’re going to do that anyway…

Butter, Salt, & Pepper are the key ingredients in this simple sauted mushroom recipe, and the cast iron pan is great for cooking mushrooms, holds heat nicely and its evenly distributed too.
You can store mushrooms in your fridge or a cool basement, I keep them in a paper bag that’s not closed tight. Plastic bags will cause the mushrooms to go bad quickly, I think. Also when you are foraging for mushrooms, bring along a few paper bags, its the best way to store them while you hike around, IMHO.
Below is my favorite book I use for mushroom identification, let me know any other suggestions you have in the comments below:
-
Kimcheejeon: A Korean Buckwheat Pancake Recipe

These kimchee scallion buckwheat pancakes (kimcheejeon) were drop dead easy to make. Kimcheejeon is a very traditional Korean dish that’s served as a side dish (panchan) or as the main meal. It has a sweet and savory flavor that complements so many foods. It’s probably better if you made your own batter, but I used a good off-the-shelf buckwheat pancake mix. It’s easier to make these with a non-stick pan (Teflon works well) or a well-seasoned cast iron skillet. The buckwheat batter has a very soft texture that’s more like a crepe; it brings out the sweet quality in the scallions.

Kimcheejeon in Buckwheat Batter
- 1/4 cup Napa cabbage kimchee, slice into thin strips
- 1/2 cup scallions, cut into 3″ long pieces
- 1/4 cups onion, thinly sliced
- 1/2 cup Arrowhead Mills organic buckwheat pancake mix
- 1/2 tsp salt
- 1/2 tsp sugar
- 1/2 cup water
- 3 tbsp kimchee juice or 1 tbsp Korean chili paset + 2 tbsp water
- cast iron or non-stick skillet
- canola oil
Mix buckwheat pancake mix, sugar, salt, water and kimchee juice together in a bowl and let it sit for 10 minutes. Add sliced kimchee and onion to the batter and mix well. The batter should be thin enough to pour but not as thin as yogurt. If it’s too thick add a little water. Bring your skillet to medium heat and grease with a little oil. Arrange scallion pieces loosely in the pan and let them sear for about a minute. Carefully spoon in kimchee buckwheat batter and cover scallions evenly. When the batter start to form bubbles along the edges (around 3 minutes), lift edges slight to make sure they don’t stick then flip. Flip and cook until the pancakes are evenly browned on each side. Serve hot!
Although this dish is vegan, the sweet and savory flavors goes well with leftover shrimp and crab meat. Experiment with your favorite ingredients, it’s a great way to move some leftovers. Serve it with dipping sauce as a dinner appetizer or have it with eggs at breakfast.
-
Tartine Bread, First Loaves
I got the Tartine Bread Book a while back, and got real excited about it. I was thinking this is the new No Knead Bread, the next new thing to come to bread baking. Buy Tartine Bread on Amazon
Buy Tartine Bread on IndieBound

First Loaf with 3-4 hour rise Tartine’s method is based on starting your own ‘starter’ or leaven batch that sits on your counter, and you feed everyday to keep it viable. I tried to make a starter, and it didn’t start. Then I got distracted for a few months.
Then I again picked up the Tartine Bread book. Its a beautiful book, clearly the authors and photographer worked hard on this. I decided to try once again to make the starter, which would allow me to make amazing bread.
This time I followed the instructions [ if all else fails, read directions ] and the starter started! So I read the first part of the book a bunch of times during the week, determined to bake Tartine Bread on the weekend.
The slow rise local leaven dough takes a while to become bread, there are two rises, the long one being either 3-4 hours in a warm place, or overnight in the fridge. The basic bread recipe makes two loaves, so for one loaf I did the 3 hour rise, and the second loaf i did the overnight fridge rise.
Constantly re-reading the directions, I actually baked bread, the first loaf was not bad, as shown in the photo, but the second loaf was pretty amazing.

Loaf with overnight refrigerator rise We’ll be posting more posts on making bread with the Tartine Bread Book, and eventually a video too. I have a bunch of photos of starting the starter for the next in our Tartine Bread posts here.
Do you use a starter for your breads, how does it work for you? Let us know below:

Buy on IndieBound -
fix a stuck food disposer GF Radio
is your food disposer stuck? or is your food disposal stuck? it might be because you put potato skins in it and it became a big ball of glue.
today on GardenFork Radio, we hear how to fix your stuck food disposer disposal from monica, and how to make simple roast pork shoulder. Then we move on to closed system green public bathrooms what use plants to filter and clean the waste water. which prompts eric to talk about his plan to use greywater from his clothes washer to supply water in the toilet in his workshop. and from here the discourse devolves into Rick making potty jokes.
But Rick aslo talks about the Oom writing software he is using for a book project, as we talk about productivity, with an audio clip from the ASAPscience channel on YouTube.
We learn the best way to finish a project is to start it. Humans have a built in compulsion to finish things, we are told.
eric realizes dishwashers have disposers in them
here is the public urinal on instructables http://www.instructables.com/id/PPlanter-urinal-sink-planter/here is the productivity video http://www.youtube.com/watch?v=lHfjvYzr-3g&list=UUC552Sd-3nyi_tk2BudLUzA&index=6
eric uses Remember The Milk for his daily to do list
finally Rick starts to talk about the meyers briggs test and that he is an INTP, which i think means he’s an introvert, except when he’s on the internet…
photo by lifeisgood
-
Fix Overheating Steam Radiators Yourself

Is your apartment too hot winter? Learn how to fix overheating steam radiators yourself below.
If your radiators are hissing or leaking, its time to replace the radiator vent, aka radiator valve, on your radiators. Radiator valves have a finite life, and its probably been too long since they have been replaced.
Replacing the radiator vent valve with an adjustable valve allows you to control – to a point – how much heat that radiator puts out. This is a great way to balance the radiators in your home, so the radiators heat the house evenly.
This is an easy DIY Home Improvement project for those of you with older homes.
In our current apartment, when the heating season started, we got loud hissing on 3 of the radiators, and this told me it was time to replace the radiator vents. Without going into a dissertation on how steam boiler heating systems work, the radiators have to be able to vent out the air that is in a steam system when the system is cold, to allow the steam coming up from the boiler to enter the radiators.
You may not realize this, but if you have what is generically called a one pipe steam system, you also have steam vents or valves at the end of the steam riser pipes. These valves may be above the ceiling, if the steam riser pipe juts into the ceiling.

drain tongue sticks out of old style radiator vent My mode of operation is to replace all the steam valves at once, if possible. Steam vents are not cheap, but if you replace them all at once, you solve a lot of problems, i think. Another benefit of replacing all the valves at once is you can balance the vents at the same time. New vents either have specific vent ratings, or are adjustable – in other words, you can adjust how much venting each vent does.
I use the adjustable vents – link to buy them here – they are much better, I think than the pre-set valves.
This is important, as large radiators need to be able to vent more air than smaller radiators, and this helps you attain the goal of steam heat getting to all the radiators at one time. I use radiator vents that are adjustable, they have a small tang that juts out that you move to adjust. Other companies make a series of vents that have different vent ratings, each vent lets out a certain amount of steam.

Adjustable Steam Radiator Vent Your local hardware store will sell radiator vents. I suggest the adjustable ones, and don’t cheap out when buying them, you get what you pay for.
Most of life is like that, good things cost money, and these radiator vents are worth it. Many times the steam radiators are wedged behind furniture or whatever, and just getting to the radiator is a pain, so do them all at once and get it done with.
So there you go, a DIY home improvement project that is do-able and will improve your heating system.
-
Simple Paper Seed Pots : GF Video
Learn how to make simple paper seed pots, the best paper seed pots, I think. These paper pots are for those of us who can’t make origami paper plant pots, OK? Simple method to make paper pots for your seedlings and seed starting trays. If you want to make a pack of paper pots, just glue or tape them together, use what you got.
Most newspapers print their paper with soy based inks now, so I’m ok with using regular newspaper for vegetable paper pots. And the newspaper will break down in the garden soil; you just open up the bottom of your paper pots just before planting to allow the roots to easily grow out the bottom of the paper pot.
You can use different size jars to make different size newspaper pots. I used a peanut butter jar to make paper pots for tomato seedlings, and used a small mason jar for lettuce transplant paper pots.
 Its best to bunch the paper pots together under grow lights, as the paper can wick away moisture from the seed staring soil, packing the pots close together cuts down on that evaporation. You can watch our how to build a simple grow light video here, and our other seed starting videos here.
How do you start your seeds in the spring, what kind of pots or trays do you use? Let us know below:
-
Beekeeping 101, a look back on the first year GF Radio
GF Contributor Matt joins Eric to talk about his first year of beekeeping. Matt reflects on what real world beginning beekeeping is like after watching the Beekeeping 101 – How to keep bees videos on Gardenfork. Losing a hive, getting stung, how to find the queen in a hive, how not to kill the queen are all touched on.
Matt wrote a series of articles on beginning beekeeping for our site, as he chronicled his first year of beginning beekeeping.
Matt tells us about how to work a hive and yes, you should wear gloves and beehives are heavy. We agree with Rick’s use of metal handles, as beehives get heavy.

Beehives die, and why do they die? As Rick says, bees are bugs in a box, and bees don’t read books. Eric offers a few reasons why the beehive died: a stressed queen, the queen was crushed when working the bees or putting the hive back together.
Eric gives reasons for not buying bee packages, and especially not having bee packages sent in the mail. Buying local nucs is much better. Matt’s experience with beginning beekeeping bears this out. His package of bees died, his nuc is going strong.
Matt talked about a program in Virginia that funds beekeepers,
Matt also talked about homemade or DIY honey extractors, like this one on Mudsongs.org .
We also talk about raised beds, and how to build raised beds using bricks or plastic lumber and the pros and cons of using different materials for building raised beds.
photo by micky07
-
Simple Vegetable Soup Recipe aka Fridge Soup
 I like Jacques Pepin. I don’t know him personally, but I watch his cooking shows, and his cookbooks. His style is GardenFork: a lack of pretention, a desire to share and teach.
In his book, Fast Food My Way, [ Amazon Link
, IndieBound Link ] there is a recipe for what he calls Fridge Soup. Jacques looks in the fridge, pulls out whatever leftovers there are, and makes a soup. Hence the name, Fridge Soup.What I found neat was his use of grits in this soup. ( we talked about making grits with my neighbor Charlie on this episode of GF Radio here ). Jacques uses instant grits as a thickener for the vegetable soup.
Lightbulb moment for me, the un-expert in the kitchen.
We live quite a way from the nearest grocery store, and I avoid making a trip just to buy a few things, so for dinner this weekend, I decided to apply the Fridge Soup Methodology to a real world situation.
 In our fridge we had carrots – we always have carrots, horse people, you know – cabbage left over from a fermentation experiment, onions, and a sweet potato.
So all this went into the pot. I started first with the onions and olive oil, added some crushed garlic. Then in went the carrots sliced up. ( Charlie Pup knows when you are slicing carrots, and will arrive to take care of the top of the carrot for you; Henry won’t eat carrots ) I like to try to get some browning on the carrots, not sure if it makes a difference, but I do it. Then the cabbage and sliced up sweet potato ( skin on , BTW ).
I added water to top it off and let is simmer. You could also do this in slow cooker. I did not add any vegetable stock or boullion; basically the ingredients were the stock, was my thinking.
I had some thyme from the garden that I hard harvested before the last big snowstorm, and it was slowly drying in a bowl in the kitchen, so in it went, though technically it wasn’t in the fridge.
Some wayward egg noodles from a half open bag were thrown in when I served the soup, and there you go: Fridge Soup .
I’ll have to experiment with using grits as a thickener for soup, neat idea. What do you do for simple soups from the fridge? Let us know in the comments below:

Click Here to Buy Fast Food My Way From IndieBound Here
Click Here To Buy Fast Food My Way From Amazon