Here’s my how to video on doing a lawn mower oil change. Its not rocket science, its actually pretty easy, AND it will extend the life of your mower. Ready? Watch the video and scroll through the instructions below:
Lawn Mower Oil Change, Step By Step
Check the manual to see what kind of oil your engine uses. Most use 30W, but just check, OK? By changing the oil, you are already helping the engine last much longer. Do a lawn mower oil change a few times a year and your mower could last forever, mbe!
Run the mower to warm up the engine. This gets the oil hot and the debris that settles up and moving. Turn off the mower.
Place plastic food wrap over the gas tank fill and screw the cap down. Not so tight that you can’t get it off again, but snug. Now we are going to gently turn the mower on its side. Position a plastic tub such that when you tilt the mower on its side, the oil fill tube will pour into the tub.
If your mower has an oil drain plug instead of a fill tube, you will have to tilt the mower on its side, remove that plug, then place the mower over the bucket. This may take some finesse and a friend to help.
See how the gas cap is on the high side of the tilt?
Be sure to tilt the mower so that the gas cap is on the higher side of the mower, so no gas could leak out if the cap leaked. Tilt the mower into the bucket and let it sit while the oil drains out. You can prop up the mower and let it sit for a while.
Get your fresh oil ready and a funnel. You can make funnel out of a piece of paper if need be. Tilt the mower back onto its wheels, and slowly add the new oil into the oil fill tube. Use the dipstick to make sure there is just enough oil.
Do Not Over Fill The Oil. Bad things can happen.
AND recycle the used oil. Take it to a quick lube shop or a car repair shop, they will recycle the oil. Don’t dump it in the woods or a stream, OK?
If you want to learn how to grow mushrooms from plug spawn, I just did it, and made a how to video about it. Watch the video then step through the photos below:
What we are doing here is imitating nature. The mushroom plug spawn I bought is for oyster mushrooms, which grow in dying trees.
With the mushroom spawn or plug spores, we are inoculating recently felled logs with the spore of a particular kind of mushroom, and providing ideal conditions for those spores to flourish and produce edible mushrooms for us.
Plug Spawn
First thing to figure out is what kind of logs you have available, and then determine what kinds of mushrooms will grow on those logs. The ideal logs are taken from trees that have just been cut or pruned. I was lucky that my neighbor was dropping some oak and birch trees, so I rode over and picked up some 4″ diameter logs.
Its OK if lichen is growing on the logs, but not mushrooms. You want fresh logs, not some that have been sitting on the ground for months or years. Those logs have already been taken over by other mushrooms and other organisms.
Follow the directions that come with the plug spawn. I drilled holes spaced 4″ apart on the logs and hammered in the spawn using a rubber mallet.
Coat the ends of the logs with beeswax or food grade soy wax. I found the soy wax to be much easier to use. An old rice cooker works well to melt the wax and keep it warm. Put a weight on the pot and hit the on button to get it to heat up to melt the wax. After the wax has melted, you can remove the weight and the cooker goes into a keep warm mode.
After pounding in all the plugs, you have to seal them in. Plus seal any wounds or gashes in the bark. You are sealing up the log to keep other fungi and organisms from competing with the mushroom spawn.
Place the inoculated logs on a pallet in the shade. You will need to water the logs every week. If it rains, that is better, less work for you. Be sure to follow the directions for how to grow mushrooms that comes with the plug spawn. This is one project where details are important.
If you’d like to learn about mushroom foraging and how to identify mushrooms, here are some videos.
Its easy to make iced coffee at home, you probably have all the ingredients, water and ground coffee. Here we go!
OK, so now you know how to make iced coffee. Let’s to a deep dive in to the process.
This is what we call cold brew coffee, we don’t actually put ice in the coffee until the end. The fact that the coffee is already cold, hence the name ‘cold brewed coffee’ , means you can skip the ice if you want. Coffee that is soaked in ground coffee overnight has a smoother taste, I think, than hot brewed does.
The ideal container to make iced coffee is a french press. (Buy a French Press here) You may be able to find one at a yard sale or perhaps your neighbor has one in their basement, the one they got as a wedding present maybe. Don’t tell them what a great tool they have, just ask if you can have it…
The biggest issue with a french press is the glass can break. I don’t have any suggestions on avoiding that, other than the obvious. I have found they break most frequently when you are washing them in the sink. Take glass, add soapy water, and gravity, and you see what can happen, right?
If you don’t have a french press, you can still make cold brew coffee. A pitcher of water and some ground coffee works well, and you can strain the coffee through a paper towel to remove the grounds. Not as easy as the press, but I’m all about ‘use what you got’.
Easy Iced Coffee Recipe
Recipe Type: Drinks
Prep time:
Cook time:
Total time:
Serves: 3 cups
Easy way to make cold brewed coffee at home
Ingredients
1 cup quality ground coffee
4 cups water
Instructions
Put ground coffee into the bottom of a french press.
Add water into french press.
Cover and place in the refrigerator overnight.
Remove from fridge, press down plunger to strain iced coffee from grounds.
Pour into a glass, add milk or sugar or whatever you like.
Eric is still getting over the stomach flu, aka an acute gastrointestinal event, and we talk about how its probably not the last thing you at that made you sick.
Rick tells about a simple water filtration system called the BioSand Filter. you can help fund this to bring clean water to people in need here: http://friendlywater.net/ also check out Water.Org
Garden Fails and Success comes next. Be careful of free compost! Wise words we should have heeded.
Tired of being dive bombed? Here’s how I get rid of deer flies when I’m working in the yard or woods. Yes, it looks weird, but it works.
Deer flies like to attack from behind and land on your head or neck. Put on this double stick tape, and they tend to aim for the strip of kinda sorta flesh colored tape instead of your neck. Then their feet get stuck in the tape. No more deer flies buzzing you.
Being the DIY guy, I first bought this online, and I thought, I can get rid of deer flies myself. So I went out and got a roll of double sided carpet tape. But it doesn’t work nearly as well. I’m not sure what’s up with this special tape, but its cheap enough that its totally worth it for peace of mind.
I can’t stand the dive bombing of the flies. And while I do get stung while beekeeping, the deer flies drive me crazy. Not sure why. Their bite seems to last longer.
According to Wikipedia, only the female deer fly will bite. The male eats pollen. And the deer fly can be a vector for anthrax, nice! But the deer fly also has predators: nest building wasps and hornets, birds such as the killdeer, and dragonflies. This is why I don’t remove wasps nests unless they are in an area where we are walking around. Leave them be to get the deer flies!
I wanted to pull some of the honey off our bigger hive. Early in the year I had stacked two honey supers on that hive, hoping to catch an early nectar flow, which I managed to do despite a swarm. But as I was going through the honey supers, which are super heavy, btw, I saw frames with different color honey cappings.
Not sure what this meant. Were the darker wax cappings honey that was older? Had the honey had more time to cure, or lose moisture and darken? There wasn’t as much dark honey in the frames, there was a lot more honey with lighter, almost white cappings.
This is a dilemma I’m happy to have, after last year’s drought left us with almost no nectar flow, and no honey to harvest. Any honey the bees managed to make we left in the hives for them to use over winter. This year’s spring rains helped kick the nectar flow in early.
Because of that early nectar flow, I wanted to pull some honey frames off the hive, extract them, and get the frames back on the hive before the nectar flow stops this summer. So I pulled off all the dark capped honey frames I found in the honey supers. Most of the lighter capped frames stayed on the hive.
If you all are wondering why I only use medium frames throughout the hive, once you pull a honey super off a hive, you will understand immediately. Honey is heavy. A medium super of honey weighs about 40 pounds. If your hive is on a hive stand, and you have two honey supers plus 3 brood supers on a hive, you are pulling 40 pounds off a hive above your head.
I put metal handles on all my honey supers, and its ideal to have a helper with this any most all jobs with beekeeping. Learn from me.
OK, back to the question of cappings. Why white and darker cappings in the same hive? First an explanation about cappings from the best beekeeping blog, Honey Bee Suite. Rusty says:
Depending on their genetics, bees either place the capping wax directly on the surface of the honey, or they may leave a little air pocket between the surface of the honey and the wax. These two methods make no difference in the flavor, color, or quality of the honey, but they make the finished combs look dramatically different.
The honeycomb with the air pockets is said to have dry cappings. The comb appears white or very light tan. Honeycomb with wet cappings is not actually wet, but it looks like it might be. The appearance is darker and may have a variegated pattern due to scattered mini air pockets, which have a lighter color.
While some honey bees produce both types of capping, some consistently build one kind or the other. Italian honey bees (Apis mellifera ligustica) are known for producing white, dry caps. At the other end of the spectrum, Caucasian bees (Apis caucasica) produced wet caps almost exclusively.
White cappings are called “dry cappings”, darker cappings are called “wet cappings” FYI.
But why the different color honey cappings in the same hive? I put honey supers on this hive in spring, and then the hive swarmed. Not wanting to lose the honey season while the hive raised a new queen, I re-queened the hive. The new queen was a mix breed from Long Island. The white cappings of the newer honey suggests she is mainly Italian. The original queen was Carnolian.
I’m calling this the Kallux Ikea hack, as it turns a shelving unit into so much more. This one is at a friend’s photo studio. I’ve done a few projects with Ikea Kallux or Expedit bookcases, and have put wheels on them to make them in to a rolling shelving unit.
You can buy rolling wheels online here, or get them at the Ikea store. Be sure to get good solid rubber ones, not the cheap kind. And pay attention when securing the wheels into the bottom of the bookcase, the wood is composite. Its best to use carriage bolts, drilling through the bottom board of the unit, just inside the outer wall of the bookcase.
Either method makes it very easy to do the Kallux Ikea Hack, just a few screws.
My friend’s Black Lab!
Either way, be sure the wheels are secure, and you have a mobile wall unit.
I have also made these shelving units into a solid wall divider. I get some luan type lightweight plywood, and cut it to size. I then polyurethane the plywood with stain that matches the color of the Kallux. Several coats of poly do a good job of making it look more like furniture, FYI.
If you go the room divider route, I would not use drywall or homosote as a backing board on the Kallux, (aka Expedit) its too heavy. Get a thin plywood, with a nice finish if possible.
When applying the plywood to the back of the unit, pay attention to where there center vertical divider is on the shelving, and tack the finished plywood to that divider, as well as the sides, top, bottom.
If you are going just for the wheels, think about what kind of weight the Kallux Ikea Hack is going to be carrying and buy wheels that will support that. Its better to buy a bigger wheel than a small one, plus it will be easier to move around that way.
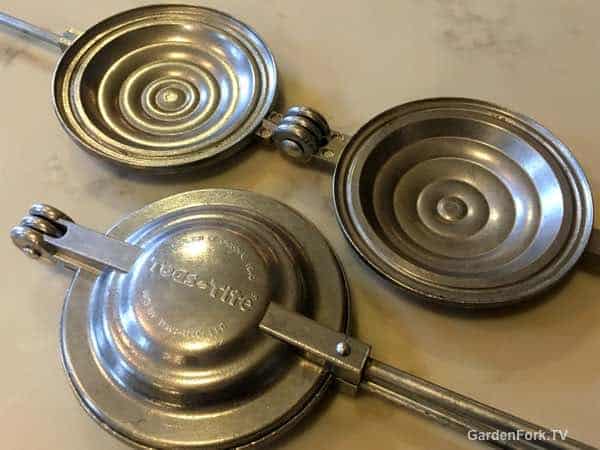
My friend picked up a stovetop panini press, so we had to make some sandwiches with it. Super analog, and a great tool for campfire cooking. The brand name is Toas-tite, you could also call this a stovetop sandwich press. I call it a lot of fun.
We cooked up a mix of ground beef and chorizo with onion and tomato. Grated cheddar goes over the mix. Sliced buttered bread goes on the press, then the filling, then the second piece of buttered bread.
We cut off the ends of the bread that stuck out, they were a good appetizer for what was to come. We didn’t preheat the stovetop panini press, we just filled it up and laid it on top of a burner. The press is lighweight, easy to move around. Started on high heat then dialed it down to low after the press heated up.
We had two of the rigs going, which worked for the two of us. You might want to make these ahead of time if you want to feed more people. One can open the press to see how the toasting is going along, though after a while you get a feel for it. The ingredients do not seep out of the sides, at least ours didn’t. I imagine if you had a mixture with too much liquid or cheese it is possible it would leak.
But wow how much fun is this! Crunchy bread with savory meat filling. You could certainly go all vegetable as well, a curry would be good. What this works really well with is leftovers. Think brisket or pulled pork.
You can purchase the Stovetop Panini Press here, its also called a hot pocket sandwich maker or stovetop sandwich press. I also saw on Amazon a cast iron sandwich press that uses the whole slice of bread, which makes sense to me.
This press uses the whole piece of bread.
I’ve also seen it called a hobo press, watch Cheryl of Flannel Acres make lasagna in one!
When you replace an outdoor outlet, spend the money on a good cover, or you will be replacing the outlet again soon. I wrote about a GFCI outlet I replaced that was hit with a power washer, and in the project below I use a higher quality outdoor outlet cover. This kind of cover is better, I think, and allows for power cords to be plugged in for the long term without getting water into the outlet.
Old outlet cover gasket had failed.
What breaks first here is the gasket protecting the GFCI outlet from the elements. When the gasket fails, water can get in and fry the outlet. A bad thing. Same thing happens when you hit it with a power washer. Another bad thing.
So when you want to replace an outdoor outlet, go buy one of these high quality outdoor covers. They are worth it. Your outlet will last a lot longer. Plus when you are plugging in your Christmas lights, you will realize how well this cover works.
I like this one because it has knock-outs that allow a cord to be plugged in yet still be protected by the clear plastic cover. Pry out the notched holes to allow the cord to run out the bottom of the outlet.
See the knock outs on the bottom of this cover, remove one or both.
Another plus of putting on a new cover is the new gasket that comes with the outlet kit, and the best thing is included in the kit are new screws! One might not get excited about that, but when you are jammed behind a large shrub, using new screws makes your day.
I see broken outdoor outlets all the time, and they can be a pain to replace. Many times they are tucked below large plantings, and are near the ground, so you have to kneel down to work. Not fun. So do this right the first time, and save your knees and time.
Yes, another bee story, but one with larger deeper thoughts. Rick joins Eric to talk about doing everything wrong while its happening around you. This time the story line involves a bee swarm but it applies to when stuff is happening around you and you do the wrong thing.
If your generator wont start, I bet the carburetor is toast, here’s how to replace it. First, watch our how-to video.
When Your Generator Wont Start:
I bet the last time you ran your generator was over a year ago. In that case, the carburetor is full of old gas that has broken down into gunk, and clogged the carb. Now, you can take apart the carburetor and clean it, even buy a rebuild kit. But for most of us, this is a higher level of skill than we posses. We can, however, buy a replacement carburetor and install it. You have the skills to do this, as long as you watch GardenFork, I bet.
First step is to order a new carburetor (here is one example, find one that matches your engine). Find the engine model number stamped on the engine somewhere. This may be several lines of numbers, and they are all relevant. If you can, photograph the numbers with your smart device. On Briggs & Stratton engines, the numbers are often on the valve cover. The numbers on the generator chassis are probably not the ones you need, find the engine numbers. Search online for “engine serial number location (name of your generator)”. I have found that there is sometimes one replacement carb that is used on many small engines for a certain brand. I had to search a bit to make sure I was getting the right carb, but the comments made by other purchasers really helped.
Your replacement carburetor may come with several choke handles, as the new carb fits several models of engine. I had to cut a small piece of metal off the back of the air filter mount to allow the new carb choke handle to fit properly. Not a big deal.
Check out the instructions that come with the carb. You may need special torx bits. I did, and only learned this after I started the job. Fun.
To remove the old carburetor, start by draining the old gas out of the fuel tank. Turn off the fuel line that runs to the carburetor, pull the hose off the carb, and put it into a gas can. Turn on the valve, open the fuel tank cap, and drain. Don’t dump this gas in the woods or a creek, OK?
Big thing to remember: take photos throughout this process, so you can refer to how it all came apart, OK? Remove the spark plug wire from the spark plug. This may seem unnecessary, but its a good practice to get into, especially if you have a electric start generator… Now remove the fuel line from the carb and remove the air filter and the frame that holds it to the carburetor.
The carb may have what look bolts or nuts that are star shaped, these are usually called Torx nuts. You may already have a set of tools to remove these, or you can borrow them or you can buy them.
Remove the governor control rod and spring assembly. A new rod and spring may come with your carb, use the new one, but hold onto the old one in case there is an issue. The rod may be concealed under a plastic or metal shroud, it may take some time to remove it.
Remove the carb from the engine carefully. There is at least one gasket that may tear, and you may not have a new one to replace it. Some gas may drip out of the carb, that’s ok.
The new carburetor will go back in about the same way the old one came out. The hardest part is getting the governor control rod and spring reconnected. There should be a diagram that comes with the new carb showing how it connects.
Also the choke handle may be different or require a little cutting to get it fit. The carb I bought came with several choke handles, and you may have to remove and replace the one that is installed on the new carb.
While you are doing the generator repair, you might as well put in new spark plug and change the oil. Spark plugs die out suddenly, and you’re already deep into small engine repair mode, this will take 2 minutes.
If your generator wont start and has been sitting, I bet the oil is the color of mud. This is a bad thing. Muddy oil can mean there is water in the oil, and will ruin the engine. Take the waste oil to a oil change or car repair shop, they will recycle it for you. Don’t dump it in your yard.
Going forward, always use gas stabilizer in your small engines. Then you don’t have to wonder what to do when your generator wont start. Whenever I fill up my gas cans, I immediately add in the gas stabilizer. My engines start on the first pull, even after a winter in the garage.
Not many things match a beehive swarm in terms of amazing nature. One of my beehives swarmed and I was lucky enough to be on the roof while it was happening. Watch the video:
This beehive swarm is from a new package we installed this spring, which is unusual.
I made two huge mistakes while the hive was swarming.
First, I saw the queen on crawling on the roof. And I went to pick her up, but I wanted to take a picture first. I got the picture, but then the queen flew off. Had I gotten the queen into a queen cage, I could guide the swarm into a new hive. But no, I wanted to use my camera. Not Smart. I’m still annoyed at myself for that.
I should have capture the queen. I didn’t.
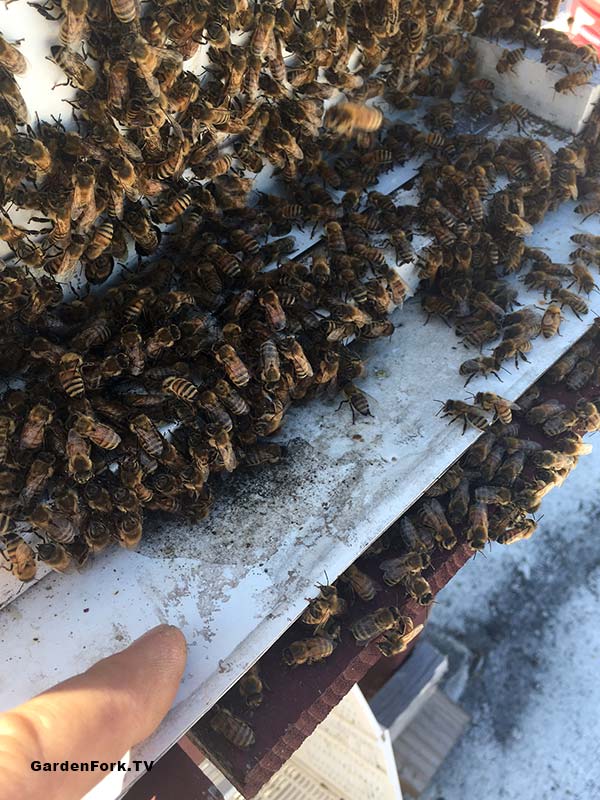
The other dumb thing I did was to not realize that the swarm was alighting, or forming, on the front of the hive, instead of a tree branch. The hives are on top of a 4 story building, above the tree line. No tree limbs above the hive for the swarm to collect on, so they just formed on the front lip of the outer cover. I was so wrapped up in what to do, and recording the spectacle on with the camera, that I completely blanked on what was right in front of me.
Grab the swarm!
This only occurred to me after I called my GF Radio Podcast host Rick, and then I bolted down the ladder and 4 flights of stairs to get a bait hive. By the time I got back up, the swarm had left the hive.
I had two unique chances to grab the swarm and I blew it. Insert choice words here.
Its unusual for a new hive, started from a package, to swarm. My radar was not attuned to this hive swarming. I had just put a third brood super on the hive, and had not opened the hive to check for swarm signs. I have never had a package swarm before. Now I have. Lesson learned.
Going forward, I will be more vigilant about swarm signs, even in packages. Rusty at Honey Bee Suite has a Taranov Split that I will try next time.
I wanted to walk you through the Skil right angle grinder repair I did this week. A while back, the plastic slide switch on this tool flew right off when I went to turn it on. Right angle grinders are not very expensive, but I hat the idea of tossing out a perfectly good tool just because the switch is bad. Here is the repair I did.
Where the on switch used to be
I thought the switch mechanism was right where the switch tab comes out of the body of the grinder, so I took apart the most of the tool to get to the switch.
4 screws hold in the spindle. Easy enough to remove.
Its always fun to see how tools are built, at least I think its fun. So in addition to completing the Skil right angle grinder repair, I just like taking things apart to see how they work.
Armature removed
But I discovered that the switch wasn’t where I thought it was. But this was after I pulled the armature and the brushes popped off the commutator. I knew then getting those back onto the motor would be a challenge.
Brushes that would have to be slipped back over commutator.
The switch itself was in the back of the grinder, near the power cord, and a long plastic rod connected the switch button and the switch mechanism. Why did I not first just pop the back of the tool open? It was just one screw holding the case together.
When I first looked at it, the back of the grinder looked like it was all one piece, only after unscrewing the one screw did I see the back end came apart easily to reveal the switch.
After trying to jumper the switch internally, meaning bypassing the switch so the grinder was always turned on, I opted to slide in a piece of plastic wedge to push the switch into its ‘on’ position permanently. Plastic glue holds it in place. The plastic I used is from one of those composite wedges one buys for carpentry projects, I think its a combo of sawdust and plastic. It worked perfectly here. Any piece of plastic would do fine.
With the grinder always on, I wired an inline switch into the power cord. This is the hardest part for me, as you have to cut the wire just right for it to fit into the switch case. Be sure to use the black wire in the switch, and the white wire passes through the switch untouched. If you cut too much of the insulation, you can use quality electrical tape to wrap the wire that sticks out of the switch case.
Now I have my grinder back, and saved some landfill space as well.
In hindsight, I would have done this one different. But here’s the story:
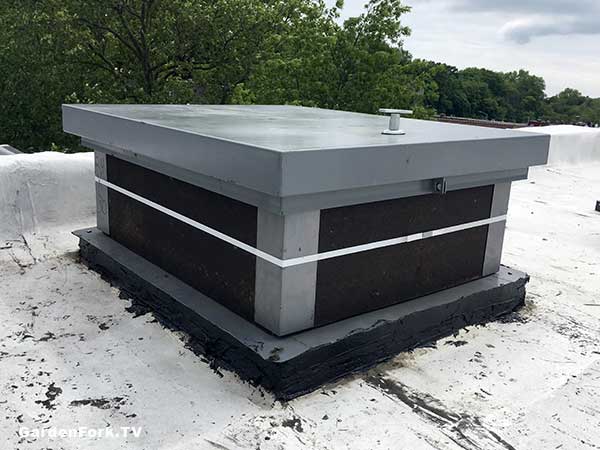
One of my best friends needed to replace the roof hatch on his row house in Brooklyn. This also happens to be the roof where we keep our honeybees. Replacing the roof hatch is pretty straightforward, go buy a new steel one, get it up on the roof, screw and glue it on. Done.
Except the roof hatch would not fit up through the existing access hole in the roof. It now occurs to me we could have cut open the hatchway, roll back the rubber roofing, get the hatch up there, then lay back down the roofing and patch it up.
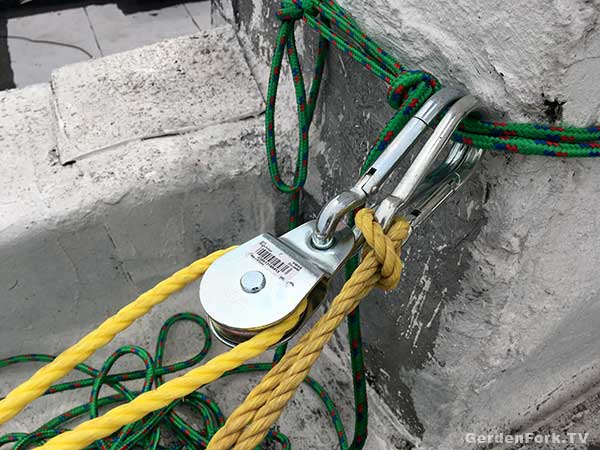
That would have been easier than what we did instead. But ropes, pulley, carabiners, and assorted gear is fun to work with.
We brought the new hatch into the backyard, and figured it would be a straight hoist up. We used a double pulley rig. That way the weight of the load would be much easier to hoist up. To rig this, the rope is secured one of the roof chimneys, the rope then goes down to the roof hatch, where its threaded though another pulley. The rope then goes back up to the roof, through a second pulley, then dropped back down to the ground.
End of the rope, and second pulley secured to chimney.
Pulling on this rope, with the two pulleys connected, makes it much easier to hoist heavy loads.
My friend secured the roof hatch with ratchet straps, and connected the pulley and hoist rope. I then pulled the hatch all the way up the back of the building, and we rested it on the top floor fire escape.
If you’re thinking of doing something like this, be sure to use rope, straps, and pulleys rated for the load you are hoisting, OK?
Once the hatch was resting just below the roof, we had to figure out how to get it up over the roof. Not easy, we found out.
It didn’t help that in the middle of this project, one of the beehives decided to swarm!
Bees swarming in middle of project.Resting on the top floor fire escape.
The last 10′ feet of hoisting involved using a ratcheting come-along (which isn’t recommended for hoisting, FYI) to hold the hatch in place as we lifted up and over the edge of the roof.
Finally up on the roof.
After our “The Eagle Has Landed” moment, we took apart the straps to see two of them had already failed. Wow.
In one of those hindsight moments, we should have ran a few straps around the sides of the roof hatch in addition to strapping it around its top and bottom. The sharp corners of the metal flashing that makes the mating edge of the hatch had cut the strapping. Not good.
Once up on the roof, it was butter to install the hatch. Clean up the existing roof curb, lay down some roof tar, and screw it in. Done.
So yeah, next time you need a large object up on a roof, think about making the hatch hole bigger and then patching that. Easier than what we did.
Every year I try to extend my vegetable garden season into winter, and get a head start on the spring season while there is still snow on the ground, with mediocre success. This is going to change now that I am re-reading Niki Jabbour’s Year-Round Vegetable Gardener, an excellent read on garden season extenders, as well as a good basic how to grow vegetables kind of book.
After the first time I read this book, I interviewed Niki on the GardenFork Radio podcast, listen here.
I talk about it in this video, but my mini greenhouse hoop house had a huge fail this winter. The kale, salad greens, and rosemary I was trying to overwinter crashed and burned. Some lessons learned there.
Snow Season Gardening
But I was re-inspired to just plant more vegetables this summer season AND get better at growing vegetables in winter. Or at least growing them later into fall. Niki has a bunch of methods here that are simple and easy to do. You don’t need lots of equipment. You might need lots of mulch and straw, but that’s easy to get.
Like a lot of how to grow vegetables books, this one goes through different vegetables, but also has a chart of how to start them early and grow them late. Niki made me realize I could sow successions of beets, not just one crop. Lightbulb goes on.
As we all know, I am not one for planning, but the ‘plan your garden’ part of this book got me thinking I should plug some dates into my calendar with reminders to get stuff started. A goal is a second crop of sugar snap peas in the fall. Watch our growing sugar snap peas vid here. And a bunch of salad greens.
Carrots have not been great in the garden, Niki has inspired me to try again. Buy Niki’s book locally or order her book here.
Other vegetable gardening posts & vids you might like:
Some garden books say you can’t transplant snap peas, instead just direct sow them early. I disagree. When we say snap peas, I think most of us mean sugar snap peas, the kind that barely make it from the garden into the kitchen. Someone has taught the Labradors to eat peas, so most of our sugar snap peas never get to the kitchen.
Sugar Snaps started from seed.
Lots of ‘how to plant peas’ texts say to plant the seeds as early as you can work the ground. Saying you can even plant them when there’s still snow on the ground. I’ve tried this, digging out some dirt as sowing a line of peas.
That didn’t work too well.
Sugar snap transplants planted at the same time.
Transplant Snap Peas, my step by step process:
Wait too long to start sugar snap peas in seed starting pots
Buy transplants at the local nursery.
Plant them.
And, BTW, sow some snap pea seeds as well.
I am great to waiting too long to get my pea seed in the ground, but if remember, I pick up some legume inoculant, as stated in my friend Kenny’s excellent how to plant snap peas post. If you don’t have the inoculant, don’t worry, you should still get the seeds or plants in the ground.
Sugar Snap Pea Transplants I grew myself. Nice!
The transplants go in right quick, not much rocket science here. I sow the seeds pretty thick in a row 1″ deep and then tamp down the soil over them. The seeds wills split underground, so give them some ground, and the leaves emerge up through the soil. You may see the seed itself pushing through the soil, I sprinkle some light soil on top of these.
All my peas go at the end of my raised garden beds, learn how to build them here, on a simple trellis. Learn here how to build trellis. The trellises are at the end of all my beds, its the perfect place to put them. They don’t take up any room in the veg bed and the Labs can get to them easily.
Another improvement I’ve made is I extended my soaker hose drip irrigation system to run parallel to the trellis, right up against the end of the bed. This waters the plants nicely, one less thing for me to blank on.
The over-seeding pays off for me, I get lots of plants, and masses of peas. I sometimes have to train the plants up onto the string trellis, but they go from there. What has your experience been when you transplant snap peas? Let me know below.
Some Videos and Posts you might want to check out:
It’s the first really hot day of the year. You climb up on the roof, and the new hive – a bee package we installed this spring – has tons of bees all over it. There’s a liquid sugar feeder on the top of this hive, and 10′ away is a mature hive that might be swarming.
It’s been a frustrating bee season so far, and I see this and just think the worst immediately. The mature hive is robbing the young hive for the sugar syrup sitting up in the top of the hive. Or, a swarm is trying to move in – though I’m not sure that is possible. But being up on a hot roof, your brain already starts to melt when you see this.
I take some pictures and send them to my local beekeeping friends, we have a gmail email group, and wait. The mature hive, which I believe has already swarmed once, it very quiet in comparison.
Bees Don’t Read Books
My beekeeping teacher told us that the first day of class. So while you are trying to figure out what is going on and how to fix it, the bees are doing what they want.
If the young hive was being robbed, you can try to place a wet sheet over the hive to thwart the attack. (there is a entrance reducer on this new hive to thwart just such an event)
Was the young hive going to swarm? This has happened to friends, though I have never had it happen to me, thankfully. Watch this cool video of us catching a swarm.
Was a swarm trying to move in on a young weak hive? I’ve never seen this, but my brain was racing through options.
By now I was starting to get replies from my fellow beeks.
Bearding. In other words, the bees are hot. So they are outside the hive.
Doh!
I use what is called a screened bottom board on my hives. It has a screen window built into the floor, and plastic slider that covers the screen. This allows a few things:
Varrao mite counts with a sticky slider board.
Varroa mite reduction when the mites fall through the screen and out of the hive.
Ventilation in the summer, and air flow to cure honey faster.
Previous to this first hot day of the year, we have still been having cool nights, so I have kept the slider board in, as the bees need to keep the brood boxes (where the eggs are laid) warm. Cool drafts at night aren’t good for that.
But today the temperature was really high, and a closed in box gets hot. So the bees go outside to cool off. You can see in the first photo that the bees are on the shady side of the hive.
My friends emails asked if I still had the bottom board slider in, and then meltdown subsided. Pull out the slider, the bees will cool down.
Pulling the slider out from the bottom board, slowly…
The plastic slider removed.
BTW, a key thing here is if you bees are on a DIY bee table/stand, the tabletop part of the stand has to have the center cut out, so air can flow to the bottom board.
Hive stand top is cut out to allow air flow.
So I was calmer after that, and felt less than smart, even though I’ve been doing this for years. Standing back and looking after the fact, it did look like an overheated hive.
But when you walk into it, that isn’t always apparent. So once again, its good to belong to a group of beekeepers that you can check with, right there on the roof.


 This same hive gave me another headache earlier this month, see it here.