Tag: diy

  • Exhaust Pipe Repair Hack – DIY GF Video

    Exhaust Pipe Repair Hack – DIY GF Video

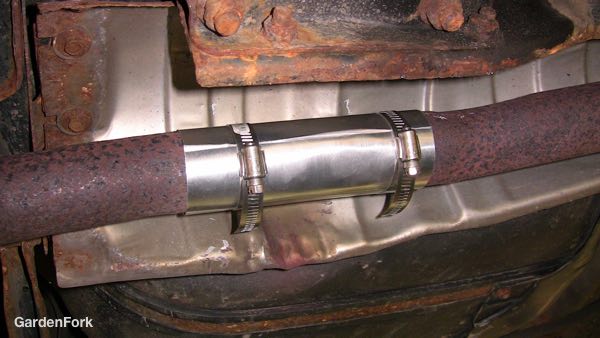
    Here’s an exhaust pipe repair hack I learned how to do a while back. It is a simple DIY muffler repair that will last long enough until you have time to take your car to the repair shop. This is not meant to be a permanent repair, this is simply a emergency stop gap measure. Maybe you don’t have the money quite yet to go to the muffler shop, this will knock down the noise. Heads up, this won’t help your car pass an emissions test but it is a neat little DIY hack to fix an exhaust pipe leak temporarily.

    The flexible metal that I used is called roof flashing, but you could also use a metal can, like those that contain tomato paste or chopped up tomatoes for making spaghetti sauce. You can also use a soda can, but soda cans are made out of aluminum, so the hack will not last nearly as long. Aluminum has a lower melting point. Any kind of flexible metal that you may have laying around, something from a gutter repair or maybe your neighbor has some sheet-metal laying around that would work. You basically want to curl the metal around the exhaust pipe and then tighten it with pipe clamps.

    exhaust pipeYou can also use this hack to do a muffler pipe repair. You would have to find a really long pipe clamps or connect together several pipe clamps. You can you can usually get clamps about 4 inches in diameter, if you buy a bunch of those you could connect them end to end and then wrap a big piece of metal around the muffler. This kind of muffler repair is not going to last really long but it would reduce the noise but your car is making – fewer people would stare at you at the red light intersection!

    exhaust pipe

    exhaust pipe

    exhaust pipe

    Video Transcript:

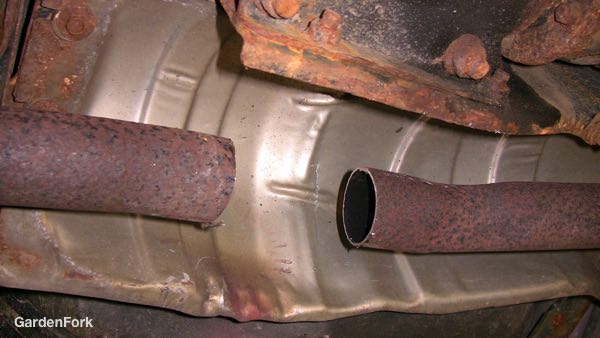
    One of our cars has a hole in the tailpipe. I’m gonna show you how to do a quick exhaust pipe repair, until you have time to fix it properly, all right? So, you could be stuck somewhere, you can run to the hardware store, buy two clamps, borrow some tin snips, and get some roofing flashing. You could also just use, like, a tin can. Like a soda can, or a tomato can, or something like that. something that has flexible sheet metal stuff. All right?

    Get under the car, let’s go. So first I’ve got to cut the old pipe. I’m gonna cut the clamps off and see what’s left there. We’re gonna use what’s called a right angle grinder with a metal-cutting disk on it. And be sure to have eye protection and ear protection. Be careful, all right? A lot of times you can just pull this out. Just put some pliers on here and you work it back and forth and it’ll come out.

    Slide two pipe clamps that are slightly bigger, one on each side of the gap, of the hole. And then put your flashing up here and you’re gonna curl the flashing around the break in the pipe. This has sharp edges so careful not to cut yourself. And then slide these clamps over the metal and slide that on like that, there we go. There we go. All right, so you’ve got two clamps on, this is, you wanna center this in the break, and then we’re gonna screw these on. By the way, if you have one of these four in one or six in one screwdrivers, if you take the screwdriver part out, You have a nut driver here. So as the clamp tightens down, it wraps the sheet metal around the gap and it tightens it up. Tighten these up.

    All right, there you go. Just a quick muffler exhaust pipe repair. If you’ve got this hole, and you drive down the highway, you could stop at a hardware store and buy those parts and fix it up, until you can get home and order the right parts or take it to the shop. It’s just one of those things that’s helped me out a couple of times so I just wanted to show you about it.

    car battery cable
    Car Battery Dead? Probably Not. Learn why here.


  • Hook Up A Generator To Your House – GF Video

    Hook Up A Generator To Your House – GF Video

    Learn how to hook up a generator your house electric panel safely in this video. We run our house with a portable generator and transfer switch when the power goes out, and here we’ll show you how to safely connect a generator to your circuit breaker panel. Watch this video, and read through the text below for more information.

    Learn more about installing a generator transfer panel here and how to buy a portable generator here.

    AND, watch this video about installing a generator interlock, which is another option for hooking up a generator to your house. It is a simpler option, if an interlock is available for your particular breaker panel.

    IMPORTANT:
    Do not run a generator in your basement or your garage. Gas engines create carbon monoxide, which will kill you. OK?

    This is part of a series of emergency preparedness videos and articles we are writing.

    To Hook Up A Generator, The Nuts and Bolts:

    Using a portable generator is an affordable way to power the house during a power outage. You can install one of those large generators that sit on cement slab with an automatic transfer switch, but we opted for the less expensive portable generator and a manual transfer switch. I installed the transfer switch myself, but you must follow local electrical codes, and if you are the least bit hesitant, or are not experienced in working on electrical panels, please call a qualified installer.

    Hook Up A Generator
    This 6500 watt generator runs everything we need in our house

    Before you go off an buy a portable generator, stop, breathe, and do some math. Generators are rated in watts. You need to know how many watts or amps all your electric powered stuff uses.

    To determine how many watts of generator power you need, figure out what appliances in the house you want to power with a generator. Each appliance will list on a label somewhere how many watts or amps the appliance uses.

    Use the formula if the appliance is rated in amps:

    Watts = Volts x Amps

    This will help figure out how many watts you need to power your home. And it will give you a good idea of how large a generator you need to buy. Most portable generators are rated by how many watts they generate.

    Go around and total up how many watts your fridge uses, the freezer down in the basement, the large TV, the well pump, the sump pump. Think about all the big things that draw power in your house. (Not the Telsa, ok?)

    Fridge 750 watts
    HDTV 195 watts
    Chest Freezer 200 watts
    Furnace 400 watts
    Microwave ?
    Toaster ?

    At its most basic, that total wattage number tells you how powerful a generator you need. Keep in mind most of these appliances will not be running all at the same time. Well pumps turn on for maybe a few minutes, furnaces run longer.

    Light bulb usage is not worth calculating, I think, especially if you use LED bulbs. The power drawn is minimal.

    After 12 years of regular winter power outages, I have found that I never use the full wattage of the generator I bought. If I had to do it again, I would have bought a smaller portable generator. The meters on my transfer panel barely move when powering most of my house. Something to keep in mind.

    The only caveat to under sizing a generator is: with my generator, you can tell when the well pump turns on. The generator engine is definitely under load when the water is pumped. Check with your well pump installer for how many amps the well pump needs to run, that is real important. You don’t want to risk burning out your well pump with an undersized generator.

    That being said, my friend has a 5k watt generator, and it runs his well pump just fine. But just check how many amps your well pump draws, OK?

    If you have a whole house air conditioner, read this post about will a portable generator run whole house AC.

    Figure out what circuit breakers control all the things you want to supply power to in a power outage. You will need to buy a manual transfer switch that has that many breakers. Here is one brand I like to use. (affiliate link)

    And of course,

    A couple of other things I have learned:

    If your generator won’t start after sitting for a long time, its time to watch our replace the carburetor video

    Listen to me on our podcast, GardenFork Radio, talk about how to hook up generator to a house.

    Let us know below your experiences and thoughts on generators and emergency preparedness, how do you prepare for winter storms?

  • Cheap Solar Panel System Runs Your Cabin or Small House – GF Video

    Cheap Solar Panel System Runs Your Cabin or Small House – GF Video

    A cheap solar panel system to run most of your small house or cabin. This video walks you through a simple solar installation we did for a friends cabin in the woods.

    A Cheap Solar Panel System, How We Did It:

    Cheap solar panel system
    This small weathered panel powers lights and electronics in the cabin.

    We talk about a simple solar installation on the GardenFork Radio podcast, in this post I want to show you how I built a cabin solar system. There are many options for what to buy, but if you want to keep it simple, here are the items we have used.

    Solar Panel & Controller: https://amzn.to/2sPEi6c
    Inverter: https://amzn.to/2M5KSOI
    Battery: https://amzn.to/2kTHqKJ
    Kill A Watt meter: https://amzn.to/2sJLlgE
    12 Volt LED bulbs: https://amzn.to/2yf9TnR
    HD Outdoor Extension Cable: https://amzn.to/2t1qtT7

    You can get a smaller solar panel than the one we link to, but it will cost about the same amount of money, and its good to have the extra capacity for dark days.

    Our solar panel is mounted on a DIY pole consisting of plumbing pipe and some scrap metal parts. It is pointed toward the ideal part of the sky for maximum power generation. If it points in the right direction you can also mount the solar panel on a roof or shed. A heavy duty outdoor extension cord is connected to the panel.

    I cut a slit in the grass about 2″ deep for the heavy duty extension cord going from the solar panel to the basement of the cabin. In the basement the extionsion cord cable from the solar panel hooks up to the charge controller. The charge controller is wired to the batteries.

    How many batteries you buy will determine how much power you will have on hand. If you don’t run a lot of stuff, you can get just one battery. This is very easy to set up, and its very simple to do.

    Regular car batteries will not work here. You need either locally purchased deep discharge batteries, aka golf cart batteries, or sealed solar batteries purchased online. Pictured below are two 6 volt golf cart batteries, you would normally purchase one 12 volt battery.

    Cheap solar panel system

    Here is a still frame from the YouTube channel The Weekend Homestead’s vid on his solar setup showing the inverter and battery. The inverter converts 12 volts to 110 volts. (Full vid at end of this post) Be sure to read the instructions that come with the unit.

    Inverter and battery from The Weekend Homestead YouTube video.
    110 volt powered by generator, 12 volt outlet runs on solar

    This cabin can be run simply because we are using 12 volt LED lights and the fridge is propane powered. A solar powered fridge would require a larger panel setup.

    You can now buy 12 volt LED bulbs with what’s called an Edison base, this is the regular silver screw in bulb type. This means you can use any regular lamps, and just drop in the 12 volt LED bulbs. Neat!

    Laptops, radio, stereo all run on 12 volt. You can buy a 12 volt car adapter to charge many laptops. Or you can pick up a small car inverter and use your regular computer’s cable to charge up the laptop.

    A portable generator runs the well pump and any power tools needed.

    While making dinner at the camp we sometimes want to use a hand blender or a mixer, so for that we fire up the generator, which is hooked up to a few electrical outlets in the house. Be sure the generator is grounded, OK?

    My main point here is that you don’t have to make this complicated, and you can probably do it yourself if you follow directions. Watch Will’s video on how he set up his cheap solar panel system.


  • Flux Core Welding Success! – GF Video

    Flux Core Welding Success! – GF Video

    My first successful flux core welding project, not without an ‘oops’ moment, but watch and read along here. You may learn something, or teach me something. Let’s see.

    I first heard of flux core welding from Jimmy Diresta, when he suggested to a viewer that it was a good beginning welder to buy. Officially called Flux-cored arc welding, aka FCAW or FCA, it is used widely in construction.

    flux core welding

    I have seen a lot of maker people on YouTube using MIG welders for their projects, but MIG welders can be expensive, and you have to use a tank of gas (usually argon) with MIG welding.

    A while back I had taken a 4 hour intro to welding class at a Brooklyn metal arts collective, but I wasn’t sold on getting a MIG welder.

    So I was at Harbor Freight Tools and saw they had a flux core welder on sale for $100. I know Harbor Freight is famous for cheap tools, and it could be a gamble to buy a flux core welder from them. But that’s what I did.

    flux core welding

    Back to YouTube I went and watched many flux core videos. Some were awful, some were great. But I learned enough to start welding. An even greater source of help was my first flux core welding video, where I asked people to post constructive comments on how I could be a better welder. It worked, lots of great comments.

    flux core welding

    A year later that vid still gets nice people writing out what I should be doing better. It was these comments that were in my head when I was repairing the tree guard with the flux core welder. And my welding has improved from the first welding video, I hope you can tell!

    flux core welding

    You can also buy an cheap flux core welder online:

    flux core welding

    A cheap flux core welder will work fine for welding thin metal and repair stuff around the house. If you want to build furniture, you should upgrade to a MIG welder. The cheap flux welders are AC welders, the better units are DC, and more expensive. I have seen some hacks online to convert a cheap AC welder to DC, but have yet to attempt that.

    flux core welding

    This type of wire fed welder is called flux core because the flux is built into the center of the welding wire. This wire is fed from a spool inside the welding unit, through a hose to the tip of the wand. When the wire is energized (by pressing the red trigger on the welding wand) the wire at the welding tip is heated, flux is released, and it allows the wire to melt, create heat, and weld the pieces of metal together.

    This core inside the welding wire also has ingredients that create a shielding gas around the weld point. MIG welding uses an intert gas, usually argon, as a shielding gas. The advantage of FCAW is that you can use it outside in windy conditions. With a MIG welder, the argon gas may get blown away by the wind. As you see in the video I made, the flux core unit is super portable. All you need is a heavy duty extension cord.

    flux core welding

    The down side of flux core welding is it shouldn’t be used indoors unless its really well vented. It puts out some noxious smoke. MIG welders can be used inside. The other downside is it can be harder to see the weld puddle, the melted metal you are working into a joint, with flux core. The process creates slag that can get in the way.

    Maple Syrup Evaporator BuildI did some welding on the homemade maple syrup evaporator project

    But I do think a cheap unit is a fine way to get into flux core welding. If you find you really like it, you can sell your cheap welder and upgrade to a nicer unit. If you find you don’t like it, you can still sell the unit.

    Let me know your experience with welding, I am always learning from you. Thx!

  • Clean A Dirty Tin Ceiling & Prepare For Painting

    Clean A Dirty Tin Ceiling & Prepare For Painting

    To show you how to clean a dirty tin ceiling, I took some photos to show you how we clean one in preparation for painting. You can also use this method to just clean most tin ceilings that don’t need a fresh coat of paint.

    This paint job was a tin ceiling in a small kitchen, and the tin ceiling was covered in grease from the stove. You can see in the picture below how stained the tin ceiling is. The lighter areas are where we did spot cleaning to see how bad the grease on the ceiling was.

    Clean a dirty tin ceiling
    Kitchen Grease on Tin Ceiling

    To to clean a dirty tin ceiling, we first cover all the counter tops and floors with plastic. We wore paint coveralls and gloves, goggles, and masks to shield ourselves while cleaning the ceiling.

    We then used TSP (Trisodium Phosphate) mixed according to the package directions in a bucket of warm water on the ceiling. We used large sponges to apply the TSP to the ceiling and then removed the cleaning solution and grease with sponges soaked in warm water. It took several applications of the TSP to get the tin ceiling clean.

    TSP is a strong cleaner! Follow all label directions and safety guidelines on the box, OK?

    Clean a dirty tin ceiling
    See the difference cleaning the ceiling makes

    If your ceiling has grease on it or is stained yellow, you have to remove this stuff before painting. The paint wont stick to grease.

    Clean a dirty tin ceiling
    After cleaning one area, you can see the contrast

    It took a whole day to clean the ceiling, applying the soap several times, then allowing the ceiling to dry before painting the ceiling. We used a 3/8″ nap roller and a high quality latex paint.

    Materials List

    TSP Surface Cleaner

    TSP P Free (less harsh cleaner)

    Cleaning Sponges (you will need a bunch of these)

    Chemical Resistant Gloves

    Safety Goggles

    Disposable Coveralls

    Have you cleaned a ceiling? What was your experience? Tell us below:

    Spilled Paint Cleanup!

  • Rollerblade Office Chair Wheels To Fix Your Broken Desk Chair!

    Rollerblade Office Chair Wheels To Fix Your Broken Desk Chair!

    As soon as I saw the description “Rollerblade Office Chair Wheels” I knew this was the solution to the question: How to fix broken office chair wheels? I have an older Aeron chair, and I have never loved the plastic roller wheels it had. Kinda like those plastic wheels on cheap rollerboard luggage.

    Rollerblade office chair wheels

    BTW, my rollerboard wheels died on the last trip I took.

    BUT, there is light at the end of the tunnel! I ordered these replacement rollerblade office chair wheels (affiliate link) and they were easy to install. Lets walk through the process of how to fix a broken office chair.

    First flip the chair over, and with a screwdriver and a pliers, lift the broken office chair wheels out of their mounts in the bottom of the chair. You will need to wiggle the screwdriver between the wheel and the mount, but they slide out pretty easily.

    Rollerblade office chair wheels

    You don’t need to save the old wheel spindle, please put it in the metal recycle. The new rollerblade office chair wheels come with new ones attached.

    The new wheels are easy to install. Just press the new spindle into the wheel mount. They should slide in easily.

    Rollerblade office chair wheels


    Couple of things to keep in mind when repairing office chair wheels:

    Make sure you order the correct replacement wheels, the spindle diameter is key.

    Order by searching for the brand name of your office chair + roller blade wheels.

    Check the reviews and comments for the wheels you are ordering, make sure they fit and work well.

    My office is in a 120 yr old building. And the floors aren’t level, and my desk is on the part of the floor that is higher than the rest of the room. These replacement office chair wheels work so well I often slide away from my desk.

    But this office chair repair is a great improvement in wheel performance. Plus they look pretty cool. Not sure why I didn’t upgrade to these wheels before, one of those light bulb moments. Gone are years of bad plastic wheels scratching up your floors, get these instead.

    Skil Right Angle Grinder Repair

  • How To Sharpen Lawn Mower Blades – GF Video

    How To Sharpen Lawn Mower Blades – GF Video

    Learn how to sharpen lawn mower blades and cut your grass better with our mower video. Then read through the steps below and you’ll be set to mow the grass.

    Key Points To Sharpen Lawn Mower Blades:

    • Be sure to put some plastic food wrap under the gas cap so it seals before you tilt the mower.
    • Whatever side of the mower that has the gas cap should be tilted up.
    • Wear safety gear when sharpening the blade, save your eyes and ears.

    The video shows best how to tilt the mower so the gas doesn’t spill out, its easier to show than to put into words, but I trust you get it. Some gas caps have vents in them, hence the need for the plastic wrap to seal it.

    sharpen lawn mower blades

    Use a block of wood and a clamp set against the rim of the mower deck to keep the blade from moving while you remove the bolt. Do not use an adjustable wrench, use a socket or wrench, or you may round off the bolt.

    sharpen lawn mower blades

    Clamp the blade into a vise and use a right angle grinder to sharpen the blade, you want to do your best to keep the angle of the blade the same. If you do not have a grinder, you can buy a mower blade sharpening stone that attaches to your corded drill.

    You can buy a right angle grinder here.

    The most important part when you sharpen lawn mower blades is to balance the blade after sharpening it. If the blade is off balance, it will wobble when its cutting and damage the engine. Bad things will happen.

    sharpen-lawn-mower-blades-2

    When attaching the blade to the mower, do not over tighten the bolt, hand tight and then a little more. Be careful not to bend the blade against the clamp when tightening the bolt.lawn mower

    The engine will take several pulls to start, don’t worry, the gas has to settle in the carburetor again. It will smoke a bit when it first starts. I sharpen my blade several times a year, it makes for a healthier lawn and a cleaner cut.

    What are your thoughts on blade sharpening? Let me know below.


  • Replace A Broken Window Pane Like A Pro – GF Video

    Replace A Broken Window Pane Like A Pro – GF Video

    Learn here how to replace a broken window pane, its not that hard, and once you do it, its like butter.

    Easy Steps To Replace A Broken Window Pane:

    1. Remove the broken glass.
    2. Remove the old putty.
    3. Pull out the old glazing points
    4. Measure the window pane.
    5. Get Glass Cut.
    6. Drop in glass and push in glazing points.
    7. Press in glazing putty.

    Replace A Broken Window Pane

    Safety First! Be sure to wear gloves and safety googles, as you don’t want glass going into your eyes or your hand. If you can remove the window from its frame, it will be easier to do the work. If not, put a tarp below the window to catch the broken glass and old putty.

    Replace A Broken Window Pane

    The putty may come out easily, it may not. Try to pull out the broken glass, it may still be held in by the putty and the glazing points. Alternate between removing putty, glazing points, and the glass, you will eventually get all of it out. Be careful with the wood trim that holds the window, you don’t want to beat it up.

    Replace A Broken Window Pane


    To replace a broken window pane, we need to get a piece of new piece of glass, you can cut the glass yourself or have the hardware store do it. Measure the pane carefully, best to have it slightly smaller rather than too large for the opening in the window.

    Place the new glass pane in the window, and press in new glazing points every 6″ to 8″. Again be careful, as you can crack the glass if you press down on it too hard while putting in the points.

    Replace A Broken Window Pane

    If the wood frame is unpainted, you have the option of painting it or brushing on some linseed oil. The thinking here is that unfinished wood will draw out some of the oil in the putty, hampering its ability to form up properly and make it brittle. I have done it both ways, and have not seen a difference, but the theory makes sense to me.

    Replace A Broken Window Pane

    Prepare the glazing putty by kneading it and adding linseed oil if you like. I like the putty more pliable than how it comes from the store.

    Replace A Broken Window Pane

    Lay a bead of the putty all around the window pane, and finish with your putty knife as shown in the video.

  • How To Cut Glass – GF Video

    How To Cut Glass – GF Video

    Learn how to cut glass to repair a broken window or to use cut glass in a crafts project. In our DIY video, we show you  few tips to make cutting glass easier.

    This same glass cutting method applies to crafts projects too. If you are doing stained glass, the glass cutting process is the same. You will do more curved cuts as you practice.

    Tips On How To Cut Glass

    • Oil the glass cutter
    • Apply firm pressure
    • Use a straight edge
    • Wear safety glasses and gloves
    • Cut clean glass

    Oiling the glass cutter was a wake up moment for me when I was learning how to cut glass. In one of our how to glaze windows videos, Bobby showed me hoe he oils his glass cutter, and it made all the difference. You can use motor oil, automatic transmission fluid, or vegetable oil, use what works and what you have.

    When cutting the glass, firm pressure is key. But you don’t want to put all your weight on the cutter. The cutter should make a sound like paper being torn, but a bit louder. You want a clean score line, not a deep gouge in the glass.

    I found a square is very helpful when cutting glass. You can run the cutter right along it, and you can put your hand on it to hold down the glass. It helps to tape the square to the glass, duct tape works well.

    Clean the glass before you cut it. You don’t want the cutter to hit any debris, and it makes it easier to draw any cut lines.

    how to cut glass

    After you score the glass, you can use the metal tapper on the back of the cutter to tap the back of the glass, the side  opposite the score line, to cause the break to expand, and then put the glass on an edge and snap it off.

  • Pallet Christmas Tree Project – GF Video

    Pallet Christmas Tree Project – GF Video

    Craft a pallet Christmas tree in about an hour from start to finish. This wood pallet project all started when my neighbor put a pallet out with the trash, and I grabbed it and brought it into my house. Watch the video to see it all go together:

    How To Make A Pallet Christmas Tree

    pallet christmas tree

    The ideal pallet for this has at least one good side. In other words, the wood slats are in good shape and not splintered. Remember you are only going to use 2/3 of the pallet, so if one side has some issues, that’s ok, just use the other side for the pallet Christmas tree. When cutting through the slats, do not cut into the studs, only cut the slats.

    Flip the pallet over and cut off all the slats except the last one, the one at the bottom, is left whole to serve as a support.

    pallet christmas tree
    Cut of the back slats except the bottom one.

    Pallet Christmas Tree

    pallet christmas tree

    Decide on your color and spray paint the wood. If you want to upgrade this into a super craft project, you can sand the wood slats, prime the wood, and brush on some quality paint. I like the transparent feel to the light coat of green spray paint I applied. Its a matter of taste and patience. And you know how I am with patience. K?

    I hand drew some stars on card stock, and then used some paper to make a larger stencil mask to avoid spraying the red paint where I didn’t want it.

    pallet christmas tree

    I cut two stabilizers from the scrap wood and screwed these into the bottom of the pallet Christmas tree. This could be improved, I think, but for this holiday season I went with this solution.

    One thing to pay attention to is make sure the pallet you use has the letters HT branded somewhere on it. This means heat treated for insects, so its safe to use for projects. More info on pallet safety from our friends at Root Simple here.

    pallet christmas tree

  • Ikea Kitchen Island You Can Build

    Ikea Kitchen Island You Can Build

    Here’s a DIY Ikea kitchen island I built out of butcher block counter top and base cabinets. The design is simple and does not require expert carpentry skills. If you can use a screw gun, and a circular saw you can build this.

    Ikea Kitchen Island

    How To Build An Ikea Kitchen Island:

    The first step is to determine what type of countertop. Ikea has several types of butcher block counter top available. This is an oak wood top, but you may prefer another style. Oak does have some open grain to it, woods such as maple or birch have a tighter grain. Some people think the open grain can catch more stains, etc. but I’m fine with the oak.

    The length of your Ikea kitchen island determines which butcher block to purchase. Right now Ikea sells two lengths, 74″ and 98″. You can easily cut these down to whatever size you need. Cutting the length shorter is easy with a circular saw.

    If you need to make the counter top narrower, you will need to do what is called a rip cut, which is harder to do with a circular saw. If you don’t use the correct saw blade, you can start to burn the wood while cutting it. Pay attention to which side is marked “DOWN” that side faces down.

    What do you want under the counter? For this project, we put in a dishwasher and two base cabinets with a top drawer and 2 door cabinets. Ikea is very modular, and with a mix of different cabinets, you can get pretty close to your ideal.

    Screw the base cabinets together in 3 or 4 places. Drill pilot holes so the cabinet wood doesn’t crack. 3/4″ screws work well. Ikea gives you some screws to join cabinets, but they are difficult to use, I think.

    To finish off the back sides of the cabinets, you can buy a sheet of backing material from Ikea. You will have to cut this to length, take your time and be careful. Put down blue masking tape right over where your cut line will occur, and mark the cut line on the tape. The tape helps make it a clean cut.

    Be sure to seal the butcher block before installing it. We use the sealer from Ikea, and give it several coats, top, sides and bottom. If you are putting a dishwasher under the top, put some extra sealer in the area above where the dishwasher will go. Your dishwasher will come with a foil strip, attach this to the underside of the counter top where the vents of the dishwasher will be located. The strip helps keep the moisture from the dishwasher affecting the butcher block.

    There will be some angle brackets in the box with the counter top to secure it to the base cabinets, screw these into the solid parts of the cabinets and then into the counter top.

    You cant’ see it in the photos, but I bought some white outside corner molding to cover up where the cabinet backing meets the side of the cabinet. Tack it on with several small nails.

    Buy the adjustable floor levelers for the base cabinets, this makes it much easier to level the kitchen island. Best to do this with the counter top in place, the weight of the top helps make it all solid. So there you go, an Ikea kitchen island you can DIY.

  • Dishwasher Installation Hooked Up To Cold Or Hot Water?

    Dishwasher Installation Hooked Up To Cold Or Hot Water?

    I often get asked, “Does it make any difference if the water supply line is hooked up to cold water line rather than hot?” To understand this fully, first watch this video on how to install a dishwasher.

    Dishwasher Installation

    If you have to pull out the old machine, watch this video on how to remove a dishwasher. Dishwasher Installation

    Are you not sure which water pipe you hooked up the dishwasher to? Or are we just figuring out which water valve we need to connect the dishwasher supply hose to before we start the install. For either one, we need to understand dishwasher soap to grasp the whole picture here.

    The new formulations of dishwasher detergent have gotten very good at cleaning dishes, and its now common practice to not rinse the dishes before putting them in the dishwasher. Yes, knock off the large stuff, but just put them in. Rinsing dishes before putting them in the dishwasher is a waste of water and your time.

    Make sure the dishes face toward the center of the machine. If you have a large pan that needs cleaning, put it face down so the spray jets can do their best cleaning. Plastic items and glasses should go on the top rack. Consumer Reports has found that the detergent pods are the best detergents right now.

    Most dishwashers have a water pre-heat function, sometimes it is a feature you can turn on or off, but leave it turned on. Dishwasher detergent, and your dishwasher, work best with very hot water. And when you first turn on your dishwasher, the water in the hot water supply is probably not very hot. The dishwasher pre-heater brings it up to a higher temperature, allowing the detergent to work at its best. The pre-heater supplements the water coming in from the hot water line, don’t think you can hook it up to the cold water line and rely on the pre-heater.

    This is why, for dishwashers, its always the hot water supply line.

    When doing a dishwasher installation, I have found the existing water supply line hooked up to the wrong pipe. Check under the sink that the dishwasher line is actually hooked up to hot water pipe. If it is not, you will have to switch out the valves under the sink to you can attach the washer line to the hot water pipe. Here’s a good book on basic plumbing that I learned a lot from.

    How To Remove A Dishwasher – DIY GF Video

    How To Install A Dishwasher – GF Video


  • Drill Into Brick or Mortar When Hanging Something? – GF Video

    Drill Into Brick or Mortar When Hanging Something? – GF Video

    Do you drill into the brick or mortar when you are going to hang a picture, TV, or shelves on a brick wall? I get this question all the time when people watch our first how to hang shelves on a brick wall video.

    There are all sorts of experts on the web, with varying degrees of expertise, who will weigh in on this topic. I work 80% of the time in 120 year old brownstone row houses, where there are many brick walls. I have hung many TVs, heavy mirrors, large pictures, etc. on brick walls. So I have an opinion about what is best that is based on experience.

    Do You Drill Into Brick or the Mortar?

    I’ve seen lots of crumbling mortar in the old buildings I work in, and some bad brick, but I always drill into the brick. If you are drilling into cinder block or cement block, I drill into that and not the cement pointing around the block.

    drill-into-brick-or-mortar-1

    In my mind, bricks are stronger than the mortar around them. They can hold an anchor and a screw or bolt well. I suggest using plastic anchors for lightweight objects, and lead anchors for medium weight items. For heavy things like TVs, you should use sleeved anchors. Be aware that once you put a sleeved anchor into brick or block, it probably won’t come back out, its permanent. Something to consider if the house is a rental.

    When drilling into cinder block, aka cement block, most blocks have hollow spaces in them, so you may be pressing on the drill and then you will hit the hollow space, and the drill will slam into the cement face. If the cinder block is an outside wall, the hollow spaces may be filled with cement and rebar (reinforcing rod) if you hit rebar with the drill bit, its not good. The drill bit will be damaged and you can’t drill through rebar with a masonry bit.

    Image of drilling into wall linking to a videoBTW, here is detailed post on how to hang a TV on a cement wall using sleeved anchors.

    For tools, you can buy a decent hammer drill for not a lot of money. Here are some links to buy a hammer drill and masonry drill bits

    You get what you pay for when buying tools, especially with masonry bits. Don’t cheap out on them.

  • Custom DIY Dishwasher Install Into Existing Cabinets

    Custom DIY Dishwasher Install Into Existing Cabinets

    I did this custom DIY dishwasher installation so it fit into existing cabinets at a friend’s apartment. There wasn’t a space for a dishwasher in the kitchen and we made a space in a creative way. Maybe we’ll call it an unusual way, actually. If you’d like to see how to connect the electric, water, and drain lines, see my video on how to hook up a dishwasher.

    In small kitchens, I often see those narrow dishwashers that you don’t see in most homes. They are common in apartments, and might be good for a tiny house too. Our plan here was to remove one of the cabinets and slide in a small dishwasher.

    Custom DIY Dishwasher Installation
    Before the DIY installation

    I call this a custom DIY dishwasher installation is because it wasn’t as simple as removing a kitchen cabinet and sliding in a dishwasher. I had to install a dishwasher into existing kitchen cabinets. The cabinet under the sink was one unit, so I had to be creative in figuring out how to make space for the dishwasher.

    I did this by cutting off about 1/3 of the base cabinet. This isn’t your usual install, it was a challenge, but it was fun. Key here was cutting real straight lines, not the easiest thing to do on site. But we did pretty good

    cutting apart kitchen cabinet

    I removed the left cabinet door, pulled off the counter and sink. This involved shutting off the water in the kitchen, disconnecting the drain pipe, and the water lines going to the sink. This is always an adventure when climbing under a sink. The shut off valves don’t always work, and once you turn them, they can break. Then you are toast.

    Thankfully the shut off valves were fairly new, so turn them off and then don’t look at them.

    I cut the lateral supports where we were to slide in the dishwasher, and moved the side of the sink cabinet unit to the right. Basically shortening the width of the sink unit. Some brackets and screws put the cabinet back together.

    Kitchen sink removed from cabinets

    The tricky part was then I moved the left side wall of the sink unit, I had to make sure the hinges on that wall were level with the hinges they were across from. Somehow this all came together fairly easily. Sometimes I am lucky. Sometimes I am toast. Today no toast.

    kitchen cabinet disassembly

    I slid in the dishwasher, remembering to slide in the feed and drain hoses beforehand, as well as the power cord. There was an outlet behind the stove, so we were good there.

    link to dishwasher videokitchen counter with dishwasher

    My friend was very happy, and it was fun to do. What do you think?

    installation of dishwasher into small kitchen

    DIY Dishwasher Installation
  • How To Mud and Tape Drywall – GF DIY Video

    How To Mud and Tape Drywall – GF DIY Video

    To mud and tape drywall aka sheetrock, you have to practice, but if I can do it, you can do it. I don’t do it perfectly, but I made a video here of how I mud and tape drywall while working on our renovation projects. I also have a video about how to mud and tape drywall corners.

    It’s one of those things where having the right tools and the right materials pays off. Your first attempts at mudding and taping will not go perfectly, but keep doing it. You will attain that ‘Ah Ha’ moment.

    Tip: Listen to our podcast, GardenFork Radio, while taping drywall.

    I like to use lightweight compound, and use a 5 gallon paint mixer paddle to whip it up into a whipped cream – cupcake frosting consistency. Some add water or plaster, I do not. BTW, adding plaster is called a ‘hot mix’ and can cause the compound to crack. The hot mix is used when you want the compound to dry quickly. I let the stuff dry overnight. Position the tray just below the area you are applying the compound to.

    mud and tape drywall

    When you mud and tape drywall, slow and steady wins the race,  OK? Its a lot easier to do it better the first time than to make a mess that will take a long time to fix later. And several thin layers is better than one thick layer. When mudding bevel joints, its ok to use more than a thin layer for the first pass, as you want to fill in the bevel and get the mud into the mesh tape.

    mud and tape drywall

    Tools I use to mud and tape drywall

    Ideally, all these tools are stainless steel, I have a carbon steel blade ( you can see it in the video ) and it rusts despite everything I do to protect it.

    6″ knife aka, a spatula

    10″ knife

    12″ knife

    Plastic rectangular mud tray

    Tile Sponge, aka small pore sponge

    Shop on Amazon for drywall taping knives & tools here.

    You can also experiment with what is called ‘setting mix’ compound. This is a dry powder you mix with water, it comes in several drying times. Its more work, but it dries faster, and can fill in deep cracks better. The tub type compound will shrink and crack in large voids.

    mud and tape drywall

    Its important that the drywall screws are screwed below the surface of the wall, as you see in the video, some of the screws are not, and the blade hits them. Also key is clean compound. You can see in the photo above the streaks you get if you get some junk in your mix.

    How To Mud And Tape Drywall Corners – GF Video

    How To Mud And Tape Sheetrock Video
  • DIY Floor Sanding – Just Say No

    DIY Floor Sanding – Just Say No

    Floor sanding is a thankless DIY project. Avoid it at all costs. I’ve sanded several floors, I’ll never do it again. Here’s why:

    Floor Sanding

    Like many who read GardenFork, my mindset is: I can do this, why pay someone? Well, when it comes to floor sanding, pay a professional. There is much that can go wrong and stuff that can break, that you will probably save money by hiring a floor refinishing company.

    First you have to rent the equipment. A floor sander is a beast with few, if any, safety features. It is a high horsepower motor with a spinning drum of sandpaper that can tear up the power cord, toes and wood. Have a helper wrangle the power cord as you sand the floor. You will buy many pieces of round sandpaper for the drum, as you will hit invisible nails and tear up the sandpaper regularly. Then you have to stop and attach new sandpaper.

    Floor Sanding
    Sanding passes made perpendicular to each other

    To remove paint or finishes from a wood floor you will do several passes perpendicular to each other. Start with rough sandpaper and move down to smooth sandpaper. You will be doing this all day.

    Then you have to sand along the walls with an edger, which is a smaller version of a floor sander. You are on your knees wrestling with a small beast.

    The floor sander has a collection bag, but it doesn’t collect much of the sawdust, it goes into the air. Put a box fan in a nearby window and exhaust it out. Use a wet-dry vacuum frequently to remove the dust.

    Don a high quality respirator that fits your face well, not a cheap dust mask. Good ear protection is a must, you will have a large motor running next to you all day. Knee pads because you are always changing the drum paper and using the edger.

    floor-sanding-1

    Add this all up, and you will be better off, and healthier, if you hire a professional floor sanding company. Yes, it costs money, but you can spend your time doing some other DIY project better suited to your skill set.

    Most professionals now use a dustless floor sander, they are nice. GF Radio co-host Rick had his maple floors refinished and the dustless floor sander did great.

    So there you go, my take on outsourcing floor refinishing. Your take? Let me know below.

    floor sanding pin
  • More Brick Pizza Oven Plans & Photos

    More Brick Pizza Oven Plans & Photos

    Here are additional photos of our DIY brick pizza plans. Easy to make and break down, you can build a pizza oven in a few hours and be making pizza in the oven tonight. Note the sturdy table the brick oven is on, this thing is heavy!

    brick pizza oven plans

    I used two pieces of tile backer board on top of a 1″ plywood base for the pizza oven. Use the cleanest bricks you have for the floor of the oven.

    brick pizza oven plans

    Recycled bed frames are become the angle iron to hold up the roof of the oven. The paint on the metal angle iron will burn off quickly.

    brick pizza oven plans

    Detail of how the angle iron sits on top of the side walls.

    brick pizza oven plans

    The back of the oven can be confusing, I used some extra brick to provide extra support.

    brick pizza oven plans

    I made a DIY pizza peel for our DIY pizza oven! Watch the Pizza Peel video here.

    brick pizza oven plans

    Use hardwood to fire the oven, charcoal will not work. Leave some logs burning as you cook the pizzas, you need the constant heat from the wood fire to cook the pizzas.

    pizza oven plansSee More Pizza Oven Assembly Photos Here

    diy-pizza-oven

    Watch all of our pizza oven and pizza dough recipes here

    Our backyard pizza oven is based on one in the book Bread , Earth, & Fire by Stuart Silverstein. Stuart’s book has a bunch of plans and info on building backyard ovens, go buy it here. it is available as an ebook or paperback. Read Stuart’s blog here.
     

  • Washing Machine Valve DIY Repair

    Here’s a washing machine valve DIY repair I did when I had to move a washing machine last week. I took some photos of how I did it to show you all.

    washing machine valve repair

    Behind most washing machines is a set of valves called the washing machine shutoff valves. This makes it easy to hook up a washing machine to the house water supply. There are two shut off valves, for the hot and cold water. Hint: when connecting or disconnecting the hoses from these valves, mark which hose is hot and cold. I often switch them and have to redo the hookup.

    As I was ready to disconnect one of the shutoff valves, I discovered the valve was leaking. It wouldn’t shut off, and water sprayed when I attempted to remove the supply hose. Bad thing. I went into the basement and found the supply pipes leading to the washing machine valves, and shut them off.

    washing machine valve repair

    I then tried to remove the broken valve from the pipe coming up through the shutoff housing, but it wouldn’t turn. So I carefully cut out some of the drywall below the valve so I could see if the pipe was soldered on or was threaded. Thankfully it was threaded, and I could slip a wrench in and remove the valve and the stub of pipe.

    washing machine valve repair

    Note how I used a utility knife to cut down on two sides and pried open the drywall. This allowed me to use the bottom of the drywall piece as a hinge and put it back in place easily. Some hole filler took care of it after that. This rig sits behind the washing machine, so the repair doesn’t have to look amazing.

    washing machine valve repair

    Once I got this out of the housing, I could get two wrenches on it and remove the broken valve. I replaced the broken valve with what I call a boiler drain valve, but it works perfect for this application, it has the same garden hose style threads, and its made of brass. Some teflon tape and pipe thread paste, and its was back in its place.

    washing-machine-valve-diy-repair-6