Tag: DIY Video

  • DIY Pendant Lamp You Can Make – GF Video

    DIY Pendant Lamp You Can Make – GF Video

    You can build this DIY Pendant Lamp with parts you buy online. Put them together and you save a bunch of money. Watch our video and read on:

    Build A DIY Pendant Lamp, what you need

    • Shade in the color of your choice
    • Light Socket and related hardware
    • Clamp to attach socket to shade
    • Cord of your choice

    There’s all sorts of choices when picking the pendant lamp shade, however, keep in mind the decor of the surroundings.

    DIY Pendant LampDIY Pendant Lamp

    You can buy the parts from suppliers on Ebay or Amazon. I will list out the main parts you need, add to them what styles you like. If this lamp is in a bathroom or kitchen, use 3 wire cord, because it needs to be grounded. Be sure the power is off when attaching this to an electrical ceiling box.

    DIY Pendant Lamp DIY Pendant Lamp

    I found that sharp wire cutters, a utility knife, and multi-tool screwdriver were key here. The antique style lamp cord can be trick to cut cleaning, because it is cloth wrapped. Order more cord than you think you need and take your time cutting it.

    Also, something to consider is whether the lamp switch will be on a wall or on the socket above the shade. I ordered a socket with a switch built in, but it ends up we wired this to a switch on the wall. one thing to consider in your project. In addition, a third alternative is to hang the lamp from a screw eye and have it plug into a wall outlet. This method is the simplest way to build a DIY pendant lamp, however, you have a cord coming down the wall.

    • Threaded light socket
    • Threaded shade fitter
    • Threaded strain relieve for socket and canopy
    • Cloth covered wire
    • Ceiling canopy or electrical plug
    • Hardware mounting kit for ceiling canopy

    You can buy these items on Ebay or on Amazon

  • How To Put In A French Drain – GF Video

    How To Put In A French Drain – GF Video

    I want to show you how to put in a french drain, which will help keep water out of your basement and away from your house.

    A french drain is what i call a surface drain, or a drain just below the soil level. For this one, the gravel is exposed, sometimes the french drain is covered with dirt or sand. I prefer to keep the gravel exposed.

    What you need to put in a french drain

    • Perforated pipe – either PVC or corrugated
    • Filter sleeve for the pipe Avail Here
    • Silt fabric – don’t cheap out on this Avail Here
    • Clean 1/2″ or 3/4″ stone (aka gravel)

    I was fortunate to have my neighbor bring his backhoe over and he dug a trench along the wall of the house where I have a water issue. You can also dig this by hand, its not hard unless there are a lot of rocks. I would dig down a minimum of 8″.

    You want the trench to pitch toward where ever the water is exiting, aka going to ‘daylight’. The pitch can be very gradual, 1/4″ per foot is fine.

    Put In A French Drain

    The first thing to go in the trench is the silt fabric. Run it all the way to the drain exit. Be sure there is enough on each side of the trench so it can fold over on itself after adding half the gravel.

    Then lay in the perforated pipe. If you are using the PVC pipe, the holes along the pipe face DOWN, OK? Slide the filter sleeve over the perf pipe. Close off the filter sleeve at the top end of the trench and tuck the  other end into the pipe itself when it connects to the solid drain pipe.

    Put In A French Drain

    Shovel more stone over the top of the perf pipe about 2″ and then fold the silt fabric over itself on top of this gravel. Then add more gravel to bring it level with the ground. You can also bury a french drain, and grow grass on top of it. Be sure to put a grate over the daylight end of the pipe to keep animals from nesting in the pipe.

    One more thing when you put in a french drain, do not connect any roof gutter downspouts to the drain pipe. The rain water can overwhelm the drain and fill the pipe and gravel with more water, when you are actually trying to drain the water.

  • How To Mud and Tape Drywall – GF DIY Video

    How To Mud and Tape Drywall – GF DIY Video

    To mud and tape drywall aka sheetrock, you have to practice, but if I can do it, you can do it. I don’t do it perfectly, but I made a video here of how I mud and tape drywall while working on our renovation projects. I also have a video about how to mud and tape drywall corners.

    It’s one of those things where having the right tools and the right materials pays off. Your first attempts at mudding and taping will not go perfectly, but keep doing it. You will attain that ‘Ah Ha’ moment.

    Tip: Listen to our podcast, GardenFork Radio, while taping drywall.

    I like to use lightweight compound, and use a 5 gallon paint mixer paddle to whip it up into a whipped cream – cupcake frosting consistency. Some add water or plaster, I do not. BTW, adding plaster is called a ‘hot mix’ and can cause the compound to crack. The hot mix is used when you want the compound to dry quickly. I let the stuff dry overnight. Position the tray just below the area you are applying the compound to.

    mud and tape drywall

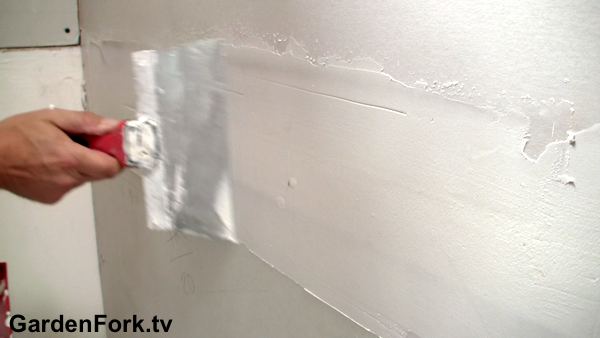
    When you mud and tape drywall, slow and steady wins the race,  OK? Its a lot easier to do it better the first time than to make a mess that will take a long time to fix later. And several thin layers is better than one thick layer. When mudding bevel joints, its ok to use more than a thin layer for the first pass, as you want to fill in the bevel and get the mud into the mesh tape.

    mud and tape drywall

    Tools I use to mud and tape drywall

    Ideally, all these tools are stainless steel, I have a carbon steel blade ( you can see it in the video ) and it rusts despite everything I do to protect it.

    6″ knife aka, a spatula

    10″ knife

    12″ knife

    Plastic rectangular mud tray

    Tile Sponge, aka small pore sponge

    Shop on Amazon for drywall taping knives & tools here.

    You can also experiment with what is called ‘setting mix’ compound. This is a dry powder you mix with water, it comes in several drying times. Its more work, but it dries faster, and can fill in deep cracks better. The tub type compound will shrink and crack in large voids.

    mud and tape drywall

    Its important that the drywall screws are screwed below the surface of the wall, as you see in the video, some of the screws are not, and the blade hits them. Also key is clean compound. You can see in the photo above the streaks you get if you get some junk in your mix.

    How To Mud And Tape Drywall Corners – GF Video

    How To Mud And Tape Sheetrock Video
  • DIY Storage Racks For Basment or Garage – GF Video

    DIY Storage Racks For Basment or Garage – GF Video

    Build these DIY Storage Racks to store long stuff in your basement or garage using recycled lumber. These storage racks are good for long things, like lumber, kayaks, poles, canoes, etc.

    I had some 2″x3″ lumber left over from a project, and I didn’t want to throw it away, so this recycled lumber became these cool DIY storage racks to hold lumber. What’s nice about this is you don’t need long pieces of lumber to make this happen, each piece of the brackets aren’t that long. You can adjust this design to the lengths of lumber you have.

    DIY storage racks

    I used 2 1/1″ coarse drywall screws to put this together and to secure it to the wall. I have a few favorite tools, and one of them is the Flip Bit, which is a screw bit and a drill bit in one piece that makes drilling pilot holes and screwing stuff together go real fast. I used 3 screws in each bracket to attach it to the wall. This DIY storage rack will hold quite a bit of weight, if you plan on something very heavy, switch out the drywall screws for wood screws, which have more lateral strength.

    DIY storage racks

    I use a laser stud finder to locate the studs in the drywall. If you are going to set these brackets into brick or cement, use a hammer drill and masonry bits. The cheaper stud finders don’t work, I think. You get what you pay for when buying these. The good ones last and will save you time in future DIY projects.

    DIY storage racks

    As a bonus, I had some metal shelf brackets laying around, and I screwed them to the bottom of the rig and hung my ladders. So I was pleased at what a space saver these DIY brackets are, one step further in my declutter project! Its great to get stuff up off the floor. Makes it much easier to clean and move around.


  • External Hard Drive Repair and Replacement DIY Video

    External Hard Drive Repair and Replacement DIY Video

    You can do an external hard drive repair. Learn how to replace the hard drive of your exnternal hard drive or backup drive with our DIY video here. Below the video are links to buy replacement hard drives and a computer toolkit.

    External Hard Drive Repair Tips

    Be sure to discharge any static charge you have by touching a water pipe.

    Take pictures as you take apart the external drive.

    Use the right tools, or you will strip the screws.

    Its best to remove the broken hard drive and then order a replacement drive. Click here to shop for hard drives. That way you know exactly what kind of hard drive it is. You can also probably buy a larger size drive for a few dollars more.

    external hard drive repair

    When is a drive broken and must be replaced?

    Most of the time. Really, its rare to be able to repair a drive if it is damaged. If you hear mechanical noises, scratching, metal on metal kind of sounds, the drive is toast. It is sometimes possible to fix a drive if its a software driver issue, but if you hear unhealthy sounds coming from the drive, its a bad sign.

    When taking apart the external hard drive, keep all the parts in a container, and keep your workspace clean. Its possible there will be some dust in the drive housing, so be prepared for that. Use some canned air to remove dust from the electronics, do not use a brush, bad things can happen.

    external hard drive repair

    Most drives slide right out of the chassis holding it. The drive has a set of pins that line up with the chassis to connect it all together. Here are some computer tool kits: http://amzn.to/1ExWh1u

  • Hanging Shelves On A Concrete Wall or Brick Wall DIY Video

    Hanging Shelves On A Concrete Wall or Brick Wall DIY Video

    Hanging shelves on a concrete wall, or a brick wall? Learn how to drill into brick and cement with our how to video. There are links to the tools you will need, and more DIY videos below the video player here.

    hanging-shelves-concrete-wallKeep in mind when you are hanging shelves on a concrete wall you’re going to have to drill into the cement and that is going to create a lot of dust. Have a vacuum or better yet a shop vac nearby to suck up all that cement or brick dust. What I do when I’m drilling into cement or brick is I have the vacuum hose right next to the drill bit while I’m drilling. This does a really good job of keeping the dust down. You can see on this post on how to hang a TV on a brick wall just how much how much dust gets flying around if you don’t use a vacuum.

    Depending on how heavy the items are that you want to put on your shelves, you’re going to have to use fairly cement anchors. Don’t use those cheap plastic anchors, you will regret it. You’re going to need metal anchors – I like to use metal sleeves would you can buy at the home-improvement store.

    drill in to brick

    hanging-shelves-concrete-wallYou’re going to need a hammer drill to drill into the concrete or brick and you’re going to need masonry drill bits to use with your hammer drill. Regular drill bits won’t work for drilling into cement OK?

    Here is detailed post on how to hang a TV on a cement wall.

    Here are some links to buy a hammer drill and masonry drill bits
    let me know what you think in the comments below, thx!

    diy-rain-barrel-system
    Watch more of our DIY Videos Here

  • Tap Maple Trees to Make Maple Syrup How To – GF Video

    Tap Maple Trees to Make Maple Syrup How To – GF Video

    Tapping maple trees to make maple syrup in this DIY video. We tap our Sugar Maple trees to collect sap in preparation for making maple syrup. This is a DIY low tech low volume method of tapping some trees in  your yard or perhaps a neighbor’s field. Several of my neighbor’s have sugar shacks complete with large evaporators and huge piles of firewood, some use traditional sap buckets to collect sap, others use plastic lines and taps.

    For my yard, I went with plastic taps and lines, they are not expensive, and I used the food grade plastic buckets from my homebrew beer kit to collect the sap. After we collected the sap, we boiled it down, and we’ll post a video about that soon.

    The general rule of how many taps to put in a tree, according to the Conn. DEP is 1 tap for a 12″ diameter tree ( 38″ in circumference ), 2 taps for 18″ diameter or larger tree ( 56″ in circumference )

    The holes you drill for the taps should be 1.5″ deep with a 5/16″ bit. If you are tapping trees that were tapped previously, pay attention to the previous tap holes. New taps should be 6″ left or right of an old tap hole, and 12″ above or below the old tap hole.

    Sugar Maple sap needs to be stored at 38F degrees or cooler, ideally you will boil the sap the day you collect it. If the sap has turned milky and foamy, it has gone bad.

    Do you tap sugar maple trees? What are some tips you can share with us below? Thanks for watching!

    Here is the tree identification book we like to use:

    Buy From An Indie Bookstore Here

    Buy From Amazon Here