Tag: diy

  • Squirrel Proof Birdhouse How To – DIY Project

    Squirrel Proof Birdhouse How To – DIY Project

    Have big holes in a birdhouse? Here’s how to make a squirrel proof birdhouse or repair an existing one. Early spring means its time for birdhouse repair in our yard. The yard is dotted with birdhouses made from our how to make a birdhouse video, and some of them have had squirrels chew open the entrances. Here’s how to make a damaged birdhouse squirrel proof and build new ones that will thwart squirrels. Its pretty simple.

    squirrel proof birdhouse

    Squirrels like birdhouses for the same reasons birds do, they are nice dry places to raise young, and squirrels need a winter home as well. The problem with wood birdhouses is squirrels can easily chew open the entrances. Most of my birdhouses are built for small birds like chickadees, and one would think a squirrel would realize that birdhouse is too small, but they rip open the entrance anyway. See our easy birdhouse plans video here.

    Once it has a big hole, birds don’t like it, as the large hole makes it easy for predators to rob their nest.

    I’ve seen a number of squirrel proof birdhouse solutions, this one I’ve adopted is the simplest, and works well in my yard.

    Pick up a roll of thin metal flashing in the roofing department of your hardware store. Our store sells a roll that is painted brown on one side, white on the other. This is great, as the brown blends in with the wood tone of the birdhouse. You can also use scrap sheet metal you have in the shop – use what you got – but the thinner flashing is easier to deal with. This stuff is handy to have on hand for all sorts of repairs.

    exhaust-pipe-repair-hack-diy-play

    You can use it for a DIY exhaust or muffler repair.


    You will drill a hole in the metal flashing that is the same diameter as the entrance of the birdhouse. I use a hole saw, which is an add name for a drill bit, but it is what it is. Pick up a hole saw kit here,  they are handy to have. Don’t use a spade bit on metal, you will ruin the bit. If doing a repair, the hole diameter should also match the original hole, you can find a link to birdhouse plans and proper hole diameters here.

    squirrel proof birdhouse

    I used small brad nails to attach the metal to the birdhouse, the flashing is thin enough to nail through. If you are  using sheet metal, you’ll need to drill some holes for the nails or screws.

    Be careful when handling metal, it can cut you, and wear safety goggles when drilling the hole.

    squirrel proof birdhouse

    birdhouse-plans-video

  • How To Build A Maple Syrup Evaporator – GF Video

    How To Build A Maple Syrup Evaporator – GF Video

    I figured out how to build a homemade maple syrup evaporator because I was burning through a lot of propane when making maple syrup. I don’t make enough syrup to warrant buying one, but a DIY maple syrup evaporator was just what I needed. Watch the 2 videos below and step through the photos of the evpaorator build.

    The Making Of time lapse video:

    How to use the Homemade Maple Syrup Evaporator

    This is made out of a metal 4 drawer file cabinet and a few steam table pans, plus some stuff you may already have or can get cheaply or for free. If you can find a 5 drawer file cabinet, even better, it will allow you space to have another pan for boiling.

    This is not an original idea of mine, I learned about it through Annie Corrigan of Earth Eats, a WFIU radio program and podcast. She produced a story about Mike Bell of the Hinkle Garton Farmstead, who made this great homemade maple syrup evaporator. You can see photos of his rig here.

    We have two videos of this evaporator. One is a fun time lapse of me building the rig, the second is a walk through of how to use make maple syrup with it. Below the videos are photos of building the evaporator and more videos on how to make maple syrup

    Before I built this evaporator, I was using a lot of propane to boil down sap into syrup, you can watch a video of how we use a propane turkey deep fryer to make maple syrup here. The turkey fryer method works, but you burn through the propane, and make a bunch of trips to the hardware store buying refills.

    I did not keep close track of how many gallons of sap I boiled down in a day, but if you keep on top of it, I imagine you can boil down about 50-70 gallons a day, depending on the sugar ratio of your sap and how hot your fire burns. Pallets and scrap lumber burn hotter than firewood, I found.

    how to build a maple syrup evaporator
    Click Here
    to go to the next page for photos and instructions on how to build the homemade maple syrup evaporator.

    After reading through photos for the homemade maple syrup evaporator, check out how I improved the original design in this video:


    Watch all our Maple Syrup How To Videos here.

    Steam Table Pan Maple Syrup Evaporator Improvements – GF Video

  • Homemade Maple Syrup Evaporator Plans

    Homemade Maple Syrup Evaporator Plans

    This is a homemade maple syrup evaporator made out of a metal filing cabinet. It is brilliant and works really well for how simple it is. Using free or almost free stuff, you can make a DIY evaporator. Most of the items I had around the garage or shop.

    Couple of things first:
    • Use this information at your own risk.
    • Wear the proper eye, hand, mouth, ear protection when using power tools and assembling any DIY project.

    home made maple syrup evaporator

    If you haven’t already, watch the two videos we made about the file cabinet evaporator. One is a time lapse of the evaporator build, the other is a walk through of how to use the DIy evaporator to make maple syrup. Then go through the photos and info below.

    Tools you will need:

    Cordless drill, having a flip bit is real handy.

    Right angle grinder with a metal cutting blade. Have several spares on hand.

    New metal cutting drill bits slightly smaller than the screws you are using.

    Self tapping screws #8 x 3/4

    Angle Iron or a metal bed frame you can cut up.

    2 hinges – almost anything will work, I recycled some I had laying around.

    Metal hasp for fire door

    4″ vent pipe  4′ – 6′ long

    4″ to heat vent metal duct to connect chimney to cabinet

    4″ metal vent elbow

    Full size steam table trays

    Zip screws for sheet metal

    Terra Cotta garden pots or firebrick or some other heat resistant objects

    Steel grate the width and length of the cabinet. This one is 12″ x 48″

    homemade maple syrup evaporator

    homemade maple syrup evaporator

    homemade maple syrup evaporator

    homemade maple syrup evaporator

    After you build this, fill the pans with water and fire it up. Let it burn for an hour or however long it takes for the paint to blister. I scraped the blistered paint off and put it in the trash.

    Some paint will remain, as you can see in the photos.

    I tried different lengths of pipe for the chimney. It helps if the chimney is higher than your head, so you get less smoke in your eyes.

    The steam table trays need the angle iron to suspend them over the fire. Do a dry fit with all the angle iron and pans in place before screwing them in.

    In the video, I attached a bathroom fan to the evaporator. I discovered I did not need to use the fan, as I was burning scrap lumber, which burns hot and fast. If you are burning firewood, you may want to attach one. Its better if you attach the fan to the front of the evaporator rather than the side like I did.

    I did not have an adjustable air intake, I found if I kept the door slightly open, that worked very well.

    I used terra cotta pots and steel grating to raise the fire up closer to the pans. I found this worked well for me. I did not line the evaporator with firebrick. Though I could see lining it would make it easier to stand next to the rig and carry the heat better. If the fire died down, the boil did too. Firebrick may have helped that.

    For Version 2.0 of this homemade maple syrup evaporator, I will move the pans closer to the chimney, and have that extra space that I filled in with a piece of drawer right above the firebox door. The area right near the front door was not nearly as hot as the rear of the box.

    This design is based on one by Mike Bell of the Hinkel Garton Farmstead, I learned of it by listening to Annie Corrigan on Earth Eats, a WFIU radio show and podcast. Here is a set of photos on their Flickr page

    Check out how I improved the original design in this video:

    make maple syrup
    Watch all our Maple Syrup How To Videos here.

  • Outdoor Dusk To Dawn Light Install

    Outdoor Dusk To Dawn Light Install

    At a friend’s house, they had a broken motion sensor light over the back door. They wanted to repair or replace the motion sensor, and I suggested getting rid of the motion sensor light and install do an outdoor dusk to dawn light install instead. Motion sensor lights always seem to break. And the light fixture is always high enough you need a ladder to repair or replace them.

    dusk to down light install
    Broken Motion Sensor is replaced by dusk to dawn light

    The reasons behind my idea to to an outdoor dusk to dawn light install

    • The existing motion sensor fixture used halogen bulbs, which use a bit of energy to run, and burn out easily, I think.
    • Use good quality LED lights in the dusk to down light fixture. A
    • well light back door all night, and it would turn off automatically, and probably last a lot longer than the typical motion sensor light.

    Full Disclosure, I am a big fan of LED lights. I use them everywhere I can.

    dusk to down light install
    Black unit on right is the dusk to dawn sensor, easy to replace.

    I chose a dusk to dawn light that was similar in design to their existing light, and made sure it was one that you could replace the light sensor on. This way, if the sensor breaks, you can replace it and not the whole light fixture again.

    dusk to down light install

    The usual rule of working with electricity apply here. Turn off the power that feeds the outdoor light, and use a non contact voltage tester to make sure the power is off in the fixture  mount. Exercise extreme caution when working with wires and electricity. I think you are capable of doing this, but be sure to follow all directions that come with the light.

    Tools you will need for this job are:

  • Pole Pruners, WiFi Phones, & Dirty Dishes – GF Radio 372

    Pole Pruners, WiFi Phones, & Dirty Dishes – GF Radio 372

    Rick and Eric talk about how using a pole pruner can wipe you out, or look at it as exercise.

    This post may contain affiliate links which won’t change your price but I earn a commission from. Thx! https://gardenfork.tv/amazon

    And a few auspicious dates are coming up:
    Friday the 13th
    Pi Day and Einstein’s Birthday on the 14th
    the Ides of March on the 15th
    St Patrick’s day on the 17th
    The 20th of March:  The Vernal Equinox, a solar eclipse, and a super moon

    The totality of the solar eclipse will be mostly over the north atlantic and north pole, the largest populated land mass is the Faroe Islands  https://en.wikipedia.org/wiki/Faroe_Islands , but the Icelandic slooh observatory will televise the eclipse:  http://main.slooh.com/  on the 20th at 4:30 am EDT

    And the big show: the Vernal Equinox on the 20th of March at 6:45 PM EDT (22:45 UTC)

    And Spring Begins. Now mark your calendars, the next confluence of the vernal equinox and total solar eclipse will not happen again until 2072.

    The supermoon: kind of a non-event but this new moon does mark it the moon’s closest approach to earth in the moon’s somewhat eliptical orbit, about 15% bigger.

    Dr. Don Olsnn, TSU, and Wife an English professor, investigate literature and historical events in relation to astronomy.

    Tarawa WWII, disastrously low tide. Van Gogh, etc. http://www.smithsonianmag.com/ist/?next=/arts-culture/forensic-astronomer-solves-fine-arts-puzzles-116770403/

    great pix
    http://www.accuweather.com/en/weather-news/total-solar-eclipse-vernal-equinox-spring-new-supermoon/44013327

    The hoop house video we talked about: https://gardenfork.tv/pvc-cold-frame-hoop-house-2-0-diy-gardenfork-video

  • Straw Bale House Construction by Jas. Townsend

    Straw Bale House Construction by Jas. Townsend

    Straw bale house construction has always been on my bucket list, and I recently discovered Jonathan Townsend’s YouTube channel where he makes videos about 18th century lifestyle.
    Jonathan and his wife have built 2 straw bale houses, and he recently posted 2 videos about straw bale construction, and I wanted to share them with you here.

    Now I want to build a straw bale house!

    Some of the key points of straw bale construction makes:

    • Use straw, not hay. Stray is the stem of wheat, and hay is a mix of grasses baled together.
    • Have a large overhang, so the bales have no chance of getting wet from roof runoff
    • Stucco over the straw bales inside and out.

    Wikipedia states the insulation R value of a straw bale can range from R17-R55 depending on construction factors, so lets say R35 could be considered an average R value. Not bad for any house.
    The construction method used in this straw bale house is a pole barn with straw side walls. Columns are set in place, then a standard roof is built on top, then the straw bales are used to fill in the walls. Note in this video the large roof overhang to protect the stucco from rain.
    Wire mesh is placed over the bales and a cement stucco is applied.

    I don’t know what issues one would have with some local zoning ordinances. There are parts of the US where you have few zoning regs, and would be an ideal place for a straw bale house.

    I love it for the renewable resource walls and simple construction with substantial insulation properties. Plus you can build most of it yourself.

    If you are interested in more alternative house building, check out our GardenFork Radio talk with Deek of RelaxShacks, one of the experts on the Tiny House Movement.

    And read this post about Deek’s Tiny House Plans here.

    tiny house plans from Deek
    Tiny House Plans for a simple A frame

    You can learn more about Jonothan on his YouTube channel and on his online store for historical reenactors looking for clothing and goods from 1750-1840.

  • Hoop House Cold Frame #2 – DIY GF Video

    Hoop House Cold Frame #2 – DIY GF Video

    This is the second DIY Hoop House Cold Frame we have built in our video series. Easy to build, this mini greenhouse allows you to grow plants in winter. Watch the video here, plans and photos are below as well as links to our other DIY Hoop House Cold Frame Videos.

    This cold frame uses a wire mesh that’s usually used for concrete, but it works really well as a cold frame form to hold the plastic up. I like how it works
    You can buy this concrete reinforcing wire at a local lumber supply yard. It comes in two thicknesses, you want the thinner gauge wire, the thick wire is too much, I think. This wire also comes in rolls, but the it is a pain to work with. The mesh I bought was 10’ x 5’.

    hoop house cold frame plansTo cut the wire mesh we use a right angle grinder with a metal cutting disc. Be sure to wear ear and eye protection and wear gloves while you’re handling this material, it can cut your skin.

    hoop house cold frame

    Be sure the cut end of the wire mesh faces the plywood end, else the plastic can get sliced by the sharp ends of the wire. You can put pieces of old garden hose along the end of the wire mesh where the plastic bends over to form the end wall, as well as on the plywood end to protect the plastic from the hard edges of the wire and wood.

    But you can build this! It’s not hard and I really like it. Another great version of the hoop house cold frames that we’ve built, we have a whole series of them – link here – and every time we make one we get better and better. The super cool part is that you can extend your growing season in the fall and you can use one of these cold frames to warm up the soil in your vegetable beds in late winter and plant seeds even earlier than you could normally. Cold frame hoop houses are especially good for salad greens, radishes, sugar snap peas – plants that are cold tolerant.

    cold frame hoop house
    You can use scrap wood to tie the corners together, or use brackets.

    thermatic-vent-hoop-house-cold-frame

    The automatic vent that we use is kind of a specialty item but that they’re not that expensive. Here is the link to buy it.

    You could put one vent in or you could put in two vents. With two vents you would put plywood at both ends of this cold frame. Having a vent on both sides allows more warm air to exit. Cold frames can get quite hot, you don’t realize how much solar energy the sun has even in the winter. You will need to vent the hoop house, you can go out on sunny days and manually vent it if you want by lifting up the cold frames, but I’m not there all the time. So I like the automatic vents.
    Have you made a cold frame? Do you have anymore questions? Pease leave them in the comments below.

    My cold frame experiences have been greatly influenced by these books by Eliot Coleman and Niki Jabbour.

    Four-Season Farm     Year Round Vegetable Gardener (affiliate links)

    Watch more of our hoop house cold frame plans videos here.

    PVC Cold Frame Hoop House #3 – DIY GF Video

  • DIY Portable Generator Cart

    DIY Portable Generator Cart

    A DIY Portable Generator Cart adds wheels to your portable generator for free. This is from a GardenFork viewer, Edward, who embraces the GF ethic of ‘use what you got’ perfectly.

    diy-portable-generator-cart

    He writes:

    “At first glance, this might not look like much, but seeing how I looked for a wheel kit for a generator and saw
    that they cost around $40 to $60, I decided to come up with my own inexpensive solution.

    I remove the engine from an old mower. I only leave the lower section of the handle connected to the mower
    frame (a great place to leave your extension cord). Using two tie-down ratchet straps the generator is secured to the
    mower frame. Doing this, I can remove the generator easily in case I need to put it in the trunk of my car. I am planning
    on adding a ply wood deck on the mower or a box style base that I can use for other projects.

    This setup is extremely stable and makes moving the generator a breeze. It also keeps the generator higher off
    the ground away from water and snow.”

    I think this is brilliant. My portable generator has air filled tires, which makes it easy to move around rough frozen ground, but if you have a flat place, or are just rolling the portable generator out of the garage into the driveway, this is the way to go. Save some money on the generator wheel kit.

    generator transfer panel installation

    Watch our Generator Transfer Switch Install Video here.

    home-depot

    Click Here to shop for Generators at Home Depot.

  • Preparing A New Battery

    Preparing A New Battery

    preparing-a-new-battery-1

    The quad needed new battery, and I’m preparing for the maple syrup season, so I picked up a new battery at the farm supply store. Its a fairly common battery, and most stores stock this one.

    The battery comes dry, that is, there is no battery acid in the battery. It comes in a separate container. This makes it easier to ship and store, I imagine. Car batteries usually come filled and sealed, and they are charged already, not the case with smaller engine batteries like this.

    preparing-a-new-battery-3

    Pretty straightforward process, the important caution here is to wear gloves and eye protection. You don’t want battery acid on your hands or in your eyes. And its easy get a few drops of this in the wrong place. Learn from me…

    Follow the instructions that come with the battery, but the general steps are to take off the caps of the battery cells, fill the cells with acid to the level indicated, and charge the battery, usually overnight.

    preparing-a-new-battery

    Save the red caps, you will replace those. The instructions that came with this battery were vague about that. I used a low amperage smart charger and this battery was ready the next morning for installation.

    preparing-a-new-battery-4

    I use the smart charger to charge up dead car and small engine batteries. To keep this battery at full charge but not wear it out prematurely, I’m thinking about a solar powered trickle charger. One less thing to plug in and have running all the time.

  • DIY Rolling Garage Shelves – GF Video

    DIY Rolling Garage Shelves – GF Video

    Build these DIY rolling garage shelves and make your basement or garage more organized and save some bucks. Shelving units with wheels are expensive, here’s how I added caster wheels to my existing garage shelving units.


    You can build the DIY rolling garage shelves either as a light-duty or heavy duty version. Light duty would be for a shelving unit that doesn’t have a lot of heavy material on it. Light stuff might be beach towels, blankets, pillows, things like that. A duty shelf would be one that has tools, screws, nails, that sort of thing on the shelves.

    diy-rolling-shelves-pinYou can build this with scrap lumber that you have laying around. One special tool that you will need is called a hole saw. If you don’t have a hole saw kit you might be able to borrow one from a neighbor or you can buy a hole saw kit here online. Don’t buy the cheapest hole saw kit, it will break.

    I used 1 1/4″ and 1 5/8″ drywall screws to pu this together, it depends on if you are using 2x4s or something thinner. Its good to have a box of both on hand anyway. For the lumber, you can use cast off studs from a renovation, spare pieces of plywood, metal studs (for the lightweight version). This is really a use what you got kind of project.

    I got the caster wheels for this project from an IKEA desk that I had taken apart, but you can find these wheels at the hardware store or at tool supply stores. I have also taken wheels off of furniture that has been put out for the trash. You can also buy wheels online here.

    Adding wheels to your shelving units does increase the height of the shelving unit. So if you have low ceilings in your basement, keep that in mind. Your new DIY Rolling Garage Shelves might hit the ceiling now if you have tall stuff on the top shelf.

    Assembly of the DIY rolling garage shelves:

    holes line up with legs of shelf
    holes line up with legs of shelf
    Done
    Shelf sits in holes of the wheel base
    Have an assistant
    Have an assistant
    Assemble upside down
    Assemble upside down
    Heavy Duty Shelves
    Heavy Duty Shelves
    Light Duty Shelves
    Light Duty Shelves
  • Changing Your Headlight bulbs & When to Call the Professionals GF Radio 354

    Changing Your Headlight bulbs & When to Call the Professionals GF Radio 354

    Rick tells of how he tried to change the headlight bulbs on his Toyota Prius, and how it all ended up a the mechanic’s garage instead. We learn when its time to call the professional and walk away from a DIY repair.

    headlightEric has been watching great car repair videos by Eric The Car Guy on YouTube, lots of great car repair how to videos done well. We learned that we will not attempt to change the struts on our car, we will take it to the experts who have the right tools. Eric the Car Guy also has a website and discussion forum on his site here.

    We read a letter from GF team member Kent, or at least Eric tries to read the letter, mangling several sentences.

  • It’s Time For Garlic Scapes – GF Radio 345

    It’s Time For Garlic Scapes – GF Radio 345

    Rick and Eric talk about harvesting garlic scapes and what to do with them on this episode of GardenFork Radio. Scapes can be found in the farmers market and some food stores right now. They are the flower of the garlic plant, and when growing garlic, you want all the energy going into the bulb of the plant, so we harvest the immature flowers.

    Here are some of our garlic scape videos: https://gardenfork.tv/tag/garlic-scapes

    Beekeeping comes up as always this time of year. Rick captured a honeybee swarm the easy way, here is the video: http://www.youtube.com/watch?v=Rwpsyph9XOQ

    garlic-scapesOne of Eric’s hives swarmed and flew off, ignoring the fine bait hives he had put up. The bees remaining in the hive were re-queened yesterday. Usually when a hive swarms, the old queen flies off and leaves several queen eggs, so you can requeen your hive by putting in a new queen and removing those growing queen eggs.

    Talking about how to use a cast iron dutch oven comes up, as Eric posted a video about using a dutch oven to bake cake outdoors.
    A neat camping recipe or just cooking outdoors in your yard: https://gardenfork.tv/bake-a-cake-outdoor-cooking-dutch-oven-gf-video

    Eric tells of being an assistant plumber helping to install a new boiler, which was quite a bit of work to do. Lots of running to get stuff for the plumber.

    And how to use a jackhammer to open a hole in a cement floor is not as hard as one would think. For the sump pump install, we had to open up the floor, and the jackhammer was very pinpoint in breaking up the cement just where we pointed the jackhammer, and not spider-cracking the cement floor. a good thing. We rented a 35 pound medium duty jackhammer from the local home improvement store for 4 hours, and it was ample time to open up the hole we had to do. The hard part was hand digging the hole, removing the dirt. Eric found that loosening the dirt, and then using the shop vac to suck up the dirt worked pretty good. You could also use a quart yogurt container to scoop it out.

    A wave of tree pollen came over Eric’s yard last weekeknd,  huge release of white pine pollen so thick you could see a green cloud in the yard. Thanks to modern over the counter allergy meds, we made it through the weekend. Pollen happens.

  • Big Green Egg Table Plans

    Big Green Egg Table Plans

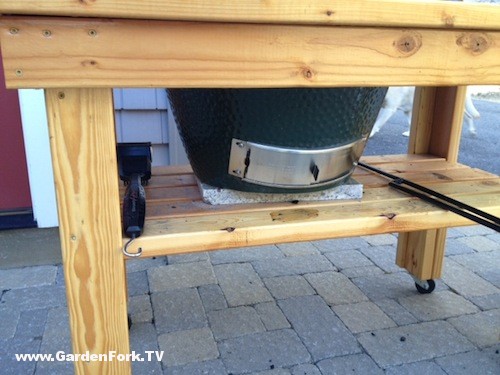
    Big Green Egg Table Plans using 2x4s and a few pieces of marble and a set of caster wheels. Build the table frame, add some legs, build the top, cut a hole, and you’re done. My neighbor built this Egg table and I wanted to share it with you.

    big-green-egg-table-plans-1

    Super simple table plan here. The table is finished with outdoor polyurethane, don’t be tempted to use indoor poly, it will peel very quickly, you want a finish that is UV proof, and water proof.

    big-green-egg-table-plans-2

    I like the simple use of some scrap marble to insulate the Big Green Egg from the stand. This allows easy access to the lower vent of the egg.

    big-green-egg-table-plans-4

    Some spare casters allow you to wheel the Egg table out of the way , or into the garage for winter storage. Be sure to use heavy duty casters, as the cooker is heavy.

    big-green-egg-table-plans-3

    Nice huh? I’m all about about simple and these Big Green Egg table plans are just that, easy DIY plans using inexpensive 2×4 lumber. I estimate this table cost about $40-60 to make if you already have some wheels in your shop. Or ask one of your neighbors if they have some spare casters, its a good chance one of them does.

    Cooker tip here, my neighbor tells me to buy the best quality chunk charcoal you can. The cheap chunk charcoal is not great for the Green Egg, it has a lot of small pieces and dust, not good for this cooker.

    How to you use your Big Green Egg? I’ve seen a few DIY table plans, but this one is my favorite for its simplicity and ease of use and easy to build. Let me know your thoughts below:

  • Replacing the Cordless Drill Battery Charger

    Replacing the Cordless Drill Battery Charger

    When we moved, I packed my drill – screwguns and the cordless drill battery chargers. Then when we unpacked, I couldn’t find the battery chargers. Has this happened to you? Battery Charger disappears into vapor. I am convinced they are in the basement in a box, and one day I will find them.

    cordless-drill-battery-charger

    I finally had to acknowledge I would not find them soon after searching everywhere in the house for them. A new replacement cordless drill battery charger would be expensive, so I turned to my favorite source for good deals on stuff, ebay.com . Click Here To Visit ebay.

    My cordless drills use a 14 volt battery, the standard now is 18 volt or more. I’ve found some of 18 volt drills to be too heavy, and my drills still work just fine. I have bought new batteries for them, and they hold charge well.

    I have seen ads claiming methods to rebuild cordless tool battery packs, but I’ve always believed that once batteries are toast, you have to replace the batteries. Plus, if there really were good methods to repair battery packs, there would be blog posts about the methods, and all we see are ads selling the how to information.

    When searching through ebay, use broad search terms, type in the brand name of your tool, and the voltage. If your search is too specific, you may miss some listings. Keep in mind the seller may not know as much as you do about your battery charger and may not title the listing well.

    I managed to find a multi voltage charger for my brand, which will charge the 14 volt batteries, and the newer voltages as well. I opted for the Buy It Now button, because the sale price with shipping was less than $20.

    So now that the replacement cordless drill battery charger is on the way, I am sure to find the original.

    Full Disclosure, GF is now is an affiliate of ebay, so if you click on any ebay links on our site, we get a small finder’s fee. But even if we weren’t I’d still suggest using ebay as a good place to buy replacement parts for cordless tools. Click Here To Visit ebay.

  • Tiny House Plans : A – Frame Vacation Cabin

    Tiny House Plans : A – Frame Vacation Cabin

    Tiny House Plans for a cheap easy to build cabin from Deek Diedrecksen, who is a brilliant designer and carpenter. This cabin is perfect for that piece of land you have in the country  Easy to build with the downloadable tiny house plans Deek and Joe Everson put together. The photos here just say simple and clean to me.

    tiny house plans from Deek
    Tiny House Plans for a simple A frame

    From Deek’s website:

    The idea was to keep it AFFORDABLE to build, EASY and QUICK to build, and to have it so that it could be altered for different uses, or added to, rather effortlessly.

    The total cost for a cabin like this, soup to nuts, is right around $1200- and that’s using city lumber pricing, meaning, elsewhere, it’d cost less to build. Add in some salvaged, free, or recycled materials, and you could EASILY build this under $1000.

    Purchase these tiny house plans here on Deek’s site

    Deek worked with David Stiles, whose site is full of plans for cabins, treehouses, sheds, etc. They also offer design services. Check out their site here.

    This tiny house plan uses locally available materials, and its simple design makes it a do-able project for the average person. If you have a cordless drill – screw gun, and a circular saw, I think you can build this. The sides could be made out of recycled lumber and metal. Is someone tearing down a building nearby? Go get your materials!

    The plans also has explanations of other versions, such as adding a bathroom or a loft, plus 16 photos of the construction. The cabin was built by Joe Everson of www.TennesseeTinyHomes.com and www.TinyHappyHomes.com, and you can check it out at Deek’s Tiny House Workshop April 11-13 2014 in Memphis, Tennesee.

    Deek joined us on GardenFork Radio, you can listen to the show here.

    tiny-house-plans-2


    Full Disclosure: Deek is a friend of mine, he is the inspiration for one of our most popular videos, the One Sheet Plywood Boat.

  • How To Make Moonshine In Brooklyn

    How To Make Moonshine In Brooklyn

    Want to learn how to make moonshine? Here’s the book. Its surprisingly simple, as told by Colin Spoelman and David Haskell.

    I first heard of this book after reading an excerpt in Edible Brooklyn, and then saw it in the local bookstore, so I had to buy it. The bookcover says it all.

    how-to-make-moonshine

    The prologue of the book sets it up for us. The author grew up in eastern Kentucky and tells of visiting the local bootlegger instead of driving to a non-dry county. This is so different than my midwest suburban adolescence.

    We get a history of whiskey in America, learning that until the 20th century, the US government relied heavily on the taxes on alcohol, hence the desire to make it yourself. I didn’t realize how many distilleries there were in New York in the 1800s. There’s a map of downtown Brooklyn showing where legit and illegal stills were.

    We are taken through the country and its explained how geography ( The Cumberland Gap ) and rivers affected where and what whiskey was made of. Bunch of history here I knew nothing about. neat.

    We then learn just what whiskey is. Complete with a detailed graphic charting the various raw materials, processes, and aging to produce different drinks. Clearly these guys know what they are talking about. A chapter of the book surveys current whiskey distillers, and who really makes whiskey and who just packages whiskey. This I did not know.

    How To Make Moonshine

    Then we move to the chapter we all want to know about, in their words, How To Make Whiskey.

    To make whiskey is straightforward, yet easy to mess up. If you have home brewed beer, you are about 1/3 of the way there. You will, of course, need a still, and be willing to technically break the law. But go forward! There are hobby stills available for purchase.

    You make a mash of corn and other grains if you wish, ferment it, add it to your still. Fire up the still, and monitor the condensate, and you have it. Done.

    Now, a lot can go wrong, but lightbulbs are going off in my head.

    After we are walked through how to make whiskey, we then learn what we’ll need to do to start a distillery. Not bad for the price of one book. I’m not sure if Colin and David had me in mind when they wrote the book, but this is exactly all the stuff I wanted to know about.

    I don’t think i’ll go out and buy a hobby  still, but this would be a cool thing to do with a small group at a hacker space, or a distillery meetup.


    // ]]>

    Click Here to Buy On ebay

  • Plywood Boat Photos from Juan

    Plywood Boat Photos from Juan

    Got  great email from Juan, he saw our plywood boat video and built one himself. How cool is that? Juan was nice enough to let us post his plywood boat photos here on the site. Here is the email he sent:

    Just wanted to say thanks for putting up the video on making a small boat it was very fun, me and my dad had a great time doing it and knowing that it works is even better.
    What i really mean to say is that today was a great day!!

    thanks again!! juan

    Not the custom made boat paddle, much nicer and well made than our store bought boa paddle. Nicely done!

    Click Here to watch our Plywood Boat Videos

    plywood-boat-photos-from-juan-1 plywood-boat-photos-from-juan-2

    plywood-boat-photos-from-juan-3


  • DIY Greeting Cards – Paper Crafting – GF Video

    DIY Greeting Cards – Paper Crafting – GF Video

    DIY greeting cards are an easy paper crafting project using lino block printing. You can make homemade cards for Christmas, wedding announcements, birthday cards, you name it. The method we are using is called block printing, or linoleum block printing. Super easy to do, and a great kids art project.

    Our guest crafts expert is Jessica Kaufman, who is a crafts instructor in the NYC area. You can learn more about Jessica at her website: happygocrafty.com

    Paper Crafting GardenFork Style

    I have done some block printing and paper crafting in grade school. I made some DIY Christmas cards using the linoleum block printing method. Looking back, this was the start of my love of print media. I moved on to silkscreen and letterpress printing later in school, loving it all.

    block-printing-clip-9

    Now that we have everything digital, I thought we should go super analog and revisit some neat paper crafting projects that you can do. Projects such as these are great for kids. The ink we use is a non-toxic water based printing ink, just wear a homemade art smock and you are ready to go.

    We bought some blank cards and envelopes at the art supply store. You can also get these at retail stores such as Paper Source, or an at arts and crafts store.

    You will also need a tool to carve the block, we used a Speedball brand lino cutter tool. The actual printing block comes in several forms, we suggest using the more flexible carving blocks, the hard ones are harder to carve for kids and adults. A breyer is a roller that applies the ink to the lino, get a rubber one.

    block-printing-roller

    We built a simple carving board, this allows you to safely do lino block printing. Get a scrap piece of plywood, put a small piece of trim on each side, and you are done.

    simple carving holder thing
    simple carving holder thing

    What do you think? Have you done block printing or other paper crafting projects? Let us know in the comment section below:

    block-printing-copy-pin-600