Tag: diy

  • Wood Deck Post Repair – Sistering a column

    Wood Deck Post Repair – Sistering a column

    Deck Repair in the winter cold, fun. A friend of mine has a wood deck off his second flooor, its not the most well built deck I’ve seen, but it came with the house, and its OK for now. But the footings for the columns or posts that hold up the deck are less than great. The posts are not set in cement footers, they are just sitting on the cement-slate patio that is below the deck.

    wood-deck-post-repair-1

    Deck Repair DIY

    As you can see from the photos, the posts are on the edge of the patio, and one of them has started to crack the cement. This being the middle of winter, we aren’t able to fix this properly, which would entail digging a proper footer. So we put in a temporary support.

    Generally this is called sistering. You can sister a floor joist that is weak from termites, for example. Basically you are adding support to the existing column or post, usually by attaching another board of similar size along side the damaged board. This can be a permanent repair or an interim one. Our deck repair is a temporary fix until the spring thaw allows us to dig a proper footer.

    Sistering in our project here is not the same as when you would sister a joist, but it does the same thing. It takes some or all of the weight from the original beam or column.

    Below you can see how we used two stock 2×6 pine boards in an A frame setup. We cut the boards slightly longer than the height of the original post, and mated both boards where the post meets the deck above it, and slowly tapped the boards towards each other until they started to take the weight of the damaged column. Scrap lumber was used to tie the two 2x6s together once they were in place.

    wood-deck-post-repair-4

    wood-deck-post-repair-3

    wood-deck-post-repair-2

    This same technique can be used to take the weight when working on an interior load bearing wall. You put up several of these A frame rigs on both sides of the load bearing wall, then you can work on the wall. I see this a lot when one is making an opening in a wall and you have to slide in a beam to span the wall opening.

    So if you have a deck that is sagging, this is a deck repair to keep it up temporarily until you can repair it properly.

  • Sitting in a DIY Deer Stand

    I was walking with my neighbor on some land he owns near my house. He was having the woods opened up by the local sawmill. They were taking oak, beech, ash and pine out of the woods. We came across two deer stands, built probably 10 years ago, and he said I could use the deer stands.

    sitting-in-a-diy-deer-stand-4

    This afternoon, a few days into the deer season, I was up in the better looking of the two hand built deer stands. Made of scrap lumber, they have this backyard tree house look to them. They would not pass any building code inspection. But they work for what they were built for. Seating consisted of a milk crate, the sides of the stand had carpet tacked to it, with some pine boughs whose needles had dropped attached to the sides of the stand.

    In other words, a perfect DIY tree stand.

    You see many deer stands for sale by the sporting stores, with ladders and steps and soft chairs, but this one works for me. Plus the fact that it was already in the woods. I didn’t have to carry a stand into the woods, assemble it, and hope that no one stole it. ( happens rarely, but one never knows )

    I am not the most accomplished deer hunter, I don’t have all the bells and whistles, just a deer rifle and insulated coveralls. One can go crazy with gear, much like other endeavors – glad I don’t own a boat…

    What I like most about deer season is I make myself go into the woods in the early morning or late afternoon, despite my aversion to cold weather, and just sit. You do a lot of staying in one place with hunting, it forces you to pay attention to subtle changes and sounds. Eventually your mind clears, and all the noise of the modern world is turned off.

    What was that click of a branch over there?

    Next you notice the sun changing. A cloud has moved, and the sun shines clear on the trees, but its getting near the ridge line. I know when the sun sets below the ridge, its time to go home.

    Today there were no deer, but it was good to be out anyway, thanks to my neighbor.

    Left
    Left
    Center
    Center
    Right
    Right
  • Hoop House Greenhouse FAQ – GF Radio 319

    Hoop House Greenhouse FAQ – GF Radio 319

    Build your own hoop house greenhouse is today’s topic. Matt tells us how to build a greenhouse out of pipe and plastic. He is building a hoop house greenhouse using off the shelf items to save money and its going well. Matt shares what he has learned in building a greenhouse that you can apply when you build your hoop house.

    Matt is using fence pipe bought at the home improvement store. He says there are lots of good kits out there, but it gets expensive quickly, and half the fun of a hoop house greenhouse is in planning and building something you designed yourself. Matt saved quite a bit of money by going the DIY route and based his ideas on those of Eliot Coleman.

    Matt's Hoop House GreenHouse photo ©2013 Matt Cuba
    Matt’s Hoop House GreenHouse photo ©2013 Matt Cuba

    Why Build a Hoop House Greenhouse?

    The motivation was to have better foods in the winter than is available at the grocery store in winter, as hoop houses allow you to extend your growing season.

    Siting the greenhouse is important, Matt built his on a slight slope that faces south, and did a bit of leveling of the foundation. He used fence pipe driven into the ground to accept the top fence rail pipe that he had curved into the hoop shape. He chose not to use PVC pipe, thinking the metal pipe would be more sturdy. The curved pipes are spaced 2′ apart. The jig he built to curve the pipe is a simple plywood curve, or a wood form. He found that curving the pipe to something slightly larger than the desired curve allowed the hoops to be slid into the base pipes with tension, helping to keep the pipes in the base pipes.

    Matt has two large blue water barrels in the hoop house to create a thermal mass. The barrels absorb solar heat during the day, and give off that heat at night, helping to keep the hoop house greenhouse warmer. He decided to not use regular clear plastic, and opted for the UV stable greenhouse plastic available at greenhouse supply stores. He also used a channel system called willow wire to hold the plastic onto the hoop house frame. You can follow Matt and his adventures on Twitter here .

  • Plywood Boat – Fail or Float? – GF Video

    Plywood Boat – Fail or Float? – GF Video

    The Improved One Sheet Plywood Boat with fiberglass seams. How to build a plywood boat despite just about everything going wrong… The perfect DIY project!

    What started out as our EPIC Plywood Boat video featuring the Ford F150 Limited that Ford loaned us for the weekend instead became a story of perseverance despite record low temperatures, huge thunderstorms, and really cheap duct tape.

    Plywood Boat with fiberglass: A Lesson

    The idea here was to improve upon our original plywood boat, which has been a very popular video on our site and YouTube. The original boat used strips of wood and caulk for the seams, which added weight and wasn’t always exactly waterproof. I also wanted to use a new thinner plywood I found at the store that is sustainably harvested. Thinner plywood and lighter seams would mean a lighter boat.

    I have a good friend who uses fiberglass a lot, and he gave me some fiberglass tape, which was perfect for the boat seams. I had read online about how to dryfit a plywood boat using duct tape to hold it all together while you added fiberglass to the seams.

    This all sounded great in theory, in practice is was another story. Things I’ve learned about working with fiberglass:

    • It smells real bad, use a high quality vapor mask, don’t cheap out on this.
    • It does not work well in cold temperatures
    • It sticks to itself and your gloves.
    • Its not easy to use from the get go.
    • You need someone to help when applying fiberglass
    • Don’t buy cheap duct tape.

    Despite applying the fiberglass in the garage with the doors open, the smell was quite strong, get a good mask. And if the temperature plunges, consider choosing another day to start this project. Also pick up some good quality nitrile gloves, you will use quite a few of them.

    plywood-boat-fail-or-float-gf-video

    We all make mistakes

    What this video is more about is to plan and persevere. What can go wrong will, and it was a weekend of everything going south quickly. In the end we triumphed. How do you push through to get stuff done? Let us know below.

    A big thank you to Mike Levine and Scotty Monty of Ford Motor for the truck!

    Original boat design based on Deek Diedricksen’s boat.


  • Broken Lawnmower Wheel Repair : GF Video

    Broken Lawnmower Wheel Repair : GF Video

    Fix a broken lawnmower wheel: watch our lawn mower repair how to video and get back to mowing you grass. The tire on our mower broke, here’s how to fix it.

    When the lawnmower broke, the camera operator, who happens to love mowing the lawn, thought we needed to buy a new mower! No, for about $10, we fixed our grass cutting machine, and the camera operator is now out cutting the grass before dinner. Not a bad deal for me…

    The lawnmower wheel repair was not difficult. All you need is a metric or standard wrench, depending on the make of the machine. An adjustable wrench will work as well, but the correct size wrench is better. Pay attention to how the tire is attached to the mower, remove the nut holding it to the threaded axle, along with any washers that may be with it. Take a picture with your cell phone as you disassemble the nut and tire unit, it will help with putting the whole thing back together.

    Take the tire to your local hardware store to match it to a replacement. Our wheel was an 8″ diameter, which seems pretty standard for push mowers.

    Lawnmower wheel

    Bring back the new one and slide it on. There may be a metal or plastic bushing inside the wheel so the tire can fit on different diameter axles. Secret tip: use some anti-seize paste on the axle threads before attaching the wheel. If you ever have to remove the wheel again, this will make the job much easier.

    Get a neat set of wrenches here.  (Affiliate link)

    And there you go. Job done, now how to convince your significant other that mowing the lawn is exercise?

    We have a how-to video on how to tune up a lawmower here,  and And a how-to video on how to sharpen the blades of a lawn mower .

  • DIY: Fixing a Balky HOME button on an iOS device

    DIY: Fixing a Balky HOME button on an iOS device

    Well, actually a “work around.”

    For some weeks the black HOME button at the bottom of the screen on my iPad 2 has been…let’s say moody, uncooperative. In a word “balky.” Like me, it only works when it wants to and is unpredictable in its work ethic, also like me.

    I’d done some research on the interwebs and found this to be a common complaint without a real cure. Some think the problem is actually software related. Some think it’s mechanical. I’ve tried all the simple suggestions I could find about “resetting” the software.

    Most of these suggestions were simple and middle-of-the-road. One was more occult than anything else.

    “Take your iPad out of it’s case or cover. Rotate your iPad into the Landscape orientation with the HOME button to the right. Rotate your device to the Portrait orientation with the HOME button on the bottom. Immediately put your iPad backdown on a cold, hard, flat surface and leave it over night.”

    Well that didn’t work.

    I did think about having the mechanical Home button replaced, but I’d read that because of the way the iPad is constructed, there was a good chance of damage. Everyone guaranteed their button and their work, but NOBODY guaranteed the damage putting the new button in.

    However, I discovered that in the later iOS upgrades there is a HOME button in accessibility options that will float on your screen and do all kinds of nifty things.

    The “soft” HOME button is small, semi-transparent, and dragable to any place on your screen.

    When activated, it pops up with this MENU:

    from here the soft HOME button accepts 1, 2 or 3 taps, just like the mechanical HOME button. “Gestures” is for recording your own unique gestures and relating them to apps or other events. “Favorites” is where your gestures are stored. Under “Device” is this MENU:

    And under “More” is this Menu:

    “Multitasking” is for quickly switching between apps.
    Activating the soft HOME button does not disable input from the mechanical HOME button, so there’s no reason not to have it on your desktop and ready to use if your iDevice stops answering input from the mechanical HOME button.

    Here are the steps for activating the soft HOME button:


  • Easy Window Install & Using Spray Foam

    Easy Window Install & Using Spray Foam

    I helped a friend install replacement windows today. The original windows were double hung sash weight windows, quite old. Wanted to show you a few things about how to install replacement windows. To install new windows, you first have to remove the old ones. This is not hard.

    We will be using the frame of the original window. The replacement windows slide inside the existing frame. Most replacement windows need to be custom ordered. Its important to measure each window, as they are all slightly different.

    easy-window-install-using-spray-foam-4
    Old window removed

    To ready the window frame for the new window, you remove the trim from the inside, and the bottom window will tip out easily. There is a thin wooden strip between the upper and lower windows, and once that is removed, the upper window comes out. You may have to disconnect the sash weights, though the sash weight cord is usually broken already. The windows may need to be lowered or raised a few inches to get past the sash weight pulley.

    easy-window-install-using-spray-foam-5

    The replacement window then slides into the existing window frame.

    Now the fun part: Spray Foam.

    Its probably the insulation obsessive in me, but I love to use spray foam. For these windows, we had to insulate a lot of cavities around the original windows, so this called for a lot of spray foam!

    There are several kinds of spray foam, different kinds expand at different rates, and some cans of foam can be used more than once. Some cans, once you start foaming, you can’t stop, or the foam hardens in the spray tube. Others you can clean out the spray tube and use it again later.

    Cavity Filler and Door Foam
    Cavity Filler and Door Foam

    The two main kinds of spray foam for our purposes is cavity filling “Big Gap Filler” and minimally expanding “Door & Jamb Foam” . The names are pretty self explanatory. You may not realize it, but the cavity filler type foam, if used when sealing a door or window, can warp the wood door frame. For doors and windows, we use the minimally expanding foam to fill in the gaps. For big open spaces, we use the big foaming stuff.

    Most spray foam cans have to be held upside down when using, if you don’t, all the propellant leaks out, leaving the foam in the bottom of the can. It can be helpful to have an additional stray handy when you have to work up close to a ceiling, the additional straw allows you still tilt the can yet get the foam where you need it.

    Cavity Filler Foam on the bottom, and Door & Jamb foam on top
    Cavity Filler Foam on the bottom, and Door & Jamb foam on top

    Most important is to wear gloves and clothes you don’t care about. You will get foam on your clothes, and it doesn’t come off. I have ruined a lot of clothing with spray foam. I invented the trash bag work smock for impromptu spray foam jobs.

    Trash Bag as spray foam application uniform
    Trash Bag as spray foam application uniform

    What do you use spray foam for? Let us know below:

  • Fix Overheating Steam Radiators Yourself

    Fix Overheating Steam Radiators Yourself

    replace-a-steam-radiator-vent-3

    Is your apartment too hot winter? Learn how to fix overheating steam radiators yourself below.

    If your radiators are hissing or leaking, its time to replace the radiator vent, aka radiator valve, on your radiators. Radiator valves have a finite life, and its probably been too long since they have been replaced.

    Replacing the radiator vent valve with an adjustable valve allows you to control – to a point – how much heat that radiator puts out. This is a great way to balance the radiators in your home, so the radiators heat the house evenly.

    This is an easy DIY Home Improvement project for those of you with older homes.

    In our current apartment, when the heating season started, we got loud hissing on 3 of the radiators, and this told me it was time to replace the radiator vents. Without going into a dissertation on how steam boiler heating systems work, the radiators have to be able to vent out the air that is in a steam system when the system is cold, to allow the steam coming up from the boiler to enter the radiators.

    You may not realize this, but if you have what is generically called a one pipe steam system, you also have steam vents or valves at the end of the steam riser pipes. These valves may be above the ceiling, if the steam riser pipe juts into the ceiling.

    drain tongue sticks out of old style radiator vent
    drain tongue sticks out of old style radiator vent

    My mode of operation is to replace all the steam valves at once, if possible. Steam vents are not cheap, but if you replace them all at once, you solve a lot of problems, i think. Another benefit of replacing all the valves at once is you can balance the vents at the same time. New vents either have specific vent ratings, or are adjustable – in other words, you can adjust how much venting each vent does.

    I use the adjustable vents – link to buy them here – they are much better, I think than the pre-set valves.

    This is important, as large radiators need to be able to vent more air than smaller radiators, and this helps you attain the goal of steam heat getting to all the radiators at one time. I use radiator vents that are adjustable, they have a small tang that juts out that you move to adjust. Other companies make a series of vents that have different vent ratings, each vent lets out a certain amount of steam.

    replace-a-steam-radiator-vent
    Adjustable Steam Radiator Vent

    Your local hardware store will sell radiator vents. I suggest the adjustable ones, and don’t cheap out when buying them, you get what you pay for.

    Most of life is like that, good things cost money, and these radiator vents are worth it. Many times the steam radiators are wedged behind furniture or whatever, and just getting to the radiator is a pain, so do them all at once and get it done with.

    So there you go, a DIY home improvement project that is do-able and will improve your heating system.

  • Simple Paper Seed Pots : GF Video

    Simple Paper Seed Pots : GF Video

    Learn how to make simple paper seed pots, the best paper seed pots, I think. These paper pots are for those of us who can’t make origami paper plant pots, OK? Simple method to make paper pots for your seedlings and seed starting trays. If you want to make a pack of paper pots, just glue or tape them together, use what you got.

    Most newspapers print their paper with soy based inks now, so I’m ok with using regular newspaper for vegetable paper pots. And the newspaper will break down in the garden soil; you just open up the bottom of your paper pots just before planting to allow the roots to easily grow out the bottom of the paper pot.

    You can use different size jars to make different size newspaper pots. I used a peanut butter jar to make paper pots for tomato seedlings, and used a small mason jar for lettuce transplant paper pots.

    simple-paper-seed-pots-pin
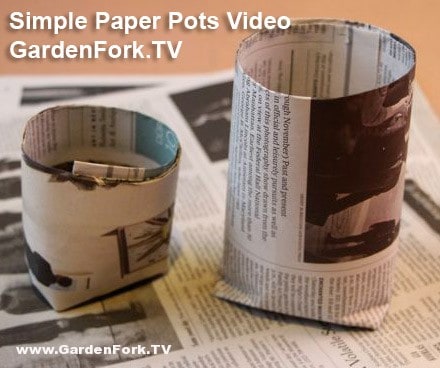
Its best to bunch the paper pots together under grow lights, as the paper can wick away moisture from the seed staring soil, packing the pots close together cuts down on that evaporation. You can watch our how to build a simple grow light video here, and our other seed starting videos here.


    How do you start your seeds in the spring, what kind of pots or trays do you use? Let us know below:

  • Toilet Repair how to replace a broken toilet flange

    Toilet Repair how to replace a broken toilet flange

    Is your toilet wobbly? Learn here how to replace a broken toilet flange. If your toilet wobbles and is not solid on the ground, it could be that the toilet flange is rotted or broken. fun. Let’s see how to repair the toilet.

    You can fix this. I did. And if you follow our how-to toilet repair photos here, you’ll be a DIY home repair expert, or at least you’ll be able to replace a broken toilet flange.

    Toilet-Repair-how-to-replace-a-broken-flange
    Rusted toilet flange, this one separated completely from the waste line.

    watch DIY videos insert

    First remove the toilet. Turn off the water line, flush the toilet, and remove the water line from the bottom of the toilet tank. Have bucket handy, as water will come out of the tank. Sponge out as much water from the tank and bowl as you can. A handyman trick is to use a wet dry shop vac to suck all the water out of the bowl and tank.

    Toilet-Repair-how-to-replace-a-broken-flange-2

    Remove the nuts on each side of the base of the toilet. These nuts-bolts attach the toilet to the flange. You may have to use a saw to cut the nuts off, which is ok, because you are going to put in new toilet bolts and nuts. The flange, when brand new, is attached to the waste pipe. Many times it rusts or snaps off. Tilt the toilet on its side and move out of the way. Have a helper assist you in moving the toilet, they are heavy and bulky.

    Toilet-Repair-how-to-replace-a-broken-flange-4

    Use a putty knife to remove the wax ring residue from the exposed flange and inspect the flange and surrounding area. What is key here is if the wood subfloor is rotted. If this is the case, you will have to cut out the surrounding subfloor and replace it with new plywood, then fix the flange.

    Thankfully on this home improvement project, the subfloor was fine, just the flange fell apart. Go to your hardware store and buy a Super Ring Replacement Toilet Ring. There are several models by different suppliers, don’t buy the cheapest one, its your toilet, remember…
    Also at the hardware store buy new toilet mounting bolts, they usually come in a package with the nuts and washers.

    use wax from the wax ring to get them to stand up straight
    use wax from the wax ring to get them to stand up straight

    Put the toilet mounting bolts in the flange pointing up, and use some wax from the old wax ring to hold them in place. Place the super ring replacement toilet ring over the waste line, making sure the mounting bolts are in the same place as the original bolts were,  one bolt on each side of the flange.

    Screw the new flange into the subfloor. You may have to use a hammer drill to drill through existing tile flooring or cement substrate. Set the new toilet wax ring onto the flange on the base of the toilet, and guide the toilet back onto the super ring, making sure the toilet mounting bolts are lined up with the mount holes in the toilet base. The super ring toilet ring allows for you to adjust the location of the bolts.

    Toilet-Repair-how-to-replace-a-broken-flange-6

    Press down on the toilet to seat the wax ring, wiggle the toilet back and forth to get it to set down and seal. Cut off the the bolts about 1/2″ above the toilet base. Spin on the mounting bolt nuts, and tighten them, but be careful not to over-tighten, as you will crack the porcelain toilet.

    Toilet-Repair-how-to-replace-a-broken-flange-7

    Re-attach the water supply line, turn on the water valve, flush the toilet and check for leaks.

    diy videos play

    Watch More DIY Videos Here.

    So there you go, not as complicated as you thought. The biggest red flag is if the subfloor is rotted, because then your simple home improvement project has become a much bigger deal.

  • How To Install A Dishwasher – GF Video

    How To Install A Dishwasher – GF Video

    Learn how to install a dishwasher with this video I made for you. Installing a dishwasher is not hard, nor is it rocket science. If you have to remove an old dishwashwer, see my video on dishwasher removal. The hardest part might be buying a new dishwasher and then reading the installation instructions.

    How to install a dishwasher, the GardenFork way

    To remove the old dishwasher, you’ll need  a screwdriver, a pliers, and an adjustable wrench. Be sure to turn off the water supply and make sure the power to the dishwasher is turned off or disconnected. Most new dishwashers plug into a wall outlet under the sink, older models may be hard wired.

    Hard wired means there is that metal cable attached to the dishwasher or it may be what is called Romex, the vinyl covered electrical wiring. Either way, turn off the circuit breaker that the dishwasher power wire is connected to, then disconnect the power wire. Put wire nuts on the bare wires. If the machine is plugged into a wall outlet, usually under the sink, just unplug it. Simple!

    One thing to keep in mind: Have a bowl handy, as when removing the hoses, they may need to be drained. You don’t want dishwasher water draining all over the floor.

    If the floor has been tiled after the cabinets and original washer was installed, you may have problems getting the old washer out. The new tile floor is higher than the original floor, so the dishwasher can’t slide out.

    Make sure the insulation wrapped around the new machine is intact and goes in neatly, this is key to reducing the noise of the washer.

    A common misconception I see is people using teflon tape or pipe sealant on the compression fitting from the water supply line. You should not use tape on that joint. You will need to use teflon tape on the right angle fitting that comes out of the dishwasher. See the photo below for how to hook up the water supply line. Make sure the right angle fitting points toward the back of the dishwasher. Remember that the dishwasher is hooked up to the hot water supply.

    It helps to have a friend help when figuring out how to install a dishwasher, and remember, if all else fails, read directions.

  • Hang a TV on a brick or concrete wall

    Hang a TV on a brick or concrete wall

    Hang a TV on a brick wall, or hang a tv above the fireplace? Here’s how to do it right. Below the how to photos is a video of how to drill into brick or cement and links to other DIY articles.

    Sleeve or Wedge Anchors are best for cement or brick walls
    Sleeve or Wedge Anchors are best for cement or brick walls

    Working in older buildings, many times I’m asked to hang a TV on a brick or cement wall. In brownstones, many times people want to hang a HDTV or flat panel TV over the fireplace. Most of the fireplaces no longer function, being old coal or gas fireplaces. Be sure not to drill holes into the chimney of  functioning fireplace. If you’d like to hide the wires, like we did in the top photo, we use plastic raceway molding.

    To hang a TV on a brick or cement wall, you will need sleeve or wedge anchors. You could also use lead anchors and lag bolts, but I prefer to use sleeve anchors. You will also need a hammer drill.

    drill into brick video insert

    Hammer drills are not that expensive. Click here to see some drills you can buy online. Or you can ask one of your friends if they have one. You’ll also need masonry bits for a hammer drill, they are also called percussive bits in some places.

    Hammer drill and the dust it creates

    Hammer drills are loud, so use ear protection, and eye protection is of course an always must have.

    Search On Amazon For TV Wall Mounts Here

    Hanging a TV with a HDTV mount is one of those projects that falls into the “if all else fails, read directions” . So read the directions before trying to do this.

    Attach the brackets to the back of the flat panel TV, and attach the wall mount to the TV brackets. Then get two friends to hold the TV up on the wall and find the perfect spot to mount the TV on the wall. Reach behind the TV while on the wall and with a pencil mark where the wall bracket be mounted on the wall.

    Be sure the person in charge of the interior of your house is present and has a say in the placement of the TV, because once you hammer drill holes in a cement wall, they’re kind of permanent.

    Put the TV down somewhere safe, and take the wall bracket,  place it on the wall and line it up with the marks you made. Mark where you are going to drill holes to put in the sleeve anchors. ( see the mount instructions for how many bolts are needed for your tv )

    Cover the area where you are going to drill with plastic. Brick or cement dust will come out of the hole you are drilling with the hammer drill. If you have a shop-vac, have a friend hold the hose just below where you are drilling, it will save you a lot of cleaning up.

    I usually use 4 inch long 3/8″ sleeve anchors if you are hanging on a plaster wall with brick behind it, and 3 inch long sleeves if its a bare brick or cement wall. After drilling the holes, make sure the nuts are on the ends of the sleeves, and tap the sleeves into the holes.

    Don’t hammer the sleeves too far into the wall, you need enough of the threaded end of the sleeve protruding out of the wall to hang the mount. You have the nuts on the end of the sleeves to keep the hammer from damaging the threads of the sleeve while tapping them in.

    Wall mount attached with sleeve anchors

    Remove the nuts and hang the wall mount on the wall, use washers and tighten down the nuts to secure the wall mount to the wall. Then read the directions again to remember how to hang the TV on the wall mount. Then you’re done.

    Here is a how to drill into brick or cement video we did to give you an idea of how to hang a tv on a brick wall:

    hang-a-tv-on-a-brick-or-concrete-wall-6Watch how to drill into brick and concrete here.


  • Garden Hose Repair Video  GF TV

    Garden Hose Repair Video GF TV

    Broken Garden Hose? Learn how to fix your leaking garden hose in this Fix a broken hose video. We’ve run over the garden hose with a lawnmower a few times, and instead of throwing out the hose, we fix the leak in the hose, or the cut off end of the hose with a few repair parts from the hardware store. A few things to keep in mind with garden hose repair, don’t buy cheap repair parts or hose washers, you get what you pay for in most of the world , and this applies in the garden hose fix it department too.

    Rubber or flexible washers go between your hose and the spray attachments, and keep the water from leaking out the hose. You might try buying a few different kinds of hose washers, as i’ve found some garden hose attachments don’t work with the thicker hose washers. And buy a bunch of them, you’ll save yourself time later when you need them. Hang them near the hose storage hooks or on the wall of your workshop so you can find them quickly. Put them in a drawer and they are lost.

    I’ve found a number of hoses in the neighbor’s trash that were easily fixed with a garden hose repair kit, and I saved a bunch of money and kept a fine watering hose out of the landfill.

    What do you do to repair your hoses? let us know below:

  • Spilled Paint Cleanup!

    Spilled Paint Cleanup!

    “Eric come here quick!”

    Not the phrase you want to hear on a paint job.

    It doesn’t happen often, but this is what you prepare for, the unexpected. The one time you don’t prepare is when it will happen.

    When painting rooms, I am obsessive about covering every square inch of floor with either paint tarps or red rosin contractor paper. It pays off in a number of ways, we spend almost no time cleaning paint roller splatter off the floor, any plaster or sheetrock repair dust is easily cleaned up, and if one of us happens to step into a drop of paint that has happened onto a tarp, we don’t get even more paint on the floor from walking all over with paint on our shoes. The tarps soak up the paint from the sole of the shoe.

    Painting a brownstone last week one of the crew accidentally kicked over a gallon of paint, but because we had laid down heavy duty muslin paint tarps, the clean up was easy.

    when painting, use a tarp!

    We first scoop up as much paint as we can and put it back into a paint can. You might need to strain that paint if it has sanding debris in it picked up from the tarp. We roll the tarp up into itself and take it outside. We then sop up the rest with paper towels, and lay out the tarp to dry. Latex paint will dry slowly when its thick, but after it dries, you can use the tarp again.

    If you are painting more than one room, consider buying muslin tarps instead of plastic tarps. Plastic is slippery to walk on, muslin paint tarps are much better and last for years. Be sure to write your name on your tarps, your friends will borrow them, and its a subtle way of reminding your friends whose tarps they are.

    What are your paint catastrophes? tell us below

  • DIY Grow Light PDQ

    DIY Grow Light PDQ

    We don’t have a lot of space at Casa Cairn, so we have to make a lot of stuff do double duty. And why not? Most of our stuff is really used very infrequently. I’ll bet it’s pretty much the same at your house.

    Today we’ll take a two bulb florescent light from the garage and press it into it’s twice a year role as a grow light. Note that you don’t have to buy special –and expensive– grow bulbs, but your light should have two florescent bulbs, one in the Daylight or Cool spectrum (toward blue around 6,000 K) and one in the Warm end of the spectrum (toward red, around 2,500 K). Many door growers are using red and blue LED lamps, but those are expensive (although cheaper to run than fluorescents) for a home project.

    Here’s your materials list:

    • 16 ft of 2″ x 2″ lumber. The longest piece needs to be about 4’6″ long (about 3 inches longer than your fluorescent fixture). The uprights need to be equal length, around 3 foot long or so. The feet should be at least 1 foot long. As I note in the video, the controlling issue for the uprights is usually your ceiling fan.
    • 4 – plywood triangles, about 8″ on each side. Cut up some scrap.
    • 2 – screw in hooks to hold the light
    • A fist full of wood screws, about 1″ long.
    • 2 – cleats or some way to secure the light and keep it from crashing down on your seedlings
    • 1 – 24-hr timer. You light should be on for 18 hours off for 6 hours. If plants don’t get rest, they can’t generate the hormones and enzymes they need to grow.
    • a length of line so that you can raise and lower the light. Note: the closer you put your light to the plants, the less “leggy” they will grow.

    This video was edited, including voiceover, on my iPad. Not quite as smooth a job editing as I’d like, but power was out for much of the project.

  • DIY Solar Beeswax Melter Video by Rick

    DIY Solar Beeswax Melter Video by Rick

    Solar Wax Melter plans here. Rick built this DIY solar beeswax melter out of a cooler and stuff you probably have in your garage.

    Beeswax is made by the honeybees, and when you harvest honey, the cappings on the cells of the honeycomb are cut off, and you can save these wax cappings, melt them down, and make candles, soap, and all sorts of beeswax products. In this how-to video you’ll see how honeybees make beeswax, and how they build honeycomb in a beehive.

    A solar beeswax melter will melt and clean beeswax without using electricty. Its very hands off, you don’t have to do much with it, just leave it in the sun and the solar power takes care of it. This wax melter uses a cooler and a piece of glass, its important that the glass not be double glazed, according to Rick. A few pans from the store and you are good to go.

    With the melted and cleaned beeswax, you can make all sorts of beeswax based products. Some of the most popular are candles, soaps, and lotions.
    Some interesting facts about beeswax: bees eat honey from their hives to produce beeswax, and the ambient hive has to be between 90 -97 degrees F.

    Do you use beeswax? let us know how below:

  • Chainsaw Wont Start – Chain Saw Repair : GF Video

    Chainsaw Wont Start – Chain Saw Repair : GF Video

    Chainsaw wont start? Wondering how to fix a chainsaw and the chainsaw to start? Watch our how to fix a chainsaw video and you will be on your way. Chainsaw repair is not hard, and if you’re ready to go out in the yard and cut down some trees, your chainsaw has probably been sitting in the shop all winter. Follow these simple chainsaw tune up steps, and you will have your chainsaw running in a few minutes.

    We have to talk about chainsaw safety here as well. Chainsaws are the most dangerous tool a homeowner can own without a license. I have a few friends with scars from using chainsaws improperly. Chainsaw chaps, a helmet, face shield, eye protection, steel toed boots are all mush-haves for safety.

    Sharp chainsaw chains is key in cutting up trees and cutting firewood, you can sharpen your own chainsaw chains, but I suggest you have them done at your local small engine repair shop, they have the right equipment to set the correct cutting angle, a hand file can’t do that.

    There’s more tree felling in my future, we have a few white pines on our property that need to come down, lest they come down on our house or garage, one of them is already splitting down the trunk, so we need to deal with that one soon.

     Watch all our how to cut down a tree chainsaw videos here

  • Workshop Organization is not genetic

    Workshop Organization is not genetic

    While visiting my family I am always in the workshop fixing something. My dad’s workshop is like mine, semi-managed chaos. There are many projects scattered in various stages of completion, some have been there a few years. There are bits and parts of things you can’t bear to throw away, thinking you might be able to use them for something one day. There are still things in dad’s workshop from when I was a kid, a pair of garden tractor tires for some sort of cart we have yet to build, but those tires will be good for something.

    Then there is my sister’s workshop. Immaculate and organized, one project at a time on the workbench, which is a recycled kitchen countertop and cabinets. [ we made a Real World Green video about making this work bench here ] The shelves have nails and screws in plastic storage bins with the actual screw length information present. The screw gun’s batteries fully charged, tools on the pegboard.

    Sister's workshop

    I still struggle with organization. I’m close to hiring someone to come in and organize the place. The trick is to keep it that way. Its hard to part with stuff that may have a use some day. The anxiety of knowing that a year from now I will need those small ikea counter brackets left over from a job to hold together some wood frame i’m building, but I already have a ton of brackets.

    What do you do to deal with the workshop chaos? Are you the organizer or the keeper of stuff?