Outdoor cooking recipe to bake a cake in a dutch oven. Great camping recipe or to keep you house cool in summer, outdoor baking is the way to go. We use this basic cake recipe and add in whatever fresh fruit we have in the summer months. Its a fun way to bake a cake that doesn’t heat up the house, or when you are camping, this is a super simple cake recipe. Its easy to change up the recipe to suit whatever ingredients you have.
How To Bake A Cake Outdoors
You need to have a fireproof safe place to do this. We use our grill, it works well because it is a good height, and is already built for fire. Or you could use some other fireproof material, but be careful, you will be using hot charcoal to do this. In a camping situation, you can use the coals from a campfire, but you will have to pay more attention to the coals, probably adding a few during the baking process.
If you do not have some oven-proof bowls of some sort – we like to use ramekins – you can use balled up foil to raise the dutch oven above the coals. You do not want the bottom of the dutch oven to touch the coals, this can burn the bottom of the cake. If your dutch oven does not have a flat lid, you can make a ring of foil that will keep the coals from falling off the top of the dutch oven.
To Bake a cake this way requires some experimentation, its easy to burn the cake if the coals on the bottom are too hot. There is some trial and error here. And wear oven mitts or heat proof gloves, this stuff is hot!
Easy Cake Recipe:
1 cup self rising flour
OR 1 cup all purpose flour + 1 1/2 tsp baking powder and 1/2 tsp salt
1 stick of butter
1 cup milk
1 cup sugar – you can use less sugar, this cake is pretty sweet
1 can of peaches, drained, light syrup preferred, 20-24 oz
Preheat the oven to 375F
Put the stick of butter in a 9×9 baking dish, preferably a glass dish, and place in the oven to melt the butter.
Mix together the dry ingredients, then add the milk and mix.
Pour the batter into the heated baking dish with the melted butter, then add the can of peaches.
Bake at 375 for 30-40 minutes. The cake is done when a knife comes out clean.
This is another of a series of articles about how to cook in a dutch oven, dutch oven recipes, and how to season cast iron and dutch ovens by Gary House, of Cooking-Outdoors.com. A big thank-you to Gary for contributing this.
The key to successful outdoor Dutch oven cooking, is knowing how many charcoal briquettes are required to produce a certain temperature inside of your Dutch oven while it is cooking.
The secret to this knowledge is understanding charcoal briquettes.
Types of charcoal
Types of Charcoal
Charcoal briquettes produce more uniform heat than campfire coals or Lump charcoal, making your Dutch oven temperature easier to control. Brand-name briquettes have more consistent quality than bargain brands. They are consistent in size— about 2 inches square — which is important for predictable heat. Start with charcoal briquettes if you just beginning and experiment with live campfire coals as you progress.
How many briquettes do you need?
This is the basic foundation of Dutch oven cooking, once you know this, everything else falls into place. Take your Dutch oven’s diameter in inches and double it.
• 8 inch Dutch oven = 16 briquettes
• 10 inch = 20 briquettes
• 12 inch = 24 briquettes
• And so on.
The total calculation is the number of standard-size charcoal briquettes you will need to heat your Dutch oven to approximately 325 degrees F for one hour.
It is that simple.
Controlling temperature
Most Dutch oven beginners are familiar with cooking on a stove at home, cooking with bottom heat only and that can cause confusion when cooking outdoors with a Dutch oven.
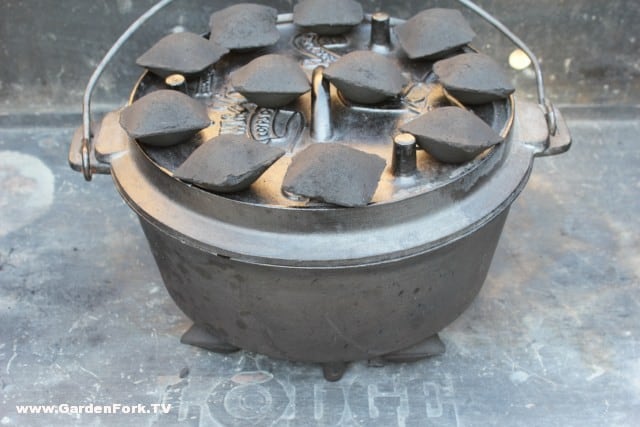
Because heat rises, briquettes heat the bottom of a Dutch oven more quickly and directly than the top. The top rim of the lid draws the heat downwards, you will need to divide your briquettes between the top and bottom for even heating. Commonly referred to as the three up method and is effective on 8, 10 and 12-inch diameter Dutch ovens; larger size Dutch ovens may require more briquettes.
As an example:
• To heat an 8-inch Dutch oven to 325 degrees, you need 5 coals on the bottom and 11 coals on top. Sixteen coals total.
• To heat a 10-inch oven, you need 7 briquettes on the bottom and 13 on top. Twenty coals total.
• To heat a 12-incher, you need 9 briquettes on the bottom and 15 on top. Twenty-four coals total.
These guidelines will get you close enough that, with practice, you can understand exactly what works for your Dutch oven.
Briquette placement
Top ring & bottom ring placement
Using the circle method of coal placement, place your bottom coals in a single circle aligned with the legs of your Dutch oven closer to the outside of the Dutch oven bottom, referencing the lip of the Dutch oven lid place your coals evenly around the perimeter.
Variables
If your recipe calls for temperatures higher or lower than 325 degrees, make adjustments by adding or subtracting 2 briquettes. Two briquettes equal approximately 25 degrees. Add these to the top of the Dutch oven, unless you need more heat on the bottom.
How long do briquettes last?
Today’s charcoal briquettes last about 45 – 50 minutes. When recipes call for longer cooking times, start fresh replacement briquettes at 40 minutes. They will be ready to add to your Dutch oven when the original coals start losing their heat. Replace approximately 60% of the coals each 45 – 50 minutes of cook time.
Compensation for weather conditions will be required. On cold days, add a couple of more coals on the top and on a hot day remove a coal or two. Wind will play a significant roll in temperature control, it is best to shelter your Dutch oven from the wind with a windscreen if possible.
Following these basic concepts will insure your first adventures in Dutch oven cooking are a success. After practicing a few recipes, temperature control will become second nature and you will no longer need to count as you become more proficient.
Here is one of my favorite beginner recipes, the same one I use in my Dutch oven classes.
Blackberry cobbler
Blackberry Cobbler
Ingredients
For the cake mix:
1 stick butter
2 cups flour
2 cups sugar
1 tbs baking powder
1tsp salt
1 1/2 cups milk
For the berries:
4 cups fresh or frozen blackberries or 2 bags frozen (thawed)
½ cup sugar
1 ½ tsp fresh grated lemon zest
¼ cup water
1 tsp cinnamon
10 or 12” Dutch oven (20 or 24 briquettes)
Start your briquettes using the formula above to determine the quantity.
Rinse your fresh blackberries and drain, place them in a bowl with your sugar, lemon zest, water and cinnamon; mix well and set aside.
When your briquettes are ready, place the bottom circle of briquettes down and set your Dutch oven with the lid on top of the briquettes, then add the remaining briquettes to the lid to pre-heat your Dutch oven.
Now you can mix your cobbler batter. In separate bowl combine flour, sugar, baking powder, and salt; stir to mix. Add milk and beat until batter is smooth.
Remove the Dutch oven lid, take one stick of butter and place in hot Dutch oven, stir until melted. Add your Blackberry mixture to the melted butter and pour your cobbler batter over the top
(A different variation of this would be to take your batter and pour that in first place your blackberries on top.)
This is the third of a series of articles about how to cook in a dutch oven, dutch oven recipes, and how to season cast iron and dutch ovens by Gary House, of Cooking-Outdoors.com. A big thank-you to Gary for contributing this.
The good news is that almost all new Dutch ovens come pre-seasoned direct from the factory. Today’s seasoning process at the factory is so good; you can use your new Dutch oven right out of the box (after washing) without going through the initial seasoning process. New Dutch ovens will still require continuous seasoning to build up the layers of protection.
Seasoning is the process of applying thin layers of grease or oil and baking until absorbed into the cast iron. This continuous process builds up layers of “carbonized” oils, protecting the surface from rust and giving you that desired non-stick coal black patina coating.
Vegetable oil, olive oil, bacon grease, Crisco, lard and premade seasonings are commonly used to season cast iron. I cannot tell you what one is best for you and everyone has their special grease or oil that they prefer; I will recommend you try grease instead of oil, as it is easier to see when you apply too much allowing you to remove the excess. Personally, I use Crisco these days and it works very well for me.
If you do have an un-seasoned Dutch oven or skillet and want to season it here are 8 simple steps to make that process easy:
• Wash with soap and water.
• Dry completely with heat, a towel will not remove enough moisture. Place cast iron in oven for a few minutes or in the sun if hot out until it is too hot to handle with your bare hands but easy to handle with heat pads. (Cast iron absorbs grease and oils best when warm so apply your seasoning to pre-heated cast iron that is warm to the touch, no need to burn yourself. Pre-heating opens up the cast iron pores to allow the seasoning to be absorbed.)
• Before applying seasoning, check for rust. Now is the time to remove it.
• Lightly grease inside and out, you do not want the oil to pool or build up anywhere while you are seasoning your oven. Lightly means enough to change the color of the cast iron; do not apply a heavy coating that feels sticky to the touch.
• Place your Dutch oven upside down with the lid laying flat on the grate into a BBQ that can maintain 375° F consistently for one hour. If you use your oven in the house you could get a lot of smoke in the kitchen, consider yourself warned.
• Bake for 1 hour at 375° F
• Turn heat off, open lid and let cool.
• Repeat two more times for best results.
Your Dutch oven is ready to use!
For bests result, apply a light coat of seasoning to your Dutch oven after every use. This builds up the layers of carbonized grease every time you do this, giving you layers of protection and non-stick surfacing.
There may come a time when you need to re-season your cast iron; perhaps it is getting a little rust, some bubbles have formed or the finish is chipping off. All caused from improper seasoning or care, but easily fixed.
• Place your Dutch oven or cast iron skillet in a self-cleaning oven.
• Turn and lock oven in the self-cleaning cycle.
• Run until cleaning cycle is complete. Your Dutch oven will be a light grey color when done.
• Let cool for a couple of hours
• Repeat steps 1 through 8 above.
I will leave you with my 6 Golden rules for storing your Dutch oven
Rule #1
Never put away your Dutch oven dirty.
Rule #2
Never put away your Dutch oven wet.
Rule #3
Put a light coating of seasoning on your Dutch oven while it is warm from cleaning.
Rule #4
Air circulation prevents a rancid Dutch oven; store with the lid off or ajar.
Rule #5
Store your Dutch ovens in the house where the humidity is balanced.
Rule #6
Rotate your Dutch ovens when selecting one for a meal. The one on the bottom in the corner is all dusty is going bad on you!
Next time we will discuss temperature control when cooking and I will have an easy bread recipe for you!
Part Three of our Dutch Oven Cooking Series by Gary House, creator of www.Cooking-Outdoors.com; an excellent source for all things about outdoor cooking, including Grill & Smoker reviews, recipes, and videos.
Gary is also the host of a new DVD, Taking Your Dutch Oven To The Max, using the dutch oven to smoke, grill, and even make ice cream.
This is the second of a series of articles about how to cook in a dutch oven, dutch oven recipes, and how to season cast iron and dutch ovens by Gary House, of Cooking-Outdoors.com. A big thank-you to Gary for contributing this.
Last time we talked about the different types and sizes of Dutch ovens available to cook meals outdoors in. By now, you should have a solid idea of where to start in purchasing a Dutch oven for you and your family or perhaps you have resurrected that dusty black pot that’s been sitting in the corner since you brought it home.
Dutch oven cooking can become somewhat addictive, so I must warn you early, you can’ just own one! They seem to grow magically as time goes by, first a 12” then a 10”, maybe I need a 12” deep and really, a 14” is not as big as Gary says, etc. I have a collection of 10 active Dutch ovens, those that I keep handy to use on a weekly basis, but hidden away in the garage are another dozen “collectables” that need to be seasoned or I have to remove the rust, etc. This collection just seems to grow and grow and grow, consider yourselves warned.
For those of you with the will power to minimize and control those urges (un-like myself), there are a few accessories that you will want to add to your Dutch oven cooking arsenal.
Undoubtedly, the most important item you can start to add to your collection is a cooking platform; you need something to place your hot coals on when you cook with your Dutch oven. The bare ground is not a good option, as it will suck the life out of your coals in record time (a campground fire pit would be an exception as the ground there has baked into a hard heat-reflecting surface and will give you a solid cooking base). Those 45 minutes to an hour cooking time that you planned will reduce to 30 minutes or less if you just place your coals and Dutch oven directly on the dirt.
I started out with a simple 32-gallon garbage can lid. Just pop the handle off, stomp it flat and it will last for years (I still have my 5 year old model). If you are looking for a Dutch oven dedicated cooking table to use at home and when you go camping you have a few options:
Table
Lodge, Camp Chef and several other manufactures offer nice models that will run you $100 or more. Think about these things before you buy yours:
How many Dutch ovens do you plan to cook with at one time?
• 2 to 4 pots at one time then stick with a Lodge http://lodgemfg.com or Camp Chef www.CampChef.com Dutch oven cooking table.
• Six plus Dutch ovens get yourself a custom table from a reputable source.
My big Dutch oven cooking table comes from www.chuckwagonsupply.com, it holds 9 Dutch ovens at a time plus room to hang my tools.
Folding legs or stationary?
• Folding legs means you can travel with it.
Windscreen?
• This should come with the table but sometimes it’s extra and it is quite necessary. The wind can cause all kinds of havoc with your cooking times, so a screen is very important.
Carrying case?
• This is usually extra and worth every penny in my opinion
Height?
• Important! The higher the table the higher you have to lift those pots and if you decide to stack your Dutch ovens (cooking one on top of the other), you will want a low platform that reaches to just above your knees.
Weight?
• Bigger = heavier, longer lasting and more difficult to transport but I think the positives far outweigh the weight issue.
Utensils
Just the basics to get started, if you’re like me, you will add so much more stuff as time goes by that you shake your head in wonder – why didn’t I buy a bigger truck!
Gloves – leather welder’s gloves that cover the lower half of your arm
Lid lifter – indispensable tool that has multiple uses in addition to acting as a solid place to set your lid when you have to stir the pot or add additional food to your recipe
Charcoal tongs – Goes without saying that charcoal burns, so you will need a tool to move those hot coals around the Dutch oven as you cook
Charcoal chimney – used to light your charcoal briquettes with a single sheet of newspaper
Wisk broom – helps to dust the ashes of the Dutch oven lid and table
Lighter – or matches, your choice. Some people use flame throwers!
Safety gear
Never leave home without them!
Fire extinguisher
Shovel – a small shovel to move the spent briquettes from the cooking table to the bucket
Ash bucket – use a galvanized pail with a lid for safe transportation and storage
First aid/burn kit
Dutch oven cooking can be as simple as you want or need it to be, do not obsess over all of the accessories available, what you should or should not have, etc. Remember, it only takes one pot and a recipe to produce a fantastic meal. Cooking outdoors in a Dutch oven is a rewarding adventure that can keep your taste buds delighted for many years to come.
Next time we will discuss how to take care of all that cast iron I have talked you into buying!
Part Two of our Dutch Oven Cooking Series by Gary House, creator of www.Cooking-Outdoors.com; an excellent source for all things about outdoor cooking, including Grill & Smoker reviews, recipes, and videos.
Gary is also the host of a new DVD, Taking Your Dutch Oven To The Max, using the dutch oven to smoke, grill, and even make ice cream.
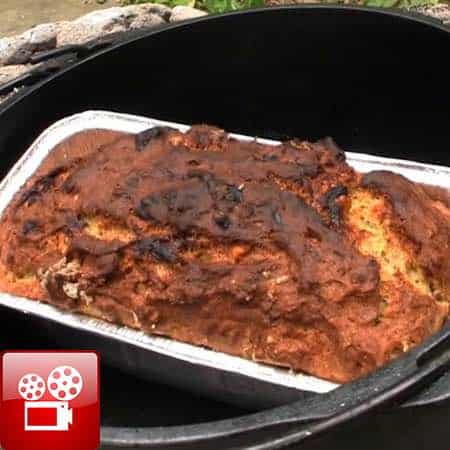
Dutch oven banana bread recipe baked in a campfire or using charcoal, nice right?. Either way it tastes like the instant comfort food that it is. Watch the video and then read the recipe below.
Head up: I now have 4 dutch ovens, and all are well seasoned at this point. You can see our how to season cast iron video here. But I’ve never used a dutch oven for what they were probably originally designed for, cooking over a campfire. So today we use the cast iron dutch oven for what it is for, cooking outdoors. Watch and learn how to bake with fire.
How to make the dutch oven banana bread recipe
Whether for campfire cooking or backyard cooking, the dutch oven comes thru as a great pot for baking. Today we are going to learn how to use the dutch oven you have to bake or cook food outdoors, using charcoal or firewood. There are a couple of tricks here we learned from Gary of Cooking-Outdoors.com, like how to stack coals on the lid of a dutch oven, and how to use a dutch oven to bake breads and cakes.
Update: Reading some of the great comments, I’ve learned that when fully fired up, each charcoal briquette puts out about 40-50F of heat. I will use this info as I experiment more with dutch oven cooking with charcoal and campfires. What fun.
If you don’t already have them here are links to buy a cast iron dutch oven, a charcoal chimney, and heat resistant oven mitts.
Some takeaways from this video and recipe, which was really fun to do.
Its not perfect. Is baking outdoors ever perfect
Use good pot holders and silicon oven gloves.
Charcoal is hot!
You will love baking outdoors.
[tasty-recipe id=”13323″]
Check out our Toad In The Hole Recipe, also made outdoors in a dutch oven.