Tag: dutch oven recipe

  • Bean Hole Beans Recipe, Dig A Hole, Start A Fire, Cook – GF Video

    Bean Hole Beans Recipe, Dig A Hole, Start A Fire, Cook – GF Video

    A while back I read an article about an artisanal bean hole beans recipe, and then and there decided to make the GardenFork version. In other words, the done is better than perfect Bean Hole recipe. Watch the video:

    Any project that involves open fire and food is a good one. Growing up, we would camp in the backyard, and boil crayfish we caught in the quarry pond over our campfire. Fire, coffee can, crayfish = good. Same thing with beans, bacon, and a hole in the ground. Its wicked simple, and fun to do on the weekend, especially in the fall.

    What is a bean hole beans recipe?

    Cooking food in a hole in the ground, as a cooking method, has been around for a long time. Probably since humans learned how to use fire to cook food, or shortly thereafter. But the Bean Hole Beans we are talking about started with the Penobscot Tribe in Maine. They cooked their beans in a clay pot with bear grease and maple syrup.

    This bean hole baked beans recipe was adopted by the logging crews in Maine. One story I read told of how they used this method while transporting logs down the river to the harbor. The cook would ride down the river one day ahead of the logging crew. He would dig a hole and start a pot of beans, mark the spot, and then ride down the river another day, and do the same thing. The loggers would arrive at the camping spot, and dig up the beans for dinner.

    I’m not sure of the veracity of this story, but its certainly plausible to me. And what’s not to like about pulling into camp to find dinner ready?

    Bean hole cooking is the original Crock Pot cooking method of its day, the pre-electric version of the slow cooker. Plus its one of those low and slow methods, which we now know as a braise or BBQ.

    How To Make Bean Hole Beans

    This cooking method, is more than just cooking, its an experience. And it is great. It embraces the two mantras of GardenFork:

    Done is better than perfect.

    Use what you got.

    Here’s what you need:

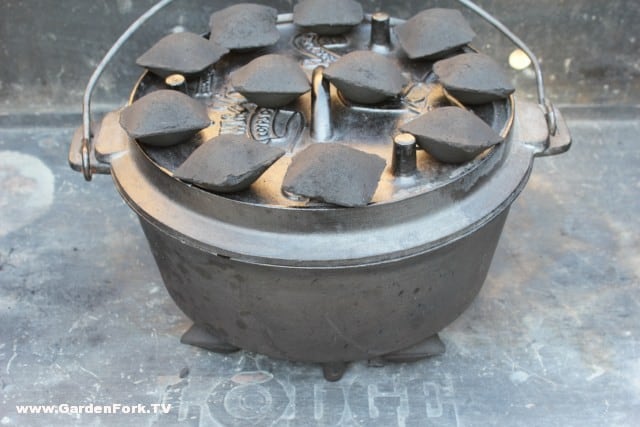
    • Cast Iron Dutch Oven with a handle, and ideally a rimmed lid.
    • Wood to burn or chunk charcoal. Not large pieces of wood, btw.
    • Used clay bricks or rocks. Don’t use rocks that break when heated.
    • Sheet metal of some sort.
    • Chain, or heavy wire, or coat hangers.
    • Aluminum foil.

    You will need to dig a hole in your yard. I have found its easiest to do this in a raised vegetable garden bed. Its much easier, but dig where you are allowed. THINK about where you are digging, before you dig, OK?

    Bean Hole Beans Recipe

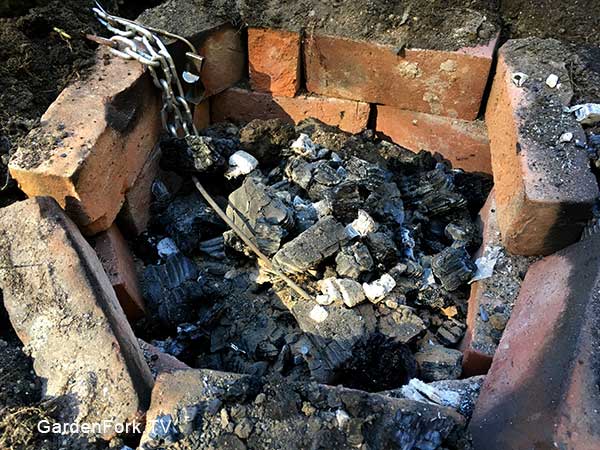
    Your hole is at least 6″ wider than the dutch oven and at least a 12″ deeper. Line the hole with used clay bricks. I don’t think one needs to use firebrick.

    Start a small fire in the hole with small pieces of wood. This will take longer if you use big pieces. Use small pieces. Add wood to this fire to build a larger fire.

    Let the fire burn down so the wood is starting to turn to coals. This is subjective, but you want a good base of coals to surround your dutch oven. There can be some wood that has not become coals yet. If you wait for everything to be burned down to coals, you’ve probably waited too long.

    Clean the center of the fire pit

    There are many bean hole beans cooks that par boil their beans before putting them in the dutch oven – to me this a waste of time. The beans are going to be cooking a long time. It’s great to brine beans before cooking, i do it all the time, but for this recipe, you don’t need to. OK? Good.

    Bean Hole Beans, the GardenFork recipe

    One 1 lb bag of dried northern beans – not soaked (other white beans work fine too)

    2 TBSP Mustard

    One small can of tomato paste

    1/2 cup maple syrup

    One chopped sweet onion

    4 slices of bacon.

    1 tablespoon kosher salt

    6 cups of water

    – again, use what you got, you can add other stuff to this recipe

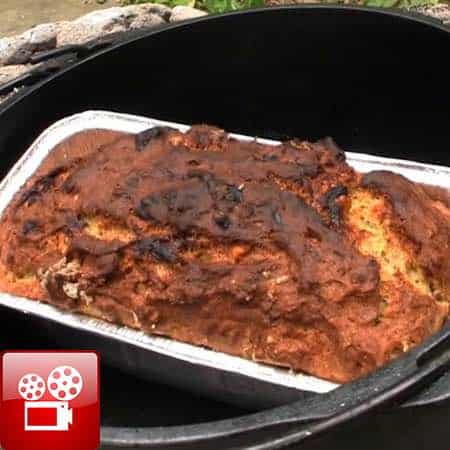
    Put all the ingredients in the dutch oven. If your dutch oven lid does not seal well, place one or two layers of aluminum foil between the dutch oven and the lid.

    Cover the outside of the lid with aluminum foil to keep any dirt from getting in to the beans.

    Remove half the coals and move the rest to the sides. Lower the dutch oven into the hole, add back in the hot coals. Cover with the tin and then dirt. Be sure to lay the chain so its outside the fire pit.

    dutch oven banana bread recipe
    Now watch this dutch oven banana bread video

    Eric Bakes Artisan Bread in Five Minutes a Day


  • Cook In A Dutch Oven – Temperature Control

    Cook In A Dutch Oven – Temperature Control

    This is another of a series of articles about how to cook in a dutch oven, dutch oven recipes, and how to season cast iron and dutch ovens by Gary House, of Cooking-Outdoors.com. A big thank-you to Gary for contributing this.

    The key to successful outdoor Dutch oven cooking, is knowing how many charcoal briquettes are required to produce a certain temperature inside of your Dutch oven while it is cooking.
    The secret to this knowledge is understanding charcoal briquettes.

    Types of charcoal

    Types of Charcoal

    Charcoal briquettes produce more uniform heat than campfire coals or Lump charcoal, making your Dutch oven temperature easier to control. Brand-name briquettes have more consistent quality than bargain brands. They are consistent in size— about 2 inches square — which is important for predictable heat. Start with charcoal briquettes if you just beginning and experiment with live campfire coals as you progress.

    How many briquettes do you need?

    This is the basic foundation of Dutch oven cooking, once you know this, everything else falls into place. Take your Dutch oven’s diameter in inches and double it.
    •    8 inch Dutch oven = 16 briquettes
    •    10 inch = 20 briquettes
    •    12 inch = 24 briquettes
    •    And so on.

    The total calculation is the number of standard-size charcoal briquettes you will need to heat your Dutch oven to approximately 325 degrees F for one hour.
    It is that simple.

    Controlling temperature
    Most Dutch oven beginners are familiar with cooking on a stove at home, cooking with bottom heat only and that can cause confusion when cooking outdoors with a Dutch oven.
    Because heat rises, briquettes heat the bottom of a Dutch oven more quickly and directly than the top. The top rim of the lid draws the heat downwards, you will need to divide your briquettes between the top and bottom for even heating. Commonly referred to as the three up method and is effective on 8, 10 and 12-inch diameter Dutch ovens; larger size Dutch ovens may require more briquettes.
    As an example:
    •    To heat an 8-inch Dutch oven to 325 degrees, you need 5 coals on the bottom and 11 coals on top. Sixteen coals total.
    •    To heat a 10-inch oven, you need 7 briquettes on the bottom and 13 on top. Twenty coals total.
    •    To heat a 12-incher, you need 9 briquettes on the bottom and 15 on top. Twenty-four coals total.

    These guidelines will get you close enough that, with practice, you can understand exactly what works for your Dutch oven.

    Briquette placement

    Top ring & bottom ring placement


    Using the circle method of coal placement, place your bottom coals in a single circle aligned with the legs of your Dutch oven closer to the outside of the Dutch oven bottom, referencing the lip of the Dutch oven lid place your coals evenly around the perimeter.
    Variables
    If your recipe calls for temperatures higher or lower than 325 degrees, make adjustments by adding or subtracting 2 briquettes. Two briquettes equal approximately 25 degrees. Add these to the top of the Dutch oven, unless you need more heat on the bottom.

    How long do briquettes last?
    Today’s charcoal briquettes last about 45 – 50 minutes. When recipes call for longer cooking times, start fresh replacement briquettes at 40 minutes. They will be ready to add to your Dutch oven when the original coals start losing their heat. Replace approximately 60% of the coals each 45 – 50 minutes of cook time.
    Compensation for weather conditions will be required. On cold days, add a couple of more coals on the top and on a hot day remove a coal or two. Wind will play a significant roll in temperature control, it is best to shelter your Dutch oven from the wind with a windscreen if possible.
    Following these basic concepts will insure your first adventures in Dutch oven cooking are a success. After practicing a few recipes, temperature control will become second nature and you will no longer need to count as you become more proficient.

    Here is one of my favorite beginner recipes, the same one I use in my Dutch oven classes.

    Blackberry cobbler

    Blackberry Cobbler
    Ingredients
    For the cake mix:
    1 stick butter
    2 cups flour
    2 cups sugar
    1 tbs baking powder
    1tsp salt
    1 1/2 cups milk
    For the berries:
    4 cups fresh or frozen blackberries or 2 bags frozen (thawed)
    ½ cup sugar
    1 ½ tsp fresh grated lemon zest
    ¼ cup water
    1 tsp cinnamon
    10 or 12” Dutch oven (20 or 24 briquettes)
    Start your briquettes using the formula above to determine the quantity.

    Rinse your fresh blackberries and drain, place them in a bowl with your sugar, lemon zest, water and cinnamon; mix well and set aside.
    When your briquettes are ready, place the bottom circle of briquettes down and set your Dutch oven with the lid on top of the briquettes, then add the remaining briquettes to the lid to pre-heat your Dutch oven.
    Now you can mix your cobbler batter. In separate bowl combine flour, sugar, baking powder, and salt; stir to mix. Add milk and beat until batter is smooth.
    Remove the Dutch oven lid, take one stick of butter and place in hot Dutch oven, stir until melted. Add your Blackberry mixture to the melted butter and pour your cobbler batter over the top
    (A different variation of this would be to take your batter and pour that in first place your blackberries on top.)

    Replace the lid and bake for 45 minutes.

    Serve with vanilla Ice cream and enjoy!

  • Toad In A Hole Recipe in a Outdoor Cast Iron Dutch Oven – GF Video

    Toad In A Hole Recipe in a Outdoor Cast Iron Dutch Oven – GF Video

    A Toad In A Hole recipe cooked outdoors, how cool is that? Watch the video and read on for the recipe and thoughts.

    Here’s an Toad In A Hole recipe from the UK that we cook in our cast iron dutch oven outdoors. You can cook this in your kitchen, but its more fun to use this  using fireplace cooking, outdoor cooking, or campfire cooking. Perfect for those urban homesteaders who want to take their cast iron outside, build a fire, and cook comfort food. We were introduced to this dish by our friends Barbara and Chris ( who are English ) and visited us at our CT house. Chris made this for us one day. Toad in a Hole is supposed to be for dinner, but I think its great for breakfast, especially after a night out imbiding.

    I changed this up a bit from the standard by adding cheddar cheese, which seemed perfectly acceptable seeing that Cheddar Cheese is from England, and cheese tastes good with eggs already, so why not mix them into the recipe?

    I make this recipe in a dutch oven, and its super fun to bake the Toad In A Hole outdoors. In the cooking video, we used charcoal to heat the cast iron dutch oven, but you can make this in a fireplace or in a campfire as well.

    Want to bake Banana Bread the same way? Watch our video here.

    Buy a Dutch Oven here, and an chimney charcoal starter. This post may contain affiliate links which won’t change your price but I earn a commission from. Thx!

    Toad In A Hole Recipe in a Outdoor Cast Iron Dutch Oven – GF Video
    Recipe Type: Dinner
    Cuisine: English
    Author: Eric Rochow
    Prep time:
    Cook time:
    Total time:
    Serves: [url:1][img:1]
    Making Toad In A Hole in a Dutch Oven outdoors is really fun. Go make this and let me know how it came out.
    Ingredients
    • 4 sausages sliced in two and then halved. I used sweet italian sausage from our local butcher, but most any sausage you like will work.
    • 1 cup of flour – all purpose works fine, but use what you’ve got.
    • 1 tablespoon coarse salt
    • Herbs of your choice, rosemary, chives, oregano, tarragon, whatever you have and like, chopped coarsely
    • 1 cup milk
    • 3 eggs – i’m a big fan of local eggs, so try to get some, help out your local farmers.
    • 2 – 3 tablespoons of good mustard, brown, spicy, deli – whatever you like.
    • 1 cup grated sharp cheddar cheese
    Instructions
    1. Fire: This recipe takes about a chimney starter full of charcoal. we used about 10 charcoal briquettes on the bottom of the cast iron to start the cooking. if you are cooking this in a fireplace or campfire, be careful not to get the dutch oven too hot.
    2. Take the sausages that have been cut in half and then sliced open lengthways and put them in the dutch oven to brown.
    3. While the sausaged are browning, take the other charcoal or wood coals and pile some on the lid of the dutch oven to preheat it.
    4. Beat the 3 eggs together, then to it the flour and salt and milk and herbs.
    5. When the sausages are browned on both sides, pour the egg batter mixture into the dutch oven and cover.
    6. Place more coals on top of the dutch oven and bake for 30 minutes. If it smells like it is burning, open the cover and check. you may have to move the dutch oven to a cooler part of the fire, or remove some briquettes.
    7. The dish is done when the batter is yellow with brown patches, you will know when its done. It will smell great.
    Notes
    Use a chimney starter to start the charcoal briquettes. You can also use chunk charcoal, but the square ones are easier.