Tag: @gardenforktv

  • DIY: Fixing a Balky HOME button on an iOS device

    DIY: Fixing a Balky HOME button on an iOS device

    Well, actually a “work around.”

    For some weeks the black HOME button at the bottom of the screen on my iPad 2 has been…let’s say moody, uncooperative. In a word “balky.” Like me, it only works when it wants to and is unpredictable in its work ethic, also like me.

    I’d done some research on the interwebs and found this to be a common complaint without a real cure. Some think the problem is actually software related. Some think it’s mechanical. I’ve tried all the simple suggestions I could find about “resetting” the software.

    Most of these suggestions were simple and middle-of-the-road. One was more occult than anything else.

    “Take your iPad out of it’s case or cover. Rotate your iPad into the Landscape orientation with the HOME button to the right. Rotate your device to the Portrait orientation with the HOME button on the bottom. Immediately put your iPad backdown on a cold, hard, flat surface and leave it over night.”

    Well that didn’t work.

    I did think about having the mechanical Home button replaced, but I’d read that because of the way the iPad is constructed, there was a good chance of damage. Everyone guaranteed their button and their work, but NOBODY guaranteed the damage putting the new button in.

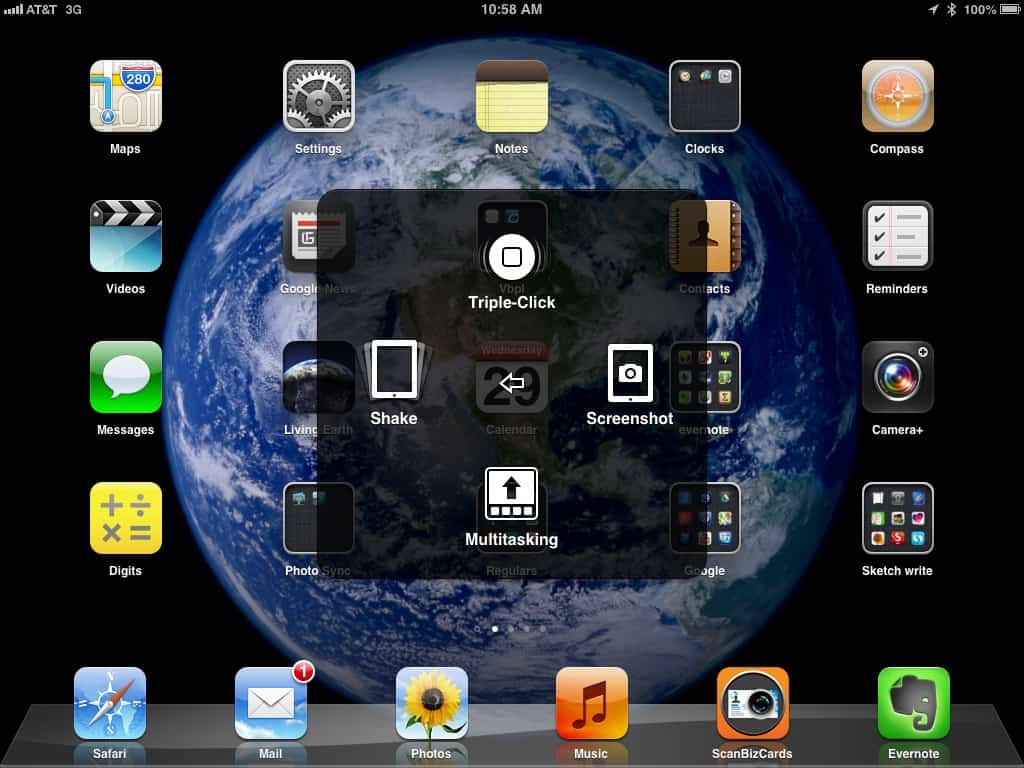
    However, I discovered that in the later iOS upgrades there is a HOME button in accessibility options that will float on your screen and do all kinds of nifty things.

    The “soft” HOME button is small, semi-transparent, and dragable to any place on your screen.

    When activated, it pops up with this MENU:

    from here the soft HOME button accepts 1, 2 or 3 taps, just like the mechanical HOME button. “Gestures” is for recording your own unique gestures and relating them to apps or other events. “Favorites” is where your gestures are stored. Under “Device” is this MENU:

    And under “More” is this Menu:

    “Multitasking” is for quickly switching between apps.
    Activating the soft HOME button does not disable input from the mechanical HOME button, so there’s no reason not to have it on your desktop and ready to use if your iDevice stops answering input from the mechanical HOME button.

    Here are the steps for activating the soft HOME button:


  • Easy Native Pollinators

    Easy Native Pollinators

    Just a short “bonus” video from Rick this morning on Easy Native Pollinators. He’s been guarding his dill and fennel patches in the front yard from the Perfectionistas’ in the neighborhood (and inside his own house) all season long. The result is this somewhat seedy but extremely prolific butterfly habitat, a Motel 6 for Monarch Butterflies headed for Mexico in successive waves new hatchlings.

    Rick also covers up his innate laziness in not getting a spring garden planted in a side bed by showing off his stand of Buckwheat. It grew from seed to super pollinator attractor in less than 3
    weeks.

  • DIY Grow Light PDQ

    DIY Grow Light PDQ

    We don’t have a lot of space at Casa Cairn, so we have to make a lot of stuff do double duty. And why not? Most of our stuff is really used very infrequently. I’ll bet it’s pretty much the same at your house.

    Today we’ll take a two bulb florescent light from the garage and press it into it’s twice a year role as a grow light. Note that you don’t have to buy special –and expensive– grow bulbs, but your light should have two florescent bulbs, one in the Daylight or Cool spectrum (toward blue around 6,000 K) and one in the Warm end of the spectrum (toward red, around 2,500 K). Many door growers are using red and blue LED lamps, but those are expensive (although cheaper to run than fluorescents) for a home project.

    Here’s your materials list:

    • 16 ft of 2″ x 2″ lumber. The longest piece needs to be about 4’6″ long (about 3 inches longer than your fluorescent fixture). The uprights need to be equal length, around 3 foot long or so. The feet should be at least 1 foot long. As I note in the video, the controlling issue for the uprights is usually your ceiling fan.
    • 4 – plywood triangles, about 8″ on each side. Cut up some scrap.
    • 2 – screw in hooks to hold the light
    • A fist full of wood screws, about 1″ long.
    • 2 – cleats or some way to secure the light and keep it from crashing down on your seedlings
    • 1 – 24-hr timer. You light should be on for 18 hours off for 6 hours. If plants don’t get rest, they can’t generate the hormones and enzymes they need to grow.
    • a length of line so that you can raise and lower the light. Note: the closer you put your light to the plants, the less “leggy” they will grow.

    This video was edited, including voiceover, on my iPad. Not quite as smooth a job editing as I’d like, but power was out for much of the project.