Tag: how-to

  • Hook Up A Generator To Your House – GF Video

    Hook Up A Generator To Your House – GF Video

    Learn how to hook up a generator your house electric panel safely in this video. We run our house with a portable generator and transfer switch when the power goes out, and here we’ll show you how to safely connect a generator to your circuit breaker panel. Watch this video, and read through the text below for more information.

    Learn more about installing a generator transfer panel here and how to buy a portable generator here.

    AND, watch this video about installing a generator interlock, which is another option for hooking up a generator to your house. It is a simpler option, if an interlock is available for your particular breaker panel.

    IMPORTANT:
    Do not run a generator in your basement or your garage. Gas engines create carbon monoxide, which will kill you. OK?

    This is part of a series of emergency preparedness videos and articles we are writing.

    To Hook Up A Generator, The Nuts and Bolts:

    Using a portable generator is an affordable way to power the house during a power outage. You can install one of those large generators that sit on cement slab with an automatic transfer switch, but we opted for the less expensive portable generator and a manual transfer switch. I installed the transfer switch myself, but you must follow local electrical codes, and if you are the least bit hesitant, or are not experienced in working on electrical panels, please call a qualified installer.

    Hook Up A Generator
    This 6500 watt generator runs everything we need in our house

    Before you go off an buy a portable generator, stop, breathe, and do some math. Generators are rated in watts. You need to know how many watts or amps all your electric powered stuff uses.

    To determine how many watts of generator power you need, figure out what appliances in the house you want to power with a generator. Each appliance will list on a label somewhere how many watts or amps the appliance uses.

    Use the formula if the appliance is rated in amps:

    Watts = Volts x Amps

    This will help figure out how many watts you need to power your home. And it will give you a good idea of how large a generator you need to buy. Most portable generators are rated by how many watts they generate.

    Go around and total up how many watts your fridge uses, the freezer down in the basement, the large TV, the well pump, the sump pump. Think about all the big things that draw power in your house. (Not the Telsa, ok?)

    Fridge 750 watts
    HDTV 195 watts
    Chest Freezer 200 watts
    Furnace 400 watts
    Microwave ?
    Toaster ?

    At its most basic, that total wattage number tells you how powerful a generator you need. Keep in mind most of these appliances will not be running all at the same time. Well pumps turn on for maybe a few minutes, furnaces run longer.

    Light bulb usage is not worth calculating, I think, especially if you use LED bulbs. The power drawn is minimal.

    After 12 years of regular winter power outages, I have found that I never use the full wattage of the generator I bought. If I had to do it again, I would have bought a smaller portable generator. The meters on my transfer panel barely move when powering most of my house. Something to keep in mind.

    The only caveat to under sizing a generator is: with my generator, you can tell when the well pump turns on. The generator engine is definitely under load when the water is pumped. Check with your well pump installer for how many amps the well pump needs to run, that is real important. You don’t want to risk burning out your well pump with an undersized generator.

    That being said, my friend has a 5k watt generator, and it runs his well pump just fine. But just check how many amps your well pump draws, OK?

    If you have a whole house air conditioner, read this post about will a portable generator run whole house AC.

    Figure out what circuit breakers control all the things you want to supply power to in a power outage. You will need to buy a manual transfer switch that has that many breakers. Here is one brand I like to use. (affiliate link)

    And of course,

    A couple of other things I have learned:

    If your generator won’t start after sitting for a long time, its time to watch our replace the carburetor video

    Listen to me on our podcast, GardenFork Radio, talk about how to hook up generator to a house.

    Let us know below your experiences and thoughts on generators and emergency preparedness, how do you prepare for winter storms?

  • Custom DIY Dishwasher Install Into Existing Cabinets

    Custom DIY Dishwasher Install Into Existing Cabinets

    I did this custom DIY dishwasher installation so it fit into existing cabinets at a friend’s apartment. There wasn’t a space for a dishwasher in the kitchen and we made a space in a creative way. Maybe we’ll call it an unusual way, actually. If you’d like to see how to connect the electric, water, and drain lines, see my video on how to hook up a dishwasher.

    In small kitchens, I often see those narrow dishwashers that you don’t see in most homes. They are common in apartments, and might be good for a tiny house too. Our plan here was to remove one of the cabinets and slide in a small dishwasher.

    Custom DIY Dishwasher Installation
    Before the DIY installation

    I call this a custom DIY dishwasher installation is because it wasn’t as simple as removing a kitchen cabinet and sliding in a dishwasher. I had to install a dishwasher into existing kitchen cabinets. The cabinet under the sink was one unit, so I had to be creative in figuring out how to make space for the dishwasher.

    I did this by cutting off about 1/3 of the base cabinet. This isn’t your usual install, it was a challenge, but it was fun. Key here was cutting real straight lines, not the easiest thing to do on site. But we did pretty good

    cutting apart kitchen cabinet

    I removed the left cabinet door, pulled off the counter and sink. This involved shutting off the water in the kitchen, disconnecting the drain pipe, and the water lines going to the sink. This is always an adventure when climbing under a sink. The shut off valves don’t always work, and once you turn them, they can break. Then you are toast.

    Thankfully the shut off valves were fairly new, so turn them off and then don’t look at them.

    I cut the lateral supports where we were to slide in the dishwasher, and moved the side of the sink cabinet unit to the right. Basically shortening the width of the sink unit. Some brackets and screws put the cabinet back together.

    Kitchen sink removed from cabinets

    The tricky part was then I moved the left side wall of the sink unit, I had to make sure the hinges on that wall were level with the hinges they were across from. Somehow this all came together fairly easily. Sometimes I am lucky. Sometimes I am toast. Today no toast.

    kitchen cabinet disassembly

    I slid in the dishwasher, remembering to slide in the feed and drain hoses beforehand, as well as the power cord. There was an outlet behind the stove, so we were good there.

    link to dishwasher videokitchen counter with dishwasher

    My friend was very happy, and it was fun to do. What do you think?

    installation of dishwasher into small kitchen

    DIY Dishwasher Installation
  • DIY Storage Racks For Basment or Garage – GF Video

    DIY Storage Racks For Basment or Garage – GF Video

    Build these DIY Storage Racks to store long stuff in your basement or garage using recycled lumber. These storage racks are good for long things, like lumber, kayaks, poles, canoes, etc.

    I had some 2″x3″ lumber left over from a project, and I didn’t want to throw it away, so this recycled lumber became these cool DIY storage racks to hold lumber. What’s nice about this is you don’t need long pieces of lumber to make this happen, each piece of the brackets aren’t that long. You can adjust this design to the lengths of lumber you have.

    DIY storage racks

    I used 2 1/1″ coarse drywall screws to put this together and to secure it to the wall. I have a few favorite tools, and one of them is the Flip Bit, which is a screw bit and a drill bit in one piece that makes drilling pilot holes and screwing stuff together go real fast. I used 3 screws in each bracket to attach it to the wall. This DIY storage rack will hold quite a bit of weight, if you plan on something very heavy, switch out the drywall screws for wood screws, which have more lateral strength.

    DIY storage racks

    I use a laser stud finder to locate the studs in the drywall. If you are going to set these brackets into brick or cement, use a hammer drill and masonry bits. The cheaper stud finders don’t work, I think. You get what you pay for when buying these. The good ones last and will save you time in future DIY projects.

    DIY storage racks

    As a bonus, I had some metal shelf brackets laying around, and I screwed them to the bottom of the rig and hung my ladders. So I was pleased at what a space saver these DIY brackets are, one step further in my declutter project! Its great to get stuff up off the floor. Makes it much easier to clean and move around.


  • Squirrel Proof Birdhouse How To – DIY Project

    Squirrel Proof Birdhouse How To – DIY Project

    Have big holes in a birdhouse? Here’s how to make a squirrel proof birdhouse or repair an existing one. Early spring means its time for birdhouse repair in our yard. The yard is dotted with birdhouses made from our how to make a birdhouse video, and some of them have had squirrels chew open the entrances. Here’s how to make a damaged birdhouse squirrel proof and build new ones that will thwart squirrels. Its pretty simple.

    squirrel proof birdhouse

    Squirrels like birdhouses for the same reasons birds do, they are nice dry places to raise young, and squirrels need a winter home as well. The problem with wood birdhouses is squirrels can easily chew open the entrances. Most of my birdhouses are built for small birds like chickadees, and one would think a squirrel would realize that birdhouse is too small, but they rip open the entrance anyway. See our easy birdhouse plans video here.

    Once it has a big hole, birds don’t like it, as the large hole makes it easy for predators to rob their nest.

    I’ve seen a number of squirrel proof birdhouse solutions, this one I’ve adopted is the simplest, and works well in my yard.

    Pick up a roll of thin metal flashing in the roofing department of your hardware store. Our store sells a roll that is painted brown on one side, white on the other. This is great, as the brown blends in with the wood tone of the birdhouse. You can also use scrap sheet metal you have in the shop – use what you got – but the thinner flashing is easier to deal with. This stuff is handy to have on hand for all sorts of repairs.

    exhaust-pipe-repair-hack-diy-play

    You can use it for a DIY exhaust or muffler repair.


    You will drill a hole in the metal flashing that is the same diameter as the entrance of the birdhouse. I use a hole saw, which is an add name for a drill bit, but it is what it is. Pick up a hole saw kit here,  they are handy to have. Don’t use a spade bit on metal, you will ruin the bit. If doing a repair, the hole diameter should also match the original hole, you can find a link to birdhouse plans and proper hole diameters here.

    squirrel proof birdhouse

    I used small brad nails to attach the metal to the birdhouse, the flashing is thin enough to nail through. If you are  using sheet metal, you’ll need to drill some holes for the nails or screws.

    Be careful when handling metal, it can cut you, and wear safety goggles when drilling the hole.

    squirrel proof birdhouse

    birdhouse-plans-video

  • Cook With A Pressure Cooker – GF Video

    Cook With A Pressure Cooker – GF Video

    Learn how to cook with a pressure cooker in this GardenFork Cooks video. I cook recipes with a pressure cooker all time in the kitchen. Its perfect for last minute meals where you decide you want beans, but forgot to cook them ahead of time. People claim you can cook foods in 5 minutes, which isn’t exactly true, but its a great kitchen tool.

    One of my favorites is our how to cook with a pressure cooker pork roast recipe video. Its very  popular because its so darn easy. And it makes you look like a genius when you have people over for dinner. Put in the pork, add beans if you like, some seasonings, maybe  you did a dry rub to the pork before hand, and cook.

    Tips when you cook with a pressure cooker:

    • Pay attention to how much liquid you add. Your cooker should have a mark inside the rim showing the maximum liquid level. Don’t go over that. The liquid could expand too much and clog the relief valve.
    • Be sure the gasket and lid are clean after each use, you don’t want any food debris to compromise the seal.
    • Read the directions that come with the cooker. You don’t usually read these, I know, but its important here, OK?
    • If steam coming out of the pressure cooker is louder than a low hiss, turn down the heat.
    • Most pressure cookers have a high pressure and low pressure setting, check the recipe to see which setting you should use.

    Some people  have a fear of cookers, which is understandable, but they are super safe. Modern day cookers have numerous relief systems in place, so cook on.

    I wrote about how to buy a pressure cooker here. I own two cookers, and based this on my experience and what some of the leading food publications recommend.

    Two of my favorite pressure cooker cookbooks are the Cooking Under Pressure series by Lorna Sass, they have great charts in them, plus recipes.

    cook with a pressure cooker

    Watch all our pressure cooker recipe videos here.

  • Broken Lawnmower Wheel Repair : GF Video

    Broken Lawnmower Wheel Repair : GF Video

    Fix a broken lawnmower wheel: watch our lawn mower repair how to video and get back to mowing you grass. The tire on our mower broke, here’s how to fix it.

    When the lawnmower broke, the camera operator, who happens to love mowing the lawn, thought we needed to buy a new mower! No, for about $10, we fixed our grass cutting machine, and the camera operator is now out cutting the grass before dinner. Not a bad deal for me…

    The lawnmower wheel repair was not difficult. All you need is a metric or standard wrench, depending on the make of the machine. An adjustable wrench will work as well, but the correct size wrench is better. Pay attention to how the tire is attached to the mower, remove the nut holding it to the threaded axle, along with any washers that may be with it. Take a picture with your cell phone as you disassemble the nut and tire unit, it will help with putting the whole thing back together.

    Take the tire to your local hardware store to match it to a replacement. Our wheel was an 8″ diameter, which seems pretty standard for push mowers.

    Lawnmower wheel

    Bring back the new one and slide it on. There may be a metal or plastic bushing inside the wheel so the tire can fit on different diameter axles. Secret tip: use some anti-seize paste on the axle threads before attaching the wheel. If you ever have to remove the wheel again, this will make the job much easier.

    Get a neat set of wrenches here.  (Affiliate link)

    And there you go. Job done, now how to convince your significant other that mowing the lawn is exercise?

    We have a how-to video on how to tune up a lawmower here,  and And a how-to video on how to sharpen the blades of a lawn mower .

  • Easy Window Install & Using Spray Foam

    Easy Window Install & Using Spray Foam

    I helped a friend install replacement windows today. The original windows were double hung sash weight windows, quite old. Wanted to show you a few things about how to install replacement windows. To install new windows, you first have to remove the old ones. This is not hard.

    We will be using the frame of the original window. The replacement windows slide inside the existing frame. Most replacement windows need to be custom ordered. Its important to measure each window, as they are all slightly different.

    easy-window-install-using-spray-foam-4
    Old window removed

    To ready the window frame for the new window, you remove the trim from the inside, and the bottom window will tip out easily. There is a thin wooden strip between the upper and lower windows, and once that is removed, the upper window comes out. You may have to disconnect the sash weights, though the sash weight cord is usually broken already. The windows may need to be lowered or raised a few inches to get past the sash weight pulley.

    easy-window-install-using-spray-foam-5

    The replacement window then slides into the existing window frame.

    Now the fun part: Spray Foam.

    Its probably the insulation obsessive in me, but I love to use spray foam. For these windows, we had to insulate a lot of cavities around the original windows, so this called for a lot of spray foam!

    There are several kinds of spray foam, different kinds expand at different rates, and some cans of foam can be used more than once. Some cans, once you start foaming, you can’t stop, or the foam hardens in the spray tube. Others you can clean out the spray tube and use it again later.

    Cavity Filler and Door Foam
    Cavity Filler and Door Foam

    The two main kinds of spray foam for our purposes is cavity filling “Big Gap Filler” and minimally expanding “Door & Jamb Foam” . The names are pretty self explanatory. You may not realize it, but the cavity filler type foam, if used when sealing a door or window, can warp the wood door frame. For doors and windows, we use the minimally expanding foam to fill in the gaps. For big open spaces, we use the big foaming stuff.

    Most spray foam cans have to be held upside down when using, if you don’t, all the propellant leaks out, leaving the foam in the bottom of the can. It can be helpful to have an additional stray handy when you have to work up close to a ceiling, the additional straw allows you still tilt the can yet get the foam where you need it.

    Cavity Filler Foam on the bottom, and Door & Jamb foam on top
    Cavity Filler Foam on the bottom, and Door & Jamb foam on top

    Most important is to wear gloves and clothes you don’t care about. You will get foam on your clothes, and it doesn’t come off. I have ruined a lot of clothing with spray foam. I invented the trash bag work smock for impromptu spray foam jobs.

    Trash Bag as spray foam application uniform
    Trash Bag as spray foam application uniform

    What do you use spray foam for? Let us know below:

  • Toilet Repair how to replace a broken toilet flange

    Toilet Repair how to replace a broken toilet flange

    Is your toilet wobbly? Learn here how to replace a broken toilet flange. If your toilet wobbles and is not solid on the ground, it could be that the toilet flange is rotted or broken. fun. Let’s see how to repair the toilet.

    You can fix this. I did. And if you follow our how-to toilet repair photos here, you’ll be a DIY home repair expert, or at least you’ll be able to replace a broken toilet flange.

    Toilet-Repair-how-to-replace-a-broken-flange
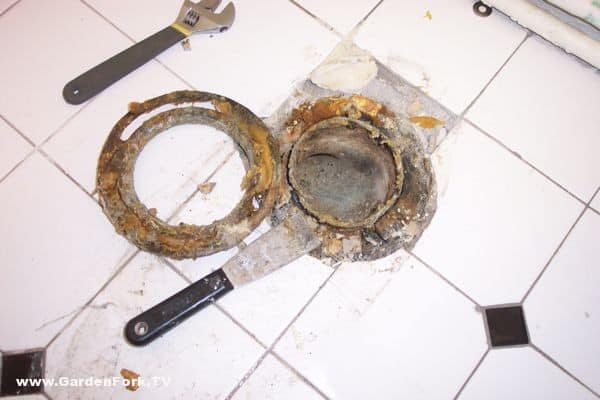
    Rusted toilet flange, this one separated completely from the waste line.

    watch DIY videos insert

    First remove the toilet. Turn off the water line, flush the toilet, and remove the water line from the bottom of the toilet tank. Have bucket handy, as water will come out of the tank. Sponge out as much water from the tank and bowl as you can. A handyman trick is to use a wet dry shop vac to suck all the water out of the bowl and tank.

    Toilet-Repair-how-to-replace-a-broken-flange-2

    Remove the nuts on each side of the base of the toilet. These nuts-bolts attach the toilet to the flange. You may have to use a saw to cut the nuts off, which is ok, because you are going to put in new toilet bolts and nuts. The flange, when brand new, is attached to the waste pipe. Many times it rusts or snaps off. Tilt the toilet on its side and move out of the way. Have a helper assist you in moving the toilet, they are heavy and bulky.

    Toilet-Repair-how-to-replace-a-broken-flange-4

    Use a putty knife to remove the wax ring residue from the exposed flange and inspect the flange and surrounding area. What is key here is if the wood subfloor is rotted. If this is the case, you will have to cut out the surrounding subfloor and replace it with new plywood, then fix the flange.

    Thankfully on this home improvement project, the subfloor was fine, just the flange fell apart. Go to your hardware store and buy a Super Ring Replacement Toilet Ring. There are several models by different suppliers, don’t buy the cheapest one, its your toilet, remember…
    Also at the hardware store buy new toilet mounting bolts, they usually come in a package with the nuts and washers.

    use wax from the wax ring to get them to stand up straight
    use wax from the wax ring to get them to stand up straight

    Put the toilet mounting bolts in the flange pointing up, and use some wax from the old wax ring to hold them in place. Place the super ring replacement toilet ring over the waste line, making sure the mounting bolts are in the same place as the original bolts were,  one bolt on each side of the flange.

    Screw the new flange into the subfloor. You may have to use a hammer drill to drill through existing tile flooring or cement substrate. Set the new toilet wax ring onto the flange on the base of the toilet, and guide the toilet back onto the super ring, making sure the toilet mounting bolts are lined up with the mount holes in the toilet base. The super ring toilet ring allows for you to adjust the location of the bolts.

    Toilet-Repair-how-to-replace-a-broken-flange-6

    Press down on the toilet to seat the wax ring, wiggle the toilet back and forth to get it to set down and seal. Cut off the the bolts about 1/2″ above the toilet base. Spin on the mounting bolt nuts, and tighten them, but be careful not to over-tighten, as you will crack the porcelain toilet.

    Toilet-Repair-how-to-replace-a-broken-flange-7

    Re-attach the water supply line, turn on the water valve, flush the toilet and check for leaks.

    diy videos play

    Watch More DIY Videos Here.

    So there you go, not as complicated as you thought. The biggest red flag is if the subfloor is rotted, because then your simple home improvement project has become a much bigger deal.

  • Garden Hose Repair Video  GF TV

    Garden Hose Repair Video GF TV

    Broken Garden Hose? Learn how to fix your leaking garden hose in this Fix a broken hose video. We’ve run over the garden hose with a lawnmower a few times, and instead of throwing out the hose, we fix the leak in the hose, or the cut off end of the hose with a few repair parts from the hardware store. A few things to keep in mind with garden hose repair, don’t buy cheap repair parts or hose washers, you get what you pay for in most of the world , and this applies in the garden hose fix it department too.

    Rubber or flexible washers go between your hose and the spray attachments, and keep the water from leaking out the hose. You might try buying a few different kinds of hose washers, as i’ve found some garden hose attachments don’t work with the thicker hose washers. And buy a bunch of them, you’ll save yourself time later when you need them. Hang them near the hose storage hooks or on the wall of your workshop so you can find them quickly. Put them in a drawer and they are lost.

    I’ve found a number of hoses in the neighbor’s trash that were easily fixed with a garden hose repair kit, and I saved a bunch of money and kept a fine watering hose out of the landfill.

    What do you do to repair your hoses? let us know below:

  • Spilled Paint Cleanup!

    Spilled Paint Cleanup!

    “Eric come here quick!”

    Not the phrase you want to hear on a paint job.

    It doesn’t happen often, but this is what you prepare for, the unexpected. The one time you don’t prepare is when it will happen.

    When painting rooms, I am obsessive about covering every square inch of floor with either paint tarps or red rosin contractor paper. It pays off in a number of ways, we spend almost no time cleaning paint roller splatter off the floor, any plaster or sheetrock repair dust is easily cleaned up, and if one of us happens to step into a drop of paint that has happened onto a tarp, we don’t get even more paint on the floor from walking all over with paint on our shoes. The tarps soak up the paint from the sole of the shoe.

    Painting a brownstone last week one of the crew accidentally kicked over a gallon of paint, but because we had laid down heavy duty muslin paint tarps, the clean up was easy.

    when painting, use a tarp!

    We first scoop up as much paint as we can and put it back into a paint can. You might need to strain that paint if it has sanding debris in it picked up from the tarp. We roll the tarp up into itself and take it outside. We then sop up the rest with paper towels, and lay out the tarp to dry. Latex paint will dry slowly when its thick, but after it dries, you can use the tarp again.

    If you are painting more than one room, consider buying muslin tarps instead of plastic tarps. Plastic is slippery to walk on, muslin paint tarps are much better and last for years. Be sure to write your name on your tarps, your friends will borrow them, and its a subtle way of reminding your friends whose tarps they are.

    What are your paint catastrophes? tell us below

  • Chainsaw Wont Start – Chain Saw Repair : GF Video

    Chainsaw Wont Start – Chain Saw Repair : GF Video

    Chainsaw wont start? Wondering how to fix a chainsaw and the chainsaw to start? Watch our how to fix a chainsaw video and you will be on your way. Chainsaw repair is not hard, and if you’re ready to go out in the yard and cut down some trees, your chainsaw has probably been sitting in the shop all winter. Follow these simple chainsaw tune up steps, and you will have your chainsaw running in a few minutes.

    We have to talk about chainsaw safety here as well. Chainsaws are the most dangerous tool a homeowner can own without a license. I have a few friends with scars from using chainsaws improperly. Chainsaw chaps, a helmet, face shield, eye protection, steel toed boots are all mush-haves for safety.

    Sharp chainsaw chains is key in cutting up trees and cutting firewood, you can sharpen your own chainsaw chains, but I suggest you have them done at your local small engine repair shop, they have the right equipment to set the correct cutting angle, a hand file can’t do that.

    There’s more tree felling in my future, we have a few white pines on our property that need to come down, lest they come down on our house or garage, one of them is already splitting down the trunk, so we need to deal with that one soon.

     Watch all our how to cut down a tree chainsaw videos here

  • Squash Vine Borer Treament Prevention #1 : GF Video

    Squash Vine Borer Treament Prevention #1 : GF Video

    Squash Vine Borer eating your squash, pumpkin, and zucchini plants every year? Squash plants dying? Here’s how to prevent squash vine borers from eating your squash plants. The borer is the caterpillar of the Melittia cucurbitae moth. The moth lays eggs at the base of young squash plants, both winter squash, summer squash, and pumpkins and the eggs hatch and the caterpillar burrows into the stem of the squash plant, eating the plant from the inside out.

    How To Prevent & Protect Squash Plants with our how to video:

    There are several ways to prevent the squash vine borer from destroying your plants, I’ve heard about wrapping the stem in foil or pantyhose to confuse the moth, or placing a square of aluminum foil around the base of the young plant is said to confuse the moth. I have also seen larvae enter the squash plant farther up the stem, so using foil or stockings may or may not work. There are also commercial sprays to deter the moth.

    Borer Prevention

    Our borer prevention method we learned from our neighbor Priscilla, who can be heard on these GardenFork Radio episodes on growing heirloom tomatoes. The one good thing about Squash Vine Borers is they have only one egg cycle, so once you get your plants past the egg laying time of the moth, you can relax about your squash plants drying from squash vine borers.

    You can buy floating row fabric from Fedco Seeds Growing Supplies here.

    Check out our gardening how-to video on how to prevent Squash Vine Borers from ruining your squash plants. Let us know how you keep the borers from killing your squash plants below:

    squash-vine-borer-treatment-3
    Squash Vine Borer Treatment method #2 Extraction

    squash-vine-borer-treatment-play
    Squash Vine Borer Treatment #3 using Bt

  • How to make homemade pasta GF TV Video

    How to make homemade pasta GF TV Video

    Home made pasta, aka fresh pasta, we show you how to make a home made pasta recipe in the GF cooking video. Pasta from scratch is not hard, there’s just a few steps to get it right. Homemade pasta tastes different from store bought pasta, and when you make it yourself, there are infinite variations possible. neat.

    There’s a good chance you have a pasta machine in the basement, an xmas gift from a while back that you never got to, so you’ve got the equipment. If you don’t have a pasta machine, check out these pasta machines
    or the links at the bottom of this article.

    My technique for making home made pasta is based on a method Jamie Oliver shows us in his book, Cook with Jamie: My Guide to Making You a Better Cook
    – a book I really like, BTW.

    Home Made Pasta Recipe  ©2012 Eric Rochow

    100 Grams all purpose or Italian “OO” flour

    1 egg

    For homemade pasta, you can use either all purpose flour or an italian flour labeled “OO”, i believe its a finer grind flour, but if you can’t find it, all purpose flour works fine.

    The ratio that I’ve found works best is 100 grams of flour to 1 egg. If you are making fresh pasta for 4 people, I’ve found 300 grams of flour and 3 eggs works well.

    Put the flour and eggs in a food processor, and pulse until the flour comes together and looks like small pebbles.

    Dump the pasta dough mixture onto a floured board, and collect the flour into a ball.

    Now knead the dough by stretching the dough out and folding it over on itself. Its best to watch our how to video to see this. Knead for 5-8 minutes

    The dough is kneaded when you press your finger lightly into the dough and the dough fills out the dimple you’ve made again, the dough bounces back.

    Shape the dough into a rectangle, wrap in plastic wrap, and put in the fridge for at least 30 minutes, longer is better.

    Take the dough out of the fridge and cut into square pieces about 3″ x 3″,  3/4″ thick. how many pieces you will have depends on how much flour and eggs you mixed together.

    Take one of the dough squares and run it through your pasta machine at its widest width. Fold the dough back over on itself in thirds, like folding a letter into an envelope.

    You will now run the dough through each width setting on the machine, holding the dough so the folds are on the sides. You may need to flour the dough when rolling it through the machine to keep it from sticking.

    After you have run the dough through the machine at its smallest width, take the dough and fold it back on itself until it is about 4″ wide or so, you want a width that is small enough so you can run the dough through the machine again.

    Run the dough the machine again, starting at the widest width and progressing through to the narrowest setting. Note: some machines  have a real narrow final width, you may not want to get the dough that thin, it depends on what kind of pasta you want to make, and how thick you want it to be.

    You can cut the dough in half if it gets too difficult to work with. And you can flour the dough as needed.


    You are now ready to run the pasta dough through the die cutters to make various kinds of pasta, or you can hand cut it on a board, or you can make ravioli with the dough. I’ve found it works best to let the pasta dough rest under a towel for 10 minutes or longer before running it through the pasta cutters, you may need to flour the dough again, you want it quite dry.

    The flour you use for dusting can be whole wheat or semolina or just regular flour. I’ve used whole wheat thinking it gives a bit of a nutty taste to the pasta, but maybe i’m just fooling myself.

    Once you cut your pasta, you can drop it into boiling water or let it dry on a dowel or broomstick set between two chairs. Fresh pasta can take 3 minutes to cook, or 8 minutes, it all depends, you’ll have to keep an eye on it.

  • Home Made Pizza Oven Photos from John

    Home Made Pizza Oven Photos from John

    After watching our brick oven pizza video, John in Arizona sent us these photos of his DIY brick oven. Much like our brick oven design, it uses brick and angle iron. I forgot to ask John where he got his angle iron from. I like that the brick oven fits nicely right next to his propane grill, right off the patio, all set for cooking.

    “My wife and I love your show. We put this together and wanted you and your wife to see it”

    Cool! This is the second set of pictures I’ve got from a viewer. A big thank you to John for sending these. love it. See the link at the bottom of this post for links to other pizza and bread oven photos.

    home made brick pizza ovenJohn tried out his oven with a pizza stone, and I’ve talked with a few people who have tried this method, its much better to just slide the pizza right onto the hot bricks. The bricks are about 700F, so its pretty sterile. And bricks are made out of clay, which is what pottery is made out of, so i’m thinking its pretty safe to do.

    home made brick pizza oven

    brick pizza oven with pizza baking in it

    pizza oven

    brick pizza oven videoMore Pizza Oven Plan Photos Here
    Love that roaring fire in the photo there, and the pizzas have a smokey hint to them when using wood. Do you have a backyard oven? send us photos or a link to your site, thanks!

  • Homemade Brick Pizza Oven Video

    Homemade Brick Pizza Oven Video

    Build this homemade brick pizza oven in your backyard with recycled used clay bricks and a recycled metal mattress frame. And the pizza oven is portable! You can assemble this in 20 minutes, make homemade pizzas, then take it apart and store it. Most backyard pizza ovens are big and permanent, this homemade brick oven is great because its easy to break down again until your next pizza baking party.Here are the pizza oven plans shown in photos, our oven uses used clay brick and 24″ angle iron we cut from a old bed frame. You have to heat up the oven for an hour to get it up to temperature. The brick pizza oven has to be on sturdy sawhorses or cement blocks. We used cement tile board to insulate the plywood table from the heat of the brick oven. Stuart, author of the Bread Oven book, emailed us, cautioning that he felt the 2 layers of cement tile board was not enough insulation to keep the plywood from scorching, he suggests a base of cement, as shown on his blog here.

    Clean the bricks that will be used for the floor of the oven, that’s where your pizza dough will be sitting. We didn’t have a thermometer, but I’m told the floor of the brick oven can reach 700F. We also found its good to keep some of the coals in the front part of the oven, so the heat is more even. We had to turn the pizza once during baking to have it cook evenly.

    I have a few ideas for more modifications, which we will post later on. Keep children and animals away from this and all fires, this is for adults.

    base of pizza oven
    building walls of pizza oven
    pizza oven roof using angle iron
    Backyard Brick Pizza Oven

    brick pizza oven videoMore Pizza Oven Plan Photos Here

    diy-pizza-ovenWatch all of our  pizza oven and pizza dough recipes here

    Our backyard pizza oven is based on one in the book Bread , Earth, & Fire by Stuart Silverstein. Stuart’s book has a bunch of plans and info on building backyard ovens, go buy it here. it is available as an ebook or paperback. Read Stuart’s blog here.

  • Christmas Sugar Cookie Recipe Video GF.TV

    Christmas Sugar Cookie Recipe Video GF.TV

    Sugar cookies are an easy christmas cookie recipe, even I can make these holiday cookies, maybe. Watch here and learn how to make sugar cookies for Christmas and the holidays.

    Universal Sugar Cookie Recipe

    This sugar cookie recipe is based on one Chris Kimball wrote about, saying its the universal recipe used by almost every baker.

    1/2 cup white sugar

    1 stick butter ( 1/2 cup ) slightly softened, but not mushy.

    1 egg

    1 1/2 cups flour

    1/4 teaspoon baking soda

    1/4 teaspoon coarse salt

    dash of vanilla

    optionals:

    chopped walnut, espresso powder, cocoa powder, almonds, etc.

    Preheat oven to 375F

    Put the stick of butter and the sugar in your food processor. You can also use an electric mixer, but I don’t have one right now, so the food processor works well for me.

    Turn the food processor on to medium speed to mix the sugar and butter together, then add the 1 egg and vanilla, mix it in. The mixture should be lumpy, not super smooth.

    Mix together all the dry ingredients – flour, baking soda, salt, – and then add these to the food processor butter mixture.

    Run the food processor until the mixture starts to form into a ball.

    Turn our the dough onto a floured board and divide the dough into two equal pieces.

    Roll each piece of dough into a log shape about 1 1/2 inches in diameter.

    Wrap these dough logs in plastic wrap and put in the fridge for one hour.

    Using knife or pastry blade, slice off 1/4″ thick circles from the dough logs, place on cookies sheets with parchment paper.

    Bake at 375F for about 8 minutes. you want the edges to be starting to brown, but not dark.

    Cool on a wire rack and eat as soon as possible. They taste great when warm.

    What is your sugar cookie recipe, your favorite addition to sugar cookies? Let us know below


  • Rice Cooker Repair – Rick’s Column

    Rice Cooker Repair – Rick’s Column

    Our $10 Wal-Mart B&D rice cooker stopped working last night. I just opened it up and, using a multimeter, found an inline fuse blown.

    I clipped the fuse off and reconnected the wire. I can’t imagine any real harm, since the circuit is gfi protected anyway. Am I missing something? Running a test batch of rice now to see how it turns out.

    BTW: if you’ve always wondered about those center spring mechanisms, they’re pretty simple…and interesting. The center plunger is not charged with electricity (unlike a lot of toasters, which are actually engaging electromagnets when you put the plunger down–hence the futility of slamming the plunger down, it not a mechanical catch of some sort). Inside, the rice cooker there’s a magnet on an arm connected to the front mechanical operating slide, a bit like a toaster–up is warm, down is cook. The weight of the water and rice in the pan hold the plunger down and the magnet sticks to the underside, closing the high heat or cook circuit.

    When enough water boils away, the spring pushes the plunger up, which lifts the pan and breaks contact with the magnet breaking the high heat connection. There’s a separate permanent circuit always connected for “warm” with it’s own little heating element. You have to unplug the whole thing to turn the warming circuit off.

    —-
    the system just “popped” open, turning off the high heat coil. Looks fine, but you always wonder…at least I do. OTOH, a rice cooker isn’t like a crockpot. We’d never leave it running all day. Any ideas? At $10 am I being penny wise and pound foolish?

  • Washing Machine Repair, Water Pump Replace GF Video

    Washing Machine Repair, Water Pump Replace GF Video

    Washing machine repair video to fix a broken water pump. My washer broke, and I made a video of how to replace the water pump on your wash machine. If the washer is not draining, the water pump is probably broken. Water pumps on washing machines are not hard to fix, watch here and i’ll show you how to fix your Kenmore, Maytag, Whirlpool Sears washing machine.

    Front Loading Washing Machine Broke? It happens more often than you think. With several models, a coin can get stuck in the drain pump, and the coin wrecks the impeller. The impeller is the round thing that looks like a airplane propeller, it pushes the water through the machine.

    Washing Machine Repair isn’t always hard

    This repair is usually easy to do. Make sure of the following:

    • The washing machine is turned off and unplugged from the wall
    • The water lines are turned off and disconnected.
    • There is no wet laundry in the machine.

    The washing machine pump, for most washers, is located in the lower part of the machine, and you access it from the bottom panel of the machine. You will tilt the machine on its back and work from the bottom of it. Take cell phone photos as you take the bottom access panel off, and put all the screws in a bowl or container. Keep a bucket handy, as there may be some water in the hoses and pump as you disconnect them.

    Washing Machine Repair
    Washing Machine Pump from a front loading washer.

    Use a pliers to remove the hose clamps, you may also need a screwdriver, pay attention to how the clamps are situated on the hoses, and where each hose goes! You don’t want to cross the hoses, or the washing machine repair you’ve just done wont work.

    There will be a power cord of some sort, this is usually a plug with a locking tang that plugs into the pump. Carefully bend back the tang with a screwdriver and pull off the plug. Pay attention to how the plug came out so you can put the plug back in the right way.

    Let me know how your repair went in the comments below, always good to hear from you: