You’ve probably seen one or three of my mini greenhouse plans videos. The most recent one talks about the complete fail of the plastic cover in the middle of winter. Here are the photos that show my attempt at repair before the complete breakdown of the covering.
My big mistake 4 months prior to the fail was to put screws through the top of the PVC pipes, and then lay plastic sheeting over the screw heads. Who knew that the metal screw head would eventually puncture through the plastic, starting as all holes do, small.
Prior to the small hole caused by the screw, all was good in the mini greenhouse. These rosemary plants had over-wintered well. Not so well after the plastic ripped though.
My attempt at repair was to use packing tape over the screw head and the splitting plastic. I knew it was not a 100% guaranteed repair, as it was cold out when I applied the tape. I don’t think other tape would have worked either. The glue on tape is not cold friendly.
That small hole grew through the winter, with the weight of heavy wet snow, and lots of wind. Then we had even more wind and that caused the complete tearing of the mini greenhouse cover. Darn. It sat for a while before I was ready to walk over and deal with it. Besides, there was still 18″ of snow on the ground. I knew all the plants inside the hoop house were toast.
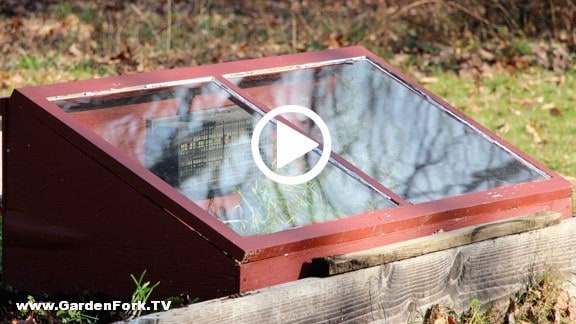
Going forward I will use UV rated greenhouse plastic, I’ve seen some that is reinforced with netting in the plastic. AND I will screw the screws into the PVC starting underneath it, through the wood crossbeam, then into the pipe. If you have some old storm windows on hand, you can make a neat cold frame with them.
In the meantime, check the video where we walk through the fail:
Cold frame gardening can be done in the Northern climes, as we see at the Brooklyn Botanic Garden. We made this winter gardening video at their demonstration garden in December. They were harvesting greens like arugula and mache. Watch the video and see for yourself. Below are some book recommendations for winter gardening.
The cold frame plans for this set are easy to build. The dimensions depend on the size of the windows. You may already have some windows, or a neighbor may be replacing their windows and you can grab a few of them. Or pick them up from a garage sale or look on the web for free stuff.
The cold frames in this video were built with 2×8 or 2×10 lumber, but you could use something less thick and it will be ok, i think. I like how they had the cold frames next to each other, so each frame helped insulate the one next to it. You could use scrap hinges off some old doors, its a ‘use what you got’ kind of project.
For cold frame gardening, its best to orient the cold frame so it faces south, if you are in the northern hemisphere. This cold frame is manually vented, meaning you vent them by opening them up and closing them yourself. You could install the thermatic vent we have used in our hoop house greenhouse plans if you like.
What to grow when gardening in winter? Cold tolerant plants, mainly salad greens work well. Several seed suppliers sell winter salad mixes, they will do well until it becomes just too cold. But then those plants will revive in early spring. Many times there is enough moisture in the ground to keep the plants watered, but keep an eye on them. If the cold frame gets too warm, the soil can dry out. And you’d be surprised at just how hot a cold frame can get in winter.
This is the second DIY Hoop House Cold Frame we have built in our video series. Easy to build, this mini greenhouse allows you to grow plants in winter. Watch the video here, plans and photos are below as well as links to our other DIY Hoop House Cold Frame Videos.
This cold frame uses a wire mesh that’s usually used for concrete, but it works really well as a cold frame form to hold the plastic up. I like how it works
You can buy this concrete reinforcing wire at a local lumber supply yard. It comes in two thicknesses, you want the thinner gauge wire, the thick wire is too much, I think. This wire also comes in rolls, but the it is a pain to work with. The mesh I bought was 10’ x 5’.
To cut the wire mesh we use a right angle grinder with a metal cutting disc. Be sure to wear ear and eye protection and wear gloves while you’re handling this material, it can cut your skin.
Be sure the cut end of the wire mesh faces the plywood end, else the plastic can get sliced by the sharp ends of the wire. You can put pieces of old garden hose along the end of the wire mesh where the plastic bends over to form the end wall, as well as on the plywood end to protect the plastic from the hard edges of the wire and wood.
But you can build this! It’s not hard and I really like it. Another great version of the hoop house cold frames that we’ve built, we have a whole series of them – link here – and every time we make one we get better and better. The super cool part is that you can extend your growing season in the fall and you can use one of these cold frames to warm up the soil in your vegetable beds in late winter and plant seeds even earlier than you could normally. Cold frame hoop houses are especially good for salad greens, radishes, sugar snap peas – plants that are cold tolerant.
You can use scrap wood to tie the corners together, or use brackets.
The automatic vent that we use is kind of a specialty item but that they’re not that expensive. Here is the link to buy it.
You could put one vent in or you could put in two vents. With two vents you would put plywood at both ends of this cold frame. Having a vent on both sides allows more warm air to exit. Cold frames can get quite hot, you don’t realize how much solar energy the sun has even in the winter. You will need to vent the hoop house, you can go out on sunny days and manually vent it if you want by lifting up the cold frames, but I’m not there all the time. So I like the automatic vents.
Have you made a cold frame? Do you have anymore questions? Pease leave them in the comments below.
My cold frame experiences have been greatly influenced by these books by Eliot Coleman and Niki Jabbour.
Cold frames have been used to grow vegetables in winter since glass was invented. Winter gardening is made possible with cold frames and hoop houses. Using a recycled window, we built a cold frame last year – see our how to build a cold frame video here – and had good success growing vegetables in the winter and starting plants early in the spring using the cold frame.
This year I took volunteer plants that had sprung up around the garden: Mustard Greens, Swiss Chard, Garlic, Chives, and parsley and transplanted these plants into the cold frame. These plants all do well in colder weather, so we’ll have some nice greens for salads in the middle of winter. How cool is that?
The key to using a cold frame to grow vegetables is controlling the temperature inside the cold frame. We use an automatic vent that has louvers that open at about 45F, letting hot air out of the cold frame. It is called a crawlspace vent at the hardware store. You can buy the automatic vent online here.
The recycled window we used is a single glaze, meaning it has only one sheet of glass, you can also use double glazed windows. As we say at GardenFork: Use what you got.
You can make a larger cold frame, aka a plastic hoop house greenhouse, by watching our hoop house video here.
Let us know your cold frame and hoop house tips and suggestions below, thx, eric.
I was looking forward to reading Nikki Jabbour’s The Year-Round Vegetable Gardener because my farming apprenticeship had a significant focus on season extension, as the farm is currently going into its twelfth month of continuous harvest. But we were growing in Virginia, whereas Ms. Jabbour has succeeded in maintaining a year-round garden in the more challenging Nova Scotian climate. Because of this, her book achieves its subtitle: How to Grow Your Own Food 365 Days a Year, No Matter Where You Live.
The book is chock full of information, from the basics (timing the seasons and intensive planting) to the complex (building structures to capture and maintain heat). It is comprehensive enough that a relative novice could start with The Year-Round Vegetable Gardener as a valuable resource. A more seasoned grower might be tempted to skip over some familiar-sounding sections, but I would urge you to read cover-to-cover as unique and useful tips are sprinkled throughout the entire text.
The chapter on winter gardening progresses from light protection (like row covers) to using an unheated greenhouse or building your own polytunnel, so a grower in any hardiness zone or variously sized growing space can find techniques to meet his or her needs. The plans to build your own cold frame or polytunnel are easy to follow and call for inexpensive materials. Plus, the chapter motived me with photos of lusciously green vegetables thriving alongside snow and ice.
Like many other gardening books, this one concludes with a crop index. Ms. Jabbour recommends specific cultivars based on cold or heat tolerance or days to maturity and includes an emphasis on vegetable varieties less talked about in other books; for example, Tatsoi has its own entry.
In short: I love this book. It’s a wonderful resource for year-round vegetable growing knowledge and inspiration. Now, if only I didn’t live in a studio apartment!
Aquaponics and Aquaculture How-to has been taking up a lot of Rick’s time. Below Rick tells us what he has learned about how to build an aquaponics system. Eric
The backbone of the inner tunnel is just 1" ID PVC for ribs
I haven’t been around the Gardenfork site very much, been busy in the greenhouse. But for the last few days rain and, particularly, mud has kept me away from the greenhouse, so I thought I’d update you on my progress on the aquaponics project.
Of course, everything is harder and takes way more time than you think it will, so I have not made as much progress as I though I would by now.
4 mil plastic from the Blue Store comes in 20 ft widths on 100 ft rolls, just what I needed.
Last time I wrote that I wasn’t going to build the inner tunnel inside the greenhouse because the winter was so mild here in Tidewater, but I changed my mind.
I’ve got 40 tomato seedlings just sprouting in the spare bedroom at our house, snuggled in and just getting a start in life. And I am already 2 weeks behind in getting the seeds sprouted, so any more setbacks would be devastating.
Clamp-On PVC over tubing to hold plastic to frame and tension the skin. 4 clamps, two per end.
That’s because, as I mentioned previously, this project has to pay. So if this crop craps out, I’m losing much more than 40 seeds; I’ll lose the early crop.
Not only do the tomatoes have to “make,” but they have to be early enough in the spring to demand a higher price at the Farmers Market. Early local tomatoes are worth gold. Late July tomatoes are nearly giveaways. So we decided that it would be pound foolish to not go ahead with the inner tunnel.
inside the inner cover (that's the Dutch Bucket system in the back left, waiting for the tomato sprouts)
I’ll be growing the tomatoes in Dutch Buckets. (I’m working up another post soon explaining how Dutch Buckets work.)
Dutch Buckets (also called Bato Buckets) are something you can do in your house, as long as you have enough light and enough warmth, particularly for tomatoes and peppers.
It’s a flimsy, wobbly affair. It won’t stand a gust and in even moderate heat the ribs will sag. But it’s quick and cheap. I’m using all 1-inch ID PVC in my plumbing, so as the temperature goes up and the inner cover comes down, I’ll be repurposing the PVC to the irrigation system as I expand.
What’s Aquaponics without fish?
The Fish Tank, is another matter all together. Here’s my first try at the platform:
first try at platform
The problem is that I didn’t show this design to anyone before I built it. She, who must be obeyed, took one look at it and said, “why not have the 4x4s tall, to help contain the tank?”
–Doh…
Fortunately, I put it all together with screws so –after another run to the Blue Store– I had some 5 ft long 4x4s for along the outside edges. I also added more of the cement blocks, so that no span is unsupported for more than two feet.
Redone…with the 5 ft supports all around.
Temperature control is important in Aquaponics. And it’s easier…it says here…to warm up a tank than to cool it off. So temperature control of the tank is important. That’s so your fish are comfortable, but most importantly, that so because the bacteria must be comfortable as well.
The key to Aquaponics is the bacteria. You can have all the fish you want and all the plants you want, but they’ll both DIE if the proper kinds of bacteria do not colonize your system or if the bacteria are unhappy.
If it dries off enough so that I can get back there with a truck this week, I’ll deliver the –damn heavy!– 4 x 8 ‘ sheets of 3/4-inch treated plywood for the sides. I’ll put sheets of interior insulation and a fish-safe pond liner inside the tank so it’s water proof. I’ll also band the top, middle and bottom of the tank around the outside of the 4 x 4s.
The finished Fish Tank will be 8 x 8 x 3 ft or 192 cubic feet. That’s about 14,000 gallons of water, which is 5.8 tons of water. Once I finish the fish tank, I’ll start on the grow beds. I’m hoping four 4 x 8 foot to begin with.