Learn how to deep fry turkey in this GardenFork.TV cooking video. We received a bunch of requests to make a video about how to make deep fried turkey, so just in time for Thanksgiving, here is the our simple method for deep frying turkey. We bought our Turkey Deep Fryer Kit on Amazon here
.
[social type=”fblike” float=”right”]
There are a bunch of precautions when using a deep fryer, remember, the oil is real HOT and can burn you.
Wear long sleeves and heavy gloves
Turn off the burner when lowering or raising the turkey
Defrost the turkey fully
Keep a fire extinguisher nearby
Slowly lower the turkey into the hot oil, takes 1-2 minutes to fully immerse the turkey
Make sure the oil temperature thermometer is not accidentally stuck in the turkey itself. You want to use the large round dial thermometer that comes with your deep fryer kit to measure the oil temperature.
Do not let the oil go above 350F, bad things can happen, like spontaneous combustion, not a good thing.
The secret to great deep fried turkey is temperature, you want cook the breast to 145F, then turn off the burner, lift out the turkey, drain and let it rest for 20 minutes. It will continue to cook a bit. I’ve found that if you cook the turkey past the 145F mark, it tastes dry and crumbly.
[box bg=”#FFCC33″ color=”#000000″]Be extremely careful when using a deep fryer! Hot oil will burn your skin. Follow all directions and precautions that come with you deep fryer.[/box]
We could go into the science of protein strands tightening up when they are heated too much, but we’ll leave that to America’s Test Kitchen. Just remember to check the temperature after about 25 minutes in the thick part of the breast.
Here is where we bought out deep fried turkey kit:
Rick and Eric talk about Hurricane Sandy Storm Preparation, and then move on to making hard cider, GF show ideas, Johnny Appleseed, making applesauce, deep fried turkey and more.
Part of our Foraging and Urban Homesteading Video Series, we show you how to forage for foods in your backyard. This foraging video is about the Staghorn Sumac and the tea or sumac-ade you can make from the seedhead of a sumac tree.
Staghorn Sumac
I remembered this drink you can make from a report I did in 6th grade, it was a cookbook of sorts of Native American foods, I think my teacher was underwhelmed by report I did, but this must have had an influence on me, in some subtle way.
In addition to the tea you can make from foraged sumac, the sumac seed pods are used in middle eastern cooking. The seeds are ground and used as a spice powder, added to dishes such as hummus and salads. neat!
According to Wikipedia, the center stem of the sumac was also used by native americans as pipe stems. Sumac also had medicinal uses in Medieval times.
Sumacs grow along forest and field edges, fence rows and the sides of the road. They are called a pioneer plant, they are one of the first bush plants to grow where a field is turning into a forest, or where the soil has been disturbed.
Their leaves are an easy way to identify the plant, especially in the fall, as they have a great red-yellow color to them.
Be sure to know the difference between Staghorn Sumac and Poison Sumac. The names of the plants are similar, but the plants do look quite a bit different. Staghorn sumac has a very unique upright seed head, usually red in color. Poison Sumac looks much more like poison ivy, and its seeds hang downward.
Poison Sumac looks like Poison Ivy – USDA photo
What can you add to our knowledge of Staghorn Sumac and foraging? Let us know below:
Henry adds perspective, a huge oak tree in Prospect Park
We rode out Hurricane Sandy in Brooklyn and came out unscathed. Many of our neighbors weren’t so lucky. Those in lower lying areas near the bay got flooded. Here are a few photos from Park Slope Brooklyn
Tree crushes cars on President St
Brooklyn’s version of Hurricane Sandy PreparationThe Labs after a walk
The latest project in my head is to make and cure home made sausage. I signed up for a how to make sausage class at The Brooklyn Kitchen taught by Ben Turley, an owner of The Meat Hook who shares space with The Brooklyn Kitchen to learn phase one: how to make fresh sausage at home.
I’ve never taken a cooking class before, and was kinda ambivalent the day of the class, but I knew it would be good when I showed up at the classroom and was handed a cold beer by Valerie, who assisted Ben with the class.
Valerie offers advice on chopping herbs
Rather than one of those cooking classes where you just sit there and watch; we were going to learn how to make sausage by making sausage, guided by Valerie and Ben.
Ben first gave a short talk, and what stuck in my head was his goal of transparency in the food they sell, and their recipes. The sausages were to make were two types of sausage they sell at the Meat Hook, and we had in our hands the actual recipes they use to make them.
Eric mixes spices into sausage meat
The common wisdom is when many chefs publish their recipe for a signature dish in a magazine, they leave out crucial details. Ben didn’t leave out any details. He laid out exactly how to make good tasting sausage.
The key to making homemade sausage is the ratio of salt and spices to fat and protein, and Ben wrote it all out for us in grams. How cool is that?
We then broke into two teams and prepared two different sausages, while Valerie and Ben offered suggestions and guidance.
A few key things I learned about making sausage:
Pork Shoulder is best, with 30% fat to 70% protein ratio.
Have the butcher grind the meat for you with a 3/16 diameter grind
Mixing the meat and spices-salt together to the right consistency
Cook a small piece of the mixed sausage before stuffing it into casings, do a taste test.
Refrigerate sausage overnight before cooking, don’t stuff and cook right away.
To make sure the meat and ingredients have been mixed properly, and the salt has been kneaded into the meat, make a thin patty of the sausage meat, put it in your palm, and turn your palm upside down. Then count to 5. If the patty is still stuck to your upside down palm when you get to 5, the meat is mixed properly.
Each person got to take home two sausages from the class project. The next day they tasted amazing.
With the impending Frankenstorm, Rick wanted to relate some of his experiences dealing with storms while stationed on Guam. We also talk about the great response of people to Eric asking people for video ideas.
Monica asks about cooking lamb shanks, Rick’s cairn terriers nesting habits, Traces of lead found in backyard urban chickens according to this NY Times article
Eric and Rick discuss the benefits of Compact Fluorescent bulbs putting less mercury in the air, arsenic in rice and arsenic in apples.
Living each day to its fullest is hard. I think a better way of looking at this is one put forward by John Sexton in an interview with Bill Moyers, the idea to make each day as transcendent as possible.
You have to make sure that you live every day as a transcendent day to the fullest of your ability, because you never know when you’re going to have a chance to live it again.
This is kinda related to ‘being in the moment’ of everyday life. When i walk the Labs in the park or the woods, I sometimes have to stop my brain from thinking too much and just realize how neat it is to be on a walk with the pups.
This somehow works better as operating instructions for daily life. Living life to is fullest can be exhausting, always running around to all sorts of stuff for the sake of doing it.
But even today, I ran out of time before I ran out of stuff I need to do. I looked at the clock and it was 4:30 already, and I barely got done what I wanted to.
Is that OK? It has to be or you’ll be cranky all the time.
What do you do? How to live in the moment? Share with us below:
I get ideas all the time for new GardenFork videos, but I’d like to hear from you guys what you’d like to see. I have a list of show ideas in my Evernote file, but some of the best ones come from you guys. Like the video we did on garden hose repair!
I’d appreciate you taking the time to post below your suggestions and thoughts, i’d appreciate it. Thanks, eric.
Broken Garden Hose? Learn how to fix your leaking garden hose in this Fix a broken hose video. We’ve run over the garden hose with a lawnmower a few times, and instead of throwing out the hose, we fix the leak in the hose, or the cut off end of the hose with a few repair parts from the hardware store. A few things to keep in mind with garden hose repair, don’t buy cheap repair parts or hose washers, you get what you pay for in most of the world , and this applies in the garden hose fix it department too.
Rubber or flexible washers go between your hose and the spray attachments, and keep the water from leaking out the hose. You might try buying a few different kinds of hose washers, as i’ve found some garden hose attachments don’t work with the thicker hose washers. And buy a bunch of them, you’ll save yourself time later when you need them. Hang them near the hose storage hooks or on the wall of your workshop so you can find them quickly. Put them in a drawer and they are lost.
I’ve found a number of hoses in the neighbor’s trash that were easily fixed with a garden hose repair kit, and I saved a bunch of money and kept a fine watering hose out of the landfill.
What do you do to repair your hoses? let us know below:
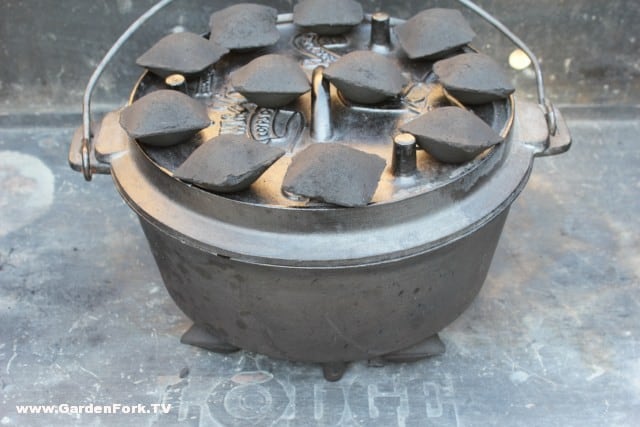
This is another of a series of articles about how to cook in a dutch oven, dutch oven recipes, and how to season cast iron and dutch ovens by Gary House, of Cooking-Outdoors.com. A big thank-you to Gary for contributing this.
The key to successful outdoor Dutch oven cooking, is knowing how many charcoal briquettes are required to produce a certain temperature inside of your Dutch oven while it is cooking.
The secret to this knowledge is understanding charcoal briquettes.
Types of charcoal
Types of Charcoal
Charcoal briquettes produce more uniform heat than campfire coals or Lump charcoal, making your Dutch oven temperature easier to control. Brand-name briquettes have more consistent quality than bargain brands. They are consistent in size— about 2 inches square — which is important for predictable heat. Start with charcoal briquettes if you just beginning and experiment with live campfire coals as you progress.
How many briquettes do you need?
This is the basic foundation of Dutch oven cooking, once you know this, everything else falls into place. Take your Dutch oven’s diameter in inches and double it.
• 8 inch Dutch oven = 16 briquettes
• 10 inch = 20 briquettes
• 12 inch = 24 briquettes
• And so on.
The total calculation is the number of standard-size charcoal briquettes you will need to heat your Dutch oven to approximately 325 degrees F for one hour.
It is that simple.
Controlling temperature
Most Dutch oven beginners are familiar with cooking on a stove at home, cooking with bottom heat only and that can cause confusion when cooking outdoors with a Dutch oven.
Because heat rises, briquettes heat the bottom of a Dutch oven more quickly and directly than the top. The top rim of the lid draws the heat downwards, you will need to divide your briquettes between the top and bottom for even heating. Commonly referred to as the three up method and is effective on 8, 10 and 12-inch diameter Dutch ovens; larger size Dutch ovens may require more briquettes.
As an example:
• To heat an 8-inch Dutch oven to 325 degrees, you need 5 coals on the bottom and 11 coals on top. Sixteen coals total.
• To heat a 10-inch oven, you need 7 briquettes on the bottom and 13 on top. Twenty coals total.
• To heat a 12-incher, you need 9 briquettes on the bottom and 15 on top. Twenty-four coals total.
These guidelines will get you close enough that, with practice, you can understand exactly what works for your Dutch oven.
Briquette placement
Top ring & bottom ring placement
Using the circle method of coal placement, place your bottom coals in a single circle aligned with the legs of your Dutch oven closer to the outside of the Dutch oven bottom, referencing the lip of the Dutch oven lid place your coals evenly around the perimeter.
Variables
If your recipe calls for temperatures higher or lower than 325 degrees, make adjustments by adding or subtracting 2 briquettes. Two briquettes equal approximately 25 degrees. Add these to the top of the Dutch oven, unless you need more heat on the bottom.
How long do briquettes last?
Today’s charcoal briquettes last about 45 – 50 minutes. When recipes call for longer cooking times, start fresh replacement briquettes at 40 minutes. They will be ready to add to your Dutch oven when the original coals start losing their heat. Replace approximately 60% of the coals each 45 – 50 minutes of cook time.
Compensation for weather conditions will be required. On cold days, add a couple of more coals on the top and on a hot day remove a coal or two. Wind will play a significant roll in temperature control, it is best to shelter your Dutch oven from the wind with a windscreen if possible.
Following these basic concepts will insure your first adventures in Dutch oven cooking are a success. After practicing a few recipes, temperature control will become second nature and you will no longer need to count as you become more proficient.
Here is one of my favorite beginner recipes, the same one I use in my Dutch oven classes.
Blackberry cobbler
Blackberry Cobbler
Ingredients
For the cake mix:
1 stick butter
2 cups flour
2 cups sugar
1 tbs baking powder
1tsp salt
1 1/2 cups milk
For the berries:
4 cups fresh or frozen blackberries or 2 bags frozen (thawed)
½ cup sugar
1 ½ tsp fresh grated lemon zest
¼ cup water
1 tsp cinnamon
10 or 12” Dutch oven (20 or 24 briquettes)
Start your briquettes using the formula above to determine the quantity.
Rinse your fresh blackberries and drain, place them in a bowl with your sugar, lemon zest, water and cinnamon; mix well and set aside.
When your briquettes are ready, place the bottom circle of briquettes down and set your Dutch oven with the lid on top of the briquettes, then add the remaining briquettes to the lid to pre-heat your Dutch oven.
Now you can mix your cobbler batter. In separate bowl combine flour, sugar, baking powder, and salt; stir to mix. Add milk and beat until batter is smooth.
Remove the Dutch oven lid, take one stick of butter and place in hot Dutch oven, stir until melted. Add your Blackberry mixture to the melted butter and pour your cobbler batter over the top
(A different variation of this would be to take your batter and pour that in first place your blackberries on top.)
Bitten by the urban foraging bug, I’m always looking at plants and trees in New York City now. There’s lots of food around if you look. On the way to the subway in Park Slope is a Horse Chestnut Tree, and every year the sidewalk is littered with the empty chestnut shells – the squirrels have gotten most of the nuts.
The nuts are called conkers, which were used to play a game in the UK called conkers as well. The nuts are considered slightly poisonous, though deer eat them.
The beekeeper and tree nerd in me was wondering whether horse chestnuts were self pollinated or needed a second chestnut tree for pollination, and whether they were insect pollinated or wind pollinated. According to wikipedia the trees are pollinated by birds and insects, and I found a second horse chestnut tree around the corner from this tree. neat.
“Raw Horse Chestnut seed, leaf, bark and flower are toxic due to the presence of esculin and should not be ingested.” says Wikipedia. There are a number of medicinal uses for some of the compounds found in the Horse Chestnut conker, which doesn’t surprise me for this cool looking plant.
Horse Chestnut in Park Slope, Brooklyn, NY
What interesting nut trees have you found in your area? Let us know below:
It doesn’t happen often, but this is what you prepare for, the unexpected. The one time you don’t prepare is when it will happen.
When painting rooms, I am obsessive about covering every square inch of floor with either paint tarps or red rosin contractor paper. It pays off in a number of ways, we spend almost no time cleaning paint roller splatter off the floor, any plaster or sheetrock repair dust is easily cleaned up, and if one of us happens to step into a drop of paint that has happened onto a tarp, we don’t get even more paint on the floor from walking all over with paint on our shoes. The tarps soak up the paint from the sole of the shoe.
Painting a brownstone last week one of the crew accidentally kicked over a gallon of paint, but because we had laid down heavy duty muslin paint tarps, the clean up was easy.
when painting, use a tarp!
We first scoop up as much paint as we can and put it back into a paint can. You might need to strain that paint if it has sanding debris in it picked up from the tarp. We roll the tarp up into itself and take it outside. We then sop up the rest with paper towels, and lay out the tarp to dry. Latex paint will dry slowly when its thick, but after it dries, you can use the tarp again.
If you are painting more than one room, consider buying muslin tarps instead of plastic tarps. Plastic is slippery to walk on, muslin paint tarps are much better and last for years. Be sure to write your name on your tarps, your friends will borrow them, and its a subtle way of reminding your friends whose tarps they are.
Sarah and I were having a production meeting the other day and we were talking about cool people we’d like to have on the show. Sarah immediately suggested Lynne Rossetto Kasper, award winning author and host the The Splendid Table radio show from American Public Radio.
I listen to Lynne’s show in the car, driving between NYC and CT. I especially like the part of the show where people call and list what they have in their fridge and Lynne comes up with a meal using those ingredients. neat.
Sarah and I both had a question to ask Lynne, Sarah’s dealt with working toward a career in the food world and mine was not nearly as interesting, it was how to cook from your fridge. And Lynne told us of how she first worked with Julia Child in a cooking demo at the A&S Store in Brooklyn, right near where both Sarah and I live.
I was a bit tongue tied at the beginning of the show, but I got better as we started talking. Lynne is a real pro at radio, she made it easy for us. We hope she’ll be back on GF Radio in a bit and we can talk more about cooking and food.
A big thank you to American Public Media for helping us arrange the call.
Lynne’s newest book is A Summertime Grilling Guide written with Sally Swift. below are links to Lynne’s books.
Deek Diedricksen, Tiny House Designer and originator of the plywood boat we built joins us to catch up on what he is doing. Deek is hosting a Tiny House Building Workshop Nov 1 & 2. His newest book is in a new printing, check it out on his site.
Priscilla the egg lady joins us to talk about how to grow swiss chard and how to cook swiss chard. Priscilla is using a double row method this year.
Josh Bauer then joins us to talk about what’s it like to go to the Culinary Institute of America and then start your own farm in Florida. You can check out Josh’s farm at his website here.
This year has been the year I’ve had to requeen 4 hives. Not sure why, but wanted to show one way how to requeen a beehive. This beehive was doing fine, I pulled some honey off the hive, and then checking it 3 weeks later there is barely any covered brood and no freshly laid eggs anywhere in the hive. You can see here in the first picture of the beehive, this frame is from the lower super, where there is usually brood, there aren’t any eggs on this frame. Luckily, I have a few other robust hives, and was able to get a queen from a nearby beekeeper.
Queens will slow down their egg laying in the fall, so you have to make sure the hive really is queenless, check most or all of the frames for brood.
Empty brood frames, not a good sign
Requeening this hive, I had to keep in mind its getting late in the year, and these bees will need a good population to get through the winter. I pulled two frames full of brood from a nearby healthy hive, knocked off most of the bees from those frames back into their hive, and got ready to open the queenless hive.
From the queenless hive, I took off the upper supers and then pulled two empty brood frames from the bottom super. I then put in the queenless hive the two frames of capped brood from the healthy donor hive, and then wedged in between those two frames the new queen in a queen cage.
Gently tap this frame over the donor hive to knock most of the bees off and back into their hive. Make sure the queen is not on these donor frames.Capped brood from the donor colony
The capped brood will hatch soon, and will help boost the population of the hive while the queen gets acclimated and starts laying. I think this hive will make it through the winter, we still have a few months to get it back in shape.
I feed all our hives a 2:1 sugar syrup solution with an essential oil mix added in ( get the honeybee essential oil recipe here ), with this hive i may start early on the feeding.
queenless hive ready to accept brood frames and queen cageCapped Brood Frames and Queen Cage inserted into queenless beehive.
Here are some beekeeping books I recommend:
What has your experience been with requeening? Let us know below: