Author: Eric

  • Sugar Cake Recipe for Honeybees – Beekeeping 101

    Sugar Cake Recipe for Honeybees – Beekeeping 101

    This winter feeding sugar cake recipe is an alternative to making fondant to feed your bees. From what I read in beekeeping magazines and online forums, it seems many people are moving to simple cakes of sugar, an alternative to sugar candy, which is a pain to make. We use these cakes in our winter insulated inner covers.

    Note: I no longer use sugar cakes, I now use the Mountain Camp dry sugar method, its much easier.

    winter beek check list watchI use shallow foil cake pans to make these sugar cakes, you can use whatever you want, or you could just hand form them into patties or rounds.

    My point here being you don’t need to use foil pans for molds, you can free form the things, I just like how the foil holds the sugar cakes together, and are easy to transport in my truck.

    The cakes do not always dry perfectly, it has to do with how much moisture is already in the sugar. I suggest you make these a few days before you are going to use them.

    Sugar Cake Recipe For Honeybees

    To make what I call sugar cake is pretty simple:

    • Take a 5 lb bag of white sugar
    • Mix it in a bowl with 7.5 ounces of water and a few drops of an essential oil mix. our honeybee essential oil recipe below
    • Mix the water in well
    • Spread into the foil pans, or drop onto wax paper or paper plates and make round sugar mounds.

    Depending on how warm and humid your house is these dry overnight or a few days. Sometimes they crumble and crack, I think this is due to the moisture content of the bag of sugar you are using. Chunks of sugar cake are fine, the bees don’t care, really.

    It is key to measure the water precisely, i use scale; it makes a big difference. if you add too much water it doesn’t dry right, i think.

    You can also press this cake mixture into the inside of an insulated inner cover, if its deep enough.

    Let the cakes at least dry overnight, a few days is better, and you are ready to place them on the top of the hive. Take care not to crush any bees when you do this. You need to use a spacer shim, or an insulated inner cover with a built in space for feeding when adding sugar cakes to the top of your hive.

    Read more of our beekeeping posts here and watch beekeeping videos here. Here is the Honeybee Essential Oil Recipe Thx!

    beekeeping-sugarcake-vid-thumb

    Do you use sugar in your hives in winter? let us know below:

  • DIY Insulated Inner Cover – Beekeeping 101

    DIY Insulated Inner Cover – Beekeeping 101

    Here is the DIY insulated inner cover I built to prevent condensation in our beehives using easily purchased materials. All the hives we have lost have been in the late winter – early spring due to, I believe, condensation and varroa mite load. This year I am determined to eliminate condensation from our hives. Here is a how to on building a DIY insulated inner cover and why you should consider using this cover for your beehives. We put dry sugar inside the inner cover. (Winter feeding beekeeping videos links are at the end of this post.)

    The basics of this design are based on those at the informative beekeeping blog Mudsongs.org . I like to read how Phillip is keeping bees in Newfoundland, Canada.

    NOTE: Since building these DIY covers, I have also started using just a piece of 2″ insulation wedged between the covers, watch the video:

    watch beekepeing videos insert copy

    The inner cover I built has a space below the plywood for feeding the bees sugar , sugar cakes, fondant, pollen, or pollen patties. My thinking was why have a wood shim below the cover to place sugar in, why not make a one piece inner cover/shim. That way there would be on less piece of woodenware to deal with.

    I used pine 1×5 lumber, the outer dimensions are 20″ x 16 1/4″.

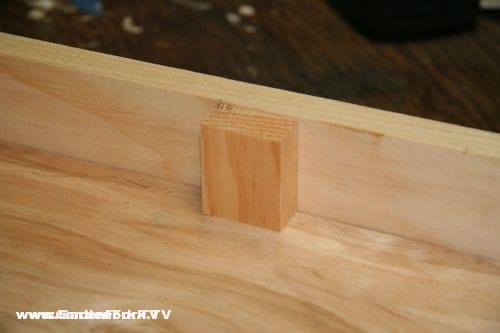
    Here is the bottom of the inner cover, you can hold the plywood in place with scrap molding or pieces of wood. Its important that any space between the plywood and side walls is covered, either with scrap trim or other wood, to keep the bees from moving up into the polystyrene. You don’t want the bees trying to chew the insulation. If you have the power tools and woodworking skill, you could dado the insides of the frame and slide the plywood into the dado slot.

    I glued these pieces of wood to the sidewall and the plywood, held with a clamp. This held the plywood at the correct depth to allow the insulation to drop into the upper section of the inner cover perfectly. Only use a waterproof wood glue, our beekeeping teacher said never to use Gorilla Glue, as it can foam, and the bees will try to eat the foam that comes out of the wood joint.

    Here is the 2″ polystyrene placed in the upper section of the insulated inner cover. Use small scraps to fill in any large spaces near the side walls of the cover.

    Be sure to drill vent – exit holes in your inner cover. These are 3/8″ but i’m thinking they should be 1/2″ to allow more airflow. Going forward, I may chisel out a 3/8′ x 1″ notch at the bottom of the cover to allow more bees to use the entrance. The holes seem to jam up traffic.

    How to cut polystyrene: get one of those utility knives with the blades that are real long, the kind that you can snap off when the tip is dull. use a straight edge to score the polystyrene. Don’t use too much pressure, make several passes to allow the knife to cut deeper. Be careful not to cut yourself.

    After scoring the foam about halfway though, you can snap the foam apart.

    Place the cut over the sturdy edge of a work table and make the break.

    top of insulated inner cover with 2″ polystyrene
    The large space built into the inner cover allows for sugar cakes to be easily put in hive
    Honeybees are eating through sugar cakes already

    Read more of our beekeeping posts here and watch beekeeping videos here. Thx!

    beekeeping-sugarcake-vid-thumb

  • Intern At An Organic Farm How To : GF Radio

    Intern At An Organic Farm How To : GF Radio

    Wondering how to intern at a farm? What is it like to intern at a farm? How do i get an internship at a farm? On GardenFork Radio we talk with a former organic farm intern, Sarah, our new GardenFork Producer. We talk about how to find a farm to work at, what to expect when doing an internship, and what the interview process is like.

    Sarah interned at an organic vegetable farm that has a successful CSA program, where she learned how to drive a tractor, use farm implements, and weed vegetable fields in the hot sun, when is the best time to harvest vegetables, how to harvest lettuce real fast without cutting yourself, succession planting, seeding lettuce in soil blocks and plug trays, building and modifying farm implements to suit a small farm. Constant problem solving in a challenging environment is how Sarah describes it.

    We also talk about how to roast duck with the barest of kitchens and a dull knife, and what a corporate apartment is.

    A big congrats to Daniel Delaney for having this video show, What’s This Food? named Top Arts Podcast of 2011 by Apple iTunes! You can watch What’s This Food on Daniel’s site here. You can hear Daniel Delaney on this GardenFork Radio Episode here.


    photo by click


  • Eggnog Recipe How To Video GF.TV

    Eggnog Recipe How To Video GF.TV

    This eggnog recipe is for classic eggnog, which is a bit different than the eggnog one buys at the store. Eggnog, is traditionally a milk drink that has egg, spices, and a bit of alcohol in it. Commercial eggnog has thickeners in it.

    The recipe for Eggnog is pretty simple, the variations come in what spices one puts in the recipe, and what kind of alcohol is added to the drink. I find most people put too much alcohol in the eggnog, most times I drink eggnog without any alcohol in it, but if there is liquor in the drink, i like just a bit to give it a warmth.

    Here is the GardenFork.TV recipe ©2011 all rights reserved

    4 egg yolks from the freshest eggs possible

    2 tablespoons powdered sugar ( regular sugar is ok )

    1/2 teaspoon cinnamon

    4 cloves, crushed with a mortar/pestle

    1/2 teaspoon nutmeg

    3 cups of milk

    1 cup of heavy cream

    Small amount of Rum, Brandy, Bourbon, Whiskey

    Separate the yolks from the whites of the eggs, reserve the egg whites.

    Mix the egg yolks with the spices, be sure to crush the cloves as best you can.

    Pour the milk and cream into the egg/spice mixture.

    Whip the egg whites until the can stand up a bit, you want a lot of air in the egg whites.

    Pour the egg whites into the milk mixture.

    Add alcohol sparingly, a few teaspoons at at time until the flavor works for you.

    Put in the fridge for at least an hour to allow the flavors to meld.

    Serve in small glasses – mugs with some cinnamon sprinkled on top.

    ©2011 Eric Rochow all rights reserved.

  • Re-Gifting is the new normal

    Re-Gifting is the new normal

    I read the blog Brain Pickings – to me its a curated view of the design world on the web. Today they posted their Re Gifting API in the form of icons that tell the recipient its ok to regift the gift.

    The season of giving is upon us — a time to receive a lot of stuff we don’t really need from people we care about, give them stuff they don’t really need in return, and do it all graciously, dancing a dance of feigned stuff-needing. But what if we could pass that stuff we don’t really want or need along to someone who might? What if we could normalize regifting, remove the guilt that bedevils it, and bake it into the gift-giving process from the get-go as an open and beautiful expression of honesty? Brain Pickings

    Obviously, Brain Pickings can write better than I do, and their idea is brilliant. Place their re-gifting icons on  your gifts, make them into stickers, or use the gift wrap design, all created by Josh Boston

    Visit their site for all the icons you can download, with a Creative Commons license

    I have strong opinions about holiday gifting, here are some Real World Green shows that talk bout greening your christmas:

  • How to make Sauerkraut Kinda Sorta – GF TV

    How to make Sauerkraut Kinda Sorta – GF TV

    We made a sauerkraut how-to video today. Fermenting green or red cabbage into sauerkraut is an easy recipe to make, and the possibilities are endless. Fermentation and fermented foods are on the rise, with their probiotic organisms and all around healthy food reputation. Making sauerkraut should be on the to do list of all urban homesteaders, and i imagine most homesteaders already make sauerkraut.

    Inspired by Daniel Gastieger, author of Yes You Can! And Freeze and Dry It, Too, we make a simple sauerkraut recipe that is the basis for all sorts of combinations. Daniel was on GardenFork Radio, you can hear his interview here.

    If your idea of sauerkraut is that greyish stuff you see in the store, try making sauerkraut yourself. Take red or green cabbage, or a mix, add salt and go from there.

    Basic Sauerkraut Recipe

    this is based on Daniel’s Yes You Can! And Freeze and Dry It, Too book.

    1 head of green or red cabbage

    pickling or kosher salt

    Glass, plastic, or ceramic fermentation container

    Remove the outer leaves from your cabbage, just the dinged up ones.

    Chop up your cabbage, you can do this by hand or use the food processor to coarsely grate the cabbage.

    Put the cabbage into a clean large bowl. Add a teaspoon of salt for each pound of cabbage.

    Use your hands to mix the salt into the cabbage, you want to crush and crinkle the cabbage.

    Put the cabbage into a fermentation container, mash the cabbage down and put a clean plate or something similar on top of the cabbage to keep the cabbage down in the container.

    Cover the top of the container with a plastic grocery bag and put the container in a dark cool area.

    Check the sauerkraut after 24 hours, there should be enough brine to cover the top of the cabbage. If there is not, boil a quart of water, add to it 1.5 tablespoons of salt. let the salt water cool, the  top off the sauerkraut so the cabbage is covered.

    Ferment the sauerkraut for at least 5 days, you can go a month if you want to. any mold that forms should be skimmed off.

    When you are happy with the fermentation, put the sauerkraut in a clean closed container in the fridge. ©2011 all rights reserved


  • Ice Fishing How To GF Radio

    Ice Fishing How To GF Radio

    Mike and Eric talk about how to ice fish and other stuff this week.


    photo by digitaldunee

  • Homemade Wood Stove Floor Protector

    Homemade Wood Stove Floor Protector

    You just bought a wood stove, now you need a wood stove floor protector. Here’s how to build your own wood stove floor pad and save money. A DIY friend of mine has fixed up a cabin up in the Catskills, and built this wood stove floor mat for his wood stove.
    (Also see the neat outdoor shower they have, link at end of this post)

    A wood stove floor protector does just what it says, it keeps the floor from getting damaged by the wood stove. Wood stoves put out a lot of heat, and a floor pad shields the floor from that heat, it also makes it easier to clean up ashes and coals. And, a DIY floor pad looks great, as it matches your home.


    He collected tiles from a few tile stores, with a blue color scheme for the one pictured.

    a mix of tiles works great here

    My friend built this out of a piece of tile backer board, a popular brand is Durock, but there are others. You have to use the heavyweight tile board, not the lightweight stuff. Below the tile backer board, he used a piece of plywood to add strength to the floor protector.

    Tile backer board and plywood support the tile
    a DIY wood stove floor protector that looks great.


    Standard tile installation practices were used to make the floor protector, choose the tile and color combination, build the plywood / tile backer base, apply the tile adhesive, lay the tile, grout the spaces between tiles. If you know of anyone looking for wood stove floor protector ideas, here you go.

    Note: this floor protector is a DIY project. Use this information at your own risk. Check local building and fire codes in your area.


    Check out the Outdoor Shower they have as well!

  • Start an Aquaculture Farm : GF Radio

    Start an Aquaculture Farm : GF Radio

    How to start an aquaculture farm starts GF Radio today, as Rick has decided to grow vegetables using aquaponics and hydroponics. Aquaculture is a system which uses fish in tanks and plants in trays. Listen as Rick tell us how to start a low cost aquaculture system, aquaponics systems, and aquaponic gardening. The plan is to grow tomatoes in winter with this fish and plant sytem, using available materials.

    Rick wrote about his new greenhouse aquaculture project on our site.

    We talked with a GF listener, Eric, about his aquaculture project on this GF Radio show. Eric has a simple aquaculture setup in his home using an aquarium and some grow lights.

    Rick also tells about a Texas turkey hunt, and why not all wild turkeys taste great. Eric talks about his deer hunting trip to the Catskills in New York State, hunting on NYC watershed land, and why you should have all your permits in order when hunting.

    We then move on to highway safety, a recurring subject on GF Radio. Driving too fast or too slow can cause accidents.

    If you have an aquaponic garden or an aquaculture setup , we’d like to hear from you, please leave a comment below or email us, always interested in hearing from you all.

    photo by iamgoo


  • How to cook a roast turkey or chicken GF TV

    How to cook a roast turkey or chicken GF TV

    Baking a roast turkey or cooking a roast chicken is not hard. Our recipe for baking a turkey is a classic with an Eric spin on it. Mayonnaise.

    GardenFork.TV Roast Turkey Recipe How-To

    Buy the best turkey you can afford. The uber-organic ones are pretty pricey, I found a mid-range fresh turkey at the local chain store.

    Remove the neck and giblets from the turkey, and rinse the turkey inside and out. Place on a platter in the fridge for a day. This dries out the bird, which I think is a good thing .

    A few hours before roasting, turn the bird upside down in a roasting rack, and slide an ice pack under each breast. Keep the bird in the fridge until ready.

    When ready to roast the turkey, preheat your oven to 425F.

    Use a medium sized jar of grocery store mayonaise, 1/2 cup mustard, and a large handful of herbs all mixed together. The herbs can be thyme, parsley, rosemary, oregano, marjoram, etc.

    Spread the mayonnaise-mustard-herb mixture over the skin of the bird, also coat the interior of the bird. If you like, you can also lift up the skin of the breast and slid the mix under the skin. A rubber spatula works well for this.

    Put a thermometer in the thigh of the bird, and place it on a rack in the oven.

    Roast at 425F for 30-45 minutes, until the skin is nicely browned, then turn down the oven temp to 325, roast for another 45-50 minutes. The USDA temp for cooked turkey is 165F. I usually pull the turkey out when it is 160F, as the temp will continue to rise.

    When the bird is done, pull it out, cover it with foil and let it rest for 2o minutes, then carve. yum.

    Tell us your secret to great baked turkey or chicken below:

  • Preparing Beehives for Winter

    Preparing Beehives for Winter

    Here’s how to overwinter your beehives & have the bees survive winter. We will do into the following steps that I take to get my beehives to survive winter:

    Note: I have an updated post on winter prep here, but below is a good read as well.

    • Feed bees 2:1 sugar syrup with essential oil mix throughout the fall
    • Insulated Inner Covers
    • Wrap Hives In Polystyrene
    • Sugar Cake  Dry Sugar Winter Feed see this post & videos for the how to
    • Hives tilted forward
    • Metal mouse guards
    • Hives strapped to ground.

    I feed the honeybees sugar syrup all fall, i start just after we harvest honey. I have become a big fan of using zipper type food bags, learn more and see 2 videos here.

    Winter is coming. Just before the October storm that dumped 20″ of snow here, I went out to our two beeyards and got the beehives ready for winter.

    The biggest danger to beehives in winter , i think, is condensation. Humidity builds up inside a warm hive, hits the top of the hive, which is cold, and the water condenses into droplets that rain back down onto the bees. Many times this kills the hive.

    There are a number of things you can do to reduce condensation in a beehive. Most important is to keep air circulating in the hive, don’t seal up the hive tight. You need air moving through the hive to remove the moisture. I believe everyone should use an inner cover with a notch, aka upper entrance, in the warm months. This allows air to flow through the hive .

    In winter, I’ve been using insulated inner covers and sugarcakes with great success.

     The insulated inner covers help reduce condensation, and provide space for the sugarcakes,  watch the video and see insulated inner cover plans here. Since using the insulated inner covers, I have not had condensation problems.

    winter beek check list watchI used to use sugarcakes to provide emergency food and a great way to absorb excess moisture in the hive. But I now use the Mountain Camp Dry Sugar Feed method, and it works well. Video here.

    sliding in sticky boards in the screened bottom board

    There is an ongoing disagreement on whether one should keep the sticky board inserted into the screened bottom board or not in winter. I think it depends on how cold it gets in your area. Around us, it gets below zero a few times each winter, and stays in the single digits at times, so I close the screened bottom board.

    Tilted Hive
    2×4 scraps tilt the hive forward

    The second thing, and just as important, i think, is to tilt the hives. Pretty simple, but tilting the hive will allow any water that has condensed on the inside of the inner top cover of the hive to, by gravity, move toward the front of the hive, and hit the front wall. The water drops then drain out the front of the hive, away from the bees.

    Tilt your hives forward by placing a piece of 2×4 scrap lumber under the back of the hive as shown in the picture.

    I use metal mouse guards on our hives, the holes in the guard allow enough air to move through the hive when used with the insulated inner covers, I think.

    mountain-camp-feed

    beekeeping-sugarcake-vid-thumb

    preparing beehives for winter

    New: I have tried various methods to insulate the hives, and this year I have used 2″ polystyrene. This isn’t the most elegant solution, but it seems to work. I tried various methods of cutting and affixing the insulation, but for this winter, just cutting them to the fit each side of the hive and strapping them together worked well. Its best if you have two people doing this.

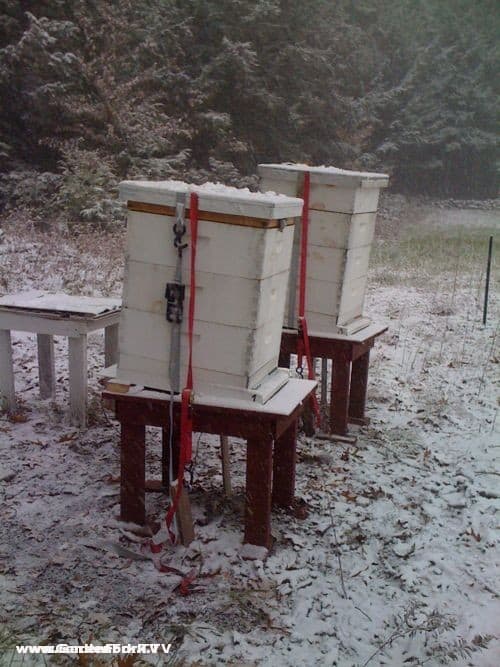
    Another important thing to do in areas with high winds in winter, is to strap your hives down to the ground to keep them from blowing over. We double strap our hives because of bears, one strap around the hive itself, another strap goes around the beehive and attaches to stakes hammered into the ground.

    Hives strapped down against winter winds

    We used wooden stakes hammered into the ground for the straps, but they work loose with frost heaves and all. Here is a photo of  GF viewer Doug’s  hives, and he used a spiral metal stake, used for dog runs and camping, that wont pull out of the ground. great idea. i’ve seen these spiral stakes at the home improvement stores.

    spiral stakes work better than my wooden stakes ©2011 Doug Anderson


    Read more of our beekeeping posts here and watch beekeeping videos here. Thx!

  • Campfire Cookery Cookbook Giveaway

    Campfire Cookery Cookbook Giveaway


    The publishers of Campfire Cookery were nice enough to send us a copy of Campfire Cookery: Adventuresome Recipes and Other Curiosities for the Great Outdoors
    , by Sarah Huck and Jaimee Young, to give away to the GardenFork audience.


    The book is full of recipes that you can cook outdoors, either in your backyard or your backwoods campfire. It also includes campfire songs, stargazing, foraging, and other fun stuff to do outside. read our foraging articles here Its more than just a cookbook, its an outdoor adventure how-to.

    How to enter the giveaway: Giveaway is closed!

    Post a comment on this page, telling us your favorite campfire recipe, tips, or recollection of past campfires. That’s it, you’re entered into the giveaway. You can leave one comment everyday. Each comment is one point. Giveaway ends November 23rd, 2011 at midnight.

    To increase your chances of winning the book giveaway, you can do each of the 4 following things, for one additional point each:

    Follow GardenFork on Twitter

    Like GardenFork on Facebook

    . this giveaway on Twitter

    [SFBSB button=”button” style=”float:left;”] . this giveaway on Facebook

    Leave a comment below to enter and lets here your campfire stories!

  • How to defrost a lock : GF Radio

    How to defrost a lock : GF Radio

    Joel the locksmith joins us to talk about how to fix a frozen lock,  buying or renting the correct tool for the job, how to fix an iphone, and spy photos of prototype cars in Detroit.

    Joel asks Eric how to fix an iphone, and Eric talks about how he fixed his iphone using Ifixit.com, and drops the hint again that Ifixit.com needs to be a sponsor of GF Radio. One needs a few special tools to open up an iphone, but they are affordable and available online.

    Fixing an iphone with large fingers takes up more time than one would think in this show, and Mike offers his take on the iphone button and what might be wrong with it. Joel thanks eric and mike for being ‘helpful’.

    We then ask Joel locksmith questions, and he suggest using Tri Flo instead of wd-40 to lubricate lock cylinders. The problem with using WD-40 in a lock is that as the lubricant dries out, it gums up the cylinder again . Joel also advises not to use graphite on locks, it make more problems and solutions.

    Joel tells us the most common ways someone will break into a home, and how to keep your home from being broken into.

    We then finally get to how to defrost or unfreeze a frozen car lock. Listen and tell us your frozen lock stories below:

    photo by mconnors

  • My visit to the Waffle House

    My visit to the Waffle House

    I have never been to a Waffle House , until now. I love waffles, see our how to make waffles video here, and have even done waffle recipe home made baking powder experiments here. But I had never been to a Waffle House.

    I love the name, and while on the road in the midwest, we needed breakfast, so I used my super-computer / smartphone to find one.


    The waffles are not like those giant thick waffles that are ubiquitous at diners, the belgian style waffle; these waffles were thinner, which I like. The menu offers you an order of 1 or 2. I had one, but I saw lots of people have 2. They were good, but not wow. I wasn’t expecting wow, though. This wasn’t an artisanal local food waffle made from scratch, its a chain restaurant waffle.

    Waffle House Waffles

    What was really good were the eggs. So many times scrambled eggs, be they at a local diner or chain, are awful. Not sure how one can not cook scramble eggs badly, but many do.

    Each egg order at the Waffle House are cooked individually in small cast iron pans with cheese. The eggs puff up nicely, I’m betting the cheese adds moisture to the eggs much like adding a small bit of milk to scrambled eggs does.

    Scrambled Eggs with Cheese


    Very nice people behind the couter, it takes a certain kind of patience to deal with the public, and these people had that. I think you should treat everyone equally, especially people in the food service world – they are, after all, touching the food you’re going to eat. And I see people who treat food service people with what ranges from impoliteness to down right rudeness, which I have zero tolerance for. Karma is boomerang, you know.

    Coffee was a bottomless cup, AND when we were leaving, we were offered a to-go cup of coffee for free. Interesting.

    What is your best waffle experience? Is there a special waffle restaurant in your town? Do you make waffles at home, if so, what is the secret to good waffles? Please tell us below:

  • More on Fishing and the Great Outdoors GF Radio

    More on Fishing and the Great Outdoors GF Radio

    Mike finishes up his how to fish for largemouth bass talk, ice fishing is just getting started, and there is still time to go out on a river and go fishing. Mike talks more about what kind of fishing lures for when, and why you shouldn’t put your tackle box in the back of your truck.

    We tell you why you should wear blaze orange clothing when hiking in the woods in the fall. We then move on to viewer voicemail, and answer a question about why are there cracks in a listener’s new drywall taped corners.


    photo by jeltovski

  • Tiny House Directory free from Tiny House Blog

    Tiny House Directory free from Tiny House Blog

    GardenFork became a fan of the Tiny House Blog on Facebook today, and at the same time signed up for their email newsletter.

    get this free directory

    As a bonus, when you sign up for their email newsletter, you get a neat downloadable PDF, the Tiny House Directory, an indexed list of websites, blogs, architects, builders, and kits of all sorts of tiny houses. Tiny houses include boats, yurts, wagons, trailers, tipis, straw bale houses, log cabins, prefabs. Neat.
    I like that a bunch of links have been indexed and are all there on a few pages, so you don’t have to use a search engine to find stuff; Tiny House Blog has done all the work for you.

    Andrew Odom, author of the Tiny rEvolution blog and a contributor to Tiny House Blog, got me interested in the Tiny House movement. He has a new post on hanging windows in your tiny house.

    Not all of us will be living in tiny houses, but even if you are not downsizing, you can get great ideas of how to live with less stuff, and lessen your impact on the earth with the info on the Tiny House Blog and Tiny rEvolution.

    You can sign up for our email newsletter right here:


    How are you downsizing? Are you moving to a tiny house? Let us know below:

  • Beaver Lodge Canoe Trip

    Beaver Lodge Canoe Trip

    Yesterday after the giant storm of 20 inches at the end of October was really a great day it was super puffy clouds out there blue sky about 50° and I said hey let’s take out the canoe. So we put the canoe in the Ford F150 and drove down to one of our local ponds.

    Were we went canoeing isn’t really a pond, though it’s called a pond, not sure why, it’s 145 acres. This area was originally a little beaver pond, the beavers had dammed up a small creek, and it became a very large marshy area. The state came in and made the dam into a spilway and created this really great lake perfect for canoeing. There are a lot of tree stumps and dead trees in the lake and this keeps powerboats out.

    This lake is our favorite lake to go canoeing and the water shallow, is really clear, it’s really quiet and there’s almost never anyone else out on this lake where there.

    parking the canoe to investigate the brook


    We were on the far end of the lake and we heard this babbling stream that I had not heard before so we canoed over to the shore, which is full of brambles and Mountain Laurel and wild blueberries, and we hiked through the brush and found this really cool little brook. I think is called a vernal stream, it was really quite active because was all the snow melt from the 20 inches of snow we had in October. While checking out the broad we run across fresh signs of beavers harvesting trees and took some pictures. Beavers have front incisors that are constantly growing so they need to constantly eat wood.

    There are a few beaver lodges in the lake and we always the check them out, and you never see the beavers, they  can hear us coming, we’re pretty clunky with the canoe, banging the paddles against the side of the canoe. We came across one of the beaver lodges right in the middle of the lake and another that is against the shore of the lake.

    I thought it interesting that beavers will actually build a beaver lodge on the side of the lake rather than the middle of it.

    We learned a bunch about beavers on Wikipedia. What I thought was the really cool is that the preferred food for beavers in the summer are water lilies, and this lakeis full of water lilies, so there you go, the perfect place for beavers.

    Canoeing is a great outdoor activity that doesn’t really cost that much money you can get a inexpensive used canoe, a few life preservers and you’re set to go.

    Where do you guys like to go canoeing your area?

  • Baking Powder Recipe – How to make it

    Baking Powder Recipe – How to make it

    Rick and I talked on GF Radio about his ‘ah ha’ moments working with baking powder, and Rick wrote a post about how baking powder works on his Rick’s Column for GF. I added to the conversation that I had learned about how baking powder works, and why it needs to be fresh, from my friend Charlie, who helped me make this Southern Biscuit Recipe video for GF TV.

    Charlie explained to me that baking powder needs to be fresh, and that the can of baking powder the average person has in the cabinet is probably stale. So Charlie made me a convert to making my own baking powder with this recipe:

    1 part baking soda to 2 parts cream of tartar

    The beauty of this is a lot of recipes call for 1 tablespoon of baking powder, so to make it fresh, just mix together 1 teaspoon of baking soda and 2 teaspoons of cream of tartar. Its best to buy cream of tartar online, Penzy’s Spice has it.

    To show just what a difference fresh baking powder makes, check out these blueberry pancakes. I made these using the fresh baking powder recipe and the pancake batter had yogurt in it, which makes baking powder go into overdrive, because of its acid content.

    pancakes made with fresh baking powder recipe
    check out the rise from using fresh baking powder for these pancakes

    Do you mix baking powder fresh? are there other kitchen products that we should be making fresh instead of buying them in a box or container? Let us know below: