Not many things match a beehive swarm in terms of amazing nature. One of my beehives swarmed and I was lucky enough to be on the roof while it was happening. Watch the video:
This beehive swarm is from a new package we installed this spring, which is unusual.
I made two huge mistakes while the hive was swarming.
First, I saw the queen on crawling on the roof. And I went to pick her up, but I wanted to take a picture first. I got the picture, but then the queen flew off. Had I gotten the queen into a queen cage, I could guide the swarm into a new hive. But no, I wanted to use my camera. Not Smart. I’m still annoyed at myself for that.
I should have capture the queen. I didn’t.
The other dumb thing I did was to not realize that the swarm was alighting, or forming, on the front of the hive, instead of a tree branch. The hives are on top of a 4 story building, above the tree line. No tree limbs above the hive for the swarm to collect on, so they just formed on the front lip of the outer cover. I was so wrapped up in what to do, and recording the spectacle on with the camera, that I completely blanked on what was right in front of me.
Grab the swarm!
This only occurred to me after I called my GF Radio Podcast host Rick, and then I bolted down the ladder and 4 flights of stairs to get a bait hive. By the time I got back up, the swarm had left the hive.
I had two unique chances to grab the swarm and I blew it. Insert choice words here.
Its unusual for a new hive, started from a package, to swarm. My radar was not attuned to this hive swarming. I had just put a third brood super on the hive, and had not opened the hive to check for swarm signs. I have never had a package swarm before. Now I have. Lesson learned.
Going forward, I will be more vigilant about swarm signs, even in packages. Rusty at Honey Bee Suite has a Taranov Split that I will try next time.
A winter beehive inspection can be either a good thing or a bad thing, here’s a video I made about how I check a beehive in winter.
Winter Beehive Inspection Rules
Only do this if its warm enough. If its above 40F, its ok, but warmer is better.
Open and close the hive real fast. You don’t want to chill the hive.
Don’t pull any frames, peer down into the hive as best you can.
In winter, you can’t do much for your bees. What you can do is make sure they have enough food. Of course, you have prepared the hive in the fall, by going through this Winter Beekeeping Prep list. Now about all you can do is open it up quick, and add some sugar if they need it.
I use the dry sugar winter feed method, and it has worked well for me. So in the winter, I can just pop the cover and top off the layer of dry sugar if need be. If the bees are not looking good or if there are very few bees in the hive, there isn’t much you can do in winter. The hive will probably die, as a result, be more prepared going into fall next year.
A winter beehive inspection can tell you if you need to order a package or nuc of bees. If the bees are alive, it can also give you a sense of accomplishment. Getting honeybees to survive winter is no small challenge, especially in norther climates.
You can see in these photos how the bees have chewed through the newspaper and are now eating the dry sugar. Through the winter, the sugar has hardened as it absorbed moisture from the hive, this is a good thing.
So again, work fast, keep the hive open only as long as needed. Its not summer, its cold out, and the hive has to be kept warm.
Here’s a homemade bucket bee feeder I made to feed the honeybees sugar syrup. Watch the video and then step through the photos below.
I like the bucket bee feeder because you can feed the bees sugar syrup in the early spring and fall without having to open up the beehive. Our other sugar feeder videos all involve opening up the hive to feed the bees. This doesn’t.
The downside is if the weather is wet or cold or both, the bees wont fly and can’t get to this feeder. So I will use a combination of hive sugar feeders and this outdoor feeder.
Couple of tips when making the bucket bee feeder:
Be sure to buy a food grade bucket with a gasket ring that seals the lid.
Don’t drill holes where the handles meet the bucket.
Fewer holes might be better.
The bucket must be level when inverted.
You may have to shop around to find a bucket with the support ring that we will use as the feeder. This ring is for a person to be able to handle the bucket better with their hands, but when the bucket is inverted, the spaces under the ring make for great sugar cups.
5/64″ holes
I found that a 5/64″ drill bit worked well for me. Several people have suggested, after watching the video, that fewer holes would keep the sugar syrup from overflowing as much when its first turned over. With fewer holes, one would drill or cut through the walls between the spaces to allow the syrup to fill the ring. I’ll have to experiment with this. Let me know if you do as well.
If you accidentally drill in to the ring cavity where there handle attaches to the bucket, like I did, you can glue the hole shut. Silicon caulk works, or some plastic glue.
When you first flip over the bucket, some syrup will pour out. It will slowly stop. If it doesn’t stop, the drilled holes are too big, or the gasket isn’t sealing.Be sure the bucket is level, or the syrup will flow out.
As suggested by a viewer, test this out with plain water first. I used a 1:1 sugar syrup solution with some essential oil mix added with the feeder. Here is a homemade essential oil mix. I now buy a commercial essential oil mix from a beekeeping supplier, its just easier for the small amount I use every year.
Here is the oxalic acid varroa mite treatment I use on our honeybees. I’ve used a few mite treatments in the past, tried the varroa resistant queens, one year I did the hands off method, and the oxalic acid mite treatment is the best thing I’ve used so far. This is based on my use, and other beekeepers I know. Some mite treatments are pretty awful in the hive, oxalic acid strikes a good balance.
Oxalic acid occurs naturally. It is present in spinach and rhubarb, and is found in small amounts in honey. My treatment method is based on a post by Rusty on my fav beekeeping blog, Honey Bee Suite.
One of the great things about this method is that it is super easy. Some people will vaporize oxalic acid in their hives, but this requires some gear, and I don’t recommend it for the hobbyist beekeeper. Our treatment process uses a 60 ml syringe. You can buy these at agricultural supply stores, or online here.
This sugar – acid mix is also great for spraying bee packages before putting then in a hive. It knocks down the mite load quite a bit. All the packages I hive are sprayed with it before dropping into a hive. When treating a regular hive, it is best to apply the mite treatment in late fall, when there is little brood in the hive. The acid will not kill any mites that are in capped cells.
Oxalic Acid is easiest to buy as wood bleach
The oxalic acid varroa mite treatment recipe:
Oxalic acid is also known as wood bleach. It is used by wood finishers. You may be able to find it in a hardware store. I couldn’t find it, so I bought it online, order oxalic acid here. You can buy the syringe here.
Put 600 ml of hot water in a quart Pyrex container, or similar glass jar.
Add 35 grams of the oxalic acid crystals and stir to dissolve in the hot water
Add 600 grams of granulated sugar.
Store in a glass jar – I use a canning jar.
Take the cover off the hive, do not break apart the hive. You apply the acid through the top super.
Measure 50 ml into the syringe, and dribble 5 ml into the spaces between each frame of a 10 frame hive. Some people will use more of the acid in the frame space areas that have more bees in them.
Rusty suggest practicing the dribble with water before doing this, and I agree. It takes a little work to get it right. Rusty references the Scientific Beekeeping site in her post for the exact oxalic acid varroa mite treatment recipe.
After trying several kinds, this beehive winter wrap works best for me. Its easy to put on, and I can re-use it every year. It makes winterizing beehives easier, and the honeybees make it through winter.
Beehive Winter Wrap How To:
Insulating the beehive is the first part of winter prep. The second and third parts of winterizing the beehive is to use an insulated inner cover and add a backup source of food, we use the dry sugar method. Before any winterizing, treat the bees for varroa mites.
I use the 2″ thick polystyrene you can buy at the lumber store. Its usually used for insulating walls and basements. Its not the cheapest stuff, but it will last a long time, just don’t beat it up. One 24″ x 96″ piece will wrap a hive with some leftover.
I cut it with a retractable box knife with the blade pushed all the way out. Be very careful when cutting. Use a piece of metal or wood as a straight edge, and make series of cuts down through the polystyrene. You can also use a hand saw with a straight edge. Best to cut this on a work table or somewhere you don’t mind getting knife marks. Once you make several cuts down through the material, you can snap it off, kinda like cutting drywall.
Keep in mind the pieces do not have to be perfect.
Do Not Block The Lower EntranceUpper Entrance Kept Clear!
The front piece of insulation will be shorter than the back piece. You have to make sure not to cover the lower or upper entrances with the insulation. These both need to stay open through winter. I use a ratchet strap to hold the hive wrap against the beehive, you could also use 2 bungee cords, one near the top, one near the bottom.
Here’s how to put together an insulated inner cover for your beehive without having to buy a new cover or build one. I learned this method from Phillipe at MudSongs.org , he has some great info on his beekeeping site, very down to earth.
An insulated inner cover reduces or prevents condensation in the beehive in winter.
Why does this matter? Condensation is water that collects on the top of the hive. It forms on the side of the inner cover that faces the bees. When enough water collects, it will drip back down onto the bees. Not a good thing.
Wet bees are dead bees.
Especially in winter.
How does this cover help? Condensation happens when warm air meets a cold object. In the beehive in winter, the bee cluster is warm, and there is some humidity in the air. When the warm air from the cluster rises and hits the cold inner cover, the water vapor condenses and drops back onto the bees. Not good.
The insulation that sits on top of the inner cover here keeps the cover from getting real cold, thus reducing or eliminating condensation. Since I have been using the insulated inner cover, I have not seen signs of condensation in the hive. If you find mold in your hives, you have condensation, FYI.
My variation on the insulated cover is to put a shim between the upper super and the inner cover. I then put sugar on top of the frames, using the dry sugar, aka mountain camp, method. This sugar provides a backup food source, and absorbs moisture in the hive.
Be sure the slot of the inner cover is not covered, one should always provide an upper entrance to the hive, plus it allows for air flow. Yes even in cold weather, I believe a hive needs some air flow, so provide an upper entrance. Remember to invert the inner cover.
You should also insulate the sides of the hive.
Here is how to stack the parts of the top of the beehive, top to bottom:
Outer cover sits on top of insulation, and usually covers it.
Insulation – I use 2″ thick polystyrene.
Inner cover, turned upside down, flat side faces upward.
Spacer shim, with dry sugar on top of newspaper.
Top brood super
I built some DIY insulated inner covers that are more involved than this stack method, and they work well for me. If you are handy, have at them.
The mountain camp method of feeding your bees sugar during winter is the best way I’ve found so far to provide bees with an emergency food source. For whatever reason, honeybees may run through their winter food stores, and need additional food to get through the tough winter months. The mountain camp method provides this back up food source in a brilliantly simple way. Watch our intro video and follow up video, then read through the rest of this beekeeping 101 post.
Mountain Camp Method How To
Before I started to use this technique, every fall I would make sugar patties for the top of the hives as an emergency feed. They work fine, but making sugar cakes is a pain. This does the same thing.
The mountain camp method of feeding honeybees emergency sugar is pretty simple. And that’s why I love it. Here’s how to do it:
Lay a sheet of newspaper over the top of the hive, cutting it down so there is space around the inside perimeter of the hive box.
Pour granulated sugar on top of the newspaper.
Spray the pile of sugar with water so it crusts over.
Place a spacer shim and/or an insulated inner cover over the pile of sugar.
We built these DIY insulated inner covers that have a spacer built in to allow for sugar feeding, be it sugar syrup in zipper bags or pollen patties. If you don’t use a cover with that allows for this, you can build a simple spacer out of 1″x3″ common pine. I haven’t seen a spacer that’s deep enough for sale anywhere. They are easy to make.
Insulated Inner Cover with built-in spacer for sugar feedingSimple spacer allows for dry and wet sugar feeding. Easy to build.
This pile of sugar on top of the hive provides a second benefit, it absorbs moisture in the hive during winter, and prevents condensation from dripping back down on to the bees. Wet bees in winter is a very bad thing.
Questions I have gotten about this method:
Can I feed them this dry sugar instead of sugar syrup in the fall? No. You still need to feed the bees sugar syrup in the fall. Watch our Sugar Syrup Feed videos.
My bees have plenty of honey and I fed them sugar syrup during the fall, why do I need to do this? I do the same thing in the fall, but the dry sugar is an emergency winter feed. Sometimes bees run out of their own stores, or sometimes they can’t get to them. Below is a photo of bees taking up sugar I provided them. If I hadn’t provided the bees with this emergency sugar, they would be dead now.
Why is it called mountain camp? From what I understand, a person who goes by that name posted this method online a while back and the name stuck.
Check out more of our beekeeping 101 and winter prep videos and posts:
Here’s a video on how we harvest honey using an uncapping roller. This extracting tool has saved us a lot of time, say goodbye to capping knives.
Using an uncapping knife gouges the honeycomb
Previous to my friend Rick telling me about this cool too, we would use a capping knife to cut open all the honeycomb to harvest honey. This results in a lot of wax and damaged honeycomb frames. I never liked this part of the honey extraction process, always gouging out chunks of honeycomb.
But the uncapping roller is great –buy it here . You have to take care not to press it too hard into the comb, or you will damage it, but you get the hang of it pretty quickly. Roll it several times back and forth and up and down. You may have to pull a few frames out of the extractor and re-roll them.
I have found that not all the honey comes out of the comb, but its not an issue for me. I put the honey supers back on the hive, above the inner cover, and let the bees clean up the frames. Its all good. I have found it helpful to have a hair dryer, aka blow dryer blowing hot air into the extractor. It seems to help the honey sling out of the comb.
Combining this new roller with the DIY bee escape board we made – video here – , honey extraction has become a much easier process. I have found its best to put the escape board on the hive a 2 days before you plan on removing the honey super.
The capping roller doesn’t ruin much of the comb.
The uncapping roller cleans up easily. I use a spatula to remove as much of the wax cappings as possible from the tool and then I run it under water for a minute.
A beehive knocked over by wind or a bear or storms is not fun. Here’s how to prevent your beehives from being knocked over.
I recently got a call from my friend Bill, saying that one of our beehives was knocked over. Normally, a beekeeper would stress about this, I didn’t, watch the video to see why.
When a beehive falls over, its usually a very bad thing. The supers are open, and the bees are very agitated, and if its cold or raining, the bees may die. Check out what happened to my friend Erik of Root Simple when his hive fell over.
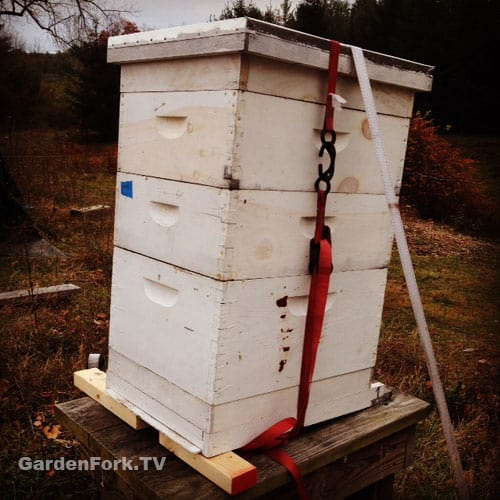
Strapping your hives with ratchet straps, the good kind used by truckers, will reduce the chaos when a beehive is knocked over.
We first started strapping our beehives as part of our bear proof the bee yard project. If the hives are strapped, the hives stand a better chance of surviving a bear in the beeyard. One can say that a ratchet strap won’t keep a bear from tearing open a beehive, but I’ve read where the strapping has helped save hives. Watch our bear proof a bee yard video here.
But an additional benefit of having to strap the hives because of the bears is the ability of the hive to withstand a fall.
Stake for Straps
Yes, removing a ratchet strap every time you want to do a hive inspection is a pain, but it may save your hive one day. Its important to buy good quality ratchet straps, and spray them with WD40 or similar lubricant every few months.
In winter, we double strap our hives – see this winterizing beehives post – one strap is around the hive, another straps the hive to the ground. We have found these spiral spikes that are sold for dog runs work well. Wooden stakes can get loose with frost heave.
High winds knocked over this hive, but the strap kept it pretty much intact.
Even our hives on city rooftops are strapped, one less thing to have to worry about.
A Hive Inspection is just that, you are checking out the beehive to see how its doing. Part of our Beekeeping 101 Video series, today we are doing a hive inspection of a nuc we installed this spring. This bee nuc had a late start, as did all our bees, because spring came late.
Note in the beekeeping video we did not smoke the honeybees. I don’t smoke bees unless I know I am giong to take apart the hive or pull honey off. When you smoke the hive, it can cause stress in the hive, and the bees start to eat their food stores, so it sets them back a few days whenever you do it.
If you are going to just do a quick eyeball check, I see no need for the smoker. For this hive inspection, I wanted to confirm the presence of the queen and make sure the hive looked robust and smelled good. You can tell a lot from just how the bees are behaving.
Some of this is gut feeling, but listen to your bees while doing the hive inspection. If there is a low incessant buzz, the beehive may be queenless, which is a bad thing.
How do you know if the hive is queenless? The big red flag is no uncapped brood. In other words, no open cells with very small eggs or larvae in the bottom of the cell. You might also see a lot of drone egg cells, which means you have a drone laying worker. Which is bad. This means one or more of the female workers has started to lay eggs. The eggs will be sterile, so they become drones, hence the presence of large drone cells.
Pull out a frame from the center of the top brood super. If you see open brood, that’s a great thing. The queen has been present in the past few days, and she is probably still around. You want your frame pattern to look roughly like the photo above. It wont be perfect, but something like this. Not every cell in the brood area will be capped, there will be some empty ones.
I think its best to learn how to raise bees by having two hives. You can compare the two, and get an idea of what is ‘normal’. There are several good books on beekeeping we recommend here.
Getting honeybees ready for winter, aka winter beekeeping preparation, is one of those things that can fall off the list for beekeepers, probably not a good thing. I believe if you just leave your hives as is, most will perish.
Below we have several videos on getting honeybees ready for winter, but first of all, here’s a few things we do to each hive in late fall to prepare for winter.
Winter Beekeeping Checklist:
Feed 1:2 sugar syrup in the fall
Treat bees for varroa mites
Feed one gallon of syrup with Fumagillin
Add dry sugar to the top of the hive.
Use an insulated inner cover.
Tilt the hives forward.
Close up the screened bottom board.
Insulate the hives with polystyrene.
Install a mouse guard on entrance.
Strap down the hives.
Varroa Mite Treatment: From what I understand, varroa mite populations in your beehive soar in winter, so knocking down that population before winter makes sense. Watch our oxalic acid varroa mite treatment video, its pretty easy to do and is a huge step toward getting your bees through winter. One should rotate mite treatments, Hop Guard is the other mite treatment I’d suggest.
Sugar Syrup: Ask your beekeeping neighbor when they start feeding sugar syrup. I add Fumagillin the first gallon of syrup. Let the bees take down all this treated syrup before adding more sugar syrup to the feeder.
Dry Sugar: This year we used the mountain camp sugar method when providing sugar on the top of the hive. In years past we have made sugar cakes, but this year I wanted something simpler. Reading about this method on the Honey Bee Suite blog, I agree with Rusty’s post, that the mountain camp dry sugar method works pretty good, and because its easy, you will do it. Making fondant or sugar cakes is a pain, and you will likely procrastinate about making the cakes it until its too late. Watch: Mountain Camp Method Video
Mountain Camp Winter Sugar Feeding
Insulated Inner Covers: I am a big convert to using these. Before I put them on the hives in winter, every spring I would find mold in the hives and dead bees. Insulated inner covers reduce or eliminate condensation from collecting on the top of the hive. Imagine its raining inside a hive in winter, that’s condensation. Wet bees are dead bees. Watch and learn how make an them in this video:
Or you can use a piece of polystyrene, a wood spacer you can easily make, and your existing inner cover to do the same thing.
Top View of Insulated Inner Cover – purchase this or make your own
Tilt the beehive forward: Gravity works. Extra insurance to keep condensation from raining down on the hive cluster. Tipping the hive forward allows any drops of water that have begun to form on the top of the hive (which is the bottom of the inner cover) to slide forward, hit the front wall of the hive, and finally, draining out the front of the hive. Its easy to do, just slide a 2×4 under the back of each hive before you strap it down.
A few more winter survival tips:
Close up the screened bottom board: This is one of those opinion based things. I use screened bottom boards that have a plastic board that slides into the bottom. So I close off the screen in winter. Because it is important to have ventilation in the hive, yet reduce condensation, the hive needs at least one top vent hole.
Insulate the Hive: First of all, the best method we’ve found so far is to surround the hive with with polystyrene, secured with a ratchet strap. We have two videos about this, watch here: Beehive Winter Wrap
Mouse Guard: This can be bought from bee suppliers or you can make one out of 1/2″ hardware screening. One year I blanked on mouse guards, as a result, I lost a hive to mice. Its sad and a pain to clean up.
Close the guard down to about 2″ wide with duct tape
Strap Down The Hives: This may seem overkill, yet it has saved us. We secure the hives against high winds and bears. One strap goes around the hive itself. The second hive secures the hive to the ground with two metal stakes. Furthermore, if you live in an earthquake zone, strapping your hives is a must. Watch our video about how using straps saved a hive here.
Winter beekeeping is not the easiest part of keeping bees, therefore some preparation in the fall can help bees survive winter. Follow these tips and increase your chances of getting bees through winter.
Clear Cloudy Honey with our how to video. Crystallized Honey can be easily decrystallized, watch Eric show you how. Why causes cloudy honey? The most common reason is temperature. The honey has been stored somewhere and the honey temperature eventually lowers enough to crystalize. The moisture content of the honey also causes cloudy honey.
How to Clear Cloudy Honey, some info:
Is it safe to eat cloudy honey? Yes, honey keeps for years. You can stir crystallized honey into your tea and it will dissolve just fine. Its hard to measure cloudy honey for baking, so its best to warm it first.
Can I use a slow cooker as a cloudy honey fix? Yes, its a great solution
There is some foam that floated to the top of the warmed honey. That’s ok, just skim it off, its beeswax probably.
The types of flowers that the honeybees collect from also can cause cloudy honey. If there are lot of rape seed flowers nearby, part of the mustard family, the honey produced gets cloudy quickly.
In my experience, we have had honey get cloudy when we have harvested honey from dead hives, and the frames may have a mix of capped and uncapped honey in them. The uncapped honey has a higher water content, and I believe this contributes to the cloudy honey.
If you have frames of capped and uncapped honey, I would leave them in the hive. If its a dead hive, I’d suggest cutting out the capped comb for comb honey. Or just extract the whole frame, keeping in mind this mixed capping honey should be consumed sooner than the capped frame honey.
Make a DIY Bee Vacuum. Usually a beekeeper can just shake a swarm of bees into the bucket and walk away. Every now and then, however, a vacuum is the only way to get the bees. In this short video, Rick shows how he constructed a bee vacuum for less than $25.
Another of our Beekeeping 101 videos on how to do a winter bee inspection. Links to more beekeeping videos at end of the post. This time we open up the beehives in late March to show us feeding bees in winter. Keeping bees in areas with snow and winter, you will want to add sugar cakes, aka fondant, in the winter, and then add protein patties in late winter – early spring to get the honeybees going early.
You can open a beehive if its above 40F to do a quick winter bee inspection, if its in the 30sF, you can open it real quick to put some sugar on the top of the hive. Do not take the hive apart for a full inspection. We are just taking off the outer and inner cover, and looking in from the top of the hive real quick. The faster you do this the better, I think.
Honeybees may not always crawl up to the top and show themselves, they may still be clustered in a lower super, so just leave them that way. If you come across a dead hive, as we did, my suggestion is to leave the hive be, tape up the entrances, and clean out the hive when it warms up. You tape the entrances closed to keep the wax moths from moving in as spring approaches.
Dead Bees near sugar cake
Why did my bees die? Its not always obvious. Condensation is a big winter killer, but since we switched to the insulated inner covers we built, click for the insulated inner cover post, we have not had a condensation problem in the beehives in winter. Every year we have had a beehive die in winter, it is hard to get them all through winter. So when a hive dies, don’t blame yourself if you have done the following:
I found these supersedure cells, sure sign of a queenless beehive, yesterday. Supersedure cells are a beehive’s way of raising an emergency queen. Something has happened to the queen, either it died, or the workers killed it because it was injured or not laying well, and the honeybees are raising a new queen. There were no signs of freshly laid eggs in this hive, and very little capped brood.
Supersedure cells are different than swarm cells. Swarm cells are queen cells that the hive is raising to create a new queen to take over the hive after the hive swarms. When a hive swarms, the current mated queen leaves with the swarm, leaving the new queen raised from the swarm cells to take over.
This hive had already swarmed, and I was thinking the new queen probably wasn’t well mated, considering we only have two hives in the yard here, and there is only one other hive nearby of Italians that I know of – there are probably feral hives nearby as well.
How do bees raise a new queen? They take some freshly laid eggs, usually 1-3 days old, and place them in these enlarged queen cells, and feed the larvae a diet of royal jelly. They don’t feed these larvae anything else, and the 100% royal jelly diet causes them to develop into queens rather than workers.
I happen to have just raised a new queen in my queen nuc, so I pulled out the frames with the supersedure cells on them, placed them in a nuc with some honey frame and workers, to make new queens.
I then took the nuc with the mated queen I just raised, and did a hive combine of the queenless hive and the mated queen nuc. I shot some video and we’ll be posting a video of that soon.
Added: Beekeeping nomenclature can be vague and confusing, because there is no one beekeeping terminology authority, here is a description of supersedure cells from my favorite beekeeper, Rusty, of HoneyBeeSuite.com :
A cell hanging off the middle of the frame somewhere is usually a supersedure or “emergency” queen cell. A cell hanging off the bottom of a frame is usually a swarm cell.
Supersedure cells are often begun after the eggs are laid. The bees, knowing they need to replace the queen, begin feeding royal jelly to a young larva they have selected. They build a supersedure cell around this larva (or several larvae) and it hangs down from the face of the comb. Swarm cells, however, are built in preparation for swarming and are not intended to replace the queen, but to raise a second queen. This way, there will be a queen for the part that swarms and a queen for the part that stays.
Just a short “bonus” video from Rick this morning on Easy Native Pollinators. He’s been guarding his dill and fennel patches in the front yard from the Perfectionistas’ in the neighborhood (and inside his own house) all season long. The result is this somewhat seedy but extremely prolific butterfly habitat, a Motel 6 for Monarch Butterflies headed for Mexico in successive waves new hatchlings.
Rick also covers up his innate laziness in not getting a spring garden planted in a side bed by showing off his stand of Buckwheat. It grew from seed to super pollinator attractor in less than 3
weeks.
Solar Wax Melter plans here. Rick built this DIY solar beeswax melter out of a cooler and stuff you probably have in your garage.
Beeswax is made by the honeybees, and when you harvest honey, the cappings on the cells of the honeycomb are cut off, and you can save these wax cappings, melt them down, and make candles, soap, and all sorts of beeswax products. In this how-to video you’ll see how honeybees make beeswax, and how they build honeycomb in a beehive.
A solar beeswax melter will melt and clean beeswax without using electricty. Its very hands off, you don’t have to do much with it, just leave it in the sun and the solar power takes care of it. This wax melter uses a cooler and a piece of glass, its important that the glass not be double glazed, according to Rick. A few pans from the store and you are good to go.
With the melted and cleaned beeswax, you can make all sorts of beeswax based products. Some of the most popular are candles, soaps, and lotions.
Some interesting facts about beeswax: bees eat honey from their hives to produce beeswax, and the ambient hive has to be between 90 -97 degrees F.
Honey bee swarm capture, or bees swarm rescue, or hiving a swarm caught on video. Capturing a honeybee swarm is a neat experience. Bees swarm in the spring, and then they move to a tree limb to start looking for a new home. This is when we can capture the swarm.
This honeybee swarm was in Carroll Gardens Brooklyn, where there are a lot of urban beekeepers. In the spring the honeybees swarm, half of the bees leave the hive with the queen to form a new colony in a hollow tree, ideally. The swarm bees will cluster on a tree limb while their scouts fly out and look for a new home.
Beekeepers can take advantage of this cluster to create a new beehive. The bees are very docile while they are swarming, they have no hive to defend, so they are not out to sting you.
Luckily, these bees here on a low hanging limb that i was able to get to with a ladder. You take a bucket, place it below the swarm, and thump the branch on the bucket so the bees drop into the bucket.
Next time i should have a helmet cam on, it was a very cool thing to watch. This video shows the view from down on the ground. It was neat, to say the least. What is key here is I had an empty hive on standby for a swarm call like this.
You can also drop the bees into a cardboard box that has large vent holes covered with screening. The bees NEED lots of air or they will overheat.
We leave the swarm box on the ground for several hours to let all the bees fly into the box, ideally you will move the box in the evening, when its cooler and the bees are calmer.
In Brooklyn, honeybee swarms have become a regular occurrence, and people will walk right by without even looking sometimes. Check out all of our how to raise honeybee videos here


 This same hive gave me another headache earlier this month, see it here. Minor Beekeeping Meltdown


 Is it safe to eat cloudy honey? Yes, honey keeps for years. You can stir crystallized honey into your tea and it will dissolve just fine. Its hard to measure cloudy honey for baking, so its best to warm it first.