Category: Beekeeping

  • Inside the Hive:  Views from a First Year Beekeeper (Scene 2)

    Inside the Hive: Views from a First Year Beekeeper (Scene 2)


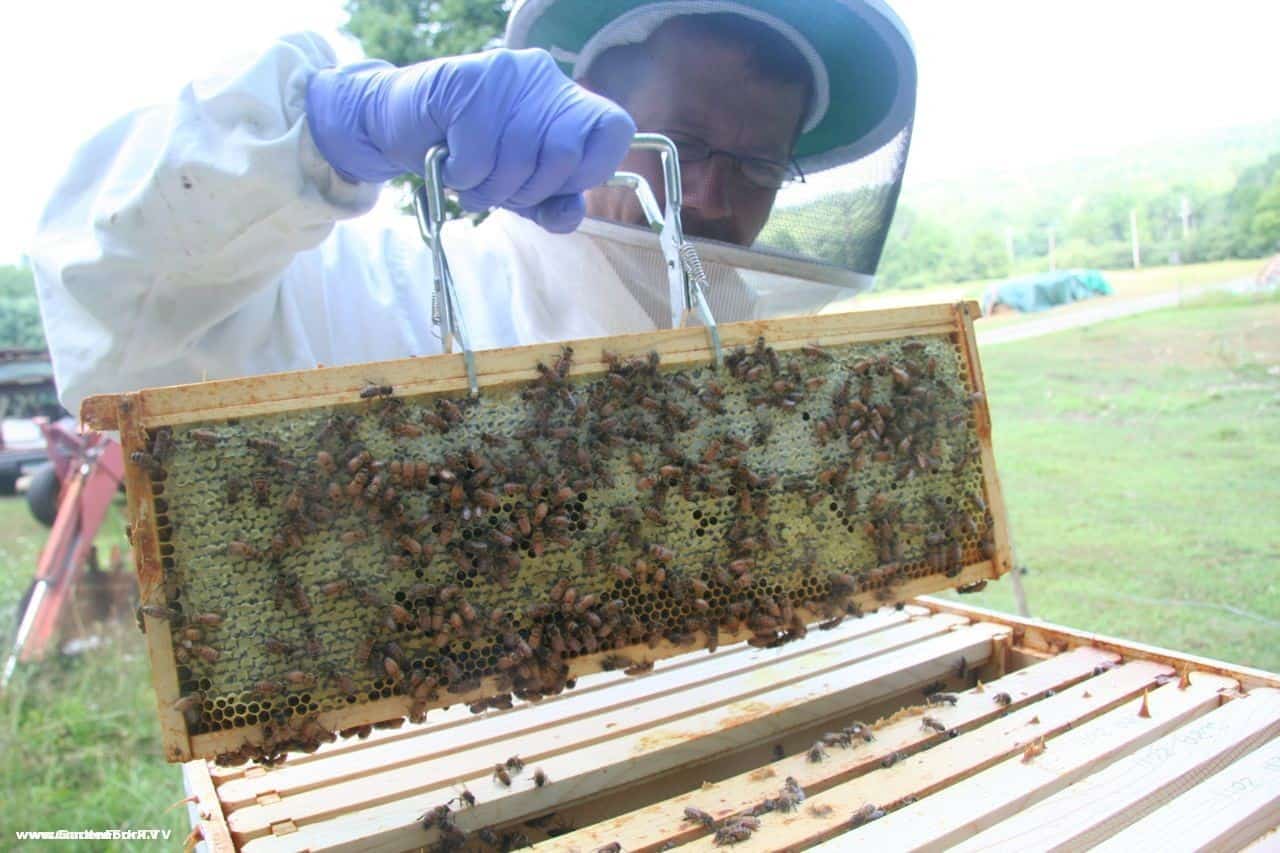
    My second image is a close-up of brood on a frame of wired wax foundation from hive #1. The bees in hive #1 had a lot of work to do as they came from a package brought from Georgia, installed about one month prior to this picture. I had installed a box of ten deep frames in that hive and the bees went through a lot of sugar syrup over the month and drew out a lot of comb on those frames.

    Visible in this picture are a bunch of busy workers tending to this frame of brood. The yellow capped cells have bees in their pupa stage (remember from school the idea of egg-larva-pupa-adult?) and below those capped cells are cells with larva in them of various sizes. Note how large the larva is near the lower left corner of the picture as compared to the larva in the center there. These cells are all “worker” sized cells and will eventually be female workers like the adult ones visible in the picture.

    Enjoy,

    Matt

    Read all of Matt’s Inside the Hive Posts here

    Matt (twitter @MattInTheGarden) is growing Asian cucumbers in his garden this year, tired of the reliable but uninspiring “Straight 8” variety. In a former life he sold computer and game system games in a mall and now can’t stand shopping in malls. He finds the Vicar of Dibley amusing.

  • Inside the Hive:  Views from a First Year Beekeeper (Scene 1)

    Inside the Hive: Views from a First Year Beekeeper (Scene 1)

    As a first year beekeeper, everything is new and exciting and, quite frankly, I find myself yammering on to anyone who will listen about the comings and goings around my bee yard. My intention is to capture images from in and around my hives this year and post them here for others to enjoy. I’m neither a great photographer nor a bee expert so I hope that we can exchange some tips, ideas and knowledge along the way.

    My first image is a close-up of newly drawn comb on a frame of wired wax foundation. This particular frame was installed a week earlier than this photo was taken and that itself is a testament to the industrious nature of the worker bees. All those cells you see in the picture (and those on four other frames) were created in seven days. In a week, the bees created a lot of wax and sculpted it into the comb you see here. Fascinating, huh? Nearly uniform in size and shape, this comb is the result of chemical processes within the bee’s body to convert food (such as honey or sugar water) into wax and then a physical manipulation of that wax.

    I wanted to point out a couple of things from this particular image that I think are noteworthy. First, the orange-brown globs in the cells are pollen. The foraging bees collect this and bring it back to the hive in their “pollen baskets”, which are located on their hind legs.

    Also you’ll notice a variety of  coloration on these bees. These bees are from hive #2, which is from an established nucleus hive I purchased from my beekeeping mentor. Unlike the Italians in hive #1, which were from a package and are of more uniform coloration, the bees in this hive are bright orange, and yellow and grayish and dull yellow. The queen has mated with a number of drones and since they all have slightly different “bits” flipped in their DNA and pass a bit of that along, you get variation, which is a very good thing. I like my “mutt” bees in hive #2 and think it is interesting to examine the slight differences among them.

    Enjoy,

    Matt

    Read all of Matt’s Inside the Hive Posts here

    Matt (twitter @MattInTheGarden) slings code by day and plays the role of handyman on his family’s hobby farm in Virginia. He makes his own Greek yogurt and enjoys time with his family. He is horrifically bad at the banjo, a mediocre juggler and can make a pretty good omelet. His black lab mix thinks he’s pretty nifty too.

  • Combining Hives – Beekeeping How-To

    Combining Hives – Beekeeping How-To

    Last week I discovered one of our honeybee hives had lost its queen, we had a drone laying worker in the hive. A laying worker is a worker bee who, after the queen of the hive dies for some reason, starts to lay eggs in the hive. The eggs of a worker bee are unfertilized, so they are all drones. Learn about a drone laying worker hive in this GF Post.

    Newspaper placed over top super of strong hive

    There are few remedies for a laying worker hive. One is to combine the hive with a stronger queenright hive. This laying worker hive was very weak, and its population low, so we decided to combine the hive with a stronger one next to it.

    To combine two beehives, first you want to get as many of the bees in the weak hive into one super. I did this by smoking the bees down into the lower brood super. The remaining few honeybees in the upper supers I brushed into the bottom super.

    Super from weak hive is placed over newspaper

    Then open the top of the strong hive you are going to combine the weak hive with. Place a sheet of newspaper across the top super of the strong hive, and cut a few slits in the paper with a knife or hive tool.

    Place the super of bees from the weak hive on top of this newspaper, put a notched inner cover on top of the weak super and then the outer cover of the hive, and leave it alone for a week. Be sure the super being added has the upper entrance a notched inner cover provides.

    Combined Hive. Strapping is part of our bear defense plan

    The newspaper allows the new worker bees to get acclimated to the strong hive’s queen scent, and allow the strong hive to slowly accept the new worker bees. The bees will slowly open up the newspaper sheet, and in the process, accept the new worker bees. After a week you can remove any remaining newspaper.

    Let us know any suggestions or comments below. How do you combine hives?

    Remains of weak hive on left, strong hive on right


  • Drone Laying Worker in a Queenless Hive

    Drone Laying Worker in a Queenless Hive

    When we check our honeybee hives, we first just stand there and observe them. We could tell there was something wrong with one of the hives.

    note the large drone cells scattered about

    It was quiet, the hive next to it was buzzing with activity.

    We opened it up to hear this odd low frequency hum in the hive, not something you usually hear. One look at a brood frame told us we had a bad problem on our hands.

    The queen was dead.

    And to make matters worse, one or more workers had started laying eggs in the cells, and since workers are infertile, all the eggs are drones.

    Queenless hive, signs of the drone laying worker here


    So how can a worker bee lay eggs? If  a hive is queenless, her pheromone is absent, and a few of the workers can then begin lay eggs. It doesn’t happen everytime a hive loses  queen, and this is the first time it has happened to us.

    You can’t just put  new queen in one of these hives, as the laying workers will kill the new queen. You have two choices, either combine the queenless hive with a healthy hive nearby, or get rid of the laying workers.

    One of our Facebook fans explained how she did this:

    Rhonda wrote: “Not good. I had this happen last year. I took the hive that had some young bees and some older bees in it and moved at about 2000′ away from the original location, dumped all the bees out onto the ground-every one of them, then took the hive body back to the original location. The younger, drone layers had not been out of the hive yet, so they could not find their way back home. I then transferred a queen cell from another hive into that hive and before long everything was good again. I know, it as a bit chancy, but the other options weren’t much better.”

    Healthy frame of brood, note the curled up larvae.

    The laying workers are nurse bees who have yet to leave the hive, so they have don’t know any outdoor landmarks or orientation to return to the hive. The older bees, who are foragers, know the location of the hive, so when dumped out of the hive, they will fly back to its location.

    This hive was pretty weak, so I’m thinking right now i’ll combine it with the stronger hive next to it, and perhaps split the strong hive in  week or two, with a new queen in the split. * we did the beehive combine, click here to see how to combine beehives

    Have you dealt with a drone laying worker? Let us know below

  • Honeycomb Surprise during beehive inspection

    Honeycomb Surprise during beehive inspection

    pulling up the super

    With spring coming early, we got to do our first inspection of the beehives last weekend. All our hives made it through the winter, which, despite the warm weather, is still a roll of the dice each year.

    Hive #1 was re-queened twice last year; the hive never thrived, and I wondered whether it would make it through the winter. It did, thankfully. We opened this beehive up and found the bees to be good, crawling all over the sugar cakes we fed them through the winter – see our winter bee feeding video here.

    After removing the sugarcakes, I started to take off the supers, and when pulling the second super, I felt the telltale rubber band pull of burr comb.

    Burr comb is honeycomb where you don’t want honeycomb to be. Honeybees don’t like open space, they will fill any void with honeycomb.

    What I had forgotten last summer when we re-queened was I neglected to remove the queen cage when we put the 2nd new queen in the hive. The queen is in a small cage to introduce her slowly to the hive, and you have to remove one of the frames of the hive to fit the cage in temporarily.

    comb full of honey

    So I forgot to remove the queen cage after the queen was released by the workers, and the honeybees filled up that open space with a huge piece of honeycomb. Which just happen to be full of honey from last fall when we found it. We removed the honeycomb, put in a frame, and put the hive back together with a sugar feeder on top for the early spring.

    The honeycomb tasted great, we brought it to our friends house for dinner.

    you can see the space the comb filled in the lower super
  • Beekeeping for Beginners FAQ Part 2 : GF Radio

    Beekeeping for Beginners FAQ Part 2 : GF Radio

    Matt joins Eric to answer Beekeeping for Beginners questions on this show. What equipment to buy, how to buy honeybees, where to put beehives in your yard, what kind of beekeeping suit to buy all answered here.

    what kind of beekeeping suit and beekeeping veil is good?

    what kind of frames should i use in the beehive, are plastic frames better than wood frames?

    wax foundation versus plastic foundation should i use plastic or wax foundation on the frames of the beehive? eric talks about the benefits of wax foundation and plastic foundation and frames

    Eric suggests 2  beekeeping for beginners books,

    Buy On IndieBound Here

    Click Here to buy on Amazon

    Click Here to Buy On Indiebound

    Click Here To Buy On Amazon

    Beekeeping for Dummies and the Backyard Beekeeper

    do you paint the outside of the beehive? yes, we use latex paint.

    should i buy 8 frame supers or 10 frame supers? matt and eric talk about the benefits of 8 frame boxes and 10 frame boxes

    what kind of beekeeping tools should i buy? eric suggests bringing duct tape, scissors, entrance reducer, smoker, woodchips, matches, 2 or 3 hive tools, a frame grabbing tool, needle nose pliers and more.

    what kind of hive stand should my beehive rest on? cinder block, wood, metal stands are talked about, eric suggests having a work table next to your hives.

    we talk about benefits of top bar hives vs. langstroth hives, and the drawbacks of top bar hives and langstroth beehives.

    should you buy a bee package or a honeybee nuc? eric talks about the advantages of honeybee packages , the pros and cons of bee packages, and the benefits of being a nuc or nucleus hive to start a beehive.

    eric advocates buying local honeybees and queens, either packages or nucs, the closer you can buy your bees the better.

    www.whiteoakapiary.com in Brewster, NY and www.warmcolorsapiary.com in Greenfield, MA is where eric buys queens and honeybees.

    should you feed honeybees in winter and how do i feed my bees over the winter? eric talks about how to feed bees in winter. you can watch our Beekeeping for Beginners video series here, and several videos are about feeding bees in winter.

    Eric uses a hand immersion blender to mix this sugar feed solution, and adds this homemade essential oil recipe for bees to the sugar

    The essential oil mixture is great for spraying the bees to combat nosema and bee diarrhea.

    winterizing beehives is discussed, here is eric’s beehive insulated inner cover video, Eric feeds sugar cakes to the bees in winter, not fondant or sugar syrup. Should you close or open a screened bottom board? Matt and Eric discuss

    Mudsongs.org is a favorite beekeeping blog of eric’s. Phillip documents his beekeeping in Newfoundland Canada.

    where to site your hives in your yard, where should you put the hives, what is the best location for beehives? eric has learned that full sun is best, he talks more about it during this radio episode.

    should I take a beekeeping class? eric says yes.

    and join your local beekeeping group. search on the web for your state’s beekeeping association, and that site should list local beekeeping groups.

    Megan of BrooklynHomesteader.com offers online beekeeping classes, and in-person classes as well.

  • Sugar Cake Recipe for Honeybees – Beekeeping 101

    Sugar Cake Recipe for Honeybees – Beekeeping 101

    This winter feeding sugar cake recipe is an alternative to making fondant to feed your bees. From what I read in beekeeping magazines and online forums, it seems many people are moving to simple cakes of sugar, an alternative to sugar candy, which is a pain to make. We use these cakes in our winter insulated inner covers.

    Note: I no longer use sugar cakes, I now use the Mountain Camp dry sugar method, its much easier.

    winter beek check list watchI use shallow foil cake pans to make these sugar cakes, you can use whatever you want, or you could just hand form them into patties or rounds.

    My point here being you don’t need to use foil pans for molds, you can free form the things, I just like how the foil holds the sugar cakes together, and are easy to transport in my truck.

    The cakes do not always dry perfectly, it has to do with how much moisture is already in the sugar. I suggest you make these a few days before you are going to use them.

    Sugar Cake Recipe For Honeybees

    To make what I call sugar cake is pretty simple:

    • Take a 5 lb bag of white sugar
    • Mix it in a bowl with 7.5 ounces of water and a few drops of an essential oil mix. our honeybee essential oil recipe below
    • Mix the water in well
    • Spread into the foil pans, or drop onto wax paper or paper plates and make round sugar mounds.

    Depending on how warm and humid your house is these dry overnight or a few days. Sometimes they crumble and crack, I think this is due to the moisture content of the bag of sugar you are using. Chunks of sugar cake are fine, the bees don’t care, really.

    It is key to measure the water precisely, i use scale; it makes a big difference. if you add too much water it doesn’t dry right, i think.

    You can also press this cake mixture into the inside of an insulated inner cover, if its deep enough.

    Let the cakes at least dry overnight, a few days is better, and you are ready to place them on the top of the hive. Take care not to crush any bees when you do this. You need to use a spacer shim, or an insulated inner cover with a built in space for feeding when adding sugar cakes to the top of your hive.

    Read more of our beekeeping posts here and watch beekeeping videos here. Here is the Honeybee Essential Oil Recipe Thx!

    beekeeping-sugarcake-vid-thumb

    Do you use sugar in your hives in winter? let us know below:

  • DIY Insulated Inner Cover – Beekeeping 101

    DIY Insulated Inner Cover – Beekeeping 101

    Here is the DIY insulated inner cover I built to prevent condensation in our beehives using easily purchased materials. All the hives we have lost have been in the late winter – early spring due to, I believe, condensation and varroa mite load. This year I am determined to eliminate condensation from our hives. Here is a how to on building a DIY insulated inner cover and why you should consider using this cover for your beehives. We put dry sugar inside the inner cover. (Winter feeding beekeeping videos links are at the end of this post.)

    The basics of this design are based on those at the informative beekeeping blog Mudsongs.org . I like to read how Phillip is keeping bees in Newfoundland, Canada.

    NOTE: Since building these DIY covers, I have also started using just a piece of 2″ insulation wedged between the covers, watch the video:

    watch beekepeing videos insert copy

    The inner cover I built has a space below the plywood for feeding the bees sugar , sugar cakes, fondant, pollen, or pollen patties. My thinking was why have a wood shim below the cover to place sugar in, why not make a one piece inner cover/shim. That way there would be on less piece of woodenware to deal with.

    I used pine 1×5 lumber, the outer dimensions are 20″ x 16 1/4″.

    Here is the bottom of the inner cover, you can hold the plywood in place with scrap molding or pieces of wood. Its important that any space between the plywood and side walls is covered, either with scrap trim or other wood, to keep the bees from moving up into the polystyrene. You don’t want the bees trying to chew the insulation. If you have the power tools and woodworking skill, you could dado the insides of the frame and slide the plywood into the dado slot.

    I glued these pieces of wood to the sidewall and the plywood, held with a clamp. This held the plywood at the correct depth to allow the insulation to drop into the upper section of the inner cover perfectly. Only use a waterproof wood glue, our beekeeping teacher said never to use Gorilla Glue, as it can foam, and the bees will try to eat the foam that comes out of the wood joint.

    Here is the 2″ polystyrene placed in the upper section of the insulated inner cover. Use small scraps to fill in any large spaces near the side walls of the cover.

    Be sure to drill vent – exit holes in your inner cover. These are 3/8″ but i’m thinking they should be 1/2″ to allow more airflow. Going forward, I may chisel out a 3/8′ x 1″ notch at the bottom of the cover to allow more bees to use the entrance. The holes seem to jam up traffic.

    How to cut polystyrene: get one of those utility knives with the blades that are real long, the kind that you can snap off when the tip is dull. use a straight edge to score the polystyrene. Don’t use too much pressure, make several passes to allow the knife to cut deeper. Be careful not to cut yourself.

    After scoring the foam about halfway though, you can snap the foam apart.

    Place the cut over the sturdy edge of a work table and make the break.

    top of insulated inner cover with 2″ polystyrene
    The large space built into the inner cover allows for sugar cakes to be easily put in hive
    Honeybees are eating through sugar cakes already

    Read more of our beekeeping posts here and watch beekeeping videos here. Thx!

    beekeeping-sugarcake-vid-thumb

  • Preparing Beehives for Winter

    Preparing Beehives for Winter

    Here’s how to overwinter your beehives & have the bees survive winter. We will do into the following steps that I take to get my beehives to survive winter:

    Note: I have an updated post on winter prep here, but below is a good read as well.

    • Feed bees 2:1 sugar syrup with essential oil mix throughout the fall
    • Insulated Inner Covers
    • Wrap Hives In Polystyrene
    • Sugar Cake  Dry Sugar Winter Feed see this post & videos for the how to
    • Hives tilted forward
    • Metal mouse guards
    • Hives strapped to ground.

    I feed the honeybees sugar syrup all fall, i start just after we harvest honey. I have become a big fan of using zipper type food bags, learn more and see 2 videos here.

    Winter is coming. Just before the October storm that dumped 20″ of snow here, I went out to our two beeyards and got the beehives ready for winter.

    The biggest danger to beehives in winter , i think, is condensation. Humidity builds up inside a warm hive, hits the top of the hive, which is cold, and the water condenses into droplets that rain back down onto the bees. Many times this kills the hive.

    There are a number of things you can do to reduce condensation in a beehive. Most important is to keep air circulating in the hive, don’t seal up the hive tight. You need air moving through the hive to remove the moisture. I believe everyone should use an inner cover with a notch, aka upper entrance, in the warm months. This allows air to flow through the hive .

    In winter, I’ve been using insulated inner covers and sugarcakes with great success.

     The insulated inner covers help reduce condensation, and provide space for the sugarcakes,  watch the video and see insulated inner cover plans here. Since using the insulated inner covers, I have not had condensation problems.

    winter beek check list watchI used to use sugarcakes to provide emergency food and a great way to absorb excess moisture in the hive. But I now use the Mountain Camp Dry Sugar Feed method, and it works well. Video here.

    sliding in sticky boards in the screened bottom board

    There is an ongoing disagreement on whether one should keep the sticky board inserted into the screened bottom board or not in winter. I think it depends on how cold it gets in your area. Around us, it gets below zero a few times each winter, and stays in the single digits at times, so I close the screened bottom board.

    Tilted Hive
    2×4 scraps tilt the hive forward

    The second thing, and just as important, i think, is to tilt the hives. Pretty simple, but tilting the hive will allow any water that has condensed on the inside of the inner top cover of the hive to, by gravity, move toward the front of the hive, and hit the front wall. The water drops then drain out the front of the hive, away from the bees.

    Tilt your hives forward by placing a piece of 2×4 scrap lumber under the back of the hive as shown in the picture.

    I use metal mouse guards on our hives, the holes in the guard allow enough air to move through the hive when used with the insulated inner covers, I think.

    mountain-camp-feed

    beekeeping-sugarcake-vid-thumb

    preparing beehives for winter

    New: I have tried various methods to insulate the hives, and this year I have used 2″ polystyrene. This isn’t the most elegant solution, but it seems to work. I tried various methods of cutting and affixing the insulation, but for this winter, just cutting them to the fit each side of the hive and strapping them together worked well. Its best if you have two people doing this.

    Another important thing to do in areas with high winds in winter, is to strap your hives down to the ground to keep them from blowing over. We double strap our hives because of bears, one strap around the hive itself, another strap goes around the beehive and attaches to stakes hammered into the ground.

    Hives strapped down against winter winds

    We used wooden stakes hammered into the ground for the straps, but they work loose with frost heaves and all. Here is a photo of  GF viewer Doug’s  hives, and he used a spiral metal stake, used for dog runs and camping, that wont pull out of the ground. great idea. i’ve seen these spiral stakes at the home improvement stores.

    spiral stakes work better than my wooden stakes ©2011 Doug Anderson


    Read more of our beekeeping posts here and watch beekeeping videos here. Thx!

  • OMG – What Have I Done?

    You’ve signed a two-year lease on what? Have you taken full-moon-French-leave of your senses…again?

    I can tell…She, Who Must Be Obeyed, is intrigued with the idea of my going into business for myself.

    “Well…technically I’m extending my Melissa Bee Farms business into new areas, opening new markets, joining the green revolution,” I counter. “Besides, last year we both agreed I needed a bigger beeyard. I’m outgrowing the backyard. I’ve got plans! ambitions! projects! I need ROOM.”

    “And MONEY, lots of money. Besides, WHAT bee business? You mean that expensive soup kitchen for bugs-in-a-box, that bee business? Businesses make money; you’ve got another expensive hobby, not a business.”

    “Reminds me, I need to pick up another 20 pounds of sugar for syrup,” making a note in my iPad.

    “Again? Already…?”

    “er….want to see some pictures of the new project, she’s a beaut?”

    green house from rick kennerly on Vimeo.

    my new green house rehab project

    And so it begins. Secretly, I know She, Who Must Be Obeyed, is right: I’m in over my head…way over my head. The tape in my head is looping: Oh, My God – What Have I Done? I feel a bit sick and a little panicky. It’s put-up or shut-up.

    So, what should I do with this green house? (Yeah, I got some space for a beeyard in the bargain.)   The owner’s still clearing it out, but it’s mine for two years. That’s two years of lease payments, two years of electricity payments, two years of water payments, two years of buying supplies and materials. I have to make this pay…and I don’t have a clue.

    Sure, I’ve been through the Master Gardener classes and I can talk a good game. I grow a pretty good vegetable garden, but what do I know about Growing for Market? Running a green house? Hydroponics? Aquaponics? Marketing?

    I need your help. I need reading resources, web sites, advice, suppliers, ideas. If you’ve got experience growing for market, chime in.

    First order of business, making it weatherproof. First freeze is predicted for tonight. 

  • Honeybees landing loaded with pollen photo

    Honeybees landing loaded with pollen photo

    We requeened this honeybee hive last month, and the bees are almost a pure yellow-gold color, its wild. This queen is a hybrid Italian honeybee queen that we bought from Warm Colors Apiary.

    Right now the Goldenrod is blooming, and there is still clover in the fields, plus around here we have late season woodland asters. The honeybees landing on this hive have a bright orange red pollen on their legs.

    Honeybees landing with pollen on their legs
    Honeybees landing with pollen on their legs
    honeybees landing
    you can see here the difference between the older bees from the previous queen and the younger bees from the new queen. The older bees have prominent black bands on their backs


    ©2011 eric rochow all righst reserved

  • First Frames full of honey from new beehives

    First Frames full of honey from new beehives

    we did a beehive inspection last week and found the new honeybees to be in good shape. they have started to fill up their new frames with honey. this honey will stay in the hive to feed the honeybees through the winter.

  • How to keep honeybees basic questions : GardenFork Radio

    How to keep honeybees basic questions : GardenFork Radio

    Want to know the basics of how to raise honeybees? what kind of beekeeping equipment you need to buy? what kind of beekeeping veil to buy? where is the best place to put beehives? Listen to GardenFork Radio for a Beekeeping 101 , the basics of raising honeybees.

    The idea for this honeybee beekeeping show started when my friend & GF viewer Matt wanted to ask me some questions about starting beekeeping. I suggested we make it into a GardenFork Radio show, as I imagine there are a bunch of people out there with questions about the basic setup needed to start raising bees. We answer questions about the following

    Getting Started in Beekeeping
    Pre-assembled hive boxes – supers or ones you assemble?
    Beekeeper suit – veil features? hats and hood-types
    How many boxes do I need for a hive?
    Plastic frames or beeswax frames for brood and honey?
    how many hive boxes do i need?
    Placement of beehives
    Better types of equipment or things you’ve learned?
    Pests and problems
    Beehive Problems with ants? Mice? Moths?
    How often should you do the powdered sugar treatment for varroa mites?
    Opening the hive
    – How often?
    – Better time of day?
    – Tips?
    Clothing
    Beekeeping gloves Blue Nitrile gloves you wear – sting-proof?
    How many supers – hive bodies do I need to leave for the bees in winter
    How to you remove honey from the honeycomb frames?
    What color do I paint my beehives supers boxes?

    We are going to do a follow up to this first Beekeeping 101 radio show next week. If you have some beekeeping questions, please let us know below or call our GardenFork Radio Voicemail line 860-740-6938 !

  • Water your honeybees

    Water your honeybees

    We just shot another of our Beginning Beekeeping aka Beekeeping 101 videos and I wanted to show you how we water the bees. One of our two beeyards is near a vernal pond, and a stream not far away, but I’m all about making it easy for the bees, so I put out some water buckets for them. Bees don’t swim, so put some wood in the bucket for the honeybees to stand on while taking up the water

    watering bucket for honeybees


    i've placed the water outside the bearproofing electric fence
  • New beehives in our second beeyard, bearproofing the beehives

    New beehives in our second beeyard, bearproofing the beehives

    We have a real bear problem in our town with bears, and bears really like to tear apart beehives. So to hedge our bets, we decided last year to start a second beeyard in another part of town. Our second beeyard is near the center of town, right next to the cemetery. The honeybees and their hives are on the edge of a large hayfield, where they are protected by the prevailing winds and get excellent daylight throughout the day.

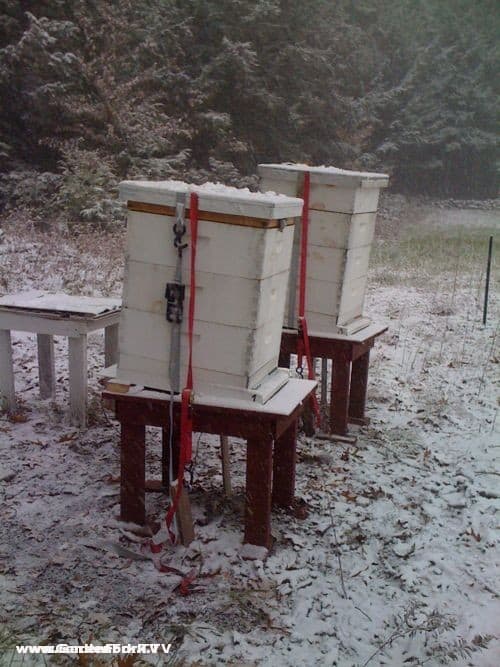
    We hived two new packages,  using medium supers on these hives. I put our hives on small tables. The height of the table makes it much easier to work the hives, and we can grease the legs of the tables to keep carpenter ants and other insects from entering the hives.

    We use a few techniques to bear proof our beehives. First we have a solar powered electric fence made by Premier 1 Supplies. Premier 1 gave us the electric fence they sell to protect beehives from bears. So far it has worked. Its also very easy to set up and move. You can watch our how to bearproof beehives video here.

    Second we use a ratcheting strap to strap together the beehives. The thinking here is that if a bear does get to the hives, the straps may keep the hives together despite the bear trying to take the hive apart. I’ve read where this has worked for a few people, so it doesn’t hurt, I don’t think. We may need a heavier ratchet strap, the kind used on semi trucks.

    Newly hived bees
    Solar powered fence from Premiere 1 Supplies
    I like the rectangular net pattern of this electric fence.
    wide view of the hayfield where the beeyard is


  • Honeybee sugar syrup: why use only cane sugar?

    Honeybee sugar syrup: why use only cane sugar?

    I’ve heard from more than one person, be them beekeepers or just people who think they know something about honeybees and beekeeping, that you should only use cane sugar to feed your bees sugar syrup in the spring or fall.

    sugar and cane sugar

    I haven’t read this in any of my beginning beekeeping books, nor was it mentioned in my beekeeping class.
    White table sugar, which is what we use to feed our honeybees in the fall and spring, is made primarily from sugarcane or sugar beets

    I looked at sugar packages at the grocery stores in my town, I noticed one brand did say cane sugar on the package.

    So, why do some say feed your bees only cane sugar?

    It may be that sugarcane has not been genetically modified (yet). But there are GMO sugar beets:

    “Genetically modified (GMO) sugar beets are already planted on more than one million acres of farmland, spanning 10 different states from Michigan to Oregon. In fact, the Roundup-resistant gene is present in 95-percent of U.S.-grown sugar beet plants.” Treehugger Federal Judge Bans Genetically Modified Sugar Beets

    So it seems prudent not to feed your bees GMO sugar if you can. Yet GMO sugarcane is on the horizon:

    Commercial utilisation of GM sugar cane is possible in the near future in the USA and Brazil. GMO-Compass

    Now my head starts spinning. All we want to do is feed our bees some sugar to get them thru the winter and early spring, and we have to contend with global GMO issues.

    What do we do? Let us know your thoughts below:

  • Bring Duct Tape when working honeybees

    Bring Duct Tape when working honeybees

    I wear Carhartt work pants. Whether I am in the city or in the country, I’m wearing Carhartt’s black canvas work dungarees. ( I do own one tan pair )

    Yesterday, we worked the bees, our plan was to powder sugar the bees to treat for varroa mites, and add new grease patties for tracheal mites.

    Before we left the house, The Camera Operator looked at me and said, “Do you want to tape up the hole in your pant leg before we go?” I had torn a hole in my dungarees dropping some pine trees. ( I should really wear the double front Carhartts )

    carhartt dungarees
    The hole in my pants

    Me, being me, said no.

    So, in the middle of taking apart our largest hive – the hive that gets a little more agitated than our other calm hives – I felt something crawling up my thigh.

    Then I felt the pinch. All this occurring while I have a 60 lb deep brood box in my hands.

    the bee sting
    The Bee Sting

    I realized once again who is the smart one in our family. Lesson here, tape up any holes in your pants before going to the beeyard. Or better yet, wear pants that don’t have holes in them.

    duct tape works
    Duct Tape Works

    What knucklehead things have you done when working? Let me know below…

  • Bearproofing your beehives with a bear proof electric fence

    Bearproofing your beehives with a bear proof electric fence

    We are going to start a second beeyard at another farm. We wanted to have a second beeyard  as a hedge against the chance that a bear will destroy our existing honeybee hives.

    Our hives in their current location are surrounded by a traditional electric fence, three strands, and is part of a larger electric fence to keep beef cattle in their pasture. Bill, who owns the farm where our hives are, thinks the local bears are already aware of his electric fence, and have not tried to get to our beehives.

    But if the bear ever did, we would lose all our hives. So we decided this year to put a few hives at another friends farm, on the other side of town.

    premier 1 bear fence
    The Electro Net fence protecting a beeyard, photo from Premier 1

    I started to look in to bear proofing and saw an ad in Bee Culture magazine for a bear proof electric fence that will protect beehives from bears. I contacted the company, Premiere 1, and they sent me an ElectroNet 9/35/12 electric fence and a PRS 50 Solar Energizer at no charge to use in our new beeyard.

    The solar Energizer, which contains the battery and electronics to zap bears, is housed in metal box that looks like it was engineered for space travel. Its pretty bulletproof.

    The electric fence and solar powered energizer for our beeyard
    Interior of the solar powered energizer

    We’ll shoot a GardenFork show about starting a new beeyard and installing this fence, and I’ll report back on how it works with our local bears. Thanks for Premier 1 for sending me this.