Category: DIY

  • Big Green Egg Table Plans

    Big Green Egg Table Plans

    Big Green Egg Table Plans using 2x4s and a few pieces of marble and a set of caster wheels. Build the table frame, add some legs, build the top, cut a hole, and you’re done. My neighbor built this Egg table and I wanted to share it with you.

    big-green-egg-table-plans-1

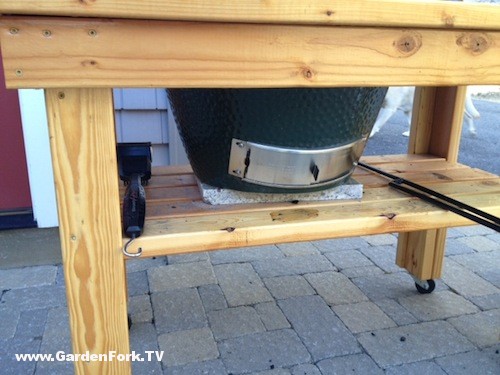
    Super simple table plan here. The table is finished with outdoor polyurethane, don’t be tempted to use indoor poly, it will peel very quickly, you want a finish that is UV proof, and water proof.

    big-green-egg-table-plans-2

    I like the simple use of some scrap marble to insulate the Big Green Egg from the stand. This allows easy access to the lower vent of the egg.

    big-green-egg-table-plans-4

    Some spare casters allow you to wheel the Egg table out of the way , or into the garage for winter storage. Be sure to use heavy duty casters, as the cooker is heavy.

    big-green-egg-table-plans-3

    Nice huh? I’m all about about simple and these Big Green Egg table plans are just that, easy DIY plans using inexpensive 2×4 lumber. I estimate this table cost about $40-60 to make if you already have some wheels in your shop. Or ask one of your neighbors if they have some spare casters, its a good chance one of them does.

    Cooker tip here, my neighbor tells me to buy the best quality chunk charcoal you can. The cheap chunk charcoal is not great for the Green Egg, it has a lot of small pieces and dust, not good for this cooker.

    How to you use your Big Green Egg? I’ve seen a few DIY table plans, but this one is my favorite for its simplicity and ease of use and easy to build. Let me know your thoughts below:

  • Replacing the Cordless Drill Battery Charger

    Replacing the Cordless Drill Battery Charger

    When we moved, I packed my drill – screwguns and the cordless drill battery chargers. Then when we unpacked, I couldn’t find the battery chargers. Has this happened to you? Battery Charger disappears into vapor. I am convinced they are in the basement in a box, and one day I will find them.

    cordless-drill-battery-charger

    I finally had to acknowledge I would not find them soon after searching everywhere in the house for them. A new replacement cordless drill battery charger would be expensive, so I turned to my favorite source for good deals on stuff, ebay.com . Click Here To Visit ebay.

    My cordless drills use a 14 volt battery, the standard now is 18 volt or more. I’ve found some of 18 volt drills to be too heavy, and my drills still work just fine. I have bought new batteries for them, and they hold charge well.

    I have seen ads claiming methods to rebuild cordless tool battery packs, but I’ve always believed that once batteries are toast, you have to replace the batteries. Plus, if there really were good methods to repair battery packs, there would be blog posts about the methods, and all we see are ads selling the how to information.

    When searching through ebay, use broad search terms, type in the brand name of your tool, and the voltage. If your search is too specific, you may miss some listings. Keep in mind the seller may not know as much as you do about your battery charger and may not title the listing well.

    I managed to find a multi voltage charger for my brand, which will charge the 14 volt batteries, and the newer voltages as well. I opted for the Buy It Now button, because the sale price with shipping was less than $20.

    So now that the replacement cordless drill battery charger is on the way, I am sure to find the original.

    Full Disclosure, GF is now is an affiliate of ebay, so if you click on any ebay links on our site, we get a small finder’s fee. But even if we weren’t I’d still suggest using ebay as a good place to buy replacement parts for cordless tools. Click Here To Visit ebay.

  • Tiny House Plans : A – Frame Vacation Cabin

    Tiny House Plans : A – Frame Vacation Cabin

    Tiny House Plans for a cheap easy to build cabin from Deek Diedrecksen, who is a brilliant designer and carpenter. This cabin is perfect for that piece of land you have in the country  Easy to build with the downloadable tiny house plans Deek and Joe Everson put together. The photos here just say simple and clean to me.

    tiny house plans from Deek
    Tiny House Plans for a simple A frame

    From Deek’s website:

    The idea was to keep it AFFORDABLE to build, EASY and QUICK to build, and to have it so that it could be altered for different uses, or added to, rather effortlessly.

    The total cost for a cabin like this, soup to nuts, is right around $1200- and that’s using city lumber pricing, meaning, elsewhere, it’d cost less to build. Add in some salvaged, free, or recycled materials, and you could EASILY build this under $1000.

    Purchase these tiny house plans here on Deek’s site

    Deek worked with David Stiles, whose site is full of plans for cabins, treehouses, sheds, etc. They also offer design services. Check out their site here.

    This tiny house plan uses locally available materials, and its simple design makes it a do-able project for the average person. If you have a cordless drill – screw gun, and a circular saw, I think you can build this. The sides could be made out of recycled lumber and metal. Is someone tearing down a building nearby? Go get your materials!

    The plans also has explanations of other versions, such as adding a bathroom or a loft, plus 16 photos of the construction. The cabin was built by Joe Everson of www.TennesseeTinyHomes.com and www.TinyHappyHomes.com, and you can check it out at Deek’s Tiny House Workshop April 11-13 2014 in Memphis, Tennesee.

    Deek joined us on GardenFork Radio, you can listen to the show here.

    tiny-house-plans-2


    Full Disclosure: Deek is a friend of mine, he is the inspiration for one of our most popular videos, the One Sheet Plywood Boat.

  • Plywood Boat Photos from Juan

    Plywood Boat Photos from Juan

    Got  great email from Juan, he saw our plywood boat video and built one himself. How cool is that? Juan was nice enough to let us post his plywood boat photos here on the site. Here is the email he sent:

    Just wanted to say thanks for putting up the video on making a small boat it was very fun, me and my dad had a great time doing it and knowing that it works is even better.
    What i really mean to say is that today was a great day!!

    thanks again!! juan

    Not the custom made boat paddle, much nicer and well made than our store bought boa paddle. Nicely done!

    Click Here to watch our Plywood Boat Videos

    plywood-boat-photos-from-juan-1 plywood-boat-photos-from-juan-2

    plywood-boat-photos-from-juan-3


  • Dead Battery, What To Do?

    Dead Battery, What To Do?

    Its been real cold this winter, 7 degrees F this morning, and I go to start the car and the engine barely turns over. On the second try, the engine doesn’t turn over, you just hear the dead battery clicking. The battery is just about dead. So the question is, how do you charge a dead battery?

    I didn’t need to go anywhere immediately, so I opted for a battery charger; the kind you plug into the wall and attach two clips to the dead battery terminals. First I had to find our car battery charger in the garage. I was hoping I hadn’t loaned it to someone and then forgotten about it. This happens sometimes. But I did find it. The cables were pretty stiff from the cold, but luckily I have ample outlets in the garage. I popped open the hood, removed the plastic boot covering the positive terminal, and connected the charging cables.

    There are a couple of different kinds of battery chargers, some are built to maintain a charge in the battery, sometimes called trickle chargers. These are good for vehicles that aren’t used regularly, as the battery can lose its charge slowly. Trickle chargers monitor the battery charge, and when it drops, it slowly charges it back up to full charge. These chargers can plug into a wall or use solar panel.

    Fast chargers are meant to charge the battery quickly. How fast depends on the model purchased, and the state of the battery. The one I have charges a battery overnight, some will charge a dead battery in a matter of hours, but they cost more.

    dead-battery-what-to-do-1
    Follow the instructions that come with your battery charger

    The other thing to think about is the age of the battery. Car batteries, as they get older, lose their ability to hold a charge. And if the battery has gone completely dead several times – called a deep discharge – the battery degrades quickly. Car batteries are built to provide a large amperage current to the starter for a short burst to start the car, they are not designed to be completely discharged.

    Cold weather also degrades a battery’s ability to work. Its a chemical reaction in the battery that is providing the power, and in cold weather, this reaction doesn’t work as well. In some cold climates, I’ve seen car battery warmers that you plug in overnight to keep the battery warm enough to start the engine.

    After an overnight charge, the car started up as normal, which is a good thing. If after a full charge, the battery still doesn’t work, or barely turns over the engine, its time for a new battery. Best to take the dead battery with you to the auto parts store, that way you can match it exactly, and the store can recycle the  dead battery for you.

    What to do you think? Tell us your car battery stories below:

  • Getting To Ready Tap Sugar Maples

    Getting To Ready Tap Sugar Maples

    Its 7 degrees F in the yard. 1 1/2 feet of snow. I strapped on my snowshoes and took the Labradors out back on the woods trail. Charlie Pup grabs a large stick, Henry loses her ball in the snow almost immediately. She digs around to find it.

    getting-ready-to-tap-sugar-maples

    I’m also thinking about the maple syrup season. Around here, trees are usually tapped around Daytona weekend, aka, Valentines Day, February 14th. But its been quite cold this year, temperatures have been below average this winter.

    The ideal for tapping sugar maples is cold nights and warm days above freezing (32F). This hasn’t happened yet. Have to see what happens in the next few weeks. I ordered some additional tubing and taps, hoping to tap more trees this year.

    This post started when I grabbed the last jar of last year’s maple syrup out of the fridge. I let the first batch of syrup off the burner get too hot, and some of it turned to maple candy, which clings to the sides of the jar. Knock off  junk of it with a knife and its hard candy. Don’t try to crunch it with your teeth, btw.

    I think the sap season will be late this year. I haven’t seen any of my neighbors starting to ready their sap houses or buckets or lines, and they are usually right. I’ll have to make a few phone calls to see what they think today.

    The maple candy has a subtle taste, kinda like a low key breath mint, I thought it would have a more pronounced taste, seeing that the syrup it was made from has a strong flavor. But sugar goes through all sorts of changes when its heated to different temperatures, and a few degrees makes all the difference.

    We have a bunch of how to make maple syrup videos here on the site if you’d like to check them out. And let us know your thoughts below:


  • Wood Deck Post Repair – Sistering a column

    Wood Deck Post Repair – Sistering a column

    Deck Repair in the winter cold, fun. A friend of mine has a wood deck off his second flooor, its not the most well built deck I’ve seen, but it came with the house, and its OK for now. But the footings for the columns or posts that hold up the deck are less than great. The posts are not set in cement footers, they are just sitting on the cement-slate patio that is below the deck.

    wood-deck-post-repair-1

    Deck Repair DIY

    As you can see from the photos, the posts are on the edge of the patio, and one of them has started to crack the cement. This being the middle of winter, we aren’t able to fix this properly, which would entail digging a proper footer. So we put in a temporary support.

    Generally this is called sistering. You can sister a floor joist that is weak from termites, for example. Basically you are adding support to the existing column or post, usually by attaching another board of similar size along side the damaged board. This can be a permanent repair or an interim one. Our deck repair is a temporary fix until the spring thaw allows us to dig a proper footer.

    Sistering in our project here is not the same as when you would sister a joist, but it does the same thing. It takes some or all of the weight from the original beam or column.

    Below you can see how we used two stock 2×6 pine boards in an A frame setup. We cut the boards slightly longer than the height of the original post, and mated both boards where the post meets the deck above it, and slowly tapped the boards towards each other until they started to take the weight of the damaged column. Scrap lumber was used to tie the two 2x6s together once they were in place.

    wood-deck-post-repair-4

    wood-deck-post-repair-3

    wood-deck-post-repair-2

    This same technique can be used to take the weight when working on an interior load bearing wall. You put up several of these A frame rigs on both sides of the load bearing wall, then you can work on the wall. I see this a lot when one is making an opening in a wall and you have to slide in a beam to span the wall opening.

    So if you have a deck that is sagging, this is a deck repair to keep it up temporarily until you can repair it properly.

  • Chainsaw Cutting Firewood

    Chainsaw Cutting Firewood this weekend, we dropped a dead cherry tree and we’re now using a chainsaw to cut the tree into firewood. For this to work, we use a timberjack, also called a peavey, to move the tree sections. Save your back, buy one of these chainsaw tools!

    Chainsaw Cutting Made Easy

    A timberjack, aka a peavey, is a simple tool that helps you wrestle large trees and logs. To cut help the chainsaw cutting  firewood, it allows you to cut 2/3 of the way through the logs, then turn the logs over and finish the cuts. The whole goal here is to keep the chainsaw cutting to avoid the dirt under the log. Keep your chainsaw chain out of the dirt! Dirt in the chainsaw chain, bar, and clutch is a bad thing.

    In the photos you can see how we have first cut the tree into sections, we then did the 2/3 cuts through the logs. Be sure to measure the firewood length. How wide is your fireplace or wood stove? Firewood for wood stoves is usually not as large as fireplace firewood. Learn from my mistakes on this one…

    I cut this tree into manageable lengths first by finding parts of the tree that weren’t sitting right on the ground. In other words, where the tree isn’t making contact with the ground. This allowed me to make a full cut while keeping the chain and bar out of the dirt.

    Read more about using a timberjack or peavey in this post here.

    chainsaw-cutting-firewood

    Here are videos we have made about using a chainsaw:

    chainsaw cutting firewood Cutting Down A Tree with a Chainsaw

    chainsaw cutting firewood Using A Chainsaw to Cut Firewood

    chainsaw cutting firewood How to ( Or How Not To ) Cut Down A Tree

    You can buy a timberjack here


  • Great GardenFork T-shirt!

    Great GardenFork T-shirt!

    Martha,  a long time fan of GardenFork, sent me this t-shirt she embroidered. How Cool Is That? Each letter is hand sewn with a lot of detail – doesn’t show in the photos here, but its not an easy thing to do.

    So a big public thank you to Martha. Look for this t-shirt in an upcoming GF video! eric.

    eric shirt garden-2

    eric shirt garden

  • The Zen of Basic Knife Skills

    The Zen of Basic Knife Skills

    #PodcastsWorthHearing : the Zen of Knife Skills (vids) – rhkennerly http://ow.ly/lBKkd

    First knife fight I ever saw was at Ft. Devens. Oddly it was at breakfast, at the butt-crack of dawn no less, in the chow hall. The fight was over the last cup of Black Cherry Yogurt. Good stuff, I’m sure, but not worth dying over.

    And that experience pretty much summed up my knife education for the last 50 years. For me it was: knife as pry tool, knife as first resort aboard ship (where the government buys the line), knife as last resort while sailing (where you buy the line), knife as show of manliness in the Caribbean (the bigger the knife, the better the diver).

    In the kitchen, I’ve always been more of a production cook:

  • DIY: Fixing a Balky HOME button on an iOS device

    DIY: Fixing a Balky HOME button on an iOS device

    Well, actually a “work around.”

    For some weeks the black HOME button at the bottom of the screen on my iPad 2 has been…let’s say moody, uncooperative. In a word “balky.” Like me, it only works when it wants to and is unpredictable in its work ethic, also like me.

    I’d done some research on the interwebs and found this to be a common complaint without a real cure. Some think the problem is actually software related. Some think it’s mechanical. I’ve tried all the simple suggestions I could find about “resetting” the software.

    Most of these suggestions were simple and middle-of-the-road. One was more occult than anything else.

    “Take your iPad out of it’s case or cover. Rotate your iPad into the Landscape orientation with the HOME button to the right. Rotate your device to the Portrait orientation with the HOME button on the bottom. Immediately put your iPad backdown on a cold, hard, flat surface and leave it over night.”

    Well that didn’t work.

    I did think about having the mechanical Home button replaced, but I’d read that because of the way the iPad is constructed, there was a good chance of damage. Everyone guaranteed their button and their work, but NOBODY guaranteed the damage putting the new button in.

    However, I discovered that in the later iOS upgrades there is a HOME button in accessibility options that will float on your screen and do all kinds of nifty things.

    The “soft” HOME button is small, semi-transparent, and dragable to any place on your screen.

    When activated, it pops up with this MENU:

    from here the soft HOME button accepts 1, 2 or 3 taps, just like the mechanical HOME button. “Gestures” is for recording your own unique gestures and relating them to apps or other events. “Favorites” is where your gestures are stored. Under “Device” is this MENU:

    And under “More” is this Menu:

    “Multitasking” is for quickly switching between apps.
    Activating the soft HOME button does not disable input from the mechanical HOME button, so there’s no reason not to have it on your desktop and ready to use if your iDevice stops answering input from the mechanical HOME button.

    Here are the steps for activating the soft HOME button:


  • Easy Window Install & Using Spray Foam

    Easy Window Install & Using Spray Foam

    I helped a friend install replacement windows today. The original windows were double hung sash weight windows, quite old. Wanted to show you a few things about how to install replacement windows. To install new windows, you first have to remove the old ones. This is not hard.

    We will be using the frame of the original window. The replacement windows slide inside the existing frame. Most replacement windows need to be custom ordered. Its important to measure each window, as they are all slightly different.

    easy-window-install-using-spray-foam-4
    Old window removed

    To ready the window frame for the new window, you remove the trim from the inside, and the bottom window will tip out easily. There is a thin wooden strip between the upper and lower windows, and once that is removed, the upper window comes out. You may have to disconnect the sash weights, though the sash weight cord is usually broken already. The windows may need to be lowered or raised a few inches to get past the sash weight pulley.

    easy-window-install-using-spray-foam-5

    The replacement window then slides into the existing window frame.

    Now the fun part: Spray Foam.

    Its probably the insulation obsessive in me, but I love to use spray foam. For these windows, we had to insulate a lot of cavities around the original windows, so this called for a lot of spray foam!

    There are several kinds of spray foam, different kinds expand at different rates, and some cans of foam can be used more than once. Some cans, once you start foaming, you can’t stop, or the foam hardens in the spray tube. Others you can clean out the spray tube and use it again later.

    Cavity Filler and Door Foam
    Cavity Filler and Door Foam

    The two main kinds of spray foam for our purposes is cavity filling “Big Gap Filler” and minimally expanding “Door & Jamb Foam” . The names are pretty self explanatory. You may not realize it, but the cavity filler type foam, if used when sealing a door or window, can warp the wood door frame. For doors and windows, we use the minimally expanding foam to fill in the gaps. For big open spaces, we use the big foaming stuff.

    Most spray foam cans have to be held upside down when using, if you don’t, all the propellant leaks out, leaving the foam in the bottom of the can. It can be helpful to have an additional stray handy when you have to work up close to a ceiling, the additional straw allows you still tilt the can yet get the foam where you need it.

    Cavity Filler Foam on the bottom, and Door & Jamb foam on top
    Cavity Filler Foam on the bottom, and Door & Jamb foam on top

    Most important is to wear gloves and clothes you don’t care about. You will get foam on your clothes, and it doesn’t come off. I have ruined a lot of clothing with spray foam. I invented the trash bag work smock for impromptu spray foam jobs.

    Trash Bag as spray foam application uniform
    Trash Bag as spray foam application uniform

    What do you use spray foam for? Let us know below:

  • Wood Fired Pizza Oven Photos from Daniel

    Wood Fired Pizza Oven Photos from Daniel

    Daniel watched our Brick Pizza Oven Plans video and built his own. He calls it a Wood Fired Oven, aka wood fired pizza oven.

    wood-fired-pizza-oven-photos-2

    He tell us a bit about it:

    I have constructed a dry stacked wood oven similar to [GardenFork’s} I purchased the cement blocks for the base and the cement board for the sub floor at home depot. After leveling the land, I created a surface onto which I placed the fire brick floor of the oven. These were also newly purchased. From there I built up the oven itself from used clay bricks. The roof is supported by angle iron pieces. I constructed a short chimney from bricks.

    My first pizzas were not at all perfect but there is still a lot to learn about maximizing this oven and of course, being that it is kind of rough, to say the least, it may never be able to match the results of a commercially produced wood fired oven. But for those who want to experience a wood fired oven without the commitment of dollars or creating a permanent structure, this might be the way to go. So far, I love it! Dan

    wood-fired-pizza-oven-photos-4 wood-fired-pizza-oven-photos-8

    I love how Daniel took the brick pizza oven plan we did, and made it his own. The cement blocks make a great base, its clear that pizza oven isn’t going anywhere. He also doubled up the brick walls and roof, so the oven would have more mass and hold more heat. If you have more brick, use it, I say.

    Daniel originally posted these photos on http://www.pizzamaking.com/, neat forum if you are into pizza making big time.

    Watch our how to build a pizza oven video here:

    pizza-oven-still-500

    Have you built a pizza oven? Have Comments or Questions? please post them below:


  • Replace Sink Strainer Gasket DIY Plumbing

    Replace Sink Strainer Gasket DIY Plumbing

    Sink leaking? I bet the gasket in the sink strainer is leaking. This is a DIY plumbing repair I did at a friend’s restaurant, but the concept is the same. But if you need to fix your leaking chef kitchen sink, this is how to repair a leaking sink.

    Use a screwdriver and hammer to unscrew the ring
    Using a screwdriver and hammer to unscrew the ring in a commercial sink

    For this sink, which is a bit more industrial than your average sink, you remove the top ring from inside the sink. For most household sinks, there is a ring with tabs on it that attaches the sink strainer to the sink itself. For either type, you can buy a fancy tool to remove the ring, or you can use my favorite tools, a hammer and a screwdriver.

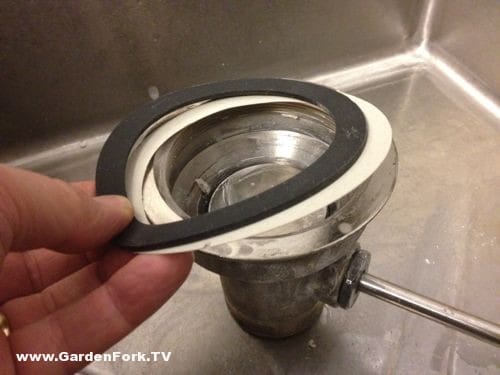
    Rubber gasket, cardboard ring and sink basket assembly - restaurant sink
    Rubber gasket, cardboard ring and sink basket assembly – restaurant sink

    First remove the pipe that is connected to the strainer – this is called a tailpipe, btw. Tap on the tabs under the sink to move the ring counterclockwise. You might have to jam a screwdriver into the basket from the top to keep it from spinning. If you break the tabs, its ok, you can go buy a new sink stainer for cheap, and its shiny clean too.

    Home kitchen sink
    Home kitchen sink

    Remove the the strainer, and clean it and the sink surfaces. There may be old plumber’s putty around the hole in the sink. Pick up a new gasket at your local hardware store, it will be a rubber gasket that also comes with a cardboard ring. If you are using the old sink strainer and there was plumber’s putty on it or the inside part of the hole in the sink, roll out a long hot dog of plumber’s putty about 1/4′ in diamter, and wrap this around the sink strainer and place the sink strainer back in the hole. Press down on strainer to squish out excess putty.

    Gasket replaced, no leaks! ( how unusual for Eric... )
    Gasket replaced, no leaks! ( how unusual for Eric… )

    From underneath, place the rubber gasket onto the strainer, then the cardboard ring, then screw on the metal or plastic ring. For this restaurant kitchen sink, its a little backwards, but you get the idea. Screw the ring on tight, but don’t break the ring getting it tight.

    Re-attach the tailpipe – the piece of pipe that connects the sink to the drain pipes- and fill the sink with water, and check for leaks. If it leaks, you may be able to just tighten up the ring a bit, if that doesn’t work, it may be that the sink hole is warped or has some crud in it that is not letting the gasket seal tight. You’ll have to take it apart, clean up the hole, and re-assemble.

    Have you done some DIY plumbing repair? Let us know below:

  • Fix Overheating Steam Radiators Yourself

    Fix Overheating Steam Radiators Yourself

    replace-a-steam-radiator-vent-3

    Is your apartment too hot winter? Learn how to fix overheating steam radiators yourself below.

    If your radiators are hissing or leaking, its time to replace the radiator vent, aka radiator valve, on your radiators. Radiator valves have a finite life, and its probably been too long since they have been replaced.

    Replacing the radiator vent valve with an adjustable valve allows you to control – to a point – how much heat that radiator puts out. This is a great way to balance the radiators in your home, so the radiators heat the house evenly.

    This is an easy DIY Home Improvement project for those of you with older homes.

    In our current apartment, when the heating season started, we got loud hissing on 3 of the radiators, and this told me it was time to replace the radiator vents. Without going into a dissertation on how steam boiler heating systems work, the radiators have to be able to vent out the air that is in a steam system when the system is cold, to allow the steam coming up from the boiler to enter the radiators.

    You may not realize this, but if you have what is generically called a one pipe steam system, you also have steam vents or valves at the end of the steam riser pipes. These valves may be above the ceiling, if the steam riser pipe juts into the ceiling.

    drain tongue sticks out of old style radiator vent
    drain tongue sticks out of old style radiator vent

    My mode of operation is to replace all the steam valves at once, if possible. Steam vents are not cheap, but if you replace them all at once, you solve a lot of problems, i think. Another benefit of replacing all the valves at once is you can balance the vents at the same time. New vents either have specific vent ratings, or are adjustable – in other words, you can adjust how much venting each vent does.

    I use the adjustable vents – link to buy them here – they are much better, I think than the pre-set valves.

    This is important, as large radiators need to be able to vent more air than smaller radiators, and this helps you attain the goal of steam heat getting to all the radiators at one time. I use radiator vents that are adjustable, they have a small tang that juts out that you move to adjust. Other companies make a series of vents that have different vent ratings, each vent lets out a certain amount of steam.

    replace-a-steam-radiator-vent
    Adjustable Steam Radiator Vent

    Your local hardware store will sell radiator vents. I suggest the adjustable ones, and don’t cheap out when buying them, you get what you pay for.

    Most of life is like that, good things cost money, and these radiator vents are worth it. Many times the steam radiators are wedged behind furniture or whatever, and just getting to the radiator is a pain, so do them all at once and get it done with.

    So there you go, a DIY home improvement project that is do-able and will improve your heating system.

  • Toilet Repair how to replace a broken toilet flange

    Toilet Repair how to replace a broken toilet flange

    Is your toilet wobbly? Learn here how to replace a broken toilet flange. If your toilet wobbles and is not solid on the ground, it could be that the toilet flange is rotted or broken. fun. Let’s see how to repair the toilet.

    You can fix this. I did. And if you follow our how-to toilet repair photos here, you’ll be a DIY home repair expert, or at least you’ll be able to replace a broken toilet flange.

    Toilet-Repair-how-to-replace-a-broken-flange
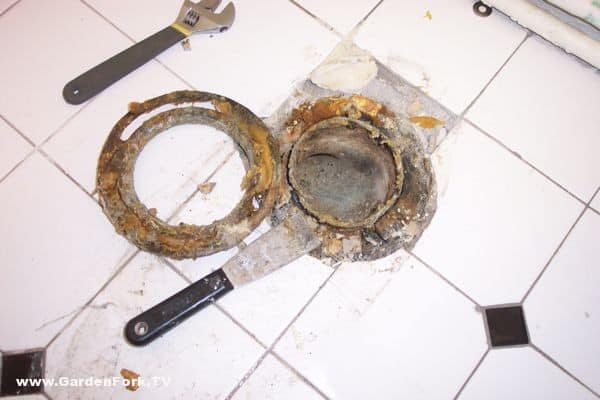
    Rusted toilet flange, this one separated completely from the waste line.

    watch DIY videos insert

    First remove the toilet. Turn off the water line, flush the toilet, and remove the water line from the bottom of the toilet tank. Have bucket handy, as water will come out of the tank. Sponge out as much water from the tank and bowl as you can. A handyman trick is to use a wet dry shop vac to suck all the water out of the bowl and tank.

    Toilet-Repair-how-to-replace-a-broken-flange-2

    Remove the nuts on each side of the base of the toilet. These nuts-bolts attach the toilet to the flange. You may have to use a saw to cut the nuts off, which is ok, because you are going to put in new toilet bolts and nuts. The flange, when brand new, is attached to the waste pipe. Many times it rusts or snaps off. Tilt the toilet on its side and move out of the way. Have a helper assist you in moving the toilet, they are heavy and bulky.

    Toilet-Repair-how-to-replace-a-broken-flange-4

    Use a putty knife to remove the wax ring residue from the exposed flange and inspect the flange and surrounding area. What is key here is if the wood subfloor is rotted. If this is the case, you will have to cut out the surrounding subfloor and replace it with new plywood, then fix the flange.

    Thankfully on this home improvement project, the subfloor was fine, just the flange fell apart. Go to your hardware store and buy a Super Ring Replacement Toilet Ring. There are several models by different suppliers, don’t buy the cheapest one, its your toilet, remember…
    Also at the hardware store buy new toilet mounting bolts, they usually come in a package with the nuts and washers.

    use wax from the wax ring to get them to stand up straight
    use wax from the wax ring to get them to stand up straight

    Put the toilet mounting bolts in the flange pointing up, and use some wax from the old wax ring to hold them in place. Place the super ring replacement toilet ring over the waste line, making sure the mounting bolts are in the same place as the original bolts were,  one bolt on each side of the flange.

    Screw the new flange into the subfloor. You may have to use a hammer drill to drill through existing tile flooring or cement substrate. Set the new toilet wax ring onto the flange on the base of the toilet, and guide the toilet back onto the super ring, making sure the toilet mounting bolts are lined up with the mount holes in the toilet base. The super ring toilet ring allows for you to adjust the location of the bolts.

    Toilet-Repair-how-to-replace-a-broken-flange-6

    Press down on the toilet to seat the wax ring, wiggle the toilet back and forth to get it to set down and seal. Cut off the the bolts about 1/2″ above the toilet base. Spin on the mounting bolt nuts, and tighten them, but be careful not to over-tighten, as you will crack the porcelain toilet.

    Toilet-Repair-how-to-replace-a-broken-flange-7

    Re-attach the water supply line, turn on the water valve, flush the toilet and check for leaks.

    diy videos play

    Watch More DIY Videos Here.

    So there you go, not as complicated as you thought. The biggest red flag is if the subfloor is rotted, because then your simple home improvement project has become a much bigger deal.

  • The Holiday Gift Guide 2012

    The Holiday Gift Guide 2012

    We asked some of the GF contributors for their suggestions for Holiday Gifts, here are their responses:

    Monica
    • I’m doing my best to buy from my local shop owners, many of which are friends. It’s a happier season all around that way. Between the Green Home Store, the Wine shop, the fancy dog treat store, we’re basically covered for everyone.

    • For product lovers: a Birchbox subscription.

    • Tip: Hold off shopping until the last possible minute. The best deals are on or around December 22nd.

    Mike
    •    Arduino Starter Experimenter’s Kit
    ($34) – This generation’s Erector Set.

    •    A Lodge Cast Iron Skillet
    ($19) – The most versatile pan in the kitchen. I never put mine away.

    • A Bicycle Tune Up gift certificate from a local bike shop ($50 – $150 depending on the services) – Cables stretch, chains stretch, oil wears away, derailleurs get out of alignment, grease gets old, people don’t get their bikes tuned up enough, the riding difference can be night and day. Here’s an example from my local bike shop.

    •    Gerber Needlenose Multi-Plier 600
    ($43) – The pliers can be deployed one handed. That’s extra handy when holding a bass by the lip with one hand and getting the pliers out to remove a hook with the other.

    •    Apple iPad
    – I use mine for hours every day. Music, magazines, looking things up, I have electronics tools on it, social stuff, schematics, data sheets, games. Most people I know who didn’t think they’d use it much end up attached to it. (Rick agrees and adds: The older ones eyes get, the more you gravitate away from smartphones and toward tablets.)

    •    Get someone a bunch of really boring stuff that they use all of the time – something day to day they will no longer have to worry about. Imagine if you didn’t have to buy toilet paper for 6 months.
    Rick

    •    Apple TV box ($95) – and then cut the expensive cable. You can access Netflix and Hulu through the box, then buy TV shows from Apple on a pay-as-you-go per show basis. We’re saving tons of cash and we’re watching less TV. More importantly, all the TV we watch now is meaningful, not mindless habit.

    •    Flashing LED front and rear lights for a bicycle to use day and night. The front flashing light has saved me a couple of times when people started to left turn in front of me and across my path.

    •    Lewis N. Clark WaterSeals Waterproof Pouch
    ($16) – A waterproof swim pouch with waterproof earphones for an MP3 Player. I slip an old cheapy MP3 player loaded with quality podcasts (like Gardenfork) and swim without fear.

    •    Jabra STREET2 Bluetooth Stereo Headset
    ($58) – Allows me to carry my iPhone on my belt but have the headset cord in my shirt and out of the way while gardening. It’s pretty much impervious to heavy sweat.

    •    Becoming Jefferson’s People
    by Clay S. Jenkinson – The most Gardenfork-y book I know of: self reliance, gardening, cooking, education, optimism, citizenship, philosophy.

    •    What’s Wrong With My Plant? (And How Do I Fix It?)
    by David Deardorff, Kathryn Wadsworth ($17) – One of the most helpful gardening books I own. The books is a flowchart with logic gates – starting with stem, roots, leaves, fruit, or flower – and then follows a branching logic tree to a diagnosis.

    Tony
    •    In the DIY vein, make a printed certificate for some task that you can do, and give it to someone who’s not so capable, or who may not have much time. Some ideas: paint a bathroom, make a four course roasted duck dinner (or something else nice they wouldn’t normally make), organize a garage, or hang shelving units

    Sarah

    •    OXO Good Grips Salad Spinner
    ($30) – For anyone who is a member of a CSA, has a vegetable garden, or otherwise eats a lot of greens. It makes cleaning greens so easy that it’s well worth the real estate it takes up in the kitchen.

    •    Mr. Beer Home Microbrewery System
    ($33) – A great introduction to how to brew. Buyer beware: May instigate lifelong obsession with homebrewing.

    •    Knife sharpening services – This is one of those things I don’t get around to nearly as often as I should and am always so happy when I do. A sharp knife isn’t just safer, it’s also far easier to use.

    •    Vitamix 1782 TurboBlend, 2 Speed
    ($380) – The theory here is you can go through five $100 blenders that don’t meet your expectations or invest in a Vitamix upfront. My husband and a handful of family members went in on one for my birthday one year and we use it often throughout the week to process soups, puree winter squash, make baby food, and even grind our own flours.

    •    Framing a sentimental photo – In the digital age we take so many pictures but rarely look at them months later. I love the idea of restoring an old photograph so that visual memory is not lost.

    photo by mconnors

  • Hang a TV on a brick or concrete wall

    Hang a TV on a brick or concrete wall

    Hang a TV on a brick wall, or hang a tv above the fireplace? Here’s how to do it right. Below the how to photos is a video of how to drill into brick or cement and links to other DIY articles.

    Sleeve or Wedge Anchors are best for cement or brick walls
    Sleeve or Wedge Anchors are best for cement or brick walls

    Working in older buildings, many times I’m asked to hang a TV on a brick or cement wall. In brownstones, many times people want to hang a HDTV or flat panel TV over the fireplace. Most of the fireplaces no longer function, being old coal or gas fireplaces. Be sure not to drill holes into the chimney of  functioning fireplace. If you’d like to hide the wires, like we did in the top photo, we use plastic raceway molding.

    To hang a TV on a brick or cement wall, you will need sleeve or wedge anchors. You could also use lead anchors and lag bolts, but I prefer to use sleeve anchors. You will also need a hammer drill.

    drill into brick video insert

    Hammer drills are not that expensive. Click here to see some drills you can buy online. Or you can ask one of your friends if they have one. You’ll also need masonry bits for a hammer drill, they are also called percussive bits in some places.

    Hammer drill and the dust it creates

    Hammer drills are loud, so use ear protection, and eye protection is of course an always must have.

    Search On Amazon For TV Wall Mounts Here

    Hanging a TV with a HDTV mount is one of those projects that falls into the “if all else fails, read directions” . So read the directions before trying to do this.

    Attach the brackets to the back of the flat panel TV, and attach the wall mount to the TV brackets. Then get two friends to hold the TV up on the wall and find the perfect spot to mount the TV on the wall. Reach behind the TV while on the wall and with a pencil mark where the wall bracket be mounted on the wall.

    Be sure the person in charge of the interior of your house is present and has a say in the placement of the TV, because once you hammer drill holes in a cement wall, they’re kind of permanent.

    Put the TV down somewhere safe, and take the wall bracket,  place it on the wall and line it up with the marks you made. Mark where you are going to drill holes to put in the sleeve anchors. ( see the mount instructions for how many bolts are needed for your tv )

    Cover the area where you are going to drill with plastic. Brick or cement dust will come out of the hole you are drilling with the hammer drill. If you have a shop-vac, have a friend hold the hose just below where you are drilling, it will save you a lot of cleaning up.

    I usually use 4 inch long 3/8″ sleeve anchors if you are hanging on a plaster wall with brick behind it, and 3 inch long sleeves if its a bare brick or cement wall. After drilling the holes, make sure the nuts are on the ends of the sleeves, and tap the sleeves into the holes.

    Don’t hammer the sleeves too far into the wall, you need enough of the threaded end of the sleeve protruding out of the wall to hang the mount. You have the nuts on the end of the sleeves to keep the hammer from damaging the threads of the sleeve while tapping them in.

    Wall mount attached with sleeve anchors

    Remove the nuts and hang the wall mount on the wall, use washers and tighten down the nuts to secure the wall mount to the wall. Then read the directions again to remember how to hang the TV on the wall mount. Then you’re done.

    Here is a how to drill into brick or cement video we did to give you an idea of how to hang a tv on a brick wall:

    hang-a-tv-on-a-brick-or-concrete-wall-6Watch how to drill into brick and concrete here.