Category: Articles

blogs

  • Foraged Oyster Mushroom Risotto

    foraged oyster mushroom | GardenFork

    After getting back from vacation I was pretty lacking in the grocery department, but fortunately Eric graced us with some of these beautiful foraged oyster mushrooms. I made mushroom risotto – a pretty common occurrence in our kitchen but made special by these particular specimens. I typically use creminis from the grocery store because they are affordable and have decent flavor, but these oyster mushrooms are much heartier in texture and woodsier in taste – the perfect addition to creamy, slightly sweet risotto. To make it a meal, we added a fried egg to each serving, the vibrant, runny yolk as a colorful finishing sauce.

    In true GardenFork style this “recipe” won’t include much in the way of precise measurements. Risotto is more art than recipe, and lovers of the dish have a good time debating the precise way to make it perfectly. In our show with Lynne Rossetto Kasper we talked a little about the process of making good risotto. Her tips: stir most of the time and use a wooden spatula with a flat tip so that you move a lot of rice with each stir. My method is below, along with a simple recipe for sautéed oyster mushrooms.

    foraged oyster mushroom risotto | GardenFork

    Oyster Mushroom Risotto
    Serves 4
    Ingredients
    •    1 onion, finely chopped
    •    1 c arborio rice
    •    dry vermouth
    •    Chicken or vegetable stock (I used a homemade chicken stock that included some leftover corn cobs, making it slightly sweet)
    •    1/2 c grated parmesan cheese
    •    2 tbsp butter
    •    4 c cleaned and sliced oyster mushrooms
    •    1/2 tsp dried thyme
    •    balsamic vinegar
    •    4 eggs
    •    chopped chives, to garnish
    •    salt, pepper, olive oil
    Cooking Directions
    1. Heat the stock (I start with a quart) in a medium pot over high heat. Once hot, reduce the heat to low to keep the liquid warm.
    2. Coat the bottom of a medium or large pot over medium-high heat with olive oil. When the oil is hot, add the onions and a big pinch each salt and pepper and sauté until translucent. Add the rice and another pinch of salt and pepper and sauté for a couple minutes. Add a couple big splashed of vermouth and continue to stir and cook until the liquid is absorbed.
    3. Add a ladle full of warm stock and stir the rice until when you run your wooden spoon along the bottom of the pot and the rice does not immediately run back together to cover the line you made. At this point, add another ladle full or two of stock. Continue this process until the rice is creamy and just cooked through, about 30-45 minutes. It may take you a few times to get the consistency just right, but rest assured that all attempts, as long as the rice isn\’t hard, will be delicious, if imperfect.
    4. When the rice is where you want it, turn off the heat, add the cheese and butter, and stir to melt and combine.
    5. Coat the bottom of a large saucepan over medium-high heat with olive oil. When the oil is hot, add the mushrooms and thyme and give them a quick stir to evenly coat with the oil. Let the mushrooms brown deeply, resisting the urge to stir. Once browned on one side, give the mushrooms a stir to brown the other side. Add a splash of balsamic, turn off the heat, and stir to distribute the vinegar evenly. Add a pinch each salt and pepper.
    6. Fry the eggs. Distribute the risotto evenly among four plates, top each with a fourth of the mushrooms and an egg, garnish with fresh chives.

  • Mushroom Foraging wow!

    Mushroom Foraging wow!

    While mushroom foraging, we came across a giant crop of oyster mushrooms right near our house. I think these oyster mushrooms were on a dead maple. I have to get better at tree bark identification ( there are some links to books below) . As always with edible plant identification – be sure to double check the identity to be sure what you are mushroom foraging is an edible mushroom, OK?

    mushroom-foraging

    Oysters, once you see them several times, become easy to identify, though they do come in different colors. These oysters were just off the road surrounded by poison ivy, so again, be careful. I used a ladder to get to these.

    Of course we made a video about the mushroom harvest, which we will post later. Our producer Sarah was talking about the oysters we brought back to Brooklyn for her, so i wanted to share photos of the harvest. These oysters popped out of the dead maple after several days of heat followed by an afternoon shower every day. It was like clockwork, every day at 4 pm it would rain. I was wondering if we had moved to Seattle or somewhere in the Northwest.

    To find mushrooms, pay attention after it  rains, often times I find mushrooms have popped up after a storm. When you do run across them, use your identification books to check the identity. I suggest two mushroom books here.

    Here are some of our mushroom foraging and how to cook mushroom videos for you:

    mushroom-foraging-2

    Oyster Mushroom Identification

    mushroom-foraging-3

    How To Cook Mushrooms

    Click here to see our other mushroom identification posts

    Cross check the mushrooms you find with several sources, books are best, I think. I use several books for identifying mushrooms , below are the mushroom identification books I recommend:


    Click Here To Buy From IndieBound

    Click Here To Buy From Amazon


    Click Here To Buy From IndieBound

    Click Here To Buy From Amazon


  • Simple Rhubarb Cake Recipe : GF Video

    Simple Rhubarb Cake Recipe : GF Video

    Make this simple rhubarb cake and and learn how to cook rhubarb in this easy cake video. This rhubarb recipe is based our Peach Dump Cake Dessert Recipe video, link here. What’s great about this recipe is that it doesn’t take long to bake and you’re ready to go out in the yard instead of being in the kitchen.

    This rhubarb recipe can be adapted to use most any fresh or canned fruit. Like its cousin, the Peach Dump Cake recipe, it uses a quick cake recipe and adds in fruit. We found that simmering the rhubarb in some sugar before adding it to the cake batter works really well. Our oven usually takes longer than most to bake cakes, so this recipe should take about 30 minutes in  your oven.

    If you want to make this recipe and its winter, you can buy frozen rhubarb in larger supermarkets now. Neat. I imagine frozen would not need to be cooked as much beforehand, as the freezing breaks it down some.

    simple-rhubarb-cake-recipe-1

    We have a bunch of how to grow and cook rhubarb videos on our site, here is the link. Our first rhubarb video we did when our Yellow Labrador Henry was just a pup, and she was eating my notes while we were shooting the show. Watch our first rhubarb recipe video here.

    Let us know your thoughts and suggestions and ideas in the comments below, are there new ways to use rhubarb in recipes? Have you ever eaten it raw? I have, it has quite a taste!

    Simple Rhubarb Cake Recipe
    Ingredients
    •    1 cup All purpose Flour
    •    1 1/2 Teaspoon Fresh Baking Powder
    •    1/2 Teaspoon Salt
    •    1 stick Butter
    •    1 cup milk
    •    1 1/3 cups sugar – use less if you want
    •    2 cups rhubarb
    Cooking Directions
    1. Preheat the oven to 375F
    2. Cut the Rhubarb into 1/2\’ pieces, toss into a small pan with 1/3 cup sugar over low heat, simmer for 5 minutes or until the rhubarb is slightly soft. You may want to drain off some of the water from this to keep the cake batter from being too wet.
    3. Mix all the dry ingredients together
    4. Add the milk and slightly cooked rhubarb. The batter may look pretty wet
    5. Pour the batter into a greased 8 x 8 cake pan. I like to use a glass pan for this. It browns the cake nicely.
    6. Bake for 30 minutes and test for doneness. The top of the cake should be nicely browned, but not too toasted.
    7. This rhubarb recipe goes well with ice cream.

  • The Zen of Basic Knife Skills

    The Zen of Basic Knife Skills

    #PodcastsWorthHearing : the Zen of Knife Skills (vids) – rhkennerly http://ow.ly/lBKkd

    First knife fight I ever saw was at Ft. Devens. Oddly it was at breakfast, at the butt-crack of dawn no less, in the chow hall. The fight was over the last cup of Black Cherry Yogurt. Good stuff, I’m sure, but not worth dying over.

    And that experience pretty much summed up my knife education for the last 50 years. For me it was: knife as pry tool, knife as first resort aboard ship (where the government buys the line), knife as last resort while sailing (where you buy the line), knife as show of manliness in the Caribbean (the bigger the knife, the better the diver).

    In the kitchen, I’ve always been more of a production cook:

  • DIY: Fixing a Balky HOME button on an iOS device

    DIY: Fixing a Balky HOME button on an iOS device

    Well, actually a “work around.”

    For some weeks the black HOME button at the bottom of the screen on my iPad 2 has been…let’s say moody, uncooperative. In a word “balky.” Like me, it only works when it wants to and is unpredictable in its work ethic, also like me.

    I’d done some research on the interwebs and found this to be a common complaint without a real cure. Some think the problem is actually software related. Some think it’s mechanical. I’ve tried all the simple suggestions I could find about “resetting” the software.

    Most of these suggestions were simple and middle-of-the-road. One was more occult than anything else.

    “Take your iPad out of it’s case or cover. Rotate your iPad into the Landscape orientation with the HOME button to the right. Rotate your device to the Portrait orientation with the HOME button on the bottom. Immediately put your iPad backdown on a cold, hard, flat surface and leave it over night.”

    Well that didn’t work.

    I did think about having the mechanical Home button replaced, but I’d read that because of the way the iPad is constructed, there was a good chance of damage. Everyone guaranteed their button and their work, but NOBODY guaranteed the damage putting the new button in.

    However, I discovered that in the later iOS upgrades there is a HOME button in accessibility options that will float on your screen and do all kinds of nifty things.

    The “soft” HOME button is small, semi-transparent, and dragable to any place on your screen.

    When activated, it pops up with this MENU:

    from here the soft HOME button accepts 1, 2 or 3 taps, just like the mechanical HOME button. “Gestures” is for recording your own unique gestures and relating them to apps or other events. “Favorites” is where your gestures are stored. Under “Device” is this MENU:

    And under “More” is this Menu:

    “Multitasking” is for quickly switching between apps.
    Activating the soft HOME button does not disable input from the mechanical HOME button, so there’s no reason not to have it on your desktop and ready to use if your iDevice stops answering input from the mechanical HOME button.

    Here are the steps for activating the soft HOME button:


  • Easy Window Install & Using Spray Foam

    Easy Window Install & Using Spray Foam

    I helped a friend install replacement windows today. The original windows were double hung sash weight windows, quite old. Wanted to show you a few things about how to install replacement windows. To install new windows, you first have to remove the old ones. This is not hard.

    We will be using the frame of the original window. The replacement windows slide inside the existing frame. Most replacement windows need to be custom ordered. Its important to measure each window, as they are all slightly different.

    easy-window-install-using-spray-foam-4
    Old window removed

    To ready the window frame for the new window, you remove the trim from the inside, and the bottom window will tip out easily. There is a thin wooden strip between the upper and lower windows, and once that is removed, the upper window comes out. You may have to disconnect the sash weights, though the sash weight cord is usually broken already. The windows may need to be lowered or raised a few inches to get past the sash weight pulley.

    easy-window-install-using-spray-foam-5

    The replacement window then slides into the existing window frame.

    Now the fun part: Spray Foam.

    Its probably the insulation obsessive in me, but I love to use spray foam. For these windows, we had to insulate a lot of cavities around the original windows, so this called for a lot of spray foam!

    There are several kinds of spray foam, different kinds expand at different rates, and some cans of foam can be used more than once. Some cans, once you start foaming, you can’t stop, or the foam hardens in the spray tube. Others you can clean out the spray tube and use it again later.

    Cavity Filler and Door Foam
    Cavity Filler and Door Foam

    The two main kinds of spray foam for our purposes is cavity filling “Big Gap Filler” and minimally expanding “Door & Jamb Foam” . The names are pretty self explanatory. You may not realize it, but the cavity filler type foam, if used when sealing a door or window, can warp the wood door frame. For doors and windows, we use the minimally expanding foam to fill in the gaps. For big open spaces, we use the big foaming stuff.

    Most spray foam cans have to be held upside down when using, if you don’t, all the propellant leaks out, leaving the foam in the bottom of the can. It can be helpful to have an additional stray handy when you have to work up close to a ceiling, the additional straw allows you still tilt the can yet get the foam where you need it.

    Cavity Filler Foam on the bottom, and Door & Jamb foam on top
    Cavity Filler Foam on the bottom, and Door & Jamb foam on top

    Most important is to wear gloves and clothes you don’t care about. You will get foam on your clothes, and it doesn’t come off. I have ruined a lot of clothing with spray foam. I invented the trash bag work smock for impromptu spray foam jobs.

    Trash Bag as spray foam application uniform
    Trash Bag as spray foam application uniform

    What do you use spray foam for? Let us know below:

  • Dandelion Greens : Info, Recipes, Videos

    Pulling some dandelions in our of our raised vegetable garden beds this weekend, I was able to pull some of the dandelion greens out whole, with their taproot. wow. The raised beds have great garden soil in them, and they weed easily; with little work the long taproot came out with the dandelion plant. Dandelions can be persistent if one does not get out the taproot, they will grow back if you just snap off the greens; which can be a good thing if you are growing dandelion for food, no need to reseed, just snap off the top.

    dandelion-greens-info-recipes-videos

    These dandelion greens were in the wrong place in our garden, so I pulled them for salad. They were in what was our tomato bed last year, peeking out from the side of the black plastic I use as a mulch and thermal blanket to keep weeds down, heat up the soil in the early spring, and conserve moisture in the soil.

    Dandelion Greens are super healthy for you, they are high in Vitamin A, C, & K. They taste great in salads, soups, and whatever else you would toss a hardy green leafy vegetable into. The greens can be bitter, and sometimes people blanch them to get rid of some of that bitterness.

    All parts of the dandelion plant are edible, most people think of dandelion greens, and dandelion wine, but what about the taproot?

    The dandelion taproot can be used to make a coffee alternative, much like burdock root is used to do the same. The taproot is also used to make a British drink called Dandelion and Burdock, and is used in making root beet. Perhaps this is where the ‘root’ part of root beer comes from.

    I’ve got burdock growing the the yard near the woodshed, this year I’ll look into making this english drink.

    We’ve made a few videos about dandelion greens and how to cook with dandelion with these recipes:

    Harvesting Dandelions Greens & Salad Recipe

      Dandelion Greens with Bacon

    Here is a good book on foraging to get you started;


    Order From An Indie Bookstore Here

    Buy From Amazon Here

  • Birdhouse Kit Repair

    After a year, one of our birdhouses we made from a birdhouse kit had been chewed open by the squirrels to the point where the entrance hole was too large for most birds. The cavity nesting birds we attract to the yard are mainly Chickadees and Nuthatches. In addition to having several kit birdhouses, we also have made several birdhouses, click here to watch out how to build a birdhouse video and get free birdhouse plans.

    Chewed Out Birdhouse Hole
    Chewed Out Birdhouse Hole

    I’ve seen number of yards with wooden birdhouses made from kits or birdhouse plans that have had the entrance holes chewed apart by squirrels, and somewhere I saw this simple solution for repairing the birdhouses.
    Here I’ve used piece of metal roof flashing, which you can buy a small roll of, to cover the enlarged entrance hole. You could also use some leftover sheet metal, or even a flattened out piece of aluminum from a soda can.

    Birdhouse-Kit-Repair-2
    Most smaller cavity nesting birds will use a birdhouse with a 1 3/8 diameter entrance hole, so I happened to have a hole saw that diameter.

    I cut the sheet metal to overlap the existing birdhouse entrance hole, and nailed it onto the front of the birdhouse. I then drilled out the sheetmetal hole. I used drill press, but you can do this with a hand drill as well.

    Birdhouse-Kit-Repair-3

    Repaired Birdhouse!
    Repaired Birdhouse!

    While you are doing this repair, check to see if there is any screening on the inside of the front wall of the birdhouse. The young birds need to be able to climb up the side of the wall of the birdhouse to get out of the nest. I put some leftover hardware cloth on the inside of the front of the birdhouse, extending down from the entrance hole to the floor of the birdhouse, to make a climbing wall for the young birds to get out.


       Here is a video on how to build a birdhouse


  • Whole Wheat Tuna Dog Treats Recipe – Adorrable Dor

    Whole Wheat Tuna Dog Treats Recipe – Adorrable Dor

    Wholewheat Tuna Dog Treats -Adorrable Dor

    Hey Allemaal! -which means everyone in Dutch-
    Finally we are getting some decent spring weather, and boy do we need it. I think we are about 3 to 4 weeks behind normal spring growth and my garden is poised to explode with greens and all kinds of flowers. Now comes the really difficult part of teaching Roshi to stay on the paths and grass and out of the vegetable and flower beds. As she is a darling Labrador in full puberty this is a hit and miss experience at the moment. But I already decided to keep the veggies limited to lettuces and legumes this year so if she damages anything in youthful folly it can be replaced easily.
    A note about the Sweet Potato dogtreats I made early March, because there is a high moisture content they must be either used within 10 days or so or be kept in the refrigerator. The last couple of treats I made spoiled I’m sorry to say.
    Wholewheat-Tuna-Dog-Treats-Recipe-2

    These Tuna Treats are also quite high in moisture but should keep 2 weeks without problems, that is if you can keep your dogs from stealing them. That’s what happed to Ellie -Roshi’s breeder- when I made her these treats for her 5 grown Labs. Within half an hour Roshi’s mom Esmer stole the container full of treats from the kitchen counter and all Labs pounced and devoured the lot, destroying the plastic tub in the process. The garlic in this recipe is optional but most dogs seem to have no problems with it and garlic helps with flea and tick control.
    The picture shows Rosh enjoying her new bowl rack –is that what you call this contraption in English- so she does not stretch her neck and spine too much when eating. Credit goes to my husband, he cleverly fashioned it from an Ikea IVAR bookcase sidepanel.

    Wholewheat-Tuna-Dog-Treats-Recipe-3

    Wholewheat Tuna Dog Treats
    If you have tuna in water no problem, substitute the 2 tablespoons of water for olive or vegetable oil.
    1 small can of tuna in oil
    2 tablespoons of water
    300 grams or 10.5 ounces of whole wheat flour
    2 eggs
    4 cloves of chopped garlic

    This recipe uses a kitchen blender but you can easily mix and knead this dough by hand, just chop the garlic very finely.
    Preheat your oven at 200 C or 395 F.

    Blend the tuna, water and garlic in the machine, add flour and eggs. Whizz again until it forms a firm but slightly sticky dough.
    Remove from the blender and add a little flour if it is too sticky to roll out comfortably.
    Using a rolling pin, glass or just your hands, roll or push the dough to a thickness of about 1 cm or 1/3 inch. It will puff a bit in the oven, so will make a substantial treat.
    Distribute the treats evenly on a baking sheet lined with greaseproof paper. Bake for about 30 minutes until nicely golden brown. You can leave them in the cooling oven for an hour or so, they will crisp up even more.
    I use Roshi’s Labrador cookie cutter but you can use any shape that takes your fancy, this is a very well behaved dough.
    Of course using a glass or the empty tuna can, even cutting into strips will work just as well.
    This recipe is adapted from the Hondenkoekjes met Tonijn recipe from the www.hondenkoekjes.nl site.

  • Wood Fired Pizza Oven Photos from Daniel

    Wood Fired Pizza Oven Photos from Daniel

    Daniel watched our Brick Pizza Oven Plans video and built his own. He calls it a Wood Fired Oven, aka wood fired pizza oven.

    wood-fired-pizza-oven-photos-2

    He tell us a bit about it:

    I have constructed a dry stacked wood oven similar to [GardenFork’s} I purchased the cement blocks for the base and the cement board for the sub floor at home depot. After leveling the land, I created a surface onto which I placed the fire brick floor of the oven. These were also newly purchased. From there I built up the oven itself from used clay bricks. The roof is supported by angle iron pieces. I constructed a short chimney from bricks.

    My first pizzas were not at all perfect but there is still a lot to learn about maximizing this oven and of course, being that it is kind of rough, to say the least, it may never be able to match the results of a commercially produced wood fired oven. But for those who want to experience a wood fired oven without the commitment of dollars or creating a permanent structure, this might be the way to go. So far, I love it! Dan

    wood-fired-pizza-oven-photos-4 wood-fired-pizza-oven-photos-8

    I love how Daniel took the brick pizza oven plan we did, and made it his own. The cement blocks make a great base, its clear that pizza oven isn’t going anywhere. He also doubled up the brick walls and roof, so the oven would have more mass and hold more heat. If you have more brick, use it, I say.

    Daniel originally posted these photos on http://www.pizzamaking.com/, neat forum if you are into pizza making big time.

    Watch our how to build a pizza oven video here:

    pizza-oven-still-500

    Have you built a pizza oven? Have Comments or Questions? please post them below:


  • Foraging Blogs Better Than GardenFork

    Foraging Blogs Better Than GardenFork

    On Twitter, Alexa asked me and a few foraging experts about identifying Mustard Garlic, and at the same time, she introduced me to 4 foragers who have websites and books on foraging.

    4-foragersFull Disclosure: I am not the high priest expert on foraging or edible plants. Like most things, I know enough to be dangerous. But Alexa was nice enough to include me in her question.

    Now that my place on the foraging scale is clear, here is a GardenFork video we did on foraging Garlic Mustard and Stinging Nettles to make a great Garlic Mustard Nettles pesto recipe.

    This is what I love about creating GardenFork – people who I’ve met introduce me to new people doing cool stuff. In no particular order here are 4 foraging wild food people who I now read thanks to Alexa, please check out their sites and social media feeds:

    Tama Matsuoka Wong, @meadowsandmore,  is a self-described weed eater, and is a TEDx speaker. She partners with Chef Eddy Leroux on their site, Meadows and More. They also both work with Restaurant Daniel in NYC. Tama and Eddy have published Forage Flavor, Finding Fabulous Ingredients In Your Backyard or Farmer’s Market.

    Becky Lerner, @UrbanForager, has a blog on Urban Foraging: Wild Plants for Food, Medicine, and More in Portland, Oregon. Becky has published Dandelion Hunter: Foraging the Urban Wilderness. I like what Rolling Stone wrote about Rebecca and her book:

    If and when the apocalypse arrives, you’ll want Rebecca Lerner by your side.

    Go check out her blog and book and ask about the 9 month wilderness survival program she took.

    Langdon Cook, @langdoncook, whose blog is Fat Of The Land, Adventures of a 21st Century Forager, also has a book of the same name. His expertise is in wild foods and the outdoors. Langdon hosts foraging workshops like many do, but he teaches about foraging for shellfish, which never crossed my mind before.

    This being one of those head-slap moments, because I go surfcasting on the Rockaways, and I bet there are shellfish there too. ( Here’s a video we did on Surfcasting )

    Karen Monger, @the3foragers, and her family go foraging, and document their experiences on their blog, The 3 Foragers. Karen lives in Southern Connecticut, I live in Northwestern Connecticut, so we come across many of the same plants. We are lucky to have an abundance of mushrooms at certain times of the year. (Last fall we had a ton of oyster mushrooms in our area, here’s a video we did on them.) I like the posts Karen has put together about foraging for invasives that are prevalent in our area. We’ll be doing a video about one of them, Japanese Knotweed.

    Get their books on Indiebound:
    Foraged Flavor from IndieBound
    Dandelion Hunter from IndieBound
    Fat Of The Land from IndieBound

  • Hoop House Plan You Can Build

    Hoop House Plan You Can Build

    A PVC hoop house design by J.B. uses PVC pipe, plywood, & plastic to make a simple greenhouse. J.B. based this on our Hoop House Plan video, and made it taller for tall plants. Perfect for seed starting tomatoes or even corn.

    Just wanted to drop you a line to say Thanks for your video’s on the hoop house. [Here’s a photo of] the hoop house I had built for our raised beds. I don’t have the vent in yet as I’m still waiting for it to get delivered. I did modify the design a bit. I made mine a bit higher to try and grow some taller plants and I used wood at both ends and ran a 2×3 spine down the middle and attached the hoops to it with the same C clamps. We had some winds the other night with a couple gusts to near 50MPH and it stood like a rock. Cant wait to get planting under it.

    Hoop-House-Plan-You-Can-Build

    With this taller hoop house cold frame, it could blow over with high wind, but J.B. secured it with C clamps to the raised bed. You could also use spring clamps or tie it down with strong rope to some screw eyes on the raised beds.

    I also like the trellis J.B. has built at the end of the raised bed using some leftover fence material.

    I just put some kale and mustard transplants into our hoop house cold frame, i’m always amazed at how much warmer it is inside the hoop house cold frame vs. the outside temperature.

    Below are some of our Simple Hoop House Cold Frame videos, Let us know your questions or thoughts in the comments below:

    hoop-house-cold-frame-play

    Click here to watch our How To Build a Hoop House Cold Frame Video

    How-to-build-a-cold-frame-hoop-house-3

    Click here to watch How to build a cold frame video.

  • Book Review: Long Way On A Little

    Book Review: Long Way On A Little

    I’ve been meaning to do this write-up for months. On the one hand, I feel a little guilty for keeping this gem of a book to myself for so long; on the other hand, there are some benefits to my procrastination. I haven’t just read this book – I’ve really lived with it. More than just an informative read-through, it has become a handy reference and recurring source of inspiration in our kitchen.

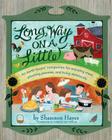
    long way bookThe cookbook is Shannon HayesLong Way On A Little, and the tagline sums it up nicely: “An earth lover’s companion for enjoying meat, pinching pennies, and living deliciously.” It is beautifully written and edited. The content flows logically and is richly educational without overwhelming. As a resource, it’s easy to pick up and quickly find the piece of information or recipe you need. And, no less importantly, the nerd in me found delight in the occasional well-placed pun.

    More than a cookbook, Long Way On A Little begins with an honest discussion on the sustainability of grassfed meat, followed by a thorough (yet concise) explanation of what makes good meat, from farming to processing to cooking. The remaining chapters include recipes and other helpful culinary guidance on: bones, fat, beef, lamb, pork, poultry, eggs, and “other unappreciated treasures.” The pages include descriptions and cooking methods for different cuts of meat, crockpot meals, homemade lip balm, a life-changing technique called super-slow roasting –  they teach more than I could summarize in this review. And the recipes! Braised beef in a cinnamon-orange coffee sauce, pork shoulder roast with caramelized onions and apples, rack of lamb glazed in balsamic butter, and so many other tantalizing dishes to choose from. We made the slow-cooked beef shanks with bacon and tomatoes when my mom was in town, and it was a hit.

    Probably the most convincing reason to own this cookbook, though, is not that it will teach you why and how to purchase quality animal products but that it will motivate you to make the most of what you buy. For example, since reading the cookbook making stock has happily become a weekly ritual in our home. Ms. Hayes has a way of inspiring through Long Way On A Little that I would encourage you not to miss!


    Buy from IndieBound Here


  • How to start catering : GF Radio

    How to start catering : GF Radio

    Sarah joins Eric to talk about how to start a catering business. Sarah has been catering birthday parties and dinners on the weekend, and tells us what its like to do catering, how to get started catering and personal chef business, and what issues she has dealt with in the catering business. The key is that it is a business that Sarah enjoys, as she loves cooking and baking. This is a big thing when starting a business, you have to love what you do. The challenge for her is to make it profitable.

    Eric brings up that despite being a mother to a 1 year old, Sarah has been able to do quite a bit, and Sarah talks about how having a child has motivated her to make her future what she wants it to be.

    Her first catering job was via a community Yahoo group, Sunset Park Parents, and word of mouth has helped  her grow her business.

    Neighborhood websites are a great place to spread the word about your new business.

    meatballsSpeaking of email groups and community websites, Sarah talks about creating a Yahoo group for parents with kids born in 2012 in her neighborhood.

    Nextdoor.com is a website that has neighborhood communities, and verifies people’s names when they are joining. One could also use Ning.com to start a community group. Or you can just create a Yahoo or Google group, which is super simple.

    We also talk about Sarah’s simple meatball recipe that she posted on HelloBee.com, a pregnancy and parenting website. Sarah is their food contributor.

    Sarah’s recipe is inspired by her reading of a book, Long Way On A Little, by Shannon Hayes, Buy Long Way on a Little here
    which will be reviewed on GardenFork soon.

    photo by kconnors

  • Dog Treat Recipe Success!

    Dog Treat Recipe Success!

    Katja watched our Sweet Potato Dog Treat Recipe video and made these great looking dog treats!

    dog-treat-recipe-katja

    In an email, she says:

    I made your Sweet Potato dog biscuit recipe today. My slightly picky Labrador pup –I know a contradiction in terms- loves them.
    Really liked the dogbone cookiecutter you used and looked online for one. I didn’t find a large one but it will do fine for a small treat.
    They also had a couple of dog breed cookiecutters and I got the Labrador one.
    It’s kinda fussy with the sticky sweet potato dough but they came out ok.

    I know some Labradors that are picky about their dog treats – Henry wont eat carrots, and of course, Charlie Pup inhales them.

    The dog treat dough for this recipe is kinda sticky, I think the sweet potato makes it that way, its also full of potato strand like stuff, so that adds to it. But with a good cookie cutter, or just a tin can, you can cut out the dog treats.

    I really like the Labrador cookie cutter Katja used here. You can find some cookie cutters online here.

    We have a few dog biscuit recipes, click  here to watch them all

    Have a dog treat recipe? please share it or your treat ideas below in the comments, thx!


  • Replace Sink Strainer Gasket DIY Plumbing

    Replace Sink Strainer Gasket DIY Plumbing

    Sink leaking? I bet the gasket in the sink strainer is leaking. This is a DIY plumbing repair I did at a friend’s restaurant, but the concept is the same. But if you need to fix your leaking chef kitchen sink, this is how to repair a leaking sink.

    Use a screwdriver and hammer to unscrew the ring
    Using a screwdriver and hammer to unscrew the ring in a commercial sink

    For this sink, which is a bit more industrial than your average sink, you remove the top ring from inside the sink. For most household sinks, there is a ring with tabs on it that attaches the sink strainer to the sink itself. For either type, you can buy a fancy tool to remove the ring, or you can use my favorite tools, a hammer and a screwdriver.

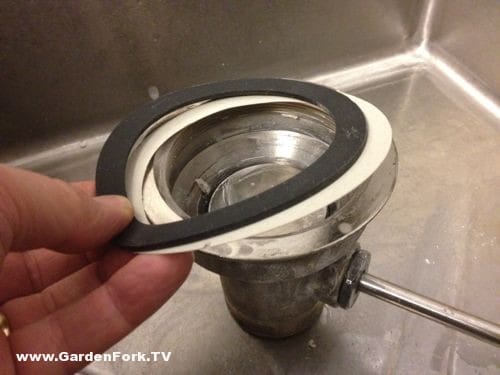
    Rubber gasket, cardboard ring and sink basket assembly - restaurant sink
    Rubber gasket, cardboard ring and sink basket assembly – restaurant sink

    First remove the pipe that is connected to the strainer – this is called a tailpipe, btw. Tap on the tabs under the sink to move the ring counterclockwise. You might have to jam a screwdriver into the basket from the top to keep it from spinning. If you break the tabs, its ok, you can go buy a new sink stainer for cheap, and its shiny clean too.

    Home kitchen sink
    Home kitchen sink

    Remove the the strainer, and clean it and the sink surfaces. There may be old plumber’s putty around the hole in the sink. Pick up a new gasket at your local hardware store, it will be a rubber gasket that also comes with a cardboard ring. If you are using the old sink strainer and there was plumber’s putty on it or the inside part of the hole in the sink, roll out a long hot dog of plumber’s putty about 1/4′ in diamter, and wrap this around the sink strainer and place the sink strainer back in the hole. Press down on strainer to squish out excess putty.

    Gasket replaced, no leaks! ( how unusual for Eric... )
    Gasket replaced, no leaks! ( how unusual for Eric… )

    From underneath, place the rubber gasket onto the strainer, then the cardboard ring, then screw on the metal or plastic ring. For this restaurant kitchen sink, its a little backwards, but you get the idea. Screw the ring on tight, but don’t break the ring getting it tight.

    Re-attach the tailpipe – the piece of pipe that connects the sink to the drain pipes- and fill the sink with water, and check for leaks. If it leaks, you may be able to just tighten up the ring a bit, if that doesn’t work, it may be that the sink hole is warped or has some crud in it that is not letting the gasket seal tight. You’ll have to take it apart, clean up the hole, and re-assemble.

    Have you done some DIY plumbing repair? Let us know below:

  • Homemade Jello

    Hey everyone! I haven’t posted in a while but wanted to wish you all an early happy Valentine’s Day and share a recipe for a healthy treat. I wanted to make my 11-month-old something special for the holiday that wasn’t loaded with sugar or white flour and decided to try my hand at homemade jello. It’s really simple and fast to make, plus it’s fun to eat.

    Homemade Jello Recipe

    Homemade jello doesn’t take any longer to make than the boxed mix and comes together without any food colorings, artificial flavors, or preservatives. All I used was 100% fruit juice (in this case, tart cherry sweetened with apple) and gelatin. Any gelatin would do but bear in mind there are some high quality products out there, like Great Lakes gelatin, made from grass-fed cows.

    Enjoy and I look forward to catching up with you next week! I have a very cool book review in the works…

    Sarah

    Homemade Jello
    Ingredients
    •    2 c cold fruit juice, divided
    •    1 tbsp unflavored gelatin
    Cooking Directions
    1. Place one cup juice in a bowl and sprinkle the gelatin over it. Allow to soften for 10-15 minutes.
    2. Add the second cup of juice to a small saucepan over high heat and cook until almost boiling. Pour over the juice and gelatin mixture and stir for a minute, until the gelatin has melted.
    3. Pour the mixture into a glass or plastic container or jello mold. Chill for at least 4 hours then turn out. Cut into squares or use cookie cutters to make whatever shape you’d like.