Category: Articles

blogs

  • 5 Minute Chocolate Cake In A Mug Recipe : GF video

    5 Minute Chocolate Cake In A Mug Recipe : GF video

    5 Min chocolate cake mug cake is a simple easy recipe to make quick chocolate cake in your microwave. mix the chocolate cake recipe, microwave for 2 minutes, and in 2 minutes you have chocolate cake.

    Here is the 5 minute chocolate cake recipe:

    3 TBSP of vegetable oil

    1 egg

    3 TBSP milk, or water – milk is better

    2 TBSP sugar

    3 TBSP flour

    2 TBSP cocoa

    2-3 TBSP chocolate chips

    Pinch of salt

    Dash of vanilla

    In a pyrex 2 cup container or microwave proof mug, mix the wet ingredients together, then add the dry ingredients to the wet batter. Mix together, but don’t whip it, just mix it.

    Place in a microwave on High for 2 minutes. Turn the cake out onto a plate, or if its in a mug, you can dust with powdered sugar. Let it cool a bit before eating, its hot.

    Do you have a 5 minute microwave cake recipe? let us know below:

  • Mike’s Road Trips GF Radio

    Mike’s Road Trips GF Radio

    Mike tell us about his recent road trips to gaming conventions and Florida. then there’s some viewer mail.


    photo by chelle

  • Honeycomb Surprise during beehive inspection

    Honeycomb Surprise during beehive inspection

    pulling up the super

    With spring coming early, we got to do our first inspection of the beehives last weekend. All our hives made it through the winter, which, despite the warm weather, is still a roll of the dice each year.

    Hive #1 was re-queened twice last year; the hive never thrived, and I wondered whether it would make it through the winter. It did, thankfully. We opened this beehive up and found the bees to be good, crawling all over the sugar cakes we fed them through the winter – see our winter bee feeding video here.

    After removing the sugarcakes, I started to take off the supers, and when pulling the second super, I felt the telltale rubber band pull of burr comb.

    Burr comb is honeycomb where you don’t want honeycomb to be. Honeybees don’t like open space, they will fill any void with honeycomb.

    What I had forgotten last summer when we re-queened was I neglected to remove the queen cage when we put the 2nd new queen in the hive. The queen is in a small cage to introduce her slowly to the hive, and you have to remove one of the frames of the hive to fit the cage in temporarily.

    comb full of honey

    So I forgot to remove the queen cage after the queen was released by the workers, and the honeybees filled up that open space with a huge piece of honeycomb. Which just happen to be full of honey from last fall when we found it. We removed the honeycomb, put in a frame, and put the hive back together with a sugar feeder on top for the early spring.

    The honeycomb tasted great, we brought it to our friends house for dinner.

    you can see the space the comb filled in the lower super
  • Plywood Boat Video by Students in Denmark

    Plywood Boat Video by Students in Denmark

    I received this email today;

    We are a group of design students interested in recording and documenting processes involved with boat building. We modeled our first boat on the one in your video, and would like to know what you thought! Have you changed your boat in any way since you first made it? Do you have any advice for us on how we could improve it? Please could you reply to us as soon as you can, looking forward to your response!

    How cool is that? Wow I am flattered. They took the GF Plywood Boat Plan Video and made it their own.

    I have to make some modifications to the original How to make a Plywood Boat ,

    1. Let the caulk cure more for the clear plastic window in the bottom of the boat

    2. Use finish nails ( the kind with a small nail head ) to put the boat together and then seal all joints with fiberglass tape and resin.

    This is neat. Thanks to  Jeak (Jordi, Ellie, Alex and Kate) !

  • The Year-Round Vegetable Gardener Book Review

    The Year-Round Vegetable Gardener Book Review

    I was looking forward to reading Nikki Jabbour’s The Year-Round Vegetable Gardener because my farming apprenticeship had a significant focus on season extension, as the farm is currently going into its twelfth month of continuous harvest. But we were growing in Virginia, whereas Ms. Jabbour has succeeded in maintaining a year-round garden in the more challenging Nova Scotian climate. Because of this, her book achieves its subtitle: How to Grow Your Own Food 365 Days a Year, No Matter Where You Live.

    Listen to Nikki talk with Eric on GardenFork Radio here.

    The Year Round Vegetable Gardener Book Review

    The book is chock full of information, from the basics (timing the seasons and intensive planting) to the complex (building structures to capture and maintain heat). It is comprehensive enough that a relative novice could start with The Year-Round Vegetable Gardener as a valuable resource. A more seasoned grower might be tempted to skip over some familiar-sounding sections, but I would urge you to read cover-to-cover as unique and useful tips are sprinkled throughout the entire text.

    The chapter on winter gardening progresses from light protection (like row covers) to using an unheated greenhouse or building your own polytunnel, so a grower in any hardiness zone or variously sized growing space can find techniques to meet his or her needs. The plans to build your own cold frame or polytunnel are easy to follow and call for inexpensive materials. Plus, the chapter motived me with photos of lusciously green vegetables thriving alongside snow and ice.

    Like many other gardening books, this one concludes with a crop index. Ms. Jabbour recommends specific cultivars based on cold or heat tolerance or days to maturity and includes an emphasis on vegetable varieties less talked about in other books; for example, Tatsoi has its own entry.

    watch more mini greenhouse vids
    In short: I love this book. It’s a wonderful resource for year-round vegetable growing knowledge and inspiration. Now, if only I didn’t live in a studio apartment!


    Order from Indie Bookstores here

    Order from Amazon here. (affiliate links)

    Grocery Gardening a new cooking gardening book that works

  • How to make homemade pasta GF TV Video

    How to make homemade pasta GF TV Video

    Home made pasta, aka fresh pasta, we show you how to make a home made pasta recipe in the GF cooking video. Pasta from scratch is not hard, there’s just a few steps to get it right. Homemade pasta tastes different from store bought pasta, and when you make it yourself, there are infinite variations possible. neat.

    There’s a good chance you have a pasta machine in the basement, an xmas gift from a while back that you never got to, so you’ve got the equipment. If you don’t have a pasta machine, check out these pasta machines
    or the links at the bottom of this article.

    My technique for making home made pasta is based on a method Jamie Oliver shows us in his book, Cook with Jamie: My Guide to Making You a Better Cook
    – a book I really like, BTW.

    Home Made Pasta Recipe  ©2012 Eric Rochow

    100 Grams all purpose or Italian “OO” flour

    1 egg

    For homemade pasta, you can use either all purpose flour or an italian flour labeled “OO”, i believe its a finer grind flour, but if you can’t find it, all purpose flour works fine.

    The ratio that I’ve found works best is 100 grams of flour to 1 egg. If you are making fresh pasta for 4 people, I’ve found 300 grams of flour and 3 eggs works well.

    Put the flour and eggs in a food processor, and pulse until the flour comes together and looks like small pebbles.

    Dump the pasta dough mixture onto a floured board, and collect the flour into a ball.

    Now knead the dough by stretching the dough out and folding it over on itself. Its best to watch our how to video to see this. Knead for 5-8 minutes

    The dough is kneaded when you press your finger lightly into the dough and the dough fills out the dimple you’ve made again, the dough bounces back.

    Shape the dough into a rectangle, wrap in plastic wrap, and put in the fridge for at least 30 minutes, longer is better.

    Take the dough out of the fridge and cut into square pieces about 3″ x 3″,  3/4″ thick. how many pieces you will have depends on how much flour and eggs you mixed together.

    Take one of the dough squares and run it through your pasta machine at its widest width. Fold the dough back over on itself in thirds, like folding a letter into an envelope.

    You will now run the dough through each width setting on the machine, holding the dough so the folds are on the sides. You may need to flour the dough when rolling it through the machine to keep it from sticking.

    After you have run the dough through the machine at its smallest width, take the dough and fold it back on itself until it is about 4″ wide or so, you want a width that is small enough so you can run the dough through the machine again.

    Run the dough the machine again, starting at the widest width and progressing through to the narrowest setting. Note: some machines  have a real narrow final width, you may not want to get the dough that thin, it depends on what kind of pasta you want to make, and how thick you want it to be.

    You can cut the dough in half if it gets too difficult to work with. And you can flour the dough as needed.


    You are now ready to run the pasta dough through the die cutters to make various kinds of pasta, or you can hand cut it on a board, or you can make ravioli with the dough. I’ve found it works best to let the pasta dough rest under a towel for 10 minutes or longer before running it through the pasta cutters, you may need to flour the dough again, you want it quite dry.

    The flour you use for dusting can be whole wheat or semolina or just regular flour. I’ve used whole wheat thinking it gives a bit of a nutty taste to the pasta, but maybe i’m just fooling myself.

    Once you cut your pasta, you can drop it into boiling water or let it dry on a dowel or broomstick set between two chairs. Fresh pasta can take 3 minutes to cook, or 8 minutes, it all depends, you’ll have to keep an eye on it.

  • How to remove your name from catalog mailing lists

    How to remove your name from catalog mailing lists

    We’ve been getting multiple copies of numerous catalogs, and then there are another bunch of catalogs that I don’t want to receive. Its been in the back of my mind to clip out the address label from each catalog, write ‘unsubscribe’ on the label, and mail it back to the catalog company. But with postage costs rising, I thought, what if I just type:

    remove my name from abc company mailing list

    into a search engine? Well here is the answer:

    Type the company name and hit go

    Brilliant! and i saved a bunch on postage. The average person in the United States receives 41 pounds of catalogs and mailings a year, and while I like and buy things from many of the companies that send me catalogs, I don’t usually use the catalog, I go to their website and shop for what I need.

    website form to remove your name from catalog lists

    According to 41pounds.org, junk mail produces more carbon dioxide than 9 million cars. They offer a service where for a $41, they will remove your name from mailing lists for 5 years. This is a great way to keep all those credit card offers from flooding you mailbox.

    I also called my credit card company and told them to stop mailing me those balance transfer checks and offers. It might not be a rational fear, but I don’t want those blank checks they mail me to end up in the wrong hands. And its one less thing to shred and jam our paper shredder. Neat.

    So there you go, type in the name of the catalog company and you will probably find a link to a page on their site to remove your name from mailings. A few of the companies required an email address when filling out the form, I typed in a made-up email address.

    How to you reduce mailings and paper in your house? Let us know below:

  • Pizza Oven Plans & Photos from Steven of Tiny House Listings

    Pizza Oven Plans & Photos from Steven of Tiny House Listings

    Here is a different take on the portable backyard pizza oven by Steven of TinyHouseListings.com . Steven sent me these photos of the brick pizza oven he built. Here’s Steve’s note to us:

    I love your website and loved the post on your pizza oven. After I saw it I posted a wanted ad on Craigslist for clay fire bricks and the next day went to pick up 100 of them from a fellow for free.

    I played around with the bricks in my back yard and came up with a way to setup an oven with no mortar, no rails, no nothing except stacked bricks. My wife and I cooked 4 pizzas last night and they turned out nicely.

    Since it was my first time setting up something like this it was a little crooked (you can tell especially in the pic from behind) but I plan to take it down and restack it. One other recommendation I would make should you decide to take this approach is to make the oven about two or three layers of bricks deeper to allow more heated air to circulate over the pizza. My oven is only 4 layers deep since I ran out of bricks! Once I get a couple more I’ll make it deeper.

    When building it be sure to build all of the layers of the wall together. In other words, lay all bricks down for each row on the entire side of the wall, then move up to the next layer so they bricks can rest on each other for support.

    I think its brilliant that Steven posted a ‘wanted’ ad on craigslist looking for bricks, I had not thought of doing that, I kept looking in craigslist for people offering bricks. Smart.

    Dry Fit Pizza Oven by Steven
    rear view of pizza oven
    Fire = Good

    Other Pizza Oven Plans and Photos Posts on GardenFork:

    Brick Pizza Oven Video and Plans GF TV video

    Brick Oven Plans and Photos from a GardenFork Fan

    Pizza Oven Photos from John

    Backyard Brick Oven Discussion! GF Radio

    Homemade Pizza Recipe : Christmas Eve

    How to make a bread peel or pizza peel : Gardenfork.tv


  • Setting Up a Dutch Bucket Hydroponics System

    (Sorry about the Auto-Start on the Video. Don’t know how to turn that off–Rick).

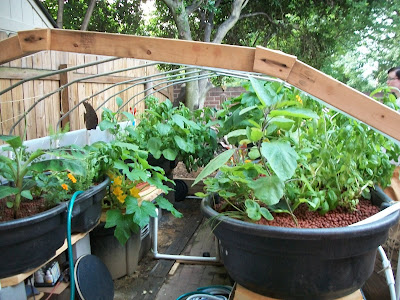
    I’ve set up a hydroponics (soil-less growing in an inert medium) system inside the tunnel, which is itself inside my greenhouse. This is a little video on how I did it and how the system works. For early season vegetables, this scheme will work all the way up to Maine…at least that’s what Eliot Coleman says. You can have, however, just one or two Dutch Buckets (also called BATO buckets) in a corner of your house. Just as long as the temps stay warm enough for, in my case, tomatoes and peppers.

    There are some parts coming that are not in the video. One is an aquarium air pump to keep the growing liquid oxygenated. The other is an aquarium heater, which will warm the solution that is pumped over the roots.

    Also I failed to mention that this system doesn’t run continuously, it is On 1 hour, Off 4 hours.

    • It used to be that you couldn’t find drip irrigation supplies at garden centers and the big Orange or Blue stores, but now you can. However, you can order drip supplies from Drip Works online as well.
    • The Dutch Buckets came from Grower’s Supply, but there are many sources (be sure to order the siphons, 2 per bucket, which are separate). There are also videos on how to make home made Dutch Buckets (BATO buckets).
    • the Hydroton came from a local hydroponics store, but is also widely available on-line. You can also use any light medium, such as expanded shale, perlite or even river gravel (anything without limestone. To test, put a hand full of gravel in a jar of vinegar. If it bubbles and sizzles, you can’t use it.)
  • Home Made Pizza Oven Photos from John

    Home Made Pizza Oven Photos from John

    After watching our brick oven pizza video, John in Arizona sent us these photos of his DIY brick oven. Much like our brick oven design, it uses brick and angle iron. I forgot to ask John where he got his angle iron from. I like that the brick oven fits nicely right next to his propane grill, right off the patio, all set for cooking.

    “My wife and I love your show. We put this together and wanted you and your wife to see it”

    Cool! This is the second set of pictures I’ve got from a viewer. A big thank you to John for sending these. love it. See the link at the bottom of this post for links to other pizza and bread oven photos.

    home made brick pizza ovenJohn tried out his oven with a pizza stone, and I’ve talked with a few people who have tried this method, its much better to just slide the pizza right onto the hot bricks. The bricks are about 700F, so its pretty sterile. And bricks are made out of clay, which is what pottery is made out of, so i’m thinking its pretty safe to do.

    home made brick pizza oven

    brick pizza oven with pizza baking in it

    pizza oven

    brick pizza oven videoMore Pizza Oven Plan Photos Here
    Love that roaring fire in the photo there, and the pizzas have a smokey hint to them when using wood. Do you have a backyard oven? send us photos or a link to your site, thanks!

  • Humble Homes; Tiny House Plans Book by Derek Diedricksen

    Humble Homes; Tiny House Plans Book by Derek Diedricksen

    Looking for tiny house plans? Here they are. The Tiny House or Small House movement has a number of well known thought leaders, Derek Diedricksen leads by building Tiny Houses. Derek is the author of a new book of tiny house plans and ideas, Humble Homes, Simple Shacks, Cozy Cottages, Ramshackle Retreats, Funky Forts
    .
    The best way to describe Deek’s book is a mash up of Tiny House Architecture meets Comic Zine.

    Reviews of the book describe it in a similar way, Mad Magazine meets This Old House meets Wayne’s World.

    And the book is very GardenFork; unpretentious and not afraid to be who he is, Deek fits right in in the GardenFork world. Taking found materials, stuff you find in your neighbor’s garbage, and building Tiny Houses with fun names. “TV Viewing Fort Cube” and “The Yeehaw Spa” are just two of the many small house designs in the book.

    Deek’s book is an idea starter, not a book of finished tiny house plans, its a book to start you on 100 ideas of how to build a tiny house that fits your world. Each page is jammed with what comes out of his head – which is similar to how my head works, i just can’t draw or drink as much caffeine.

    Derek “Deek” Diedricksen in one of his tiny houses

    You will read each page more than once, you will forget what page your were on and it wont matter, because whatever page you land on is filled with more cool ideas. If this book were designed like most how-to books, it would be 400 pages.

    This book will take you on many tangents and you will land somewhere unplanned, but that’s a good thing, I think.

    Deek was on GardenFork Radio talking about how to build a tiny house and other fun tangents, you can listen to the show here. Deek’s website is RelaxShacks.com


  • Aquaponics Aquaculture How To Update : Rick’s Column

    Aquaponics Aquaculture How To Update : Rick’s Column

    Aquaponics and Aquaculture How-to has been taking up a lot of Rick’s time. Below Rick tells us what he has learned about how to build an aquaponics system. Eric

    1" ID PVC ribs
    The backbone of the inner tunnel is just 1" ID PVC for ribs

    I haven’t been around the Gardenfork site very much, been busy in the greenhouse. But for the last few days rain and, particularly, mud has kept me away from the greenhouse, so I thought I’d update you on my progress on the aquaponics project.

    Of course, everything is harder and takes way more time than you think it will, so I have not made as much progress as I though I would by now.

    4 mil plastic from the Blue Store
    4 mil plastic from the Blue Store comes in 20 ft widths on 100 ft rolls, just what I needed.

    Last time I wrote that I wasn’t going to build the inner tunnel inside the greenhouse because the winter was so mild here in Tidewater, but I changed my mind.

    I’ve got 40 tomato seedlings just sprouting in the spare bedroom at our house, snuggled in and just getting a start in life. And I am already 2 weeks behind in getting the seeds sprouted, so any more setbacks would be devastating.

    Clamp-On PVC over tubing to hold plastic
    Clamp-On PVC over tubing to hold plastic to frame and tension the skin. 4 clamps, two per end.

    That’s because, as I mentioned previously, this project has to pay. So if this crop craps out, I’m losing much more than 40 seeds; I’ll lose the early crop.

    Not only do the tomatoes have to “make,” but they have to be early enough in the spring to demand a higher price at the Farmers Market. Early local tomatoes are worth gold. Late July tomatoes are nearly giveaways. So we decided that it would be pound foolish to not go ahead with the inner tunnel.

    inside the inner cover
    inside the inner cover (that's the Dutch Bucket system in the back left, waiting for the tomato sprouts)

    I’ll be growing the tomatoes in Dutch Buckets.  (I’m working up another post soon explaining how Dutch Buckets work.)

    Dutch Buckets (also called Bato Buckets) are something you can do in your house, as long as you have enough light and enough warmth, particularly for tomatoes and peppers.

    My inner tunnel is pretty basic (ala Eliot Coleman, The Winter Harvest Handbook: Year Round Vegetable Production Using Deep Organic Techniques and Unheated Greenhouses
    . As you can see, it’s nothing but 1-inch ID PVC in 10 foot lengths, joined in the center by a PVC 4-way cross fitting. The rib spacers at the peak are 5 foot long. 8-inch long galvanized nails in the ground stick up for the ends of the PVC to slip over.

    It’s a flimsy, wobbly affair. It won’t stand a gust and in even moderate heat the ribs will sag. But it’s quick and cheap. I’m using all 1-inch ID PVC in my plumbing, so as the temperature goes up and the inner cover comes down, I’ll be repurposing the PVC to the irrigation system as I expand.


    What’s Aquaponics without fish?


    The Fish Tank, is another matter all together. Here’s my first try at the platform:

    first try
    first try at platform

    The problem is that I didn’t show this design to anyone before I built it.  She, who must be obeyed, took one look at it and said, “why not have the 4x4s tall, to help contain the tank?

    –Doh…

    Fortunately, I put it all together with screws so –after another run to the Blue Store– I had some 5 ft long 4x4s for along the outside edges. I also added more of the cement blocks, so that no span is unsupported for more than two feet.

    Redone…with the 5 ft supports all around.

    Temperature control is important in Aquaponics. And it’s easier…it says here…to warm up a tank than to cool it off. So temperature control of the tank is important. That’s so your fish are comfortable, but most importantly, that so because the bacteria must be comfortable as well.

    The key to Aquaponics is the bacteria.  You can have all the fish you want and all the plants you want, but they’ll both DIE if the proper kinds of bacteria do not colonize your system or if the bacteria are unhappy.

    If it dries off enough so that I can get back there with a truck this week, I’ll deliver the –damn heavy!– 4 x 8 ‘ sheets of 3/4-inch treated plywood for the sides. I’ll put sheets of interior insulation and a fish-safe pond liner inside the tank so it’s water proof. I’ll also band the top, middle and bottom of the tank around the outside of the 4 x 4s.

    The finished Fish Tank will be 8 x 8 x 3 ft or 192 cubic feet. That’s about 14,000 gallons of water, which is 5.8 tons of water. Once I finish the fish tank, I’ll start on the grow beds. I’m hoping four 4 x 8 foot to begin with.

    Next time: Dutch Buckets.

    Insulating under the platform


    More or less finished platform.

  • Brick Oven Plans and Photos From a GardenFork Fan

    Brick Oven Plans and Photos From a GardenFork Fan

    After watching our Simple Brick Oven Plan Video, Roger sent us these photos of his Brick Oven Construction. He has modified the Brick Pizza Oven Plan we used to be able to hold more heat and make a Backyard Brick Bread Oven.

    Enjoyed your brick oven video. We found the same plan after being inspired by our daughter who had spent a week with Bread and Puppet on her campus in Iowa (they built an oven and baked bread for the audience after their performance).
    Attached are some photos. We added the wooden door for bread baking. We soak it prior to baking so that it steams the oven and gives the bread a nice spring as it bakes. We purchased a [ Fluke ] infrared thermometer to ensure the proper temp for the baking. Fluke 62 Mini Infrared Thermometer

    A typical baking progression includes: flatbreads, pizza, bread, tart. It’s great fun. Thanks for sharing your video, Roger

    I like how Roger has added more mass to the Wood Fired Brick Oven to allow it to bake bread, yet still retaining the break down portable nature of the oven, keeping the oven a simple dry fit brick wood oven, easy to build and then take down.

    I need to buy one of those Infrared Thermometer gizmos

    Bread and Pizza Oven using dry fit brick
    A wood door was built and it is soaked in water to give steam in the oven when baking bread
    Bread from a simple brick oven
    Pizza from the backyard brick oven

    a tart for dessert!

  • Beekeeping for Beginners FAQ Part 2 : GF Radio

    Beekeeping for Beginners FAQ Part 2 : GF Radio

    Matt joins Eric to answer Beekeeping for Beginners questions on this show. What equipment to buy, how to buy honeybees, where to put beehives in your yard, what kind of beekeeping suit to buy all answered here.

    what kind of beekeeping suit and beekeeping veil is good?

    what kind of frames should i use in the beehive, are plastic frames better than wood frames?

    wax foundation versus plastic foundation should i use plastic or wax foundation on the frames of the beehive? eric talks about the benefits of wax foundation and plastic foundation and frames

    Eric suggests 2  beekeeping for beginners books,


    Buy On IndieBound Here

    Click Here to buy on Amazon


    Click Here to Buy On Indiebound

    Click Here To Buy On Amazon

    Beekeeping for Dummies and the Backyard Beekeeper

    do you paint the outside of the beehive? yes, we use latex paint.

    should i buy 8 frame supers or 10 frame supers? matt and eric talk about the benefits of 8 frame boxes and 10 frame boxes

    what kind of beekeeping tools should i buy? eric suggests bringing duct tape, scissors, entrance reducer, smoker, woodchips, matches, 2 or 3 hive tools, a frame grabbing tool, needle nose pliers and more.

    what kind of hive stand should my beehive rest on? cinder block, wood, metal stands are talked about, eric suggests having a work table next to your hives.

    we talk about benefits of top bar hives vs. langstroth hives, and the drawbacks of top bar hives and langstroth beehives.

    should you buy a bee package or a honeybee nuc? eric talks about the advantages of honeybee packages , the pros and cons of bee packages, and the benefits of being a nuc or nucleus hive to start a beehive.

    eric advocates buying local honeybees and queens, either packages or nucs, the closer you can buy your bees the better.

    www.whiteoakapiary.com in Brewster, NY and www.warmcolorsapiary.com in Greenfield, MA is where eric buys queens and honeybees.

    should you feed honeybees in winter and how do i feed my bees over the winter? eric talks about how to feed bees in winter. you can watch our Beekeeping for Beginners video series here, and several videos are about feeding bees in winter.

    Eric uses a hand immersion blender to mix this sugar feed solution, and adds this homemade essential oil recipe for bees to the sugar

    The essential oil mixture is great for spraying the bees to combat nosema and bee diarrhea.

    winterizing beehives is discussed, here is eric’s beehive insulated inner cover video, Eric feeds sugar cakes to the bees in winter, not fondant or sugar syrup. Should you close or open a screened bottom board? Matt and Eric discuss

    Mudsongs.org is a favorite beekeeping blog of eric’s. Phillip documents his beekeeping in Newfoundland Canada.

    where to site your hives in your yard, where should you put the hives, what is the best location for beehives? eric has learned that full sun is best, he talks more about it during this radio episode.

    should I take a beekeeping class? eric says yes.

    and join your local beekeeping group. search on the web for your state’s beekeeping association, and that site should list local beekeeping groups.

    Megan of BrooklynHomesteader.com offers online beekeeping classes, and in-person classes as well.

  • Truck Stop Meatloaf Recipe with Potato Chips

    Truck Stop Meatloaf Recipe with Potato Chips

    Ah, meatloaf — it  brings back memories of a cross-country road trip, getting lost, and finding a diner that served the best home-cooked meals. The meatloaf was delicious, moist and smooth, but the waitress was salty. I asked her what was in it, she made a crack about lost college kids. In a hushed tone she said  “potato chips” then she gave us pie on the house.

    You don’t have to get lost to find this truck-stop style meatloaf. This recipe does not call for salt or oil since potato chips already have the perfect balance and just the right amount of starch which gives this meatloaf a very moist, smooth texture. I prefer plain low-salt potato chips, but you can explore the many varieties that are available. Cool Ranch anyone?

    You’ll Need:
    1 lb ground chuck or sirloin
    1 lb ground turkey
    2 sweet Italian sausages or 1/4 lb ground pork
    3/4 cup crushed plain potato chips, low salt
    1/2 cup unseasoned breadcrumbs
    1 cup onion, minced
    1 cup celery, minced
    1/2 cup fresh parsley, minced
    3 cloves of garlic, minced
    1 tbsp each dried ingredient: rosemary, thyme, basil, black pepper
    2 tbsp dried mustard
    1 eggs
    1 large and 1 medium size bowl
    1 paper bag
    a low baking dish
    oven thermometer

    The Sauce
    1 tbsp Worcestershire sauce
    1/4 cup ketchup
    1 tsp powdered onion
    1 tsp dried mustard
    1/2 Liquid Smoke (optional)

    Make the Sauce
    The sauce is important, it makes a tangy seal that keeps in moisture as the meatloaf bakes. In a small bowl mix ketchup, Worcestershire sauce, powdered onion, and dried mustard. Liquid smoke is optional but it gives this meatloaf an extra kick.

    Mix It Up
    In a measuring cup, crush and pack in enough potato chips to yield 3/4 cup, then pour everything into a paper bag. With the bottom of a glass or the palm of your hand, pound the potato chips further to remove excess oil (warning: the bag will be soaked with oil). Pour crushed chips and all dried ingredients into a bowl and mix well.

    The key to a smooth meatloaf is to not overwork everything. I find that mixing with my hands instead of a food processor give me the right texture. Remove sausage from the casing (or use ground pork), add all ground meats, minced ingredients, and egg into a large bowl and mix well. Add all dry ingredients and mix again. Here’s how I do it: plunge both hands into the bowl and squeeze every thing through your fingers, turn everything over in the bowl and repeat until everything is smooth and evenly distributed. Let it rest for 15 minutes.

    Bake It
    Preheat the oven to 375°. In a low baking dish form a loaf into a low, rounded rectangle — roughly 2″ deep. The edges will further round off as it cooks. Use the back of a spoon to generously smooth the sauce over the top, but coat the sides lightly. Bake the meatloaf for an hour and 10 minutes. Use an oven thermometer to check if the center has reached 165°. Remove from the oven and let the it sit for 5 minutes.

    If you want a more caramelized meatloaf, stick it in the broiler for three minutes, but watch it closely to make sure that it doesn’t burn. Serve it hot with gravy, more ketchup, or cocktail sauce… turn off the TV and enjoy every bite, but try to leave some for sandwiches tomorrow.


  • Aquaponics Part 1

    3x5 Aquaponics
    Read Meg Stouts excellent blog 3'x5' Aquaponics, on how to build a backyard aquaponics system

    My greenhouse aquaponics project (OMG What Have I Done?) has come up in some soon-to-be-published interviews with Eric, so I thought I’d report on my progress…or lack of progress. First of all, the old commercial greenhouse (100 ft by 30 ft by 30 ft high) has been sealed (added side curtains, repaired the fire damage, put up some canvas flap doors on each end (contact local sign and advertising companies for used banners they are throwing away: heavy, hemmed, UV-resistant. Good stuff for temporary fixes.)

    I’ve begun seedlings at home under a grow light, mostly tomatoes. I’ve set up a Dutch Bucket hydroponics system (video forthcoming). I’ve given up on the idea of building an inner greenhouse inside the greenhouse (see the writings of Eliot Coleman on winter greenhouse gardening without heat) and instead will drape plastic over existing plants if needed.

    Aquaponics – aka aquaculture.

    The learning curve is steep, but not daunting. Thanks to GardenFork listener
    @CCorbiere who’s offered his considerable experience in fish wrangling and pond design. His knowledge and experience is going to be more than helpful as I get started on the fish side of the equation.

    Aquaponic Gardening: A Step-By-Step Guide to Raising Vegetables and Fish Together
    My Bible: Sylvia Bernstein's Aquaponic Gardening: A Step-By-Step Guide to Raising Vegetables and Fish Together

    My biggest hurdle seems to be settling on some systems issues, a breed of fish, and –most importantly– trying to start the biologic process in the winter, which is the reason I launched a hydroponics Dutch Bucket system first. Hydroponics is even more “fiddly-fidgety” than aquaponics, but at least you don’t have to try to start bacteria colonies in the cold. I’ll be documenting this process as I go along.

    If you need a brief primer on aquaponics you can’t do better than the Flash animations (click the red button to make them work) from EcoFilms Australia: How an Aquaponics System Works. The system demonstrated is the CHOP system (constant height, one pump), which is what I’ll be doing. There is also an excellent animation on the same page about how a Bell Siphon works. (BTW: the Austrailains are way, way ahead of us in aquaculture.)

    3x5 aquaponics
    from Meg Stout's 3×5 Aquaponics & 365 Aquaponics Blogs, excellent how-to building videos

    If you are not familiar with aquaponics, here’s a brief description. Think: Closed Loop Agriculture.

    • You feed the fish (organic feed, if you wish)
    • the fish poop
    • you pump the fish water with the poop to the grow beds (what is called a flood and drain system)
    • the medium (usually gravel, but can be other things) hosts bacteria that convert the ammonia in the poop to nitrites and then another bacteria converts the nitrites to nitrates (plant nitrogen)
    • plants in the grow beds pick up the nitrogen from the water when the bed floods
    • the bell siphon (see video link above) drains the bed after a “dwell” time
    • the draining of the bed draws oxygen down into the beds and the root zone for the plants
    • the drained water splashes down to the sump, re-oxygenating the water for the fish
    • the sump water is pumped back to the fish tank with as much splashing as possible to add more oxygen to the fish tank
    • Repeat
    • eventually you get a lot of solids built up in your grow bed
    • so you add compost worms to the beds (which can breath air and water) to reduce the solids to castings, which become compost tea for the plants

    Your only input is fish food and water (to top off the tanks).

    Of course there is more to it than this, but that’s the gist of it, a closed-loop, sustainable, agriculture system.

  • There Ought to be an App for That: Annoyance Calls

    Yep, I’m a fanboy. The minute I stopped being paid for fiddling around with other systems I took the whole house Apple and never looked back. But this tactic should work for most cell phones where you can install ringtones.

    Despite our cell numbers being listed in the Federal No-Call Database, we frequently get telemarketer calls as well telephonic missives from that broad class of “allowed” cold calls: political candidates, companies we have a “business relationship with” (however slight), and charities.

    Most annoyingly, however, many of these unwanted telephone calls are robo-calls that treat you to several seconds of dead silence as the line is switched to a person who then tries to lighten your wallet. If you or, more importantly to these callers, your fat wallet are not boated the first time, or if you slip the hook and hang up before an operator gets to reel you in, the system will call again and again, usually once a day. It’s quite annoying when your phone goes off in meetings or when you’re trying to get some work done, like during my naps.

    Unsolicited calls particularly bothers “She, Who Must Be Obeyed,” because…well, I don’t know why. But it does. She’s downright cranky about it and demands that I “do something.” So I searched the There’s-An-App-For-That store but didn’t find a tool that would work. (If given the choice, I always opt to buy my way out of things.)  But I turned up an excellent fix on an old blog post by Richard K Miller, which works like a champ. I’m sure a similar workaround is available for other operating systems, but this will give you the idea:

    1. First download a ringtone called Silence.m4r, which is just 30 seconds of dead silence (m4r is the file extension for Apple ringtones).
    2. Drag Silence.m4r into the Tones directory in iTunes on your computer.
    3. Sync your iPhone to iTunes, ensuring that Sync Tones is checked on the Tones tab.
    • Then on your iPhone create a new Contact. I called mine SPAM. Assign SPAM the custom ringtone “Silence” and set the custom Vibration to “None.”
    • Tap the “Recents” icon on your phone, find the offending numbers, and one-by-one tap the blue right arrow next to each number and on the next screen  select “Add to Existing Contact.” Of course, that contact is SPAM, the one I created earlier.

    That’s it! When those numbers call your cellphone, they activate the 30 seconds of silence ringer and, since Vibrate is set to None, it’s just “poof.” The record of them having called will show in Recents as SPAM. You can add as many numbers as you like to the contact SPAM.

    Here’s a twist:

    If you need some serious alone time, like a nap, but also need to be available to certain numbers, like the kids or the your bookie, assign each special number a unique ringtone. Then set your phone’s general Ringtone to Silence, Vibrate None. Now only the callers you’ve assigned unique ringtones to will get through. The rest go to voicemail.

    Richard K. Miller has excellent screen shots of each process on his blog, linked above.