
Does it float? You’ll have to watch this week’s show…

blogs
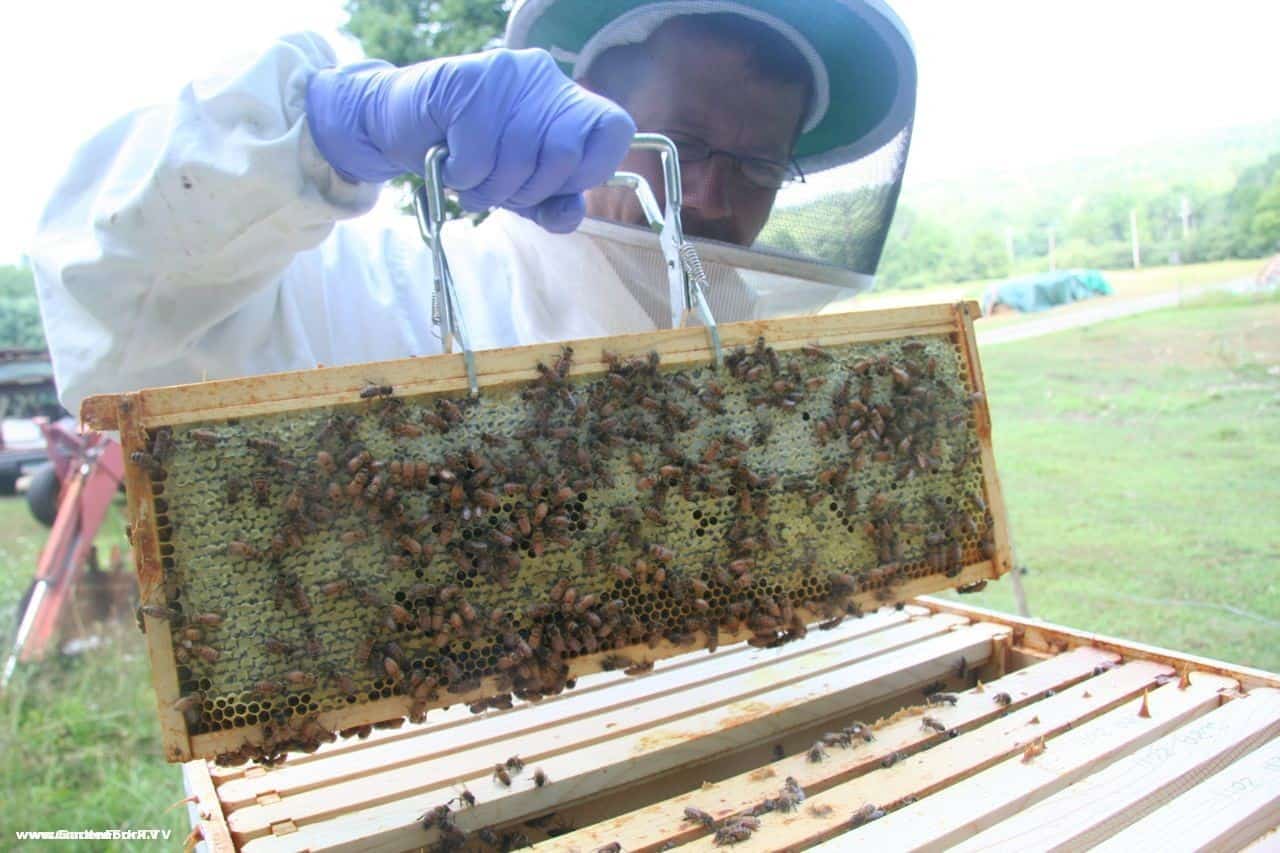
we did a beehive inspection last week and found the new honeybees to be in good shape. they have started to fill up their new frames with honey. this honey will stay in the hive to feed the honeybees through the winter.


Want to know the basics of how to raise honeybees? what kind of beekeeping equipment you need to buy? what kind of beekeeping veil to buy? where is the best place to put beehives? Listen to GardenFork Radio for a Beekeeping 101 , the basics of raising honeybees.
 The idea for this honeybee beekeeping show started when my friend & GF viewer Matt wanted to ask me some questions about starting beekeeping. I suggested we make it into a GardenFork Radio show, as I imagine there are a bunch of people out there with questions about the basic setup needed to start raising bees. We answer questions about the following
Getting Started in Beekeeping
Pre-assembled hive boxes – supers or ones you assemble?
Beekeeper suit – veil features? hats and hood-types
How many boxes do I need for a hive?
Plastic frames or beeswax frames for brood and honey?
how many hive boxes do i need?
Placement of beehives
Better types of equipment or things you’ve learned?
Pests and problems
Beehive Problems with ants? Mice? Moths?
How often should you do the powdered sugar treatment for varroa mites?
Opening the hive
– How often?
– Better time of day?
– Tips?
Clothing
Beekeeping gloves Blue Nitrile gloves you wear – sting-proof?
How many supers – hive bodies do I need to leave for the bees in winter
How to you remove honey from the honeycomb frames?
What color do I paint my beehives supers boxes?
We are going to do a follow up to this first Beekeeping 101 radio show next week. If you have some beekeeping questions, please let us know below or call our GardenFork Radio Voicemail line 860-740-6938 !

We just shot another of our Beginning Beekeeping aka Beekeeping 101 videos and I wanted to show you how we water the bees. One of our two beeyards is near a vernal pond, and a stream not far away, but I’m all about making it easy for the bees, so I put out some water buckets for them. Bees don’t swim, so put some wood in the bucket for the honeybees to stand on while taking up the water


If you want to keep deer from eating your plants, plant plants that the deer don’t eat. Ruth Rogers Clausen, author of 50 Beautiful Deer Resistant Plants, joins us to talk about how to keep deer out of your yard by choosing plants that are deer resistant or deer proof. Did you know that acorns attract deer? That fact is  just one of the ‘aha’ moments I had when reading about how to deal with the deer problem in the garden and yard. The book is full of well done photographs and in addition to the 50 Deer Resistant Plants that are the main theme of the book, Ms Clausen lists additional companion plants to fill out your deer proof yard and garden.
Win a copy of 50 Deer Resistant Plants! Here is how to participate in the giveaway of this great book on creating a Deer Proof Garden
First: Add your name to the drawing by filling out the form below
[form form-1]
Second: Like the GardenFork Page on Facebook, Facebook.com/GardenFork or follow us on Twitter Twitter.com/GardenforkTV , If you are not liking or following GF already > click on the FB Like icon or Twitter to the right >
If you are not on Facebook or Twitter but want to be part of the drawing, please note that in the above submission form


I love Blue Cheese dressing with my hot wings or salad. It’s tangy, salty, and creamy with a rich blue-veined flavor. There’s quite a few varieties available, but Roquefort, Stilton, and Gorganzola work the best. You don’t need much, but do get a good Blue Cheese. I like Danish Saga, it’s less salty and much creamier than Roquefort. I found that crumbled cheese is usually much cheaper than the block since it’s made from what’s left after cutting. Everything else you probably have in the fridge. Let’s get busy.

Maple Blue Cheese Dressing

In a small bowl add cheese and garlic into the mayonnaise and sour cream and mix. Make sure not to overwork the dressing, you do want some chunks of cheese in there. Then add maple syrup and a little vinegar and mix well. Adjust ingredients to suit your taste. I always add more Blue Cheese.

Crumbled bacon is optional but I never leave it out. Cut streaky bacon into 3″ strips. Coat a hot skillet with a little oil. Cook the fattiest pieces first to make enough fat for frying. Fry until evenly golden, drain fat, cool and crumble into small pieces. Add about 3 tbsp of bacon to the dressing, reserve the rest for the salad.

My friend Lindsey says her mother makes some kick-ass Blue Cheese Dip. Mrs. McCosh was more than happy to share her recipe with us. This Midwestern classic dip is made with Roquefort and cottage cheese. It’s light with a hearty texture — guaranteed to take the sting out of any hot wing.

Mrs. McCosh’s Blue Cheese Dip

Dissolve sugar in the vinegar and set aside. Crumble Roquefort in a bowl using a fork then add the rest of the ingredients and mix well, salt an pepper to taste. The cottage cheese hold everything together perfectly, lumps and all. Adjust ingredients to your taste. Pour Blue Cheese dressing into a container and refrigerate for at least 30 minutes before serving. It’s served best the next day — then it’s thick enough to stand a fork.

For salad, tear Romaine lettuce into bite sized pieces, toss with thinly sliced white onion and red grapes and plate up serving portions. Add hard boiled egg and drizzle Blue cheese dressing, and (optionally) top with more bacon. Diner is served!
Trying to actually chart how I find cool people and neat stuff on the web can be interesting. I was showing my sister the Tartine Bread video made by 4SP films, and I saw that 4SP also had produced a video about Chez Pim making a pie – pastry crust. The recipe is super simple, what really interested me was the technique of making the dough by hand on a piece of marble. So many of us – me included – pull out the food processor to make pie crust. Next time I’m using Chez Pim’s method shown here in this well done video:
Pim has published a book, The Foodie Handbook, information is on her website here.

I’ve been making bread using the Artisan Bread in 5 Minutes a Day method, ( we made a GF video about artisan bread here ) and the original recipe calls for placing the dough on a bread peel to rise, then sliding it onto a pizza stone in the oven to bake. This pizza stone method yields a good loaf, but after baking bread with the No Knead Bread Recipe, ( here’s a video we made about the No Knead Bread Recipe ) I wanted to get that crunchy bread oven style crust on the Artisan Bread, so I thought I’d try using a dutch oven to bake the artisan bread. I’ve been baking the Artisan Bread in a cast iron dutch oven with good success.

If you are new to the Artisan Bread in 5 minutes a day method, you make a large amount of bread dough and it stores in your fridge. The beauty of this is that you don’t have to think ahead if you want to make bread. Just grab a hunk of dough, preheat your oven and dutch oven, and bake.

I had been having problems scoring or cutting the top of the dough to get those neat cuts in the bread, then I read that flouring the top of the loaf before scoring it allows the knife to cut easier.
I let the dough rise on a piece of parchment paper, then grab the corners of the parchment paper and lower the risen dough into the preheated dutch oven. Its ok to have some of the parchment paper sticking out of the sides of the lid.
To bake the Artisan Bread in 5 in a dutch oven, I bake it in a 450F oven, and bake the dough with the dutch oven lid on for 30 minutes, then I remove the lid and bake the bread for another 20-30 minutes with the lid off.
I’m really amazed at the bread I’ve been able to make with this and the No-Knead Bread Method. Check out the Artisan Bread in 5 Minutes site here.
What have your experiences been? let us know below:

I spent a lot of time in NYC, lived there about 25 years, and I saw this really nice time lapse video by Josh Owens, and wanted to share it with you.
Mindrelic – Manhattan in motion from Mindrelic on Vimeo.
I was pointed to Josh’s site on Twitter by @katiemo and @nerdist

We have a real bear problem in our town with bears, and bears really like to tear apart beehives. So to hedge our bets, we decided last year to start a second beeyard in another part of town. Our second beeyard is near the center of town, right next to the cemetery. The honeybees and their hives are on the edge of a large hayfield, where they are protected by the prevailing winds and get excellent daylight throughout the day.
We hived two new packages, using medium supers on these hives. I put our hives on small tables. The height of the table makes it much easier to work the hives, and we can grease the legs of the tables to keep carpenter ants and other insects from entering the hives.
We use a few techniques to bear proof our beehives. First we have a solar powered electric fence made by Premier 1 Supplies. Premier 1 gave us the electric fence they sell to protect beehives from bears. So far it has worked. Its also very easy to set up and move. You can watch our how to bearproof beehives video here.
Second we use a ratcheting strap to strap together the beehives. The thinking here is that if a bear does get to the hives, the straps may keep the hives together despite the bear trying to take the hive apart. I’ve read where this has worked for a few people, so it doesn’t hurt, I don’t think. We may need a heavier ratchet strap, the kind used on semi trucks.


Its only been a week since we hived all the bee packages, and our bees are already firing on all cylinders. When you hive a package – you can watch our how to hive a bee package here – you pull out one of the frames to make room for the queen cage that will fit in that space.
The queen is in a separate cage so the worker bees can slowly become used to her unique scent. The bees in your package more than likely have been pulled from a number of hives, and the queen they are paired with is not one they are familiar with.
One end of the queen cage has a small hole plugged with sugar candy which the worker bees will chew through to release the queen into the hive. It takes a while for the workers to chew through the candy plug, and that allows the workers be become acclimated to the new queen’s scent.
You usually leave the bees alone for a week to allow the bees to release the queen and become accustomed to their new surroundings. But, while we are waiting, bees will fill any spaces in their new hive larger than 3/8″ with honeycomb. Which is exactly what all 4 new hive packages did this year.
Every hive we opened had 3 or 4 big pieces of burr comb where the bees had filled up the space around the queen cage. Here are a few pictures showing how industrious the bees are. Nature hates a void.
Burr comb is honeycomb the bees have drawn down that is not on the frames. It messes up the working of the hive, and most of the time your remove it. We’ll use the burr comb to make candles.


Last fall I helped a neighbor dig a bunch of potatoes, and we were given a few bushel baskets of potatoes for our efforts. The potatoes were pretty darn simple to harvest, as the garden soil was nice and loamy, it dug easily with a garden fork. The hardest part was not hitting the potatoes with the fork, there were so many of them.
I took our part of the potato harvest and put it in bushel baskets in the basement. I didn’t clean or was the potatoes before storing them, I think its best to leave them caked in dirt for the winter. Pretty neat to be able to walk into the basement to pull our of a basket some dinner.
It ended up we didn’t eat all the potatoes we had harvested, and this spring, I noticed pale sprouts coming out of the bushel basket, aiming for the basement window.

I wasn’t sure what to do with the sprouting potatoes, as I hadn’t planned on growing potatoes this year. Last time we grew them, we had the Colorado Potato Beetle Invasion, watch the video here. Then this weekend I decided to put them in the garden. If you’re wondering how to plant potatoes, its not rocket science, and potatoes are pretty forgiving, which is a good thing, considering I’m the one planting them.
The potatoes had become a tangled mass of sprouted seed potatoes, a giant ball of roots, potatoes, and sprouts.
I dug out part of one of our raised beds, added some time release fertilizer and azomite, a rock powder, and gently planted the seed potatoes.

As I covered the seed potatoes with dirt and leaf mulch, I tried my best to get the potato sprouts to point up thru the soil.

Not sure what’s going to happen, but I think the potatoes i planted will be good. I’ll mound the potatoes once or twice with mulch or some straw or other compost like material, and I’ll work on the Potato Beetle problem.
We made a GardenFork.TV video about how to hill your potatoes, its the first one we shot with Henry, one of our Yellow Labradors, when she was a puppy. Its fun to watch.
What do you think is the best way to plant potatoes? Let us know below:

Looking for a pesto recipe? or how to make pesto? Watch our Pesto Recipe with a new twist, we’ll use parsley instead of basil. This same recipe works great for basil pesto BTW. Parsley is super healthy and easily found in the store or your backyard garden.
Eric’s Parsley Pesto Recipe
1 bunch of flat leaf parsley
2 cups grated Romano cheese
1 cup walnuts, whole or chopped
1 clove garlic, crushed
quality extra virgin olive oil
Grab your bunch of parsley and swish it around in a large bowl of water or you salad spinner filled up with water.
Cut off about 2 inches of the stem end off the parsley bunch. Then cut the parsley bunch into thirds, drop into a salad spinner and spin away. You want to remove as much of the water as possible. If you don’t have a salad spinner, you can roll up the parsley leaves in a dish towel to dry them out.
Add the parsley to your food processor, and pour in about 1/4 cup of the olive oil. About 6 glugs, I think.
Turn on the food processor and get the parsley cut up and mixed in with the oil.
Take the walnuts and toss them into a pan and toast them lightly. Don’t forget them on the stove, as they burn easily. I know this from experience.
Take the grated cheese and walnuts and crushed garlic and add to the food processor.
Top off with more olive oil, 6 glugs or so, and turn on the processor. If the machine sounds like it is bogging down, add more oil. Process to the consistency you like. I like it not over-processed.
You can now add this to pasta or spread on bread or garnish soups with. Its real good.
What do you think? Do you have a pesto recipe or suggestion or idea? Let us know below:

This hasn’t ever happened before, but all our apple trees are blooming this spring. Usually there are a few that don’t bloom. At least two of our trees bloom biennially. Here is the oldest tree in a view from our house. Last weekend was rainy with fog, so it looks great in the yard.

I had dug up a few sage plants last fall and managed to get them thru the winter in the greenhouse. The trick I’ve discovered is to not let the soil dry out. Even though the greenhouse is not heated, it can get pretty warm in there on sunny days, so paying attention to the soil worked out.
The sage leafed out again, and then I noticed two other plants growing in the pot. A Jack In The Pulpit and some Lambsquarter. What fun. We have some Jack in the Pulpit growing in the woods, but this is a rare random appearance.
And the lambsquarter is one of the new edible forage plants we talked about in a recent GardenFork.TV video. You can watch our wild and urban foraging video here on How to Eat Lambsquarter.
What happy accidents have you had happen in your garden this spring? let us know below:

Growing and Cooking Rhubarb was one of the first how to videos GardenFork made, and as our rhubarb plants are just now popping out of the cold soil, I thought it a good time to pull one of our shows from the archive and repost it for those who may not have watched it.
Eric’s Rhubarb Crisp Recipe
1 quart of rhubarb chopped into roughly 1/2″ pieces
1/4 cup sugar ( you can add more if you like, but i think this works best )
Zest from 1/2 of a large lemon or all of it from a small lemon ( you can also use orange zest of a mix of lemon and orange ) and some juice from the lemon or orange.
3/4 of a stick of butter, cold ( leave in fridge until you need it )
1/2 cup flour
3/4 cup brown sugar
1/2 cup walnuts
1/2 cup oatmeal – old fashioned style, rolled oats is best
1/2 teaspoon cinnamon – Penzy’s Spice has real good cinnamon
mix together the rhubarb, regular sugar, lemon/orange zest, and lemon/orange juice in a bowl and let it sit while you make the crisp, ( the part that goes on top of the rhubarb )
Get out your food processor and put in the cold butter, which you’ve chopped into cubes, add the flour and brown sugar with the cinnamon pulse this until the flour coats the butter and breaks it up a bit. It should still look chunky, not like sand.
Then add the walnuts and oats into the flour butter mix in the food processor , and pulse a few more times to mix them in and chop up the walnuts a bit. Over pulsing is bad here. Err on the side of less mixing.
Grease a 8″ baking dish. The glass ones are best for this, I think. Pour in the rhubarb mix and then cover the rhubarb with the flour oat butter mixture. Don’t over think this, the flour oat mix doesn’t have to be a super even layer over the rhubarb.
Put this in a preheated 375 degree oven for about 45 minutes. As always, your oven temp and baking time will vary from mine. I think those new convection ovens bake faster than mine. But then my oven was pulled out of a junked camper trailer.
The rhubarb crisp is done when the edges of the pan are starting to get burnt and the crisp is browning and the rhubarb bubbles a bit.
This goes real well with our ginger ice cream recipe, watch our how to make ice cream video here and get the recipe as well.


Can you believe how intense this color of purple is? I love coleslaw, especially when it’s made with sweet red cabbage, jicama, and Granny Smith apples. Jicama is a tropical tuber originally from South America that has made it’s way into Asian cuisine. The cream white flesh has the crisp texture of a pear. It has a slightly sweet flavor that complements red cabbage well. It’s usually eaten as one would a radish. Making a small batch is almost impossible, so I usually make it for picnics or parties. It goes well with pork and lamb dishes, or just as a small salad before the main course. Red Cabbage Slaw has to macerate overnight, so plan ahead.
You’ll need:
Dressing:
Remove the outer layer of leaves and slice red cabbage into quarters. Remove and discard the white core and the base, and shred the cabbage. If you don’t have a food processor or a mandolin, use a sharp knife and cut it as fine as you can. Peel, core, and dice two apples into 1/2″ cubes. Slice onion and red pepper into fine strips. Peel and cut jicama into matchstick strips. Place the cabbage, red pepper, onion, jicama, and black sesame seeds into a large bowl. Sprinkle with salt and mix well. Let it sit for 10 minute or until the cabbage starts to release some liquid.
In a small bowl add brown sugar, raspberry preserve, and dried currant into the cider vinegar and olive oil. Mix until the sugar is dissolved and the raspberry preserve is evenly distributed.
Pour the dressing into the bowl and mix everything again with your hands, break up any clumps. Cover and place in the fridge over night. Before serving, drain and toss again, adjust salt if needed. Red Cabbage Slaw keeps well in the fridge for abut a week as long as it’s kept covered.


Last night I was a guest of the Ford Motor Company in Manhattan. They invited me to come check out their new cars, trucks and SUVs before the opening of the New York International Auto Show. Really Cool. Craig Patterson and Scott Monty spoke about how they were using social media to introduce the new Ford Explorer. The 2011 Ford Explorer is the North American Truck of the Year, and it gets the best fuel mileage in its class.

For 2011 Ford has redone the Explorer. What I thought was interesting are the new inflatable rear safety belts. In an accident the seat belts become airbags and cushion the occupants. There’s a video on the Ford Explorer website you can watch that explains the inflatable seat belts better than I can.

The 2011 Ford Escape Hybrid was on the show floor. Ford gave us an Escape Hybrid a while back and we did a review video about it, watch the video here. Our Labradors really like the Ford Escape Hybrid, lots of room in back for them and 34 miles per gallon in the city its pretty cool. The Escape Hybrid has echo friendly seats; biologists at the Ford plant in Chicago have devised a way to make the seat covers out of soy instead of oil-based products.

A favorite part of the Ford exhibit for me was the new 2011 Ford F150 with their Echo Boost Engine. It’s a dual turbocharged direct fuel injected engine that they torture tested full speed ahead for 164,706 miles.
Ford took took a random Eco Boost engine off the assembly line ( engine #448AA ) and started running it. First on a dynometer for 300 hours, simulating 10 years of use, then hauling timber, then running 24 hours on a Nascar track, then trailer pulls against the competitors, and then, Ford took the same engine to the Baja 1000. Ford has a neat series of videos documenting the story of engine #448AA on their site here. Click here to watch the whole series of videos . Well done videos.


