Category: Articles

blogs

  • Rollerblade Office Chair Wheels To Fix Your Broken Desk Chair!

    Rollerblade Office Chair Wheels To Fix Your Broken Desk Chair!

    As soon as I saw the description “Rollerblade Office Chair Wheels” I knew this was the solution to the question: How to fix broken office chair wheels? I have an older Aeron chair, and I have never loved the plastic roller wheels it had. Kinda like those plastic wheels on cheap rollerboard luggage.

    Rollerblade office chair wheels

    BTW, my rollerboard wheels died on the last trip I took.

    BUT, there is light at the end of the tunnel! I ordered these replacement rollerblade office chair wheels (affiliate link) and they were easy to install. Lets walk through the process of how to fix a broken office chair.

    First flip the chair over, and with a screwdriver and a pliers, lift the broken office chair wheels out of their mounts in the bottom of the chair. You will need to wiggle the screwdriver between the wheel and the mount, but they slide out pretty easily.

    Rollerblade office chair wheels

    You don’t need to save the old wheel spindle, please put it in the metal recycle. The new rollerblade office chair wheels come with new ones attached.

    The new wheels are easy to install. Just press the new spindle into the wheel mount. They should slide in easily.

    Rollerblade office chair wheels


    Couple of things to keep in mind when repairing office chair wheels:

    Make sure you order the correct replacement wheels, the spindle diameter is key.

    Order by searching for the brand name of your office chair + roller blade wheels.

    Check the reviews and comments for the wheels you are ordering, make sure they fit and work well.

    My office is in a 120 yr old building. And the floors aren’t level, and my desk is on the part of the floor that is higher than the rest of the room. These replacement office chair wheels work so well I often slide away from my desk.

    But this office chair repair is a great improvement in wheel performance. Plus they look pretty cool. Not sure why I didn’t upgrade to these wheels before, one of those light bulb moments. Gone are years of bad plastic wheels scratching up your floors, get these instead.

    Skil Right Angle Grinder Repair

  • Buy A Tiny House Kit On Amazon?

    Buy A Tiny House Kit On Amazon?

    You can buy a tiny house kit from several online sites, but Amazon? Yes you can.

    Tiny House Kit

    Not bad for starting at about $5,000 for a house kit. Unless you lived in a warm area year-round, you would need to insulate. But for a starter home, this is intriguing. These lack the wheels that a tiny house kit might come with, but if you have a specific piece of land in mind, it works.

    Tiny House Kit

    Several of the designs look like they are intended as backyard cabins, but I’ve looked at several of the designs and they could work for full time living. The big challenge would be siting a bathroom within the structure, but if you like the outdoors, how about an outdoor shower and outhouse?

    What I do like is the simple way to locate the kit house on cinder blocks. So you could move this on the back of a flatbed tow truck to a new location. Many of the tiny houses are limited by the wheelbase of the trailer they are built on.

    The Allwood brand kits have siding that lock into the next board, making the build pretty easy. Not sure how much cutting is involved.

    This would probably have more appeal if you are looking for a seasonal tiny house, instead of an all season house. Put this up on a piece of land and spend long summer weekends. Run some solar and collect rainwater from the roof, you are good to go.

    Pick up a how to tiny house book if you aren’t ready to hit the go button just yet. Also check out Deek Diedricksen’s website, RelaxShacks.

    Since I already have a small-ish house, one of these kits would make a nice office, I’m thinking. What are you thinking? Let me know below.

    Build an Outdoor Shower

  • Use Soap On Cast Iron? Waffle House Does

    Use Soap On Cast Iron? Waffle House Does

    To use soap on cast iron is a super hot button topic in the cast iron cooking world. I know because of the cast iron videos and posts I have made.

    I happen to be in Waffle House, one of my favorite places to be, sitting at the counter, another favorite place. I noticed that the dishwashing station is under the front counter. And there they were, the cast iron pans they cook eggs in, being washed with soap.

    use soap on cast iron

    People have been told, and repeat, to use soap on cast iron will ruin the pan. It washes off the seasoning. Some comments from our YouTube channel:

    “I season my cast iron the old fashioned way with lard and i tell you from experience that dish soap strips the finish right off it to where everything sticks like glue.”

    The flip side:

    “I have used soap on my cast iron all my life, just like my mother and grandmother did, and I’ve never had a problem. After washing and drying a give the pan a light coating of oil before putting it away, whether it’s going to be put away for a few minutes or a few weeks or months.”

    I grew up being told not to clean a cast iron pan with soap, and to use salt to clean our stuff that stuck to the pan. This never seemed to work very well. So I used some soap and a plastic scrubber pad, and it worked just fine. No one knew the difference, and the world did not come to an end. After washing, I oiled the pan and let it dry. Done.

    And I’m totally OK with that. Are you? Watch this video:

    Use Soap Cast Iron

    I do a deep dive on can you use soap on cast iron in this post here.

  • Pick Up A Tornado Shelter At The Home Improvement Store

    Pick Up A Tornado Shelter At The Home Improvement Store

    While in the Midwest this week, I was at one of the large home improvement stores and outside they had tornado shelters you could pick up then and there.


    Tornadoes are a big deal in this state, there are swaths of empty ground along the road where you can tell a tornado came through. The houses that were there are now gone.

    We have always sheltered in the basement, but this is an upgrade to that practice. I have seen many home made tornado shelters on the web, some have failed because the storm doors purchased were not rated correctly.

    Both of these shelters are designed to be bolted to a concrete pad, either outdoors or your garage or carport floor. The cylinder model might be better at deflecting wind, but both have been tested in wind tunnels from what I have read.

    Read More Storm Preparedness Posts Here.

    What are your storm preparedness plans? Let me know below.

    You run around and try not to get killed : Storm Chasing : GardenFork Radio

  • A 4WD Self Propelled Mower Review, The Troy-Bilt 4×4 XP – GF Video

    A 4WD Self Propelled Mower Review, The Troy-Bilt 4×4 XP – GF Video

    Go up hills easy! My self propelled mower review of the Troy-Bilt 4×4 XP. Watch the video and then read through my comments below.

    Why I Like This Self Propelled Mower:

    • Great Power
    • Ease of Steering
    • Troy-Bilt Quality

    Full disclosure here, Troy-Bilt has been a sponsor of GardenFork for a while now. I wouldn’t work with them if I didn’t believe in their products or their company. I’ve met about 20 people who work at Troy-Bilt and have been using their products for years. They are good people and they make good stuff. Here’s a vid about a volunteer project we did recently with Troy-Bilt

    OK, back to the 4 WD self propelled mower. It will pull you up hills.

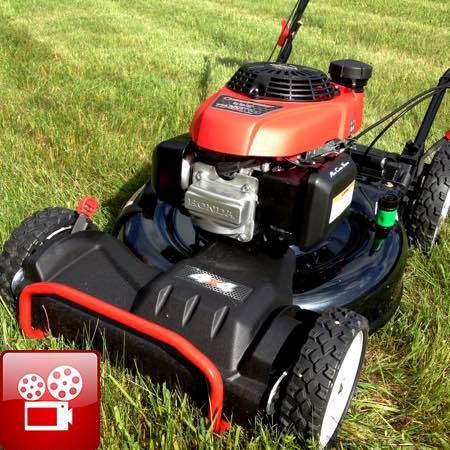
    self propelled mower

    Yes, its that simple. I took this lawn mower over to my neighbor’s hilly cow pasture and went through 12″ high grass mix up a hill with no problems. And that’s with the mower set the mulching mode.

    On the mower handle you can choose front wheel drive, rear wheel drive, or four wheel drive, pretty easy. I used it in all modes but found 4WD worked best for me.

    self propelled mower

    Talking about Troy-Bilt quality, it the small things that matter, like how they attach the gas cap to the fuel tank. Ever lost your gas cap? I have.

    self propelled mower

    I suggest buying this mower with the large rear wheels and the Honda engine. If you change the oil in your lawn mower, it can last forever.

    self propelled mower

    Its easy to adjust the height of the wheels for grass cutting height. Note the larger real wheels, makes it much easier to drive around and steer. Its all about ease of use, why make it hard to cut the grass?

    Like most, this self propelled mower comes with a bagger and a side discharge and a mulching mode. I like to mulch the grass, so I did not use the bag feature, but its in the box with the mower if you want to make compost from your grass clippings.

    I give this mower a thumbs up, its a quality machine, and the 4WD is brilliant. You will like this rig.

    Learn more about this mower on Troy-Bilt site here.

    Lawn Mower Oil Change, How To Do It Easy – GF Video

    How To Sharpen Lawn Mower Blades – GF Video


  • This Cheap Pull Knife Sharpener Works Just Fine, Thank You

    This Cheap Pull Knife Sharpener Works Just Fine, Thank You

    Best knife sharpener? I have one, its the electric Chef’s Choice, its about $120. How much do I use it? Not much.

    Cheap pull knife sharpener

    What I DO use is my cheap pull knife sharpener. Its right there in the top drawer. The best knife sharpener is in a cabinet somewhere. You have to plug it in, and it makes a bit of noise. The cheap sharpener has a very low carbon footprint…

    The cheap pull knife sharpener I have is from Chef’s Choice, its low tech and handy. They also make the electric model I use every few months. I like the simple knife sharpener because of its ease of use. Just pull it out of the drawer and start pulling the knife through it.

    Works for me, how about you?

    I know there’s all this talk on the knife discussion groups about angle and all, but I just want to be able to cut onions with a sharp knife.

    On a few tangents here, I do think you should store your knives in those plastic sleeves to keep them sharp. Get some here. Throwing a sharp knife into a drawer is a quick way to unsharpen that knife. One thing with the sleeve protector, be sure the knife is dry before storing it.

    I’m not a fan of the knife block, its one more thing on my counter and who knows what’s in the bottom of that knife slot… At least you can clean kitchen drawer partitions.

    And there’s a few good cheap restaurant kitchen type knives that are almost as good as a $100 knife. Check them out here. Mark Bittman pointed out a few years back that most of your food in restaurant kitchens is cut up with cheap knives they buy in bulk:

    I started with an eight-inch, plastic-handle stainless alloy chef’s knife for $10. This is probably the most essential tool in the kitchen. People not only obsess about knives (and write entire articles about them), but you can easily spend over $100 on just one. Yet go into any restaurant kitchen and you will see most of the cooks using this same … tool. NY Times

    How to you keep your knives sharp? Let me know in the comments below.

    Best Cast Iron Seasoning Instructions – GF Video

  • Bought a 110 Volt power adapter for the car, here’s what I learned.

    Bought a 110 Volt power adapter for the car, here’s what I learned.

    We do some telecommuting on the drive between the city and the country. And NYC being what it is, the power inverter we had is gone now. Remember to lock your car doors…

    So I ended up buying two power inverters. A power inverter is a box of electronics that allows you to plug a 110 volt plug into a cable that plugs into the car power outlet. AKA cigarette lighter socket.

    I bought a Bestek 200 Watt power inverter that has this neat design. It has the same shape as a large cup of coffee, and sits nicely in a car cup holder.

    car power inverter

    Thinking I should have one of these also for our second car, I bought a second power inverter. This time I opted for the more box shaped model.

    car power inverter

    After using each of these for a while, the box type has become my favorite. While I like the design of the coffee cup model, it is best located in the cup holder, and there’s only two in the front of our car. We usually each have a drink in those holders.

    AND I have managed to lose the power cable for the cup holder model. The wire is not permanently attached to the inverter. Not good in my world. I lose small things. They fall out of the car somehow.

    So, for the vast majority of you all, the 300W Power Inverter is the way to go. Plug in your laptop to charge, a few USB cables – what more do you need?

  • Honey Harvest Made Easier

    Honey Harvest Made Easier

    Its honey harvest time again. I’ve talked about the uncapping roller before, video here, but you combine this tool with putting 9 frames in a 10 frame honey super and you’ve made your life much easier.

    Honey harvest

    Most beekeepers use a hot knife, or uncapping knife to cut the beeswax caps off the tops of the honeycomb cells. Uncapping means opening up the cells so you can get the honey out, usually using an extractor.

    Honey harvest

    But with this roller tool, (buy it here) you don’t need to use a knife to cut off the caps. The photos look kind of messy, but this works pretty good. With a hot knife, you run the risk of gouging into the honeycomb. This means more work for the bees, rebuilding the comb before they can fill it with honey again.

    The uncapping roller punches holes in the caps. Its not a perfect process, but you get much less wax in your honey when extracting. So you don’t have to filter nearly as much wax when bottling the honey. Honey harvest

    The second new thing I’ve done is put 9 frames in a 10 frame honey super. This means one less frame than the box is designed for. But what this does is create a bit more space between each frame. The bees draw out the honeycomb a bit farther, which makes uncapping easier. And it means less propolis between frames, its much easier to pull these frames out of the super.

    I use brackets that set the frames at the right spacing. This has been a really nice thing.

    more beekeeping videos insert

    Save

    Save

    Save

  • Purslane Is Not A Weed In Sunset Park

    Purslane Is Not A Weed In Sunset Park

    Many US vegetable gardeners consider Purslane a weed. It pops up and keeps growing. But in my Sunset Park neighborhood in Brooklyn, it is sold at the grocery stores and vegetable markets along Fifth Avenue.

    My neighborhood has a huge Latino population, and they call purslane Burdolaga. I see it every week and thought to share with you. My neighbors upstate tear this out of the garden, my neighbors in the city buy it.

    Vegetable Garden Weed

    Burdolaga has a ton of Vitamin E and provides 25% of daily amount of Vitamin C your body needs.

    Vegetable Market Food

    Of course, I’ve made a video about this super healthy soup and salad green:

    Vegetable Garden Fails & Successes – GF Video


  • The Best You Is The Real You by Sean Tucker

    The Best You Is The Real You by Sean Tucker

    Somehow I ran across a YouTube video by Sean Tucker on a website, and I watched it, and then I wanted to see more. So on to Sean’s YouTube channel.

    I wish I could be as successful in getting a point across, or to be as good of a speaker, I often feel tongue tied.

    A big theme in my life is:

    Be Yourself, Everything Else Is Taken

    And Sean speaks to that and more in this video. Let me know your thoughts.

    Check out Sean’s YouTube Channel and his very nice website.

    More of my thoughts on following through, and failing, and big Eric thoughts:

    Planning and Failures, & Ricks Hiatus – GF Radio 435

    It’s OK To Suck At Something – GFR 444

  • Vegetable Garden Fails & Successes – GF Video

    Vegetable Garden Fails & Successes – GF Video

    My vegetable garden fails were pretty obvious this year, and in the video below we give you a garden tour. Watch the vid then read through our thoughts below.

    At least the sunflowers and the kale are growing!

    Garden Fail

    The garden heated up quickly this year and I found that any of the greens or mustards that I got as transplants bolted very quickly. I was surprised how quickly they did. Maybe those plants were already stressed in the plant pack trays and I couldn’t do anything about it.

    Garden Fail

    My bed of salad greens, which is the shadiest bed in the yard, turned into weeds. I think the compost I got was full of weed seeds. Boom, a bed of weeds. I think I will use the string trimmer on this bed and then replant.

    Garden Fail

    The sunflowers are doing well. I even transplanted several from the other garden beds. They key to transplanting sunflowers is to dig out a large root ball and water them often after replanting. They also like fertilizer. I did sow the sunflower seed too early, so a lot of them did not germinate. But I re-seeded and that batch has taken off. I made sure to have the taller varieties in the back of the bed. It should be a good cutting garden soon.

    The sugar snap peas (watch our how to grow sugar snap peas video here) are doing well. They are just now browning out after a good season of producing lots of Labrador snacks. I tried the Sugar Anne variety with not great success. I really like the Super Sugar Snap peas. You learn how to build the trellises we use in a video here.

    Garden Fail

    Our string beans are just starting to flower. I really like the Rattlesnake Pole Beans I get from Fedco Seeds, or you can save your own string bean seeds. they don’t get stringy or woody and can stay on the vine a few days after ripening. They are on the same kind of simple string trellis we use for the peas.

    What are your garden fails? Let me know below. Meantime some more cool posts are below.

    Can You Transplant Snap Peas?

    Simple Techniques To Garden Almost Year Round In This Book

    How To Grow Mushrooms From Plug Spawn – GF Video

  • The Deer Fly Repellent That Catches Deer Flies

    The Deer Fly Repellent That Catches Deer Flies

    You want a deer fly repellent to keep deer flies from dive bombing you while hiking, camping, working the the yard. This repellent works by catching the deer flies on a piece of sticky tape. I know it sounds weird, but it works.

    deer fly repellent

    These 19 deer flies are from one 45 minute walk in the woods with the Labradors. I check my hat a few times during the walk and thwack the flies with my finger to make sure they aren’t going to fly off and bother someone else.

    I wrote about this in a earlier post, How I Get Rid Of Deer Flies, but I wanted to show you just how well this tape works.

    Like me, you are thinking, “Oh, I can just go buy some double stick tape.” No, it doesn’t work. I tried that.

    Besides, if you buy these Deer Fly Patches in bulk, its about the same as the cost of a roll of tape, and easier to carry with you. I don’t know of any other deer fly repellent that works as well.

    Its peace of mind to work in the yard or go on a walk and not worry about getting a deer fly bite, which aren’t fun. Yes, the flies still fly around you, but they end up landing on the patch, not your neck or arms.

    Deer flies tend to stay along the tree line, and park themselves on plants waiting for someone or an animal to walk by. Our yard is surrounded by woods, so its a perfect habitat for them. I’ve found they flies are more active on hotter days. If its cool out, they flies are not out.

    I’ll have to research it more, but its very interesting how the deer flies know to land right between the eyes of my Labradors, and bite them. And the Labs usually don’t know what’s going on. If I approach one of the dogs from behind I can sometimes nail the fly.

    Save

  • Does Your Dog Smell Like A Swamp? Ours Does

    Does Your Dog Smell Like A Swamp? Ours Does

    Labrador Henry smells like a swamp all summer. Like all the dogs, she loves to go swimming, but her coat gets this funky smell from swimming. So I’m curious if your dogs have the same issue.

    We’ve tried a few home made dog shampoos, the ones for when you dog gets sprayed by a skunk work for a bit. They have peroxide and dish soap in them. Its fun to mix these up when you pour the peroxide into the baking soda infused water and add the dish soap. Its like a science experiment.

    But Henry doesn’t love this science experiment. We tried several odor control shampoos and finally got a prescription only shampoo from the doctor. It seems Henry has gets this yeast condition on her skin in summer when her fur gets wet. The vet shampoo does the job, but we have to bath her several times a summer.

    Not surprising considering the kind of standing water and mud they roll in on a regular basis.

    What kind of shampoo do you use? I’d like to try some alternatives.

    Save

  • Lawn Mower Oil Change, How To Do It Easy – GF Video

    Lawn Mower Oil Change, How To Do It Easy – GF Video

    Here’s my how to video on doing a lawn mower oil change. Its not rocket science, its actually pretty easy, AND it will extend the life of your mower. Ready? Watch the video and scroll through the instructions below:

    Lawn Mower Oil Change, Step By Step

    Check the manual to see what kind of oil your engine uses. Most use 30W, but just check, OK? By changing the oil, you are already helping the engine last much longer. Do a lawn mower oil change a few times a year and your mower could last forever, mbe!

    Run the mower to warm up the engine. This gets the oil hot and the debris that settles up and moving. Turn off the mower.

    Place plastic food wrap over the gas tank fill and screw the cap down. Not so tight that you can’t get it off again, but snug. Now we are going to gently turn the mower on its side. Position a plastic tub such that when you tilt the mower on its side, the oil fill tube will pour into the tub.

    If your mower has an oil drain plug instead of a fill tube, you will have to tilt the mower on its side, remove that plug, then place the mower over the bucket. This may take some finesse and a friend to help.

    lawn mower tune up
    See how the gas cap is on the high side of the tilt?

    Be sure to tilt the mower so that the gas cap is on the higher side of the mower, so no gas could leak out if the cap leaked. Tilt the mower into the bucket and let it sit while the oil drains out. You can prop up the mower and let it sit for a while.

    Get your fresh oil ready and a funnel. You can make funnel out of a piece of paper if need be. Tilt the mower back onto its wheels, and slowly add the new oil into the oil fill tube. Use the dipstick to make sure there is just enough oil.

    Do Not Over Fill The Oil. Bad things can happen.

    AND recycle the used oil. Take it to a quick lube shop or a car repair shop, they will recycle the oil. Don’t dump it in the woods or a stream, OK?

    See More Lawnmower Tune Up and Oil Change Tips Here

    This same process can be used for your generator oil change or your riding mower.

    lawn mower

  • How I Get Rid Of Deer Flies

    How I Get Rid Of Deer Flies

    Tired of being dive bombed? Here’s how I get rid of deer flies when I’m working in the yard or woods. Yes, it looks weird, but it works.

    Get rid of deer flies

    Deer flies like to attack from behind and land on your head or neck. Put on this double stick tape, and they tend to aim for the strip of kinda sorta flesh colored tape instead of your neck. Then their feet get stuck in the tape. No more deer flies buzzing you.

    Being the DIY guy, I first bought this online, and I thought, I can get rid of deer flies myself. So I went out and got a roll of double sided carpet tape. But it doesn’t work nearly as well. I’m not sure what’s up with this special tape, but its cheap enough that its totally worth it for peace of mind.

    Get the Deer Fly Tape Here.

    I can’t stand the dive bombing of the flies. And while I do get stung while beekeeping, the deer flies drive me crazy. Not sure why. Their bite seems to last longer.

    According to Wikipedia, only the female deer fly will bite. The male eats pollen. And the deer fly can be a vector for anthrax, nice! But the deer fly also has predators: nest building wasps and hornets, birds such as the killdeer, and dragonflies. This is why I don’t remove wasps nests unless they are in an area where we are walking around. Leave them be to get the deer flies!

  • Why The Different Color Honey Cappings?

    Why The Different Color Honey Cappings?

    I wanted to pull some of the honey off our bigger hive. Early in the year I had stacked two honey supers on that hive, hoping to catch an early nectar flow, which I managed to do despite a swarm. But as I was going through the honey supers, which are super heavy, btw, I saw frames with different color honey cappings.

    different color honey cappings

    Not sure what this meant. Were the darker wax cappings honey that was older? Had the honey had more time to cure, or lose moisture and darken? There wasn’t as much dark honey in the frames, there was a lot more honey with lighter, almost white cappings.

    This is a dilemma I’m happy to have, after last year’s drought left us with almost no nectar flow, and no honey to harvest. Any honey the bees managed to make we left in the hives for them to use over winter. This year’s spring rains helped kick the nectar flow in early.

    different color honey cappings

    Because of that early nectar flow, I wanted to pull some honey frames off the hive, extract them, and get the frames back on the hive before the nectar flow stops this summer. So I pulled off all the dark capped honey frames I found in the honey supers. Most of the lighter capped frames stayed on the hive.

    If you all are wondering why I only use medium frames throughout the hive, once you pull a honey super off a hive, you will understand immediately. Honey is heavy. A medium super of honey weighs about 40 pounds. If your hive is on a hive stand, and you have two honey supers plus 3 brood supers on a hive, you are pulling 40 pounds off a hive above your head.

    I put metal handles on all my honey supers, and its ideal to have a helper with this any most all jobs with beekeeping. Learn from me.

    OK, back to the question of cappings. Why white and darker cappings in the same hive? First an explanation about cappings from the best beekeeping blog, Honey Bee Suite. Rusty says:

    Depending on their genetics, bees either place the capping wax directly on the surface of the honey, or they may leave a little air pocket between the surface of the honey and the wax. These two methods make no difference in the flavor, color, or quality of the honey, but they make the finished combs look dramatically different.

    The honeycomb with the air pockets is said to have dry cappings. The comb appears white or very light tan. Honeycomb with wet cappings is not actually wet, but it looks like it might be. The appearance is darker and may have a variegated pattern due to scattered mini air pockets, which have a lighter color.

    While some honey bees produce both types of capping, some consistently build one kind or the other. Italian honey bees (Apis mellifera ligustica) are known for producing white, dry caps. At the other end of the spectrum, Caucasian bees (Apis caucasica) produced wet caps almost exclusively.

    White cappings are called “dry cappings”, darker cappings are called “wet cappings” FYI.

    But why the different color honey cappings in the same hive? I put honey supers on this hive in spring, and then the hive swarmed. Not wanting to lose the honey season while the hive raised a new queen, I re-queened the hive. The new queen was a mix breed from Long Island. The white cappings of the newer honey suggests she is mainly Italian. The original queen was Carnolian.

  • Kallux Ikea Hack, Rolling Shelving Unit

    Kallux Ikea Hack, Rolling Shelving Unit


    kallux ikea hack

    I’m calling this the Kallux Ikea hack, as it turns a shelving unit into so much more. This one is at a friend’s photo studio. I’ve done a few projects with Ikea Kallux or Expedit bookcases, and have put wheels on them to make them in to a rolling shelving unit.

    kallux ikea hack

    You can buy rolling wheels online here, or get them at the Ikea store. Be sure to get good solid rubber ones, not the cheap kind. And pay attention when securing the wheels into the bottom of the bookcase, the wood is composite. Its best to use carriage bolts, drilling through the bottom board of the unit, just inside the outer wall of the bookcase.

    You can also buy these wheel base kits

    Either method makes it very easy to do the Kallux Ikea Hack, just a few screws.

    kallux ikea hack
    My friend’s Black Lab!

    Either way, be sure the wheels are secure, and you have a mobile wall unit.

    I have also made these shelving units into a solid wall divider. I get some luan type lightweight plywood, and cut it to size. I then polyurethane the plywood with stain that matches the color of the Kallux. Several coats of poly do a good job of making it look more like furniture, FYI.

    If you go the room divider route, I would not use drywall or homosote as a backing board on the Kallux, (aka Expedit) its too heavy. Get a thin plywood, with a nice finish if possible.

    When applying the plywood to the back of the unit, pay attention to where there center vertical divider is on the shelving, and tack the finished plywood to that divider, as well as the sides, top, bottom.

    If you are going just for the wheels, think about what kind of weight the Kallux Ikea Hack is going to be carrying and buy wheels that will support that. Its better to buy a bigger wheel than a small one, plus it will be easier to move around that way.

    Check out the Ikea Kitchen Island I made here.

    Save

  • Stovetop Panini Press, What Fun!

    Stovetop Panini Press, What Fun!

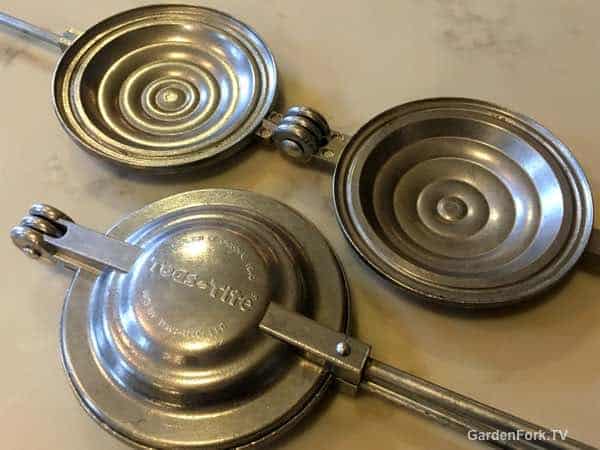
    My friend picked up a stovetop panini press, so we had to make some sandwiches with it. Super analog, and a great tool for campfire cooking. The brand name is Toas-tite, you could also call this a stovetop sandwich press. I call it a lot of fun.

    stovetop panini press

    We cooked up a mix of ground beef and chorizo with onion and tomato. Grated cheddar goes over the mix. Sliced buttered bread goes on the press, then the filling, then the second piece of buttered bread.

    stovetop panini press

    We cut off the ends of the bread that stuck out, they were a good appetizer for what was to come. We didn’t preheat the stovetop panini press, we just filled it up and laid it on top of a burner. The press is lighweight, easy to move around. Started on high heat then dialed it down to low after the press heated up.

    stovetop panini press

    We had two of the rigs going, which worked for the two of us. You might want to make these ahead of time if you want to feed more people. One can open the press to see how the toasting is going along, though after a while you get a feel for it. The ingredients do not seep out of the sides, at least ours didn’t. I imagine if you had a mixture with too much liquid or cheese it is possible it would leak.

    stovetop panini press

    But wow how much fun is this! Crunchy bread with savory meat filling. You could certainly go all vegetable as well, a curry would be good. What this works really well with is leftovers. Think brisket or pulled pork.

    You can purchase the Stovetop Panini Press here, its also called a hot pocket sandwich maker or stovetop sandwich press. I also saw on Amazon a cast iron sandwich press that uses the whole slice of bread, which makes sense to me.

    This press uses the whole piece of bread.

    I’ve also seen it called a hobo press, watch Cheryl of Flannel Acres make lasagna in one!


    Save

    Save

    Save