This last weekend the temperature was around 5-10 degrees F all night and day. So this played havoc with our maple syrup evaporator operation. The line that feeds raw sap to the evaporator froze as soon as I would defrost it, so I was ladling sap in to the pan by hand.
Bigger problems were elsewhere in the yard. My main sap storage tank was frozen to the point that the drain valve froze shut. Its kinda a bulky object to work with, so it just had to sit until it warms up later this week.
But one thing I had never seen is just how frozen one of my barrels out in the wood was. These barrels sit at the end of a line of maples we have tapped. This one had so much ice in it, the lid had been popped off.
I hacked through the top layer of ice knowing there would be slushy sugary sap inside. I scooped out the sap and carried it in buckets over to the evaporator.
Usually, if I have overnight ice in a bucket, its maybe an inch thick. I remove this ice and toss it. My thinking is the first ice that freezes on cool nights has a low sugar content.
But this barrel was different. It had gotten very cold, and this was a lot of ice. So I dragged a spare barrel over and connected it to the sap line, and let this one just sit. The temperature will go up later this week and I hope most of the ice will melt. Then I can haul it to the evaporator.
Tossing ice from sap buckets is one of those contentious topics in the maple syrup world. I want to borrow my friends brix refractometer and measure the ice in the buckets and the remaining liquid to see the actual sugar percentages.
Check out this homemade leaf mulcher bagger that Greg built! Using a free wood crate and an electric leaf mulcher, Greg made a rig for almost free that would cost big bucks at the store. How cool is that?
Here’s the how to make the Homemade Leaf Mulcher Bagger
From Greg’s email:
I love the show.
You show the world that it’s (usually) pretty easy to do a lot of useful things. You let everyone know that it’s okay if you don’t get everything perfect on your first try. The fact that the dogs continually pester you to play make your projects that much more realistic to me. Because that’s how it works at my house.
I currently work in a machine shop. We get a lot of pallets and shipping crates. They end up throwing them in the dumpster. So, of course, I have to find a use for as much as I can. It is nice that we get a lot of them all the same size and in new condition.
Attached you can see that I got tired of emptying the bagger. I adapted one of the crates by adding a base with wheels. I had some hinges around, so I hinged the old top back on but to what is now “the front”. I cut a hole and strapped a spare electric leaf blower/vac to the back side. I mounted it as high as I could in order get maximum fill.
I connected my gas blower/vac to the electric blower/vac via a 4″ hose, This is the the hard plastic kind that you would redirect a downspout with. Well this is the longest one I could find. When I “accordion” out the entire length of it, its about 25 feet long. I’m sure there is something better suited for this task, but this was only for proof of concept. A word of warning. When the hose is in it’s expanded state, it is subject to damage from our four-legged playmates.
Well, I tell ya. The thing works pretty darn well. Well enough to give my Dad a try at it.
I maintain a few properties and this whole rig fits into the hatch of my car. With a 100 foot extension cordon the base, I don’t need to stop until I run out of gas, I can make a nice batch of leaf mold. I hinged the door in a manner that allows me to dump the contents right into the waiting compost pile.
Though you might get a kick out of this.
Greg has sent a few other projects our way, here is his pallet compost bin setup. Again a big thanks to him for taking the time to show us his homemade leaf mulcher bagger. What have you made? Let me know in the comments.
These easy to make homemade pallet compost bins were made by GF fan Greg, a machinist by day, and weekend DIY guy. Pallets work great for compost.
I am a new listener/viewer and love your programs. I’m able to listen to the podcast at work, so have really been on a binge. Found your video “Composting 101” while preparing to build my Composting Center, here it is so far.
Homemade Compost Bins = Good
Note how Greg cut down the front door pallets to allow one to add new compost material to the bins. In other words, much smarter than my first go at building compost bins! See more of our pallet compost bin projects here.
First of all, I love this because Greg took the time to share this with me. Plus he allowed us to post the photos here on the site. A simple design, yet it works great, which works for me. Most of all, I love the barrel composer at the end. You can use this for finishing or doing intensive composting, rolling the barrel every day to aerate the mix.
Probably one of the most popular pallet projects, homemade pallet compost bins are good one for most any DIY-er person. Note how Greg elevated the walls of the compost bin up off the ground. This can extend the life of the bins, and most of all, allow air to get into the bottom of the pile. One could also lay PVC drain pipe with vent holes drilled in them, and therefore, get even more air in the bottom of the pile.Greg adds, “Thanks for including the dogs in so much of your content, Life truly is better with pets.” Here are his two pups.
A big thanks to Greg, I say. Love the sharing that happens here, if you have a project like these homemade pallet compost bins, or most anything, please send me some photos!
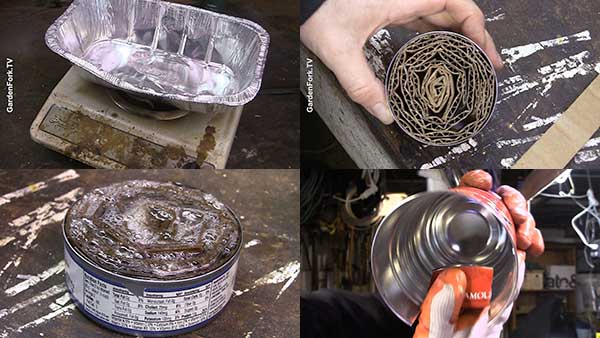
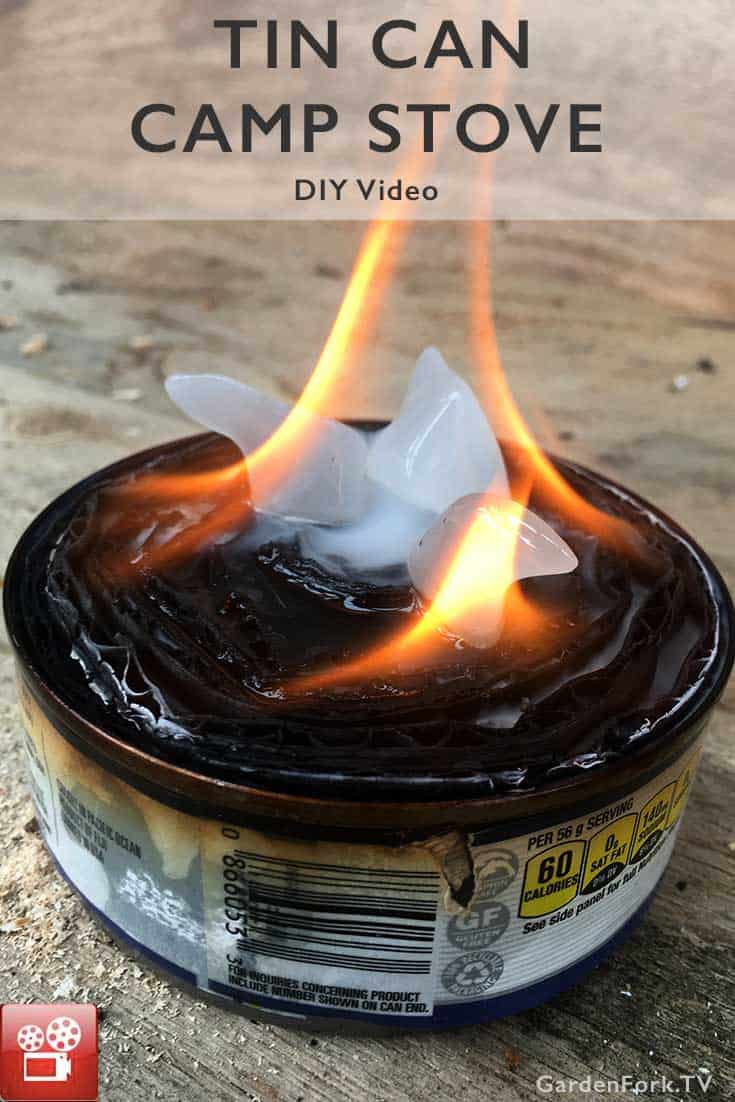
I think the tin can camp stove, aka buddy burner, is ready for a revival. Be it for emergency preparedness or backyard camping, you can make these in about 30 minutes. Here’s the video on how I put one together:
A Few Precautions When Making the Tin Can Camp Stove
Melt the wax in a double boiler or carefully on a hot plate
Hot Wax is flammable! So be careful
Use this stove outside, OK?
First of all, I just need to say BE CAREFUL. Hot wax and open flame require you to pay attention. You can wax you buy at the hardware store, furthermore, you could melt down a bunch of old used candles. Wear gloves while handling the wax melting container. Make sure the cardboard doesn’t have any labels or tape attached to it, because burning plastic isn’t great.
While you may have some tin cans in the house, you might want to seek out the ideal tin can. Cans that are not lined with an interior coating nor have a plastic or painted on label are best. Its actually hard to find such cans. The one in our video had a painted on label, consequently, it smoked and burned. Again, reason to use the buddy burner outside.
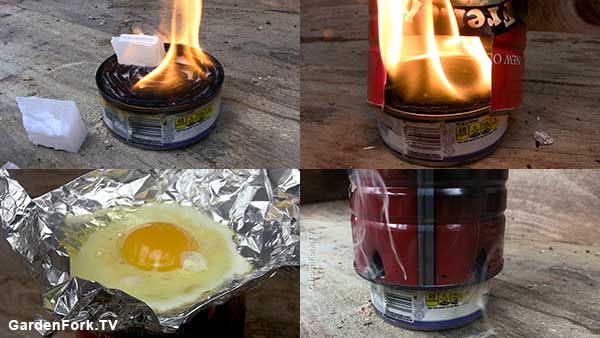
I have seen other posts that suggest using the bottom slot as a sort of air damper to control the flame. I have not tried this, as a result, we have a high heat, always on burner to cook our eggs. Maybe if you punched fewer holes up top there would be less air flow. I suggest finding a small fry pan at the dollar store or a yard sale for this. We used aluminum foil to hold our fried eggs, but a fry pan is easier.
Want to sell on ebay to make money or declutter? Selling on eBay is easy, if I can do it, you can do it. One of my friends makes a living on buying antiques and collectibles at yard sales and selling on eBay, and I’ve learned how to use eBay from them. We’ve talked about selling on ebay on this GF Radio episode, and the realities of what your stuff is worth here.
I use eBay to get rid of stuff I don’t need. I’m big into decluttering now, and have instituted the One Year Rule: If I haven’t used the item in the last year, out it goes.
I either sell on eBay, or use our block association email list to give things away, or I just put it on the sidewalk outside our house. Stuff disappears! And the declutter process makes you feel great.
We just moved into a row house, and in the basement we found a metal and porcelain chandelier. Someone at one time really liked this style of lamp, but it wasn’t something we were going to use. But I was thinking it must be a style that some people like.
I went to eBay.com and typed into the search “metal hanging chandelier” and scrolling through the search results, I found several lamps that looked like ours. They all used several key words to describe the lamp style:
Tole, Italian, Shabby Chic, Vintage
How To Sell on eBay
Here’s my steps to selling on ebay.
1. Take good photos. Your cell phone takes good photos, you can use a fancy camera too. I’ve found the best photos are with daylight coming through a window, and the sale item on a white background. We have a white tile table that I photograph items on. Cluttered backgrounds make for bad photos and are a turn-off for buyers – clean white background = good sales.
Take good close-up photos
2. Write a good description and BE HONEST. If the item has scratches on it, you have to state this in the description. Take a photo of the scratches – you can load 8-12 photos per listing for free on eBay. Use the keywords you found in similar listings in your title and description.
3. Don’t use exclamation points and bold type and ALL CAPS. Shouting doesn’t work when trying to sell on ebay. It makes you look like a 9 year old.
4. Be personal. In the description of the lamp we posted for sale, I wrote about how we found it in the basement of our new home, and how it would look nice in a shabby chic decor home.
5. Research what similar items are selling for. Have an idea of its worth, but pay attention to what’s not selling as well.
6. Start the bid at .99 . This might seem counter-intuitive, but it works most of the time. You will get a lot more interested buyers, and the market will prevail on pricing. There will be those buyers that want the item and are ready to pay a market price for it. Your auction price will rise close to what the market is paying right now.
7. Be explicit in payment requirements and shipping. I always use PayPal for payment, unless the person wants to come pick it up in person, and then they can pay in cash.
8. State your return policy. If you are selling a camera or computer, you might offer a refund if the item is DOA ( dead on arrival ) because of a shipping problem. For items like antiques I don’t offer a returns, I sell them as-is.
9. Ship the item promptly. State in your auction how many days it will take to package the item and ship after the end of the ebay auction. Contact the buyer through ebay and send them a tracking number.
10. After the buyer receives the item, ask them to leave positive feedback, and do so as well for the buyer. Remember, Karma is Boomerang.
The auction for the ceiling light ended and we were stunned to see it sell for over $200! I messaged the buyer and they explained a bit about Tole lamps. They lived in California and it fit their house decor well. Good for them.
What are your how to sell on ebay techniques? Let us know below:
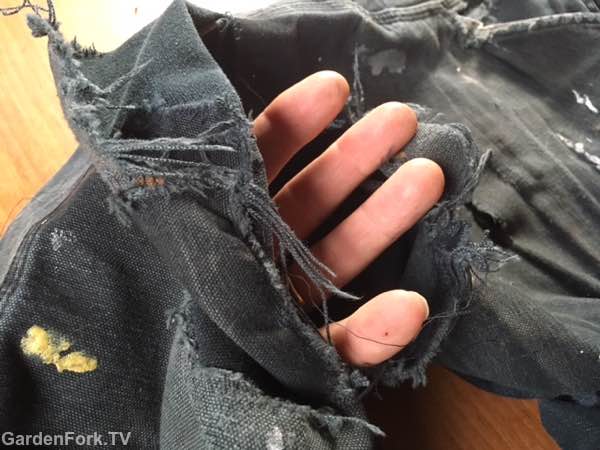
I wear work pants all the time, most of them have sewed on patches – learn how to use a sewing machine here. The pair I had on yesterday had recently developed a new hole, and a tree limb snagged in that hole yesterday. Unfortunately, the tear was quite large, and the dungaree cloth was weak already from previous repairs.
I love using the my sewing machine, I think its the original 3D printer. Its an intricate machine with lots of moving parts hidden behind a plastic case. I don’t know what many of the knobs and adjustments do. But I am able to sew patches on pants with it.
So it was time to retire this pair of Carharrts, though they have served me well. But the silver lining for pants that can’t be repaired, is that you can salvage the cloth. This cloth can be uses to repair other stuff. Typically the back of the pants legs are still in good shape, so sharp scissors make quick work to remove a large section of cloth.
The rest of the pants can be recycled in one of those drop off bins you see in store parking lots. From what I understand, any clothing not intact is sent to be used as insulation or filling. Please don’t just throw them in the trash.
Do you repair your clothes? By hand or machine? Let us know below.
I’ve been on a decluttering mission for a awhile now, but I’m always stuck by what to do with that has value. Can’t bear to just throw it out, so I have found a solution.
There was this 50 amp generator plug lying around in my shop, and I will never use it, so I looked on ebay, and these plugs sell for about $65 new on the site. I took some photos and posted it, starting the bidding at $1, plus I added a Buy It Now for $35. The plug sold in a few days.
How cool is that? The plug I didn’t need got to someone who needed it and I got some paypal spending money. What fun.
I did the same thing with my older weather station that was partially broken. The unit has several pieces, and some had failed, but I couldn’t stand just throwing it in the trash. Knowing that many people had the same weather station, I thought someone could use the parts to repair their own station.
Up it goes on ebay, with the bidding starting at $1, and I sold it for $40. I was very surprised yet very happy. I get rid of clutter, and the stuff goes to good use, not a landfill.
Erik and Kelly of Root Simple talk about decluttering on their podcast. This got me started, plus just wanting to clear up the place to have room for projects. When your desk and shop table are filled with stuff, you can’t get any work done.
So I am much happier knowing another way to get rid of stuff, yet make sure it goes to good use. How about you? Appreciate your thoughts in the comments.
Tree Pruning is best done on dormant trees, so this being winter, now is the time. I was walking through the park and saw the staff had done some tree pruning. I took these pictures to show how the tree should look after its done. Here’s a video we did on how to prune a tree.
When pruning a tree, after determining which branches to cut, you make 3 cuts to the limb. This is done to keep the tree bark from stripping back down the tree trunk. First is a bottom cut about an inch away from the finish cut, then a top cut an inch farther out on the limb to cut the limb. The bottom cut keeps the bark from stripping down past the cut. The final cut is made flush to the growth ring near the trunk.
Why 3 Cuts When Tree Pruning?
This may seem like a waste of time, so go ahead and prune a few tree limbs, you can see how the bark rips down the trunk, not a good thing.
When doing the final cut it should be close to the trunk, however, you don’t want the cut to be flush with the trunk. Though it can be hard on some trees, you want the cut to be just past the growth ring of that limb. As a result, cutting at the ring will allow the tree to heal faster, like the one below.
On some trees, the ring isn’t obvious, so do the best you can. Trees are amazingly resilient. Do not paint on any kind of coating after making the cut. The tree will create its own chemical barrier inside the wound to prevent bad stuff from enter the tree. If you apply paint or some sort of tree wound product, it will only keep bad stuff in the wound, not out.
Sometimes you can’t get close to the trunk, so do the best you can. Your tree will take care of itself. Be happy that you took out the branches that are dead and dying, making the tree look better and grow better.
You usually think about storm preparedness just before the lights flicker out, right? To help you be more prepared, here are 3 things you should have before the power outage.
Storm Preparedness Tools I Have
Whether you have a generator or not, a solar powered radio, that also charges mobile devices, is the first thing I tell everyone to buy. I have this Eton radio that has AM, FM, and 7 pre-programmed weather stations dialed in. This radio has a USB charger plug, and you can power up devices either by turning the crank or using solar power. The solar cell can take all day to charge up a device, however, the hand crank works faster.
I have gone through many cheap LED headlamps, then I finally decided to stop buying whatever was at teh store and upgrade to a better quality one. This Eveready LED Headlamp has 7 LEDs and several functions. I used it last weekend to do some electrical work, so you can also use it for your DIY projects as well.
A quality waterproof flashlight is our 3rd must have tool, because the power goes out when its raining or snowing, not when the sun is shining. We tested this Dorcy LED Flashlight and it works great. I also like that it uses AA batteries, not larger cells. This means we can just use our existing AA batteries.
As you can see in the video, this flashlight floats and can be used a Labrador toy. This may sound like fun, but it also proved to me that your dog can chew on it and it will still be waterproof and function.
We do use a generator for power outages, but its loud and I’d rather not run it day and night. Instead, we power up our headlamps and listen to the radio. I occasionally run generator to heat the house and keep the fridge cold.
People have been asking me how to find used brick for building our DIY pizza oven plan, so as I just found some more brick today, I can share with you how to do this.
The best way is to look around for construction demolition projects going on in your area. Ask you friends if they know of any work being done. I was lucky today to walk down the block to find a crew taking down a brick wall of a building. They were happy to get rid of some brick.
Used Brick sits well in those plastic organizer crates, but make sure they aren’t the cheap flimsy kind.
Perfect reason to ride your bike around, so go look into construction dumpsters and find used brick.
If there aren’t brick buildings near you, check out Craigslist. You’d be surprised how had a pile of brick that they want to get rid of.
You will probably pay more for clean brick, so keep in mind when you want to clean brick and when you to just pay for brick that has already been cleaned.
The issue of using used clay brick has been debated quite a bit. I have used it for several pizza ovens and I am fine with it. You can make your own choice. For pizza, we are not heating up the brick for hour after hour to build heat, we are creating a space to hold fire for a short period to cook some dough and cheese.
Chainsaw chaps have saved my leg twice. Lots of people don’t wear them when using a chainsaw, and I think those people are not being smart. I am not the ultimate expert on chainsaw safety and PPE (personal protection equipment) but I do cut down trees and cut firewood on a regular basis.
My chaps saved me from tearing open my leg
Basically, chainsaw chaps keep your chainsaw from cutting into your thigh or leg. The chaps are filled with a threadlike material. If you get a running saw too close to your leg, the chain cuts into the chaps instead of your leg, and the inner material blooms out and stalls the chainsaw. And you are not bleeding all over the ground in the woods.
This has happened to me twice when I was not paying attention. The first time I was kneeling and cutting up a felled tree, and my leg slipped right up against the running saw. The saw stopped almost immediately after hitting the chaps.
Buy chaps a bit shorter than your regular pant leg size, or you will trip over then in the woods. You can get brand name chaps or generic ones. I have both and they both work fine.
I didn’t have a hard hat for a while, then I whacked my head on a limb as it was coming down. Then I bought a hard hat. Its super easy to take on and off. Plus, with the eye screen, you don’t have to keep pulling off safety goggles. If you don’t get an all in one, buy ear and eye protection separately. Its worth it!
Steel toed boots are a must. Logs will roll onto your feet, and anything you damage now will become arthritic later in life, learn from my experience.
Carry several pairs of gloves, you will lose them, and in all that leaf debris, you wont find them. Plastic wedges make tree felling much more controllable, you wont get your saw pinched in a tree anymore once you buy them.And I am a convert to pre-mixed fuel. Yes it costs more, but it saves on repairs. Its cheaper to buy the fuel than to have your chainsaw in the repair shop for a carb rebuild before it needs it.
Easy to make no knead bread recipe, this time we add black olives for extra flavor. Oil cured black olives are what a friend of mine calls ‘little salt bombs’ they are that and more. Watch the video and check out the recipe.
Lately I’ve been doing a whole wheat – white flour mix for my no knead bread recipe. I’m adding more whole grains into my diet, and the whole wheat adds that nice nuttiness to the bread. Making 100% whole wheat breads can be tough, especially no kneads.
But the main ingredient here are black olives! Don’t buy the watery black olives in a can, get oil cured olives. These are usually available in a deli or gourmet shop. I have seen oil cured in a jar, but not often. Buy pitted olives, but when chopping them, keep an eye out for pits, you may run across one or two.
For some time now I have been using parchment paper to move the dough from the the bowl it rises in into the dutch oven. This eliminates the risks of flopping the formed dough into the dutch oven. Its ok if the parchment paper sticks out of the lid of the dutch oven, it will help with removing the baked loaf when its done.
This is what shaggy can look like.
For my basic no knead bread recipe, the bread is done with the internal temperature reaches 200F. I usually bake the bread for 35 minutes covered and then 15 minutes uncovered. With your oven these baking times may change. Its better to over-bake bread than to under-bake it. Wet dough bread is no fun.
Even if you are a big fan of black olives, using less is more here. Olives pack a lot of flavor in a little portion, OK?
No Knead Bread Recipe with Olives
Recipe Type: Bread
Cuisine: American
Author: Eric Rochow
Prep time:
Cook time:
Total time:
Serves: 1 loaf
An easy bread recipe that adds more flavor with black olives. Serve this at dinner, your friends will like it.
Ingredients
2 cups all purpose flour
1 cup whole wheat flour
1/4 teaspoon active dry yeast
1 1/2 teaspoons salt
1 cup chopped & pitted oil cured black olives
1 1/2 cups warm water
Instructions
Mix together the two flours, the salt, and the yeast. I like to use a whisk for this.
Add in the pitted and chopped olives, be sure they don’t have any pits in them. Bad things can happen.
Add in the warm water and mix together.
The dough will be stiff and will not come together. Don’t worry, it won’t. You want the dough to be ‘shaggy’ like shag carpet, not wet.
Add water by the teaspoon if needed, but a bit too much water will make the dough wet.
Cover the bowl with plastic wrap and place is a warm place to rise. I use my oven with the light on.
Let the dough rise 12-18 hours. The dough should have strands pulling away from the bowl when its ready.
Flour a board lightly. Scrape the dough out of the bowl onto the board. Dust the dough with a bit of flour and turn the dough into itself to form a ball.
Place the ball of dough onto a sheet of parchment about 18” long. The parchment should be wide enough to sit in the dutch oven and stick out the top a bit, as shown in the video.
Gather the corners of the parchment/dough and put into a bowl with high sides. One similar to the one I use in the video is good.
Cover with a towel and let the dough rise for two hours in a warm place. I use the oven with the light on again.
After 1 1/2 hours of rise, put the dutch oven and lid in the oven and set the oven to 450F.
After 30 minutes, remove the dutch oven from the preheating oven, lower the parchment with the dough into the dutch oven, cover and bake for about 30-40 minutes. It all depends on your oven.
After 30 minutes, remove the lid of the dutch oven, the bread should be starting to brown. Bake another 15 minutes with the cover off.
Check the temperature of the bread, its done with the bread reaches 200F
Can you show us how to prune a tree? Yes. For this post, we’ll be pruning an apple tree in spring, but this method applies to most trees. Watch the video, then read on.
How To Prune A Tree – Some Tips:
Early spring or fall is the best time to prune.
Use bypass pruners for live wood, anvil pruners for dead wood.
Cut away branches that cross each other.
Less is not always better.
Buy a quality hand saw
There are a couple of types of pruners. I have a pair of hand pruners, the kind that look like pliers that cut limbs, and then I have the larger kind the require some upper body strength for larger limbs. Bypass pruners tend to make a cleaner cut on live wood. Anvil pruners have one blade that presses against a flat surface, these work best with dead limbs, as they can smash up live wood. But again, use what you got!
One of the big reasons for pruning is to remove branches that rub against each other, or are about to. Rubbing branches damages the bark and can invite disease. You’ve probably seen branches that have kinda fused together after years of touching, something you want to avoid. Remove branches that will start to rub as they grow before it happens.
Pruning less from a tree is not always better. For fruit trees, its important to have what’s called an ‘open habit’, you want air to flow through the tree.
Tools To Use
I was recently given a 4 cycle gas trimmer from Troy-Bilt (a GardenFork sponsor) that has a chainsaw pruning pole attachment that is excellent for pruning a tree. I was able to use this to cut off a large limb that had snapped on one of our standard size apple trees. With the pole extension, this rig can reach 11′ up, and it cuts fast. Be sure to keep oil in the chain bar reservoir and the chain sharp. You can see how The Impatient Gardener uses this powered pole pruner here.
Chainsaw Pole Pruner Attachment
Get yourself a quality hand saw. I prefer the kind with teeth that cut on the pull and push. I think the blade is called a Japanese blade. Cheap knockoffs will only bind in the tree and mean more work. I used to buy cheap ones, then I got a nice one, and its great.
You get what you pay for with saws. This one is made in Germany and works great.
When showing people how to prune a tree, I use two kinds of hand pruners, bypass and anvil. I use the anvil pruners a lot on blueberries and raspberries.
To start pruning, first cut away branches that cross, these will cause problems down the road, so visualize which limbs will get larger and cross. Its easier to cut them now, not later.
How much to prune? The common wisdom is you can prune out about 25% of a tree without harming it. I know that you can’t actually measure 25% of a tree, but step back from time to time while you prune and see what effect you are having. Its OK to cut out large limbs like I did in the video above.
Seal the pruning cuts? No, you don’t want to seal up the bare wood, the tree will form an internal chemical barrier to protect itself from any infection or invasion.
Here is a great example of the before and after of a nicely pruned fruit tree. I pruned this tree in Austin when the Troy-Bilt Saturday6 team got together and volunteered to restore a community garden. Note how you can see through the tree after pruning.
So this is my version of how to prune a tree, any thoughts or suggestions? Let me know below.
FYI: Troy-Bilt is a sponsor of GardenFork and provided me with these tools. Its part of how we pay the bills here. I won’t feature products I don’t think are of good quality.
Want to build a grow light for seed starting? In this video I show you how to make an inexpensive one from parts you can buy at the hardware store. This rig may not be fancy, but it works, and that’s what its all about on GardenFork. Check out our seed starting video below as well.
Tips on how to build a grow light
Its ok to use regular fluorescent bulbs.
The plant leaves can touch the bulbs, it won’t hurt the plant.
Keep the bulbs on 18 hours a day while growing seedlings.
People say you have to buy special bulbs to grow seedlings. I don’t. For the short time we are using the grow light for a tray of seeds, regular bulbs are fine. Save your money. Sometimes I have seen packs of regular bulbs on sale, doesn’t hurt to buy them on sale!
The leaves can touch the bulbs. Its actually good they do, as they are getting the maximum amount of light from the bulb then. You don’t want leggy plants, they will perish when you transplant them. Adjust the lamp height as the plants grow. If you have different plants under the same light, you can raise up the light for the tall plants and then slide wood or something under the shorter plants to stay close to the light.
I keep the grow light on 18 hours a day to make up for the lower brightness of bulbs versus regular daylight. Get yourself a simple light timer and plug it in.
I have found chain is the best way to hang the light on the stand, it makes it easy to adjust the height. Rope doesn’t work well.
After build a grow light, you can learn how to start seeds, its easy to do:
I made a new video on how to start seeds indoors to reflect all I’ve learned lately. This included making cool paper pots and cardboard tubes.
To start seeds indoors
You need warmth and light and water. Lots of light and warmth, and not much water. Soaking wet seeds or seedlings will die off, imagine having your feet in water all the time, not fun.
I start my seedlings near the furnace in our basement. You can also buy a waterproof grow mat that is like a heating pad but built for seeds starting. Don’t go and use your heating pad for this, OK?
When the seeds start to sprout, its time to move them under the grow lights. The seedlings do not have to be as warm once they are started. But is is very important to keep the seedlings directly under the lights, basically touching the bulbs. With our DIY grow light rig, you can slowly raise the grow light as the plants grow.
I have found putting seed trays in the window doesn’t work. The plants get very leggy and top heavy. When you transplant them, they fall over in the wind. Your experience may be different, as I live in New England, where the winter light is poor at best.
It’s OK that the leaves touch the bulbs of the grow light
For the grow light, we use regular fluorescent bulbs, not the expensive lights. For seed starting, this works fine.
You don’t want to over-water your seedlings. This can cause mold and fungus to grow and will kill the young plants. Best is slightly moist to slightly dry. Many of the seed starting trays have a wicking mat under the seed pots, and this works pretty good. Watering from underneath instead of over the plants is best. I do not mist the plants.
I use a prepared seed starting mix, I don’t make my own, too much work, I think. Do not use regular potting soil or soil from your garden. You can get Clyde’s Planner here.
Tom built this brick pizza oven that is heated by a DIY aluminium foundry, and sent me a note and great photos. He says:
Eric, loved your pizza oven video, so I built one and it worked as described. Mine only got to about 600 degrees, so instead of 90 seconds cook time like Naples style, it took me more like 5 minutes. Not quite as much char and the crust is just not quite there. I spent a lot of time in Italy as a kid, so I really want to try to get the temperature up without having to build a full size permanent wood fired oven in the yard.
I thought you might like to see my first attempt to get higher temps. I took a portable aluminum foundry (YouTube video) and built the oven around it. Above the heat source, I put a 8th inch piece of steel, and laid a pizza stone on it. when fired up (which took about an hour instead of 4), the steel bowed quite a bit (you can see this in the picture), and this caused the stone to crack, so I didn’t force the temp any higher (controlled by amount of air pumped into combustion chamber). I did get up to around 700 degrees, so I’m moving in the right direction. Cook time was more like 3 minutes, and the taste is about 92 percent of what I remember from my childhood. Hopefully by spring, I’ll have a trail number 3, with a thicker slab of steel and a new stone, and a front door to trap more heat. I’ll probably order the Naples flour and tomatoes and pick up some prosciutto and good mozzarella. I’m hopeful I can get up to 850-900 degrees. If I actually do, I’ll send you pics and let you know how it went.
Homemade aluminum foundries are popular on the web, but I never thought of using one to heat up a DIY pizza oven. Brilliant idea, I think, and something I never would have thought of. A big thank you to Tom for sending us the photos!
“Eric, what do you think of the Flow™ Hive?” I get this question every week, so I thought I’d write out a post to refer people to for more information.
The short answer is this: It is a great solution in search of a problem.
People who are not beekeepers see this product and the beautiful videos, and then email me saying:
“I’m going to buy a Flow Hive so I won’t have to touch the bees and get stung.”
My first rule of beekeeping is: You are going to get stung.
Having a hive where you just turn on the tap and out comes honey isn’t realistic, in my opinion.
Bees are the same as other farm animals, you have to take care of them.
For most beekeepers, you harvest honey one day a year. For the other 364, you have to take care of your bees.
Below is a quick rundown on taking care of a beehive through the year.
In spring, you have to first make sure your bees are alive, then feed them sugar syrup and pollen patties until food sources appear in your are. If you want to prevent swarming, you may re-queen the hives now. In late spring you’ll add honey supers.
Spring into summer you will do periodic checks to make sure the queen is alive and laying. If you see queen cells being produced, you’ll try to prevent swarming. You may split the hive as a check against swarming. Be sure check the electric fence to make sure the bears don’t tear apart your hives.
Keep an eye on nectar and pollen sources and see if there is a dearth due to drought or just the plant cycle of your area.
In late summer you might think about harvesting honey. You’ll have to think about how much honey to leave a hive for winter. How strong is the hive? If the hive is weak, you may combine it with another hive. You may also re-queen in late summer, early fall.
As fall approaches your whole goal is to get the hive in the best shape possible to live through winter, we have a bunch of videos about this here.
These are just some of the tasks of beekeeping, my point here is the Flow Hive is one way to keep bees, but its not a hands-off method of beekeeping, as many people seem to misunderstand.
Dehydrating apples is a great way to preserve food into winter. To us, dehydrated apples are like candy, so they get eaten faster than I’d like. The whole idea being to have some apples in the middle of winter. Watch this video on dehydrating apples and then read on for more information on the dehydrator we use.
Dehydrating apples, what we use:
We use a simple forced air dryer, its not the fanciest dehydrator, but its affordable and works for us.
This is a forced air dehydrator, its a pretty simple design, hot air is circulated around the trays. The model we have is no longer available, but Nesco makes several models that are similar, shop Amazon for food dehydrators here. I have found it helpful to rotate the trays halfway through the drying process, the newer models may not require this step. We don’t spray the trays with any oil, the dehydrated apple slices don’t stick when they are dry.
Slicing the apples is a ton of fun with this apple corer-slicer rig we got as a present one year. What fun. This is a very handy device to have if you want to dehydrate apples, saves a bunch of time. Shop for apple peeler – corer on Amazon here.
You can also make sun dried apple slices with a solar dehydrator. This is pretty simple, use some twine or fishing line and put the apples in a very sunny place. The hard part is keeping bugs from landing on the fruit while it dries. You may be able to fashion some sort of mesh or window screen system to keep the bugs off the apples while they dry.
Do you have any thoughts on what is a good food dehydrator? or any tips on using one? Please let me know in the comments below. thx!


 There was this 50 amp generator plug lying around in my shop, and I will never use it, so I looked on ebay, and these plugs sell for about $65 new on the site. I took some photos and posted it, starting the bidding at $1, plus I added a Buy It Now for $35. The plug sold in a few days.


