Here is a cheap sous vide machine that works almost as well as an expensive sous vide machine. My beer cooler sous vide setup works just as well as those immersion sticks. Watch the video and read on!
The beauty of this cheap sous vide machine is, you probably already have all the parts to make it happen. Its not even a ‘machine’, I think, it’s a big insulator sitting on the shelf in the garage. So go get it, clean it out, and let’s go.
One key thing: the lid of most coolers is hollow. Get a can of regular spray foam (not the kind for big gaps) and drill two 3/8″ holes in the lid, along the front edge near the corners. Fill the lid with spray foam. Its ok if it spills out the holes, it will dry and you can snap it off. Its best if you prop the lid up so the front edge of the lid is pointing up, that way the foam will flow down into the lid. Let this dry overnight.
How to use the Cheap Sous Vide Machine, aka Beer Cooler Sous Vide
Go buy good steaks. They don’t have to be expensive, but I’ve found steaks at least 1″ thick work best. I have also used blade steaks and they work quite well. What kind of steak is up to you.
Put the steaks on a tray or plate, and season with salt and pepper on both sides. Put them in the fridge overnight. This allows the salt to permeate the meat and the fridge dries out the steak a bit. Kind of like dry aged steaks only not as dry. It does help.
But if you are like me and don’t plan, just salt and pepper the steaks and put each in a zipper bag. Drop the bags into a bowl of water to push out as much of the air as possible. See the video for how to do this. You can drop in some herbs if you want, and add some butter. Nice.
I like my steaks medium rare, so I aim for an internal temperature of about 132º F. This tells me to fill the beer cooler, aka cheap sous vide machine, with water that is 135º F. There will be a bit of a temp drop in the cooler, so bump the water temp a bit higher than your ideal internal meat temperature. Keep in mind you are going to sear the steak after the beer cooler, so it will raise the temp a bit of the meat.
Once you are happy with the temp of the water in the cooler, drop in your meat in the zipper bag. If the bag wants to float, you need to remove more air. If you’ve gotten as much air as possible out, use a rubber band some silverware to the bag to keep it submerged. Close the lid.
A few times while the water heats the meat, I will pop the lid and stir the water real quick. After an hour, I take out the bags and fire up the grill or the cast iron pan.
IMO, the best way to sear a steak is a cast iron pan, but you can use the grill if you want. OK with me…
Dry the meat after pulling it out of the bag, preheat and oil your pan, and drop in the steaks. Sear each side quick, you can add butter if you want to make a quick sauce – like we do in this steak cooking video – and place on a plate. Let the steak rest at least 5 minutes, OK?
Then pour a nice glass of red wine, sit down with those mashed potatoes you made, and enjoy. You’ve cooked an amazing steak with gear from your garage.
You want to cook a steak, right, and you want to try that sous vide method. I mean, what’s that all about? But the problem is is those sous vide machines are, like, wicked expensive, right, and I’m not gonna go out and buy one of those things and you’re maybe thinking but you want to try something, right? Let me take you on my journey of the cheapest, if not free, DIY sous vide machine. You probably already have one in your basement. Hello? Beer cooler sous vide. Ready? Here we go.
I made a video about this cheap sous vide machine quite a while ago and the other day, the light bulb went off. I had some steaks. I had more than this and I was like, Let’s sous vide these puppies again and I brought out my DIY sous vide beer cooler machine. Total credit, I did not invite this. Invite? Invent this. Kenji Lopez Alt from Serious Eats and also the fantastic book, The Food Lab, he came up with this.
I’m just showing you his, I’m spreading his word, okay? This thing is brilliant. It’s a cooler but it’s also a heater. I mean, it keeps things warm and it keeps things cool. Let me show you.
So coolers are insulated waterproof plastic boxes, right? The trick here is that the top is usually hollow so what Kenji suggests, and I did, was I got some spray foam and I drilled two holes here and then you spray foam the whole lid and that helps insulate. Basically, a giant insulated thing and you usually coop but keep. I can’t talk. You usually use it to keep things cold, right? But it equally keeps things hot and sous vide is all about maintaining a constant temperature to cook something to X degrees, right? Enter the beer cooler and hot water and this.
I salted this steak last night and then I put it in the fridge. I didn’t cover it. I kind of like that it dries out a little bit but I’m gonna add some pepper. Salt and pepper, yellow Labrador, beer cooler. You don’t need to use this big of a cooler. GardenFork is all about, Hey, let’s try this and see what happens and use what you got. And this is what we got. So that’s what we’re using.
And I got a thermometer thing. So I want to see how hot the water comes out of the tap at. Medium rare is what, 130 degrees. This is 128. Maybe it’ll kick up a little bit. 127, 126. I’m gonna heat this water up to get that a little above our ideal temperature.
Salt and pepper, zipper bag. Um, this goes in here at the bottom, whoa, there we go. Yeah, like that. And then the goal is to get all or as much of the air out of here as possible. We’re gonna do this by submerging it in the water, bringing it all the way up to the zipper part and then sealing this. ‘Cause my cooler’s so deep, it’s kind of hard to show that so I’m gonna show you in a pan of water here. So this is submerged and the water pushes all the air out of the bag there. I don’t know if you can see that. So we’re just gonna push the bag all the way down. Just fold it on top of itself. That’s totally fine. A little bit of air is totally fine and then see how I got this, it’s hitting the zipper? The level of the water is hitting the zipper like that? So just push this all down. I run the zipper across while holding this down. It’s not rocket science, doesn’t have to be perfect. Because on GardenFork, done is better than perfect and this is almost done.
Now, into the cooler. More hot water needed. More hot water. I guess it would help to turn this on, right? Okay, so this is at about 132. That’s pretty good. That’s like medium, medium rare. This goes in here and it sits like that. And that’s it. That’s, I mean, you don’t have to use this giant cooler. Just a six-pack cooler makes a fine inexpensive sous vide rig. Kenji, in his video on Serious Eats site, has just a six-pack cooler. This just happens to be what I got so that’s what we use, right? But it’s brilliant and you don’t need to be buying one of those fancy machines, right? That in there, one hour. Let’s watch Labradors. Ready? Go.
All right, steak time. Wow, it’s, wow, you can really feel the warmth in here and that is at, this thermometer runs really slow, so. Shaking it helps, you know. Whoa, it fogs the lens. Sorry. 129. Pretty good. Pull this out. How cool is that? So it looks brown. It doesn’t look super tasty but just hold on, okay? Wait ’til we taste this at the end of the video. So this doesn’t look great. That’s okay. It’s going to be fantastic. Stick around for the tasting at the end of the video. Keep that up really hot. So you want this to be what I call wompin’ hot. That’s hot. We’re gonna throw some vegetable oil in here and then we want to get it to the smoke point of the oil and then lay the steak in.
All right, vegetable oil. I want to get it to its heat smoke point, which it’s pretty much close to right now. Heat, fan on, sorry. This is hot. This . All right, every 30 seconds now, according to Kenji, I’m gonna turn this. I’m being splattered right now. 30 seconds, turn. 30 seconds, turn, and a wadge of butter. Maybe there’s too much vegetable oil in there. Let’s see what happens. Okay, after about two minutes of searing, I want to cook the fat along the edge there. Now comes the hardest part. Let your steak rest a couple minutes. This smells great.
Let’s just go right for the center and see what happens. Wow, look how nicely that cuts. Oh, look at that. That, all the way through and then the sear. Pink all the way through and the sear. That is amazing. That is amazing. It’s tender. It’s got flavor from salt and pepper. It’s not that overcooked edges. I’m talking really well with food in my mouth, aren’t I? Phenomenal.
Here’s an exhaust pipe repair hack I learned how to do a while back. It is a simple DIY muffler repair that will last long enough until you have time to take your car to the repair shop. This is not meant to be a permanent repair, this is simply a emergency stop gap measure. Maybe you don’t have the money quite yet to go to the muffler shop, this will knock down the noise. Heads up, this won’t help your car pass an emissions test but it is a neat little DIY hack to fix an exhaust pipe leak temporarily.
The flexible metal that I used is called roof flashing, but you could also use a metal can, like those that contain tomato paste or chopped up tomatoes for making spaghetti sauce. You can also use a soda can, but soda cans are made out of aluminum, so the hack will not last nearly as long. Aluminum has a lower melting point. Any kind of flexible metal that you may have laying around, something from a gutter repair or maybe your neighbor has some sheet-metal laying around that would work. You basically want to curl the metal around the exhaust pipe and then tighten it with pipe clamps.
You can also use this hack to do a muffler pipe repair. You would have to find a really long pipe clamps or connect together several pipe clamps. You can you can usually get clamps about 4 inches in diameter, if you buy a bunch of those you could connect them end to end and then wrap a big piece of metal around the muffler. This kind of muffler repair is not going to last really long but it would reduce the noise but your car is making – fewer people would stare at you at the red light intersection!
Video Transcript:
One of our cars has a hole in the tailpipe. I’m gonna show you how to do a quick exhaust pipe repair, until you have time to fix it properly, all right? So, you could be stuck somewhere, you can run to the hardware store, buy two clamps, borrow some tin snips, and get some roofing flashing. You could also just use, like, a tin can. Like a soda can, or a tomato can, or something like that. something that has flexible sheet metal stuff. All right?
Get under the car, let’s go. So first I’ve got to cut the old pipe. I’m gonna cut the clamps off and see what’s left there. We’re gonna use what’s called a right angle grinder with a metal-cutting disk on it. And be sure to have eye protection and ear protection. Be careful, all right? A lot of times you can just pull this out. Just put some pliers on here and you work it back and forth and it’ll come out.
Slide two pipe clamps that are slightly bigger, one on each side of the gap, of the hole. And then put your flashing up here and you’re gonna curl the flashing around the break in the pipe. This has sharp edges so careful not to cut yourself. And then slide these clamps over the metal and slide that on like that, there we go. There we go. All right, so you’ve got two clamps on, this is, you wanna center this in the break, and then we’re gonna screw these on. By the way, if you have one of these four in one or six in one screwdrivers, if you take the screwdriver part out, You have a nut driver here. So as the clamp tightens down, it wraps the sheet metal around the gap and it tightens it up. Tighten these up.
All right, there you go. Just a quick muffler exhaust pipe repair. If you’ve got this hole, and you drive down the highway, you could stop at a hardware store and buy those parts and fix it up, until you can get home and order the right parts or take it to the shop. It’s just one of those things that’s helped me out a couple of times so I just wanted to show you about it.
To get rid of deer flies, you have to attract them. Yes, I said attract them. Watch my video here and see what I mean as we make a deer fly trap.
Every summer, I walk out of the house and am bombarded almost immediately with deer flies. They fly around my head dive-bombing me. While my Labradors lie in the yard, the deer flies land between their eyes, on the bridge of their nose, and bite them.
So I had to figure out how to get rid of deer flies. Its been an interesting learning experience.
How to get rid of deer flies
There are two methods I use to get rid of deer flies. The first one is a DIY deer fly trap, the second is a store bought solution. The DIY trap is more fun, but the store bought solution is quick and easy.
BTW, if you are interested in the 12 volt drill – driver I use in the video, you can buy it here: cordless drill combo
A while back I ran across an article on the Univ of Florida website about deer flies with this odd photo:
Deer Fly Trap Univ of Florida photo
Of course I was immediately intrigued. I went out and bought some blue plastic cups and the sticky glue (affiliate links) to apply to the cups. I hacked together a few deer fly traps, using blue cups, dowel rods or sticks, and a few of my less favorite hats.
It worked.
Depending on the day and weather, I filled up the cups with deer flies. From what I understand, there are a finite number of deer flies in any given area, so if I could knock down the population in my yard, I could work in the yard with little interference from deer flies.
I learned that the blue cups with sticky stuff only work if they are moving. You can’t just stick on on a pole and put it in the yard. The cup has to be in motion. You can attach the pole/cup to the front of your tractor, lawnmower, or walk around carrying the pole. Or put a cup on your head.
Deer flies wait for something to fly by them, even though I think they are prowling around the yard. It is the female that bites you. The males eat pollen. You can get some protection by using a DEET based spray, and wearing long sleeve shirt and pants. Deer flies attack on the highest part of one’s body first.
I have read that some people will walk around the yard perimeter several times, pole + blue cup above their head, collect up all the deer flies, and then work in the yard. Sounds good to me.
The second way to get rid of deer flies:
Much simpler. Buy these deer fly patches. Don’t think you can just use that double stick carpet tape in your shop, it won’t work. The tape works by taking advantage of how the deer fly attacks. From up above, usually on a the tallest part of one’s body.
You go out in your yard, you wanna do some work, right? And immediately, you are dive-bombed by deer flies. Me too, we’re in the same boat here, and I keep thinking, “Is there a way to kind of “knock them back, keep them from dive-bombing me, “keep the deer flies at bay?” I have two ideas on how to do this. One is pretty cool, one is store-bought. Well, let’s try these and see what happens, ready? Let’s go.
GardenFork: making things, making food. If I can do it, you can do it. All right, down in the GardenFork research facility, AKA my shop. Don’t look, it’s kind of a mess, but that’s like me, right? Maybe your workshop’s like this too. Deep research, I’ve learned things about deer flies. They’re attracted to the tallest thing around that’s moving. They’re also attracted to different colors, so we want to attract the deer flies, not repel them.
So how do we attract them and keep them to this? This stuff, have you ever used this stuff? It is like the super stickiest thing I have ever dealt with. It’s used for, you put it on tree bark to keep caterpillars from going up into a tree, things like that. We’re gonna use it to stick deer flies to a cup. But our other challenge is, I mean, am I gonna? Well, I could be like that, I guess. Do I have any elastic? But here’s my thought. Hat, cup on hat. All right, how do we get the cup onto here? A little sewing, maybe. Great, elegant, isn’t it?
Oh, there we go. Okay, what’s your secret for threading needles? Ooh, look, I did it, oh my gosh. All right, thread, needle. So my thought here is to sew this onto here. Does that look weird? It does look weird, but they’re deer flies. I mean, do you want to live with deer flies? No, all right. So you want to put this between the two threads you pulled through. I have another idea, do you? It might work. This here, let’s see. Hm, did that work? No. And I got the staple stuck, nice. Oh, that didn’t work. There we go, all right, let’s press on. Right in there. Ooh, did that work?
That did work, except it’s sticking out the side. It’s sticking out the side of the hat. Well, that might work. It’s, uh, kinda centered. A little off, but I’m a little off, too, right? Ooh, I did it, holy cow. All right, step two now. Very important because this will stick to you.
By the way, the second tip is a little simpler. Stick to the end, I’ll share that one with ya, okay?
Application wand, should we call that? Look at that stuff. It doesn’t have to go on super thick because we’re just catching deer flies, right? Uh oh, it broke. One of the staples came loose. My hands are coated, well, the gloves are coated. I just kinda smoked my hat with goopy stuff, so I’m gonna try and maybe I could reattach that with some thread. I don’t know. In and through.
I gotta take off the gloves to do this. I’ve got it through there twice, so I’m gonna loop it around and tie this off for our experiment. Um, yeah, it’s a thing. But there’s already deer fly around me. He’s buzzing around me. Let’s see what happens. They’re buzzing around the camera more, so maybe if I put the camera down lower so they will… How do I know that they’ve stuck on there? Will you tell me? Maybe I should just kinda do some gardening. I could hill the potatoes. What’s it look like? Are there any stuck on there? How do I look?
– Camera Operator: A fly.
– Deer fly, score one for Eric.
– Camera Operator: Just one.
– How do I look?
– Camera Operator: Dashing. You look a little peculiar.
– You could probably keep your neighbors guessing like, maybe thinking that you’re like one of those tin foil hat kind of guys, which I am.
– Camera Operator: Mhm, we don’t have to guess. Yeah, let’s check back in a few minutes.
– Well, I was gonna do some gardening, but I have another idea for a second attractant type cup.
– Camera Operator: On top of that?
– So you don’t have to…
– Camera Operator: Wear it?
– Wear it. They move, they go towards things that are in motion, and supposedly are blue in color. They also attack from behind. They attack from behind to get to your neck.
– Camera Operator: It just flew on there and he is never coming off.
– Oh, there’s one on there?
– Camera Operator: Yeah.
– How cool is that? You just have to have a blue cup on your head.
– Camera Operator: Score two for Eric.
– But, it’s peace of mind. It’s like, I get so tired of being bombarded, you know, when you’re in the garden or wherever. I mean, there’s one flying around you right now and I just get the…
So I’m gonna bring out a second idea and I’m gonna do some gardening and see what works better.
We’re gonna prepare a second cup here. I’ve been thinking about this and I’m like, “Let’s make a video.” I mean, GardenFork’s all about, hey, let’s try this and see what happens, right?
And if we can have a home-made deer fly, not repellent, attractant, actually, to get rid of them, neutralize them, then wouldn’t that be a thing?
I accidentally got some of this on the camera That’s a bad thing. Oh, I still have my blue hat on, don’t I? Yeah, very complimentary there.
Next, dowel rod. This centered in there, hold on. There you go. Yeah, tip number one, don’t wear your blue cap hat inside. We’re being dive-bombed. I have my dowel stick here. Deer flies are attracted to things that move and are tall.
Not yet. You know, this morning, there were tons of them when we walked the dogs in the woods. Should I go in the woods?
We got one! Maybe if you had this on a spring and it could kinda jiggle in the wind and that would attract, because they’re attracted by the motion.
At my friend’s house. I want to show you his blue cap results, and at the end here, the simpler solution. I love the blue cap and the Tangletrap stuff. Tangle stick stuff. Deer flies are already around me here. That is amazing, isn’t it? Look how many are on there, and his application was much better. Uh oh, I’ve been caught. So I have the tub, like the margarine tub, of sticky stuff. This is the rubber cement can version of PVC glue, and I’ll link below to this stuff, but this works.
So a little simpler than the hat and the blue cone, wait for it, is the tape. This is a pre-made piece of double-stick tape. Carpet tape won’t work, by the way. Goes on the back of your hat and this works. Boom, they land on the back of your head, done. You can garden, you can do whatever you want. I’ll link below to the information for that tape. Meanwhile, let’s continue our time together here. Right here should be another video. Eric’s world: cooking, gardening, DIY. You and I, together, right here.
I talk with Rick about how to stain wood, and his experience staining wood doors. We walk through preparing the wood, why pre stain conditioner is important, choosing the right stain, and how to apply polyurethane. Rick tell us all about it and then I add in some comments and suggestions when using wood stain.
Eric: Hey real quick before we start the show, I just wanted to do a little shout out to garden for scientists. Tony. Um, he had a brain tumor and he posted a pretty amazing little video clip of while these staples in his head. I’m like, I want boy and I think, um, it stuff like that just kinda all of a sudden it makes you realize that if you can get up and walk and talk that the day’s pretty good, you know? So, uh, we are thinking about you my friend and um, maybe you could save some staples for us. All right, so Salem Tony is in the garden fork discussion group on Facebook a lot and he was one of those guys that he was just on the show talking about chemicals. Not all chemicals are bad, which I agree with. All right, here we go. Ready my friend. I am ready.
Eric: hey there. Thanks for downloading the show. This is garden fork radio. My name is Eric. I host this DIY eclectic kind of podcast with my cool friends. I also have a youtube channel. Similar, hey, let’s try this and see what happens kind of things. Today we’re going to talk about staining wood with my good friend Rick Kennerley. Hello Sir. Hey, how are you my friend? I’m good. We don’t have the hurricane. Do you have the hurricane and the hurricane is along the Gulf, right?
Rick: Well it’s, it’s already blown inland. Uh, and so, um, I think the inner center part of the country is getting kind of a drenched, but, um, I hadn’t had it, I don’t think it’s got a hook over this direction. So, uh, we’re doing pretty good. Just a little thunderstorm the area. Beulah, listen closely. You’ll be able to hear it rumble every now and then.
Eric: I closed the door so you don’t hear the air conditioner banging away in the other room. So,
Rick: oh,
Eric: so long story short, quite awhile ago, um, when I was renovating the house I live in now, I had to change out some doors. There were some French doors that opened up into our bedroom and we wanted them to be solid wood doors and it was quite a drama to figure out how to get some doors that would fit. Cause there it’s a brown stone and the doors were oversized. We finally found out what to do. But I got these raw pine panel doors and I had this stain them in polyurethane. And I thought, well I’ll make a video, two videos about this, right. Get yourself a twofer. And those two videos of some of those popular videos, other recent ones I’ve done, we’re constantly, people are writing comments about it. And then you, um, thought you’d stained some doors.
Rick: Yeah. Um, one I want to really thank you for those two videos. They helped me so much in getting prepared and knowing what to buy and, and uh, the importance of reading the label because I did the same thing you did. And one of the, I think your staining video, I, uh, had two cans in my hand. One was a, uh, a stain and the other was a polyurethane. And when I was reading the back of the cans, which I learned from the video, I realized they were an incompatible. And so, you know, I mean you got to really pay attention to this stuff because a mistake can, it’s, it’s painful, uh, mean re sanding. Um, you know, recovery is a, is difficult to get back to the, a clean piece of wood. And so I really appreciate your, uh, your uh, Yo, setting those up for me.
Rick: Thank you. You can be on the show again. Thank you. Okay, well thank you. I’ve earned my key. So let’s back wind. Let’s hit the rewind button on the VHS recorder. Um, cause this was all sparked by, well Wallace of the weekend homestead cause it is. Hey had a barn door hinge kind of door and you know, he uh, he’s renovating this uh, old, uh, camp ground that has some buildings. One, I think our was that in his house he did this house. It might have been at his house. He does so much work. It’s hard to keep up with him. He makes me tired just watching him. But, uh, yeah, he did that. And I looked at and I said, that’s really cool. And so I, you know, I emailed will and got some tips about how that process works because it’s not as, it’s straightforward, but it’s not as straightforward as you might think about basically like a pipe overhead with these roller wheels that hold a door from the top and your role at open and you roll it closed, right.
Rick: And his was actually a kind of a, a bar instead of a pipe. And that’s the real difference between ours. The bar has fixed stanchions where you mount, it mounts it, you have to mount at every so often along the wall, every so many feet or so many inches. And to do that, most of the time you’ve got to have a header board of a board you put up there, uh, that you tie into the, uh, the studs cause the likelihood of hitting a stud with the, even a few of those fixed, uh, stanchions on the, on the back of his rail are very, very small. Now when you have the bar, or at least the system that I have, the stanchions are independent, they, they, they’re loose. And so you can put them where you need them and it’s really easy just to, um, uh, one, put the hardware on top of your door and fit it first and then pull it and y’all stand it up and lift it up about half an edge off the floor and mark exactly where that is.
Rick: So you’ll know where to put the, uh, the stanchion. Did you use a stud finder or, oh yeah, I have to use a stud finder, a yell to find the studs and ag. I locked. Um, we had two of these doors and I locked in almost every stud along there. I missed, uh, a one and I just put, I used a wall anchor in there because all I was going to do is support it so that wouldn’t sag. All the weight was hanging from the, uh, the bar. So that worked out really well. The tricky part about this was, um, actually staining and, um, and prepping the doors and that raw wood when you bought them. Yeah. And they were terribly expensive. Um, it’s, um, pine, uh, the first one and with a glass insert of specialty glass insert. The pattern is called rain, which was,
Eric: okay, we’re going to, we’ll post these pictures on the, uh, the website for, and you’re also in the garden fork discussion group,
Rick: right. And uh, yeah, it looks like rain and it’s, um, it’s nice. In fact, it is raining outside right now. All that thunder is paying off so it provides light but gives you privacy. Exactly. And A, when they’re lit from the back, they’re quite attractive. And um, yeah, we just had to do something. Those little bi-fold doors that came with the house, this is a very old house. Um, we’re just such a problem and they never worked right in the, uh, you know, anything that’s caddy levered like that, uh, hooked on one side at the top and the bottom. And then the way to supported out over something is going to be a problematic. And so we just wanted to get rid of them and do something a little nicer. And the, so that’s the solution that we came up with.
Eric: Yeah, it’s interesting. Um, I, I’ve never seen the kind of roller thing that is, it’s a stainless steel roller pipe cause they’re usually, they’re all painted black to look like, you know, a rod iron kind of black smithy thing. So yeah, that there’s other, where did you buy those?
Rick: You know, uh, I hate to say this. I did my very best to buy from, uh, uh, you know, independent outfits online that, you know, the restoration hardware, you know, places like that. And in the end, and I couldn’t find what I wanted because, uh, the pipe is kept on either end and by wanting it to be continuous so the doors could roll the full length of the pipe. And so there was a kit sold on Amazon that had, uh, two Tim foot poles or pipes and, uh, uh, center plug, uh, that you took the caps out instead the sitter plug to tie them together. And so I found that kit and the only place I could find it after weeks of shopping was at Amazon. And uh, he came in at about 160 for the entire, uh, entire set. One Bat.
Eric: Okay. So let’s walk through you. So you’ve got rob pine doors, you’re going to have to tape off the glass. But first, first kind of red flag is you’re going to want to stain pine and
Rick: pine is a soft wood and those stains are built, are designed for hardwoods. So Lemon, did you make them miss the big mistake everyone does or did you learn from the video? Uh, yes to both questions. I um, I went ahead and re sanded the doors even when they came in really nicely sanded. I would make sure if there was any wax or, or anything on there that I would got it off. And then I pretreated uh, the soft pine and um, with a priest and conditioner. Yeah, exactly. It’s a pristine conditioner and you just brush it on or are put it on with the rag, uh, let it dry about maybe 15, 20 minutes. And then within two hours of putting that on, do you have to stay? Yes. And uh, my first attempt at staining for some reason, uh, she who must be obeyed, insisted that I use a brush, um, against my better judgment.
Rick: And I used a brush, but we brought the doors inside the house because we wanted them to dry this century. Yeah. And, um, so we had them set up in the sun room, a little bit of a fan of going over the top of them using a low voc, volatile organic compound, uh, both stain and a polyurethane. So I didn’t smell too bad. We weren’t frying our Brighton sales then I put it on, but it dried so quickly behind me that I didn’t get a chance to rub it off. Yes. And that was my first big mistake. And um, I found out that is helpful is your video is the best video to go see every time is how to fix things. You know, how to fix a bad stain job, how to fix that. And, and you, you are not necessarily a video, just a list and you’ll see these discussions.
Rick: And there’ll be eight or 10 people have really messed up their stain jobs. If you get this good information about what to do, it turns out the really simple thing to do, which I had, I guess I just don’t have enough experience to even think about it, is just to put more stain on those spots. The mineral spirits that are in the stain that are, will evaporate off also a soften and will allow you to work that old state again and wipe it off. And so that, that was my first big screw up with this. And so I went to using a rag after that to work the staying in and doing small sections only, maybe a, uh, maybe two foot at a time. Uh, rub it and let it us or wipe it off. Move on to the next section section. And you can kind of do some blending at that spot where you break and the prize that in the end product, if you’re consistent, you can’t see where you start.
Rick: Stopped and started actually, right. And then, uh, yeah, we put on um, uh, two rounds of stain, uh, on all sides of the doors. So that was taking some time. Uh, one of the things that worked out really well for me is because we had a glass insert, we could set the uh, the doors on a table and set tuna cans underneath the glass where they touch the glass between glass and the door. And so we could flip the um, the doors and do them pretty quickly without having to wait for them to drive for four. You turn it over having all those Saul horse problems that you sometimes have when you stained. When I’m doing a door like that, I will drill in the top and the bottom, some pretty substantial drywall screws, like a three inch, two in the top, two in the bottom.
Rick: And then you and another person can flip the door like that. So you’re not touching the door. You’ve got these screws in the top and bottom and you can move it that way. That is brilliant. Why? Why didn’t you, but why didn’t you put that in the video? Video number three, although we were both crazy in the same way, uh, because mine was more Rube Goldberg, I had thought about suspending, um, uh, two pieces of wire rope from the ceiling and putting the bolts in the center of the door so I could kind of spin them as I am.
Eric: [inaudible] would you like to have more Eric in your ears? Maybe not. Um, just to kind of a little boost for the garden fork patrons. They’re people that support me and garden fork on a monthly basis. It’s Kinda like PBS, uh, you know, are you, he basically pumped him a couple bucks a month, $3 a month as a suggested starting point for garden fork. That’s like a cup of coffee a month. What I offer in return for that is some behind the scenes of Eric’s world using the Patrion app, which is the program we use for this program. Does that make sense? Anyway, I use a website called Patriot to collect the supporters contributions. They have a pretty robust app and also email system. So throughout the month I’ll post exclusive. That sounds kind of hokey. Basically I take pictures that I don’t share on Instagram and I’m just like, hey guys, this is what I’m up to today.
Eric: And kind of a sharing a little bit more of Eric’s world. I’m a little reluctant sometimes I just got a little creaked out basically by posting too much stuff on the Internet, and this is maybe a little more secure, but anyway, you either get it as an email or if you load the Patriot app onto your, which is a really cool app. I think it’s not invasive at all. You can look at these pictures and posts and stuff. Plus just recently I’ve added a kind of behind the scenes podcast extra, so as a second podcast, probably three times a week, three times a month. Now it’s me Yakking into the recorder or Yak and the newer microphone, the last one, I walked around the yard and talked and people seem to like that first. I just want to also say that was what, that wasn’t the first thing I said, but anyway, we do have some new supporters. I want to thank Nicole owl and a gentleman who is calling himself stuck in Japan and he’s invited me to come to Japan, which is very tempting because I’m intrigued by the ramen shops there. Anyway, more information about becoming a regular contributor to garden fork is in the show notes. You just click on the Patriot and link or patrion.com/garden park. Thank you.
Eric: So I have a couple thoughts here for people. If you’re thinking about staining wood, first of all, get some similar wood to your project, your scrap wood and practice. Um, take, do tests. I cause I had to match existing stained wood when I put these doors up. So I would lay down stain and I would first with a Sharpie, I would create rectangles on the piece of scrap wood. It was pine actually and that I would do the pretreatment and then I’d write five minutes, 10 minutes, 15 minutes and I would lay down the stain and I’d rub the stain at five minutes, rub it a 10 and rub it at 15 cause you get an idea of how dark it’ll go. And also you get to practice applying stain that way as well. So I would not start at the beginning and all of a sudden y’all just going to stay in this would, you know, buy a piece of scrap and work on that first.
Rick: What did you put that in the video? Okay, well let’s do the second thing. We’ll have a transfer
Eric: scripted this video of this talk and I will just make a video. So,
Rick: well, you know, it, it would actually be helpful to, um, you know, because a lot of us just don’t have your experience in working with this stuff and we don’t think about them, you know, all the permutations of what to go wrong, how to figure out things. Cause that was, you know, how long do you leave staying on? And uh, that was another discussion that went on twin. She and who must be obeyed myself. And uh, I was like, Yo, let’s leave it on just your five minutes and you know, cause it’s easy to restate and make it darker. Right. And, um, and she said she insisted that the cans said 15 minutes and that didn’t take into account that were inside an air conditioned building with the fan going, you have ceiling fans blowing down on the, on your work. And of course she won.
Eric: So some background, she is a registered nurse. So
Rick: there are products
Eric: cause for everything. And she was a brilliant person for even considering being married to you.
Rick: You, you know, uh, you know, she gets points, just a humanitarian points for marrying and marrying the handicapped. I mean, you know, so let’s,
Eric: okay, so another thing people need to realize is you have to let stain dry between coats, read the can, the can, the can spells out the truth, you know, and then when you’re going to polyurethane, you have to let it dry again before you apply. So this is like a, it can be a two or three day project. It’s, you’re not going to get this all done in one day.
Rick: Yeah. And, uh, we, it’s lucky that we, we were doing the work ourselves so we didn’t have the pressure of uh, somebody coming in and we’re trying to, uh, finish the doors, the staining and whatnot, and they’re going to mount the hardware. Yeah. But, uh, you know, if, if that happens to you, uh, just know that you can unmount that door and take it back out as soon as the guy finishes with it, take it back out to your workshop and continue your staying in polyurethane project. Yes, it’s on hinges. You can just pull out the pins and, right. So there, there are ways around almost every obstacle. So should we
Eric: move on onto the polyurethane part of the day?
Rick: Let me think. Oh No. Despite my very best efforts and using the, um, the pretreatment of, for the stain, I don’t know how it happened, but one door on one side came out looking like an Appaloosa horse. Yes. I had the same thing. Yeah, I saw that in your video and I have no idea why that had happened. And so you, you learn to just accept that despite your best efforts. Sometimes something is going to happen. And that required me to take the, uh, uh, door outside, uh, set up in the shade and uh, use the sand dirt and sand it down, uh, get all that stain off and whatever was underneath it. And I have no idea what that was underneath it.
Eric: Interesting comment on the youtube video that, that happened on. A gentleman said that more than likely at the warehouse, some kind of liquid was splashed on the door while it was being stored.
Rick: Oh, maybe.
Eric: Maybe when they were loading it, it was winter and it’s salt water or some kind of fluid off of a forklift truck or something. But um, but yeah, I had to send the whole thing down. So that was very interesting that it was basically somewhere in the process, the manufacturing process, something got spilled on there. Spray sprayed on there.
Rick: Yeah. And the other thing that kind of annoyed me is I had already sanded it because, you know, I started off, I did a pre sand just just to be sure I would catch anything like that and I still got caught out.
Eric: Yeah. It’s weird cause it goes on and then all of a sudden, an hour later you’re like, what is that and why? What did I do wrong? You know,
Rick: and you know,
Eric: the other thing to realize though, when these kinds of things happen because of the texture of the glass, it’s only on one side. And we wanted the texture on the outside. It did occur to me that I, it wasn’t as bad as I thought because we wanted the texture of the glass on the outside. That particular side was on the inside the backside of the door and it would be against the wall and no one would actually see it very much. And so, uh, it’s Kinda like a Christmas tree, you know, you turn the bad bad side to the wall and you know, and that, so that worked out for me, but I went ahead and reset re stained it and sanded it and restate it just to, uh, to catch up cause I couldn’t stand up a project that wasn’t nearly perfect. Right. Yeah. So then how did you set about the polyurethane,
Rick: polyurethane? Not Ones I stayed in the same family I used. Um, Minwax and so I wanted to use their Minwax, um, poly urethane smart. And this is where I actually screwed up the first time though because I had that can, that, uh, they, there are some varieties of Minwax poly that do not mix with the variety, uh, another variety of stains in their, in their system. You’ve got to read them. But I, I got the right one. It was a low volatile organic compound and that stuff is dangerous. Uh, high BLCs. Um, I mean they literally, they say drinking kills brain cells. High Voc really kills brain cells. I went to school with a guy, uh, who was supposedly pretty bright at one time and he worked in the, uh, a university press, uh, printing office and, uh, he was cleaning, uh, those machines every day with a high voc and not wearing a respirator or gloves. And, uh, he ended up, uh, mentally in a very bad place.
Eric: You can get an organic vapor mass, very, I mean, they’re 34, maybe 40 bucks at so worth it.
Rick: Yeah. Yeah. And they’re worth it just for the peace of mind, even if you’re using a low voc a and I bought one and used it. Yeah. So also
Eric: Kinda real quick there, there are, there are water-based polyurethanes, there’s oil based poly or things. And then there are these blended ones as well. And I almost got caught up in this cause the stain I was using, I’ve learned I had to buy the special kind of Minwax poly that as actually kind of hard to find, but I found it and used it, but just read, read the cans because even a ma, even in a same manufacturer, they’re not all compatible.
Rick: Right. And, uh, you know, they, they have, you know, oil, both stains, water-based stains and then they had the new gel stains. And, and that the, I think the real in compatibility happens over there on that gel end. But, um, they’re, they’re just all kinds of little things that you have to keep track of.
Eric: I’ve never had a good experience with the gel stains, but that’s, it’s, I haven’t done it a lot either. So. Yeah.
Rick: And so the, the poly went fine. Uh, getting it on, uh, getting it stayed. Just take your time, put it on thin and uh, and you know, pay attention to what you’re doing. Find some reef, something that reflects, you know, like light from a window and get down low and see if there are any voids or hollows and be sure and check for holidays. You know, little drips down the side that pull up on the backside of your, you’re a door. Oops. Yeah, I had a few of those first time
Eric: you can use a clamp light for that as well. If you don’t have a a that way you can shot, you can move the clamp light around or have your friend move the clamp light around at a really low angle to the door and you can look right across the whole thing.
Rick: Yeah, I actually was using my, um, my sitting bucket, uh, my, um, orange store bucket that has lid that I, I, that I use for gardening, but I actually sat on that so I’d be at a really low angle so I could, uh, see, uh, any holidays missed spots, uh, cause you really want to do a very fine job, but you won’t do a very thin job, uh, too much. Um, too much. Polly is not right.
Eric: Your friend, when you’re mixing poly or thing, do not shake it. You went to stir it because if you shake it, you’ll introduce air bubbles into it, which make for a very poor finish.
Rick: Yeah. Uh, particularly if you’re not, if it’s your final finish, uh, you can correct for that with, um, a little bit of a steel wool datum. Tell me, do you still wall or do you, uh, sand between your, your finishes?
Eric: I use the steel wool. Uh, I don’t understand how it works. It seems counterintuitive that you’re sanding the polyurethane, the smooth, polyurethane, and you just put down, but it makes a huge difference. You’re, you’re knocking down the little high points. You’re giving a tooth to the new layer. And I, I use Pollio steel will for od steel, will very fine steel. And then I go over with a tack cloth, which is cheese cloth that has, I think bees wax in it. And that lifts up all the, uh, the debris that you’ve, you’ve scuffed up basically. Right.
Rick: And take your time between coats and really work the, uh, the, uh, tack rag because, uh, that’s where you’ll screw up your finish. You’ll get a little sand or a little debris from the, um, the uh, steel wool and next thing you know, you’ve sealed that in under the code.
Eric: Yeah. And then the more time you take the better at it takes a while for the polyurethane to cure each time. Some of them say you can recoat in an hour. It just depends, you know, if all else fails, read directions. So yeah, I was,
Rick: I had enough time that I could recode, uh, just once a day and get a nice hard finish every day. And I think that really helped to, um, to make it come out looking good.
Eric: They look great. Except is that a sat and finish or sat in polyurethane? It’s a satin finish. Yeah. I think that looks better. My floors in my brownstone were polyurethane with this super shiny, super high gloss and it was horrible. But luckily we have Labradors who knocked that finish down.
Rick: Just scoped it right up.
Eric: Yeah, that and my, my robot vacuum.
Rick: So, but you know, it, it came out all right. But it was a frustrating and I spent one really sleepless night just, um, you know, when that Appaloosa finish came out, uh, just, you know, cursing everybody and everything,
Eric: right. Cause they’re expensive doors and you’re like, what the h did I do. You know? And it’s something that you have to realize that not everything is within your control. So.
Rick: Oh, well one thing we do need to talk about, first of all, this was not the first set of doors. This project has been hanging fire since, um, March. Uh, we are the custom ordered doors. We got them from the orange store and when they arrived, uh, the manufacturer had put the wrong glass inside and so they had to reorder and then they reordered and they showed up and some reason they were pallet mounted and just raw together and had pallet straps, uh, where they had crushed the wood Time-Warner. Well now on the corners, cross middle of the door. And so I was thinking, well, do I send it back and you know, refuse it in order another set and you’d think, well, they’ll find a new way to screw those up. Yeah. And so I went ahead and took them cause they were at least pretty close to what we wanted. And I did spend a lot of time, um, uh, sanding and filling. Uh, and I should’ve called you and asked, what kind of wood filler do you use or, cause, I mean there’s the micro bubbles. Um, you know, it’s almost like a styrofoam that you can put in there. And then there’s a standard wood filler, which I have no idea what that stuff is. Um,
Eric: sawdust and a and a sire and a glue, a staying compliant glue basically.
Rick: Yeah. And frankly those, those spots did not a stain up as well as I’d hoped now. But I, you know, I worked with what I had and I’m a, it’s like you told me and this is the best advice you ever gave me. You know, in two weeks you’ll know
Eric: exactly because you know you’re obsessing about this and when you get the doors up there’s going to be other stuff around the doors and your eyes are looking all over the place, not at the lower left corner where that little ding is in the door. Yeah, exactly. I would paint so many rooms when I had my painting, contracting business and the client would obsess over what kind of color and I’d be like, look, why don’t you put all your junk in this room? And it was true and it would really be kind of crushing because we would build, we’d paint these beautiful rooms and then I’d maybe have to come back a week later to get paid or something or hang something for them. And they put all this junk in the room. And I’m like, what did you do to my room?
Rick: You know? Well, you know, I hit, I knew that lesson is just, you had to remind me because, uh, I painted our front door and, um, it was a two tone paint, a kind of a beige and a black trim. And there were spots on there that it was so hot and I was so tired. I said, I’m just gonna have to come back out and finish this and you know, take it off and Redo it again. And I talked myself out of it and a week later, uh, I, I’d forgotten all about that little flaw down that, that little corner over there. Yeah. So
Eric: it happens. I do want to circle back to the, uh, on Minwax, I think it’s called pre stained conditioner. Cause my father in law, um, got me to stay in, he’s a cabinet maker. He’s very talented. He’s like, Oh, you can do all the staining. And He’s, he gave me this, can a priest and condition. I’m like, I don’t need this. This is, you know, we don’t, you know, and you really do on softwoods like pine, you really do need to use that because pine, the heartwood and the Sapwood, the different pieces of the wood absorb stain radically differently and the priests and conditioners smoothed that out. So do not skip that step because you will learn from me.
Rick: Well you know in it like say you just have to take your time and really do every step. There are no short cups in a in doing that.
Eric: Oh I’ve gotta be the title of the show. There are north shore cuts and staining wood.
Rick: Well I think
Eric: Do you shop on Amazon? I shop locally and also on Amazon and other line line stores. If I need something very specific like seat covers for the new used car we just bought, I will go online and sometimes use Amazon and garden fork happens to have a dedicated shopping page on the Amazon site now, which is very cool. It is an affiliate link page. We do get a finder’s fee for anything that you buy when you start shopping from that page. But I list their interesting items that I think are worthy of the garden. For DIY person. It’s amazon.com/shop/garden fork. If you would start your Amazon shopping experience no matter what you’re looking for on Amazon, started at garden fork and that would be great. It’s amazon.com/shop/garden fork. That’s amazon.com/shop/garden
OK, total left turn here. I would like to listen to more podcasts and I’d actually, I’m interested in interview podcasts, but a lot of the interview podcasts is for everyone, not just rec, are always about like movie stars. And I would rather they be about interesting people that aren’t movie stars.
Rick: Oh, well then you’re just listening to the wrong podcast. Okay. First is longform podcast. That’s what it’s called. Yeah. Long form podcast. And they interview some of the most interesting people, uh, writers, authors, business people, uh, academics, thinkers, uh, all kinds of things. It is wonderful
Eric: because the iTunes, you know, you go to iTunes podcast, their suggestion machine has always taught, you know, this, this movie star or this actor has a new podcast and they’re just interviewing other actors about act, how they were acting in La. And I’m like [inaudible]
Rick: no, yeah, yeah, I understand. I understand your appeal, your pain. The other is aspen ideas to go. Huh. And this is a s, p. E n. It’s after the Aspen festival and Aspen, Colorado. And it’s, it’s kind of like Ted talks, but their, uh, their audio and the [inaudible] yeah. And yeah, they’re, they’re a little less, uh, you know, sometimes I love, I love Ted talks when they began, but you know, uh, people have started parodying them because they were just so set and yell you where you take your fingers and all the, all the little things you do that just, it was almost like a formula to habitat.
Eric: No, I thought about doing a garden fork version of the Ted talk about something really just
Rick: mundane or just off the freaking law. Now, here’s one that I absolutely adore and I think you will too. It’s cool. It’s from the BBC. It’s 30 animals that made us smarter. Oh. And it’s about Geckos. How GIC, it’s really about biomimicry, how we’re creating things. Um, new things for science and human beings, uh, by mimicking nature, um, Geckos and adhesive because of the way they are, they can climb anything with pads that are not sticky. They’re actually hairy. And so it’s counterintuitive. Spiders and robots, they’re making rescue robots now that work like spiders do, you know, spiders do not have muscles in their legs. They work on hydraulics. They increase blood pressure to extend. That’s when you see a dead spider and it’s all curled up. A, that’s just natural state. It has blood pressure, increases the blood pressure to extend that leg and then releases the pressure to close it.
Rick: And they’re creating a robots that work like that, that can run as fast as a spider, a maneuver like spider climb walls. Uh, and the, the idea, the idea of the robot is, um, that it would be a rescue robot going into rubble and debris looking for survivors taking in microphones, that kind of thing. Sharks, sharks have, particularly with sharks, a podcast or this, this thing. No, no, no, no. I’m just fascinated by the story. I can tell my last one now. I’ll pass. I’ll shut up. But the, the shark and the Glock of the shark particularly has a skin that bacteria will not adhere to because of the way it’s constructed and their bio using that as biomimicry in hospitals now on surfaces that people touch because bacteria will not adhere and grow to that. Wow. And so it’s, it’s just fascinating, uh, stories about, um, you know, things around us in the world. It also makes you wonder, you know, if we’re losing all these species, how many, uh, um, you know, really great ideas and technologies are going to go with them because we didn’t realize soon enough, um, you know, through extinction, uh, what a wonder some of these, uh, um, animals have solved what problems they’d solved.
Eric: Wow. Well, thank you. All right, I will link, I will put those names in the podcast notes, um, which you can, by the way, you can see, depending on which podcast app you’re using, if you just scroll up from the little player, usually like little garden for gritty icon and you can scroll up. Just thumb up, swipe up I guess on your phone. And at least on the iTunes pod, the podcast app for the app, iPhones, all the texts and informational texts blow with clickable links. One of those clickable links is to sign up for my weekly email, which you are missing out on. So I’m not missing out on it. You can also just go to our website and it should be on every page, but if, if not, garden fork.tv/news, the link in the show notes here.
Rick: One more podcast and I’ll let you go. Okay, one more. I promise. It’s a science rules with Bill Nye.
Eric: Oh, I just saw a image for that
Rick: and he does remarkable interviews in the realm of science about, uh, all the things you’re interested in, space launches and uh, solar sales. Um, you know, search for extra terrestrial life, uh, just everything. Space-Related and, and he, he’s, you know, he’s moving into more regular sites or other science issues as well. But it’s, it’s just, it’s wonderful to hear, you know, interesting, positive, uh, people that are getting us out of our every everyday we grubby little existences and, and a political turmoil to, uh, to listen to some of this stuff and uh, get away from that and kind of lift your eyes up a little bit.
Eric: All right. Yeah, I actually saw a, uh, a documentary about him and he was, it was very good. He was a debating several times. Um, this gentleman who, ah, denies, uh, evolution and I don’t, I don’t know if he built the arc that’s, um, it’s, I think it’s in the middle of the country, but he visited that, uh, that arch they built with the, uh, evolution denier and they had kind of debate in the Ark itself. And I think, I think in one of the stalls when the animal stalls was like a terra ductal or something, um, a prehistoric dinosaur like animal and Bill Nye is like, how can you have a dinosaur in your art? Because when Noah was alive, they didn’t have this dinosaur. And it was interesting. He’s fighting the good fight. So I got them a lot.
Rick: He’s also president of the planetary society. Uh, did you know that the, a planetary society launched a yacht, essentially a cube sat, yeah. That, that has a solar sail. So they were actually, you know, these are amateur astronomers or at least the private sector going out there and doing these proof of concept things to, uh, to prove they actually work. And that’s very much a bootstrapped organization. So very much, very much
Eric: so. Along those same lines, uh, I don’t know if you’ve seen, um, the new PBS series called chasing the moon. Not yet. I plan to amazing isn’t, it’s, no, there are no talking heads in it. And uh, I’d heard that. I’m a, I’m a PBS donor, I think. I think I gave him like $6 a month and I get what’s called their passport to their back catalog. So it already broadcasting will rebroadcast, I think you can watch it online for maybe the next month. But if you become a PBS passport supporter, you get their whole back catalog you can watch on their website or through your apple TV box. And it’s pretty amazing. But I’m a big mean Moon Geek. Me and Jimmy, my executive producer had been talking about, we’re trying to get Mike from space rocket history on, but go check that out. Chasing the moon. It’s great cause they’re interviewing people who aren’t, they don’t interview Neil Armstrong, they’re interviewing other people. Some of them you know, behind this. A lot of behind the scenes people. I’m one of the few NASA engineers who was a woman, uh, interviewed in there. I know it’s just really good and it’s all, um, there’s voice over interviews and then showing, uh, footage during the NASA moon rocket. I’m mumbling and during the sixth. So it’s not a lot of this Ken Burns talking head stuff.
Rick: Right. And I heard a podcast, I think it was a long form podcast with the, uh, director of the producer events series. And he said they did that intentionally. They did not want to distract from the visual images and they went way beyond the NASA catalog, which is what most people use for the, for the films. They were going everywhere in the world, trying to find more footage, more people to talk to. And so it’s not just a rehash of things you probably see in a dozen times from NASA. This is all, well not all but a lot new material, but they didn’t want to distract from the visual, so they just had the audio, uh, cover. Uh, and it, it worked out beautifully. I think. Uh, I, I have seen trailers that I haven’t seen the actual thing waiting for a good moment. Like when I finished my stations.
Eric: Well, speaking of another beautiful moment, uh, this is the time of the show where we go and look and see if we had any new reviews on iTunes.
Rick: Well, I hope so. You know Eric is actually crushed if there are no reviews due to do, and if you love Eric, you go and do a review.
Eric: One, two, three, four, five, six, six new ones. That’s great. Are you there? Sounds like there’s wind blowing over your microphone. There’s thunder outside. Oh, okay. First one deep dive on being handy. I grew up as a kid, fascinated with the foxfire books. Hand Up. Me Too. Me Too. And Aaron’s home spun advice and how tos reminds me of those books. Youtube channels also must great info and fun. Listened to five stars. Thank you, Bill from [inaudible] master 13 2019 update. You can update your review. By the way, Eric has really dedicated himself to improving the podcast and his videos. What’s he mean by that? What was that in all caps taking classes, upgraded equipment, and an elevated confidence or elevated confidence. Yeah, a must listen for the DIY enthusiast. Eric and his friends host an eclectic DIY homesteading, gardening, cooking, and much more podcasts. Eric’s a long time video blogger and his extended into this podcast.
Eric: He splits his time between Brooklyn and his cabin in the woods. Each episode is a fun mix of topics on whatever’s holding their interest at the moment. Exactly. Each episode feels like a visit with good friends who have lots of practical advice. I credit Eric with giving a city boy like me the courage to buy and fix up a cabin in the woods. Holy Cow. Wow. You’re, you’re the next Henry David Thoreau should get an admission on these mortgages. You will learn. You will laugh and you will be inspired to try something new. Oh, how cool is that? Yeah. Let’s wonderful. Thank you for that. A fidget and smudge FiveStars really enjoyed listening to the podcasts during the day. While I work. There’s a lot of good information to learn and Eric and his crew keep me laughing. Keep up the good work. Also love the videos. Yay.
Eric: Thank you. I think it was for Tina. A Basel Worth Group says DIY at its best. FiveStars Eric and his slash friends will educate you on everything from DIY as well as humor. Interesting facts and Labradors to Eric’s approach of if I can do it, you can do it and done is better than perfect. We’ll encourage you to tackle those projects. Wow. My mantras are coming through. That’s great. Yeah, that’s wonderful. A fun and educational five stars by Tins, a, t, m, Z, Z. A. I’ve yet to come away without learning something new. Listening to Eric and his friends is like sitting around with friends and having a wonderful conversation. That’s exactly what I want this to be like. It’s fun and always. I look forward to the next show. It makes my 3:00 AM commute to work more enjoyable. Who boy allege painful? The show is a great addition to the youtube channel.
Eric: Keep up the great work. My friends from Tony. Thank you, Tony. Tony. That is a great pod podcast by Jennifer, Ohio. I’ve been listening for years. This podcast is so multifaceted by always interesting and educational. Thank you, Eric and Rick. My favorite coat karst. Oh, who was that again? Jennifer, Ohio. Jennifer. Well thank you. Jennifer will be over there and it’s Prius very quickly. I you some pancakes. I’ll even drive the Prius prime instead of the Prius primitive. All right, so we, oh wow. This is a long show, but you should feel good. You should feel loved. I do you feel, are you feeling love? I do. I feel I feel better than when I did walking out of my therapist’s office this morning. So, which we’re going to talk about [inaudible] we reckon I or threatening to talk about it. So we needed to talk about therapy, so, yeah. Alright. Okay. Thank you for taking time, sir. Thank you for telling your epic story. Yeah, it was kind of epic on Felica was a dominating the narrative, but again, it was my narrative so you couldn’t tell it for me. I thought you were bagging the microphone. I didn’t realize it was thunder art or one go out and make it a great day. Radio at Garden Fork Dot TBR. I was wanting to hear from you guys. Thank you. Talk to you later, my friend. Bye Bye.
Eric: Garden fork radio. His executive producer is Jimmy Gootz of hollow books.com and our music is licensed from unique tracks
On the podcast today I am talking with Serena Appiah who does DIY furniture refinishing on her YouTube channel and website. We had an eclectic conversation about how to refinish furniture using liming wax, as well as how to upcycle furniture from the thrift store.
Serena: Hey Eric, what’s going on? Thank you for having me.
Eric: I almost didn’t get here in time. I was literally in the car and I stopped at the my friends vegetable stand and I talked for 20 minutes and then I realized I had a phone call to me.
Serena: Well, I was literally in bed with my hair up and looking like craziness and I thought, I’ve got to get up and shower and I’m going to talk to Eric soon. I’m glad because I, you know, I had a super busy week. There’ve been so many projects going on and they’re all converging at one time and sometimes, you know, you forget to shower. I don’t know that happens to you, but this week it happened to me twice. My family was not very happy.
Eric: Yeah. people in the podcast know my showering habits already and it’s usually just amounts to my better half saying, uh, you need to take a shower.
Serena: You’re like, okay, okay.
Eric: Oh, I have this great idea! Laura Kampf has a youtube channel and she made this wood fired water heater for her outdoor shower and wow. It Reignited an idea for me for a solar heated water for an outdoor shower.
Serena: Oh my. Okay. I think you might have just given me my project for next spring.
Eric: I’m going to sketch it out. I’ll send you the sketch I’m going to do.
Serena: Yeah, please do. That sounds so much. That sounds so much fun.
Eric: So in the intro I told everyone that you have a youtube channel and that we met at the Troy-Bilt meetup in Cleveland, which was a lot of fun. Every year there I kind of click with someone and you just sat down and started talking to me and I’m like, all right, here we go.
Serena: You know what? That event was so much fun. This was for, Troy-Bilt and you know, I really didn’t know what to expect. I did know two of the influencers who were going and so I knew there would be some people there that I didn’t know and I was really happy to meet you. And I, and I was telling you that, that you have this way about you of just making everybody around you feel comfortable. And I don’t know if it’s what you say or how you say it, but you are just full of jokes all the time. And I like this guy. And so then when I actually had a chance to watch GardenFork, I thought, wow, you know, this, I, you know, even after a couple of minutes I wasn’t bored. I didn’t turn away. Like you kept my interest throughout the entire video and you sort of told a story and I’m getting this, this firsthand, look at this thing that you’re doing, this garden. Uh, was it a planter that you did from a tree stump? Yeah. And it was just, it was just such a fun video to watch. And I was like, wow. You know, I really like your storytelling.
Eric: Thank you. You can be on the podcast again now.
Serena: Thank you. I’ll check that off my list of okay. Compliment. Eric.
Eric: I’ll be sending you the jar of maple syrup.
Serena: Yes, please do. I keep thinking about that too.
Eric: Well, I liked, I like yours because it’s, it’s stuff I would never think to do. So what is your creation story? What, what got you, why did you start a youtube channel?
Serena: So I’ll take you on a little backtrack in time. And I’ll try to make it short. I know we don’t have a lot of time. People were probably driving in their cars right now when, when I was growing up, I always wanted to be creative. I wanted to be an artist and wanting to be a writer. And then, you know, you grow up and life happens and you go to college and you choose something that makes sense. And now I’m a blogger, a DIY blogger at ThriftDiving, and I refinish furniture. I build things and upcycle, repurpose. And so I’m, I’m realizing this childhood dream, but it didn’t happen until probably about 2010 when we bought this old house. It was 1973 house. There was wallpaper everywhere. There were avocado, green toilets. And we were, I mean, yeah, I mean the toilets and the shower matched green, Turquoise.
Serena: It was, it was horrible. And the problem is that we had spent all of our money by, in this house, we went from a two bedroom to a four bedroom that we needed money to decorate and there was no money. And I literally, Eric, I’m not kidding you. I literally didn’t think about how we were gonna decorate the house. When you go from two bedrooms to four there’s a lot of echoes in that house. Yeah, no. And you’re like, wait a minute. I think I forgot something. Oh, I, I, and I’ve always loved thrift stores, but I loved them for books and clothing and things and things. I never really thought a lot about buying furniture, even though I dibbled and dabbled a little bit in furniture. And so I started going to the, my, one of my favorite through stores and finding so much amazing stuff that like my dining room table was $12 Ah, I mean literally $12 and I taught myself, it was like that golden oak color, you know, it wasn’t really like, it wasn’t a bad quality table, but it just, you know, it wasn’t, it wasn’t bad for a family moving into, you know, a new home, but it was not the color I wanted.
Serena: So I taught myself how to refinish furniture. And I’m not kidding you. Literally 95% of the furniture that we have in our house came from the thrift store. Perfect. I mean, seriously. And if we have it that we purchased it, it’s from, you know, probably 2002. So, so over time my blog evolves in to, uh, from painting furniture to suddenly, oh, I want to learn how to use power tools and remove toilets and put up crown molding. So my blog is taking this journey from just from being creative to really be in handy. And now I’m a carpentry student at my unit, a local community college. So now I want to actually start building walls and learning how to do more hands on things with tools and, and understanding the construction of homes and not just painting furniture. Now it’s just a little bit of everything and gardening too.
Eric: So now you’re going to start building your third home.
Serena: Do you know what that I, that is my dream. That is my dream really is to build a home from scratch. Now I don’t know when that’s gonna happen, but I th I think my next, my next goal is going to be to build a shed. If I can build a shed, then maybe I can build and I was telling you earlier that I’m working on cleaning out my garage. Like we creatives and I don’t know if you’re the same way, Eric, but when I do a project, I don’t clean up. After I’m done the project, I move into the next thing. Do you clean up?
Eric: No, you should. I’ll show you the, send you a picture of my workshop
Serena: and the thing is, is my husband doesn’t understand. So he comes out into the garage yesterday and he’s just shaking his head and he’s like, I don’t know why you brought all this mess. I’m like, well, it’s not just me. You know, I work with companies, I work with brands, they send me things, but then I’m also creative with these things and I don’t put things back. I don’t think any creative person does and you just didn’t get it. He was like, you’re just, I don’t understand you. So good. I’m glad to know that you’re confirming that I’m right.
Eric: Yeah. I actually, we’ll show glimpses of the chaos in the workshop from time to time. It’s just to reassure it, reassure people that we’re all messy. So did you, did you start making videos when you started your blog or was that something later?
Serena: Well, so when I started my blog, I’m sorry. Yeah, I see. I’m always gonna make this a short story and it ends up being a long one. So when I started my blog in 2010 it was really just documenting what I was doing in the house. But then in 2012 I started getting word that people were making money with their blog. And I thought, wait, I’ve been doing this for free for two years and people are making money. So it was literally October, 2012 I decided I was going to do my first youtube video. I, I was working outside of the home at that time. I am full time, you know, blogger, youtube now. And I used a sick day and I called in sick because I wanted to paint my fireplace and I had this special kit that I ordered online and I was going to do it and show people how I did it.
Serena: And that was my very first video. And I, I have always been someone who was creative back. Remember when, remember those big camcorders you’d sit on your shoulder? Yeah, yeah. yeah. From like, what’s that? That really funny comedy, National Lampoon’s European vacation. So when I was in high school, we had rented one of those and I remember setting it up on the table and just kind of leaning down on my knees and I said, hi, this is Serena coming to you live from Marburn road. So I used to pretend that I was on camera all the time. So in 2012 when I decided that I was going to go, you know, quote unquote pro and try and make money at this, I was like, you know what, I’m going to do a youtube channel. And the crazy thing is, is that I’m very comfortable in front of the camera and I had no idea really these years that I had a talent for it. So that’s, and I just, and I, and I kept doing it. I enjoyed it and I kept doing it. And even when there was no one watching the video, I just love being on camera and showing people from start to finish what happened with my project. And this includes the fails too, not just, hey, I’m so perfect. No, it’s, I can’t believe I just did that. Look what I did, here’s how we’re going to fix it. So that’s how I got started.
Eric: Yeah. I, when the Troy-Bilt people first introduced this by email, I, I just did this kind of deep dive into your youtube videos and I liked how you’re kind of making something out of nothing. You know, it’s like, okay, there’s this kind of beat up table and all of a sudden you’re like, Oh wow, look at that. And I don’t, I’m not good with colors and stuff. The camera operator is much better. But I, I would never think to do the things you did. And is that just kind of innate or did you learn that in school or something or just by doing or ?
Serena: I, you know, I think I just learned it by doing Eric. Like I said, I’ve, I’ve, I think I’ve always been creative, but there was a part of me that, that sort of lost that creativity. You know, you go to college and you think, Oh, I’m supposed to graduate and get a job and sit in an office with four walls and do that every day. Yep. And so when we bought this house, it was almost like this house saved my life because it gave me a reason to get back into being creative. And I’m getting goosebumps as, as I’m talking about it because it’s that important to me is, you know, giving yourself time to experiment with things. And Andy and I started actually thinking about that. You know, how, how does somebody become creative? How do you take something or junk or an old table and turn it into something else?
Serena: And I actually, I don’t know if I did a video on this, but I actually wrote a blog post on this with asking yourself the, the, the right questions. So for example, you know, let’s say you remove a shutter from your house, you’re doing some project, and instead of just throwing it in the pile, you know, why not turn it into a different direction and ask yourself, what does this remind me of? What if I turn this upside down? Could I need it for something else? Or what if I add legs to it and make it taller? Could it become a bench or a table or you know, so by asking yourself certain questions, even if you don’t think you’re a creative person, everybody could come up with some ideas just by asking these detailed questions. And I can send that to you too. So if maybe your audience wants to look at that. But yeah, it’s so it’s a great way to, I think everybody is creative and I think it’s a great way to ask yourself these pointed questions. For me, I think it just comes natural. Oh, if I turn it this way or do that, I could turn it into something else. So yeah, you just have to learn to ask the right questions about certain things.
Eric: For me, it’s sometimes has to sit in the corner for awhile and I look at it.
Serena: Yes. Well let me tell you about, let me tell you if this one project that I did, it was a toddler bed. My, my youngest son had had outgrown it and I was, and I actually bought it at the thrift store and I was going to re donate, donate it back to the thrift store, which I do a lot and I, I put it into the back of my van. But with beds in thrift stores and cribs, like certain things you can’t donate and they won’t take it if it’s real rock, you know, rickety and wildly. So I said, well this, you know, I probably just need to tighten it up but I don’t, I think I’ll just make you know, firewood out of this. Well, as I was pulling it out of the back of my van, I set the toddler bed straight up and I thought, oh my goodness, that looks like a gardening bench.
Serena: Now it looks like a gardening bench for kids. But what if I build a platform and make it a little higher? And I can actually send you that as well. And it’s, it’s been sitting out on my patio now as a gardening bench, painted, painted a beautiful poppy color and just added a few little details, some cedar to the top and I made a garden bench out of it, you know, something that would have just been discarded or you know, maybe tossed in a landfill or something is now, you know, this cool piece of furniture that’s on my patio. Okay.
Eric: I love that. And then you can remember when your, your, your large teenager was a kid, you know.
Serena: Exactly. Exactly. When you look at this furniture and you’re like, well I did that with a crib. You know, with cribs, certain cribs you can’t donate. Especially like the drop side because kids were getting stuck in them. Yeah. And I’ll pad a drop side cribs for, you know, my oldest son, well I didn’t want to just, you know, trash it. So I cut the ends of, of the crib off and I made a coffee table for my patio and just again put some cedar boards over top and it served its purpose for about a year or two on my patio. So you just have to think of how can I use parts of things and do something different with it. Then just getting rid of it.
Eric: Do you ever, do anything with street fines? I mean, do you happen to be driving down the subdivision road and people like have a thing at the, that’s stuck at the mailbox there and you grab it?
Serena: Oh yes. That, that’s definitely happened. Yep. Anything is up for grabs. But, you know, the, the thing that I’ve learned is that over time when you have this passion for, uh, like refinishing things, what happens is that your garage starts to get really, really packed until, you know, and, and so my husband complained at that time as well. But one thing that I started doing was pulling back a little bit. Like I’ll see something great on the curb and I’ll say, oh, it looks good, but I don’t have the space. So now, you know, when my garage is overrun, it’s usually a overrun with tools and gardening things. I don’t bring as much furniture home now because we’ve pretty much decorated most parts of our home. So if there is something I bring home, it has to replace something else so that you don’t become a pack rat. But yes. Yeah, yeah.
Eric: There’s been times I was, and the, I lived in, I lived in this more upscale neighborhood in Brooklyn and there was this oak, a dresser out on the curb, you know, with the trash and the sanitation guys were coming down the street, you know, so I’m, I’m pulling out the drawers and I’m getting rid, put this in my car and the Sanitation guy’s going, oh, no, no, we want that. I’m like, no, I want that. So, I mean, I didn’t have to wrestle with them, but I was like, I was like, come on guys, the boss wants this. He’s like, “okay”. You know? But it was such a nice piece of furniture that the sanitation, they, they, I mean, so they Musk, that’s amazing what they see, I would think.
Serena: Oh, I’m sure. I’m sure. I mean it, to me, it doesn’t make any sense that people get rid of stuff like this. But, but that’s the thing, sometimes people don’t see that it can be something amazing. You know the, the show that was on Netflix. Marie Kondo. Yeah. Yes. So I think what’s happening, like right now there’s this big boom in thrift store donations. People are just getting rid of everything because they’re like, oh this doesn’t spark joy. This doesn’t spark joy either. But the thing people have to realize is that sometimes with just a coat of paint, you know, even if you don’t think you’re creative, the information is there and it’s really not hard to paint furniture. I mean you, it’s almost like you can’t mess it up as long as you pick the right products to use. And I have information on my blog about that too. But you know, sometimes just a different color will suddenly make you think, oh my gosh, well this is great. I mean especially if you’ve got old furniture from like your, your grandparents or your mother, you can reuse that stuff cause it’s usually better quality than this stuff you buy in the stores now.
Eric: Well that was going to be my next question is kind of a, a quick PR Waco reference to your blog. which is thrift diving.com, thrift like thrift store and then diving like diving board, thrift diving, all one word. So what, I mean your typical piece of furniture is going to have stain and then maybe polyurethane on top. And how can you get paint on top of that without the paint flaking off?
Serena: Yeah. You know, there’s, there’s a lot of pings that are on the market now that are like, I consider them furniture paints. You know, there’s paint that you buy at like home depot or Lowe’s or any of those stores that are like regular latex wall paint, some DIY bloggers. We’ll use that and you can, but it’s, the process is a little different. So I would always recommend people to get a good furniture paint. And can I mention some of the brands?
Eric: Yeah. Cause I, I know I know nothing about this, so, yeah, sure, sure.
Serena: Well, some of it, some of the brands that people probably have heard about as Annie Sloan chalk paint and what it is, it has a calcium carbonate in it and it just makes it a lot hardier for sticking to virtually, almost any surface. So there’s Annie Sloan chalk paint a, there’s one that I actually am going to be using and soon country chic beyond pain is another one. They’re a brand that I work with in the past, but I find that it’s really easy to use just out of the box, out of the, you know, out of the bottle. If you’ve never painted anything, they even recommend using a roller. I mean, anybody has rolled their walls, right? You can roll your walls, you could roll your furniture, about the chipping, you know, like I said with these furniture paints that are on the market now, they, they say, oh, there’s no stripping, there’s no sanding.
Serena: You can just open up the bottle. And well, that’s true for the most part. I mean, you want to make sure you clean it with a good degreaser, like maybe simple green. Once you clean it, you can paint it even if it’s got top coats on it. But here’s the thing, if it’s a piece that that’s got a lot of traffic on it, so if it’s like a kitchen table address are top places where there’s going to be a lot of things put on top of it. Yup. You definitely have to probably do about two or three coats of paint and you’re going to want to do like a top coat two or three. So you’re, you’re doing multiple layers. So one thing that’s kind of like, I don’t want to say if it’s a misnomer, but some of these furniture paints will say, oh, there’s no priming.
Serena: You don’t have to prime. Well because you’re adding so many coats. It’s like a primer. So you know, you don’t have to strip it. So when you think of painting furniture, you don’t have to necessarily strip it down to the bare wood and then paint it. That’s what a lot of people think they have to do nowadays and they don’t. If you want to lightly just sand it, that’s fine. I usually don’t. But I think you probably would get better results if you just lightly sand it and just know you’re going to have to add two or three coats plus a top coat, you know, one or two coats of that. If it’s going to be, especially if it’s going to be something that’s getting a lot of wear and tear. And then you’ve got, you know, beautiful furniture that looks updated. It looks more light and airy.
Serena: Some of the older stuff, it’s just so dark and dreary. But here’s what I tell people and I’ve got a post on my blog and I believe I even did a youtube video, when should you not paint wood furniture? So if there’s something that’s an antique, and by Antique I mean something that’s at least a hundred years old or something that’s got a lot of value. Uh, don’t paint those because right now painting furniture, it’s kind of trendy, but I feel like it’s starting to move back to more natural furniture. so don’t do it just to be trendy. Don’t do it, uh, and ruin the value of something. Or if you’re like, grandma, Betty is going to roll over in her grave because you painted her hutch from like 1850. Don’t, don’t do that. Don’t do that wood. When I, when I first started working with what ad, don’t consider myself to be a woodworker, but there are things that I’ve built.
Serena: For example, my bathroom vanity, I built that from scratch. That was the first large piece that I had built and yet, and it turned out really, really nice. I mean, there was some kinks in there, you know, maybe some drawers they didn’t close quite properly. Those are hard to do. Yes. But for first attempt it was really good and buying that wood and, and finishing that wood in the way that I did. And again, I’ll leave links if you have show notes. Yeah. but it really caused me to look at the value of wood, you know, by, in that red oak was not cheap. And to think of even even slathering paint on that beautiful piece of vanity, I thought maybe I shouldn’t be painting furniture as much, you know, let’s take it case by case. You know, so look at the piece. If you’ve got a beautiful woodgrain on there, especially if it’s an oak, you know, you can actually do some really cool finishing where you’re using like liming wax where it’s like a white wax.
Serena: I don’t know if you’ve heard of that Eric, but it’s settled into the grain. Oh, it’s beautiful. It’s a beautiful, beautiful finish. And so it’s called Liming wax, but it’s also called Suruce oak. So it’s taking oak with that deep grain and just rubbing that wax into the grain so that you can see the grain. It’s highlighted. And if you go to my youtube channel there, if you search, go to thrift diving and search for, I think it was a wooden chest, just type in thrift diving, wooden chest. There’s a wooden jet. Honestly, it looks like it looks like a casket and the shape of it looks like a casket, but it was a $40 chest OIC chest that I got from the thrift store. It was a little worn. It was that golden oak color I didn’t like. And I thought, you know what we’re gonna do, some would die and do some liming wax in. The finish of it is just absolutely gorgeous. So if you’ve got oak, don’t just paint it, like really highlight that beautiful green. and another time when you shouldn’t paint furniture is if you’re using the wrong products. So for example, if you’re just, you know, getting a can of spray paint and just, you couldn’t do that, but do that on things that are like laminate, like cheap ikea stuff. Yep. Don’t do that on good quality wood.
Eric: I actually, I, I’m a big Ikea Fan. Do you ever do any eye anything with stuff from Ikea? Kind of rehack it into something else or,
Serena: I don’t specifically buy stuff from Ikea to do that with, but there was a garden, oh gosh, what do you call it? It’s, Oh, there was, it was like a kitchen cart that I found. I found it at the thrift store. It was actually probably $60 at all at Ikea, but I found it for $20 at the thrift store. And yes, I know, right. Love a discount. And I actually turned it into, it was almost like, hey, I call it a command center. It was really cool. Like I removed the slats on the second shelf and, and used my router to route some pieces of wood and turned it into like a file cabinet. It’s kind of hard to explain, but it was a really cool project to see this now. Yeah. I don’t think I did it a video because back then I was not filming everything.
Serena: Now on my youtube t I feel, I feel everything. I mean if I’m cleaning my car out, I film it because I’m like, this could be content. But yeah, back then, you know, it was, my videos were coming every now and then I would maybe film it or maybe not, but now everything gets filmed. So I do have the blog post, I’ll send you that link. Neat. but yeah, so I, I don’t do a lot of Ikea stuff, but really it’s the projects that I work on is, or the projects that I’m really, really passionate about and I think it has to be that way. So that’s why I don’t, I don’t know about you, but I don’t plan my content out in the future. I don’t know what I’m going to be working on.
Eric: Oh good. You’re like me then. Yeah, I was in the car and I’m like, what am I going to do this weekend?
Serena: It’s for me, it’s all about, and I know like from a business standpoint, it’s really not the way to operate, but I feel like when you operate from a place of passion, people can feel that passion and they’re much more likely to love what you do because they see the excitement and, and you know the pride that you feel when you’ve made something and you’re like, oh my gosh guys, you’re not going to believe this. It turned out so good. Here’s how it went. People feel that. But if I just have to make something because it’s on the calendar, I’m not really feeling it. So I’m like you, I operate just whatever I feel passionate about. So who knows? I may find a piece of furniture from Ikea and be like, oh, you know what, that would look great with this. So we can’t say it won’t come
Eric: this weekend. so I’m going to say this, so now I have to commit to it, but I’m, I’m big on making no knead bread and I was watching somebody. Oh they, they’re these re-enactors. They do like, like revolutionary time reenacting and they made a bread on a hearth just at an open fire. And I thought I wonder if we can hack. No need bread to be done in a campfire. So that involves two, my three, my favorite things. Cast iron, no name red and open fire.
Serena: Ooh. Can you send some of that too? If it turns out, can you send me some of that too with that? With the Maple Syrup,
Eric: I’ll get the maple syrup here. The bread I might have to eat it.
Serena: Come on one day. Express shipping. It can get here, it can get here.
Eric: All right. So I imagine people are pulling into their parking spot and they are thinking about quitting their jobs and going to the thrift store and then making a living. But I mean you have been, you have a magic touch cause I don’t know if people realize this, but it is incredibly hard to make a living, you know, on the Internet the way we are. and you’ve done really well. So that’d be fun. And I, I I just think that people need to learn more about your world there. Cause it’s, it’s all about using what got, and that’s one of my big things in the world. Repurposing rather than going out and buying something.
Serena: Right. And it’s fun too. It’s, it’s fun to just flex your creative muscle. You know, like you said, people are pulling into their jobs right now and they’re like, oh, not another day of this. You know, they want something to look forward to when they come home. You know, if they have time at the end of the evening getting the kids ready, getting some time to themselves. Why not tackle a project? You may not be able to finish it in 30 minutes, but you know, if you finish it that week, now you’ve got something else to look forward to. Then just go into work every day.
Eric: Yay. Now you can start your blog.
Serena: Exactly. And then your, and then your garage can get fooled too.
Eric: Our earlier one was if you have want more information about Serena, it’s at thrift diving.com or go to youtube and type in thrift diving. It’ll be in the show notes here. And any other questions for us? It’s [email protected][email protected]. And Serena, you’re going to go to the garden fork podcast page on iTunes and write us a positive review, right?
Serena: Yes, I will
Eric: I keep harping on people to do that,
Serena: so I will do that. Thank you Serena. Thank you so much, Eric. This was fun.
Surfer Mike joins me to talk about DIY projects, rain gutters and the leaf free gutter systems. I then described my motion sensor dilemma to Mike. And Mike offers up a very simple solution.
We then go on to plaster walls that have drywall on top of it, and how fun it is to work on walls like that.
Spray foam, and how would Eric do it in his house. We talk about how to vent the roof shingles while using the spray foam, in a basic way.
Declutter using Ebay and make sure your stuff goes to a good place and is useful to someone. That’s a huge thing with me. I have stuff, and I want to get rid of it, but I want it to be used by someone who needs it.
I have way too many electronic and computer things, and most of it can’t be recycled well. One example was this two disc set of Mac OSX Install discs. Perfectly good software that I’m sure someone out there needed, and was just taking up space on my desk.
I could just toss them into the plastic recycling bin, but are software CDs really recyclable? Why not allow these discs to improve someone’s life instead?
Enter Ebay!
One thing you have to keep in mind here to declutter using Ebay. Throw profit out the window, expect no windfall of cash. Expect joy of letting stuff go and feeling it wen to somewhere useful. That’s your payoff.
To declutter with Ebay, make sure that the object is what it is. For these software discs, I made sure they still worked, and weren’t damage. You don’t want a negative experience, because decluttering is all about joy, right?
For these discs, I photographed the discs and typed into the auction description exactly what it says on the discs. I also did some research to see what computers these discs would work with. Any helpful info you can provide will make it easier for someone to find your stuff and help you get rid of it. (Again, more joy…)
I listed the auction to start at $1 and set the Buy It Now to $5. Again, not seeking profit, but seeking to get rid of stuff to a good place.
The discs sold in a few hours.
Ebay is hooked up with PayPal and USPS to create this seamless process to print out a shipping label. So in a few minutes the label is printed and the discs are off my desk and my brain has joy.
Rick and I talk about the sliding barn door he is hanging up and how the maple syrup season ended fast and late for me. As always, we talk about LED lights, and the screw in shop lights that now light up Rick’s garage. Buy them here: https://amzn.to/2DeyHfQ
My two favorite YouTube channels for small engine repair are DonyBoy and Steve’s Small Engine Saloon. You will learn from both. One likes to drink beer, which is OK with me.
We touch on how to make a podcast, and how, IMO, scripted podcasts don’t work. Be Real, OK?
And on Netflix is a very interesting documentary series on Formula One racing. Good for when you have the flu, binge watch.
#trashtag is all about getting people to pick up trash. Not sure why people dump trash. I suggest an urban trash tag. Might work? Will from The Weekend Homestead co-hosts the show and it was his idea to talk about #trashtag.
Will talks about the sliding barn door he installed at his house. Barn door hardware: https://amzn.to/2I1YxrB
Thanks to Jesse and Kevin for helping with Rick’s microphone issue.
Eric and Rick talks about DIY projects, like repairing a ceiling and how to do it best.
Both Will and I want to emphasize the goodness in people in our lives, and those that just stop by to offer help. Especially when you have a water main leak at your new camp, as happened with Will recently. Many Thanks to all of you.
Danny joins us to talk about how to brew kombucha, and how to make ginger beer and other stuff in your kitchen. Danny has made kimchi, sourdough, hard cider all in his kitchen, nice.
Danny walks us through how to make ginger beer, which is pretty darn easy to do. Add ginger to a jar, water, sugar and watch it go, basically. Ginger is one of those magic foods. I almost called it a fruit, but it is a root, actually.
We move on to starting a sourdough starter. Again, not rocket science. And once you’ve got your sourdough starter going, you can keep it in the fridge, it doesn’t have to live on the counter.
We then move on to talk about the homestead Danny has purchased. He is mapping out a fruit orchard. I suggested sourcing his apple trees from Fedco Seeds, they have heirloom saplings with cold resistance and a huge selection.
Because Danny lives in the DC area, these trees would have longer summer season, and Fedco would ship the dormant trees earlier.
We wander into talking about perc tests, as Danny is building a house. This stands for percolation test, it is used to determine if the soil in your yard is good for a septic system. You may see in some parts of the country a raised septic system. It looks like a helicopter landing pad. These are for areas that have soil that is not good for a septic system. If you have a lot of shale just below the ground, you may end up with a raised system.
The perc test is one of the things one should do before buying property, I think. If the area you want to build a house fails a perc test, well that is a red flag about buying that land. If you love the property, there are ways to put in a septic, but get an idea of that cost before buying the land.
Rick shares his desktop with Eric, but its safe for work!
Here is the video Eric just released
Eric talks about dropping a twin trunk tree that lodges in some other trees and why it takes so long. And thinking about replacing the carburetor on a small chain saw, go with the cheap clone?
We answer the question of do electric cars pollute as much as gas cars because they use electricity generated by coal fired power plants.
We then wander into all electric cars. More and more people are buying them as companies make them.
Don’t electric and hybrid cars need to have their batteries replaced at great cost, and environmental costs? Rick addresses this in his special way.
Rick has bought his second Prius, a Prius Prime no less and getting about 200 mpg. It’s like the regular Prius but you also plug it in to charge it’s battery for a local trips. Prius is highly rated by readers of Consumer Reports, according to Rick.
I had a solar array installed on the Brooklyn roof. wow. More information on this as I learn how it all works. Waiting on the net meter to be installed.
Are we subsidizing these solar installations? Rick addresses this in his thoughtful way.
Solar charging stations are popping up as parking lots installed panels on car parking lot roofs.
Rick tells of how the local power company can use your plugged in electric car as a power bank in the middle of the day.
We then wander into the world of Elon Musk – we are big fans of him – and the power wall battery that would be good for the solar array. I learned a lot from listening to the Joe Rogan interview of him. It is not easy to build cars from scratch. The stories he tells are good examples of how it looks easy but isn’t.
The 3 hour Joe Rogan Podcast interview of Elon Musk is good, listen here: https://joeroganexperience.io/elon-musk/ FYI The Joe Rogan Show interview uses adult language.
Will from The Weekend Homestead YouTube channel joins me to talk about cooking down apple butter, drilling into brick, and egress windows.
I talk with Will about what to do when you have too many apples? You make apple butter! The apple corer rig we talk about in the show https://amzn.to/2SmvIHZ I was wondering about using the Instant Pot my fav cooking machine, video here, to cook down the apples. No answers yet, what do you think?
We move into talking about my video on how to make hard cider, which is the easiest thing to brew.
Do you drill into the brick or the cement when hanging on a brick wall? I am a big fan of sleeved anchors to hang heavy stuff on brick or cement walls. I use what is generally called ‘wiremold’ or cable concealer to hide the TV wires on the brick.
What is a dumbwaiter? We talk a bit about that, I have seen several.
Will needs to buy a small generator. Do you buy the Honda or the Harbor Freight knock-off? Curious to hear what you think, let me know in the comments below.
I do have a Harbor Freight FLux Core Welder, which I like, here’s a vid I did.
What is an egress window? Will had to install some in the basement rooms of his house. Pretty straightforward, but it helps to have a backhoe.
Straws are not the real problem, in my opinion. But the OXO carrot peeler is a success story well worth reading. On this podcast, I talk with Erin Schanen, friend and garden guru at The Impatient Gardener site and her YouTube Channel.
We move through Erin’s dog eating her USB headset, onto the topics we selected, then of course, get off into the weeds of raised bed gardening. Erin is an expert at that gardening thing. Just look at her website.
High Performance Coach Rich Gee joins me to first talk about the inspirational quotes he posts on Instagram and then help me follow through on projects. Rich has been on the podcast before, listen here.
The quotes we talk about on the show are on Rich’s Instagram feed. Rich has a Brand Marketing & Strategic Coaching podcast called Two Heads. Contact Rich through his website.
Pass It On is the group posting the inspirational billboards.
My blueberry bushes are the epitome of a weed infested garden. But I want to show you how I restore the weed infested garden bed, with some help from Troy-Bilt. They sponsored this post and provided some fine outdoor power equipment for me to use to restore this blueberry patch.
I neglected my blueberries this year, not sure why, but there’s always a ton to do, and the weeds took over. It was time for drastic action to remedy the weed infested garden. Look at the ‘before’ photo and see for yourself.
In this overhead drone photo, you can’t see the blueberry bushes, but they are there.
So my plan was to clean up the area, make a raised wood bed border, and smother the weeds in the raised bed with cardboard, and lay down wood chips on top of the cardboard for a permanent mulch. The cardboard will break down in to the soil, and the wood chips will keep new weeds at bay.
First I cut down the all the plants that were overwhelming the berries. The brush cutter attachment on the string trimmer worked well for this.
I then outlined what was to be the new raised bed with string and cut a slot for the pressure treated 2×6 lumber to sit in. This area has a slight slope so for the end nearest the woods, the lumber will sit right on the soil.
For the long end of the bed, I used a mending plate to connect two pieces of lumber to span the length. And in the corners, used corner brackets. You can find these in the roofing hardware area of a home improvement store.
It was nice that the box that our chipper shredder came in was large. Perfect for the layer of weed suppressing cardboard. Be sure to leave room around the plants, keep the cardboard about 4-5″ away from the stems.
Then came the fun part. I had already dropped a dead apple tree, so I had plenty of material to run through the Troy-Bilt CS 4325 Chipper Shredder.
What fun! Nothing like running power equipment and turning brush into useful wood chips. The chipper shredder had no problem with most of the wood we put through it. You have to go slow with bigger branches – it handles up to 3″ limbs – especially because this was fresh hardwood, very different than a soft pine.
We made A LOT of wood chips. Nice. The bag filled up right quick and we got rid of all the branches from the tree we dropped.


 A while back I made my first video about the beer cooler sous vide rig.
 From the video:
 You can also use this hack to do a muffler pipe repair. You would have to find a really long pipe clamps or connect together several pipe clamps. You can you can usually get clamps about 4 inches in diameter, if you buy a bunch of those you could connect them end to end and then wrap a big piece of metal around the muffler. This kind of muffler repair is not going to last really long but it would reduce the noise but your car is making – fewer people would stare at you at the red light intersection!
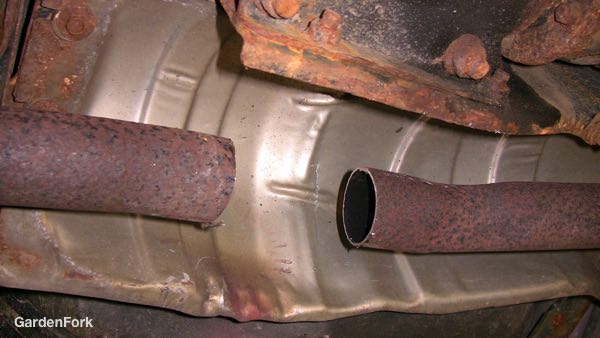
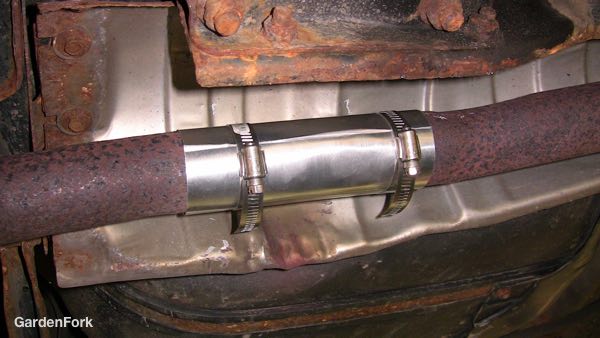


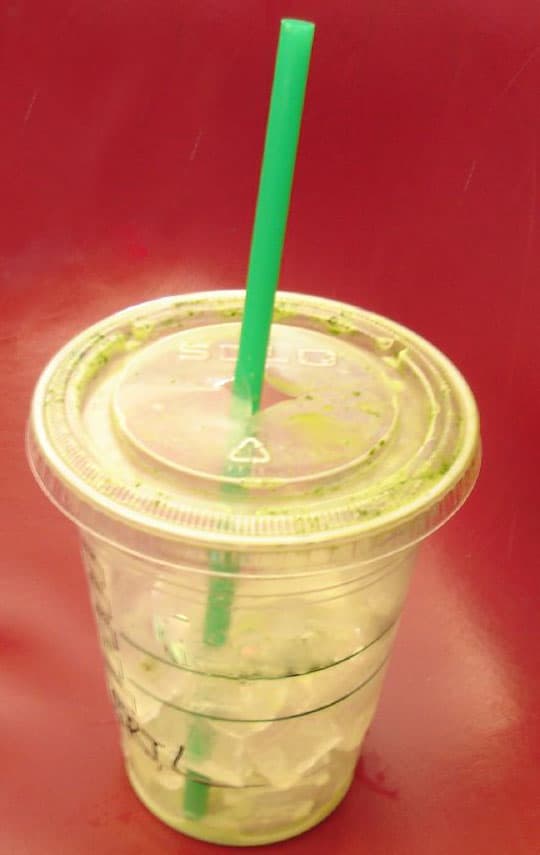


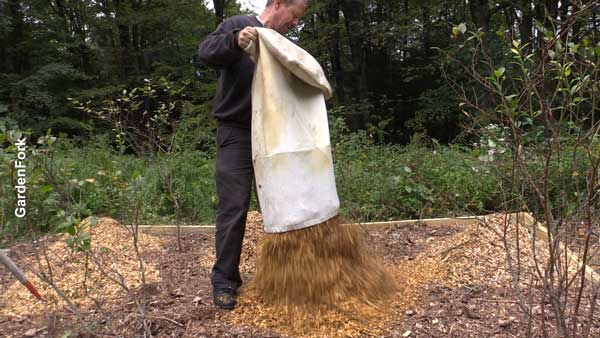


.jpg)