• Flux Core Welding Success! – GF Video

    My first successful flux core welding project, not without an ‘oops’ moment, but watch and read along here. You may learn something, or teach me something. Let’s see.

    I first heard of flux core welding from Jimmy Diresta, when he suggested to a viewer that it was a good beginning welder to buy. Officially called Flux-cored arc welding, aka FCAW or FCA, it is used widely in construction.

    flux core welding

    I have seen a lot of maker people on YouTube using MIG welders for their projects, but MIG welders can be expensive, and you have to use a tank of gas (usually argon) with MIG welding.

    A while back I had taken a 4 hour intro to welding class at a Brooklyn metal arts collective, but I wasn’t sold on getting a MIG welder.

    So I was at Harbor Freight Tools and saw they had a flux core welder on sale for $100. I know Harbor Freight is famous for cheap tools, and it could be a gamble to buy a flux core welder from them. But that’s what I did.

    flux core welding

    Back to YouTube I went and watched many flux core videos. Some were awful, some were great. But I learned enough to start welding. An even greater source of help was my first flux core welding video, where I asked people to post constructive comments on how I could be a better welder. It worked, lots of great comments.

    flux core welding

    A year later that vid still gets nice people writing out what I should be doing better. It was these comments that were in my head when I was repairing the tree guard with the flux core welder. And my welding has improved from the first welding video, I hope you can tell!

    flux core welding

    You can also buy an cheap flux core welder online:

    flux core welding

    A cheap flux core welder will work fine for welding thin metal and repair stuff around the house. If you want to build furniture, you should upgrade to a MIG welder. The cheap flux welders are AC welders, the better units are DC, and more expensive. I have seen some hacks online to convert a cheap AC welder to DC, but have yet to attempt that.

    flux core welding

    This type of wire fed welder is called flux core because the flux is built into the center of the welding wire. This wire is fed from a spool inside the welding unit, through a hose to the tip of the wand. When the wire is energized (by pressing the red trigger on the welding wand) the wire at the welding tip is heated, flux is released, and it allows the wire to melt, create heat, and weld the pieces of metal together.

    This core inside the welding wire also has ingredients that create a shielding gas around the weld point. MIG welding uses an intert gas, usually argon, as a shielding gas. The advantage of FCAW is that you can use it outside in windy conditions. With a MIG welder, the argon gas may get blown away by the wind. As you see in the video I made, the flux core unit is super portable. All you need is a heavy duty extension cord.

    flux core welding

    The down side of flux core welding is it shouldn’t be used indoors unless its really well vented. It puts out some noxious smoke. MIG welders can be used inside. The other downside is it can be harder to see the weld puddle, the melted metal you are working into a joint, with flux core. The process creates slag that can get in the way.

    Maple Syrup Evaporator BuildI did some welding on the homemade maple syrup evaporator project

    But I do think a cheap unit is a fine way to get into flux core welding. If you find you really like it, you can sell your cheap welder and upgrade to a nicer unit. If you find you don’t like it, you can still sell the unit.

    Let me know your experience with welding, I am always learning from you. Thx!

  • Should You Quit Facebook? GF Radio 469

    Eric & Will get an email asking should one leave Facebook.

    Will and Eric,

    I respect you both highly and love following you both.

    That said, I have always been suspicious of FB and was going to pull the plug regardless of the latest news.

    My only hesitation is being able to continue to follow both of you which I know I can get through podcast and YouTube. I suppose I can still go to your respective Websites? The GardenFork discussion group has really been valuable for me.

    I would truly appreciate your respective thoughts.

    Lifehacker has some good articles on how to secure your data and still use Facebook. The simplest ways to limit how much data FB collects is to not hit the Like Button or Comment on anything. And don’t post anything. Just scroll through. Use Facebook on your computer, not your phone. The app can collect all sorts of data.

    We then talk about tapping sugar maples for maple syrup. Here’s one of Eric’s videos about how to tap trees for maple syrup.

    Will asks Eric his preferences about hoop houses vs greenhouses. Here’s a vid on how to build a mini greenhouse, aka hoop house.

  • Heirloom Yogurt Starter and How To Make Yogurt With It

    Heirloom yogurt starter is exactly what it sounds like. Its a yogurt starter passed down through generations. Here I’ll show you how to make yogurt with it. I’m using an instant pot to make yogurt, but this process works for any method. Watch my how to make yogurt in an instant pot video here.

    Heirloomm yogurt starter

    My buddy Rick told me about using heirloom yogurt starter. I had been using a commercial starter, or just some yogurt from the store, to make yogurt. His goal in using the heirloom yogurt was to increase the diversity of probiotics in his system. Makes sense to me.

    Making yogurt is not rocket science. You can make yogurt in a cardboard box if you want. You heat up some milk, let it cool, add starter, and heat it again for X number of hours.

    How To Make Yogurt With Heirloom Yogurt Starter

    I bought an heirloom yogurt starter pack that come with packets of 4 heirloom starters here: http://amzn.to/2prpSaO

    The package has some good instructions, but the first time I followed them, the yogurt didn’t ferment as I expected. The starter supplier suggest making a pint of yogurt overnight in warm place. My attempts this didn’t take. So I made my own method.

    Heirloomm yogurt starter

    The packets that come in the package are quite small. What you are doing with these little packs is making one jar of yogurt, and that one jar is now your starter jar. You will make your heirloom yogurt going forward from this starter jar.

    So here is how I make heirloom yogurt. Its super easy. I love using the Instant Pot to make yogurt, but you can do this on a stove top, wood stove, or on top of your furnace in the basement. Any kind of yogurt maker works as well.

    • Heat up one pint of milk in a clean glass mason jar to about 180F.
    • Let it cool to 110F
    • Add the starter packet to the one jar, mix well.
    • Heat the yogurt for 14 hours.
    • Use this jar as starter for future yogurt batches.

    The instant pot makes this super easy, it maintains a warm temp over the 14 hours, and beeps when its done. I found that shorter ferment times didn’t work for me. Either the yogurt didn’t set up at all, or it was quite runny.

    The key thing I realized is that one little packet is not intended to make several jars of heirloom yogurt, its to make one ‘starter jar’. From that one jar you can add a tablespoon of heirloom starter and add it to each pint of milk. Before that jar runs out, set aside a jar of new yogurt you made from it to be the next ‘starter yogurt’ jar.

    You can order the heirloom yogurt starter here: mzn.to/2prpSaO

    If you are interested in the Instant Pot, I have a video review here.

  • Our Labrador Charlie Pup Had A Canine Stroke

    One of our dogs had a canine stroke, here’s how we found out and the recovery.

    Canine stroke
    Light grey oval in Charlie’s spinal cord indicates a canine stroke.

    A few weeks back we noticed Charlie Pup slipping when she ran around corners on our wood floors. This progressed into a general wobbly back end, losing control of her back legs. We thought it might be hip dysplasia, so we went to see Charlie Pup’s doctor. Canine stroke was not even in my list of possibilities.

    Hear me talk more about Charlie’s stroke on this episode of the GardenFork Radio Podcast.

    Charlie Pup’s doctor watched her and immediately said that this condition was not hip related, but neurological. She suggested and we agreed to take her to the see a neurosurgeon at the Animal Medical Center in Manhattan. Our vet helped us make the arrangements and did an x-ray and blood tests to rule out a few causes.

    We’ve been to AMC in NYC before, with our other Labrador, Henry about 10 years ago. Its kinda like the Mayo Clinic for dogs.

    So we drive from Brooklyn to Manhattan, park the car in the hospital parking lot, and take the elevator to the waiting room. The doors open, and I see a rooster, an iguana, a parrot, and a bunch of NY people and their dogs and cats.

    Kinda like a live version of a New Yorker Magazine cartoon.

    We get to see Dr. Abby Lebowitz, a neurologist and neurosurgeon. Super nice doctor who also has a Labrador. Dr. Lebowitz and her team take Charlie and want to do some motor function tests. So we get to wait in the waiting room with the cast of characters.

    We met Dr. Lebowitz after the testing and learn there can be several causes for Charlie losing control of her back legs. We are given the option of having an MRI right away, or we can have Charlie on confined rest for 3 weeks and see if she improves.

    We opt for confined rest, as an MRI is not cheap. Having been through several back-spine treatments myself, I know the body can heal itself for some back issues.

    I didn’t realize how confined the rest had to be until I read the instructions they sent home with us. Really confined. We didn’t do a very good job the first week, but I re-read the instructions and the confinement was done right.

    We kept Charlie Pup and Henry up near the front bay window in Brooklyn so they would have sunlight and see outside most of the day. Charlie Pup is bonded to our older Lab, Henry, so we have to keep them together. Our neighbors lent us two sets of folding dog fences that worked great to keep them in their small area.

    canine stroke

    Here is the bolster orthopedic dog bed we use for Charlie Pup, the dog fence, and Henry’s flat orthopedic bed.

    I was surprised the Labradors did not just push the fence down. But it worked very well.

    We are lucky to have a small backyard in Brooklyn, so the pups went outside 4-6 times a day. We would walk Charlie Pup in the yard on a leash. She likes to bolt out the door to chase squirrels. She was not allowed on stairs either.

    After 3 weeks of confinement, we realized her wobbly legs were not improving. We talked with Dr. Lebowitz and scheduled the MRI.

    Charlie Pup spent the whole day in the offices of the neurology department. We are told she was very popular. They did an MRI, X-rays, and a sonogram.

    At the end of the day we met with Dr. Lebowitz and we learned that Charlie Pup had had a canine stroke, and it is causing her to lose control of her back legs.

    This is a relief in a few ways, its not a ruptured disc that would require surgery, or spinal stenosis, which would mean steroids.

    Charlie Pup is to take it easy and slowly progress back to her normal activities. We might try some physical therapy; aqua therapy sounds appealing as she loves to swim.

    She will always be a bit wobbly in her back legs, but its good to know what happened and how to proceed.

    Listen to me talk about what can happen if your dog has wobbly legs on GardenFork Radio.

  • Charlie Pup and Rick & Modern Medicine GF Radio 467

    Eric tells about Charlie Pup losing control of her back legs, full story here, and her visits to the Animal Medical Center in Manhattan. Rick is a walking example of the success of modern medicine.

    Rick had cataract surgery in one eye and will have the other done soon.

    Charlie Pup had an MRI and x-rays to figure out what is causing her leg dysfunction.

    This is the dog ramp we got for the Labradors, it works great: http://amzn.to/2FsrVlH

    We read two viewer mails. One from long time listener Kevin about maximizing the heat generated from the DIY maple syrup evaporator, and one from Jonathan about making the steam pan file cabinet maple syrup evaporator.

    Check out another eclectic episode: Grow Apple Trees From Seed? & Acorn Flour – GF Radio 460

  • LED vs CFL – 5 ways LEDs are better than CFLs

    If you are using compact fluorescent bulbs, hear me out on the LED vs CFL debate. Below I’ll list out 5 ways LEDs are better than CLFs. For a long time I was an advocate for CFL bulbs, but then LEDs became affordable, and the tables turned. I now also use LEDs for dusk to dawn light installations.

    LED vs CFL lights

    LED vs CFL  Here are 5 ways LED are better:

    1.CFL Bulb shape = design fail. CFL lights have always had a bad reputation for being, basically, ugly. I still see some hanging lights in buildings that have those curled CFL bulbs in them. Not a great look. LED bulbs have the same look and feel as incandescent bulbs.

    2. Most of them put out an ugly green tinged light. The light cast is reminiscent of those tube fluorescents of gym class. You can get a warm white compact fluorescent, and some are not bad. But there is still that tinge of an ugly cold white light reputation.

    3. LED bulbs are much cheaper to use. I was always loyal to the CFL for the energy savings. You could leave lights on without feeling guilty. Then LED lights showed up in the hardware store and costs pennies to operate.

    4. LEDs are dimmable! There are a few CFLs that are kinda dimmable, but the light level steps up and down instead of being on a continuous dimming spectrum. You need to use quality dimmer switches with LEDs, the cheap ones don’t work. Learn from me. And buy LED bulbs that specifically say dimmable on the package.

    LED vs CFL lights
    LED bulb on left is in classic bulb shape, CFL less than classic

    5. CFL bulbs contain a trace amount of mercury, and you have to bring them to the hardware store to dispose of. This means the CFLs sit in my car until I remember to drop them off on the next store trip. Even then I will forget them in the car for several weeks. LEDs do contain electronic circuitry, and whether we should recycle them is a work in progress.

    Recommended dimmable LED bulbs on Amazon. Get this dimmer switch to use with dimmable LEDs

  • Troy Bilt Snow Blower Review & Video – Storm 2690 XP Snow Thrower

    Here’s my Troy Bilt snow blower review and video of the Storm 2690 XP Snow Thrower. If you want to move snow, this snow blower does that nicely, even that wet heavy snow, as you’ll see in the video. We have also done some other Troy Bilt reviews here.

    At the end of my reivew on this machine, I’ve posted a video of this same rig by my friend Erin of The Impatient Gardener.

    My Troy Bilt Snow Thrower Review of the Storm 2690 XP Snow Thrower

    First, Troy-Bilt has been a regular sponsor of GardenFork, and this video is sponsored by them, but as always I will be straight with you about my thoughts.

    This is a two stage snowblower, which means it has a large spinning auger that brings the snow you are clearing into the machine, and then a second rotating scooper in the back of the unit pushes it up through the adjustable chute and out of your driveway. Two stage snowblowers are much better than single stage blowers, especially for wet snow and storms with more than 4-5″ of snow. For more specs and info here is the 2690 page on TroyBilt.com

    Troy Bilt Snow Blower Review
    Two stage system

    This two stage system worked quite well for us this winter. It has been a wet one. Not a lot of big dumper snow storms, but weekly snow that has been wet. Often we would get a mix of rain and snow. The Storm 2690 XP did not fail to toss this mess 20′ away. Nice.

    Safe to say it will also take on much deeper snow. It has the power and the auger size to toss the deep stuff as well.

    Since we all know I am not great at complete paragraphs, I’ll list out the features here and some quick thoughts on them.

    Snow being tossed nicely

    The best feature that is worth the extra dollars here is the joystick controlled snow chute. You don’t have to crank a rod or lean over the machine to turn the chute left or right every time you turn to make another pass on your driveway. Your right thumb moves the red knob and the chute turns side to side and points the snow chute up or down.

    Chute Control Joystick

    The electric start fired up the engine right away – you use a extension cord to start it – no battery. It also has a pull cord, which I used as well.

    The heated handles were a bonus, I have never used a blower with those before and forgot this had them until I grabbed the handles to start working the snow.

    troy bilt snow blower review
    Hand controls and heated handles.

    Muscling a snow blower at the end of a pass is never fun, so Troy Bilt added two triggers underneath the handles to steer to make it much easier to control. Pull the handle and the blower turns. Nice.

    Troy Bilt Snow Blower Review
    Air filled tires

    One way to make equipment less expensive is to use solid or plastic tires, and when you are moving snow, you want real tires, IMHO. I was wondering if this snowblower would do better with chains, but for my needs that answer was no. The air filled snow tires worked well. There’s a few times where you will have to tip the snowblower back on its  wheels to get more weight over the axle for traction, but I think that is a given with any machine.

    Troy Bilt Snow Blower Review
    Oil Drain Tube!

    Attention to detail is something that I think Troy-Bilt does well. A good example is the oil drain pipe on the bottom of the engine. It can be a pain to drain oil from a small engine. The drain plug is usually in an awkward spot, and you will spill oil all over when draining the crankcase. But Troy-Bilt makes it a much nicer experience just by adding in this extension pipe so you can drain the oil easier. Simple = Good.

    Also up by the handles, there is storage for two shear pins. If you hit a big rock, these pins break, saving the auger. Having two on hand is a brilliantly simple addition. Yes, you probably have some spare shear pins in the garage, but where?

    I did not find any red flags with this blower. I’m not sure why snow blowers have to have 6 forward speeds, but that’s not unique to TB.

    Like most everyone, I like to think I can get good stuff at the inexpensive tool store with a nautical sounding name, and sometimes you might find a deal. But with snow blowers you get what you pay for, and I think this one is worth the price.

    Here is Erin’s video of the Troy Bilt Snow Blower:

    The NY Times product review site, The Wirecutter, reviewed the 30″ version of this snowblower favorably.

    Some of the other Troy-Bilt equipment we’ve reviewed:

    Troy Bilt Flex Review, One Engine Goes A Long Way

    Troy Bilt FLEX Log Splitter, How Does It Stack Up? – GF Video

  • Behind The Scenes At The Big Game GF Radio 465

    Will visits to tell us about his working behind the scenes at the Super Bowl. Then talking about replacement windows, and whether its possible to slide the new windows in from inside the house.

    Troy-Bilt, a GardenFork sponsor, sent Eric a new snowblower. A discussion about single stage, two stage, and three stage snowblowers happens, complete with what are shear pins.

    Eric insulated the back door of the apartment and made a video about how to insulate a door with spray foam, and a discussion on how to use spray foam happens, along with spray foam hacks from Will.

    Viewer Mail:

    Hi Eric, I love your radio show and watch your YouTube videos in batches when I head over to YouTube on occasion. If you haven’t heard of this show, I recommend taking a watch of it. It’s Alive with Brad is a bon appetit affiliated show about fermented foods and other things that are alive like oysters. I find it very entertaining and watch it about as regularly as I watch garden fork! Keep up the great work and thanks again! Daniel

    The Alive With Brad videos are on YouTube.

    Then the DIY pizza oven comes up, and whether Eric owns a digital laser temperature gun. Then how to store brick over winter.

    Visit Will at this YouTube Channel, The Weekend Homestead

    More episodes of GardenFork Radio

    Grow Lights, Axe and Mouse Issues – GF Radio 396

    Jimmy & Eric Are Space Geeks – GF Radio 464

    Urban Farming In Your Front Yard & Workshop Organizing – GF Radio 456

    Photos from Library of Congress

  • Is Apisoir A Word? Wikipedia Says No

    Apisoir is a word coined by Michael Alberty to promote the local terrior of honey. Being a wine writer, Michael had words to describe different wines, so why not honey? Erik of the Root Simple podcast interviewed Michael Alberty, and its a good listen on how one can, or as it happens sometimes, cannot create a new word. The word bootylicious is used as an interesting example of how words happen.

    apisoir

    I’m still left wondering who determines if a word is a word.

    But the idea of having a term for the unique tastes of different honey is a good one. Honey from different hives tastes different. Honey from the same hive, but from different frames of comb, can taste different.

    Why does honey taste different hive to hive? Its all about the nectar used to produce the honey, and the plants that produced that nectar, and the environmental conditions that those nectar producing plants grow in.

    I bet most of us have been to a farmers market where different jars of honey are lined up, and you can see the differences in the honeys. You’ve probably seen buckwheat honey sitting next to goldenrod honey, or similar pairings. So yeah, a word for that would be good.

    But not so fast. Wikipedia wouldn’t allow Michael to create a page for the word Apisoir. This could be just the Wikipedia hall monitor on duty the day Michael added the page didn’t get it. But Wikipedia could have good reasons for not approving the page, they have to manage many people creating many pages. I’m sure they have some interesting stories.

    Interesting to read some of the comments on the Root Simple podcast episode, as some are now saying that the word apisoir, while drawing on the French language, doesn’t sound nice in French. It sounds too much like the word pissoir. Oops.

    So from what I can tell, if we all use the non-word apisoir in our posts and podcasts, it may work its way into the mainstream. Maybe if its used in a hip-hop song it will help, this practice seems to get the attention of the Old English Dictionary.


  • Is Your Car Battery Dead? A Quick DIY Fix

    You turn the key, and you just hear ‘click’. Is your car battery dead? Maybe not. Here’s a quick DIY repair that may save you some $. (If you suspect the alternator may not be charging, learn how to test an alternator here.

    This happened to a friend of mine who had just replaced their battery recently, and I was able to fix it in about 10 minutes. I opened the hood and could see right away that the problem.

    car battery corrosion

    Is the car battery dead? No.

    Car batteries last about 3 years, in my experience. Open the hood of you car and find the battery. If the above photo is what one or both of your battery cables look like, get some wrenches out.

    What we have here is corrosion that isn’t allowing the cable to connect with the battery in an ideal way. And its real easy to fix. Get these items:

    • Wrenches, pliers, screwdriver, and a socket set if available.
    • Baking soda & plastic bowl
    • WD-40 spray
    • Wirebrush or old toothbrush

    We want to remove the battery cable from the battery. You may need to spray the nut & bolt with WD-40, then loosen it with a wrench or socket. Be careful not to strip the bolt or wrench off the battery terminal. Holding the cable with the pliers may help. A screwdriver can help lift the clamp off the battery. DO NOT allow the tools to touch any metal on the car when removing the RED positive cable. It can spark. Not the end of the world, but please avoid doing this.

    Is Your Car Battery Dead?

    Mix a tablespoon of baking soda into a shallow plastic bowl that has water in it. The measurements are not critical. Put the terminal end of the cable into the solution. It will bubble. If you can’t get the cable in, brush the baking soda-water mix onto the terminal end with a toothbrush.

    Is Your Car Battery Dead?

    Scrub the cable to remove the corrosion, the crumbly blue stuff. Then wipe the cable ends with a paper towel to finish up the job and remove the moisture.

    Clean up the battery itself as well, scrubbing with the solution, and wiping down with a paper towel. Its ok if the solution runs down the side of the battery.

    Replace the cables on the battery, tighten down the clamps.

    Is Your Car Battery Dead? Is Your Car Battery Dead?

    Then do this KEY thing: Spray the terminal ends and clamps with WD-40. This will remove the last bits of water and protect the connection.

    Also, consider keeping a battery booster or jumper cables in your car. These compact battery boosters are quite good, or consider getting the large one to have on hand if you have a big SUV or truck. Here are a few suggested models:

    Compact Battery Booster (affiliate link)

    Large Size Jump Starter  (affiliate link)

    Is Your Car Battery Dead?

    So, next time you ask yourself, is my car battery dead? Open the hood and check this before buying a new battery.


    Bought a 110 Volt power adapter for the car, here’s what I learned.

    Simple Way to Test Your Car Alternator

  • Jimmy & Eric Are Space Geeks – GF Radio 464

    Jimmy of Hollow Books joins Eric to talk about the Space X Falcon Heavy rocket launch the day after the spectacle happened on the same launch pad as the Saturn V rocket took off to the moon. Jimmy questions the wisdom of putting a Tesla in orbit around the sun, but in general we are in awe.

    The Space Rocket History Podcast is a favorite on GardenFork Radio, wondering whether the host of the show attended the launch of the Falcon Heavy.

    We check back on Jimmy’s Growing tobacco project, the leaves are drying and he has used it in a pipe.

    We then walk through gardening topics like Rabbits, Morning Glory, Hummingbird Vines.

    Rick likes the TV show Ray Donovan, Eric has been watching Queen Elizabeth’s Secret Service on PBS.

    We close with an email from Dan, a listener in Canada. Dan’s wife likes to listen to the show too. thx!

    Grow Lights, Axe and Mouse Issues – GF Radio 396

  • Selling On Ebay, Its Not Always Worth What You Think

    Selling on Ebay is a great way to get rid of stuff. We talk about this in a how to sell post here, and on the GardenFork Radio Podcast. But I learned recently that what you are selling it is not always worth what you think it is.

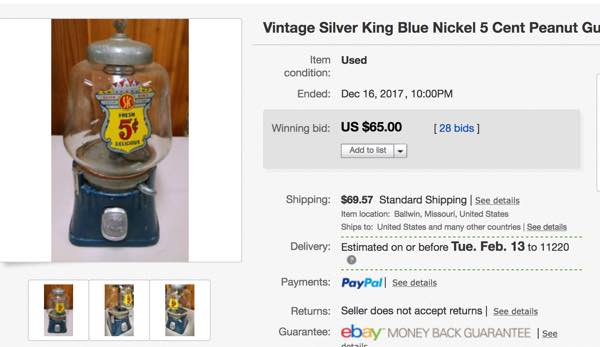
    Take this antique gumball machine for instance. It has been in the basement for years, with me thinking it was worth lots of money.

    Selling On Ebay

    Looking on Ebay, I was sure this would sell for a couple of hundred dollars. There were several similar items listed wiht nice prices. But they weren’t auctions, there were the Buy It Now or Make Offer listings. The sellers had a set price in mind. Which might not be based on the real market value of the item.

    Selling On Ebay

    Selling on Ebay, A Reality Check

    Here’s the thing. You probably think the gizmo you have is worth more than it really is. Ebay is very good at determining a realistic selling price for your stuff. It can be a kick in the head.

    But I wanted to get this thing out of the basement, where it had been for years, so waiting around for someone to match my price wasn’t an option. Decluttering was the priority. So here’s how I get rid of stuff by selling on ebay.

    I set the starting bid at $1.00 .

    This gets the interest of a LOT of people, and some will bid it up a few dollars. They are now invested in the auction. And there will be a bunch more people ‘watching’ the auction, and may bid at the last minute. Ebay will send those who click the “Watch” button an email when the end of the auction is happening soon.

    AND your item will sell for about what that kind of thing is selling for these days. Probably less than you want. BUT its out of your basement. Your mind will be free-er, if that’s a word.

    Selling On Ebay

    The flip side of this is stuff I think will sell for nothing sells for something. I also had a generator transfer panel that was missing some parts (easily bought new). I listed it at $1, thinking it wouldn’t sell for much at all. Then I watched the bid price rise.

    Selling On Ebay

    Not bad for something out of your garage!

    A Few Key Things For Selling On Ebay

    • Be Honest
    • Start bid at $1.00
    • Answer any questions
    • Ship via US Postal Service, not UPS
    • Sell As-Is
    • Add in a packing fee if need be

    An honest description is key to your integrity on Ebay and in real life. Karma is boomerang here and now. If the buyer is not happy, they can make their displeasure known on Ebay, and you lose your credibility to sell other stuff. I check a seller’s rating before I bid on items. You should too.

    The bid at $1.00 gets eyeballs, the price will rise to close to what its really worth, so relax.

    Answer any questions submitted through Ebay and allow those questions/answers to be posted to the auction page, it shows you are open and honest.

    UPS has an awful website for trying to print out a shipping label, its incredibly clunky. USPS is integrated into the sales process of Ebay. Use them.

    You are selling a used item as-is, with no warranty or returns. Reiterate that several times in the description. Describe all the scratches and dents. Disclose everything.

    For the gumball machine, I had to buy bubble wrap to safely ship it, so I added a $15 packing fee. Save your shipping boxes and packing stuff for your own shipping.

    What are your tips for selling on Ebay? Let me know below.

    Buy A Tiny House Kit On Amazon?


  • Flowers, Meditation, Harbor Freight, A New iMac – GF Radio 463

    Rick and Eric start out the show trying their hand at guiding a meditation for you all listeners. It starts out well. We talk more about meditation here.

    Eric mentions the GardenFork Shop Page on Amazon, this is an affliate link.

    What is good to buy from Harbor Freight? Hand tools and the like seem like good things, but what about gas powered generators? How does one get parts for them. Eric has one of their inexpensive flux core welders, and it works well. Its not perfect, but for $100 it does the job. Good for fixing lawnmowers.

    Troy-Bilt has sent Eric the Storm 2690 Snowblower to test out. (GF is sponsored by Troy-Bilt, FYI) Video will happen with next big snow storm.

    Is it ok to buy a refurbished computer? If its from Apple, we say yes. Its time to upgrade the 6 yr old iMac and Apple has a refurbished section in their online store, with a good savings off a new model. Rick suggests buying the best one you can afford to future-proof as much as possible. Additional RAM was ordered as well. Buy as much RAM as you can afford, is our expert opinion, for what its worth…

    Erin from The Impatient Gardener blog has a post on 5 Flowers That Are Dead Simple To Grow From Seed. Great list for easy seed starting. Nasturiums are an easy one that Eric has grown, and the flowers are edible. We see the flowers for sale at the Farmers Market. The last flower that is easy is castor bean, be careful with growing this one, you don’t want your pets eating this one, if they are plant eater pets.

    Rick sent Eric an envelope of tomato seeds from the Klee Lab at the University of Florida. These tomatoes have very good resistance to common tomato problems. Will they grow in Eric’s yard? We will see.

    A sourdough starter email brings up an episode on sourdough by Gastropod.

  • Will My Bees Survive Winter?

    Helping your bees survive winter is one of the hardest parts of beekeeping. I have several videos about winter bee survival and feeding.  A reader asked:

    It’s been in the 20’s and 30’s for the last two weeks or so with another week of the same temps. If my bees are clustered will they be able to feed and keep clustered enough to survive until the weather breaks?

    Will My Bees Survive Winter
    Beehive insulated, with insulated inner cover, and strapped to survive winter

    Will The Bees Survive Winter?

    Honeybees don’t hibernate, they cluster. Their metabolism does slow down, but the don’t ‘go to sleep’. The bees move around the hive, in a balled mass, with the queen in the middle. They move through the hive eating the honey stores. The bees on the outside of the cluster move their wings to generate heat, to keep the cluster warm. And the bees rotate, kinda like a volleyball team, so the bees on the outside of the cluster slowly move to the center to warm up, and the inner bees move outward to be the cluster-warmers.

    In a perfect world, this works fine, then spring comes, and the queen lays eggs, and off we go on another season. But in the northern states, this is not the case. Whatever issues a hive had over the season has a big impact on whether the bees survive winter.

    Best Beekeeping Books
    Best Beekeeping Books That I Still Use

    I’ve got a bunch of vids and how to posts on the topic of winter beekeeping, but I’ll answer the question above right quick.

    Temps in the 20 and 30s are pretty good for winter, I think. The problems get really bad when its near zero. But you can still lose your bees in a 30 degree winter.

    Mite Load. If there are mites in the hive in the fall, that number will explode in winter. As the mite load rises, the bee population declines due to winter die off. The mites will eventually kill off the rest of the hive. Currently I think the best mite treatment is with oxalic acid, here’s the video.

    BTW, just because you don’t see mites doesn’t meant you don’t have any. You more than likely do.

    Will My Bees Survive Winter

    Condensation. The outside of the hive is cold, the inside is warm. Condensation collects on the top of the hive, and drips back down onto the bees. Cold bees are OK in winter, cold wet bees are dead bees in winter. The combined use of dry sugar feeding and a insulated inner cover eliminates condensation.

    Starvation. Either leave a lot of honey on the hive or feed your bees starting in late summer. Sugar syrup is cheap winter bee survival insurance.

    Will My Bees Survive Winter
    Bees eating dry sugar in late winter.

    Emergency Winter Feeding. I think the dry sugar feed is great, but you can also put fondant, sugar cakes, or candy boards on top of your hive. The dry sugar method, aka moutain top feeding, is literally a piece of newspaper on top of the hive with 4 pounds of dry sugar poured on it.

    Northern Queen. Southern queen that come in bee packages have a lower survival rate than Northern Queens. If you have bought a package, you can replace the queen in summer (requeening video here), and increase your chances of winter survival.

    OK, that is my 500 word thought on the subject, what are your thoughts? I always learn from you all in the comments. Thx!

    Prepare your bees for the cold with this winter beekeeping checklist

  • Hook Up A Generator To Your House With This Generator Interlock Kit – GF Video

    A generator interlock kit is a simple and safe way to hook up a generator to your house. I just learned about this kit, and wish I had installed it in my house. I installed a generator transfer switch in my house, now I wished I did this instead. Watch the video I made below and read through for more information.

    Steps To Install A Generator Interlock Kit

    Generator Interlock Kit
    Circuit breaker with metal shield provides power to the panel from the generator.

    First of all, I strongly suggest you hire an electrician for this project. I am showing you the steps because I myself was curious how the generator interlock worked. Sticking your hands into an electric service panel is not for the non-professional, OK?

    Generator Interlock Kit
    Interlock in generator ON position. Not how it blocks the line power from being turned on.

    Basically, an interlock provides a way to feed power from your generator into your electric service panel without backfeeding generator power back down the utility line. Backfeeding is bad, it means sending electricity from your generator into the electric grid, aka, the utility wires that connect to your house to the local power company. Backfeeding can kill a lineworker.

    The interlock provides power to your home in a simple way. A 220 volt circuit breaker, matched to the amperage of your generator, is installed at the top of the stack of breakers that feed power to the various rooms and appliances in your house. This 220 breaker is connected, with the proper gauge wire, to a weatherproof outlet outside your home. (NOT in your basement)

    Generator Interlock Kit

    The interlock kit is a metal slide, that is fabricated for the model of circuit panel you own. Interlocks are not avail for all electric panels, you will need a generator transfer panel if one is not made for your panel.

    This mechanical slide does one simple thing. It keeps anyone from turning on the main power breaker (power from the utility lines) when the generator circuit breaker is turned on, and vice versa. Utility power is feeding the circuit panel, the slide is pushed down, generator feeding the panel, the slide is up. The interlock prevents both the utility power and the generator power breakers from being ‘ON’ at the same time.

    Couple of Things I Learned About Generator Interlock Installation

    • Site your weatherproof outlet where you can easily get to it, and have the generator near by.
    • Make sure the outdoor outlet is mounted into studs or brick, you will be yanking on it to plug and unplug the power cord
    • Interlocks are not available for all circuit panels.
    Generator Interlock Kit
    The 10-3 wire can be run through a hole in the mortar, but the bolts holding the outdoor outlet must be set into the brick or a wood stud.
    Generator Interlock Kit
    20 amp L14-20 generator cord, and the corresponding outlet on the generator.

    Here is a list of items you will need for the installation, your electrician may need additional materials, talk to them before purchasing anything. This is sized for a 20 amp 220 volt generator plug & outlet, the L14-20.

    Generator Interlock Kit (this is the one for our panel, yours may be different)

    20 amp Two Pole Circuit Breaker (for our brand of circuit panel)

    Generator Power Cord (20 amp with L14-20 plugs)

    Outdoor Outlet For Generator (20 amp)

    Let me know thoughts and questions, I’ll do my best to answer, thx!

    Hook Up A Generator To Your House – GF Video

  • Dandelion Greens & Bacon Salad Recipe : GF Video

    What do you with dandelion greens? You make a salad of course. Watch our video to find out how to identify and forage for dandelion in your yard, and make a great salad. If you are looking for edible plants in your yard, make sure the yard hasn’t been treated with herbicides or other things that are bad for you to ingest. Check out our other foraging videos here.

    How To Find and Prepare Dandelion Greens

    Wild Greens are abundant if you live in an area with grassy weedy places. They grow, we eat them. Things like mustard grow wild, wild onions, dandelion, purslane, burdock, all sorts. What I like about dandelion is it is ubiquitous and abundant, and it grows all summer. It is said that the dandelion greens are more bitter after the dandelion flower have bloomed, but my personal experience has been mixed. It is true the older the leaf, the more bitter it will be.

    I do suggest buying at least one foraging plant identification book, I’m a big fan of Leda Meredith’s Foraging Books, she also has regional foraging books out as well. A second book you might consider is Joy Of Foraging.

    Dandelion Greens

    Follow this simple dandelion greens recipe, and all will be great. It uses items you probably have in your fridge.

    Dandelion Salad Recipe  makes 2 salads

    1 bunch of dandelion, about a large handful, tap root and flower stems removed, washed and dried.

    2 strips of thick cut bacon

    balsamic vinegar

    2 eggs, poached for 3 minutes

    1 avocado

    Cook the bacon to crisp

    While the bacon is cooking arrange the dandelion in two salad bowls or plates.

    Cut the avocado in half, core and add to the bowls

    Add the poached egg on top of the greens,

    Cut the bacon into small pieces, spread over the salad

    Pour about a half teaspoon of the bacon grease from the pan over each bowl.

    Serve as soon as possible.

    Now on to foraging for Lambsquarters!

    Wild and Urban Foraging for Lambsquarters : GF Video


  • A Simple Way To Insulate Your Hoop House With This Curtis Stone Video

    Rick and I were talking on the GF Radio podcast about the success of his mini greenhouse, and how using 2 layers of  plastic, separated by some wood supports, had added an insulation layer. I immediately thought of a video I saw on Curtis Stone’s YouTube channel about how he uses a double layer of plastic in his very successful market garden operation. Here is the video:

    Curtis uses a fan to force air between the two layers of greenhouse plastic, which reduces heat loss through the plastic. Think of it as air as insulation. I think you can do this on a small scale, but the key is to pick a fan that works for your size greenhouse. Here is a good starting point for fans you can connect to your greenhouse plastic.

    I’m wondering if you have a small greenhouse, could you hook up a bathroom fan you’ve pulled out of a dumpster? I’ve got a few from some renovation projects sitting here looking at me. One of them worked really well on the homemade sap evaporator, but we have more to put to use.

    I have built several what I call mini-greenhouses, aka hoop houses, to cover our raised beds. And of course, we have videos about all of them here. Considering the size of my raised beds, 4′ wide x 12′, I’m not sure using a fan to insulate the layers of plastic would be a good use of electricity. Maybe we could go solar with the fan?

    I am a big fan of Curtis Stone, and how he shares so much info on his YouTube channel. He also has in-person classes if you are serious about becoming a market gardener. I’ve learned better methods on how to grow carrots and salad greens from Curtis.

    He has turned his yard, and those of a few of his neighbors, into farmland, basically. Gone is the grass and instead there are rows of vegetables. This doesn’t go over well with everyone, but I’m all about a smaller lawn.

  • Love Of Goya Foods! GF Radio 461

    Rick and Eric both have big love for Goya Food products, especially the Pardina Lentils, Canned chickpeas, and the spices. The grocery store near Eric in BKLN has a whole aisle devoted to Goya, and its a beautiful thing.

    Eric talks about how changes at Amazon are affecting GardenFork. Please do not use a GF link that takes you to the main page of Amazon. You can check out GardenFork’s Amazon Shop Page here, on the GF Amazon Page, I have listed a bunch of tools, books, cool stuff that is GardenFork approved.

    Making yogurt in the Instant Pot is super fun, how to make yogurt video here. Rick uses the heirloom yogurt starter from Cultures for Health . He also adds in probiotic capsules from the health food store. Kefir is also good for tuning up the biome.

    A recent Science VS. podcast talked about obesity and touched on the biome in your gut and how that affects how much people weigh. It seems a lot of weight issues are not what we think, and the biome in your stomach has a lot to do with weight issues, and how come it is hard to lose weight.

    Rick got a new Apple Watch for Christmas, and he likes it. Rick finds he looks at this phone a lot less now, he can dictate Notes into the watch, and the world globe showing weather patterns is for the geek in all of us.

    More info on how the near field communications chip in new smartphones is a good secure way to pay for things. Rick can talk about this more, and he does on the show, but its sounds like its hard to hack, which is a good thing.

    Eric’s new cookbook is Deep Run Roots by Vivian Howard. She also produces a show called A Chef’s Life you can watch on the PBS app.

    GFR listener Kathlean writes in about using acorn flour, we hope to have Kathlean on the show soon.

    Rick’s new double wall greenhouse has done well, keeping this swiss chard from freezing. Watch The Curtis Stone video we talk about.