Mike joins Rick and Eric to talk about raccoons, snowmobiles, and the mayan calendar. links to follow!
photo by kconnors
Mike joins Rick and Eric to talk about raccoons, snowmobiles, and the mayan calendar. links to follow!
photo by kconnors
Cooking pizza in a fireplace is not rocket science! No need to build a pizza ove, let me show you how to cook pizza in the fireplace. This is totally a “Use What You Got” GardenFork moment. I wanted to make pizza in our portable backyard pizza oven, but it was freezing outside, and staring at the fireplace, the light bulb went off in my head. I already had a built-in pizza oven in our living room.
For this pizza oven method, you’ll need a cast iron dutch oven combo cooker, You can buy a combo cooker dutch oven here
And a cooking or camping grate. you can buy the camping grate here
We make our pizza dough – watch our pizza dough recipe video here – the day before and let it do a slow rise in the fridge overnight.
Be very careful when working with the fire! Fire burns – don’t wear loose clothing, wear gloves and use fireplace tongs or other metal tools.
After the fire in the fireplace pizza oven dies down bit, put the camping grate over the fire and preheat both parts of the dutch oven. You may need to adjust the height of the camping grate over the fire, I used bricks under the legs of the camping grate. Have all your ingredients prepared ahead of time, as well as the dough rolled out.
Hardwoods make the best firewood, my wood shed is primarily stacked with oak and maple. The maple takes longer to catch, so I use a mix of what I have.
Have you used your fireplace as a pizza oven? Let us know in the comments section below.
 Here are the links again to the combo cooker dutch oven and the camping grate:
We’ve been making a bunch of pizza oven videos and how to make pizza videos, so I thought we should show how to make easy pizza dough using your food processor.
You can make this pizza dough recipe and put it the fridge for two hours, but its much better if you mix it up the night before and refrigerate the pizza dough overnight. I had some extra pizza dough after making a bunch for the video and put it in the dutch oven as a round loaf and it baked up great.
3 cups Bread or All Purpose Flour
1 tsp active yeast about 1/2 packet of yeast
1 tbsp sugar
1 tsp coarse salt
1/3 cup olive oil
1 cup warm water
Put all the dry ingredients in your food processor and turn on the food processor for a few seconds to swirl the ingredients together.
Turn on the food processor to high and pour in the olive oil
Start to slowly trickle into the food processor the water. The goal is to get the dough wet, but not real wet
Once the dough forms into a rough ball, turn off the processor, gather up the dough, and put it on a large piece of plastic food wrap.
Wrap the dough with the plastic wrap and put in the fridge for at least 2 hours, overnight is better.
When rolling the dough out, if it shrinks back, allow it to rest a few minutes and then roll it again.

Mij, our Labrador Henry’s brother, who lived down the road from us and appears in many GardenFork shows passed away this weekend. He had developed an enlarged heart.
Mij was the tennis ball obsessed alpha male of the Labradors who congregate in our yard. He would let Charlie Pup and Moose act like the goofs they are, while he and Henry sat in the yard or on the couch and watched. He was a great pup.


Why do my short ribs blow?

So this is one of those where I had some short ribs in the freezer, I defrosted them, and cooked them pretty much how everyone else does, and the short ribs come out tough, not fork tender.
I’m not a huge cookbook collector, but I have few general go-to reference cookbooks, and the braised short ribs recipes are all pretty much like this:
Sear the ribs in dutch oven or in a baking pan in the oven, add liquid, cover and cook for hours on a low flame.

I did try the browning the meat in the oven method, because I think the short ribs can get cooked to fast when searing them. Or maybe this is all just in my head and not real food science…
Thinking this was one of those dishes I could safely ignore, I got sucked into the world of tweaking the GardenFork.TV website, and then realized how long it had been since I started cooking the ribs. I got up and turned them in the dutch oven, and let them cook longer.
I even cooked these in the afternoon, and then pour off the liquid, threw that in the freezer to separate the fat out – which worked, BTW.
I gently reheated the ribs which I had cooked with onions, carrots and about 2 cups of liquid, half red wine – half water.
But the ribs were tough, which bummed me out a bit, as they looked great when i first opened the package. Food guru Chris Kimball has taught me that meats like short ribs will turn tough if cooked too long. The proteins lock up and don’t allow any liquid in, thus being tough to chew.

So many recipe give a time and oven temp to cook meat, but what I think recipes really need is a temperature to attain, and then the meat is done.
Have to work on this more. What are your thoughts on overcooking meat, especially things like short ribs? Let us know below:
 Today we talk with longtime GF viewer James on how to grow hot peppers, how to dry hot peppers, and bringing your own condiments into a restaurant, and what can happen when you do that.
James tells us of how he migrated from a regular in ground vegetable garden to using raised beds, and we talk about our how to build raised garden beds videos. James may make a video himself soon, we look forward to it.
We also touch on freezing vegetables, especially summer squash, which James has a good technique for.
James is co-host of The Book Guys Podcast, avail on their site and iTunes. We talk about how to start a podcast and what gear we use to record our podcasts, and what we get from podcasting. James has been using Go To Meeting to record his show, we use Skype with a plug in called Call Recorder that records the conversation and saves it as a quicktime file that can be edited.
Then we get into Mushroom Identification, and the recent GF Video on Oyster Mushroom identification and how to cook mushrooms. James, like myself, is a recent convert to mushrooms, interesting how as one slowly becomes an adult you start to like adult foods.
photo by mugur
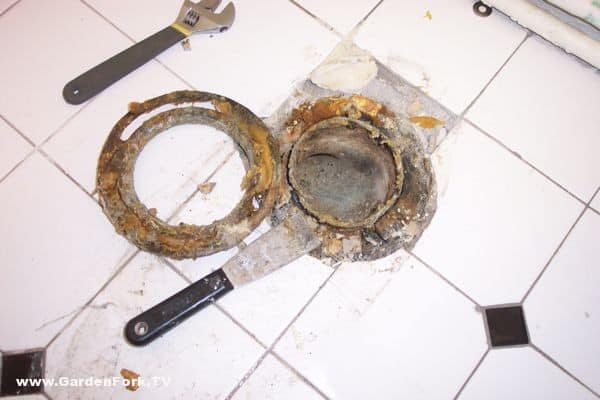
Is your toilet wobbly? Learn here how to replace a broken toilet flange. If your toilet wobbles and is not solid on the ground, it could be that the toilet flange is rotted or broken. fun. Let’s see how to repair the toilet.
You can fix this. I did. And if you follow our how-to toilet repair photos here, you’ll be a DIY home repair expert, or at least you’ll be able to replace a broken toilet flange.


First remove the toilet. Turn off the water line, flush the toilet, and remove the water line from the bottom of the toilet tank. Have bucket handy, as water will come out of the tank. Sponge out as much water from the tank and bowl as you can. A handyman trick is to use a wet dry shop vac to suck all the water out of the bowl and tank.
Remove the nuts on each side of the base of the toilet. These nuts-bolts attach the toilet to the flange. You may have to use a saw to cut the nuts off, which is ok, because you are going to put in new toilet bolts and nuts. The flange, when brand new, is attached to the waste pipe. Many times it rusts or snaps off. Tilt the toilet on its side and move out of the way. Have a helper assist you in moving the toilet, they are heavy and bulky.

Use a putty knife to remove the wax ring residue from the exposed flange and inspect the flange and surrounding area. What is key here is if the wood subfloor is rotted. If this is the case, you will have to cut out the surrounding subfloor and replace it with new plywood, then fix the flange.
Thankfully on this home improvement project, the subfloor was fine, just the flange fell apart. Go to your hardware store and buy a Super Ring Replacement Toilet Ring. There are several models by different suppliers, don’t buy the cheapest one, its your toilet, remember…
Also at the hardware store buy new toilet mounting bolts, they usually come in a package with the nuts and washers.

Put the toilet mounting bolts in the flange pointing up, and use some wax from the old wax ring to hold them in place. Place the super ring replacement toilet ring over the waste line, making sure the mounting bolts are in the same place as the original bolts were, one bolt on each side of the flange.
Screw the new flange into the subfloor. You may have to use a hammer drill to drill through existing tile flooring or cement substrate. Set the new toilet wax ring onto the flange on the base of the toilet, and guide the toilet back onto the super ring, making sure the toilet mounting bolts are lined up with the mount holes in the toilet base. The super ring toilet ring allows for you to adjust the location of the bolts.

Press down on the toilet to seat the wax ring, wiggle the toilet back and forth to get it to set down and seal. Cut off the the bolts about 1/2″ above the toilet base. Spin on the mounting bolt nuts, and tighten them, but be careful not to over-tighten, as you will crack the porcelain toilet.

Re-attach the water supply line, turn on the water valve, flush the toilet and check for leaks.

So there you go, not as complicated as you thought. The biggest red flag is if the subfloor is rotted, because then your simple home improvement project has become a much bigger deal.
We talk with my neighbor Charlie – who Charlie Pup is named after- about growing up eating grits and how to make grits in New York.
Electric clock repair video I made with my sister. She bought an Empire style electric clock that needed to be rewired, so we made a how-to video on rewiring an electric clock. Make sure the clock is unplugged while you work on it!
When repairing an electric clock, pay attention to whether the old plug is polarized. Polarized plugs have one power lug larger than the other. If so, be sure that the wire from the polarized lug on the new plug attaches to the same place in the clock that the old polarized plug wire did. Its important to pay attention to this detail, it can reduce the risk of shock.

We use push connectors to fix this electric clock. I like push connectors because they make stripping the wire insulation unnecessary. All you do is push the ends of the old wire and the new wire into the push connector and press the metal blade down through the wires to make the connection, then close the plastic tab to seal the deal.
This same technique could be used for other electric appliances that need rewiring or new wires. However, make sure these old appliances are OK to use, and are not a fire hazard.
Here is a good book I like if you want to learn basic home wiring:
Have a question or suggestion or story? Let us know below:
Learn how to install a dishwasher with this video I made for you. Installing a dishwasher is not hard, nor is it rocket science. If you have to remove an old dishwashwer, see my video on dishwasher removal. The hardest part might be buying a new dishwasher and then reading the installation instructions.
To remove the old dishwasher, you’ll need a screwdriver, a pliers, and an adjustable wrench. Be sure to turn off the water supply and make sure the power to the dishwasher is turned off or disconnected. Most new dishwashers plug into a wall outlet under the sink, older models may be hard wired.
Hard wired means there is that metal cable attached to the dishwasher or it may be what is called Romex, the vinyl covered electrical wiring. Either way, turn off the circuit breaker that the dishwasher power wire is connected to, then disconnect the power wire. Put wire nuts on the bare wires. If the machine is plugged into a wall outlet, usually under the sink, just unplug it. Simple!
One thing to keep in mind: Have a bowl handy, as when removing the hoses, they may need to be drained. You don’t want dishwasher water draining all over the floor.
If the floor has been tiled after the cabinets and original washer was installed, you may have problems getting the old washer out. The new tile floor is higher than the original floor, so the dishwasher can’t slide out.
Make sure the insulation wrapped around the new machine is intact and goes in neatly, this is key to reducing the noise of the washer.
A common misconception I see is people using teflon tape or pipe sealant on the compression fitting from the water supply line. You should not use tape on that joint. You will need to use teflon tape on the right angle fitting that comes out of the dishwasher. See the photo below for how to hook up the water supply line. Make sure the right angle fitting points toward the back of the dishwasher. Remember that the dishwasher is hooked up to the hot water supply.
It helps to have a friend help when figuring out how to install a dishwasher, and remember, if all else fails, read directions.


We talk with Matt of WrightFood about how to make salami at home, and talk in general about home cured meat, and most important, food safety with home meat curing.

.
Here’s a simple squash soup recipe that uses heirloom winter squash- Blue Hubbard – instead of the usual Butternut Squash. You can use any type of winter squash in this soup, but we wanted to trumpet the use of more heirloom vegetables in our recipes here.
We grow heirloom and hybrid squash in our neighbor’s field, using the weed stop fabric. We made a how to video about using the weed free plastic gardening mulch, which you can watch here.
Winter Squash are easy to grow. The biggest problem we have with growing squash is the Squash Vine Borer, and we have 2 videos on dealing with them
An organic method to prevent the Squash Vine Borer Video
How to deal with a Squash Vine Borer infestation Video
You can cook winter squash several ways, steaming, frying, baking… I prefer to roast squash. You need to be careful when cutting winter squash, it’s quite dense, and you need a sharp knife. Take care to steady the squash and yourself when cutting it up, if you slip, its a bad thing with a knife.
Baking or roasting squash helps sweeten the flavor of the squash, i think. I split the squash in two, put both halves face up in a pan, and stick in the oven; don’t cover with foil.
Heirloom Simple Squash Soup Recipe
Ingredients
• 1 Heirloom Squash, such as Hubbard
• 1 medium onion, chopped
• 1 small handful sage or thyme or a mix
• 2 cups lowfat milk
Cooking Directions
1. Split the squash in half, scoop out the seeds, place face up in roasting pan and roast for 1 hour at 350 or until squash flesh is soft. you can check this when a knife easily inserts into the flesh.
2. When squash is roasted, put 2 glugs of oil in a dutch oven or deep pot, toss in oinion and cook till just golden and kinda clear
3. Add cooked squash flesh to the pot along with chopped herbs
4. Mash the squash with a potato masher and add some of the milk.
5. You can use a hand blender or masher to cream the squash, adding more milk to get the consistency you want. A blender will work also, but its more messy.
6. Salt and pepper to taste and ladle into individual bowls.
7. You can add in home made croutons, which makes the soup more of a filling meal.
The Camera Operator does not appear on GardenFork.TV . You only hear her wry commentary. Some people have asked for a photo of the CO, here’s one.


The guys at iTunes Podcasts had a poll on their Facebook Page, asking people who their favorite cooking podcast was, and GardenFork got the most votes! They then featured GardenFork on the main podcast page of iTunes. How cool is that?
A big thank you to the iTunes crew. Really appreciate that!
Rick and Eric talk about the GF Kickstarter campaign, an update on Charlie Pup’s eye, being nice to nurses and what its like to be drunk in the Bellevue Hospital emergency room. Then Rick and Eric reflect on the beekeeping season.
Foraging for Mushrooms this fall, I found a bunch of Oyster Mushrooms, and made this Mushroom Identification Video. Oyster Mushrooms are edible and delicious. They grow on dead or dying trees. The trees can be standing or on their side. I’ve found oyster mushrooms growing out of the ends of cut logs, and the stumps of dead trees.
Oyster mushrooms grow in clusters, and are usually stacked on top of each other, the individual mushrooms are kidney shape. It has gills and doesn’t have much of a stem. Oyster mushrooms are white to tan colored, they are usually darker in color later in the season. The mushrooms in this video were harvested in late November.
When harvesting, I always leave some mushrooms on the tree to allow the mother plant to spread spores to create more mushrooms. So don’t strip a tree of all its mushrooms, you may get a second growth of mushrooms on the same tree, so check back a week later, or after a rain.
Be sure to be very sure what you are doing when foraging for mushrooms! Learn from someone who is a practiced mushroom hunter, or consider taking a class. Do a web search for your state or county or city and “mycological society” and you may find a group offering classes. Also check nearby nature centers.
Click here to see our other mushroom identification posts
Cross check the mushrooms you find with several sources, books are best, I think. I use several books for identifying mushrooms , below are the mushroom identification books I recommend:

Click Here To Buy From IndieBound
Click Here To Buy From Amazon

Click Here To Buy From IndieBound
Click Here To Buy From Amazon
GardenFork Viewer Kathlean made a brick pizza oven based on our How to make a backyard brick oven video, and put together this great video of how she made a pizza oven out of brick. Kathlean found the brick on freecycle.org, which is brilliant – i’m all about use what you got, and these bricks fit the bill. These bricks have holes in them, our brick oven bricks did not, but Kathlean puts the holes to good use, making the roof of the oven out of brick and black pipe that slides through the brick and supports it.
We’ve gotten a bunch of photos of back yard pizza and bread ovens, and i plan on putting together a photo gallery of the backyard ovens people have made inspired by our brick oven. Next on my list is an enhanced oven to bake bread. I need to increase the mass of the oven with more brick, and make a door to cover the front opening. Then we’ll heat up the oven with firewood to about 700F, let the fire die down, and slide in some loaves of bread. Neat.
Have you built a brick, stone, or cob oven? I’d like to hear about it, you can leave comments below:
 We asked some of the GF contributors for their suggestions for Holiday Gifts, here are their responses:
Monica
• I’m doing my best to buy from my local shop owners, many of which are friends. It’s a happier season all around that way. Between the Green Home Store, the Wine shop, the fancy dog treat store, we’re basically covered for everyone.
• For product lovers: a Birchbox subscription.
• Tip: Hold off shopping until the last possible minute. The best deals are on or around December 22nd.
Mike
• Arduino Starter Experimenter’s Kit
($34) – This generation’s Erector Set.
• A Lodge Cast Iron Skillet
($19) – The most versatile pan in the kitchen. I never put mine away.
• A Bicycle Tune Up gift certificate from a local bike shop ($50 – $150 depending on the services) – Cables stretch, chains stretch, oil wears away, derailleurs get out of alignment, grease gets old, people don’t get their bikes tuned up enough, the riding difference can be night and day. Here’s an example from my local bike shop.
• Gerber Needlenose Multi-Plier 600
($43) – The pliers can be deployed one handed. That’s extra handy when holding a bass by the lip with one hand and getting the pliers out to remove a hook with the other.
• Apple iPad
– I use mine for hours every day. Music, magazines, looking things up, I have electronics tools on it, social stuff, schematics, data sheets, games. Most people I know who didn’t think they’d use it much end up attached to it. (Rick agrees and adds: The older ones eyes get, the more you gravitate away from smartphones and toward tablets.)
• Get someone a bunch of really boring stuff that they use all of the time – something day to day they will no longer have to worry about. Imagine if you didn’t have to buy toilet paper for 6 months.
Rick
• Apple TV box ($95) – and then cut the expensive cable. You can access Netflix and Hulu through the box, then buy TV shows from Apple on a pay-as-you-go per show basis. We’re saving tons of cash and we’re watching less TV. More importantly, all the TV we watch now is meaningful, not mindless habit.
• Flashing LED front and rear lights for a bicycle to use day and night. The front flashing light has saved me a couple of times when people started to left turn in front of me and across my path.
• Lewis N. Clark WaterSeals Waterproof Pouch
($16) – A waterproof swim pouch with waterproof earphones for an MP3 Player. I slip an old cheapy MP3 player loaded with quality podcasts (like Gardenfork) and swim without fear.
• Jabra STREET2 Bluetooth Stereo Headset
($58) – Allows me to carry my iPhone on my belt but have the headset cord in my shirt and out of the way while gardening. It’s pretty much impervious to heavy sweat.
• Becoming Jefferson’s People
by Clay S. Jenkinson – The most Gardenfork-y book I know of: self reliance, gardening, cooking, education, optimism, citizenship, philosophy.
• What’s Wrong With My Plant? (And How Do I Fix It?)
by David Deardorff, Kathryn Wadsworth ($17) – One of the most helpful gardening books I own. The books is a flowchart with logic gates – starting with stem, roots, leaves, fruit, or flower – and then follows a branching logic tree to a diagnosis.
Tony
• In the DIY vein, make a printed certificate for some task that you can do, and give it to someone who’s not so capable, or who may not have much time. Some ideas: paint a bathroom, make a four course roasted duck dinner (or something else nice they wouldn’t normally make), organize a garage, or hang shelving units
Sarah
• OXO Good Grips Salad Spinner
($30) – For anyone who is a member of a CSA, has a vegetable garden, or otherwise eats a lot of greens. It makes cleaning greens so easy that it’s well worth the real estate it takes up in the kitchen.
• Mr. Beer Home Microbrewery System
($33) – A great introduction to how to brew. Buyer beware: May instigate lifelong obsession with homebrewing.
• Knife sharpening services – This is one of those things I don’t get around to nearly as often as I should and am always so happy when I do. A sharp knife isn’t just safer, it’s also far easier to use.
• Vitamix 1782 TurboBlend, 2 Speed
($380) – The theory here is you can go through five $100 blenders that don’t meet your expectations or invest in a Vitamix upfront. My husband and a handful of family members went in on one for my birthday one year and we use it often throughout the week to process soups, puree winter squash, make baby food, and even grind our own flours.
• Framing a sentimental photo – In the digital age we take so many pictures but rarely look at them months later. I love the idea of restoring an old photograph so that visual memory is not lost.
photo by mconnors