Noreen tells us how to survive a hurricane, how to prepare for a hurricane, and how to help afterward. Hurricane Florence just went through North Carolina and Noreen’s town was flooded. Noreen tell us what is was like to go through the storm, some of the ways they prepared, and how they are helping out survivors after the storm.
A weather radio is a must, because your TV may not work in a storm. Plus food, a variety of food is what Noreen suggests. You will get tired very quickly of hot dogs 3 times a day. A variety of ready to eat, or easy to cook foods is good.
Mac and cheese should always be ready, but also consider canned tuna or meats, plus canned soups. Go buy bags of ice and a large cooler. Use these to keep refrigerated items cold.
The deep freezer will start to thaw after 4 days without power. Pack the freezer before the storm, and don’t open it when the power is out. It will stay cold for quite a while this way.
Put away yard items that can blow around and cause damage. Patio chairs can become airborne, a bad thing, yes? If you are in a low lying area, move your cars up to higher ground.
Before and during the storm, play close attention to the local weather. Leave your house if local officials call for it. While the storm is moving through you area, keep the radio on to get updates.
After the storm, if you power is out, use a propane grill or outdoor burner to cook food. Be sure to check on your neighbors and see what they need. Pool resources, not everyone will be as prepared.
Will and Eric talk about how to identify mushrooms, using books and apps. And how Will did with some Fried Chicken Mushrooms. Will uses two foraging apps, Nature’s Foraging and Nature Mobile.
If you want to start learning how to identify mushrooms, I suggest learning from someone local. Ask around to see if one of your neighbors is a mushroom expert. And check out local conservation groups, they may offer classes, that’s how I started out learning.
The main mantra for musrhoom foraging is double triple check your mushrooms. Start slowly and don’t over-harvest. Bring along a serrated knife and a net or mesh bag. The mesh bag allows the spores to disperse as you walk home.
Preheat the canning jars before putting filling them.
Lower them gently into the hot water canner.
Use rubber coated tongs when handling jars.
Set on a wire grate to cool.
Kristen sent us an article on honey smuggling. We were surprised at how much honey is consumed in the US. The best way to be sure you are not buying adulterated honey is to buy it from a local beekeeper. It may cost more, but you are supporting a local business and protecting open space.
Learning how to mud and tape drywall corners is like most things. The more you do it, the better you get. Here’s a video showing how I do it. You can also see how we mud and tape drywall joints in a video here.
Steps to Mud and Tape Drywall Corners
Get the joint compound smooth like cake frosting.
Lay down a thin layer.
Apply wet tape.
Apply thin layer over tape.
Repeat.
That’s about it. You will get better with the mud and tape drywall thing as you go along. Breathe and go slow. Put down lots of tarps. Play podcasts like GardenFork Radio!
Since making this video, I have started using a new corner tape that has a metal corner built into it. This makes things much easier. But use what you got, you know? The new corner tape has a hard metal corner in the center and paper edges, but it sits nice in the corner and can cover over badly done corners.
For outside corners, if the area will get a lot of traffic, go with the all metal corner bead. It can be beat up more. It takes longer to mud in, but its worth it. Having things bang into the corner can damage a wall, as you probably know.
My other secret to mud and tape drywall corners is to not sand, but wet sponge the compound after it dries. Might seem counter-intuitive, but it works nicely, as you can reshape the compound. And it creates NO dust, which is the thing I hate about mud and tape projects.
Keep in mind you can always hit the re-do button on drywall projects. Joint compound is very forgiving. It is REAL important to keep the bucket of compound pristine. Always put back the thin plastic sheet to keep it moist, and the hard cover to keep debris out. If you get dust in the bucket, its bad. You will not be happy.
Erin tells us about how she built her amazing raised vegetable beds, which put to shame our DIY raised garden beds. We cover the dreaming, planning, ground preparation, construction, and sealing of the beds.
Erin’s raised beds are a click above our simple ones, listen as we walk through how she came to this design, and what she learned as she went along.
Learn how to hook up a generator your house electric panel safely in this video. We run our house with a portable generator and transfer switch when the power goes out, and here we’ll show you how to safely connect a generator to your circuit breaker panel. Watch this video, and read through the text below for more information.
AND, watch this video about installing a generator interlock, which is another option for hooking up a generator to your house. It is a simpler option, if an interlock is available for your particular breaker panel.
IMPORTANT: Do not run a generator in your basement or your garage. Gas engines create carbon monoxide, which will kill you. OK?
Using a portable generator is an affordable way to power the house during a power outage. You can install one of those large generators that sit on cement slab with an automatic transfer switch, but we opted for the less expensive portable generator and a manual transfer switch. I installed the transfer switch myself, but you must follow local electrical codes, and if you are the least bit hesitant, or are not experienced in working on electrical panels, please call a qualified installer.
This 6500 watt generator runs everything we need in our house
Before you go off an buy a portable generator, stop, breathe, and do some math. Generators are rated in watts. You need to know how many watts or amps all your electric powered stuff uses.
To determine how many watts of generator power you need, figure out what appliances in the house you want to power with a generator. Each appliance will list on a label somewhere how many watts or amps the appliance uses.
Use the formula if the appliance is rated in amps:
Watts = Volts x Amps
This will help figure out how many watts you need to power your home. And it will give you a good idea of how large a generator you need to buy. Most portable generators are rated by how many watts they generate.
Go around and total up how many watts your fridge uses, the freezer down in the basement, the large TV, the well pump, the sump pump. Think about all the big things that draw power in your house. (Not the Telsa, ok?)
At its most basic, that total wattage number tells you how powerful a generator you need. Keep in mind most of these appliances will not be running all at the same time. Well pumps turn on for maybe a few minutes, furnaces run longer.
Light bulb usage is not worth calculating, I think, especially if you use LED bulbs. The power drawn is minimal.
After 12 years of regular winter power outages, I have found that I never use the full wattage of the generator I bought. If I had to do it again, I would have bought a smaller portable generator. The meters on my transfer panel barely move when powering most of my house. Something to keep in mind.
The only caveat to under sizing a generator is: with my generator, you can tell when the well pump turns on. The generator engine is definitely under load when the water is pumped. Check with your well pump installer for how many amps the well pump needs to run, that is real important. You don’t want to risk burning out your well pump with an undersized generator.
That being said, my friend has a 5k watt generator, and it runs his well pump just fine. But just check how many amps your well pump draws, OK?
Figure out what circuit breakers control all the things you want to supply power to in a power outage. You will need to buy a manual transfer switch that has that many breakers. Here is one brand I like to use. (affiliate link)
Can a portable generator run whole house AC? I learned the answer in short order the other day. I had just installed a generator interlock switch (video here) on my sister’s electric panel, and showed her how to hook up a portable generator to the house.
Can a portable generator run whole house AC?
The power went out during a recent storm during a heat wave, and out came the portable generator, ready to hook up to the house electric panel. Soon we would have the whole house air conditioning up and running.
The proper hook up steps were followed. All breakers turned off, main breaker turned off. Interlock switch engaged. Generator cable connected from it to the weatherproof outlet. Fire up generator.
But will a portable generator run whole house AC?
The generator started up right away on the second pull. The generator used to never start easily, but thanks to the new carburetor we installed, and an excellent generator tune up it fires up nicely.
We then switched on the 240 volt AC breaker in house electric panel. The air conditioner started to fire up. Then a clicking noise started coming from the outdoor unit. We shut off the breaker, waited a few minutes, and tried again.
And it did the clicking thing again. The AC tried to start, but never got up to full speed. After this second try, we didn’t try again. We set up some fans in the house and called the air conditioner repair guys.
Portable generators are a great thing to have, they can run most of a house when the power goes out. I call them portable because they are on wheels, they aren’t those giant metal boxes that sit on a cement slab connected to a propane tank next to the garage.
I’ve talked about how to size a generator for your needs in this video. Figure out how many watts/amps you want to power in a house when the power lines go down, buy a generator that matches that number.
Problem here was I didn’t do this with this install. We already had a generator that came with the house, and it seemed sufficient to take care of our needs.
The air conditioner repair guy came out quickly. I was happy and surprised, figuring they would be busy during a heat wave. He showed me the mistake we made in sizing a generator to run a whole house air conditioner.
I hadn’t looked at the label on the side of the AC that noted the unit needed 23 amps to start up.
That’s a lot of power. All at once.
And our little 5000 watt portable generator was not going to supply that.
Even a larger portable gen unit was not going to supply that amount of amps. One would need one of the stand alone units, with the propane tank and all, to fire that AC up.
Our work around for this was to realize we did not need to cool the whole house during a power outage during the summer. We could buy one or two bedroom size window AC units to have on standby, and stay in a few of the rooms in the lower part of the house during an outage.
The portable generator we have will run a couple of small window ACs.
Eric and Rick talk about using Firefox’s new tool to protect you from Facebook tracking you all over the web. Eric’s data drain from Instagram. Vegetables that are better for you cooked.
Bees on a hot roof in NYC can be a problem in the middle of summer. I built a DIY hive top vent board to keep the hives a bit cooler. This also helps cure the honey in the supers, by the way. On the flip side, if you want to learn how to insulate your beehives for winter, here are a few posts.
The inner cover on top of the hive has one small opening out the front of the hive. In summer, in full sun, this doesn’t do very well keeping the hive cool. You don’t want the hive to be cold, but you should do what you can to keep it from overheating. If you have a hive in the sun, and see tons of bees crawling around the outside of the hive, its probably not a swarm, but bees that are too hot.
To keep a beehive cool in summer:
Used a screened bottom board, and make sure the screen cover is pulled out.
Use a slatted rack below the brood supers.
Move it to a shadier area.
Use a hive top vent board or screen.
DIY Hive Top Vent Board How To
I built this out of scrap 1×4 pine. What we are doing is creating a chimney effect for the hive. The opening in the center of the inner cover isn’t huge, but if we add some vents along the side, we can get more hot air leaving the hive.
The diameter of the holes is not super important. These are 1 1/4″ but they could be 3/4″, I think. Do not put any vent holes in the front of the vent board, you don’t want to confuse the bees that use the upper entrance. They might try to use the screen covered hole as an entrance.
I covered the holes with some scrap window screen and stapled around the holes.
The corners of the board were made strong by gluing in some scrap wood. These are 2×3″ pieces. I use regular wood glue.
What is important is that the beehive ventilation board is at least 3″ high. If you use a narrow piece of wood, the outer cover, which has a big overhang, covers the vent holes. Learn from me, the first vent boards I made were from 1×2″ pine. They didn’t work.
You can see here how the outer cover would cover up the vents if we used a narrow piece of wood to build the DIY hive top vent board.
A cheap solar panel system to run most of your small house or cabin. This video walks you through a simple solar installation we did for a friends cabin in the woods.
A Cheap Solar Panel System, How We Did It:
This small weathered panel powers lights and electronics in the cabin.
We talk about a simple solar installation on the GardenFork Radio podcast, in this post I want to show you how I built a cabin solar system. There are many options for what to buy, but if you want to keep it simple, here are the items we have used.
You can get a smaller solar panel than the one we link to, but it will cost about the same amount of money, and its good to have the extra capacity for dark days.
Our solar panel is mounted on a DIY pole consisting of plumbing pipe and some scrap metal parts. It is pointed toward the ideal part of the sky for maximum power generation. If it points in the right direction you can also mount the solar panel on a roof or shed. A heavy duty outdoor extension cord is connected to the panel.
I cut a slit in the grass about 2″ deep for the heavy duty extension cord going from the solar panel to the basement of the cabin. In the basement the extionsion cord cable from the solar panel hooks up to the charge controller. The charge controller is wired to the batteries.
How many batteries you buy will determine how much power you will have on hand. If you don’t run a lot of stuff, you can get just one battery. This is very easy to set up, and its very simple to do.
Regular car batteries will not work here. You need either locally purchased deep discharge batteries, aka golf cart batteries, or sealed solar batteries purchased online. Pictured below are two 6 volt golf cart batteries, you would normally purchase one 12 volt battery.
Here is a still frame from the YouTube channel The Weekend Homestead’s vid on his solar setup showing the inverter and battery. The inverter converts 12 volts to 110 volts. (Full vid at end of this post) Be sure to read the instructions that come with the unit.
Inverter and battery from The Weekend Homestead YouTube video.110 volt powered by generator, 12 volt outlet runs on solar
This cabin can be run simply because we are using 12 volt LED lights and the fridge is propane powered. A solar powered fridge would require a larger panel setup.
You can now buy 12 volt LED bulbs with what’s called an Edison base, this is the regular silver screw in bulb type. This means you can use any regular lamps, and just drop in the 12 volt LED bulbs. Neat!
Laptops, radio, stereo all run on 12 volt. You can buy a 12 volt car adapter to charge many laptops. Or you can pick up a small car inverter and use your regular computer’s cable to charge up the laptop.
A portable generator runs the well pump and any power tools needed.
While making dinner at the camp we sometimes want to use a hand blender or a mixer, so for that we fire up the generator, which is hooked up to a few electrical outlets in the house. Be sure the generator is grounded, OK?
My main point here is that you don’t have to make this complicated, and you can probably do it yourself if you follow directions. Watch Will’s video on how he set up his cheap solar panel system.
Finally a mail order company creates the best way to unsubscribe from catalogs.
We get way too many catalogs for people who don’t really buy that much stuff. It all goes into the recycle. To me its a waste of paper and resources to print the thing, and get it to my door, only to be recycled into pizza boxes.
I have tried to unsubscribe from catalogs by tearing off the mailing label, and postal mailing it back to the company, asking to be removed from their mailing list.
This works only some of the time. Depsite several requests by postal mail, I keep getting a door mat catalog, even though I only bought one rug years ago.
Drives me a bit crazy.
With my efforts to declutter from years of collecting and keeping stuff I might use one day, I’ve managed to slim down the stuff. Selling off stuff on Ebay has been a great way to declutter.
Catalogs should be an easy one to keep from entering the house, right?
Not always.
But FarmTek, who has great agricultural equipment, makes it super easy to unsubscribe from catalogs. There’s a page on their site to just type in your info, and you are done.
FarmTek makes it super easy to unsubscribe.
I bet there are other catalogs out there too that have the same page on its site. Just type into search ‘unsubscribe from catalog’ and the name of the catalog.
I bought some hop plants from Fedco Seeds a while back. They are called rhizomes. Below is what a hop plant looks like 3 years old.
When you get the hop rhizomes from the supplier, they look like 6″ long brown sticks with some roots sticking out. Get them in the ground asap. Also buy them from a decent plant supplier, like Fedco. If you get them and they look like dried out sticks, they aren’t good.
You want to plant the rhizomes in some soft soil, like seed starting mix or something. So when planting, dig a hole 4″ deep, drop in your seed mix, and push the hop rhizome into it about 1″. This is so the plant can easily throw up some green stems and get going.
Water the thing every day. You will see see that looks like purple asparagus sticking up out of the ground. Be happy, you have successfully gotten them to grow. Now make sure your dogs don’t trample all over the young plants.
Think about where you are planting. This is a long term commitment, as this thing gets real big, and is not easy to move, IMHO. Mature hop plants grow really tall, and they will grab onto anything nearby.
You hop plants will grow slowly the first year and be underwhelming to look at. Pay attention that other nearby plants don’t over take them. You might get 2-3′ long vines, and they will be thin in diameter. A simple trellis with some string is enough for the first year.
The 2nd year, you need to build a real robust trellis. I use a 12′ long 2×4 and then put a 1×4 six feet wide across the top, like a cross, but its a trellis. I staple sisal twine from the cross bar down to the base of the 2×4. The hop plant will grab onto this and go. Fast.
Hops can grow 6″ in a day. That fast. You can order them in early spring from Fedco Seeds.
If you’d like to learn more about home brewing, which uses hops, listen us on this GardenFork Radio episode.
I am new to welding, so I call this video Beginning Flux Core Welding. I hope to inspire you to try flux core, and walk you through some tips to get started. After watching this first video, you can see how I have progressed in this welding repair video I did for my neighbor.
Full disclosure, I am an amateur welder, still learning as I go. If you have any suggestions on how I can be a better welder, comments are greatly appreciated.
Beginning Flux Core Welding, How To Get Started
I consider Flux Core the gateway welding method. The welding machine can be bought cheaply, so you can start welding without a huge investment. If you decide you want to do more welding, you can upgrade your equipment. The gear I list below is perfect for someone who is happy to have a simple welding kit in the garage for doing repairs and small projects.
Safety First! You HAVE to use a full face welding helmet. Flux Core puts off UV light, and your face needs to be protected. Do not use welding goggles that are used for gas welding, you will burn your face. Wear long sleeves(ideally a welding jacket) work boots, and tie back any long hair. Weld outside, flux core puts out a lot of smoke.
The metal you want to weld needs to be clean, no paint, rust, just bare metal. A right angle grinder with a metal grinding disc makes short work of cleaning up the metal. After you weld, clean up the bead with a wire brush.
The above photos show how the welding tip goes from off to on very quickly. As soon as the wire touches the metal, the spark starts!
The hardest part of beginning flux core welding is just that. The starting part. It can be hard to figure out just how far to keep the wand from the work, how fast to set the wire feed, and what power setting to set the welder to. And when you start welding, its a lot of light and sparks and arcing sounds.
But like most things, the best way to learn is to just start. I have collected metal bed frames left out for recycling pickup. You can also stop by your local metal shop and ask to buy some scrap pieces. $20 of scrap metal is plenty to start.
The photo above show just how amateur I am with my welding. I am moving the wand too fast. I need to keep the wire feeding into a pool of melted metal. You can see this with your helmet on. But it does take practice.
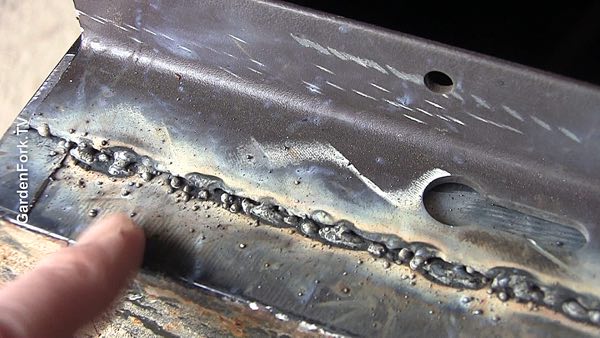
This photo shows how you can blow a hole in your metal, the part on the right there. But then the weld on the left is am improvement. Keep the tip moving in small ovals, and build up a pool of metal. What is cool is you can actually see the angle iron metal melt and mix into the pool of wire you are feeding in.
The hole in the metal happens when you stay too long in one place, or the power is too high. In this case, I am trying to weld thin metal (the cabinet) to a thicker metal (the angle iron). When welding different thicknesses, keep the wand over the thicker metal most of the time.
Learn how to make maple syrup with this simple maple syrup evaporator. I’ll show you how to tap and collect sap from your sugar maples and then boil down the sap. This setup uses propane and 2 outdoor propane stoves.
What’s great about this simple maple syrup evaporator rig is you can walk away from it. You don’t have to watch it constantly. I have mine outside the kitchen, and every 15 min or so I go out and check it.
I found a used large stainless steel pot that was probably used to boil clams, and I found a large shallow stainless steel bowl at the dollar store. The idea behind this DIY maple syrup evaporator is the cold sugar maple sap is brought up to a boil in the first large pot, and then it is ladled into the shallow finishing pan to be boiled down into maple syrup.
Sugar Maple Sap becomes maple syrup when the sap reaches 7.5 degrees F above the local boiling point. Boil a small pan of water on your stove and when it boils, measure the temperature with your digital thermometer. Add 7.5 degrees to that temp – at our house the boil happens at 210F – and when the sap reaches that temperature, it is now syrup. Quickly turn off the heat on the finishing pan burner, and strain the syrup in to jars. If you are up to it, you can let the sap boil to a slightly higher temperature for a slightly darker syrup – be careful not to burn the finishing pan.
Parts You Need For The Simple Maple Syrup Evaporator
I strongly suggest buying a digital kitchen thermometer, old style candy thermometers are hard to use with this setup.
If you see your finishing pan foaming big time, you probably have syrup, and probably the temperature is above the ideal, turn off the propane and pour off the syrup.
The drawback of this system is that it uses quite a bit of propane, not the best use of what you’ve got. The plan is to build a wood fired evaporator next year. I have a ton of white pine from the trees we dropped that would fire a sugar shack nicely.
Maple sap becomes Maple Syrup at 7.5 degrees F above the local boiling point. Go boil a pan of water on your stove, use your digital thermometer to measure the temp at boiling. I bet it wont be 212F, but probably lower. Add 7.5 to that boiling point for the temperature you want to attain.
Wide Pots work best for boiling sap
When its Syrup, the sap starts to foam up, so you have to keep an eye on the process.
Be very careful. Hot sap burns bad, plus there is open flame. Use common sense, keep kids and dogs out of the way.
The wider the pot you use, the more sap you can boil off faster. Its all about surface area. This is why evaporators are wide and shallow.
Take the pot off the propane burner as soon as you reach temp. Its OK if the temp goes a bit higher, but not much higher. I find it best to finish the boil on the stove in the kitchen. Take it inside when you are within a few degrees of syrup at your elevation.
Strain through cloth, cheesecloth, whatever you like. You will have some cloudiness in the syrup if you use cheesecloth.


 This video shows how we improved version of