Tag: beehives

  • DIY Insulated Inner Cover – Beekeeping 101

    DIY Insulated Inner Cover – Beekeeping 101

    Here is the DIY insulated inner cover I built to prevent condensation in our beehives using easily purchased materials. All the hives we have lost have been in the late winter – early spring due to, I believe, condensation and varroa mite load. This year I am determined to eliminate condensation from our hives. Here is a how to on building a DIY insulated inner cover and why you should consider using this cover for your beehives. We put dry sugar inside the inner cover. (Winter feeding beekeeping videos links are at the end of this post.)

    The basics of this design are based on those at the informative beekeeping blog Mudsongs.org . I like to read how Phillip is keeping bees in Newfoundland, Canada.

    NOTE: Since building these DIY covers, I have also started using just a piece of 2″ insulation wedged between the covers, watch the video:

    watch beekepeing videos insert copy

    The inner cover I built has a space below the plywood for feeding the bees sugar , sugar cakes, fondant, pollen, or pollen patties. My thinking was why have a wood shim below the cover to place sugar in, why not make a one piece inner cover/shim. That way there would be on less piece of woodenware to deal with.

    I used pine 1×5 lumber, the outer dimensions are 20″ x 16 1/4″.

    Here is the bottom of the inner cover, you can hold the plywood in place with scrap molding or pieces of wood. Its important that any space between the plywood and side walls is covered, either with scrap trim or other wood, to keep the bees from moving up into the polystyrene. You don’t want the bees trying to chew the insulation. If you have the power tools and woodworking skill, you could dado the insides of the frame and slide the plywood into the dado slot.
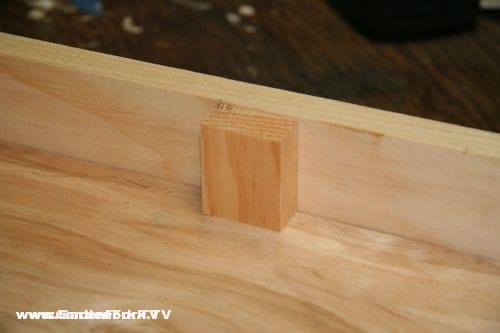
    I glued these pieces of wood to the sidewall and the plywood, held with a clamp. This held the plywood at the correct depth to allow the insulation to drop into the upper section of the inner cover perfectly. Only use a waterproof wood glue, our beekeeping teacher said never to use Gorilla Glue, as it can foam, and the bees will try to eat the foam that comes out of the wood joint.

    Here is the 2″ polystyrene placed in the upper section of the insulated inner cover. Use small scraps to fill in any large spaces near the side walls of the cover.

    Be sure to drill vent – exit holes in your inner cover. These are 3/8″ but i’m thinking they should be 1/2″ to allow more airflow. Going forward, I may chisel out a 3/8′ x 1″ notch at the bottom of the cover to allow more bees to use the entrance. The holes seem to jam up traffic.

    How to cut polystyrene: get one of those utility knives with the blades that are real long, the kind that you can snap off when the tip is dull. use a straight edge to score the polystyrene. Don’t use too much pressure, make several passes to allow the knife to cut deeper. Be careful not to cut yourself.

    After scoring the foam about halfway though, you can snap the foam apart.

    Place the cut over the sturdy edge of a work table and make the break.

    top of insulated inner cover with 2″ polystyrene
    The large space built into the inner cover allows for sugar cakes to be easily put in hive
    Honeybees are eating through sugar cakes already

    Read more of our beekeeping posts here and watch beekeeping videos here. Thx!

    beekeeping-sugarcake-vid-thumb

  • Preparing Beehives for Winter

    Preparing Beehives for Winter

    Here’s how to overwinter your beehives & have the bees survive winter. We will do into the following steps that I take to get my beehives to survive winter:

    Note: I have an updated post on winter prep here, but below is a good read as well.

    • Feed bees 2:1 sugar syrup with essential oil mix throughout the fall
    • Insulated Inner Covers
    • Wrap Hives In Polystyrene
    • Sugar Cake  Dry Sugar Winter Feed see this post & videos for the how to
    • Hives tilted forward
    • Metal mouse guards
    • Hives strapped to ground.

    I feed the honeybees sugar syrup all fall, i start just after we harvest honey. I have become a big fan of using zipper type food bags, learn more and see 2 videos here.

    Winter is coming. Just before the October storm that dumped 20″ of snow here, I went out to our two beeyards and got the beehives ready for winter.

    The biggest danger to beehives in winter , i think, is condensation. Humidity builds up inside a warm hive, hits the top of the hive, which is cold, and the water condenses into droplets that rain back down onto the bees. Many times this kills the hive.

    There are a number of things you can do to reduce condensation in a beehive. Most important is to keep air circulating in the hive, don’t seal up the hive tight. You need air moving through the hive to remove the moisture. I believe everyone should use an inner cover with a notch, aka upper entrance, in the warm months. This allows air to flow through the hive .

    In winter, I’ve been using insulated inner covers and sugarcakes with great success.

     The insulated inner covers help reduce condensation, and provide space for the sugarcakes,  watch the video and see insulated inner cover plans here. Since using the insulated inner covers, I have not had condensation problems.

    winter beek check list watchI used to use sugarcakes to provide emergency food and a great way to absorb excess moisture in the hive. But I now use the Mountain Camp Dry Sugar Feed method, and it works well. Video here.

    sliding in sticky boards in the screened bottom board

    There is an ongoing disagreement on whether one should keep the sticky board inserted into the screened bottom board or not in winter. I think it depends on how cold it gets in your area. Around us, it gets below zero a few times each winter, and stays in the single digits at times, so I close the screened bottom board.

    Tilted Hive
    2×4 scraps tilt the hive forward

    The second thing, and just as important, i think, is to tilt the hives. Pretty simple, but tilting the hive will allow any water that has condensed on the inside of the inner top cover of the hive to, by gravity, move toward the front of the hive, and hit the front wall. The water drops then drain out the front of the hive, away from the bees.

    Tilt your hives forward by placing a piece of 2×4 scrap lumber under the back of the hive as shown in the picture.

    I use metal mouse guards on our hives, the holes in the guard allow enough air to move through the hive when used with the insulated inner covers, I think.

    mountain-camp-feed

    beekeeping-sugarcake-vid-thumb

    preparing beehives for winter

    New: I have tried various methods to insulate the hives, and this year I have used 2″ polystyrene. This isn’t the most elegant solution, but it seems to work. I tried various methods of cutting and affixing the insulation, but for this winter, just cutting them to the fit each side of the hive and strapping them together worked well. Its best if you have two people doing this.

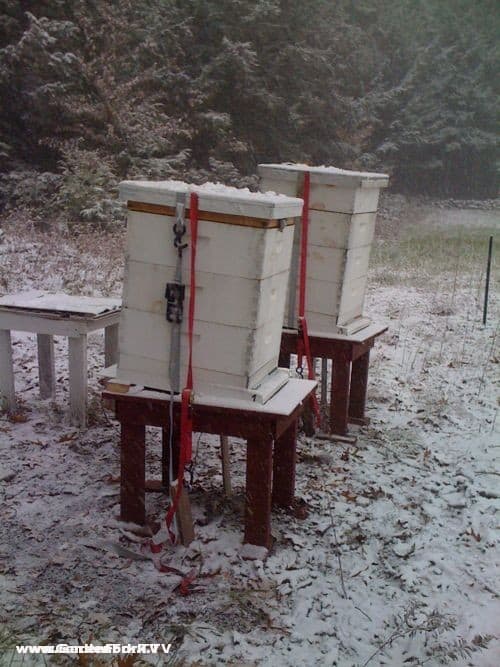
    Another important thing to do in areas with high winds in winter, is to strap your hives down to the ground to keep them from blowing over. We double strap our hives because of bears, one strap around the hive itself, another strap goes around the beehive and attaches to stakes hammered into the ground.

    Hives strapped down against winter winds

    We used wooden stakes hammered into the ground for the straps, but they work loose with frost heaves and all. Here is a photo of  GF viewer Doug’s  hives, and he used a spiral metal stake, used for dog runs and camping, that wont pull out of the ground. great idea. i’ve seen these spiral stakes at the home improvement stores.

    spiral stakes work better than my wooden stakes ©2011 Doug Anderson


    Read more of our beekeeping posts here and watch beekeeping videos here. Thx!

  • Hive Crashes & Roundabouts : GardenFork Radio

    Hive Crashes & Roundabouts : GardenFork Radio

    One of Eric’s beehives crashes, and then we segue to traffic roundabouts, which reduce car crashes. Then Near Space cameras and a DIY Broiler Fired pizza oven from Mike Senese. We hope to get Mike to Skype into the show soon. Call with your questions or comments: 860-740-6938

    photo by Wallyir

  • Bearproofing your beehives with a bear proof electric fence

    Bearproofing your beehives with a bear proof electric fence

    We are going to start a second beeyard at another farm. We wanted to have a second beeyard  as a hedge against the chance that a bear will destroy our existing honeybee hives.

    Our hives in their current location are surrounded by a traditional electric fence, three strands, and is part of a larger electric fence to keep beef cattle in their pasture. Bill, who owns the farm where our hives are, thinks the local bears are already aware of his electric fence, and have not tried to get to our beehives.

    But if the bear ever did, we would lose all our hives. So we decided this year to put a few hives at another friends farm, on the other side of town.

    premier 1 bear fence
    The Electro Net fence protecting a beeyard, photo from Premier 1

    I started to look in to bear proofing and saw an ad in Bee Culture magazine for a bear proof electric fence that will protect beehives from bears. I contacted the company, Premiere 1, and they sent me an ElectroNet 9/35/12 electric fence and a PRS 50 Solar Energizer at no charge to use in our new beeyard.

    The solar Energizer, which contains the battery and electronics to zap bears, is housed in metal box that looks like it was engineered for space travel. Its pretty bulletproof.

    The electric fence and solar powered energizer for our beeyard
    Interior of the solar powered energizer

    We’ll shoot a GardenFork show about starting a new beeyard and installing this fence, and I’ll report back on how it works with our local bears. Thanks for Premier 1 for sending me this.

  • Done Is Better Than Perfect : GardenFork Radio

    Done Is Better Than Perfect : GardenFork Radio

    This episode of GardenFork Radio takes its title from a Tweet posted by Nichelle Stephens of Cupcakes Take The Cake cupcake blog. It pretty much sums up the GardenFork mindset.

    Monica, our BBQ and Food Safety Correspondent, joins us for an hour of mosquitos, tomato hornworms ( watch tomato hornworm video here ), roadfood.com, a bear proof electric fence for beehives, and Eric shares fish with Brancaccio’s Food Shop, a great italian food place in Kensington, Brooklyn

    Premiere 1 has sent us a solar powered electric fence capable of keeping bears away from your beehives, we’ll install this in our new second beeyard and shoot a video about how to bearproff your beehives and beeyard . http://www.premier1supplies.com/

  • Beehive lost to nosema?

    Beehive lost to nosema?

    I went over to a friend’s house yesterday to find he had lost a hive recently. There were few dead bees in the hive, but here was a ton of what I think is nosema in the hive, evidenced by the amount of bee droppings in the hive. Nosema is an intestinal ailment in honeybees, it gives the bees diarrhea.

    And bees normally don’t poop in their hive, seeing bee poop in a hive, i think, is a sign of something wrong.

    Both of our hives have signs of nosema, and I have been treating them with Fumagilin in a sugar syrup, spraying the hives once a week for 3 weeks.

    You don't usually see comb spotted with bee droppings
    You don't usually see comb spotted with bee droppings

    and in the frames with honey, there was what looked like crystallized honey in some of the comb. Again, not sure what this is all about. Anyone know?

    Crystals in some of the comb
    Crystals in some of the comb
  • How to move a Beehive : GardenFork.TV Beginning Beekeeping

    How to move a Beehive : GardenFork.TV Beginning Beekeeping

    We decided to move a beehive, so I learned how to move a beehive, and now we’ll show you how we moved the it. Moving a beehive is not hard,  watch this Beginning Beekeping Series video and learn how.

    Have you moved a beehive? Please tell us below: