Tag: beekeeping video

  • Mountain Camp Method for Winter Feeding – Beekeeping 101 Video

    Mountain Camp Method for Winter Feeding – Beekeeping 101 Video

    The mountain camp method of feeding your bees sugar during winter is the best way I’ve found so far to provide bees with an emergency food source. For whatever reason, honeybees may run through their winter food stores, and need additional food to get through the tough winter months. The mountain camp method provides this back up food source in a brilliantly simple way. Watch our intro video and follow up video, then read through the rest of this beekeeping 101 post.

    Mountain Camp Method How To

    Mountain Camp Method Beekeeping 101

    Before I started to use this technique, every fall I would make sugar patties for the top of the hives as an emergency feed. They work fine, but making sugar cakes is a pain. This does the same thing.

    The mountain camp method of feeding honeybees emergency sugar is pretty simple. And that’s why I love it. Here’s how to do it:

    • Lay a sheet of newspaper over the top of the hive, cutting it down so there is space around the inside perimeter of the hive box.
    • Pour granulated sugar on top of the newspaper.
    • Spray the pile of sugar with water so it crusts over.
    • Place a spacer shim and/or an insulated inner cover over the pile of sugar.
    • Tilt and strap your hives down for winter.

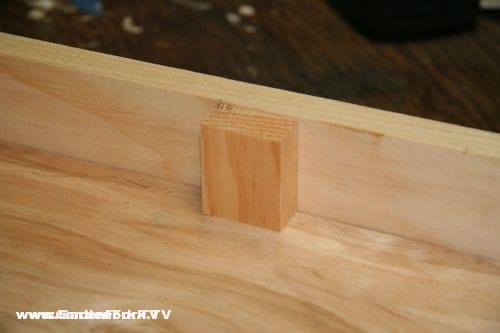
    watch beekepeing videos insert copyWe built these DIY insulated inner covers that have a spacer built in to allow for sugar feeding, be it sugar syrup in zipper bags or pollen patties. If you don’t use a cover with that allows for this, you can build a simple spacer out of 1″x3″ common pine. I haven’t seen a spacer that’s deep enough for sale anywhere. They are easy to make.

    Insulated Inner Cover with built-in spacer for sugar feeding
    Insulated Inner Cover with built-in spacer for sugar feeding
    Mountain Camp Method Beekeeping 101
    Simple spacer allows for dry and wet sugar feeding. Easy to build.

    This pile of sugar on top of the hive provides a second benefit, it absorbs moisture in the hive during winter, and prevents condensation from dripping back down on to the bees. Wet bees in winter is a very bad thing.

    Questions I have gotten about this method:

    Can I feed them this dry sugar instead of sugar syrup in the fall? No. You still need to feed the bees sugar syrup in the fall. Watch our Sugar Syrup Feed videos.

    My bees have plenty of honey and I fed them sugar syrup during the fall, why do I need to do this? I do the same thing in the fall, but the dry sugar is an emergency winter feed. Sometimes bees run out of their own stores, or sometimes they can’t get to them. Below is a photo of bees taking up sugar I provided them. If I hadn’t provided the bees with this emergency sugar, they would be dead now.

    Mountain Camp Method Beekeeping 101

    Why is it called mountain camp? From what I understand, a person who goes by that name posted this method online a while back and the name stuck.

    winter beek check list watchCheck out more of our beekeeping 101 and winter prep videos and posts:

    Winter Bee Inspection Video

    Build an Insulated Inner Cover

    Let us know your comments below, thanks!

  • Beehive Knocked Over – GF Video

    Beehive Knocked Over – GF Video

    A beehive knocked over by wind or a bear or storms is not fun. Here’s how to prevent your beehives from being knocked over.

    I recently got a call from my friend Bill, saying that one of our beehives was knocked over. Normally, a beekeeper would stress about this, I didn’t, watch the video to see why.

    When a beehive falls over, its usually a very bad thing. The supers are open, and the bees are very agitated, and if its cold or raining, the bees may die. Check out what happened to my friend Erik of Root Simple when his hive fell over.

    Strapping your hives with ratchet straps, the good kind used by truckers, will reduce the chaos when a beehive is  knocked over.

    We first started strapping our beehives as part of our bear proof the bee yard project. If the hives are strapped, the hives stand a better chance of surviving a bear in the beeyard. One can say that a ratchet strap won’t keep a bear from tearing open a beehive, but I’ve read where the strapping has helped save hives. Watch our bear proof a bee yard video here.

    watch more

    But an additional benefit of having to strap the hives because of the bears is the ability of the hive to withstand a fall.

    Stake for Straps
    Stake for Straps

    Yes, removing a ratchet strap every time you want to do a hive inspection is a pain, but it may save your hive one day. Its important to buy good quality ratchet straps, and spray them with WD40 or similar lubricant every few months.

    In winter, we double strap our hives – see this winterizing beehives post – one strap is around the hive, another straps the hive to the ground. We have found these spiral spikes that are sold for dog runs work well. Wooden stakes can get loose with frost heave.

    Beehive knocked over
    High winds knocked over this hive, but the strap kept it pretty much intact.

    Even our hives on city rooftops are strapped, one less thing to have to worry about.

    beehive knocked over


  • Feeding Honeybees Sugar Syrup, Zip Bag Method GF Video

    Feeding Honeybees Sugar Syrup, Zip Bag Method GF Video

    When feeding bees sugar syrup, I have tried many methods, and I like the zipper bag method best. Here is another of our beginning beekeeping 101 videos, this one on how to feed bees sugar syrup.

    I have tried various sugar feeders with some success, but it seems that most feeders drown bees also. My friend Rick Kennerly introduced me to this zipper bag sugar feeder method.

    The advantage of many sugar feeders is that you don’t have to open the hive to add more sugar syrup. With the bag method, you do open the top of the hive, but its not much more work than filling up a sugar feeder. When the first bag of syrup is empty, I leave it on the top frames of the hive, and just lay another one on top if it. This keeps the bees from making too much burr comb in the space where the feeder sits. Its also less intrusive that way, you aren’t peeling off a bag every time you open the hive, you peel off all the bags when its time to stop feed sugar syrup.

    You can add essential oils to the sugar syrup, we do. Here is a recipe for essential oil mix for honeybees, or you can buy it pre-mixed. Either works well.

    You may have to experiment to find the best zipper style food bags. The store brand ones work fine for us. Transporting them when they are full can be tricky, I put them in a wide tray or bucket when I drive to the beeyard. You don’t want syrup spilling in your car or your yard, it creates bee chaos.

    I fill up the bags by putting them in a metal pasta pot, with the opening spread over the top of the pot. Don’t fill it up all the way, or the bag will burst.

    Here is our  overview of how to overwinter honeybees, with all sorts of good info.
    A video and information about sugarcakes, which you give the bees for winter:
    beekeeping-sugarcake-vid-thumb

  • DIY Insulated Inner Cover – Beekeeping 101

    DIY Insulated Inner Cover – Beekeeping 101

    Here is the DIY insulated inner cover I built to prevent condensation in our beehives using easily purchased materials. All the hives we have lost have been in the late winter – early spring due to, I believe, condensation and varroa mite load. This year I am determined to eliminate condensation from our hives. Here is a how to on building a DIY insulated inner cover and why you should consider using this cover for your beehives. We put dry sugar inside the inner cover. (Winter feeding beekeeping videos links are at the end of this post.)

    The basics of this design are based on those at the informative beekeeping blog Mudsongs.org . I like to read how Phillip is keeping bees in Newfoundland, Canada.

    NOTE: Since building these DIY covers, I have also started using just a piece of 2″ insulation wedged between the covers, watch the video:

    watch beekepeing videos insert copy

    The inner cover I built has a space below the plywood for feeding the bees sugar , sugar cakes, fondant, pollen, or pollen patties. My thinking was why have a wood shim below the cover to place sugar in, why not make a one piece inner cover/shim. That way there would be on less piece of woodenware to deal with.

    I used pine 1×5 lumber, the outer dimensions are 20″ x 16 1/4″.

    Here is the bottom of the inner cover, you can hold the plywood in place with scrap molding or pieces of wood. Its important that any space between the plywood and side walls is covered, either with scrap trim or other wood, to keep the bees from moving up into the polystyrene. You don’t want the bees trying to chew the insulation. If you have the power tools and woodworking skill, you could dado the insides of the frame and slide the plywood into the dado slot.

    I glued these pieces of wood to the sidewall and the plywood, held with a clamp. This held the plywood at the correct depth to allow the insulation to drop into the upper section of the inner cover perfectly. Only use a waterproof wood glue, our beekeeping teacher said never to use Gorilla Glue, as it can foam, and the bees will try to eat the foam that comes out of the wood joint.

    Here is the 2″ polystyrene placed in the upper section of the insulated inner cover. Use small scraps to fill in any large spaces near the side walls of the cover.

    Be sure to drill vent – exit holes in your inner cover. These are 3/8″ but i’m thinking they should be 1/2″ to allow more airflow. Going forward, I may chisel out a 3/8′ x 1″ notch at the bottom of the cover to allow more bees to use the entrance. The holes seem to jam up traffic.

    How to cut polystyrene: get one of those utility knives with the blades that are real long, the kind that you can snap off when the tip is dull. use a straight edge to score the polystyrene. Don’t use too much pressure, make several passes to allow the knife to cut deeper. Be careful not to cut yourself.

    After scoring the foam about halfway though, you can snap the foam apart.

    Place the cut over the sturdy edge of a work table and make the break.

    top of insulated inner cover with 2″ polystyrene
    The large space built into the inner cover allows for sugar cakes to be easily put in hive
    Honeybees are eating through sugar cakes already

    Read more of our beekeeping posts here and watch beekeeping videos here. Thx!

    beekeeping-sugarcake-vid-thumb

  • How to Requeen a beehive : GardenFork.TV : Beginning Beekeeping

    How to Requeen a beehive : GardenFork.TV : Beginning Beekeeping

    Learn how to requeen a beehive in this beginning beekeeping video. Requeening the hive is not rocket science, but you do need to know how a few things when you do this. This Beekeeping video will show you how to replace the queen in your beehive, or at least how we do it. As with many things in life, this is how we do it, others may do it differently.

    You replace the queen in a beehive when you want to improve the hive’s characteristics or when the original queen of the beehive has died for some reason. You also requeen a beehive to keep it from swarming.

    We are going to try requeening our hives in late August to prevent swarming the following spring. I’m told that queens replaced in the fall will not swarm in springtime, so we’ll see. Of course we’ll make a video about that.

  • Preparing for Winter – Beekeeping 101 Video

    Preparing for Winter – Beekeeping 101 Video

    In this Beginning Beekeeping show, we get the hive ready for winter. Raising bees is a great hobby, and here we show how we prepare the beehive for the coming winter. Below the recipe are links to our other beekeeping vids and sources.

    winter beek check list watchGrease Patties:

    I made my own based on reading thru the various online forums and blogs.

    2 cups vegetable shortening  – NOT butter or other flavored shortening

    4 cups white sugar

    10 drops of food grade pepperment oil or wintergreen oil

    1/4 cup mineral block – this is a mineralize salt lick you can get at a farm – ag supply store. break off a chunk with a hammer.

    mix this together and form into 4″ wide patties, they have to be thin enough to be placed between hive supers.

    you can wrap these patties in wax paper , put in a freezer back and freeze for future use.

    Read more of our beekeeping posts here and watch beekeeping videos here. Thx!

    beekeeping-sugarcake-vid-thumb