Tag: full-image

  • Exhaust Pipe Repair Hack – DIY GF Video

    Exhaust Pipe Repair Hack – DIY GF Video

    Here’s an exhaust pipe repair hack I learned how to do a while back. It is a simple DIY muffler repair that will last long enough until you have time to take your car to the repair shop. This is not meant to be a permanent repair, this is simply a emergency stop gap measure. Maybe you don’t have the money quite yet to go to the muffler shop, this will knock down the noise. Heads up, this won’t help your car pass an emissions test but it is a neat little DIY hack to fix an exhaust pipe leak temporarily.

    The flexible metal that I used is called roof flashing, but you could also use a metal can, like those that contain tomato paste or chopped up tomatoes for making spaghetti sauce. You can also use a soda can, but soda cans are made out of aluminum, so the hack will not last nearly as long. Aluminum has a lower melting point. Any kind of flexible metal that you may have laying around, something from a gutter repair or maybe your neighbor has some sheet-metal laying around that would work. You basically want to curl the metal around the exhaust pipe and then tighten it with pipe clamps.

    exhaust pipeYou can also use this hack to do a muffler pipe repair. You would have to find a really long pipe clamps or connect together several pipe clamps. You can you can usually get clamps about 4 inches in diameter, if you buy a bunch of those you could connect them end to end and then wrap a big piece of metal around the muffler. This kind of muffler repair is not going to last really long but it would reduce the noise but your car is making – fewer people would stare at you at the red light intersection!

    exhaust pipe

    exhaust pipe

    exhaust pipe

    Video Transcript:

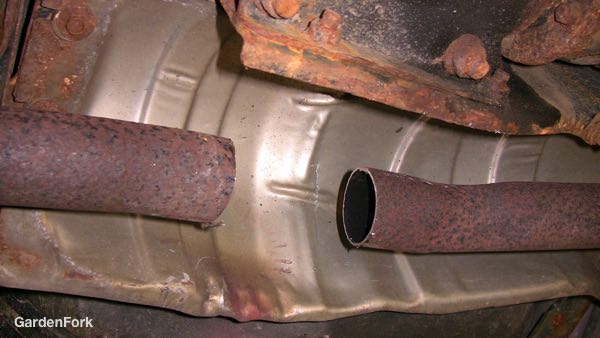
    One of our cars has a hole in the tailpipe. I’m gonna show you how to do a quick exhaust pipe repair, until you have time to fix it properly, all right? So, you could be stuck somewhere, you can run to the hardware store, buy two clamps, borrow some tin snips, and get some roofing flashing. You could also just use, like, a tin can. Like a soda can, or a tomato can, or something like that. something that has flexible sheet metal stuff. All right?

    Get under the car, let’s go. So first I’ve got to cut the old pipe. I’m gonna cut the clamps off and see what’s left there. We’re gonna use what’s called a right angle grinder with a metal-cutting disk on it. And be sure to have eye protection and ear protection. Be careful, all right? A lot of times you can just pull this out. Just put some pliers on here and you work it back and forth and it’ll come out.

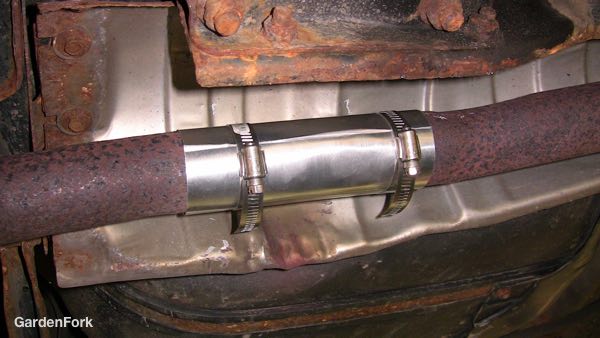
    Slide two pipe clamps that are slightly bigger, one on each side of the gap, of the hole. And then put your flashing up here and you’re gonna curl the flashing around the break in the pipe. This has sharp edges so careful not to cut yourself. And then slide these clamps over the metal and slide that on like that, there we go. There we go. All right, so you’ve got two clamps on, this is, you wanna center this in the break, and then we’re gonna screw these on. By the way, if you have one of these four in one or six in one screwdrivers, if you take the screwdriver part out, You have a nut driver here. So as the clamp tightens down, it wraps the sheet metal around the gap and it tightens it up. Tighten these up.

    All right, there you go. Just a quick muffler exhaust pipe repair. If you’ve got this hole, and you drive down the highway, you could stop at a hardware store and buy those parts and fix it up, until you can get home and order the right parts or take it to the shop. It’s just one of those things that’s helped me out a couple of times so I just wanted to show you about it.

    car battery cable
    Car Battery Dead? Probably Not. Learn why here.


  • Simple Maple Syrup Evaporator : GF Video

    Simple Maple Syrup Evaporator : GF Video

    Learn how to make maple syrup with this simple maple syrup evaporator. I’ll show you how to tap and collect sap from your sugar maples and then boil down the sap. This setup uses propane and 2 outdoor propane stoves.

    We have used several methods to make maple syrup, watch all our maple syrup videos here and we have built a DIY maple syrup evaporator out of a file cabinet.

    What’s great about this simple maple syrup evaporator rig is you can walk away from it. You don’t have to watch it constantly. I have mine outside the kitchen, and every 15 min or so I go out and check it.

    maple-syrup-updateI found a used large stainless steel pot that was probably used to boil clams, and I found a large shallow stainless steel bowl at the dollar store. The idea behind this DIY maple syrup evaporator is the cold sugar maple sap is brought up to a boil in the first large pot, and then it is ladled into the shallow finishing pan to be boiled down into maple syrup.
    Sugar Maple Sap becomes maple syrup when the sap reaches 7.5 degrees F above the local boiling point. Boil a small pan of water on  your stove and when it boils, measure the temperature with your digital thermometer. Add 7.5 degrees to that temp – at our house the boil happens at 210F – and when the sap reaches that temperature, it is now syrup. Quickly turn off the heat on the finishing pan burner, and strain the syrup in to jars. If you are up to it, you can let the sap boil to a slightly higher temperature for a slightly darker syrup – be careful not to burn the finishing pan.

    Parts You Need For The Simple Maple Syrup Evaporator

    digital_thermometerI strongly suggest buying a digital kitchen thermometer, old style candy thermometers are hard to use with this setup.

    If you see your finishing pan foaming big time, you probably have syrup, and probably the temperature is above the ideal, turn off the propane and pour off the syrup.

    The drawback of this system is that it uses quite a bit of propane, not the best use of what you’ve got. The plan is to build a wood fired evaporator next year. I have a ton of white pine from the trees we dropped that would fire a sugar shack nicely.


    make maple syrup
    Watch all our Maple Syrup How To Videos here.

    Here is a great PDF from the Univ of Maine on how to tap trees and boil sap

    Questions? Comments? let us know below:

  • Chocolate Halloween Treats Recipe – GF Video

    Chocolate Halloween Treats Recipe – GF Video

    Here’s a Halloween Treats Recipe for those of you who want to go the DIY way and make their own treats for the trick or treaters.

    As you know I love chocolate almost in any form, and I was watching Jacque Pepin’s TV show More Fast Food My Way and he did a quick little recipe for these DIY Halloween treats,  he called them Chocolate Rochers, similar to my last name. Very simply just melted chocolate with a couple different crunchy items dropped onto parchment. They were brilliant, really simple and I thought that’s a GardenFork Halloween treat if I ever saw one. Click Here to buy Jacques Pépin’s Book More Fast Food My Way

    Our Halloween Treats Recipe is based on his, pretty straightforward. Taking crunchy items like Rice Crispies, Cornflakes, toasted almonds, you could also use toasted hazelnuts or toasted walnuts. It’s really what do you like, if it’s crunchy and goes good with chocolate, it probably works. I’m a big fan of peanuts as well, you could have peanuts that you toasted in the fry pan.

    chocolate-halloween-treats-recipe-pin


    As far as what kind of chocolate to use for the chocolate Halloween treats, we were using semi sweet baking chocolate which I preferred or a big bar of Hershey’s dark chocolate, both of which you can buy at almost any grocery store. Experiment and buy a couple different ones and see what you like.

    Be very careful when melting the chocolate! You can melt it in the microwave with short pulses of about 30 seconds and you wait a minute or two and then zap it for another 30 seconds. I found that a simple homemade double boiler works fine for mem. A small saucepan pan with about an inch of water in it,  a metal bowl on top works very well as a double boiler.
    So there you go, our version of a DIY Chocolate Halloween Treat. What is your favorite kind of halloween treat that you can make? I would love to hear in the comments below, it’s great to hear from you all.

    Chocolate Crunchers, a DIY Halloween Treats Recipe

    1 box of semi sweet baking chocolate or whatever chocolate you like.

    2 cups of Rice Crispies, Corn Flakes, roasted nuts such as almonds, walnuts, hazelnuts.

    In a double boiler, break up the chocolate bar into pieces and melt the chocolate. Do not over-melt it, you want it such that it is thick.

    Take the bowl off the boiling water and add in the chosen ingredient(s). Be careful as the bowl is hot.

    If you are working with kids, scrape the melted chocolate into another bowl.

    How much of the crunchy ingredients is up to you. I prefer most of the nuts be covered in chocolate.

    Drop tablespoon sized amounts of the melted chocolate onto parchment paper and let the chocolate cool.

  • Easy Spaghetti Meatballs Recipe – GF Cooks Video

    Easy Spaghetti Meatballs Recipe – GF Cooks Video

    What’s not to like about this easy spaghetti meatballs recipe? Bake the meatballs, cook the pan sauce, add pasta and eat. Simple and easy to do, and you could use this recipe to make meatballs sandwiches as well. Nice.

    Our simple recipe uses meatloaf mix and a bunch of italian seasonings. We buy about 1.5 pounds of meatloaf mix, which around us is half pork and half ground beef. The beef I bought for this project was 90% lean, and I’d rather have it around 80% lean. You could toss in a few tablespoons of bacon drippings or butter to amp this up a bit. It all works.

    A key thing here is to not over mix the meat mixture, it will make the meatballs tough. You can use your hands or a spoon to mix it all up, use what you got. Be sure to wash your hands after handling meat.

    This is different than in the video, but I have found out that I like the cheese to be coarse grated with the large holes of a box grater instead of the fine grating of the microplane. It just tastes better, and i think the cheese stands out more, you run across pieces of cheese in the meatballs, which I like.

    easy-spaghetti-meatballs-recipe-gf-cooks-video-2

    Easy Spaghetti Meatballs Recipe

    1.5 pounds of meatloaf mix, preferably 80% lean beef and pork

    4 tablespoons Italian seasoning herb mix

    3 ounces of tomato paste, half a small can

    1- 28 oz can of crushed or pureed tomatoes, buy a good quality brand.

    1 large yellow or sweet onion chopped up

    2-3  cloves of garlic

    2 slices of bread toasted and ground up in a mini chopper or similar gizmo

    1/2 cup milk

    2 eggs

    2 cups coarsely grated pecorino romano cheese

    Preheat the oven to 375F

    Boil up a pound of your favorite pasta.

    Put the onion in a large pan or pot with good slick of oil on the bottom of the pan. Its best to slow cook these onions, but do what you can. Golden color on the onions is best for flavor. Chop up the garlic and add in to toast for a few minutes at the end of the cooking.

    Add half the onion to a bowl with the meatloaf mix, 2 tablespoons Italian seasonings, eggs, ground up toast, milk, cheese, some salt and pepper.

    Add the can of tomatoes and paste and seasoning to the pan with the cooking onions and simmer the sauce while we make the meatballs. Halfway through the simmer, at about 15 min, add a half cup of water and some sugar to taste.

    Mix the meatball ingredients together, don’t overmix the meat!

    Roll the meatballs into about  1.5″ diameter balls and put in a baking pan or sheet. Put in the oven for about 20 minutes, check with a thermometer, 145F is done.

    In a perfect world, this all comes together at about the same time, so you an assemble the dish and sit down, but you can cover the meatballs with foil while prepping the other stuff.


  • Pumpkin Cornbread Recipe – GF Video

    Pumpkin Cornbread Recipe – GF Video

    A cornbread recipe that adds in pumpkin to change it up. This will go great with chili, stews, or as a Thanksgiving side dish recipe. I love cornbread already, and when I saw pumpkin puree on sale at the store, I started to think of ways to use it, and there you go: add it to a cornbread recipe!


    A couple of key things here, I use a sectional cast iron pan for this, you can use a cast iron fry pan or an 8×8 or other square baking pan as well. A glass baking dish will make the best crust, I think. If you are using cast iron, put the fry pan in the oven and then preheat the oven and the cast iron. Do not oil the cast iron pan, just let it heat up. We will oil the pan just before we put in the batter, OK? You can buy the cast iron cornbread pan here. This post may contain affiliate links which won’t change your price but I earn a commission from. Thx!

    If you are using a baking pan, put 2 tablespoons of butter in the pan, and put it in the oven to melt just before you are ready to add in the batter. Take care not to burn the butter, this is a bad thing. If the butter burns, get a clean pan out and start over with that process.

    This is basically a quick bread recipe, so take care not to over mix the batter, the milk helps everything come together pretty well, but don’t beat it into a mess. If you want more pumpkin flavor, add in more puree, and dial back on the milk. It will be an experiment, but I think it will come out fine. Let me know how you use pumpkin in the comments below.

    pumpkin-cornbread-recipe-gf-cooks-video2

    Pumpkin Cornbread Recipe
    Recipe Type: Bread
    Cuisine: American
    Author: Eric Rochow
    Prep time:
    Cook time:
    Total time:
    Serves: 8[url:1][img:1]
    Cast Iron Corn Bread Recipe gets a flavor upgrade with Pumpkin for Thanksgiving or any time.
    Ingredients
    • 1 1/2 cups Cornmeal
    • 1/2 cup All Purpose Flour
    • 1 tablespoon Baking Powder
    • 1 teaspoon Salt
    • 1/4 cup Brown Sugar
    • 1/2 teaspoon Nutmeg
    • 2 Eggs
    • 1 cup Pumpkin Puree
    • 1/4 cup Vegetable Oil
    • 1/2 cup Milk
    Instructions
    1. Preheat the oven to 375F and preheat the cast iron pan if you are using one.
    2. Mix all the dry ingredients together in medium sized bowl
    3. Crack the two eggs into a small bowl and scramble them together, then add to the dry batter.
    4. Add in the puree, milk, veg oil.
    5. Mix the ingredients together, but don’t over mix, OK?
    6. If using a baking pan, put 2 tablespoons of butter in it, and place in the oven to melt.
    7. After butter has melted, swirl it around in pan and then add batter.
    8. If using cast iron, take pan out, swab vegetable oil all around and add batter.
    9. Bake for about 30 minutes and test for doneness. Its not the end of the world if cornbread overbakes a bit.
    10. Let cool for 1o minutes then pop out of the pan.
    11. This tastes great with maple syrup.

  • DIY Dog Tug Toy – GF Video

    DIY Dog Tug Toy – GF Video

    Learn how to make a dog tug toy in this DIY GardenFork Video. Our dogs tear through store bought toys, maybe the toys are made for smaller dogs, not sure. So I bought 100′ of rope and now we make our own dog rope toys. This video is one of several we are working on for Dog Toy series. Sign up for our newsletter to find out when we post new vids.

    One precaution here: In this video we are using a polyester rope, and some dog have issues with this kind of rope, it can get stuck in their stomach. Our pups do not have this problem. I suggest you use cotton rope, which you can get at a camping supply store or a good hardware store.

    diy-dog-tug-toy-gf-video2

    This tug toy is not perfect, the dogs manage to tear it apart in a week or two, but then I just make up another one. And they love it when they see me with the large hank of rope making them a new toy. Moose, the black lab, loves to get hold of the whole hunk of rope, which makes a mess of it.

    Charlie Pup and Moose are the main users of the tug toy, Henry will want to play with Moose, and then Charlie Pup jumps in. Not sure if this is a dominance thing or just Charlie Pup being jealous, or maybe its just dogs being dogs. But it is a blast to watch, below is a video of the dogs playing with the tug toy. You can watch more Lab videos on their YouTube Channel here. As you can see, it works very well, and it wears them out, which is a big goal of mine. Sleeping dogs are a good thing at the end of day, and this works well for that.

    I can barely hold onto the rope when I play with them, its amazing how much pull strength they have. Their jaw clamps onto that rope and then they pull back with their hind legs. I let go the rope, lest I wreck my back.

    Do you make your own dog toys? Let us know below:

  • Grilled Tomatoes with Spinach and Cheese, an Easy Tomato Recipe – GF Video

    Grilled Tomatoes with Spinach and Cheese, an Easy Tomato Recipe – GF Video

    An easy tomato recipe to use up some of those giant beefsteak tomatoes that doesn’t involve making a salad or a BLT. Grill big tomato slices, make a cream sauce, add in spinach, top with cheese, and you’ve got a nice appetizer or side dish. This recipe comes from GF viewer Marcus, who sent us a nice note about his friends food blog, Cheater Chef, and this recipe.


    Be sure to oil the grill grates after preheating your grill, take a paper towel with vegetable oil and use tongs to apply the oil from the towel onto the grates. I use a propane grill for this easy tomato recipe, be sure to heat it up, mine takes a while, mbe your grill doesn’t. A charcoal grill will heat these up quickly.

    You can also use the broiler of your oven to make these, ideally one would put a grate into a baking sheet so the tomato slices sit above the pan. I think many people forget about the broiler function of their ovens, restaurants use the broiler all the time, we should use it more too.

    The original recipe calls for using heavy cream, and this appetizer or side dish is quite rich with the sauce, I think you can use half and half or even whole milk and dial down the richness a bit, the tomatoes will do just fine. I like a sharp cheddar for this, but use what you got, Mozzarella would work, but also some drier cheeses too, like Emmenthaler.

    easy tomato recipe

    Easy Tomato Recipe

    Grilled Tomatoes with Spinach & Cheese, based on the recipe by Cheater Chef

    1 large beefsteak tomato, nice and ripe.

    1 bag or large bunch of spinach, about a 1 pound bag would work

    small onion or half of a larger onion, chopped up fine

    1/2 cup half/half or whole milk, your choice

    1 clove garlic minced, depending on how much garlic you want.

    Butter for the pan

    2 cups grated sharp cheddar cheese

    • Preheat your grill

    • Slice the tomato into half inch slices, oil the grill grates carefully, and place slices on grill, close grill cover

    • Chop spinach, discarding large stems, and microwave on high for about 3 minutes, you want it to wilt, but not overcook.

    • Melt butter in fry pan,  and add chopped onions, cook them down until starting to brown.

    • Add garlic, be sure to get the garlic to grown a bit too.

    • Go check on slices grilling, turn them when they are starting to have grill marks

    • Add half/half or whole milk to the pan and let it thicken, don’t burn it like I did.

    • Toss in cooked spinach and bring cream sauce out to grill

    • Turn slices if you haven’t done so already, and place a big spoonful of the cream sauce on each slice

    • Top with cheese, and close grill to allow the cheese to melt. Don’t walk away from the grill right now.

    • When the cheese is melted, the dish is ready.


    Do you grill tomatoes? Let us know below:


  • Cherry Tomato Recipe: Make Pesto! – GF Video

    Cherry Tomato Recipe: Make Pesto! – GF Video

    A cherry tomato recipe that is a new one to me: Cherry Tomato Pesto. I heard about this from Lidia Bastianich, who was interviewed on ATK Radio and mentioned it. I was surprised at how well it turned out, never had I thought of making pesto this way before. What fun to have a new and unique cherry tomato recipe just in time for the tomato overflow from the garden.

    Another interesting ingredient in this pesto recipe is the use of almonds, which i had not thought of before but now seems so obvious. One thing I did learn while working on this recipe was that the almonds need to be ground up in the food processor before adding in the rest of the ingredients. Just dumping them in with the tomatoes doesn’t work, as the almonds are still pretty chunky when the rest of the ingredients have been mixed together.

    Basil does play a role here, but you could also use parsley, both work well when paired with tomato. I imagine you have both growing in your garden somewhere near the cherry tomatoes, do a mix of the two if you like.

    And do not use cheap olive oil for a pesto recipe, use the best you can get, or almost the best. There are a lot of adulterated olive oils out there, you can check out Truth In Olive Oil for a list of good olive oils you can buy in your area.

    cherry-tomato-recipe-make-pesto-1

    Not your usual Cherry Tomato Recipe

    Cherry Tomato Pesto Recipe  based on Lidia Bastianich’s recipe

    • 1 pint cherry tomatoes, not the super sweet kind, a mix is good.
    • 3/4 cup grated Pecorino Romano cheese, buy a wedge and grate it yourself
    • Approx 1 cup Extra Virgin Olive Oil
    • 3/4 cup raw almonds, not salted or roasted, but you could use the salt-roast kind in a pinch
    • 1 medium clove of garlic, smashed or minced
    • 1 small handful of basil leaves and young stems
    1. Mince of smash the garlic and let it sit out while you prepare the rest of the ingredients.
    2. Put the almonds in a dry saute pan on the stove, and toast lightly. Be careful not to burn them. The almonds will click when its time to turn them.
    3. Grate the Pecorino Romano cheese with the large holes of a box grater.
    4. Pull the basil leaves and young stems from the woody older stems.
    5. Put the toasted almonds in the food process and break them down to small chunks and some powder
    6. Add the cherry tomatoes, cheese, garlic, basil.
    7. Turn on the food processor and mix this all together, be careful not to over process, you want this to have some texture.
    8. Slowly drizzle the olive oil into the food processor as it mixed the ingredients together. The pesto will thicken a bit.
    9. Test for salt, it may or may not need some.

    Do you have a favorite cherry tomato recipe? Let us know below!


  • Thaw Meat Quickly How To – GF Video

    Thaw Meat Quickly How To – GF Video

    Learn how to thaw meat quicky, defrost steaks, chicken breasts, fish and other smaller pieces of meat with this simple method. No longer does one have to defrost meat in the fridge overnight. No when you get home from work, you can thaw meat quickly and have it for dinner that night.

    The information presented here was first published in the NY Times in a article by our favorite food science writer, Harold McGee.

    The science behind how to thaw meat quickly

    Liquids transfer heat more efficiently than air, so if you want to change the temperature of an object, putting it in a liquid instead of the fridge will cause the objects temperature to change faster. Putting a frozen steak in the fridge overnight, the steak is surrounded by slightly warmer air, and over time, an equalization of temperature happens.

    Putting that same frozen meat in a warmer tray of water, the temperature equalization will happen much faster. The warmer water will cause the meat to warm up, and the water will lose of of its warmth, both the water and steak come to an equilibrium eventually.

    For a long time, we’ve been taught that you can run cold water over a piece of frozen meat to thaw it. But this still takes some time and lots of water, despite the water running at a trickle. Now we’ve learned that you can use warm water – I use about 100F water – to defrost meat quickly.

    A few rules here:

    • One must cook the meat right after defrosting it
    • This works only for small pieces of meat- steaks, fillets, breasts, etc.
    • The meat must be fully submerged in the water, weigh it down with something heavy.

    An alternative to the hot water running over the meat is to fill pot with 125F water, and put the meat in it. Stir the water occasionally, and the meat will defrost. Its important to stir the water. This method saves water too.

    thaw-meat-quickly-gf-video
    Chicken Breasts can be thawed quickly with this method

    What do you all think? Let us know below:

  • Quick Coleslaw Recipe -GF Video

    Quick Coleslaw Recipe -GF Video

    Here’s a quick coleslaw recipe that takes no time to put together. This is a perfect addition to one of our pulled pork recipes. The pairing of BBQ and coleslaw is a given in the GardenFork world, so here we go!

    We use the grater disc on our food processor for this quick coleslaw recipe, you can also use a box grater or a mandolin, but it will take longer, hence, less quick. OK? We used a larger size grater hole for the carrots. I think big chunks of cabbage are unappealing, but I also don’t want the cabbage to look like sawdust. Just my thoughts here.

    You can use red cabbage for part or all of the cabbage in this recipe, but I’d suggest adding some red cabbage but not 100%. Its just too much, and i think red cabbage is a tougher chew when it is raw. We do have some great red cabbage recipe videos here, so check them out after make this coleslaw.

    Quick Coleslaw Recipe

    1 medium head of green cabbage

    4 good sized carrots, washed well but not peeled.

    2 teaspoons of caraway

    1 tablespoon deli or brown mustard

    1/2 cup virgin olive oil

    4 tablespoons apple cider vinegar

    salt and pepper to taste

    Cut the cabbage into quarters and remove the core. Then cut into chunks that will fit into your food processor. Put on the grater blade and shred the cabbage.

    Change the blade to a coarser one and grate the carrots.

    In a large bowl add in the olive oil, vinegar, caraway, mustard, salt and pepper. Whisk this together. The mustard will bind it all together. Taste for salt, you may need to add more afterward.

    Add in the shredded cabbage and carrots, and toss well. This tastes best when put in the fridge overnight, I think, but you can serve it right away as well.


  • Dr Pepper Pulled Pork Slow Cooker Recipe – GF Video

    Dr Pepper Pulled Pork Slow Cooker Recipe – GF Video

    Pulled Pork is a GardenFork favorite, and I’ve heard of adding soda to the slow cooker, so here is our Dr Pepper Pulled Pork Slow Cooker Recipe. I like how the soda adds some sugar-caramel flavor, plus that raspberry taste that Dr Pepper has. Plus it was just fun to put this together to see what happened. What did happen was a great pulled pork. Add a side of our easy coleslaw recipe and you are good to go for a summer BBQ. Yet another great slow cooker recipe

    We used a smaller pork shoulder for this recipe, but you can use a large one if you have a large slow cooker. The cut of shoulder we use is also called a Pernil, you might see that on the label at the butcher. We like skin on and bone in, but you can use a boneless pork butt if that is what you have. Use what you got. The skin, aka fat cap, adds flavor, and you peel it off after the pork shoulder has spent its time in the crock pot.

    Dr Pepper may sound like an odd choice, but I like it. I do not drink a lot of soda, but Dr Pepper has that cola taste with a touch of raspberry that makes me want to try it with this. Colas in general have sugar and caramel, which work well for slow cooking meats, I think.


    A key tool to have here is a gravy separator, which I did not own until recently, but I’m glad I have it. After the pork is cooked, pour the cooking liquid into the gravy separator, and add some of this braise liquid back into the pork after it is pulled apart. I’ve seen a bunch of recipes that toss this cooking liquid, not sure why.

    Cole Slaw is a must for pulled pork, and we have a companion video with an easy Coleslaw recipe here. I like apple cider vinegar in my slaw, and sweet tomato BBQ sauce in BBQ pork.

    Dr. Pepper Pulled Pork Slow Cooker Recipe

    3-4 lb pork shoulder, bone-in, skin on

    1 bottle Dr. Pepper

    1 medium onion, chopped into rough chunks

    This is one of those throw it all in and turn it on pulled pork recipes. Some people brown the pork before braising it, and we have another pulled pork slow cooker recipe where you can do a dry rub overnight here. But this is super simple

    Take all three ingredients and put them in the slow cooker. You want the Dr. Pepper to cover about 2/3 of the pork shoulder.

    Put the cover on the slow cooker and turn it on Low and let it go for 5  hours, check it with a fork. If the pork is not falling apart tender, put the lid back on and let it go longer, check again in an hour. Repeat.

    Once cooked, remove the pork, and pour the braise liquid into a gravy separator. Remove the fat cap and shred the pork with two forks.

    Pour the braise liquid over the pork, using the separator to avoid adding the liquid fat back into the pork.

    This is best when put in the fridge overnight, but you can dress it right away with BBQ (sparingly) and have at it.

    The accompanying Coleslaw recipe is here.

    cole slaw vid


  • Grilled Pineapple – GF Video

    Grilled Pineapple – GF Video

    Are you grilling some food tonight? Then try this Grilled Pineapple Recipe while you’re at it. I like the idea of making dessert outdoors, one less thing to heat up the house with.

    We’ve touched a bit on grilled fruit before, with mixed results, but this one works well and is easy to do. Its a good way to get your kids acquainted with grilling and the payoff is a healthy dessert. Nice.

    Grilled Pineapple How To

    At its simplest, we take pineapple, slice it up, and place it on an oiled hot grill and keep our eyes on it. Half inch pieces work well for us, any thinner and they burn quickly and can be hard to lift up off the grill. Learn from my experience.

    This grilled pineapple can be cooked on a gas or charcoal grill, or you can use the broiler in your oven. In the summer I’m all about keeping heat out of the house, so if we are already grilling some meat or vegetables, I automatically think about grilled fruit. One could also make this in the fireplace with a grate like the one we use in our fireplace cooking videos here.

    Variations on grilled pineapple

    There are a lot of recipes that say to put the pineapple in a marinade or glaze it with oil or sugar. I don’t see the need for this, but go ahead and try it with honey or brown sugar. We drizzle some of our balsamic vinegar reduction on it (video here), and sprinkle on cinnamon or nutmeg. Chunky salt flakes are good too for that sweet – salt thing.

    A few thoughts on cutting up pineapple here. You can add the skin and top to the compost pile, but it will take a while for the top of the thing  to break down. Its kinda like a cactus or spiny aloe vera plant with thick leaves. One GF viewer suggested saving the skin and cuttings and put them in a juicer, had not hear of that one.

    Let me know your thoughts below on how to make grilled pineapple.


  • Garlic Scape Recipe, A Scape Frittata – GF Video

    Garlic Scape Recipe, A Scape Frittata – GF Video

    Here’s a garlic scape recipe that my friend Georgina sent to me, and I immediately wanted to make it. I had given Georgina a bunch of scapes we had harvested from our garlic plants, and she sent me a photo of the scape frittata she made. Hence this video.

    What I like about this garlic scape recipe is it moves scapes beyond the usual sauteed garlic scapes, which we have a video of here, into an area i had not thought of. But then it became obvious to me that garlic scapes can be substituted into many recipes that call for scallions or chives.

    Raw, garlic scapes have a bit of a bite, but when cooked, they mellow out. We use them in a pesto recipe raw, but I usually cook them down in a pan with some olive oil when used in other dishes.

    When harvesting garlic scapes, be sure to get them before it uncurls. That’s when the stem gets woody. You want the young immature flower and stem. If you grab them when it unfurls, you wont like the taste or the hard stem. If you don’t grow your own garlic, you can usually find garlic scapes in your Farmers Market in late spring and early summer. If you belong to a CSA, there’s a good chance you will find them in your allotment box at some point.

    To get the garlic smell off your hands after handling scapes, or garlic in general, grab a stainless steel spoon or similar tool, and rub your hands over the spoon under running water. Not sure how it does it, but the stainless steel removes the garlic smell from your hands. We’ll have to find out what that happens.

    Below is our Garlic Scape Recipe, let us know your thoughts and suggestions for more scape recipes!

    Egg Frittatta Garlic Scape Recipe

    5 or 6 eggs

    1 cup of chopped garlic scapes, 1/2″ long

    2 slices of bacon – optional

    Parmesan Cheese to taste

    2 tablespoons of milk

    If using, cook the bacon in an 9″ oven proof fry pan, set the bacon aside and drain off most of the bacon fat, leave about a tablespoon.

    With the pan still hot, toss in the garlic scapes and cook  them down to your liking. I like them brown

    Put the scapes in a bowl and crumble the bacon into the bowl.

    Add a few glugs of olive oil into the pan, and pour in the eggs. Add the scapes and bacon on top of the eggs. Don’t touch.

    Turn down the heat and let the eggs cook slowly. It should be 5-6 minutes, mbe more depending on how many eggs.

    Fire up the broiler and place the pan under the broiler to cook the top of the Frittata, I like to brown the top, but careful not to brown it.

    Slice the frittata into wedges, and sprinkle with some cheese or add dollops of goat cheese.

    Serve warm or cold.

  • Bake A Cake : Outdoor Cooking with a dutch oven – GF Video

    Bake A Cake : Outdoor Cooking with a dutch oven – GF Video

    Outdoor cooking recipe to bake a cake in a dutch oven. Great camping recipe or to keep you house cool in summer, outdoor baking is the way to go. We use this basic cake recipe and add in whatever fresh fruit we have in the summer months. Its a fun way to bake a cake that doesn’t heat up the house, or when you are camping, this is a super simple cake recipe. Its easy to change up the recipe to suit whatever ingredients you have.

    How To Bake A Cake Outdoors

    You need to have a fireproof safe place to do this. We use our grill, it works well because it is a good height, and is already built for fire. Or you could use some other fireproof material, but be careful, you will be using hot charcoal to do this. In a camping situation, you can use the coals from a campfire, but you will have to pay more attention to the coals, probably adding a few during the baking process.

    If you do not have some oven-proof bowls of some sort – we like to use ramekins – you can use balled up foil to raise the dutch oven above the coals. You do not want the bottom of the dutch oven to touch the coals, this can burn the bottom of the cake. If your dutch oven does not have a flat lid, you can make a ring of foil that will keep the coals from falling off the top of the dutch oven.

    bake-a-cake-outdoor-cooking

    To Bake a cake this way requires some experimentation, its easy to burn the cake if the coals on the bottom are too hot. There is some trial and error here. And wear oven mitts or heat proof gloves, this stuff is hot!

    Easy Cake Recipe:

    1 cup self rising flour
    OR 1 cup all purpose flour + 1 1/2 tsp baking powder and 1/2 tsp salt

    1 stick of butter

    1 cup milk

    1 cup sugar – you can use less sugar, this cake is pretty sweet

    1 can of peaches, drained, light syrup preferred, 20-24 oz

    Preheat the oven to 375F

    Put the stick of butter in a 9×9 baking dish, preferably a glass dish, and place in the oven to melt the butter.

    Mix together the dry ingredients, then add the milk and mix.

    Pour the batter into the heated baking dish with the melted butter, then add the can of peaches.

    Bake at 375 for 30-40 minutes. The cake is done when a knife comes out clean.

  • DIY Rain Barrel System – GF Video

    DIY Rain Barrel System – GF Video

    Easy Rain Barrel System we built with spare lumber and trash cans and some PVC. What I like about this rain barrel system is that you don’t have to go buy or find some rain barrels, you just go to the hardware store and buy some garbage cans. Done.

    How to build a rain barrel system

    Below is a slide show of photos I took while we assembled the rain barrels. The exact dimensions of your project will vary, depending on the size of your trash cans and how high up in the air you want to put your system.

    Important: Be sure to screen the slot where the downspout enters the barrel or use mosquito dunks to control mosquito breeding.

    A list of the items used:

    Gutter Downspout Diverter, available here: http://amzn.to/1mf6ENG

    • 2″ male and female electrical PVC connectors to attach the PVC drain pipe to the trash cans
    • 2″ PVC plumbing pipe to connect the rain barrels to the garden hose spigot. The length of pipe you need depends on your trash cans and the stand you build.
    • Two 2″ PVC 90 degree elbows
    • One 2″ PVC T connector
    • One 2″ PVC 30 degree elbow
    • Assorted PVC adapters to fit the garden hose spigot to the end of the PVC pipe
    • One each 3″ male and female electrical PVC connectors for overflow pipe
    • One 3″ PVC street elbow for overflow
    • Various 3″ PVC elbows to divert overflow to where you want it to drain.
    • Sections of downspout pipe to connect downspout diverter to your rain barrel system
    • Quality silicone bathtub caulk

    We built the stand for the rain barrels out of scrap lumber. Be sure to build the stand to support a heavy load, and do not site the rain barrels where they could fall over, they are heavy! If the stand is sitting on soft earth, put bricks or pavers underneath the legs of the stand.

    The top of the stand has a gap in the middle of it for the pipe that comes out of each rain barrel, plan for this ahead of time.

    Our overflow pipe is 3″, which might be overkill for some designs. This system takes in water from a large flat roof, and in a hard downpour, a smaller overflow pipe would be overwhelmed, we believe. If you are doing rainwater collection from a smaller roof, your overflow pipe could be smaller.


  • 2 Ingredient Cake Recipe – GF Video

    2 Ingredient Cake Recipe – GF Video

    Bake a simple cake with our 2 ingredient cake recipe. Yes, it works. Super simple cake recipe, just watch our video and follow along.

    This cake recipe succeeds because ice cream has the same ingredient as most cakes:

    • Eggs
    • Dairy – in this case cream and milk
    • Vanilla or some sort of flavoring


    The addition of self rising flour makes for a true 2 ingredient cake. I have found if you want to get a high rise, use a narrow loaf pan. And in true “use what you got”™ GardenFork style, we had some dried cranberries on hand, so we tossed those in. You could add in walnuts or raisinss, dates, etc.

    The choice of what kind of ice cream opens up all sorts of possiblities. Want to make pistachio cake? Buy pistachio ice cream. I think a chocolate chip mint ice cream cake sounds great. That and   cup of coffee makes dessert easy. I also like this style of simple cake recipe because it gets kids interested in cooking. I’m thinking they will be curious about how ice cream can become cake.

    I like to have ice cream along with most quick cakes, and our 2 ingredient cake work well with additional ice cream in its original form alongside the cake. Now i’m wondering if someone makes banana ice cream, and whether it would work , and how it would taste. With the endless flavors of ice cream available, you will busy with the cake recipe.

    If you like easy cakes, consider trying out our 5 minute microwave cake, decadent and done in 5 min. nice.

    2-ingredient-cake-recipe-gf-video

    If you don’t have self rising flour, you can make some. For each cup of self rising flour needed, add 1 1/2 teaspoons of baking powder and a pinch of salt to one cup of all purpose flour

    2 Ingredient Cake Recipe
    Ingredients
    • 1 pint high quality ice cream, vanilla to start
    • 1 1/2 cups self rising flour
    • handful nuts, dried fruits, whatever you got
    Cooking Directions
    1. Preheat your oven to 350 F
    2. Oil and flour a 4 x 8 cake pan or similar loaf pan
    3. Put the ice cream on counter to melt.
    4. When its kinda thick but liquid-like, pour the ice cream into a bowl.
    5. Add the flour and mix, but don\’t over mix.
    6. Pour into cake pan
    7. Bake for 45 min, until knife comes out clean.

  • Simple Apple Crisp Recipe : GF Video 12

    Simple Apple Crisp Recipe : GF Video 12

    A simple apple crisp recipe that you can make for a quick dessert with minimal effort. We visited our local pick your own orchard, Riiska Orchard in Sandisfield, Mass, and picked way too many apples! This is our go to recipe for a quick dessert. You can use store bought apples, but we’re all about local when we can, so please consider supporting your local orchards.

    We usually add a lemon juice or orange juice to the sliced apples for flavor. The juice also keeps the slices from browning, but this isn’t a big deal for us, because its going to be baked anyway. We like to use the apple slicer gizmo – link here – but you can also just use a knife to cut them up. Thinner is better, but the apple slices don’t have to be wafer thin, just thin, OK? I have found it handy to use an apple corer when slicing the apples with a knife, this round handle device cuts out the core of the apple, saving time. Yes it is one of those uni-tasker tools, but I have one.

    apple-crisp-recipe-1

    Avoid using the instant oatmeal in this apple crisp recipe, its cut too thin, and I like the big flakes of the rolled oats, aka old fashioned oats. You can use different nuts, again use what you got, I like walnuts, but pistachios would be neat in this, or almonds or whatever you have.

    This is for a 8×8 pan, but works for something slightly larger. Glass or metal pans work fine. Glass might produce a more crunchy apple crisp along the sides and bottom, not sure why. We served this with our homemade ginger ice cream, but it tastes great alone as well. You can dial back the sugar more , but not too much or the topping wont work as well, I think.

    Simple Apple Crisp : GardenFork.TV
    Ingredients
    • 4 sliced apples
    • 1 tablespoon lemon or orange juice
    • 1 tablespoon lemon or orange zest
    • 5 tablespoons butter
    • 1 tablespoon sugar
    • 1 cup rolled oats
    • 1 handful walnuts
    • 1/2 cup sugar
    • 1/2 cup flour
    Cooking Directions
    1. Slice up your apples, not paper thin, but not chunks either. Use the slicer rig or a knife. Either way core the apples.
    2. Put the slices in a bowl and mix with 1 tablespoon sugar and lemon or orange juice and zest. If you like it sweet, you may add more sugar. Keep in mind a little zest goes a long way with flavor.
    3. Put the oats, flour, 1/2 cup sugar, walnuts, and butter in a food process and give it a few whirls. You want to cut in the butter, but not over mix it.
    4. Grease an 8×8 pan, and put the apples in the bottom.
    5. Top with the flour-butter mixture, and bake in a 350 oven for 45 minutes or when the top starts to brown and a bit bubbly

  • Is It OK To Double Dip? Viewer Mail Video #5

    Is It OK To Double Dip? Viewer Mail Video #5

    Double Dipping, Cranky Comments and more on Viewer Mail Video #5

    Karma is boomerang is a big theme in Eric’s life, and we talk about that today. I am aware of what I did, so just move on in life.

    “It’s a great time to be alive” is Rick Kennerly’s life mantra, and we believe in that too. Don’t try to outdo negativity, come back in a positive way.

    A bunch of self help there for you. What do you think? Let us know below.

    We talk about our tapping sugar maple videos and then segue to double dipping, and why it’s ok to double dip.

    If you want to see an interesting photo of Eric’s foot post surgery, you can see that here.