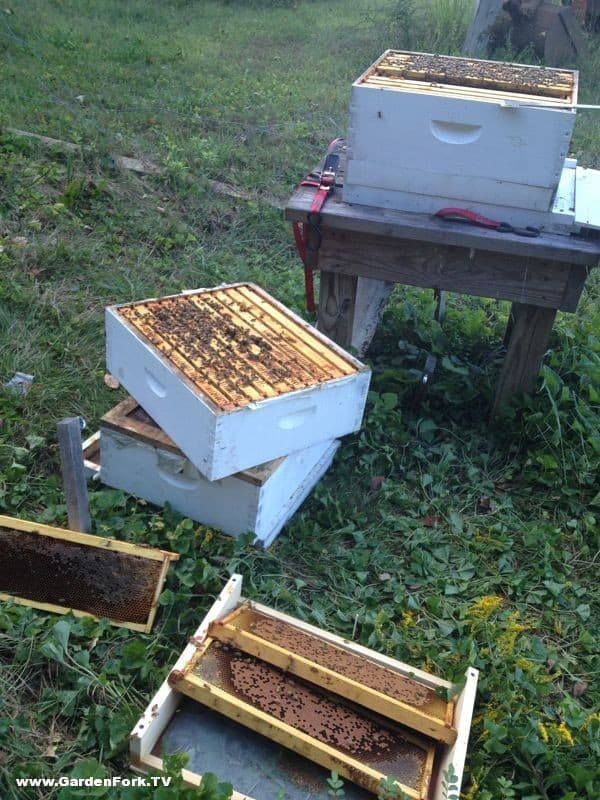
Tag: homesteading

  • Simple Maple Syrup Evaporator : GF Video

    Simple Maple Syrup Evaporator : GF Video

    Learn how to make maple syrup with this simple maple syrup evaporator. I’ll show you how to tap and collect sap from your sugar maples and then boil down the sap. This setup uses propane and 2 outdoor propane stoves.

    We have used several methods to make maple syrup, watch all our maple syrup videos here and we have built a DIY maple syrup evaporator out of a file cabinet.

    What’s great about this simple maple syrup evaporator rig is you can walk away from it. You don’t have to watch it constantly. I have mine outside the kitchen, and every 15 min or so I go out and check it.

    maple-syrup-updateI found a used large stainless steel pot that was probably used to boil clams, and I found a large shallow stainless steel bowl at the dollar store. The idea behind this DIY maple syrup evaporator is the cold sugar maple sap is brought up to a boil in the first large pot, and then it is ladled into the shallow finishing pan to be boiled down into maple syrup.
    Sugar Maple Sap becomes maple syrup when the sap reaches 7.5 degrees F above the local boiling point. Boil a small pan of water on  your stove and when it boils, measure the temperature with your digital thermometer. Add 7.5 degrees to that temp – at our house the boil happens at 210F – and when the sap reaches that temperature, it is now syrup. Quickly turn off the heat on the finishing pan burner, and strain the syrup in to jars. If you are up to it, you can let the sap boil to a slightly higher temperature for a slightly darker syrup – be careful not to burn the finishing pan.

    Parts You Need For The Simple Maple Syrup Evaporator

    digital_thermometerI strongly suggest buying a digital kitchen thermometer, old style candy thermometers are hard to use with this setup.

    If you see your finishing pan foaming big time, you probably have syrup, and probably the temperature is above the ideal, turn off the propane and pour off the syrup.

    The drawback of this system is that it uses quite a bit of propane, not the best use of what you’ve got. The plan is to build a wood fired evaporator next year. I have a ton of white pine from the trees we dropped that would fire a sugar shack nicely.


    make maple syrup
    Watch all our Maple Syrup How To Videos here.

    Here is a great PDF from the Univ of Maine on how to tap trees and boil sap

    Questions? Comments? let us know below:

  • Dandelion Greens & Bacon Salad Recipe : GF Video

    Dandelion Greens & Bacon Salad Recipe : GF Video

    What do you with dandelion greens? You make a salad of course. Watch our video to find out how to identify and forage for dandelion in your yard, and make a great salad. If you are looking for edible plants in your yard, make sure the yard hasn’t been treated with herbicides or other things that are bad for you to ingest. Check out our other foraging videos here.

    How To Find and Prepare Dandelion Greens

    Wild Greens are abundant if you live in an area with grassy weedy places. They grow, we eat them. Things like mustard grow wild, wild onions, dandelion, purslane, burdock, all sorts. What I like about dandelion is it is ubiquitous and abundant, and it grows all summer. It is said that the dandelion greens are more bitter after the dandelion flower have bloomed, but my personal experience has been mixed. It is true the older the leaf, the more bitter it will be.

    I do suggest buying at least one foraging plant identification book, I’m a big fan of Leda Meredith’s Foraging Books, she also has regional foraging books out as well. A second book you might consider is Joy Of Foraging.

    Dandelion Greens

    Follow this simple dandelion greens recipe, and all will be great. It uses items you probably have in your fridge.

    Dandelion Salad Recipe  makes 2 salads

    1 bunch of dandelion, about a large handful, tap root and flower stems removed, washed and dried.

    2 strips of thick cut bacon

    balsamic vinegar

    2 eggs, poached for 3 minutes

    1 avocado

    Cook the bacon to crisp

    While the bacon is cooking arrange the dandelion in two salad bowls or plates.

    Cut the avocado in half, core and add to the bowls

    Add the poached egg on top of the greens,

    Cut the bacon into small pieces, spread over the salad

    Pour about a half teaspoon of the bacon grease from the pan over each bowl.

    Serve as soon as possible.

    Now on to foraging for Lambsquarters!

    Wild and Urban Foraging for Lambsquarters : GF Video


  • Honey Harvesting Made Easy With Honey Uncapping Roller

    Honey Harvesting Made Easy With Honey Uncapping Roller

    Honey harvesting has always been labor intensive, but with a honey uncapping roller, its a lot easier. This is the second harvest we’ve done with the comb roller, and its much easier to use than a hot capping knife.

    Honey Harvesting

    With a capping knife, its easy to gouge out large chunks of honeycomb, exactly what you want to avoid in the first place. The idea is to  remove the beeswax caps on the honey cells, but not damage the cells themselves. Its an ideal that we don’t achieve often. When you only do honey harvesting twice a year, you don’t get to practice much with the uncapping tools.

    more beekeeping videos insert

    With the honey uncapping roller, ( buy it here ) you just roll the tool across the face of the frame several times up and down, and side to side. You have to be careful not to crush the comb, especially when extracting honey from wired foundation. ( I prefer plastic foundation, btw )

    I have found that sometimes, after putting the frames into the extractor, I may have to re-roll areas of the frame, but its still so much better than using a capping knife.

    Honey Harvesting
    Very little beeswax in the honey when using this tool

    Honey harvesting is easier, here’s why:

    • You get a lot less beeswax in your honey
    • No hot knife that is plugged into the wall
    • Most anyone can do this task
    • Honeycomb is not destroyed.

    You no longer need a cappings tub of some sort to catch all the beeswax and honey while uncapping. I stand the frames up in an old cake pan. While bottling the honey, the honey runs through a kitchen sieve. The amount of beeswax cappings from one super is less than a handful.

    Honey Harvesting
    Honey Frames after Honeybees cleaned them up

    I have found that at times, not all the honey is extracted from the frames, but to me its not a big deal. I put these frames back out in the beeyard and they are cleaned up quickly by the honeybees.

    honey harvest email
    Watch the uncapping roller in action in this honey harvest video

    So there you go, have you used the cappings roller for honey harvesting? Let me know below:

  • How To Build A Maple Syrup Evaporator – GF Video

    How To Build A Maple Syrup Evaporator – GF Video

    I figured out how to build a homemade maple syrup evaporator because I was burning through a lot of propane when making maple syrup. I don’t make enough syrup to warrant buying one, but a DIY maple syrup evaporator was just what I needed. Watch the 2 videos below and step through the photos of the evpaorator build.

    The Making Of time lapse video:

    How to use the Homemade Maple Syrup Evaporator

    This is made out of a metal 4 drawer file cabinet and a few steam table pans, plus some stuff you may already have or can get cheaply or for free. If you can find a 5 drawer file cabinet, even better, it will allow you space to have another pan for boiling.

    This is not an original idea of mine, I learned about it through Annie Corrigan of Earth Eats, a WFIU radio program and podcast. She produced a story about Mike Bell of the Hinkle Garton Farmstead, who made this great homemade maple syrup evaporator. You can see photos of his rig here.

    We have two videos of this evaporator. One is a fun time lapse of me building the rig, the second is a walk through of how to use make maple syrup with it. Below the videos are photos of building the evaporator and more videos on how to make maple syrup

    Before I built this evaporator, I was using a lot of propane to boil down sap into syrup, you can watch a video of how we use a propane turkey deep fryer to make maple syrup here. The turkey fryer method works, but you burn through the propane, and make a bunch of trips to the hardware store buying refills.

    I did not keep close track of how many gallons of sap I boiled down in a day, but if you keep on top of it, I imagine you can boil down about 50-70 gallons a day, depending on the sugar ratio of your sap and how hot your fire burns. Pallets and scrap lumber burn hotter than firewood, I found.

    how to build a maple syrup evaporator
    Click Here
    to go to the next page for photos and instructions on how to build the homemade maple syrup evaporator.

    After reading through photos for the homemade maple syrup evaporator, check out how I improved the original design in this video:


    Watch all our Maple Syrup How To Videos here.

    Steam Table Pan Maple Syrup Evaporator Improvements – GF Video

  • Foraging Blogs Better Than GardenFork

    Foraging Blogs Better Than GardenFork

    On Twitter, Alexa asked me and a few foraging experts about identifying Mustard Garlic, and at the same time, she introduced me to 4 foragers who have websites and books on foraging.

    4-foragersFull Disclosure: I am not the high priest expert on foraging or edible plants. Like most things, I know enough to be dangerous. But Alexa was nice enough to include me in her question.

    Now that my place on the foraging scale is clear, here is a GardenFork video we did on foraging Garlic Mustard and Stinging Nettles to make a great Garlic Mustard Nettles pesto recipe.

    This is what I love about creating GardenFork – people who I’ve met introduce me to new people doing cool stuff. In no particular order here are 4 foraging wild food people who I now read thanks to Alexa, please check out their sites and social media feeds:

    Tama Matsuoka Wong, @meadowsandmore,  is a self-described weed eater, and is a TEDx speaker. She partners with Chef Eddy Leroux on their site, Meadows and More. They also both work with Restaurant Daniel in NYC. Tama and Eddy have published Forage Flavor, Finding Fabulous Ingredients In Your Backyard or Farmer’s Market.

    Becky Lerner, @UrbanForager, has a blog on Urban Foraging: Wild Plants for Food, Medicine, and More in Portland, Oregon. Becky has published Dandelion Hunter: Foraging the Urban Wilderness. I like what Rolling Stone wrote about Rebecca and her book:

    If and when the apocalypse arrives, you’ll want Rebecca Lerner by your side.

    Go check out her blog and book and ask about the 9 month wilderness survival program she took.

    Langdon Cook, @langdoncook, whose blog is Fat Of The Land, Adventures of a 21st Century Forager, also has a book of the same name. His expertise is in wild foods and the outdoors. Langdon hosts foraging workshops like many do, but he teaches about foraging for shellfish, which never crossed my mind before.

    This being one of those head-slap moments, because I go surfcasting on the Rockaways, and I bet there are shellfish there too. ( Here’s a video we did on Surfcasting )

    Karen Monger, @the3foragers, and her family go foraging, and document their experiences on their blog, The 3 Foragers. Karen lives in Southern Connecticut, I live in Northwestern Connecticut, so we come across many of the same plants. We are lucky to have an abundance of mushrooms at certain times of the year. (Last fall we had a ton of oyster mushrooms in our area, here’s a video we did on them.) I like the posts Karen has put together about foraging for invasives that are prevalent in our area. We’ll be doing a video about one of them, Japanese Knotweed.

    Get their books on Indiebound:
    Foraged Flavor from IndieBound
    Dandelion Hunter from IndieBound
    Fat Of The Land from IndieBound

  • Maple Sap Collection Tips, Backyard Maple Syrup Project GF Video

    Maple Sap Collection Tips, Backyard Maple Syrup Project GF Video

    Halfway through collecting maple sap to make maple syrup, I made this video on tips on tapping maple trees and how to collect sap to make maple syrup. Shot on the iPhone, it looks pretty good.

    I use tree saver plastic taps and plastic lines to collect sap, i’m finding that buckets at each tree work pretty well. I have one large barrel that collects from two trees, and its kind of a pain to get the sap out. The benefit is if the sugar maple sap runs really well, the bucket can handle the sap. One time my smaller 5 gal buckets overflowed.

    There has been some discussion on how much sugar gets trapped in the ice that we remove from the sap buckets. My neighbors, old time maple syrup experts, remove the ice from their maple sap buckets. But then I was asked how much sugar is lost with the ice, and I don’t know. The questioner brought up Popsicles, and the fact that they are made with sugar that seems to freeze with the ice.

    maple-syrup-update

    It helps when hauling buckets of sap to have them only half full, its easier on your back and you splash a lot less. I store our sap in a big new trash can on the shady side of the house that has been surrounded with snow to keep the sap cool.

    Check out all of our how to make maple syrup videos here

    Here is a great PDF from the Univ of Maine on how to tap trees and boil sap

    Let us know  your questions or comments below:

  • DIY tapping maple trees for maple syrup – GF Video

    DIY tapping maple trees for maple syrup – GF Video

    Tapping sugar maple trees to make maple syrup is a big tradition in my part of Connecticut, so I wanted to show you how to tap maple trees to get maple sap to make maple syrup. We use plastic taps and tubing that are connected to buckets at the base of each tree. The advantage of using individual buckets is that some of the water in the sap will freeze in the collection bucket. The whole goal of boiling sap in an evaporator is to remove the water from the maple sap, so removing some of the water as ice is a super simple way to reduce your boiling time.

    Tubing Connector for tapping sugar maples
    Tubing Connector for tapping sugar maples

    We buy our taps and tubing from Leader Evaporator. The smallest length the tubing comes in is 500′, but don’t fret, its quite inexpensive, about $60 for that much tubing. To buy a lesser amount of tubing locally would cost just as much. We use Tree Saver taps. Buy a bunch of their tubing connectors too, you will need them to tie several taps into one bucket.

    In a future sugar maple tree tap video, we’ll connect several trees into one large collection barrel.

    Check your buckets every morning, scoop out the ice with a sieve, and then store the sap in a large barrel that is in a cold place packed with snow. The sap has to stay cold or it will spoil. You can tell if you sap has gone bad if it has a milky color to it.

    We have a bunch of maple syrup making videos, including how to boil down your sap into maple syrup, click here to watch our maple syrup videos

    Here is a great PDF from the Univ of Maine on how to tap trees and boil sap

    Have any questions or comments? Please post them below:

  • Oyster Mushroom Identification, Foraging, Hunting – GF Video

    Oyster Mushroom Identification, Foraging, Hunting – GF Video

    Foraging for Mushrooms this fall, I found a bunch of Oyster Mushrooms, and made this Mushroom Identification Video. Oyster Mushrooms are edible and delicious. They grow on dead or dying trees. The trees can be standing or on their side. I’ve found oyster mushrooms growing out of the ends of cut logs, and the stumps of dead trees.

    Oyster mushrooms grow in clusters, and are usually stacked on top of each other, the individual mushrooms are kidney shape. It has gills and doesn’t have much of a stem. Oyster mushrooms are white to tan colored, they are usually darker in color later in the season. The mushrooms in this video were harvested in late November.

    When harvesting, I always leave some mushrooms on the tree to allow the mother plant to spread spores to create more mushrooms. So don’t strip a tree of all its mushrooms, you may get a second growth of mushrooms on the same tree, so check back a week later, or after a rain.

    Be sure to be very sure what you are doing when foraging for mushrooms! Learn from someone who is a practiced mushroom hunter, or consider taking a class. Do a web search for your state or county or city and “mycological society” and you may find a group offering classes. Also check nearby nature centers.

    Click here to see our other mushroom identification posts

    Cross check the mushrooms you find with several sources, books are best, I think. I use several books for identifying mushrooms , below are the mushroom identification books I recommend:


    Click Here To Buy From IndieBound

    Click Here To Buy From Amazon


    Click Here To Buy From IndieBound

    Click Here To Buy From Amazon

  • Foraging: Staghorn Sumac  GF Video

    Foraging: Staghorn Sumac GF Video

    Part of our Foraging and Urban Homesteading Video Series, we show you how to forage for foods in your backyard. This foraging video is about the Staghorn Sumac and the tea or sumac-ade you can make from the seedhead of a sumac tree.

    Staghorn Sumac

    I remembered this drink you can make from a report I did in 6th grade, it was a cookbook of sorts of Native American foods, I think my teacher was underwhelmed by report I did, but this must have had an influence on me, in some subtle way.

    In addition to the tea you can make from foraged sumac, the sumac seed pods are used in middle eastern cooking. The seeds are ground and used as a spice powder, added to dishes such as hummus and salads. neat!

    According to Wikipedia, the center stem of the sumac was also used by native americans as pipe stems. Sumac also had medicinal uses in Medieval times.

    Sumacs grow along forest and field edges, fence rows and the sides of the road. They are called a pioneer plant, they are one of the first bush plants to grow where a field is turning into a forest, or where the soil has been disturbed.

    Their leaves are an easy way to identify the plant, especially in the fall, as they have a great red-yellow color to them.

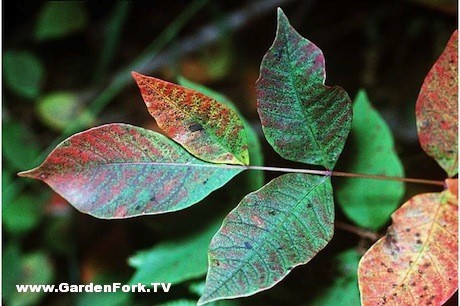
    Be sure to know the difference between Staghorn Sumac and Poison Sumac. The names of the plants are similar, but the plants do look quite a bit different. Staghorn sumac has a very unique upright seed head, usually red in color. Poison Sumac looks much more like poison ivy, and its seeds hang downward.

    Poison Sumac looks like Poison Ivy – USDA photo

    What can you add to our knowledge of Staghorn Sumac and foraging? Let us know below:
  • How to make sausage at The Meat Hook & The Brooklyn Kitchen

    How to make sausage at The Meat Hook & The Brooklyn Kitchen

    The latest project in my head is to make and cure home made sausage. I signed up for a how to make sausage class at The Brooklyn Kitchen taught by Ben Turley, an owner of The Meat Hook who shares space with The Brooklyn Kitchen to learn phase one: how to make fresh sausage at home.

    FYI, we have a bunch of how to cook videos here if you’d care to check them out.

    Pork Shoulder is best for sausage.

    I’ve never taken a cooking class before, and was kinda ambivalent the day of the class, but I knew it would be good when I showed up at the classroom and was handed a cold beer by Valerie, who assisted Ben with the class.

    Valerie offers advice on chopping herbs

    Rather than one of those cooking classes where you just sit there and watch; we were going to learn how to make sausage by making sausage, guided by Valerie and Ben.

    Ben first gave a short talk, and what stuck in my head was his goal of transparency in the food they sell, and their recipes. The sausages were to make were two types of sausage they sell at the Meat Hook, and we had in our hands the actual recipes they use to make them.

    Eric mixes spices into sausage meat

    The common wisdom is when many chefs publish their recipe for a signature dish in a magazine, they leave out crucial details. Ben didn’t leave out any details. He laid out exactly how to make good tasting sausage.

    The key to making homemade sausage is the ratio of salt and spices to fat and protein, and Ben wrote it all out for us in grams. How cool is that?

    We then broke into two teams and prepared two different sausages, while Valerie and Ben offered suggestions and guidance.

    A few key things I learned about making sausage:

    • Pork Shoulder is best, with  30% fat to 70% protein ratio.
    • Have the butcher grind the meat for you with a 3/16 diameter grind
    • Mixing the meat and spices-salt together to the right consistency
    • Cook a small piece of the mixed sausage before stuffing it into casings, do a taste test.
    • Refrigerate sausage overnight before cooking, don’t stuff and cook right away.

    To make sure the meat and ingredients have been mixed properly, and the salt has been kneaded into the meat, make a thin patty of the sausage meat, put it in your palm, and turn your palm upside down. Then count to 5. If the patty is still stuck to your upside down palm when you get to 5, the meat is mixed properly.

    Each person got to take home two sausages from the class project. The next day they tasted amazing.

    Home Made Sausage. how cool is that?

    cooking videos
    Watch Our Cooking Videos here

    We’ll be making a how to make sausage video soon. You can sign up for cooking classes at the Brooklyn Kitchen here.

    Do you make sausage homemade? Any suggestions or tips? Let us know below:

  • Requeening A Hive In Fall, a visual beekeeping how to

    Requeening A Hive In Fall, a visual beekeeping how to

    This year has been the year I’ve had to requeen 4 hives. Not sure why, but wanted to show one way how to requeen a beehive. This beehive was doing fine, I pulled some honey off the hive, and then checking it 3 weeks later there is barely any covered brood and no freshly laid eggs anywhere in the hive. You can see here in the first picture of the beehive, this frame is from the lower super, where there is usually brood, there aren’t any eggs on this frame. Luckily, I have a few other robust hives, and was able to get a queen from a nearby beekeeper.

    Queens will slow down their egg laying in the fall, so you have to make sure the hive really is queenless, check most or all of the frames for brood.

    Empty brood frames, not a good sign

    Requeening this hive, I had to keep in mind its getting late in the year, and these bees will need a good population to get through the winter. I pulled two frames full of brood from a nearby healthy hive, knocked off most of the bees from those frames back into their hive, and got ready to open the queenless hive.

    more beekeeping videos insert

    From the queenless hive, I took off the upper supers and then pulled two empty brood frames from the bottom super. I then put in the queenless hive the two frames of capped brood from the healthy donor hive, and then wedged in between those two frames the new queen in a queen cage.

    Gently tap this frame over the donor hive to knock most of the bees off and back into their hive. Make sure the queen is not on these donor frames.
    Capped brood from the donor colony

    The capped brood will hatch soon, and will help boost the population of the hive while the queen gets acclimated and starts laying. I think this hive will make it through the winter, we still have a few months to get it  back in shape.

    I feed all our hives a 2:1 sugar syrup solution with an essential oil mix added in ( get the honeybee essential oil recipe here ), with this hive i may start early on the feeding.

    queenless hive ready to accept brood frames and queen cage
    Capped Brood Frames and Queen Cage inserted into queenless beehive.

    Here are some beekeeping books I recommend:

    What has your experience been with requeening? Let us know below:

  • Chainsaw Wont Start – Chain Saw Repair : GF Video

    Chainsaw Wont Start – Chain Saw Repair : GF Video

    Chainsaw wont start? Wondering how to fix a chainsaw and the chainsaw to start? Watch our how to fix a chainsaw video and you will be on your way. Chainsaw repair is not hard, and if you’re ready to go out in the yard and cut down some trees, your chainsaw has probably been sitting in the shop all winter. Follow these simple chainsaw tune up steps, and you will have your chainsaw running in a few minutes.

    We have to talk about chainsaw safety here as well. Chainsaws are the most dangerous tool a homeowner can own without a license. I have a few friends with scars from using chainsaws improperly. Chainsaw chaps, a helmet, face shield, eye protection, steel toed boots are all mush-haves for safety.

    Sharp chainsaw chains is key in cutting up trees and cutting firewood, you can sharpen your own chainsaw chains, but I suggest you have them done at your local small engine repair shop, they have the right equipment to set the correct cutting angle, a hand file can’t do that.

    There’s more tree felling in my future, we have a few white pines on our property that need to come down, lest they come down on our house or garage, one of them is already splitting down the trunk, so we need to deal with that one soon.

     Watch all our how to cut down a tree chainsaw videos here

  • Inside the Hive: Views from a First Year Beekeeper (Scene 13)

    Inside the Hive: Views from a First Year Beekeeper (Scene 13)

    Bees, particularly those in new hives, require a lot of energy to draw out comb. To help jump-start the hive, a 1:1 sugar syrup can be used to help feed them during this time. I’m pretty certain they could make it without this feeding in the spring assuming there were sources of nectar around. But, since my hives are new and I’m not expecting or planning to take any honey this year, I’m OK about feeding them sugar syrup to provide them with the food they need to draw out comb on the frames this year.

    I started with baggy feeders but they are a bit messy and quite honestly I don’t like them because they are really a one-use feeder. I’ve got a bunch of canning jars and those can be reused so I’m trying some 1-quart jars in my hives as feeders. All one has to do is punch some small holes in the lid (I tapped a nail into the lid just a bit so that the smallest of holes was made.)  and fill the jar with sugar syrup. With the lid screwed on tight and inverted over the hole in the inner cover a vacuum is formed and the syrup will not run out. The bees can then slowly eat the syrup. When it’s emptied, I can just swap it out for a new one without disturbing the hive much at all.

    Enjoy,

    Matt

    Read all of Matt’s Inside the Hive Posts here

    Matt (twitter @MattInTheGarden) is a big fan of Punch Brothers and the music of Chris Thile in general. If putt putt doesn’t count, he has never played golf. This time next year he’ll be one year older.

  • Foraging: Garlic Mustard & Nettle Pesto Recipe : GF Video

    Foraging: Garlic Mustard & Nettle Pesto Recipe : GF Video

    Foraging was on our minds this weekend, seeing some edible wild plants in our yard, after listening to this NPR story on eating and cooking wild foods like edible Garlic Mustard and Nettles.

    Yes, you can eat nettles, despite the fact that the stems of the nettle plant have tiny barbs that sting if you grab Nettles without gloves. The secret is blanching before eating the nettles.

    Garlic Mustard is an edible wild green, its leaves have hint of Garlic taste, though the mustard leaf taste is more prominent. Garlic Mustard is a non-native invasive plant that crowds out woodland native flowers like trilliums, bloodroot, etc. When harvesting Garlic Mustard, be sure to remove the entire root base, so it doesn’t grow back.

    Our Wild Edible Plant Pesto Recipe made with Stinging Nettles and Garlic Mustard is inspired by an NPR interview of Leah Lizarondo whose food blog is Brazen Kitchen. A big thank you to Larkin Page-Jacobs of NPR and Leah.

    Please tell us about your foraging recipes and tips below the recipe, thanks.

    Foraging Videos & Edible Plant Identification:

    Here are other plant identification foraging videos we have done:

     Dandelion, How to find, forage, and cook Dandelion Video


    Lambsquarter, Foraging and Cooking Lambsquarter Video

    Click for photos of Garlic Mustard and Stinging Nettles for plant identification.


    Garlic Mustard & Nettle Pesto Recipe
    Recipe Type: pesto
    Author: Eric Rochow
    Prep time:
    Cook time:
    Total time:
    Serves: 2 cups
    A simple pesto recipe made from foraged edible plants, Garlic Mustard, Stinging Nettles and Dandelion
    Ingredients
    • 1 cup Blanched Nettles
    • 3 cups Garlic Mustard Leaves
    • 1 cup Parmesan or Romano cheese, grated
    • 1 cup Extra Virgin Olive Oil
    • 1 cup Dandelion Leaves ( optional )
    • 1/2 lemon
    • 1 tablespoon lemon zest
    • 1 cup toasted walnuts
    • 2 medium cloves garlic
    Instructions
    1. Wash all greens in a salad spinner – wear gloves when handling stinging nettles.
    2. Take 2 large handfuls of nettles – wear gloves! and blanch in boiling water for 5 minutes, drain in a colander.
    3. Grate 1 cup of cheese using the large holes on a box grater, don\\\\\\\’t buy the pre-grated cheese, it tastes awful.
    4. Toast the walnuts in a fry pan on the stove, keep an eye on them, the burn easily.
    5. Place the greens, walnuts, cheese, garlic in a food processor, pour olive oil over the ingredients in the food processor.
    6. Add lemon zest and the juice from half a lemon.
    7. Turn on the food processor and watch the fun, you want the greens to become a roughly chopped paste, but not turn to mush.
    8. Serve this over pasta ( whole wheat pasta goes well with these flavors ) or in white bean soup, or on bread, its great.


  • Nettles Plant Identification & Foraging

    Nettles Plant Identification & Foraging

    Nettles, aka Stinging Nettles are a wild food that is edible. Here is video about how to cook nettles for a pesto recipe we made. Foraging for nettles is easy, they grow like the weeds they are considered, and are easy to harvest. Nettles have hairs along the stem that will sting you if you grab the plant, so wear gloves. The key to eating nettles is to blanch the leaves and stems in boiling water for 5 minutes, then drain. Nettles taste like spinach, and have been used to treat numerous ailments.

    For some reason I associate Nettles with medieval times, not sure why, it just seems like the people of that age would use Stinging Nettles to treat ailments in addition to harvesting nettles to eat.

    The nettles that grow in our area are perennial, and have squarish stems, like mint does. It grows up to about 3 feet high in summer, and spreads by rhizomes. Stinging Nettles are native to North America, but I don’t think harvesting them for personal use will put a dent in the number of them in our world. To harvest nettles you can cut the stem or pull out whole plants with the roots. You can transplant young nettle plants into your edible medicinal plant garden if you like. The plants will spread, so you might want to keep the roots contained.

    Here is picture of edible stinging nettles:

  • Drone Laying Worker in a Queenless Hive

    Drone Laying Worker in a Queenless Hive

    When we check our honeybee hives, we first just stand there and observe them. We could tell there was something wrong with one of the hives.

    note the large drone cells scattered about

    It was quiet, the hive next to it was buzzing with activity.

    We opened it up to hear this odd low frequency hum in the hive, not something you usually hear. One look at a brood frame told us we had a bad problem on our hands.

    The queen was dead.

    And to make matters worse, one or more workers had started laying eggs in the cells, and since workers are infertile, all the eggs are drones.

    Queenless hive, signs of the drone laying worker here


    So how can a worker bee lay eggs? If  a hive is queenless, her pheromone is absent, and a few of the workers can then begin lay eggs. It doesn’t happen everytime a hive loses  queen, and this is the first time it has happened to us.

    You can’t just put  new queen in one of these hives, as the laying workers will kill the new queen. You have two choices, either combine the queenless hive with a healthy hive nearby, or get rid of the laying workers.

    One of our Facebook fans explained how she did this:

    Rhonda wrote: “Not good. I had this happen last year. I took the hive that had some young bees and some older bees in it and moved at about 2000′ away from the original location, dumped all the bees out onto the ground-every one of them, then took the hive body back to the original location. The younger, drone layers had not been out of the hive yet, so they could not find their way back home. I then transferred a queen cell from another hive into that hive and before long everything was good again. I know, it as a bit chancy, but the other options weren’t much better.”

    Healthy frame of brood, note the curled up larvae.

    The laying workers are nurse bees who have yet to leave the hive, so they have don’t know any outdoor landmarks or orientation to return to the hive. The older bees, who are foragers, know the location of the hive, so when dumped out of the hive, they will fly back to its location.

    This hive was pretty weak, so I’m thinking right now i’ll combine it with the stronger hive next to it, and perhaps split the strong hive in  week or two, with a new queen in the split. * we did the beehive combine, click here to see how to combine beehives

    Have you dealt with a drone laying worker? Let us know below

  • Tap Maple Trees to Make Maple Syrup How To – GF Video

    Tap Maple Trees to Make Maple Syrup How To – GF Video

    Tapping maple trees to make maple syrup in this DIY video. We tap our Sugar Maple trees to collect sap in preparation for making maple syrup. This is a DIY low tech low volume method of tapping some trees in  your yard or perhaps a neighbor’s field. Several of my neighbor’s have sugar shacks complete with large evaporators and huge piles of firewood, some use traditional sap buckets to collect sap, others use plastic lines and taps.

    For my yard, I went with plastic taps and lines, they are not expensive, and I used the food grade plastic buckets from my homebrew beer kit to collect the sap. After we collected the sap, we boiled it down, and we’ll post a video about that soon.

    The general rule of how many taps to put in a tree, according to the Conn. DEP is 1 tap for a 12″ diameter tree ( 38″ in circumference ), 2 taps for 18″ diameter or larger tree ( 56″ in circumference )

    The holes you drill for the taps should be 1.5″ deep with a 5/16″ bit. If you are tapping trees that were tapped previously, pay attention to the previous tap holes. New taps should be 6″ left or right of an old tap hole, and 12″ above or below the old tap hole.

    Sugar Maple sap needs to be stored at 38F degrees or cooler, ideally you will boil the sap the day you collect it. If the sap has turned milky and foamy, it has gone bad.

    Do you tap sugar maple trees? What are some tips you can share with us below? Thanks for watching!

    Here is the tree identification book we like to use:

    Buy From An Indie Bookstore Here

    Buy From Amazon Here

  • Maple Syrup Season Update GF Radio

    Maple Syrup Season Update GF Radio

    Eric talks with Bill of Maple Knoll Farm about tapping Maple Trees for sap, making maple syrup, and how this warm winter is affecting the maple syrup season. Bill can be seen in our GF Video Make Maple Syrup here. Bill has about 150 trees tapped, using metal buckets. He and his family collect the maple sap, and boil it down in the evaporator in the family sugar shack. This warm winter weather has thrown a wrench in the usual maple syrup making process. Sap runs in sugar maple trees when the nights are cold and the days are warm. This year we’ve had just warm weather for the most part.

    In the sugar shack, Bill and his family fire up the evaporator and boil down the sugar maple sap to syrup. Its very cool process to watch. There are several maple syrup operations in our town, and we visited another one recently and made this how to make maple syrup video there. Each sugar shack is different, reflecting the interior design sense of each sap house owner.

    Some additional maple syrup posts on Gardenfork:

    How to make Maple Syrup at Bill’s Sugar Shack

    How to tap sugar maple trees

    How to make maple syrup at the Norfolk sugar shack

    Summer Salad with Maple Blue Cheese


    photo by earl53